wheel torque ISUZU TROOPER 1995 Owner's Guide
[x] Cancel search | Manufacturer: ISUZU, Model Year: 1995, Model line: TROOPER, Model: ISUZU TROOPER 1995Pages: 1928
Page 248 of 1928
48-6 REAR AXLE
1••1 INSTALLATION
17. Differential assembly
• Refer to "DIFFERENTIAL ASSEMBLY" in this
section.
16.
Axle shaft assembly
• Tighten the bearing holder mounting nut to the
specified torque.
~~~ Torque N·m (lb·ft) 74 (54)
• Be sure not to damage the oil seal by the spline
of the shaft.
15. Brake
pipe
14. Antilock brake system (ABS) speed sensor and
harness
• Refer to Section 5A4 "4-WHEEL ANTI-LOCK
BRAKE SYSTEM (ABS)".
13. Brake disc
12. Brake
caliper
• Refer to Section 5A2 "DISC BRAKES".
11.
Axle housing assembly
10. Coil spring and insulator
9. Bolt and nut
• For the procedures in Items 9-5, refer to Section
3D "REAR SUSPENSION".
8. Bolt and nut
7. Nut
6. Nut
5. Nut
4. Brake tube flare nut
• Refer to Section 5A2 "DISC BRAKES".
3a. Rear Wheel Antilock (RWAL) speed sensor,
bracket and harness connector
• Tighten the speed sensor bolt to the specified
torque.
1~1 Torque N-m (lb·ft) j 24 (18)
3. ABS connector and bracket
2. Breather hose
1. Parking brake cable
• Refer to Section 5C "PARKING BRAKES".
Page 251 of 1928
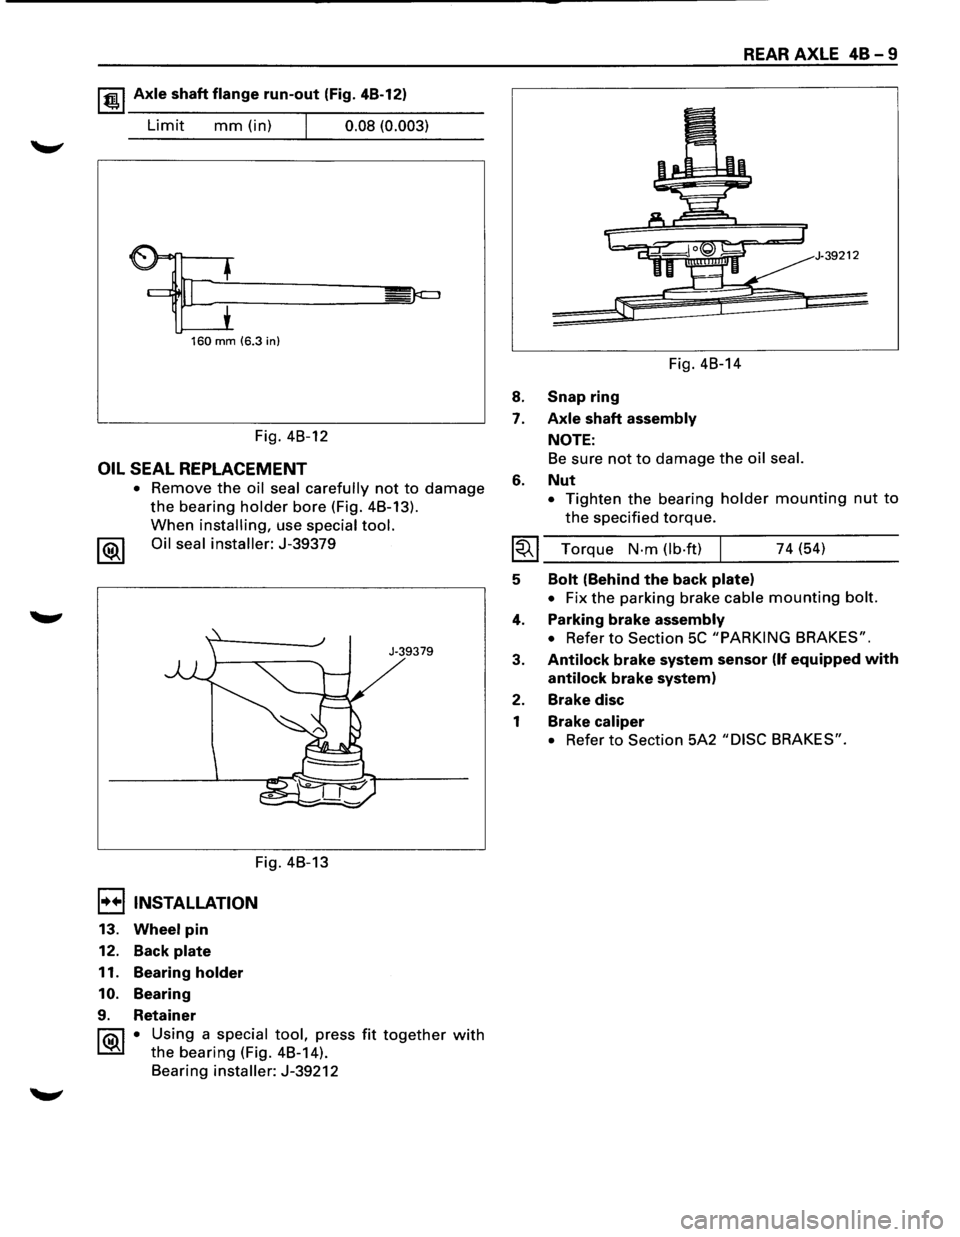
1 t!!.l Axle shaft flange run-out (Fig. 4B-12)
Limit mm (in) I 0.08 (0.003)
160 mm (6.3 in)
Fig. 4B-12
OIL SEAL REPLACEMENT
• Remove the oil seal carefully not to damage
the bearing holder bore (Fig. 4B-13).
When installing, use special tool.
1®1 Oil seal installer: J-39379
Fig. 4B-13
I••IINSTALLATION
13. Wheel pin
12. Back plate
11. Bearing holder
10. Bearing
9. Retainer
J-39379
1 ®I • Using a special tool, press fit together with
the bearing (Fig. 4B-14).
Bearing
installer: J-39212
8.
7.
6.
Fig. 4B-14
Snap ring
Axle shaft assembly
NOTE:
REAR AXLE 48-9
39212
Be sure not to damage the oil seal.
Nut
• Tighten the bearing holder mounting nut to
the specified torque.
I~I ___ T_o_rq_u_e __ N_·_m_(_lb_·f_t)~l _____ 7_4_(~5~4) ____ ___
5
4.
3.
2.
1
Bolt (Behind the back plate)
• Fix the parking brake cable mounting bolt.
Parking brake assembly
• Refer to Section 5C "PARKING BRAKES".
Antilock brake system sensor (If equipped with
antilock brake system)
Brake disc
Brake caliper
• Refer to Section 5A2 "DISC BRAKES".
Page 268 of 1928
48-26 REAR AXLE
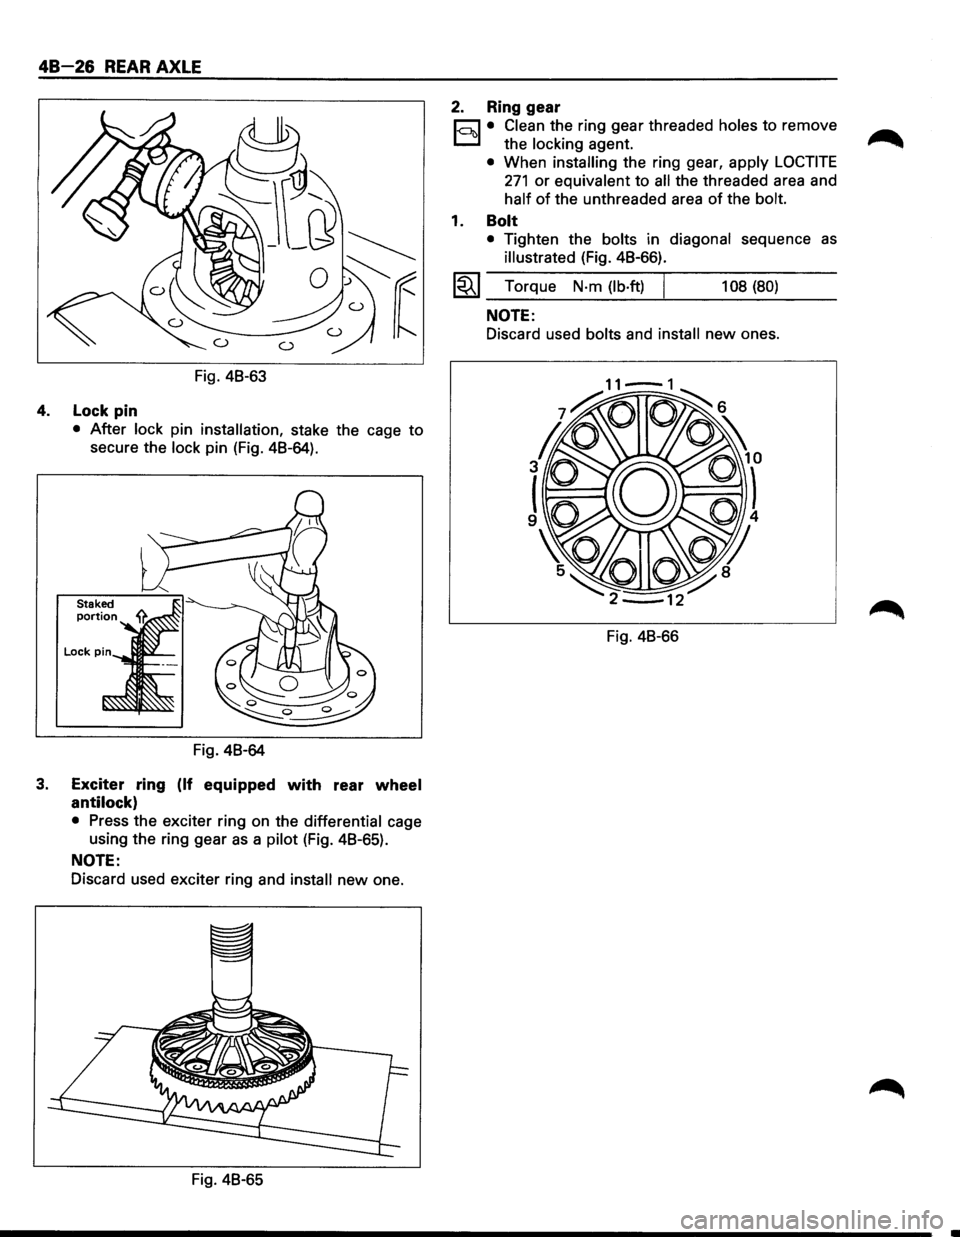
Fig. 48-63
4. Lock pin
• After lock pin installation, stake the cage to
secure the lock pin (Fig. 48-64).
Fig. 48-64
3. Exciter ring (If equipped with rear wheel
antilock)
• Press the exciter ring on the differential cage
using the ring gear
as a pilot (Fig. 48-65).
NOTE:
Discard used exciter ring and install new one.
Fig. 48-65
2. Ring gear
r;:::;J • Clean the ring gear threaded holes to remove
D the locking agent.
• When installing the ring gear, apply LOCTITE
271 or equivalent to all the threaded area and
half of the unthreaded area of the bolt.
1. Bolt
• Tighten the bolts in diagonal sequence as
illustrated (Fig. 48-66).
l~l Torque N·m (lb·ft) I 108 (80)
NOTE:
Discard used bolts and install new ones.
Fig. 48-66
Page 279 of 1928
FRONT DRIVING AXLE 4C-1
SECTION 4C
FRONT DRIVING AXLE
'f CAUTION:
When fasteners are removed, always reinstall them at the same location from which they were removed.
If a fastener needs to be replaced, use the correct part number fastener for that application. If the correct
part
number fastener is not available, a fastener of equal size and strength (or stronger) may be used.
Fasteners
that are not reused, and those requiring thread locking compound, will be called out. The
correct
torque values must be used when installing fasteners that require torque. If the above conditions
are not followed, parts or system damage could result.
CONTENTS
General Description . . . . . . . . . . . . . . . . . . . . 4C-1
Diagnosis
of Front Driving Axle . . . . . . . . . . . 4C-2
Automatic Locking Free Wheel Hub . . . . . 4C-3
On-Vehicle Service ..................... 4C- 4
Pinion
Shaft Oil Seal Replacement . . . . . . 4C-4
Front Drive Shaft Joints Replacement . . . 4C-5
Front Hub Bearing Preload Check . . . . . . . 4C-5
Unit Repair . . . . . . . . . . . . . . . . . . . . . . . . . . . . 4C-6
Front Drive Axle Assembly . . . . . . . . . . . . 4C-6
Front Axle Drive Shaft . . . . . . . . . . . . . . . . 4C-9
Differential Assembly ................. 4C-14
Differential Cage Assembly . . . . . . . . . . . . 4C-24
Front Hub and Disc (4WD Model with
Automatic Locking Hub) . . . . . . . . . . . . 4C-28
Main Data and Specifications . . . . . . . . . . . . 4C-37
General Specifications . .
. . . . . . . . . . . . . . 4C-37
Torque Specifications ................. 4C-38
Special Tools .......................... 4C-41
GENERAL DESCRIPTION
This publication contains essential removal, instal
lation,
adjustment and maintenance procedures.
The
front axle utilizes a central disconnect type front
axle/transfer case system. The
drive axles are completely flexible assemblies,
consisting
of inner and outer constant velocity (CV)
drive shaft joints connected by an axle shaft. For
description
of front propeller shaft and universal
joint, refer to Section 4A "PROPELLER SHAFT".
Page 309 of 1928
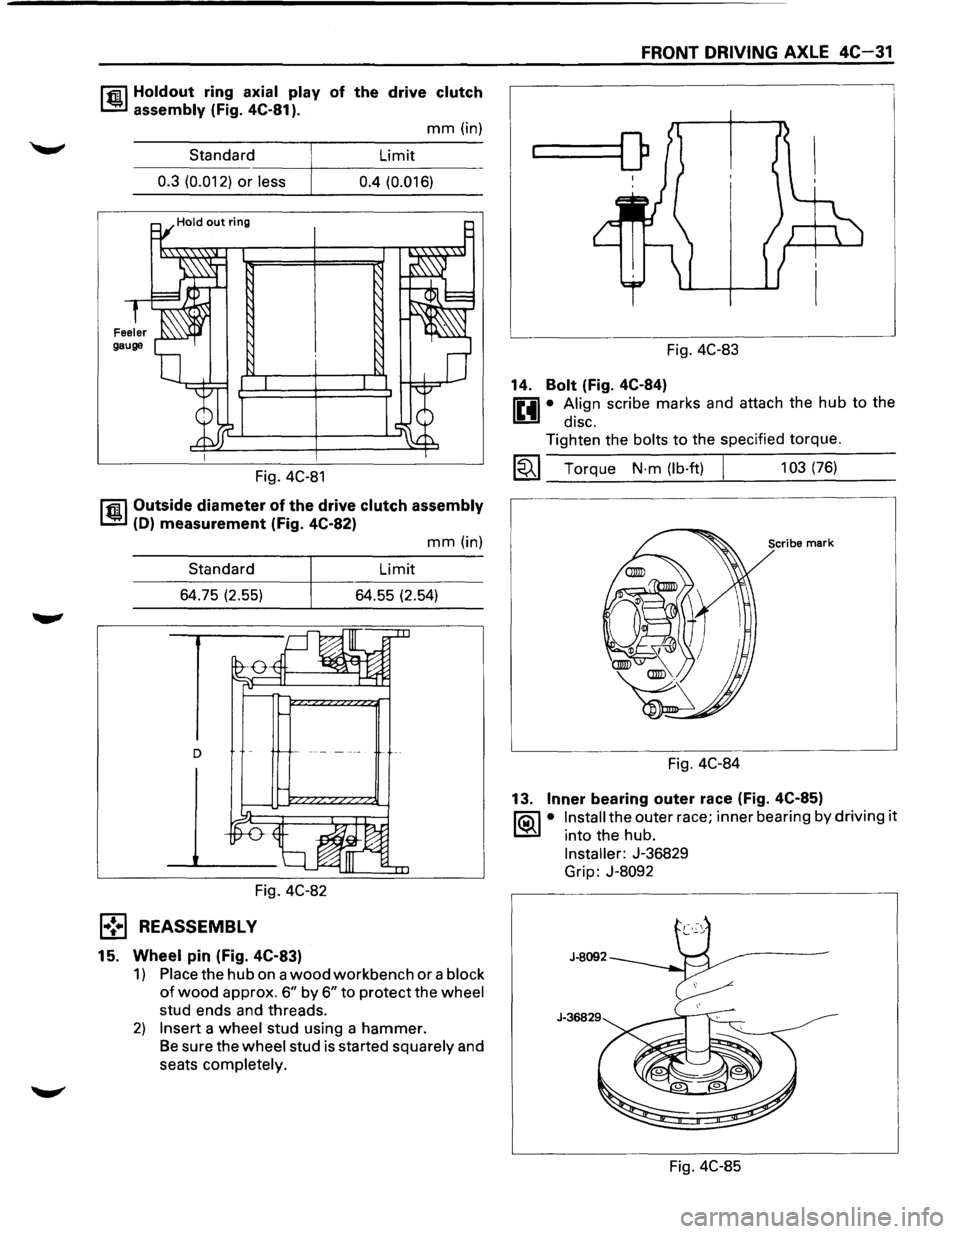
r.r.il Holdout ring axial play of the drive clutch
1..!!:.1 assembly (Fig. 4C-81 ).
mm (in)
Standard Limit
----~----------------0.3 (0.012) or less 0.4 (0.016)
Fig. 4C-81
r.r.il Outside diameter of the drive clutch assembly
1..!!:.1 (D) measurement (Fig. 4C-82)
Standard
64.75 (2.55)
Fig. 4C-82
l•! .. l REASSEMBLY
15. Wheel pin (Fig. 4C-83)
mm (in)
Limit
64.55 (2.54)
1) Place the hub on a wood workbench or a block
of wood approx. 6" by 6" to protect the wheel
stud ends and threads.
2) Insert a wheel stud using a hammer.
Be sure the wheel stud is started squarely and
seats completely.
FRONT DRIVING AXLE 4C-31
...____[)
Fig. 4C-83
14.
Bolt (Fig. 4C-84)
0 • A.lign scribe marks and attach the hub to the
1!!:!1 diSC.
Tighten the bolts to the specified torque.
~~~ Torque N·m (lb·ft) I 103 (76)
Scribe mark
Fig. 4C-84
13.
Inner bearing outer race (Fig. 4C-85)
1'?.:\1 • Install the outer race; inner bearing by driving it
l..::5::il into the hub.
Installer: J-36829
Grip:
J-8092
Fig. 4C-85
Page 310 of 1928
4C-32 FRONT DRIVING AXLE
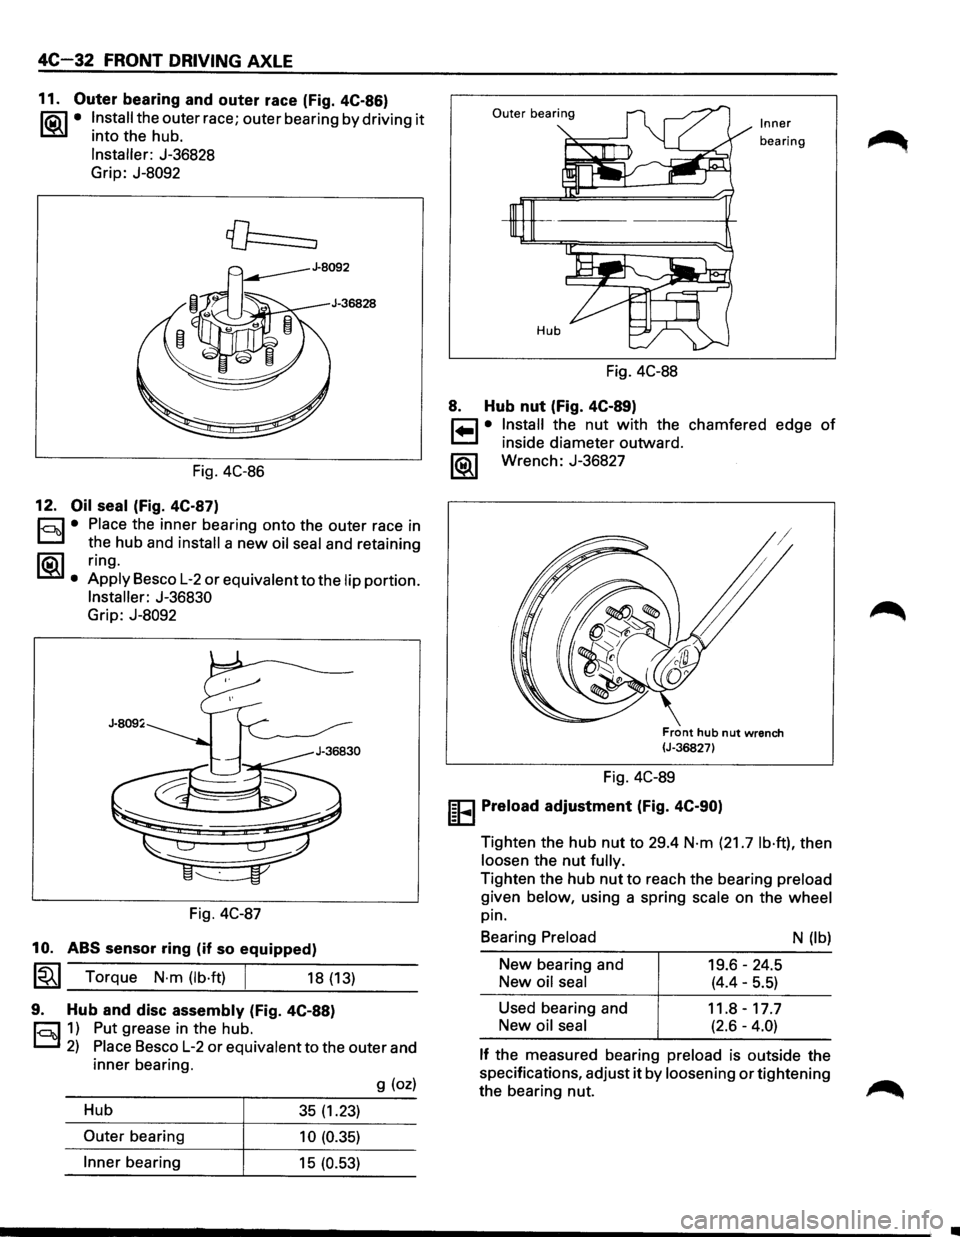
11. Outer bearing and outer race (Fig. 4C-86)
li5\l • Install the outer race; outer bearing by driving it
L::!iil into the hub.
Installer: J-36828
Grip: J-8092
Fig. 4C-86
12. Oil seal (Fig. 4C-87)
r::::l • Place the inner bearing onto the outer race in
D the hub and install a new oil seal and retaining
~. ring.
Apply Besco L-2 or equivalent to the lip portion.
Installer: J-36830
Grip: J-8092
Fig. 4C-87
10. ABS sensor ring (if so equipped)
~~~ Torque N·m (lb·ft) [ 18 (13)
9. Hub and disc assembly (Fig. 4C-88)
r::::l 1) Put grease in the hub.
D 2) Place Besco L-2 or equivalent to the outer and
inner bearing.
g (oz)
Hub 35 (1.23)
Outer bearing 10 (0.35)
Inner bearing 15 (0.53)
Outer bearing Inner
bearing
Fig. 4C-88
8. Hub nut (Fig. 4C-89)
r=1 • Install the nut with the chamfered edge of
~ inside diameter outward.
1®..1 Wrench: J-36827
Front hub nut wrench (J-36827)
Fig. 4C-89
IEEI Preload adjustment (Fig. 4C-90)
Tighten the hub nut to 29.4 N·m (21.7 lb·ft), then
loosen the
nut fully.
Tighten the hub nut to reach the bearing preload
given below, using a spring scale on the wheel
pin.
Bearing
Preload
New bearing and
New oil seal
Used bearing and
New
oil seal
19.6-24.5
(4.4-5.5)
11.8-17.7
(2.6-4.0)
N (lb)
If the measured bearing preload is outside the
specifications, adjust
it by loosening or tightening
the bearing nut.
•
Page 321 of 1928
HYDRAULIC BRAKES SA-1
BRAKES
w CAUTION:
• All
brake attaching fasteners are an important attaching part in that they could affect performance of vital
parts and systems, and/or could result in major repair expense. They must be replaced with one of the same
part
number or with an equivalent part if replacement becomes necessary. Do not use replacement parts of
lesser quality or substitute design. Torque values must be used as specified during reassembly to assure
proper retention
of these parts.
CONTENTS
Hydraulic Brakes . . . . . . . . . . . . . . . . . . . . . . . . . . . . . . . . . . . . . . . . . . . . . . . . . . . . . . . . . . . . . . Section SA
Brake Booster System ........................................................ Section 5A1
Disc Brakes . . . . . . . . . . . . . . . . . . . . . . . . . . . . . . . . . . . . . . . . . . . . . . . . . . . . . . . . . . . . . . . . . . Section 5A2
Rear
Wheel Antilock Brake System (RWAL) .................................... Section 5A3
4-Wheel Antilock Brake System (ABS) ......................................... Section 5A4
Parking Brakes . . . . . . . . . . . . . . . . . . . . . . . . . . . . . . . . . . . . . . . . . . . . . . . . . . . . . . . . . . . . . . . .
Section 5C
SECTION 5A
HYDRAULIC BRAKES
CONTENTS
Brake System Diagnosis ................ SA-2
Road
Testing the Brakes . . . . . . . . . . . . . . SA-2
Brake
Fluid Leaks . . . . . . . . . . . . . . . . . . . . SA-2
Warning Light Operation . . . . . . . . . . . . . SA-2
Antilock Brake System (RWAL or ABS) . SA- 2
Diagnosis of Brake System . . . . . . . . . . . . . . SA-3
On-Vehicle Service .................... SA- S
Filling Master Cylinder Reservoir . . . . . . . SA-S
Deterioration of Brake Fluid . . . . . . . . . . . SA-S
Leakage
of Brake Fluid . . . . . . . . . . . . . . . SA-S
Bleeding Brake Hydraulic System . . . . . . SA-S
Flushing Brake Hydraulic System . . . . . . SA-6
Brake Pipes
and Hoses . . . . . . . . . . . . . . . SA-6
Brake Hose
Inspection . . . . . . . . . . . . . . . SA-6
Brake Hose
Replacement . . . . . . . . . . . . . SA-7
Brake Pipe
Replacement . . . . . . . . . . . . . . SA-8
Combination Valve/P & B Valve . . . . . . . SA-9
Valve Replacement . . . . . . . . . . . . . . . . . . SA-1 0
Inspection of Brake Pad Lining . . . . . . . . SA-11
Inspection of Brake Rotors . . . . . . . . . . . . SA-11
Brake Pedal Assembly .................. SA-13 •
Checking Pedal Height ................ SA-13
Checking Pedal Travel ................ SA-13
Brake
Pedal Replacement ............. SA-14
Stoplight Switch Replacement ......... SA-1S
Master Cylinder Assembly ............... SA-16
General Description .................. SA-16
On-Vehicle Service ................... SA-17
Unit Repair .......................... SA-19
Main Data and Specifications ............ SA-21
General Specifications ................ SA-21
Torque Specifications ................ SA-21
Special Tools .......................... SA-22
Page 327 of 1928
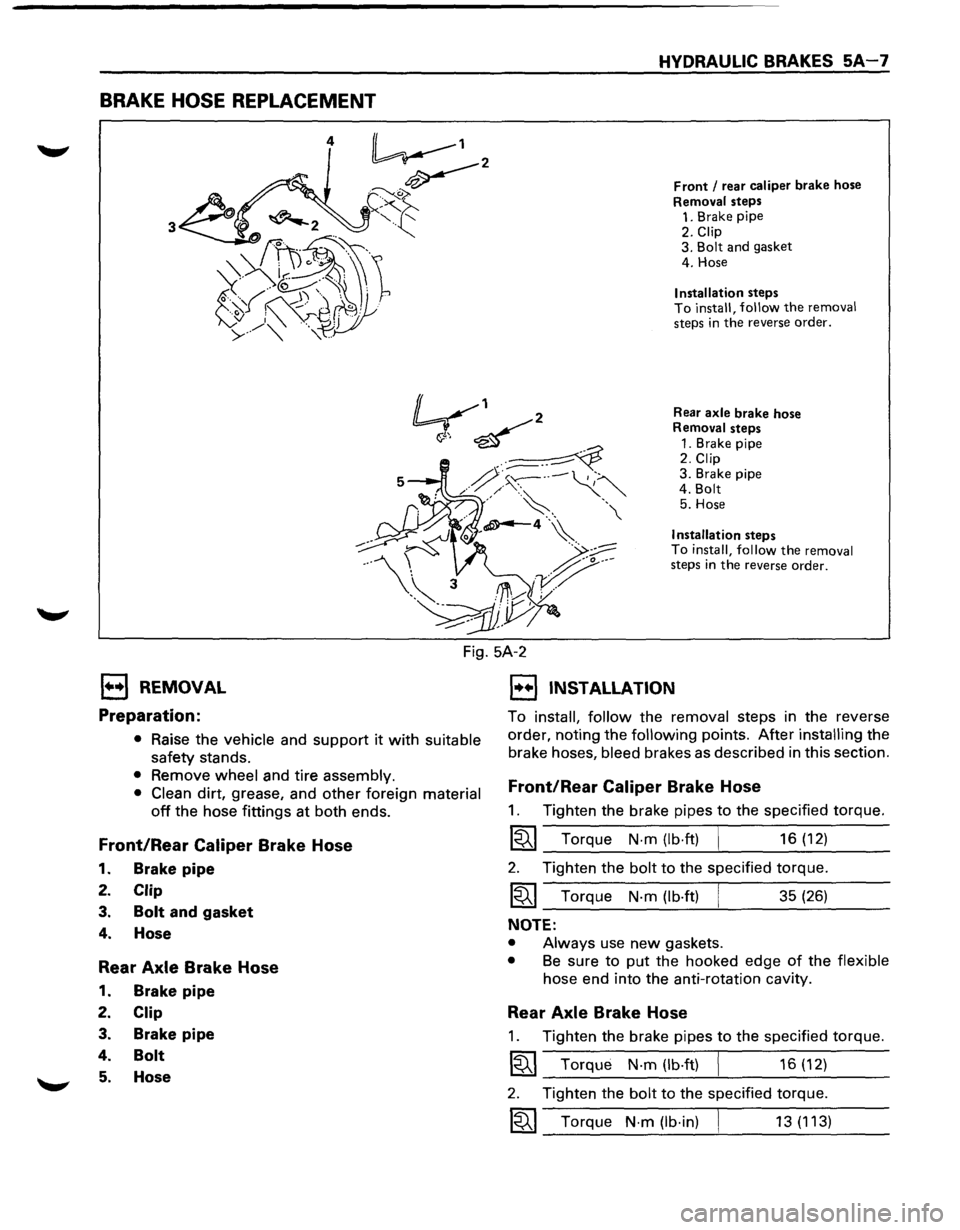
BRAKE HOSE REPLACEMENT
HYDRAULIC BRAKES 5A-7
Front I rear caliper brake hose
Removal steps 1. Brake pipe
2. Clip 3. Bolt and gasket
4. Hose
Installation steps To install, follow the removal steps in the reverse order.
Rear axle brake hose Removal steps
1. Brake pipe
2. Clip 3. Brake pipe
4. Bolt
5. Hose
Installation steps To install, follow the removal steps in the reverse order.
Fig. 5A-2
l••l REMOVAL
Preparation:
• Raise the vehicle and support it with suitable
safety stands.
• Remove wheel and tire assembly.
• Clean dirt, grease, and other foreign material
off the hose fittings at both ends.
Front/Rear Caliper Brake Hose
1. Brake pipe
2. Clip
3. Bolt and gasket
4. Hose
Rear Axle Brake Hose
1. Brake pipe
2. Clip
3. Brake pipe
4. Bolt
5. Hose
1••1 INSTALLATION
To install, follow the removal steps in the reverse
order, noting the following points. After installing the
brake
hoses, bleed brakes as described in this section.
Front/Rear Caliper Brake Hose
1. Tighten the brake pipes to the specified torque.
1«1 Torque N-m (lb·ft) 16 (12)
2. Tighten the bolt to the specified torque.
1«1 Torque N-m (lb-ft) 35 (26)
NOTE:
• Always use new gaskets.
• Be sure to put the hooked edge of the flexible
hose end into the anti-rotation cavity.
Rear Axle Brake Hose
1. Tighten the brake pipes to the specified torque.
1«1 Torque N-m (lb-ft) 16 (12)
2. Tighten the bolt to the specified torque.
1«1 Torque N·m (lb·in) 13 (113)
Page 328 of 1928
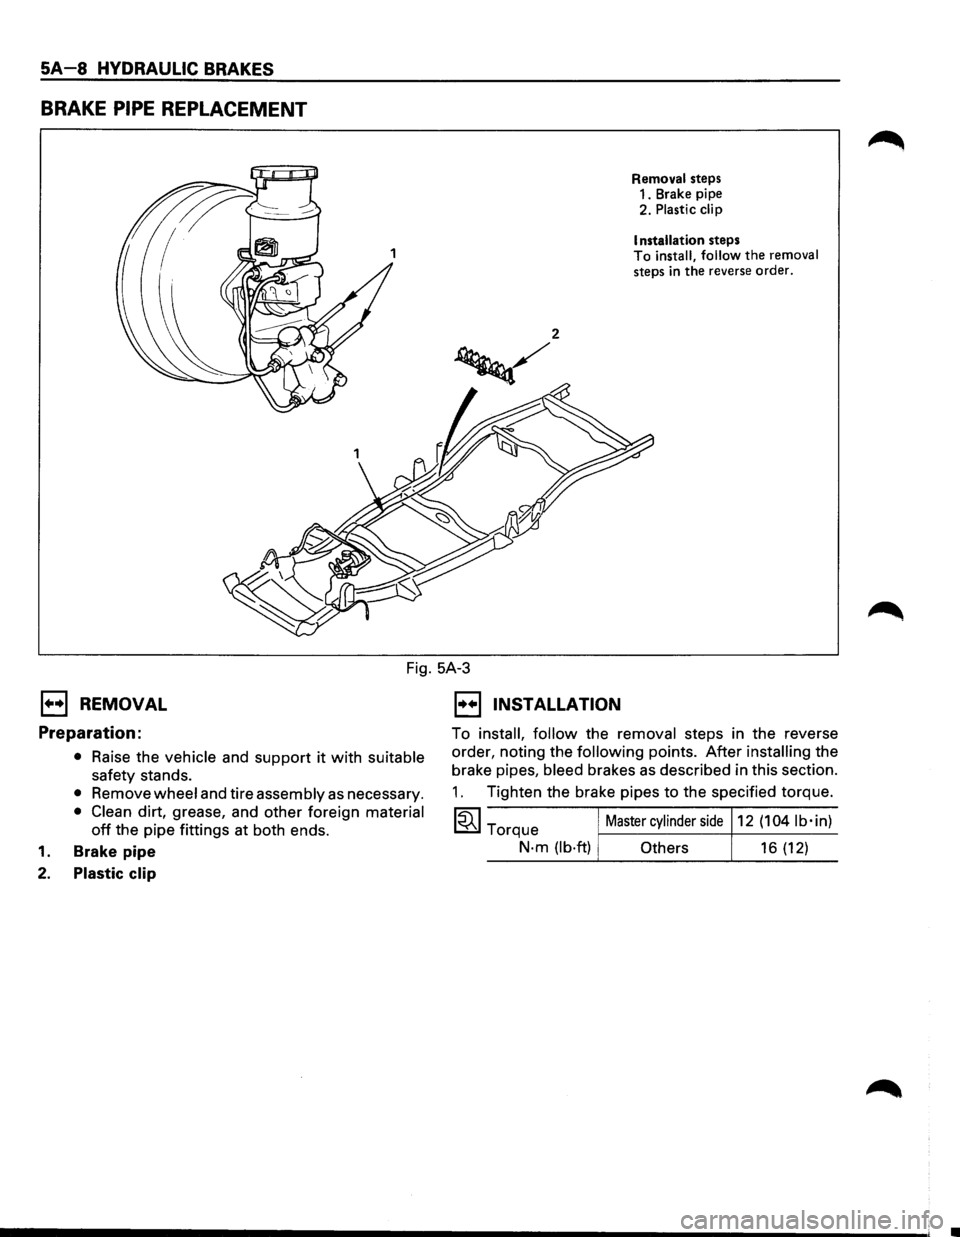
SA-8 HYDRAULIC BRAKES
BRAKE PIPE REPLACEMENT
Removal steps
1. Brake pipe
2. Plastic
clip
I nstallation
steps
To install, follow the removal steps in the reverse order.
Fig. 5A-3
1••1 REMOVAL
Preparation:
• Raise the vehicle and support it with suitable
safety stands.
• Remove wheel and tire assembly as necessary.
• Clean dirt, grease, and other foreign material
off the pipe fittings at both ends.
1. Brake pipe
2. Plastic clip
1••1 INSTALLATION
To install, follow the removal steps in the reverse
order, noting the
following points. After installing the
brake pipes,
bleed brakes as described in this section.
1. Tighten the brake pipes to the specified torque.
~~~ Master cylinder side 12 (104 lb·in) Torque
N·m(lb·ft) Others 16(12)
Page 341 of 1928
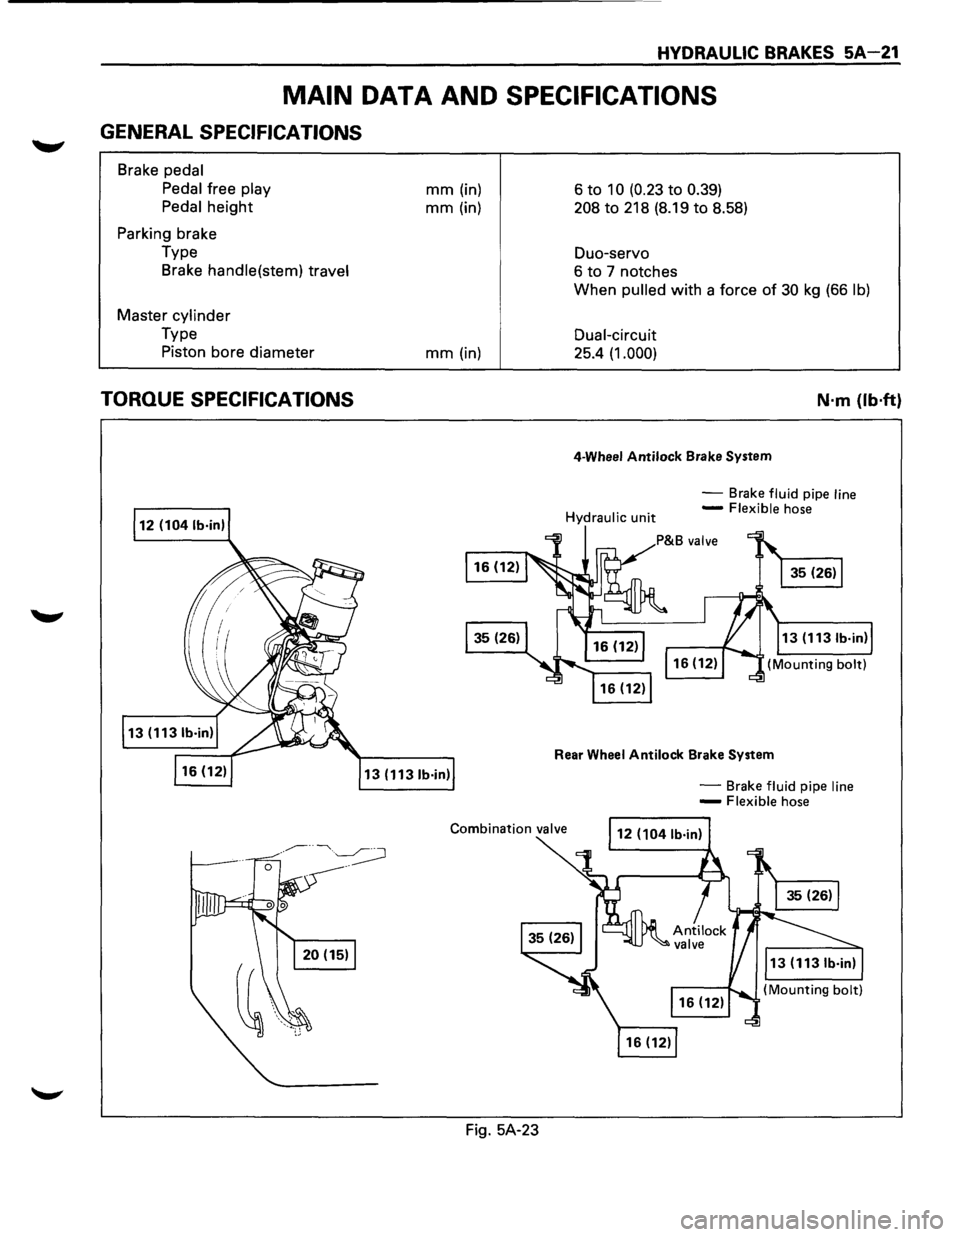
HYDRAULIC BRAKES 5A-21
MAIN DATA AND SPECIFICATIONS
GENERAL SPECIFICATIONS
Brake pedal
Pedal
free play
Pedal
height
Parking brake
Type Brake
handle(stem) travel
Master cylinder
Type
Piston bore diameter
TORQUE SPECIFICATIONS
mm (in)
mm (in)
mm (in)
13 (1131b·in)
Fig. 5A-23 6
to 10 (0.23 to 0.39)
208 to 218
(8.19 to 8.58)
Duo-servo
6 to 7 notches
When
pulled with a force of 30 kg (66 lb)
Dual-circuit
25.4 (1.000)
4-Wheel Antilock Brake System
N·m {lb·ft}
-Brake fluid pipe line -Flexible hose
Rear Wheel Antilock Brake System
-Brake fluid pipe line -Flexible hose