power steering ISUZU TROOPER 1995 Manual Online
[x] Cancel search | Manufacturer: ISUZU, Model Year: 1995, Model line: TROOPER, Model: ISUZU TROOPER 1995Pages: 1928
Page 1684 of 1928
9J-60 Supplemental Restraint System
DTC 24 {PAGE 1 OF 3)
INITIATOR CIRCUIT VOLTAGE LOW
' I,
CIRCUIT DESCRIPTION
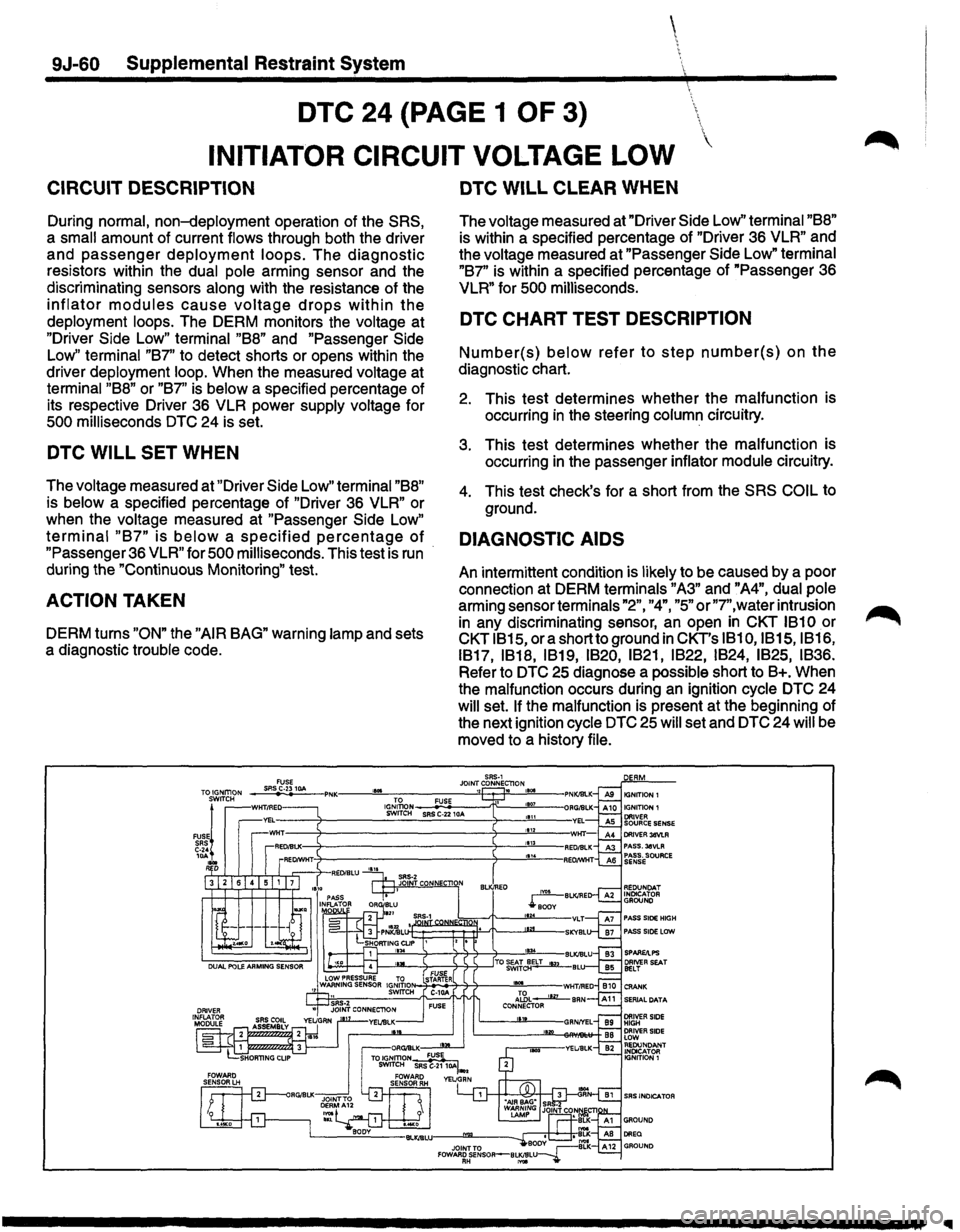
During normal, non-deployment operation of the SRS,
a small amount of current flows through both the driver
and passenger deployment loops. The diagnostic
resistors within the dual pole arming sensor and the
discriminating sensors
along with the resistance of the
inflator modules cause voltage drops within the
deployment loops. The DERM monitors the voltage at
"Driver Side Low" terminal "88" and "Passenger Side
Low" terminal "87" to detect shorts or opens within the
driver deployment
loop. When the measured voltage at
terminal "88" or "87" is below a specified percentage of
its respective Driver 36 VLR power
supply voltage for
500 milliseconds DTC 24 is set.
DTC WILL SET WHEN
The voltage measured at "Driver Side Low" terminal "88"
is below a specified percentage of "Driver 36 VLR" or
when the
voltage measured at "Passenger Side Low"
terminal "87" is below a specified percentage of
"Passenger 36 VLR" for 500 milliseconds. This test is run
during the "Continuous Monitoring" test.
ACTION TAKEN
DERM turns "ON" the "AIR BAG" warning lamp and sets
a diagnostic
trouble code.
DTC WILL CLEAR WHEN
The voltage measured at "Driver Side Low" terminal "88"
is within a specified percentage of "Driver 36 VLR" and
the
voltage measured at "Passenger Side Low" terminal
"87"
is within a specified percentage of "Passenger 36
VLR" for 500 milliseconds.
DTC CHART TEST DESCRIPTION
Number(s) below refer to step number(s) on the
diagnostic chart.
2. This test determines whether the malfunction is
occurring
in the steering column circuitry.
3. This test determines whether the malfunction is
occurring
in the passenger inflator module circuitry.
4. This test check's for a short from the SRS COIL to
ground.
DIAGNOSTIC AIDS
An intermittent condition is likely to be caused by a poor
connection at DERM terminals
"A3" and "A4", dual pole
arming sensor terminals "2", "4", "5" or"7",water intrusion
in any discriminating sensor, an open in CKT 1810 or
CKT 1815, ora short to ground in CKT's 1810,1815, 1816,
1817, 1818,
1819, 1820, 1821, 1822, 1824, 1825, 1836.
Refer to DTC 25 diagnose a possible short to B+. When
the malfunction occurs during
an ignition cycle DTC 24
will set. If the malfunction is present at the beginning of
the next ignition
cycle DTC 25 will set and DTC 24 will be
moved to a history
file.
SAS·1 JOINT CONNEC'TlON ,, .
PASS SIDE HIGH PASS SIDE LOW
SRS INDICATOR
Page 1703 of 1928
Supplemental Restraint System 9J-79
,~DTC35
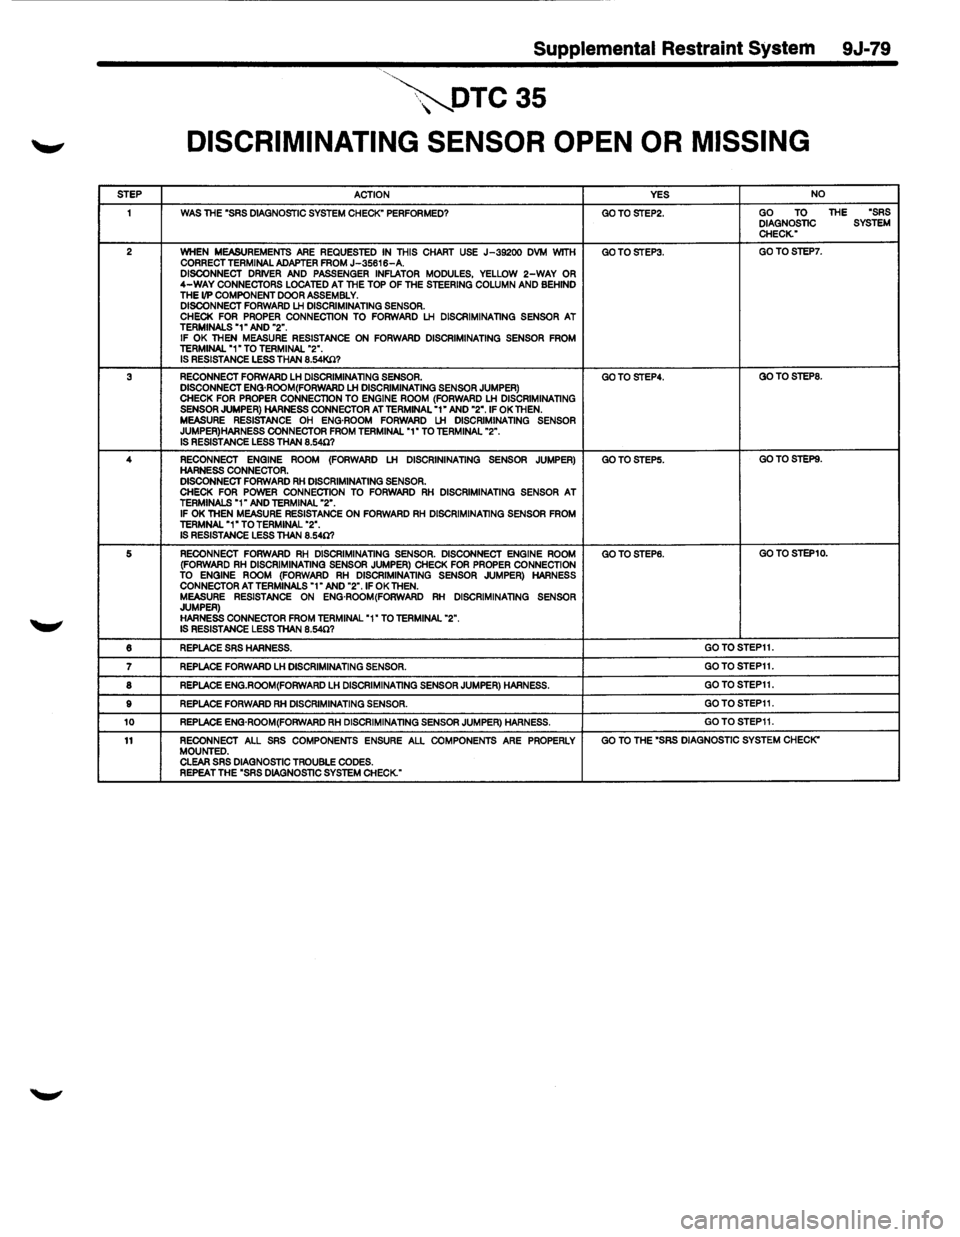
DISCRIMINATING SENSOR OPEN OR MISSING
STEP ACTION YES NO
1 WAS THE "SRS DIAGNOSTIC SYSTEM CHECK" PERFORMED? GOTOSTEP2. GO TO THE "SRS DIAGNOSTIC SYSTEM CHECK."
2 WHEN MEASUREMENTS ARE REQUESTED IN THIS CHART USE J-39200 DVM WITH GOTOSTEP3. GOTOSTEP7. CORRECT TERMINAL ADAPTER FROM J-35616-A. DISCONNECT DRIVER AND PASSENGER INFLATOR MODULES, YELLOW 2-WAY OR 4-WAY CONNECTORS LOCATED AT THE TOP OF THE STEERING COLUMN AND BEHIND THE 1/P COMPONENT DOOR ASSEMBLY. DISCONNECT FORWARD LH DISCRIMINATING SENSOR. CHECK FOR PROPER CONNECTION TO FORWARD LH DISCRIMINATING SENSOR AT TERMINALS "1" AND "2". IF OK THEN MEASURE RESISTANCE ON FORWARD DISCRIMINATING SENSOR FROM TERMINAL "1" TO TERMINAL "2". IS RESISTANCE LESS THAN 8.54K.Cl?
3 RECONNECT FORWARD LH DISCRIMINATING SENSOR. GOTOSTEP4. GOTOSTEP8. DISCONNECT ENG·ROOM(FORWARD LH DISCRIMINATING SENSOR JUMPER) CHECK FOR PROPER CONNECTION TO ENGINE ROOM (FORWARD LH DISCRIMINATING SENSOR JUMPER) HARNESS CONNECTOR AT TERMINAL "1" AND "2". IF OK THEN. MEASURE RESISTANCE OH ENG·ROOM FORWARD LH DISCRIMINATING SENSOR JUMPER) HARNESS CONNECTOR FROM TERMINAL "1" TO TERMINAL "2". IS RESISTANCE LESS THAN 8.540?
4
RECONNECT ENGINE ROOM (FORWARD LH DISCRININATING SENSOR JUMPER) GOTOSTEP5. GO TO STEPS. HARNESS CONNECTOR. DISCONNECT FORWARD RH DISCRIMINATING SENSOR. CHECK FOR POWER CONNECTION TO FORWARD RH DISCRIMINATING SENSOR AT TERMINALS "1" AND TERMINAL "2". IF OK THEN MEASURE RESISTANCE ON FORWARD RH DISCRIMINATING SENSOR FROM TERMNAL "1" TO TERMINAL "2". IS RESISTANCE LESS THAN 8.540?
5 RECONNECT FORWARD RH DISCRIMINATING SENSOR. DISCONNECT ENGINE ROOM GOTOSTEP6. GO TO STEP10. (FORWARD RH DISCRIMINATING SENSOR JUMPER) CHECK FOR PROPER CONNECTION TO ENGINE ROOM (FORWARD RH DISCRIMINATING SENSOR JUMPER) HARNESS CONNECTOR AT TERMINALS "1" AND "2".1F OK THEN. MEASURE RESISTANCE ON ENG·ROOM(FORWARD RH DISCRIMINATING SENSOR JUMPER) HARNESS CONNECTOR FROM TERMINAL "1" TO TERMINAL "2". IS RESISTANCE LESS THAN 8.540?
6 REPLACE SRS HARNESS. GOTOSTEP11.
7 REPLACE FORWARD LH DISCRIMINATING SENSOR. GOTOSTEP11.
8 REPLACE ENG.ROOM(FORWARD LH DISCRIMINATING SENSOR JUMPER) HARNESS. GOTOSTEP11.
9 REPLACE FORWARD RH DISCRIMINATING SENSOR. GOTOSTEP11.
10 REPLACE ENG·ROOM(FORWARD RH DISCRIMINATING SENSOR JUMPER) HARNESS. GOTOSTEP11.
11 RECONNECT ALL SRS COMPONENTS ENSURE ALL COMPONENTS ARE PROPERLY GO TO THE "SRS DIAGNOSTIC SYSTEM CHECK" MOUNTED. CLEAR SRS DIAGNOSTIC TROUBLE CODES. REPEAT THE "SRS DIAGNOSTIC SYSTEM CHECK."
Page 1741 of 1928
Supplemental Restraint System 9J-117
SERVICE PRECAUTIONS
CAUTION: WHEN PERFORMING SERVICE ON OR
AROUND SRS COMPONENTS OR SRS WIRING,
FOLLOW
THE PROCEDURES LISTED BELOW TO
TEMPORARILY
DISABLE THE SRS. FAILURE TO
FOLLOW PROCEDURES COULD RESULT IN
POSSIBLE AIR BAG DEPLOYMENT, PERSONAL
INJURY OR OTHERWISE UNNEEDED SRS
REPAIRS.
The DERM in Driver-Passenger SRS can maintain
sufficient voltage to cause a deployment for up to 2
minutes after the ignition switch is turned to
"OFF," the
battery is disconnected, or the fuse powering the DERM
is removed.
Many of the service procedures require removal of the
"AIR BAG" fuse, and disconnection of the inflator
modules from the deployment loop to avoid an accidental
deployment.
If the inflator module is disconnected from
the deployment loop as noted in the "Disabling the
SRS"
procedure that follows, service can begin immediately
without waiting for the 2 minute time period to expire.
DISABLING THE SRS
REMOVAL
• Turn the steering wheel so that the vehicle's wheels
are pointing straight ahead.
• Turn the ignition switch to "OFF"
1. Remove SRS fuse C-21, C-22, C-23 and C-24 from
left dash side lower fuse block.
2. Disconnect yellow
3-way connector at the base of
the steering column.
3. Remove
liP compartment door assembly, Refer to
"Passenger inflator module replacemenf' in section
9J-135.
4. Disconnect yellow 4-way connector behind the liP
compartment door assembly.
NOTE
• With the" AIR BAG" fuse removed and ignition switch
"ON," the "AiR BAG" warning lamp will be "ON." This
is normal operation and does not indicate
an SRS
malfunction.
ENABLING THE SRS
INSTALLATION
Turn ignition switch to "LOCK" and remove key.
1. Connect yellow 4-way connector of passenger
inflator module.
2. Install liP compartment door assembly, Refer to
"Passenger inflator module replacement" in section
9J-3.
3. Connect yellow 3-way connector at the base of the
steering column.
4. Install" AIR BAG" fuse C-21, C-22, C-23 and C-24 to
left dash side lower fuse block.
Tum ignition switch to
"RUN" and verify that the "AIR
BAG"
warning lamp flashes seven times and then turns
"OFF" If it does not operate as described, perform the
"SRS Diagnostic System Check" in section 9J-32.
HANDLING/INSTALLATION/DIAGNOSIS
1. Inflator modules should not be subjected to
temperatures above 65°C(150°F).
2. Discriminating s~nsors, inflator modules, arming
sensors, or DERMs should not be used if they have
been dropped from a height of 1
00 centimeters (3.28
feet) or more.
3. When a discriminating sensor or arming sensor is
replaced, it MUST be oriented with the arrow
on the
sensor pointing toward the front of the vehicle.
It is
very important for the discriminating sensors and
arming sensor to be located flat on the mounting
surface, parallel to the vehicle datum line.
It is
important that the sensor mounting surface is free of
any dirt or other foreign material.
4. Do not apply power to the SRS unless all
components are connected or a diagnostic chart
requests it, as this
will set a diagnostic trouble code.
5. The
"SRS Diagnostic System Check'' must be the
starting point of any SRS diagnostics. The
"SRS
Diagnostic System Check" will verify proper "AIR
BAG" warning lamp operation and will lead you to the
correct chart to diagnose any SRS malfunctions.
Bypassing these procedures may result in extended
diagnostic time, incorrect diagnosis, and incorrect
parts replacements.
INSPECTIONS REQUIRED AFTER ACCI
DENT
CAUTION: CERTAIN SRS COMPONENTS MUST BE
REPLACED AFTER A FRONTAL
CRASH INVOLVING
AIR
BAG DEPLOYMENT.
In all types of accident regardless of "Air Bag"
deployment, visually inspect all the following
components and their points and replace as required:
- Passenger
Inflator Module
- Steering wheel
- SRS coil assembly
- Steering column
- Knee bolster and
Instrument panel mounting
Page 1746 of 1928
9J-122 Supplemental Restraint System
DUAL POLE ARMING SENSOR
WARNING: DURING SERVICE PROCEDURES, BE VERY CAREFUL WHEN HANDLING A SENSOR. NEVER ~
STRIKE OR JAR A SENSOR. UNDER SOME CIRCUMSTANCES, IT COULD CAUSE DEPLOYMENT AND
RESULT IN PERSONAL INJURY OR IMPROPER OPERATION OF THE SUPPLEMENTAL RESTRAINT SYSTEM(
SRS
). ALL SENSOR AND MOUNTING BRACKET BOLTS MUST BE CAREFULLY TORQUED TO ASSURE
PROPER OPERATION. NEVER POWER
UP THE SRS WHEN ANY SENSOR IS NOT RIGIDLY ATTACHED TO
VEHICLE, SINCE
THE SENSOR COULD BE ACTIVATED WHEN NOT ATTACHED AND COULD RESULT IN
DEPLOYMENT.
WARNING: PROPER OPERATION OF THE SENSORS AND SUPPLEMENTAL RESTRAINT SYSTEM( SRS)
REQUIRES
THAT ANY REPAIRS TO THE VEHICLE STRUCTURE RETURN IT TO ITS ORIGINAL PRODUCTION
CONFIGURATION.
DEPLOYMENT (CURRENT CODE 51 )OR ANY VISIBLE DAMAGE TO SENSOR AND/OR
THEIR MOUNTING
BRACKETS REQUIRES REPLACEMENT, NOT REPAIR. PROPER OPERATION OF A
SENSOR ALSO REQUIRES THAT SENSOR BE RIGIDLY BOLTED TO THE VEHICLE STRUCTURE. THE ARROW
ON
THE SENSOR MUST BE POINTING TOWARD THE FRONT OF THE VEHICLE. FAILURE TO OBSERVE
THESE PRECAUTIONS CAN RESULT IN IMPROPER SRS OPERATION AND POSSIBLE LACK OF
SUPPLEMENTAL RESTRAINT PROTECTION FOR THE DRIVER AND PASSENGER DURING AN ACCIDENT
IMPACT.
All
sensors are specifically calibrated and are keyed to the sensor location and SRS wiring harness. Caution should
be used to ensure proper location of the sensors. The keying of the sensor to their locations and wiring harness
connectors should never be modified
in the filed.
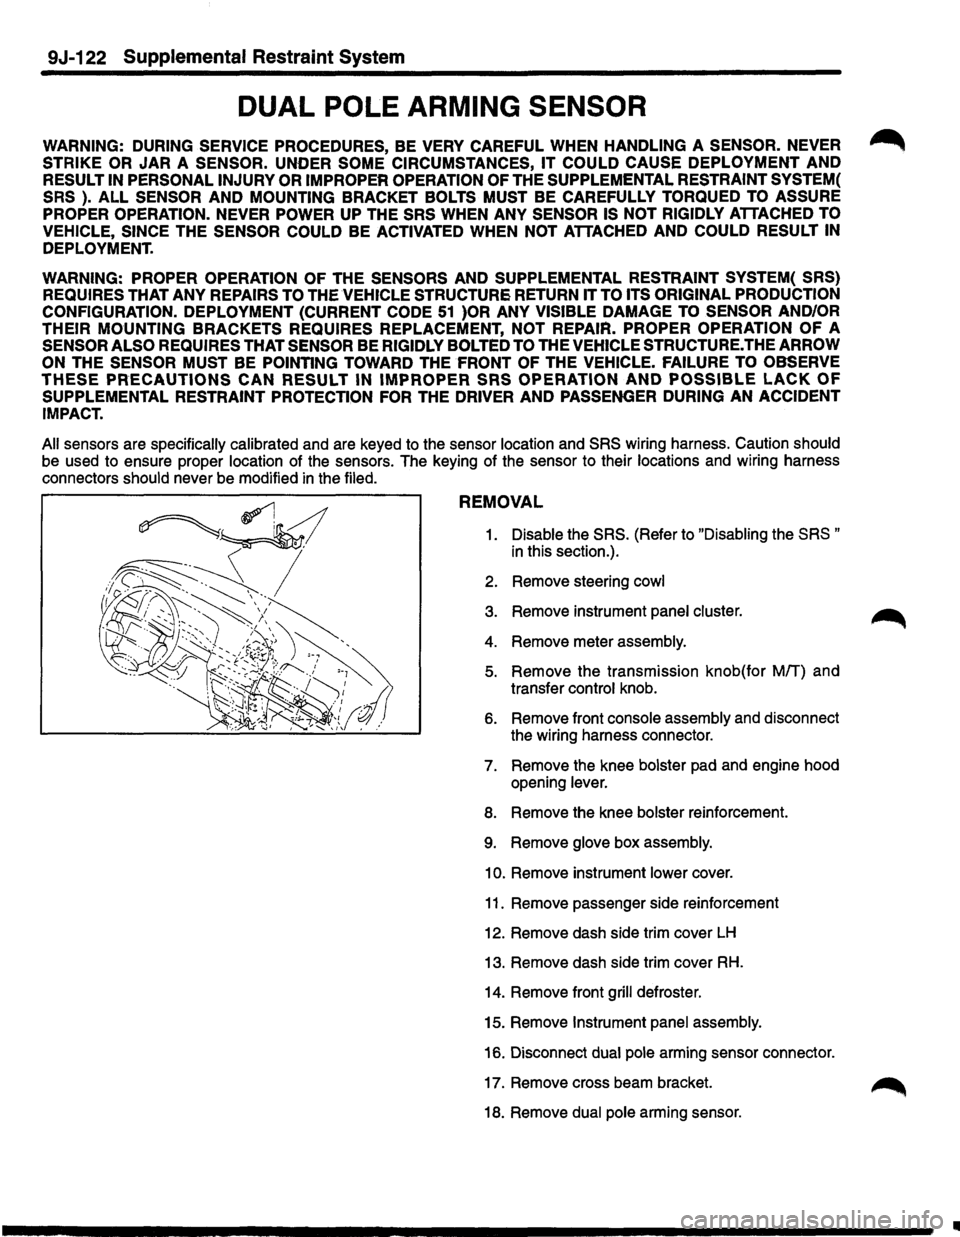
REMOVAL
1. Disable the SRS. (Refer to "Disabling the SRS "
in this section.).
2. Remove steering
cowl
3. Remove instrument panel cluster. ~
4. Remove meter assembly.
5. Remove the transmission knob(for Mff) and
transfer control knob.
6. Remove front console assembly and disconnect
the wiring harness connector.
7. Remove the knee bolster pad and engine hood
opening lever.
8. Remove the knee bolster reinforcement.
9. Remove glove box assembly.
10. Remove instrument lower cover.
11. Remove passenger side reinforcement
12. Remove dash side trim cover
LH
13. Remove dash side trim cover RH.
14. Remove front grill defroster.
15. Remove
Instrument panel assembly.
16. Disconnect
dual pole arming sensor connector.
17. Remove cross beam bracket.
18. Remove
dual pole arming sensor.
II