timing belt ISUZU TROOPER 1995 Workshop Manual
[x] Cancel search | Manufacturer: ISUZU, Model Year: 1995, Model line: TROOPER, Model: ISUZU TROOPER 1995Pages: 1928
Page 18 of 1928
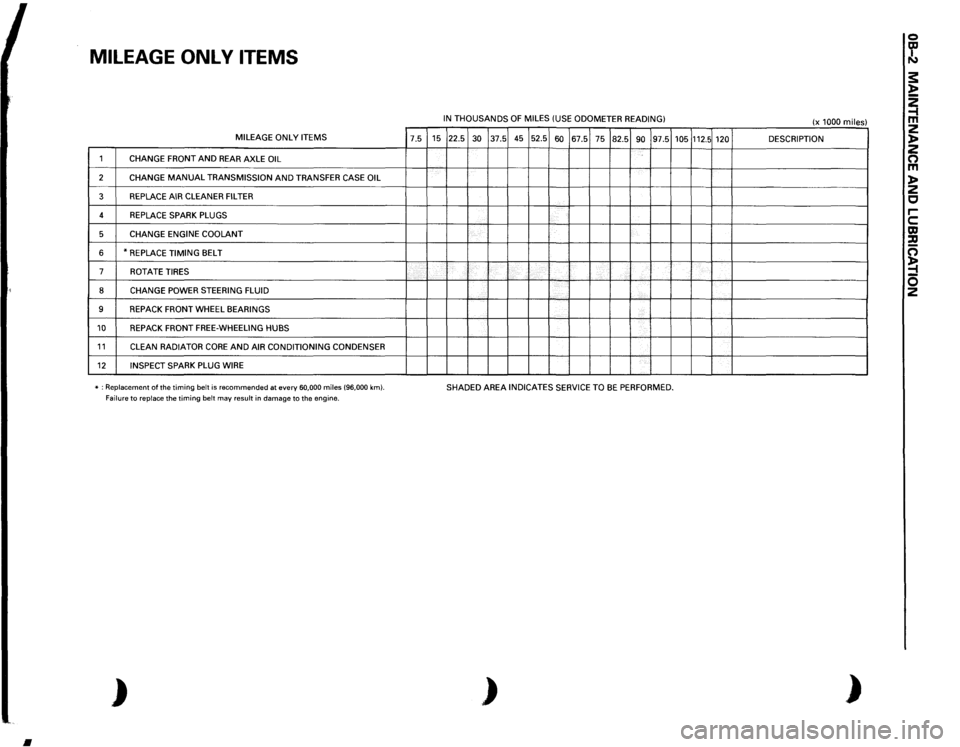
MILEAGE
ONL
V
ITEMS MILEAGE
ONLY
ITEMS
7.5
1
CHANGE
FRONT
AND
REAR AXLE
OIL
2
CHANGE
MANUAL
TRANSMISSION
AND
TRANSFER CASE
OIL
3
REPLACE AIR
CLEANER FILTER
4
REPLACE SPARK PLUGS
5
CHANGE ENGINE
COOLANT
6
*REPLACE
TIMING
BELT
7
ROT
ATE
TIRES
8
CHANGE
POWER STEERING FLUID
9
REPACK FRONT
WHEEL
BEARINGS
10
REPACK FRONT
FREE-WHEELING HUBS
11
CLEAN
RADIATOR
CORE
AND
AIR CONDITIONING CONDENSER
12
INSPECT SPARK PLUG WIRE
'
-----
* : Replacement
of the
timing
belt
is recommended
at every
60,000
miles
(96,000
km).
Failure
to replace
the timing
belt
may
result
in damage to the engine.
)
•
IN THOUSANDS
OF
MILES
(USE
ODOMETER
READING)
15 22.5
30
37.5 45 52.5
60
67.5
75
82.5
90
97.5
'
-
'---
~--·-L....
SHADED AREA
INDICATES SERVICE TO
BE
PERFORMED.
)
105
112.5
120 '-------
(x 1000
miles)
DESCRIPTION ------
)
0 ~ s: l> ~ z l> z 0 m l> z c rc m :a c; ~ 0 2
Page 20 of 1928
OB-4 MAINTENANCE AND LUBRICATION
EXPLANATION OF COMPLETE VEHICLE
MAINTENANCE
SCHEDULE
Brief explanations of the services listed in the
preceeding Maintenance Scheduled are presented
below.
Replace
all questionable parts and note any necessary
repairs
as you perform these maintenance
procedures.
FRONT AND REAR AXLE LUBRICANT
REPLACEMENT
Check the lubricant level after every 7,500 miles
(12,000 km) of operation and add lubricant to level
of filler hole if necessary.
Replace the front and rear
axle lubricant at 15,000
miles (24,000 km) and 30,000 miles (48,000 km) and
after every 30,000
miles (48,000 km) or operation
thereafter.
MANUAL TRANSMISSION LUBRICANT
REPLACEMENT
Check the lubricant level after every 7,500 miles
(12,000 km) of operation and add lubricant to level
of filler hole if necessary.
Replace the transmission
lubricant at 15,000 miles
(24,000 km) and 30,000 miles (48,000 km) and after
every 30,000
miles (48,000 km) of operation there
after.
TRANSFER CASE LUBRICANT
REPLACEMENT
Check the lubricant level after every 7,500 miles
(12,000 km) of operation and add lubricant to level
of filler hole if necessary.
Replace
the transfer case lubricant at 15,000 miles
(24,000 km) and 30,000 miles (48,000 km) and after
every 30,000
miles (48,000 km) of operation there
after.
AIR CLEANER ELEMENT REPLACEMENT
Replace the air cleaner under normal operating
conditions every 30,000 miles (48,000 km).
Operation
of the vehicle in dusty areas will
necessitate more frequent replacement.
SPARK PLUG REPLACEMENT
Replace the plugs at 30,000 mile (48,000 km) intervals
with the type specified at the end of this section.
COOLING SYSTEM SERVICE
Drain, flush and refill system with new engine coolant.
Refer
to "Recommended Fluids and Lubricants" in
this section,
or ENGINE COOLING (SEC. 68).
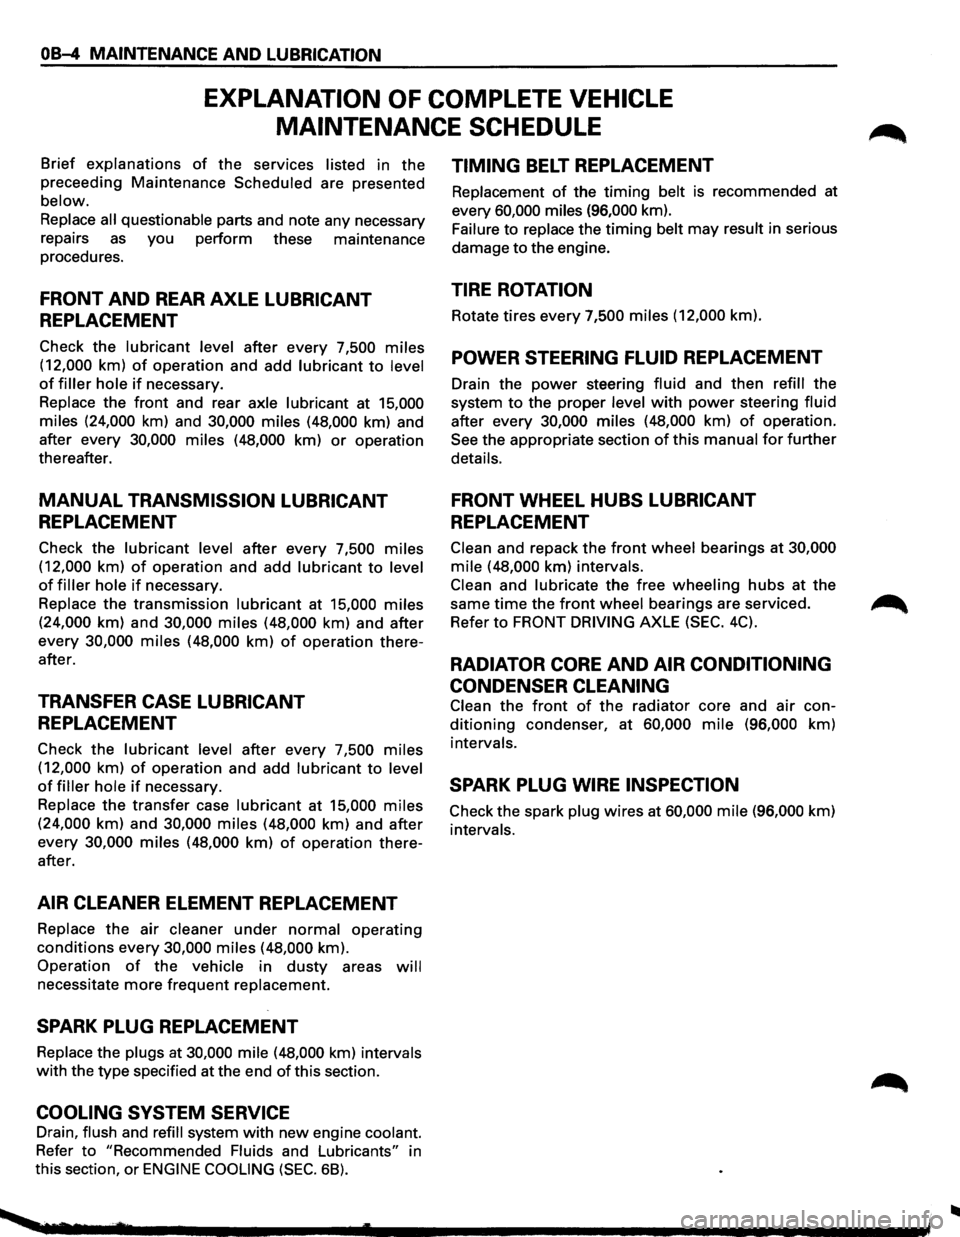
TIMING BELT REPLACEMENT
Replacement of the timing belt is recommended at
every 60,000 miles (96,000 km).
Failure
to replace the timing belt may result in serious
damage
to the engine.
TIRE ROTATION
Rotate tires every 7,500 miles (12,000 km).
POWER STEERING FLUID REPLACEMENT
Drain the power steering fluid and then refill the
system
to the proper level with power steering fluid
after every 30,000 miles (48,000 km) of operation.
See the appropriate section
of this manual for further
details.
FRONT WHEEL HUBS LUBRICANT
REPLACEMENT
Clean and repack the front wheel bearings at 30,000
mile (48,000 km) intervals.
Clean and lubricate the free wheeling hubs at the
same
time the front wheel bearings are serviced.
Refer
to FRONT DRIVING AXLE (SEC. 4C).
RADIATOR CORE AND AIR CONDITIONING
CONDENSER CLEANING
Clean the front of the radiator core and air con
ditioning condenser, at 60,000 mile (96,000 km)
intervals.
SPARK PLUG WIRE INSPECTION
Check the spark plug wires at 60,000 mile (96,000 km)
intervals.
..
Page 509 of 1928
ENGINE DIAGNOSIS 6-11
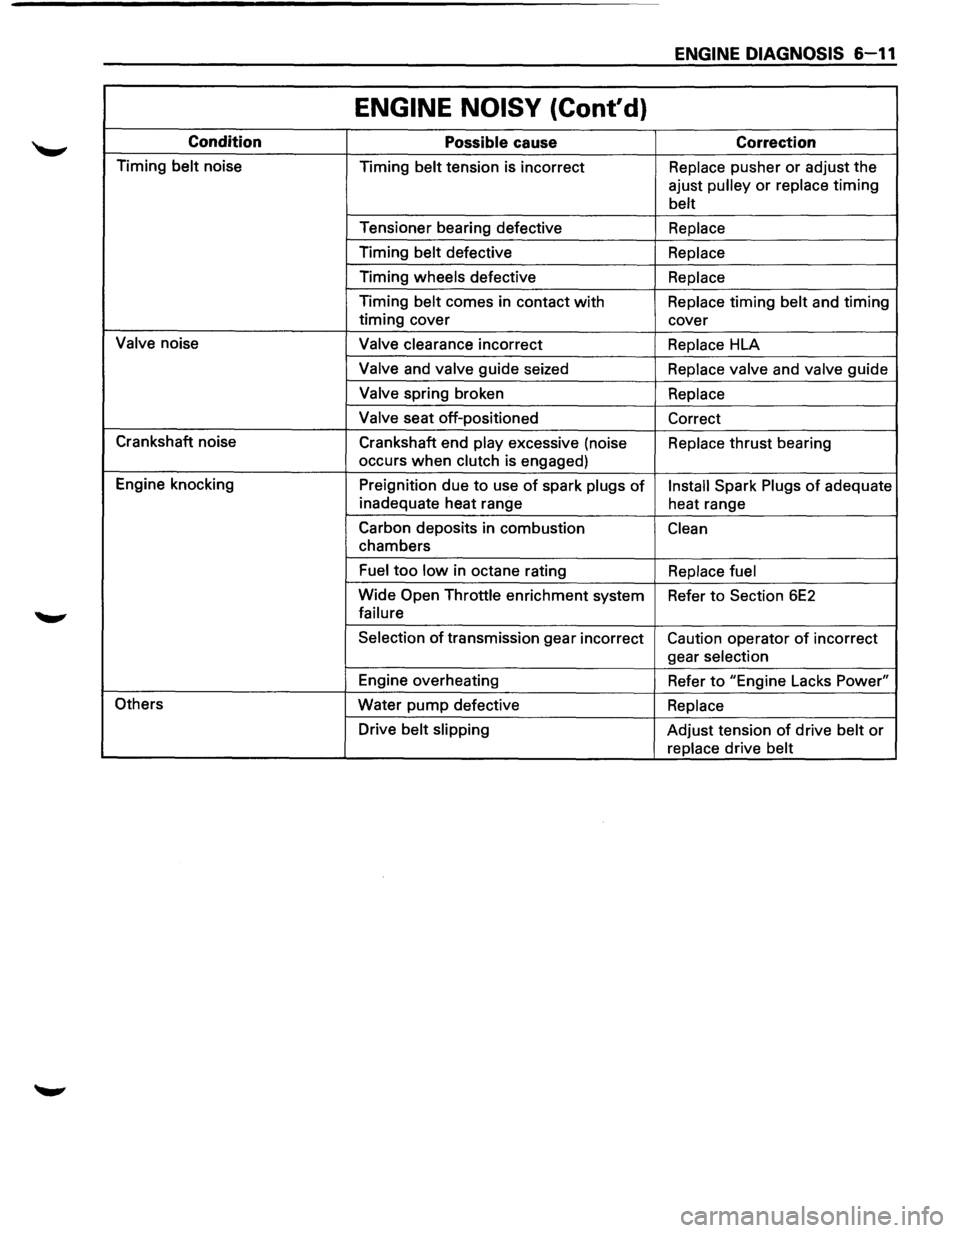
ENGINE NOISY (Cont'd)
Condition Possible cause Correction
Timing belt noise
Timing belt tension is incorrect Replace pusher or adjust the
ajust
pulley or replace timing
belt
Tensioner bearing defective Replace
Timing belt defective Replace
Timing wheels defective Replace
Timing belt comes in contact with Replace timing belt and timing
timing cover
cover
Valve noise Valve clearance incorrect Replace HLA
Valve and valve guide seized Replace valve and valve guide
Valve spring broken Replace
Valve
seat off-positioned
Correct
Crankshaft noise
Crankshaft end
play excessive (noise Replace thrust bearing
occurs
when clutch is engaged)
Engine knocking
Preignition due
to use of spark plugs of Install Spark Plugs of adequate
inadequate heat range
heat range
Carbon deposits in combustion
Clean
chambers
Fuel too low in octane rating Replace fuel
Wide Open Throttle enrichment system
Refer to Section 6E2
failure
Selection
of transmission gear incorrect Caution operator of incorrect
gear
selection
Engine overheating
Refer to "Engine Lacks Power"
Others Water
pump defective Replace
Drive belt slipping Adjust tension of drive belt or
replace drive belt
Page 559 of 1928
ENGINE (V6 3.2L DOHC AND SOHC) 6A 1-1
SECTION 6A1
3.2L V6 ENGINE
CONTENTS
General Description .................. 6A1-2 Crankshaft Pulley ................... 6A1-24
Cylinder Block . . . . . . . . . . . . . . . . . . . . . 6A 1-3 Camshaft/Rocker Arm (SOHC) ........ 6A1-25
Cylinder Head ...................... 6A1-3 Camshaft/Swing Arm/Hydraulic Lash
Valve Train ........................ 6A1-3 Adjusters (DOHC) ................. 6A1-29
Intake Manifold .................... 6A1-3 Timing Chain (DOHC) ................ 6A1-33
Exhaust Manifold ................... 6A1-3 Valve stem Oil Controller and
Piston and
Connecting Rod .......... 6A1-3 Valve Spring ..................... 6A1-38
Crankshaft and Bearing .............. 6A1-3 Cylinder Head (SOHC) ............... 6A1-42
Oil Pump .......................... 6A1-3 Cylinder Head (DOHC) ............... 6A1-46
Engine Lubrication . . . . . . . . . . . . . . . . . . 6A 1-3 Oil Pan ............................ 6A 1-50
On-Vehicle Service . . . . . . . . . . . . . . . . . . 6A1-4 Oil Pump .......................... 6A 1-52
Cylinder Head Cover LH (SOHC) ....... 6A1-4 Oil Pump Oil seal ................... 6A 1-53
Cylinder Head Cover RH (SOHC) ...... 6A1-5 Oil Filter ........................... 6A 1-54
Cylinder Head Cover (DOHC) . . . . . . . . . 6A 1-6 Oil Cooler .......................... 6A 1-55
Common Chamber Duct (DOHC) ...... 6A1-8 Piston, Piston Rings and Connecting Rod . 6A 1-56
Common Chamber (SOHC) ........... 6A1-10 Crankshaft and Main Bearings ........ 6A1-57
Common Chamber (DOHC) ........... 6A1-12 Rear Oil Seal ....................... 6A1-60
Intake Manifold (SOHC) .............. 6A1-14 Engine Assembly .................... 6A1-61
Intake Manifold (DOHC) ............. 6A1-16 Main Data and Specification ........... 6A1-63
LH Exhaust Manifold . . . . . . . . . . . . . . . . 6A 1-18 General Specification ................ 6A 1-63
RH Exhaust Manifold ................ 6A1-19 Torque Specification ................ 6A1-64
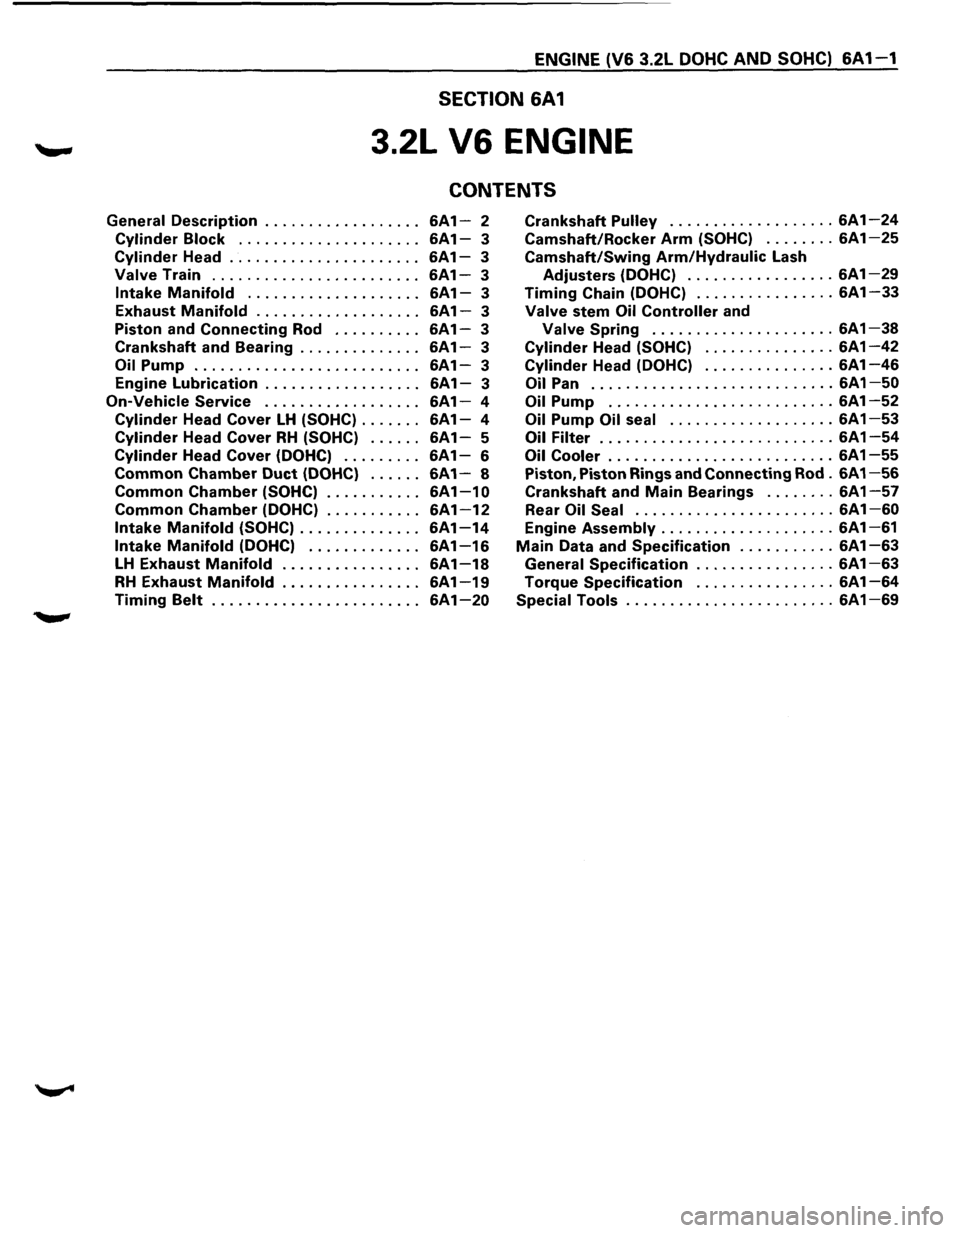
Timing Belt ........................ 6A1-20 Special Tools ........................ 6A1-69
Page 561 of 1928
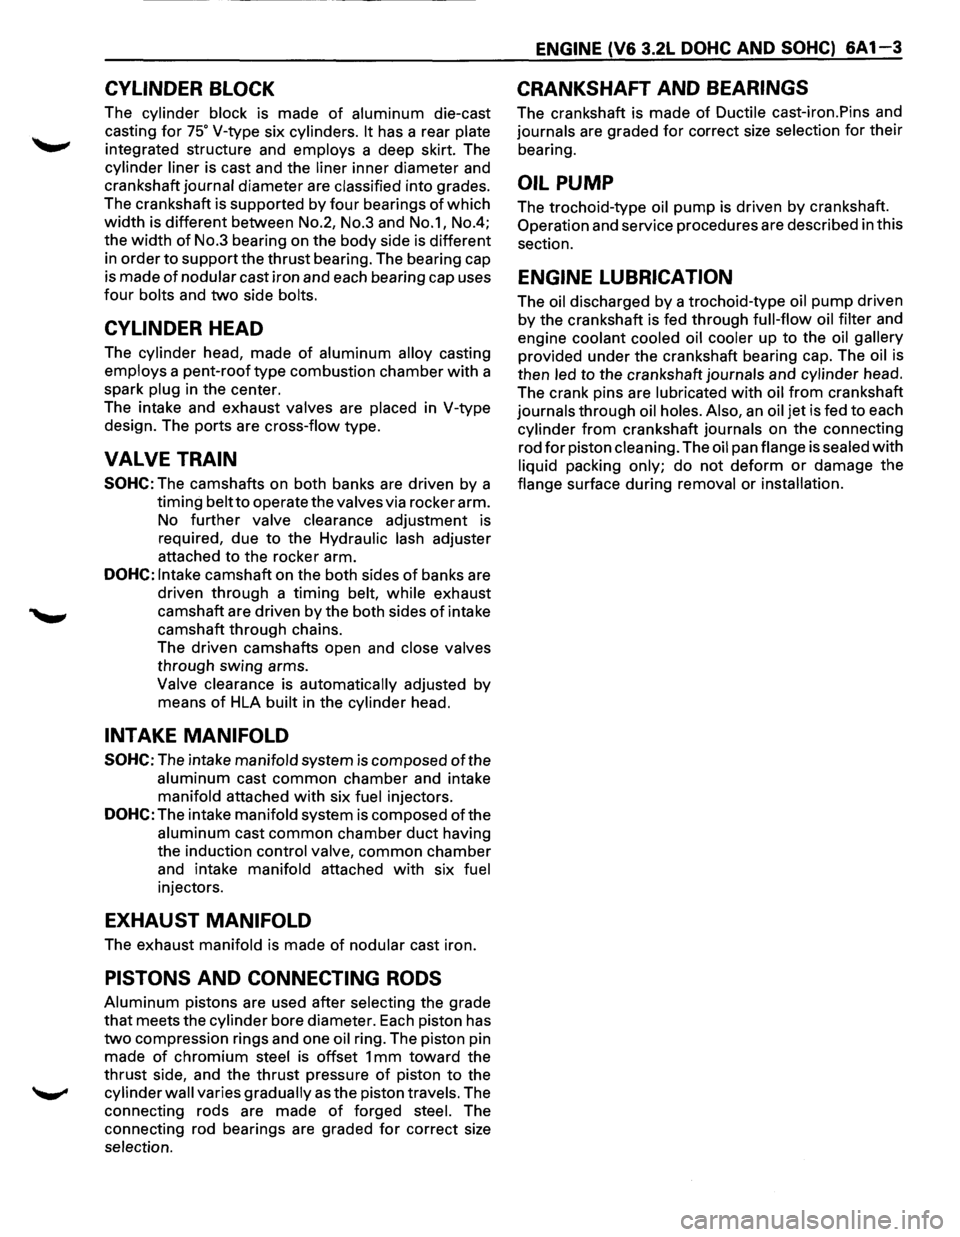
CYLINDER BLOCK
The cylinder block is made of aluminum die-cast
casting
for 75° V-type six cylinders. It has a rear plate
integrated structure and employs a deep skirt. The
cylinder liner is cast and the liner inner diameter and
crankshaft
journal diameter are classified into grades.
The crankshaft is supported by four bearings
of which
width is different between No.2, No.3 and No.1, No.4;
the
width of No.3 bearing on the body side is different
in order
to support the thrust bearing. The bearing cap
is made
of nodular cast iron and each bearing cap uses
four bolts and two side bolts.
CYLINDER HEAD
The cylinder head, made of aluminum alloy casting
employs a pent-roof type combustion chamber with a
spark
plug in the center.
The intake and exhaust
valves are placed in V-type
design. The ports are cross-flow type.
VALVE TRAIN
SOHC: The camshafts on both banks are driven by a
timing
belt to operate the valves via rocker arm.
No
further valve clearance adjustment is
required, due
to the Hydraulic lash adjuster
attachedtotherockerarm.
DOHC: Intake camshaft on the both sides of banks are
driven through a
timing belt, while exhaust
camshaft are driven by the both sides
of intake
camshaft through chains.
The driven camshafts open and
close valves
through swing arms.
Valve clearance is automatically adjusted by
means
of HLA built in the cylinder head.
INTAKE MANIFOLD
SOHC: The intake manifold system is composed ofthe
aluminum cast common chamber and intake
manifold attached with six fuel injectors.
DOHC: The intake manifold system is composed of the
aluminum cast common chamber duct having
the induction
control valve, common chamber
and intake
manifold attached with six fuel
injectors.
EXHAUST MANIFOLD
The exhaust manifold is made of nodular cast iron.
PISTONS AND CONNECTING RODS
Aluminum pistons are used after selecting the grade
that meets the cylinder bore diameter. Each piston has
two compression rings and one oil ring. The piston pin
made
of chromium steel is offset 1 mm toward the
thrust side, and the thrust pressure
of piston to the
cylinder wall varies gradually as the piston travels. The
connecting rods are made
of forged steel. The
connecting rod bearings are graded
for correct size
selection.
ENGINE (V6 3.2L DOHC AND SOHC) 6A1-3
CRANKSHAFT AND BEARINGS
The crankshaft is made of Ductile cast-iron.Pins and
journals are graded for correct size selection for their
bearing.
OIL PUMP
The trochoid-type oil pump is driven by crankshaft.
Operation and service procedures are described in this
section.
ENGINE LUBRICATION
The oil discharged by a trochoid-type oil pump driven
by the crankshaft is fed through full-flow oil filter and
engine
coolant cooled oil cooler up to the oil gallery
provided under the crankshaft bearing cap. The oil is
then
led to the crankshaft journals and cylinder head.
The crank pins are
lubricated with oil from crankshaft
journals through oil holes. Also, an oil jet is fed to each
cylinder from crankshaft journals on the connecting
rod
for piston cleaning. The oil pan flange is sealed with
liquid packing only; do not deform or damage the
flange surface during removal or installation.
Page 578 of 1928
·,'
6A1-20 ENGINE (V6 3.2L DOHC AND SOHC)
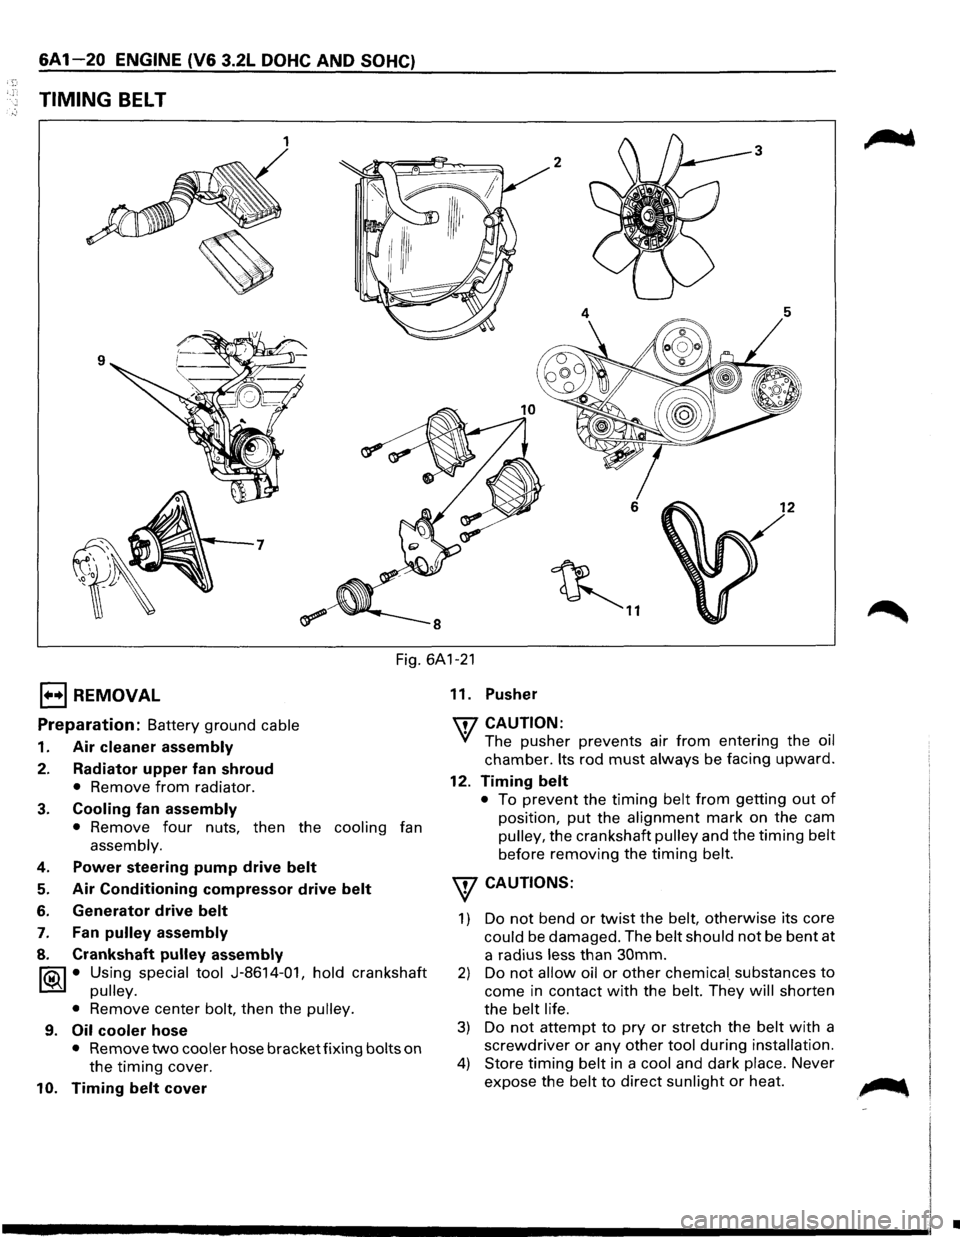
TIMING BELT
1 3
2
6 12
~ ..
Fig. 6A1-21
1••1 REMOVAL
Preparation: Battery ground cable
1. Air cleaner assembly
2. Radiator upper fan shroud
• Remove from radiator.
3. Cooling fan assembly
• Remove four nuts, then the cooling fan
assembly.
4. Power steering pump drive belt
5. Air Conditioning compressor drive belt
6. Generator drive belt
7. Fan pulley assembly
8. Crankshaft pulley assembly
~ • Using special tool J-8614-01, hold crankshaft
~ pulley.
•
Remove center bolt, then the pulley.
9. Oil cooler hose
• Remove two cooler hose bracket fixing bolts on
the timing cover.
10. Timing belt cover 11.
Pusher
'IT7 CAUTION:
'if The pusher prevents air from entering the oil
chamber. Its rod must always be facing upward.
12. Timing belt
• To prevent the timing belt from getting out of
position, put the alignment mark on the cam
pulley, the crankshaft pulley and the timing belt
before removing the timing belt.
w CAUTIONS:
1) Do not bend or twist the belt, otherwise its core
could be damaged. The belt should not be bent at
a radius
less than 30mm.
2) Do not allow oil or other chemica[ substances to
come in contact with the belt. They will shorten
the
belt life.
3) Do not attempt to pry or stretch the belt with a
screwdriver or any other tool during installation.
4) Store timing belt in a cool and dark place. Never
expose the
belt to direct sunlight or heat. ~
•
Page 579 of 1928
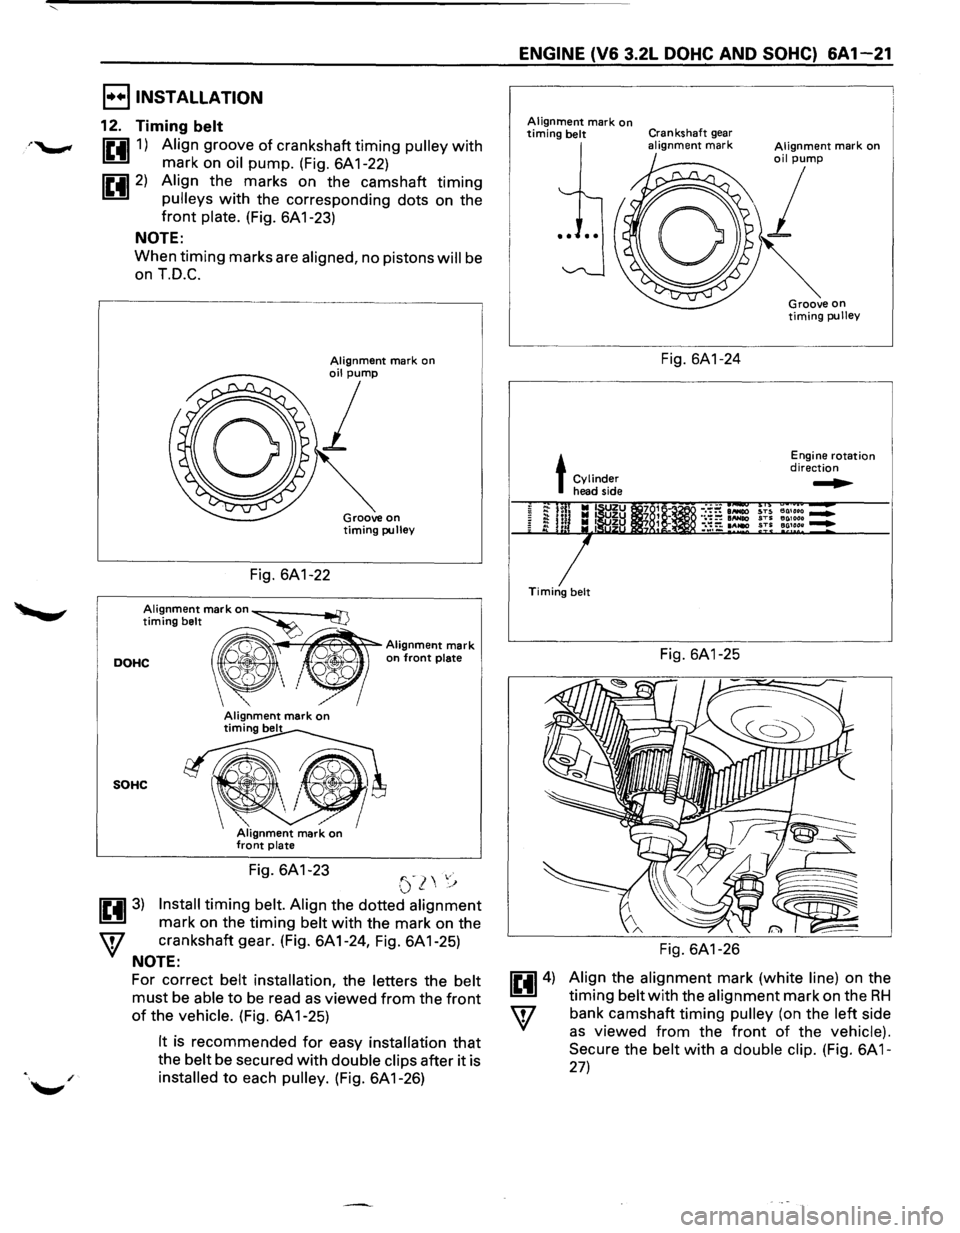
I••IINSTALLATION
12. Timing belt
1£4111) Align groove of crankshaft timing pulley with
mark on oil pump. (Fig. 6A 1-22)
1£4112) Align the marks on the camshaft timing
pulleys with the corresponding dots on the
front plate. (Fig. 6A 1-23)
NOTE:
When timing marks are aligned, no pistons will be
on T.D.C.
,-----------------------------,
Fig. 6A1-22
Groove on timing pulley
Alignment mark on~ ad]
timing belt ·~Alignment mark
DOHC ", ' on front plate Q',
SOHC
Fig. 6A1-23 '"-) ,.· (.)~\,'j
1£4113) Install timing belt. Align the dotted alignment
mark on the timing belt with the mark on the
W crankshaft gear. (Fig. 6A1-24, Fig. 6A1-25)
NOTE:
For correct belt installation, the letters the belt
must be able to be read as viewed from the front
of the vehicle. (Fig. 6A 1-25)
It is recommended for easy installation that
the belt be secured with double clips after it is
installed to each pulley. (Fig. 6A 1-26)
ENGINE (V6 3.2L DOHC AND SOHC) 6A1-21
Alignment mark on timing belt Crankshaft gear alignment mark
L~---
t Cylinder head side
Timing belt
Fig. 6A1-24
Fig. 6A1-25
Fig. 6A1-26
Engine rotation direction
~
Align the alignment mark (white line) on the
timing belt with the alignment mark on the RH
bank camshaft timing pulley (on the left side
as viewed from the front of the vehicle).
Secure
the belt with a double clip. (Fig. 6A 1-
27)
Page 580 of 1928
&A 1-22 ENGINE (V& 3.2L DOHC AND SOHC)
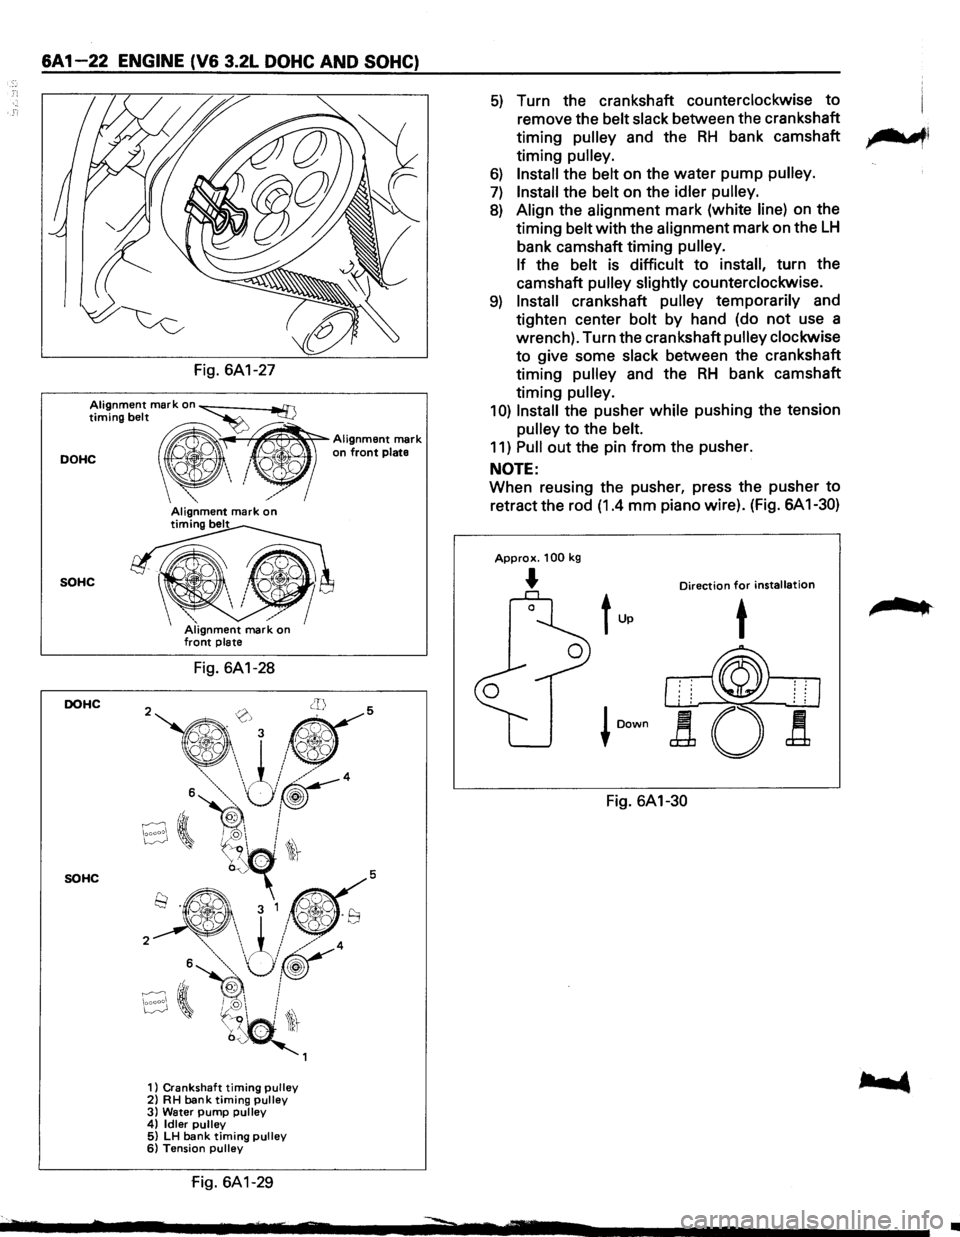
Fig. 6A1-27
Alignment mark on ~ timing belt ~
DOHC " ' on front plate
~~
Alignment mark
_","'
SOHC
DOHC
SOHC
/ Alignment mark on timing belt
Fig. 6A1-28
1) Crankshaft timing pulley 2) RH bank timing pulley 3) Water pump pulley 4) Idler pulley 5) LH bank timing pulley 6) Tension pulley
fig. 6A1-29
5) Turn the crankshaft counterclockwise to
remove the belt slack between the crankshaft
timing
pulley and the RH bank camshaft ,.......,,
timing pulley.
6) Install the belt on the water pump pulley.
7) Install the belt on the idler pulley.
8) Align the alignment mark (white line) on the
timing belt with the alignment mark on the
LH
bank camshaft timing pulley.
If
the belt is difficult to install, turn the
camshaft
pulley slightly counterclockwise.
9) Install crankshaft pulley temporarily and
tighten center bolt by hand (do
not use a
wrench). Turn the crankshaft
pulley clockwise
to give some slack between the crankshaft
timing
pulley and the RH bank camshaft
timing
pulley.
1 0) Install the pusher while pushing the tension
pulley to the belt.
11) Pull out the pin from the pusher.
NOTE:
When reusing the pusher, press the pusher to
retract the rod (1.4 mm piano wire). (Fig. 6A 1-30)
Approx. 100 kg
... Direction for installation
Fig. 6A1-30
,.. ..
•
Page 581 of 1928
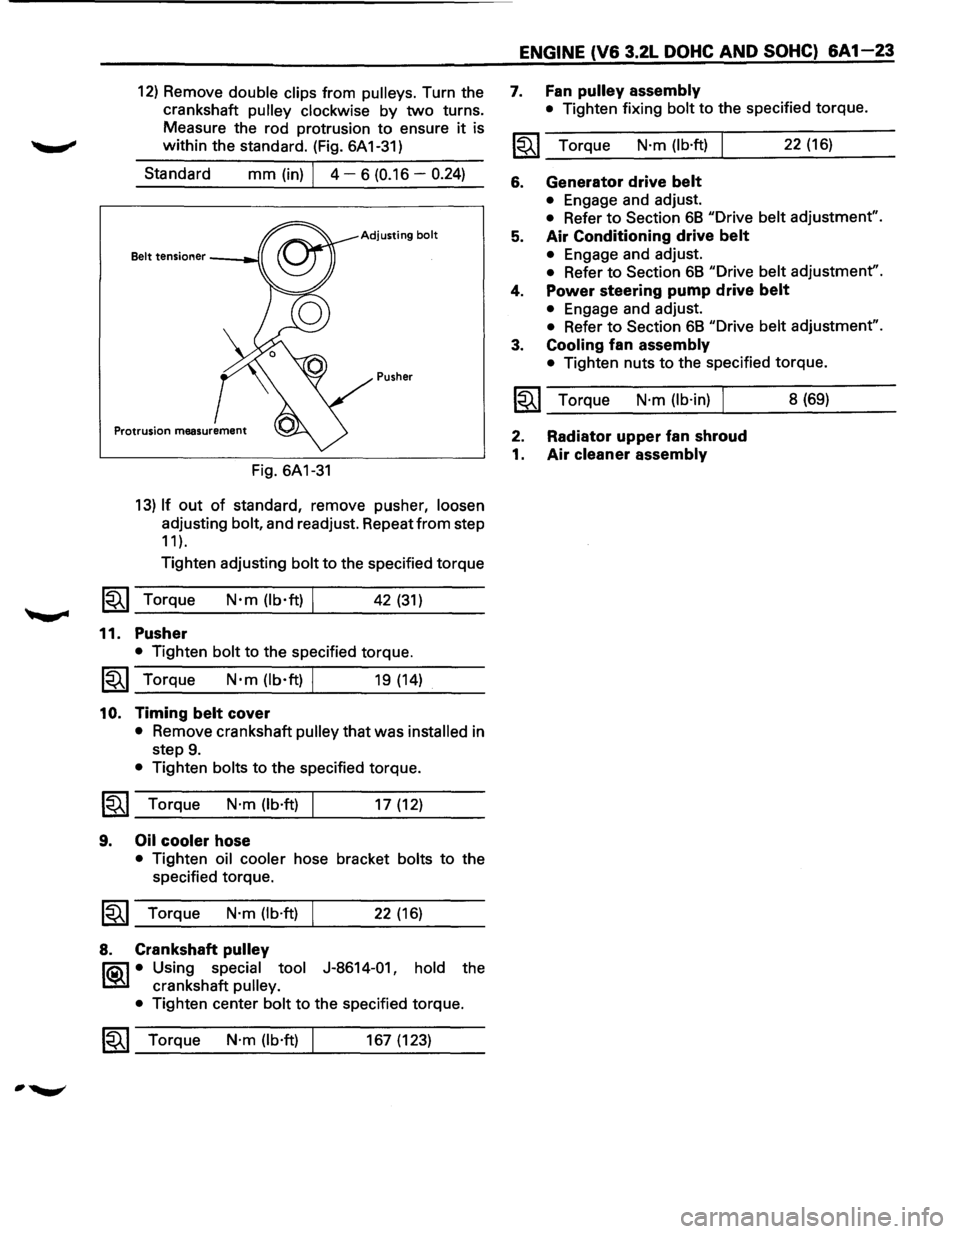
12) Remove double clips from pulleys. Turn the
crankshaft
pulley clockwise by two turns.
Measure the rod protrusion to ensure
it is
within the standard. (Fig. 6A 1-31)
Standard
mm (in) I 4 - 6 (0.16 -0.24)
Adjusting bolt
Pusher
Fig. 6A1-31
13) If out of standard, remove pusher, loosen
adjusting bolt, and readjust. Repeat from step
11 ).
Tighten adjusting bolt to the specified torque
1~1 Torque N·m (lb·ft) I 42 (31)
11. Pusher
• Tighten bolt to the specified torque.
1~1 Torque N·m (lb·ft) I 19 (14)
10. Timing belt cover
• Remove crankshaft pulley that was installed in
step
9.
• Tighten bolts to the specified torque.
~~~ Torque N·m (lb·ft) I 17 (12)
9. Oil cooler hose
• Tighten oil cooler hose bracket bolts to the
specified torque.
~~~ Torque N·m (lb·ft) I 22 (16)
8. Crankshaft pulley
l"iQ\1 • Using special tool J-8614-01, hold the
~ crankshaft pulley.
•
Tighten center bolt to the specified torque.
1~1 Torque N·m (lb·ft) 167 (123)
ENGINE (V6 3.2L DOHC AND SOHC) 6A1-23
7. Fan pulley assembly
• Tighten fixing bolt to the specified torque.
~~~ Torque N·m (lb·ft) 22 (16)
6. Generator drive belt
• Engage and adjust.
• Refer to Section 68 "Drive belt adjustment".
5. Air Conditioning drive belt
• Engage and adjust.
• Refer to Section 68 "Drive belt adjustment".
4. Power steering pump drive belt
• Engage and adjust.
• Refer to Section 68 "Drive belt adjustment".
3. Cooling fan assembly
• Tighten nuts to the specified torque.
~~~ Torque N·m (lb·in) I 8 (69)
2. Radiator upper fan shroud
1. Air cleaner assembly
Page 584 of 1928
6A1-26 ENGINE (V& 3.2L DOHC AND SOHC)
1••1 REMOVAL
Preparation: Battery ground cable
1. Air cleaner assembly
2. Radiator upper fan shroud
• Remove from radiator.
3. Cooling fan assembly
• Remove four nuts, then the cooling fan
assembly.
4. Accelerator Pedal cable
• Disconnect from throttle body and cable
bracket.
5. Vacuum booster hose
• Disconnect from common chamber.
6. Connectors
• Disconnect from Manifold Absolute Pressure,
canister Vacuum Switching Valve (VSV),
Exhaust
Gas Recirculation VSV, Intake Air
Temperature and ground cable.
7. High tension cables
• Disconnect from cylinder head cover.
8. Ignition Control Module assembly
• Disconnect three Electronic Ignition con
nectors.
• Remove three Electronic Ignition bracket fixing
bolts, and remove Electronic
Ignition assembly
with high tension cables.
9. Throttle body
• Remove four fixing bolts.
10. Vacuum hoses
• Disconnect vacuum hoses on canister VSV and
Exhaust Gas Recirculation
VSV from the
throttle body.
11. Positive Crankcase Ventilation hose
• Disconnect from common chamber.
12. Fuel Pressure Control Valve vacuum hose
• Disconnect from common chamber.
13. Evaporative Emission Canister Purge hose
• Disconnect from common chamber.
14. Exhaust Gas Recirculation Valve assembly
• Remove five bolts from common chamber,
exhaust manifold and cylinder head cover.
15. Common chamber
• Remove six bolts, two nuts and three bracket
fixing bolts, then remove the
common
chamber.
16. Fuelhoses
• Disconnect feed and return fuel hoses from fuel
pipes, and remove
two bracket fixing bolts on
the cylinder head cover.
17. Power steering pump drive belt
18. Air Conditioning compressor drive belt
19. Generator drive belt
20. Power steering pump
21. Fan pulley assembly
22. Crankshaft pulley assembly
lf5\l • Using special tool J-8614-01, hold crankshaft
t:::!il pulley.
•
Remove center bolt, then the pulley.
23. Oil cooler hose
• Remove two cooler hose bracket fixing bolts on
the timing belt cover.
24. Timing belt cover
25. Pusher
CAUTION:
The pusher prevents air from entering the oil chamber.
Its rod must always be facing upward.
26. Timing belt
CAUTIONS:
1) Do not bend or twist the belt, otherwise its core
could
be damaged. The belt should not be bent at
a radius less than 30mm.
2) Do not allow oil or other chemical substances to
come in contact with the belt. They will shorten
the belt life.
3) Do not attempt to pry or stretch the belt with a
screwdriver
or any other tool during installation.
4) Store timing belt in a cool and dark place. Never
expose the belt
to direct sunlight or heat.
27. Cylinder head cover
• Remove 11 fixing bolts, then the cylinder head
cover.
28. Camshaft
• Camshaft pulley fixing bolt and camshaft pulley
•
Front plate fixing bolts and front plate
• Camshaft bracket fixing bolts and camshaft
29. Rocker arm
• Fixing bolts and rocker arm
I••! INSTALLATION
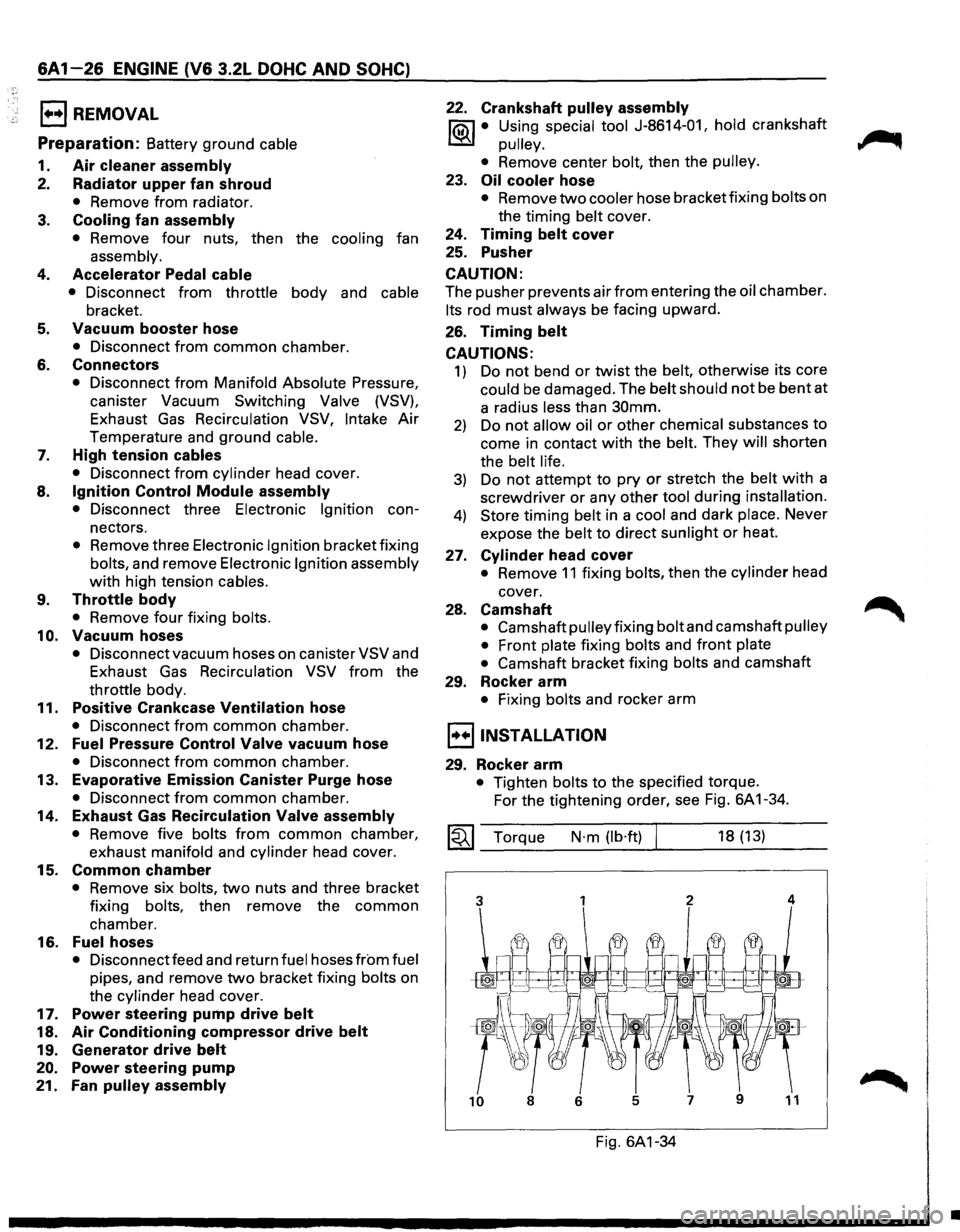
29. Rocker arm
• Tighten bolts to the specified torque.
For the tightening order, see Fig. 6A 1-34.
~~~ Torque N·m (lb·ft) 18 (13)
Fig. 6A1-34
•