engine ISUZU TROOPER 1998 Service Repair Manual
[x] Cancel search | Manufacturer: ISUZU, Model Year: 1998, Model line: TROOPER, Model: ISUZU TROOPER 1998Pages: 3573, PDF Size: 60.36 MB
Page 1556 of 3573
6A Ð 6 ENGINE MECHANICAL
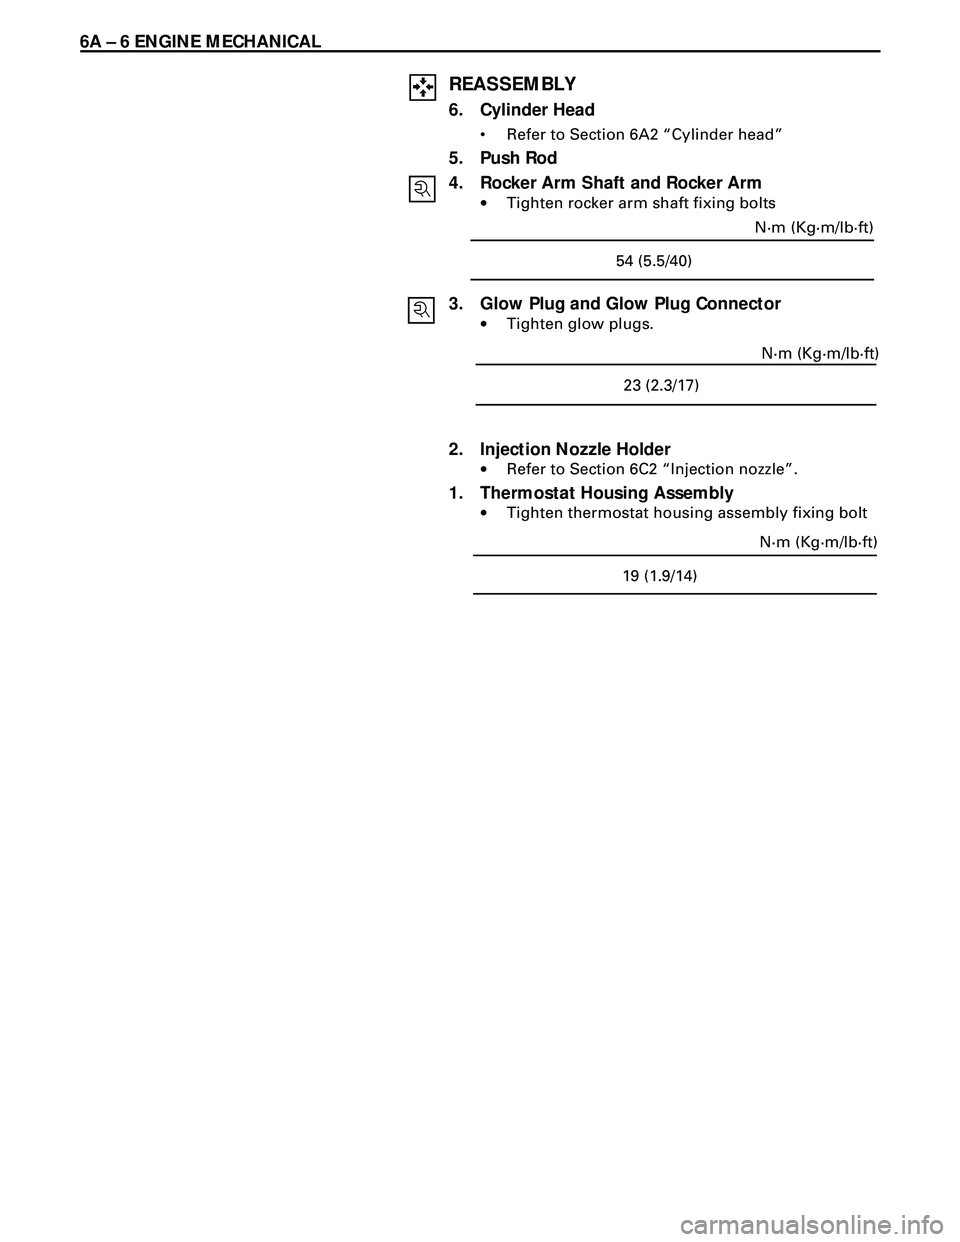
REASSEMBLY
6. Cylinder Head
¥ Refer to Section 6A2 ÒCylinder headÓ
5. Push Rod
4. Rocker Arm Shaft and Rocker Arm
·Tighten rocker arm shaft fixing bolts
3. Glow Plug and Glow Plug Connector
·Tighten glow plugs.
2. Injection Nozzle Holder
·Refer to Section 6C2 ÒInjection nozzleÓ.
1. Thermostat Housing Assembly
·Tighten thermostat housing assembly fixing bolt
N·m (Kg·m/lb·ft)
54 (5.5/40)
N·m (Kg·m/lb·ft)
23 (2.3/17)
N·m (Kg·m/lb·ft)
19 (1.9/14)
Page 1557 of 3573
ENGINE MECHANICAL 6A Ð 7
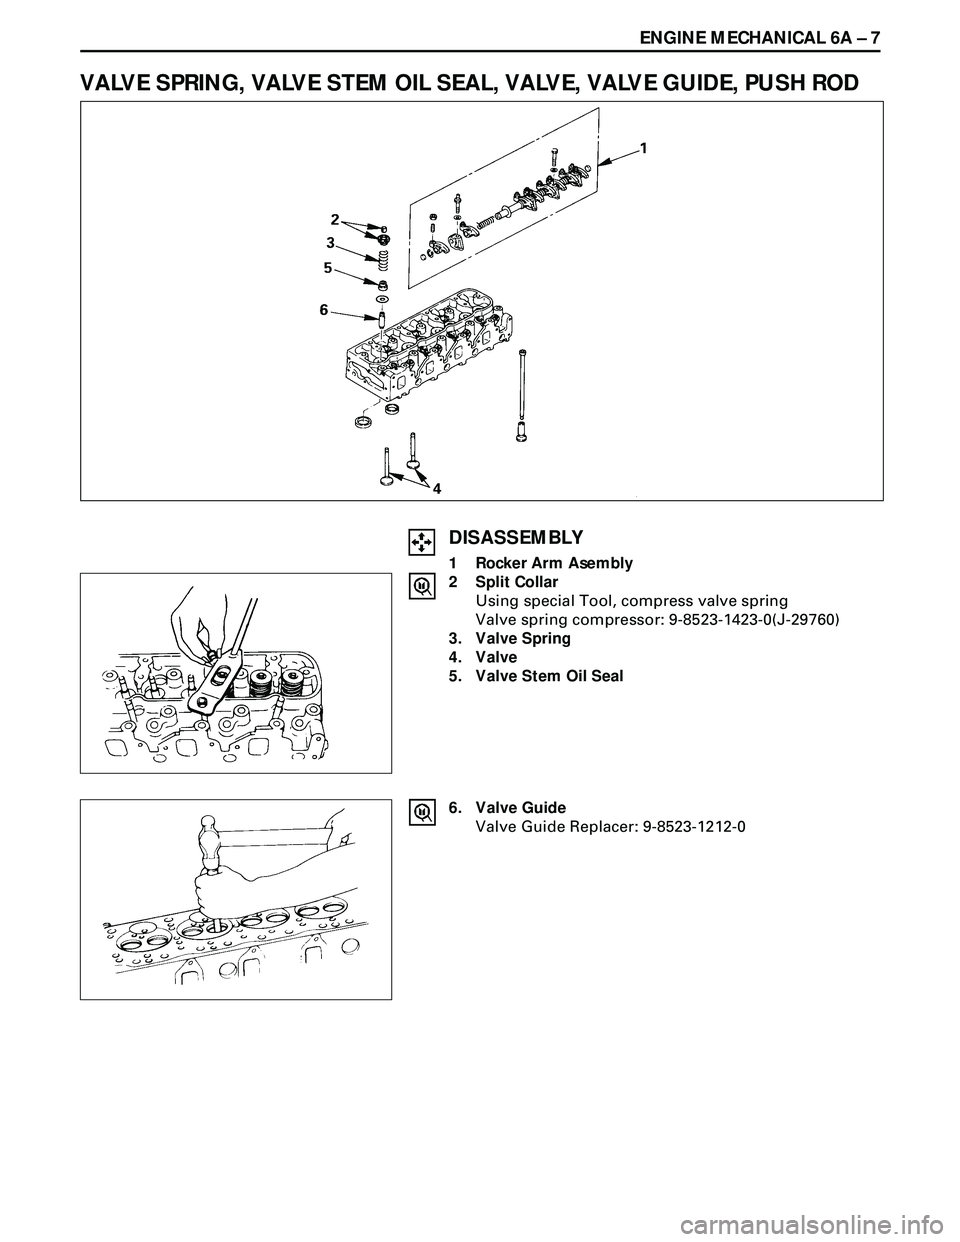
VALVE SPRING, VALVE STEM OIL SEAL, VALVE, VALVE GUIDE, PUSH ROD
DISASSEMBLY
1 Rocker Arm Asembly
2 Split Collar
Using special Tool, compress valve spring
Valve spring compressor: 9-8523-1423-0(J-29760)
3. Valve Spring
4. Valve
5. Valve Stem Oil Seal
6. Valve Guide
Valve Guide Replacer: 9-8523-1212-0
Page 1558 of 3573
6A Ð 8 ENGINE MECHANICAL
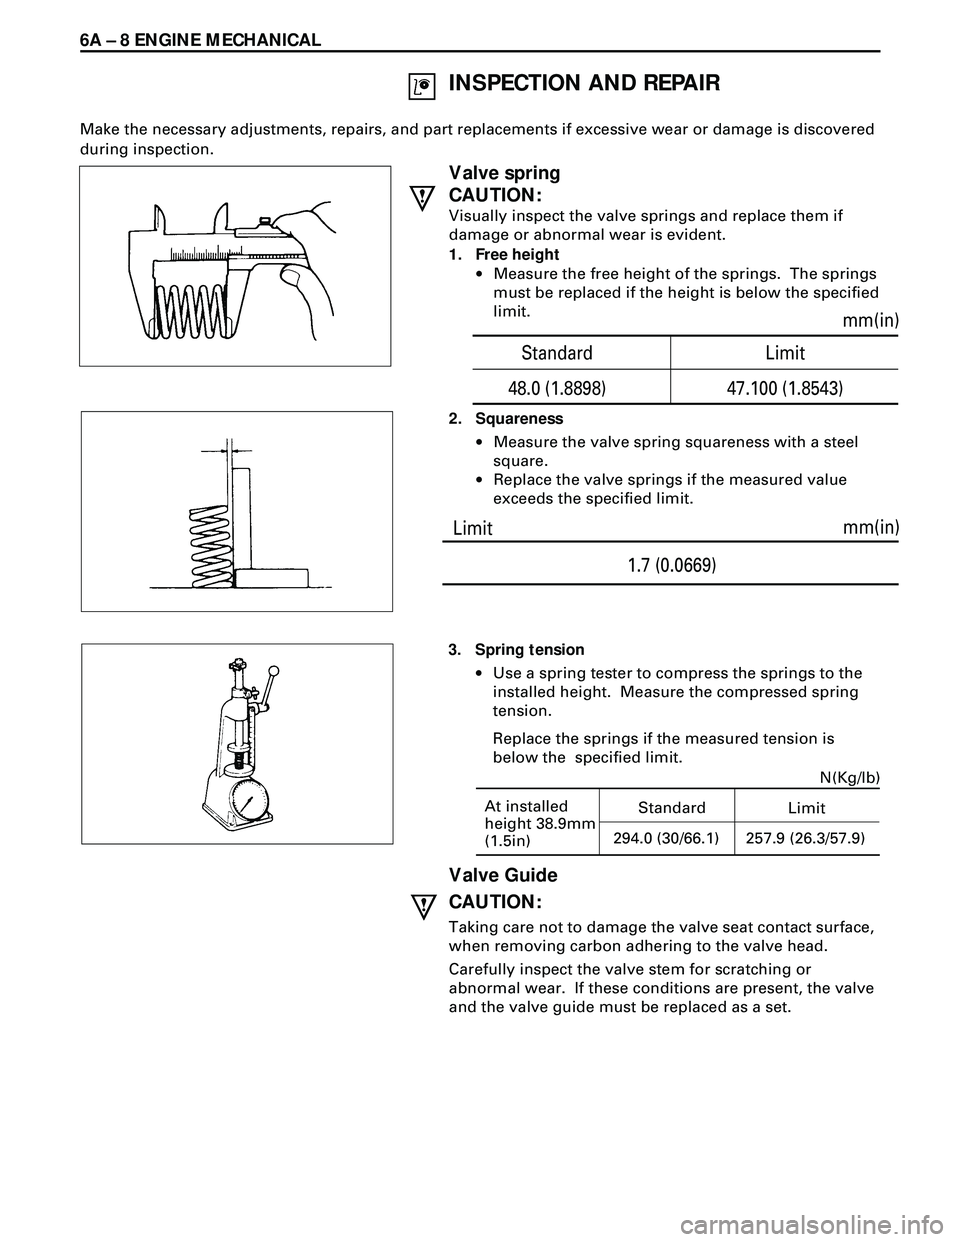
At installed
height 38.9mm
(1.5in)StandardN(Kg/lb)
Limit
294.0 (30/66.1)257.9 (26.3/57.9)
Valve spring
CAUTION:
Visually inspect the valve springs and replace them if
damage or abnormal wear is evident.
1. Free height
·Measure the free height of the springs. The springs
must be replaced if the height is below the specified
limit.
INSPECTION AND REPAIR
Make the necessary adjustments, repairs, and part replacements if excessive wear or damage is discovered
during inspection.
2. Squareness
·Measure the valve spring squareness with a steel
square.
·Replace the valve springs if the measured value
exceeds the specified limit.
3. Spring tension
·Use a spring tester to compress the springs to the
installed height. Measure the compressed spring
tension.
Replace the springs if the measured tension is
below the specified limit.
Valve Guide
CAUTION:
Taking care not to damage the valve seat contact surface,
when removing carbon adhering to the valve head.
Carefully inspect the valve stem for scratching or
abnormal wear. If these conditions are present, the valve
and the valve guide must be replaced as a set.
Limitmm(in)
1.7 (0.0669)
Standard Limit
48.0 (1.8898) 47.100 (1.8543)mm(in)
Page 1559 of 3573
ENGINE MECHANICAL 6A Ð 9
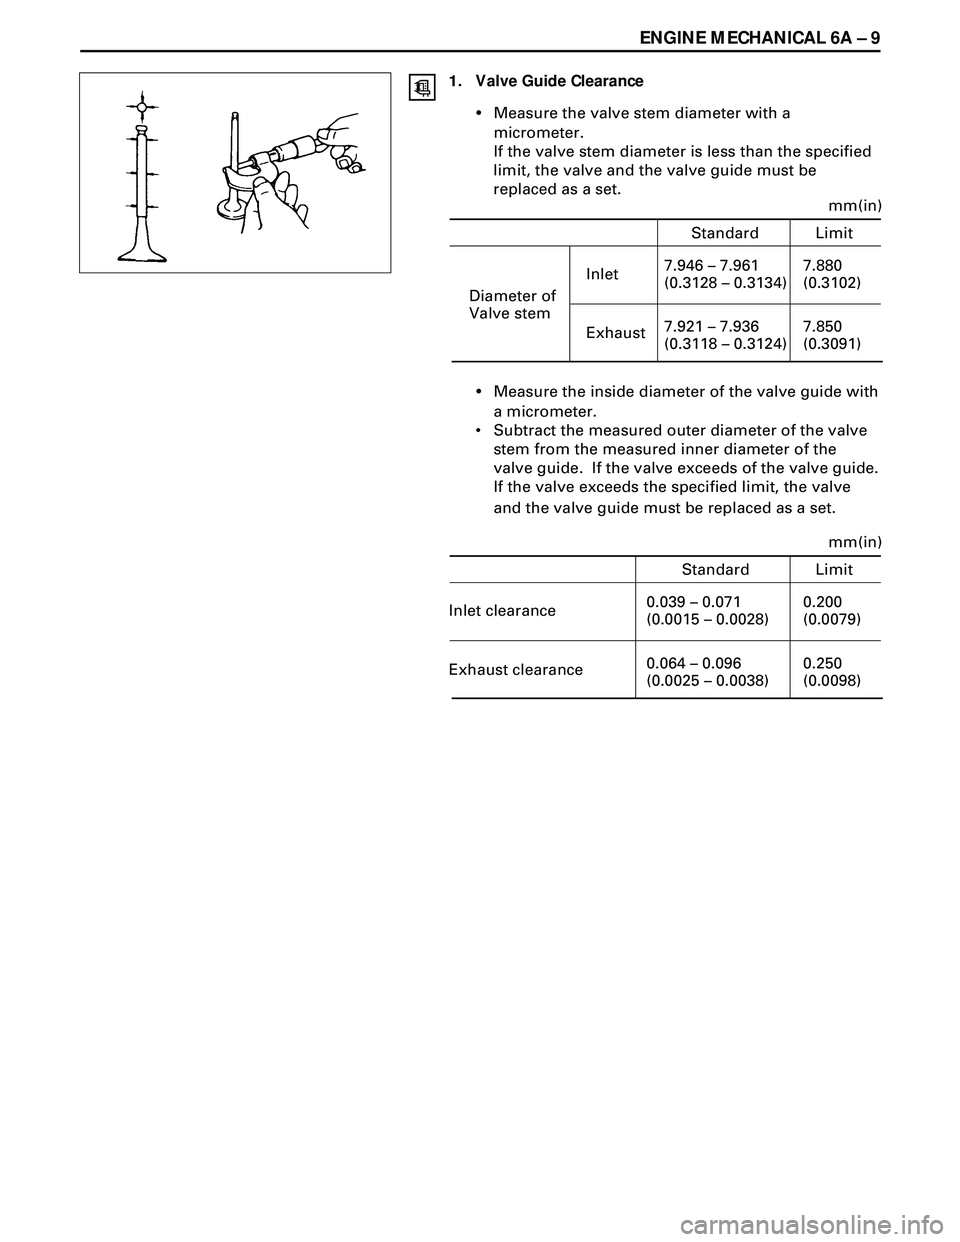
1. Valve Guide Clearance
¥Measure the valve stem diameter with a
micrometer.
If the valve stem diameter is less than the specified
limit, the valve and the valve guide must be
replaced as a set.
¥Measure the inside diameter of the valve guide with
a micrometer.
¥ Subtract the measured outer diameter of the valve
stem from the measured inner diameter of the
valve guide. If the valve exceeds of the valve guide.
If the valve exceeds the specified limit, the valve
and the valve guide must be replaced as a set. Diameter of
Valve stemInlet
mm(in)
7.880
(0.3102)
Standard Limit
Exhaust7.946 – 7.961
(0.3128 – 0.3134)
7.850
(0.3091) 7.921 – 7.936
(0.3118 – 0.3124)
Inlet clearance
mm(in)
0.200
(0.0079)
Standard Limit
Exhaust clearance0.039 – 0.071
(0.0015 – 0.0028)
0.250
(0.0098) 0.064 – 0.096
(0.0025 – 0.0038)
Page 1560 of 3573
6A Ð 10 ENGINE MECHANICAL
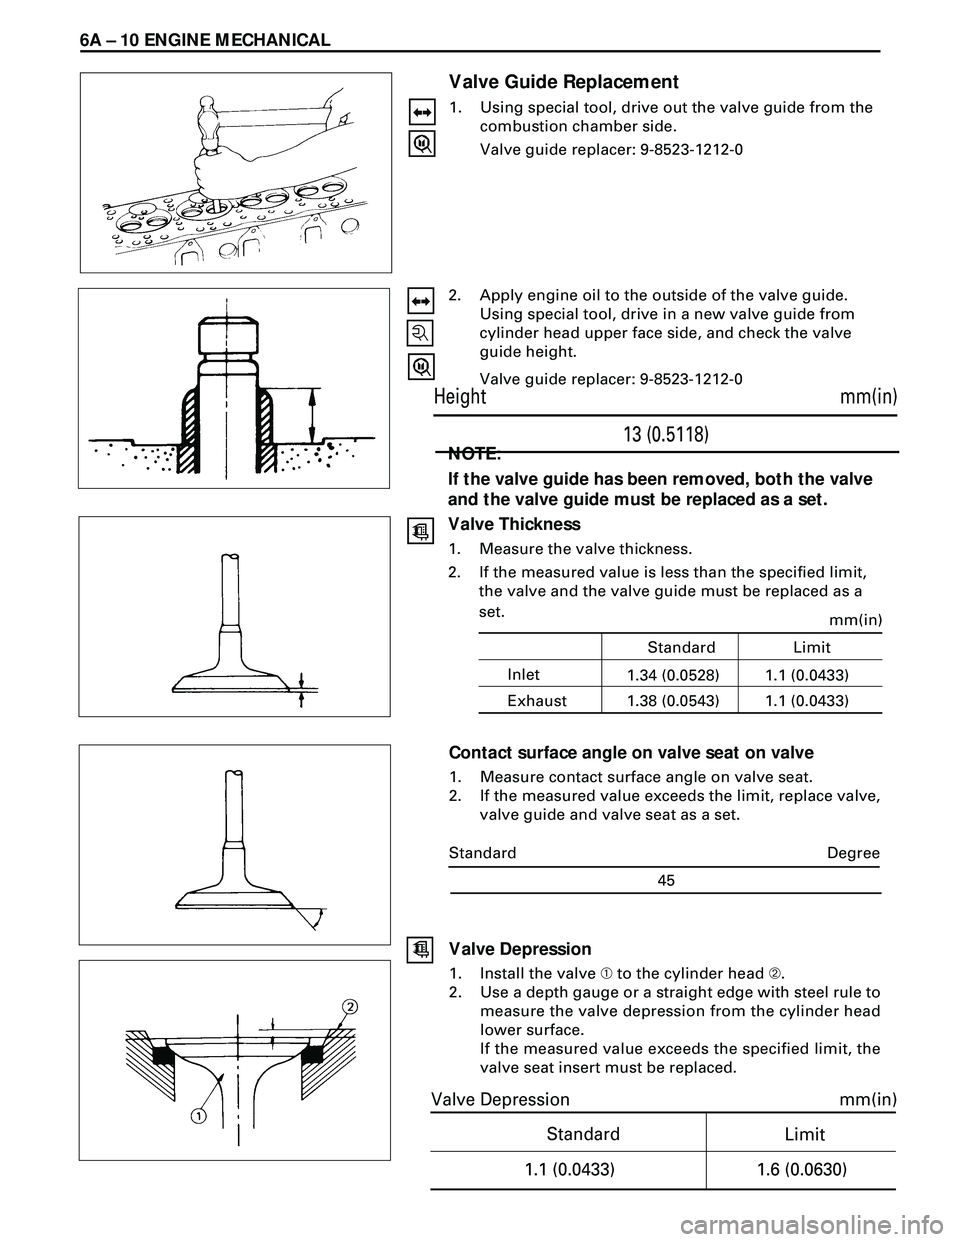
Valve Guide Replacement
1. Using special tool, drive out the valve guide from the
combustion chamber side.
Valve guide replacer: 9-8523-1212-0
2. Apply engine oil to the outside of the valve guide.
Using special tool, drive in a new valve guide from
cylinder head upper face side, and check the valve
guide height.
Valve guide replacer: 9-8523-1212-0
NOTE:
If the valve guide has been removed, both the valve
and the valve guide must be replaced as a set.
Valve Thickness
1. Measure the valve thickness.
2. If the measured value is less than the specified limit,
the valve and the valve guide must be replaced as a
set.
Contact surface angle on valve seat on valve
1. Measure contact surface angle on valve seat.
2. If the measured value exceeds the limit, replace valve,
valve guide and valve seat as a set.
mm(in)
13 (0.5118) Height
Standard
mm(in)
Limit
1.1 (0.0433)
1.6 (0.0630)
Valve Depression
Degree
45 Standard
Valve Depression
1. Install the valve À to the cylinder head Á.
2. Use a depth gauge or a straight edge with steel rule to
measure the valve depression from the cylinder head
lower surface.
If the measured value exceeds the specified limit, the
valve seat insert must be replaced.
Inletmm(in)1.1 (0.0433) Standard Limit
Exhaust1.34 (0.0528)
1.1 (0.0433) 1.38 (0.0543)
Page 1561 of 3573
ENGINE MECHANICAL 6A Ð 11
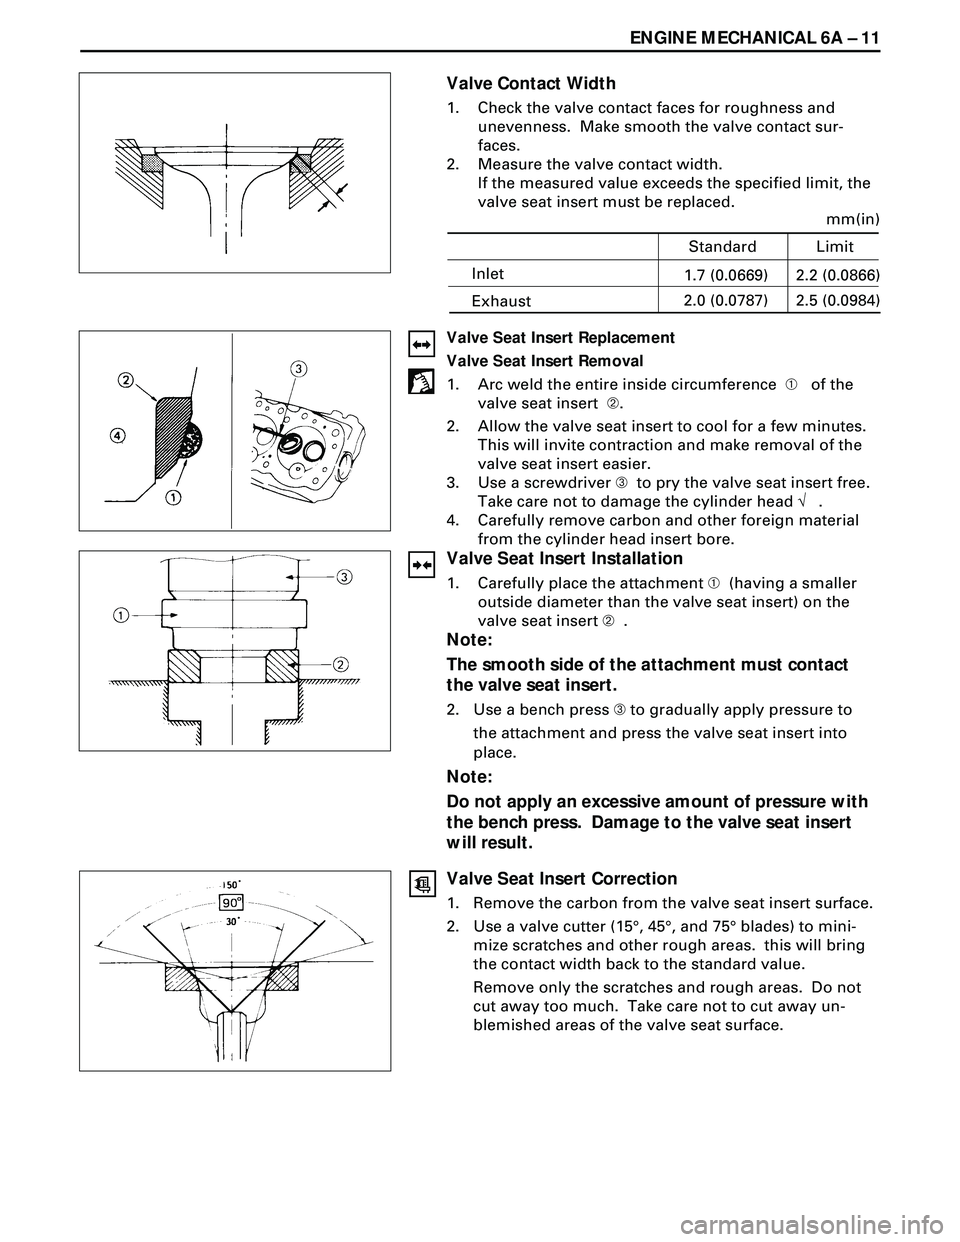
Valve Contact Width
1. Check the valve contact faces for roughness and
unevenness. Make smooth the valve contact sur-
faces.
2. Measure the valve contact width.
If the measured value exceeds the specified limit, the
valve seat insert must be replaced.
Valve Seat Insert Replacement
Valve Seat Insert Removal
1. Arc weld the entire inside circumference À of the
valve seat insert Á.
2. Allow the valve seat insert to cool for a few minutes.
This will invite contraction and make removal of the
valve seat insert easier.
3. Use a screwdriver  to pry the valve seat insert free.
Take care not to damage the cylinder head Ö .
4. Carefully remove carbon and other foreign material
from the cylinder head insert bore.
Valve Seat Insert Installation
1. Carefully place the attachment À (having a smaller
outside diameter than the valve seat insert) on the
valve seat insert Á .
Note:
The smooth side of the attachment must contact
the valve seat insert.
2. Use a bench press  to gradually apply pressure to
the attachment and press the valve seat insert into
place.
Note:
Do not apply an excessive amount of pressure with
the bench press. Damage to the valve seat insert
will result.
Valve Seat Insert Correction
1. Remove the carbon from the valve seat insert surface.
2. Use a valve cutter (15°, 45°, and 75° blades) to mini-
mize scratches and other rough areas. this will bring
the contact width back to the standard value.
Remove only the scratches and rough areas. Do not
cut away too much. Take care not to cut away un-
blemished areas of the valve seat surface.
Inlet
mm(in)
2.2 (0.0866)
Standard Limit
Exhaust1.7 (0.0669)
2.5 (0.0984) 2.0 (0.0787)
Page 1562 of 3573
6A Ð 12 ENGINE MECHANICAL
3. Visually inspect both ends of the push rod for exces-
sive wear and damage. The push rod must be re-
placed if these conditions are discovered during
inspection.
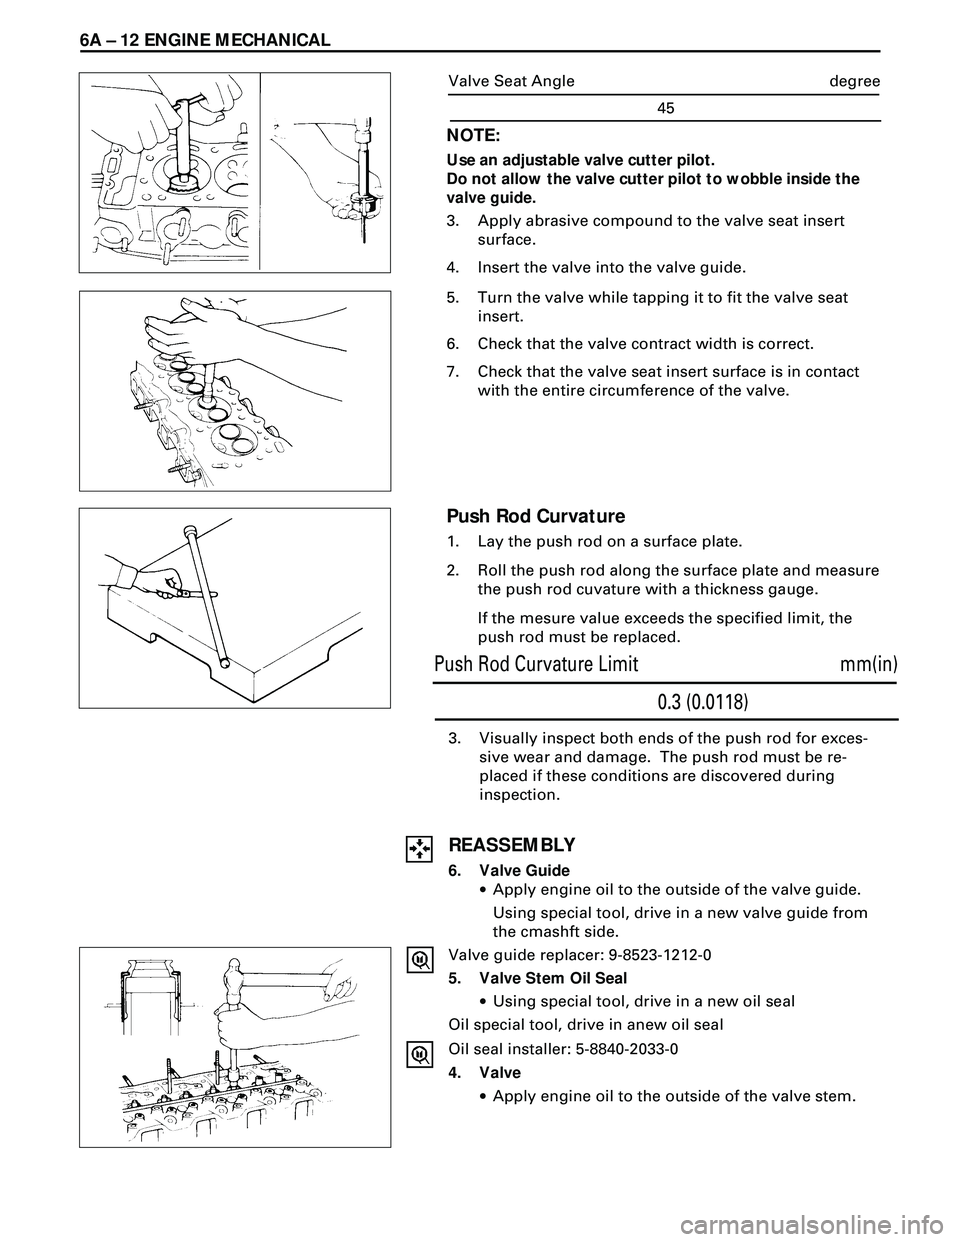
REASSEMBLY
6. Valve Guide
·Apply engine oil to the outside of the valve guide.
Using special tool, drive in a new valve guide from
the cmashft side.
Valve guide replacer: 9-8523-1212-0
5. Valve Stem Oil Seal
·Using special tool, drive in a new oil seal
Oil special tool, drive in anew oil seal
Oil seal installer: 5-8840-2033-0
4. Valve
·Apply engine oil to the outside of the valve stem.
Push Rod Curvature
1. Lay the push rod on a surface plate.
2. Roll the push rod along the surface plate and measure
the push rod cuvature with a thickness gauge.
If the mesure value exceeds the specified limit, the
push rod must be replaced.
NOTE:
Use an adjustable valve cutter pilot.
Do not allow the valve cutter pilot to wobble inside the
valve guide.
3. Apply abrasive compound to the valve seat insert
surface.
4. Insert the valve into the valve guide.
5. Turn the valve while tapping it to fit the valve seat
insert.
6. Check that the valve contract width is correct.
7. Check that the valve seat insert surface is in contact
with the entire circumference of the valve.
mm(in)
0.3 (0.0118) Push Rod Curvature Limit
degree
45 Valve Seat Angle
Page 1563 of 3573
ENGINE MECHANICAL 6A Ð 13
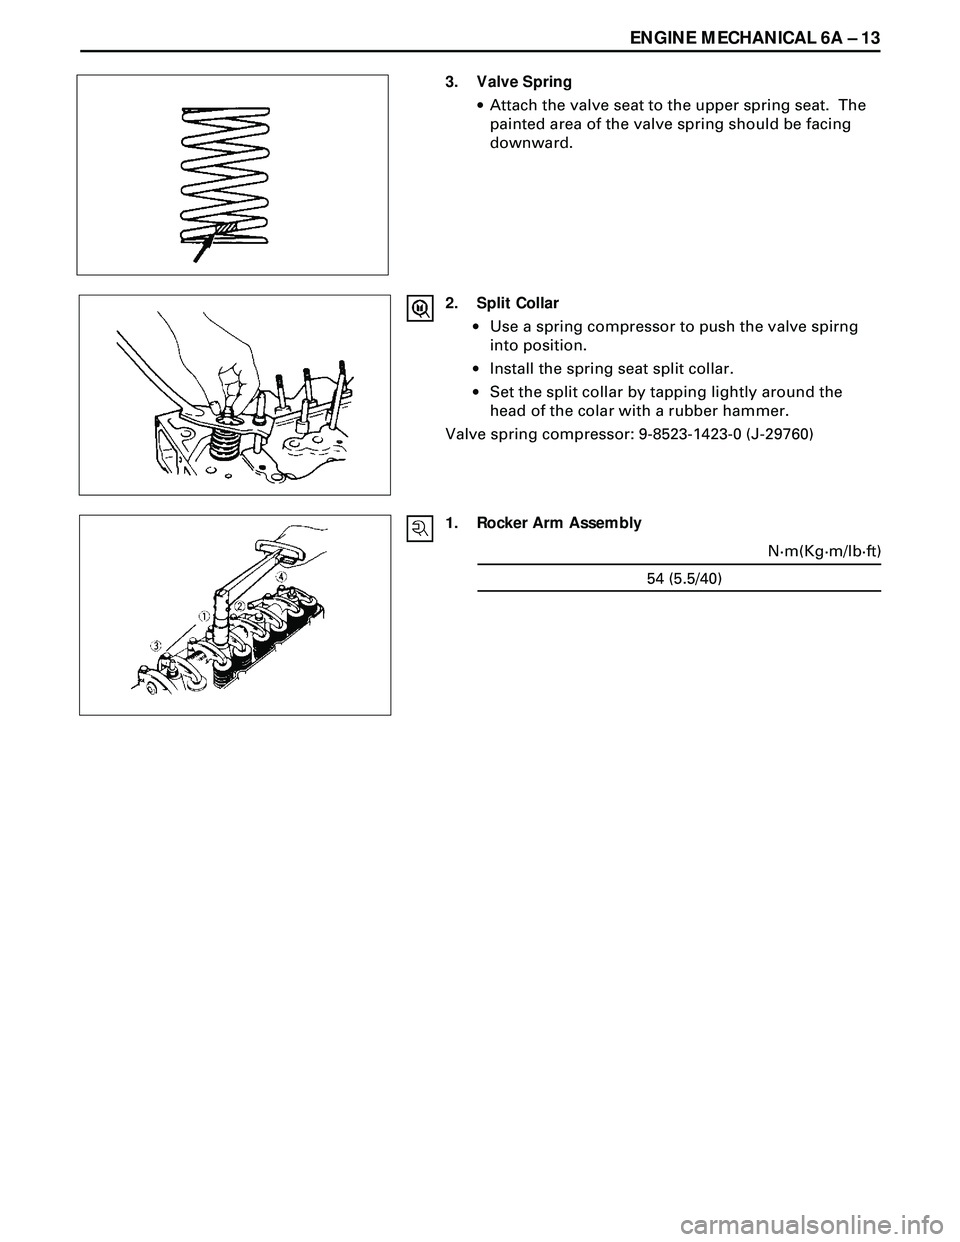
3. Valve Spring
·Attach the valve seat to the upper spring seat. The
painted area of the valve spring should be facing
downward.
2. Split Collar
·Use a spring compressor to push the valve spirng
into position.
·Install the spring seat split collar.
·Set the split collar by tapping lightly around the
head of the colar with a rubber hammer.
Valve spring compressor: 9-8523-1423-0 (J-29760)
1. Rocker Arm Assembly
N·m(Kg·m/lb·ft)
54 (5.5/40)
Page 1564 of 3573
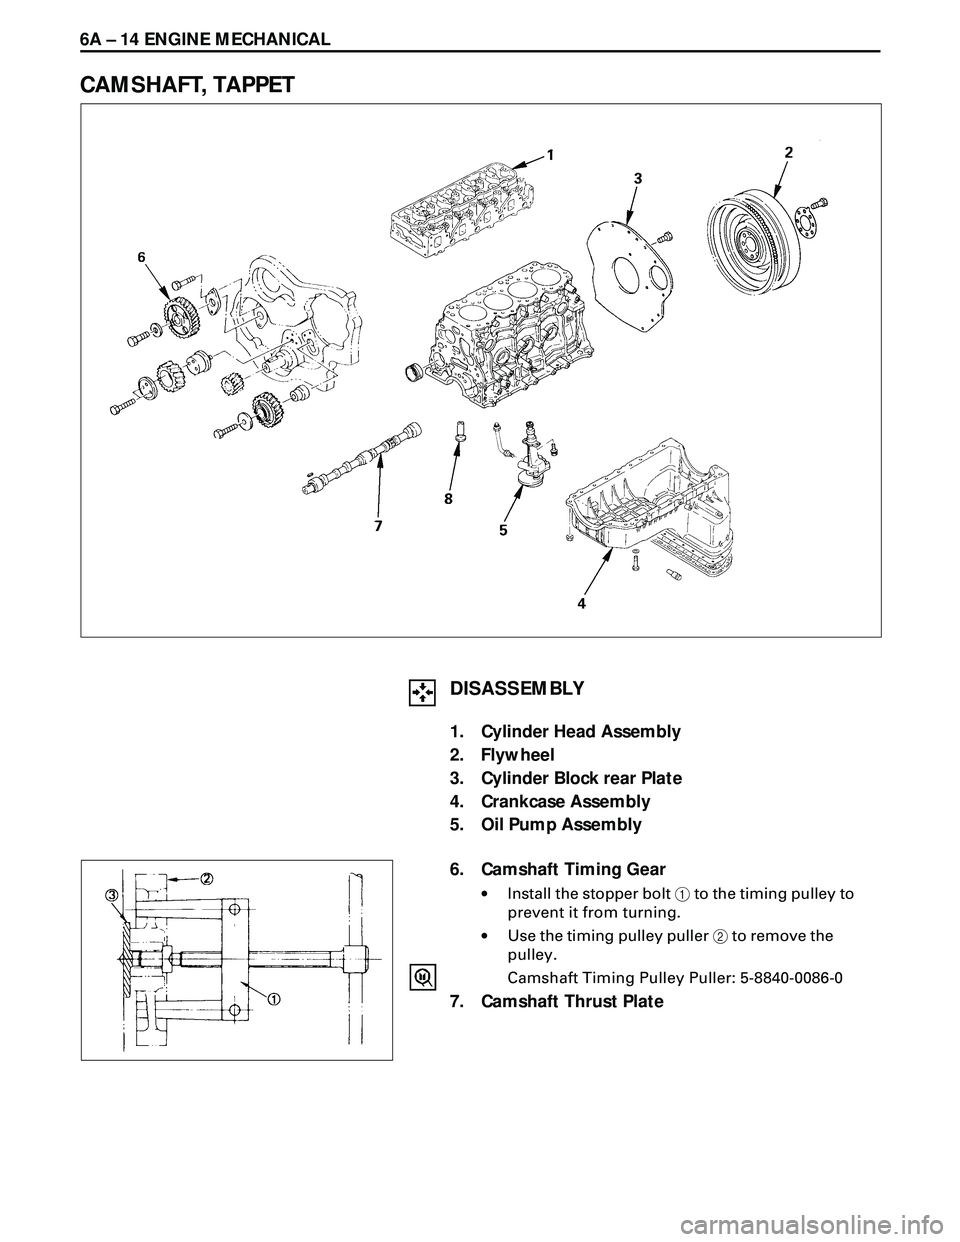
6A Ð 14 ENGINE MECHANICAL
CAMSHAFT, TAPPET
6. Camshaft Timing Gear
·Install the stopper bolt 1 to the timing pulley to
prevent it from turning.
·Use the timing pulley puller 2 to remove the
pulley.
Camshaft Timing Pulley Puller: 5-8840-0086-0
7. Camshaft Thrust Plate
DISASSEMBLY
1. Cylinder Head Assembly
2. Flywheel
3. Cylinder Block rear Plate
4. Crankcase Assembly
5. Oil Pump Assembly
Page 1565 of 3573
ENGINE MECHANICAL 6A Ð 15
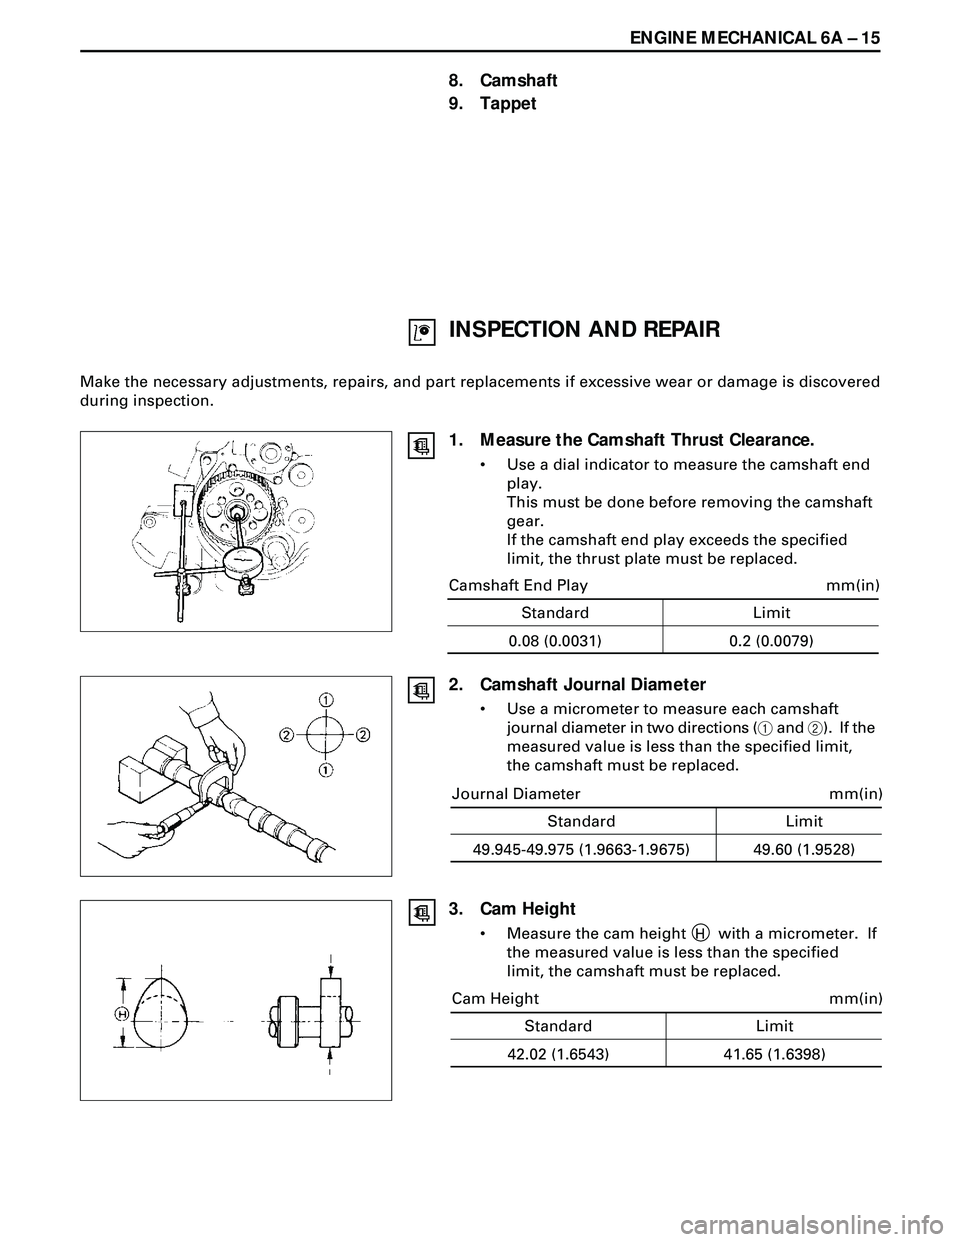
INSPECTION AND REPAIR
Make the necessary adjustments, repairs, and part replacements if excessive wear or damage is discovered
during inspection.
8. Camshaft
9. Tappet
1. Measure the Camshaft Thrust Clearance.
¥ Use a dial indicator to measure the camshaft end
play.
This must be done before removing the camshaft
gear.
If the camshaft end play exceeds the specified
limit, the thrust plate must be replaced.
2. Camshaft Journal Diameter
¥ Use a micrometer to measure each camshaft
journal diameter in two directions (1 and 2). If the
measured value is less than the specified limit,
the camshaft must be replaced.
3. Cam Height
¥ Measure the cam height H with a micrometer. If
the measured value is less than the specified
limit, the camshaft must be replaced.
Standard Limit
mm(in)
49.945-49.975 (1.9663-1.9675) 49.60 (1.9528) Journal Diameter
Standard Limit
mm(in)
42.02 (1.6543) 41.65 (1.6398) Cam Height
Standard Limit
mm(in)
0.08 (0.0031) 0.2 (0.0079) Camshaft End Play