engine JAGUAR X308 1998 2.G Workshop Manual
[x] Cancel search | Manufacturer: JAGUAR, Model Year: 1998, Model line: X308, Model: JAGUAR X308 1998 2.GPages: 2490, PDF Size: 69.81 MB
Page 655 of 2490
I
nstallation
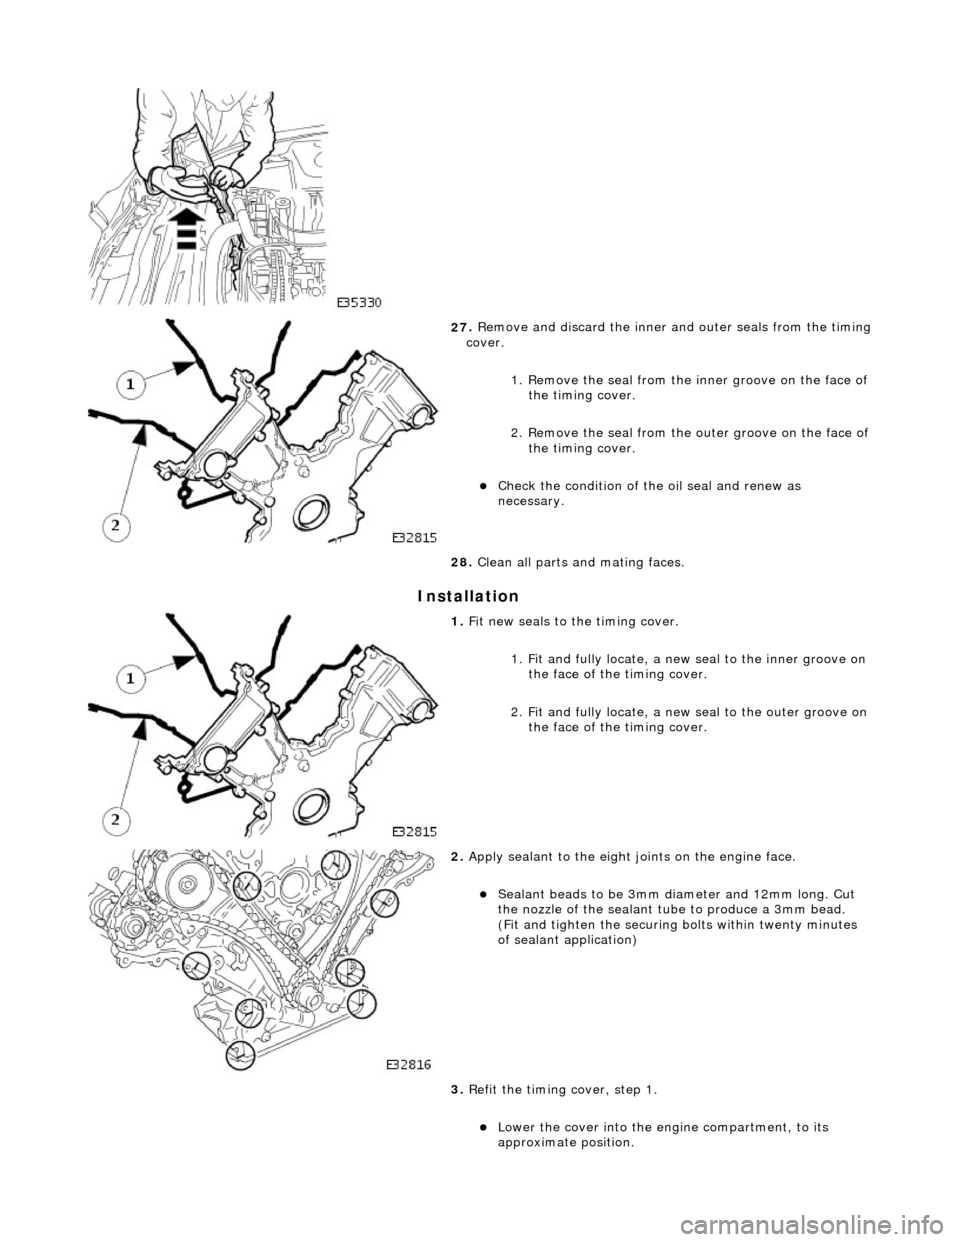
27
.
Remove and discard the inner and outer seals from the timing
cover.
1. Remove the seal from the inner groove on the face of the timing cover.
2. Remove the seal from the outer groove on the face of
the timing cover.
пЃ¬Chec
k the condition of the oil seal and renew as
necessary.
28. Clean all parts and mating faces.
1. Fi
t new seals to the timing cover.
1. Fit and fully locate, a new seal to the inner groove on the face of the timing cover.
2. Fit and fully locate, a new seal to the outer groove on the face of the timing cover.
2. Appl
y sealant to the eight joints on the engine face.
пЃ¬Sealant
beads to be 3mm di
ameter and 12mm long. Cut
the nozzle of the sealant tube to produce a 3mm bead.
(Fit and tighten the securing bolts within twenty minutes
of sealant application)
3. Refit the timing cover, step 1.
пЃ¬Lo
wer the cover into the engine compartment, to its
approximate position.
Page 657 of 2490
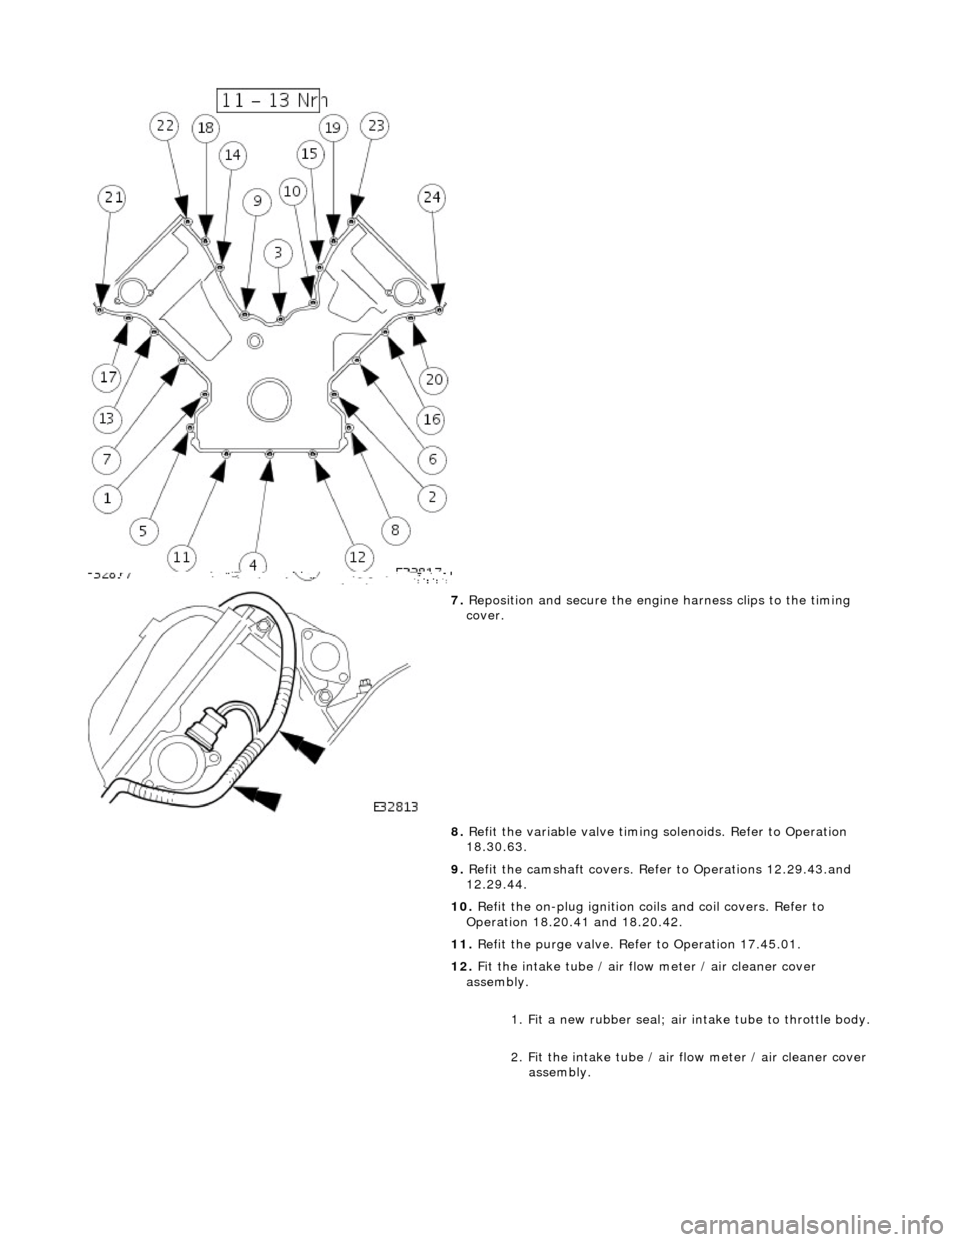
7. Reposition and secure the engine harness clips to the timing
cover.
8. Refit the variable valve timing solenoids. Refer to Operation
18.30.63.
9. Refit the camshaft covers. Refer to Operations 12.29.43.and
12.29.44.
10. Refit the on-plug ignition coils and coil covers. Refer to
Operation 18.20.41 and 18.20.42.
11. Refit the purge valve. Refer to Operation 17.45.01.
12. Fit the intake tube / air flow meter / air cleaner cover
assembly.
1. Fit a new rubber seal; air in take tube to throttle body.
2. Fit the intake tube / air flow meter / air cleaner cover
assembly.
Page 658 of 2490
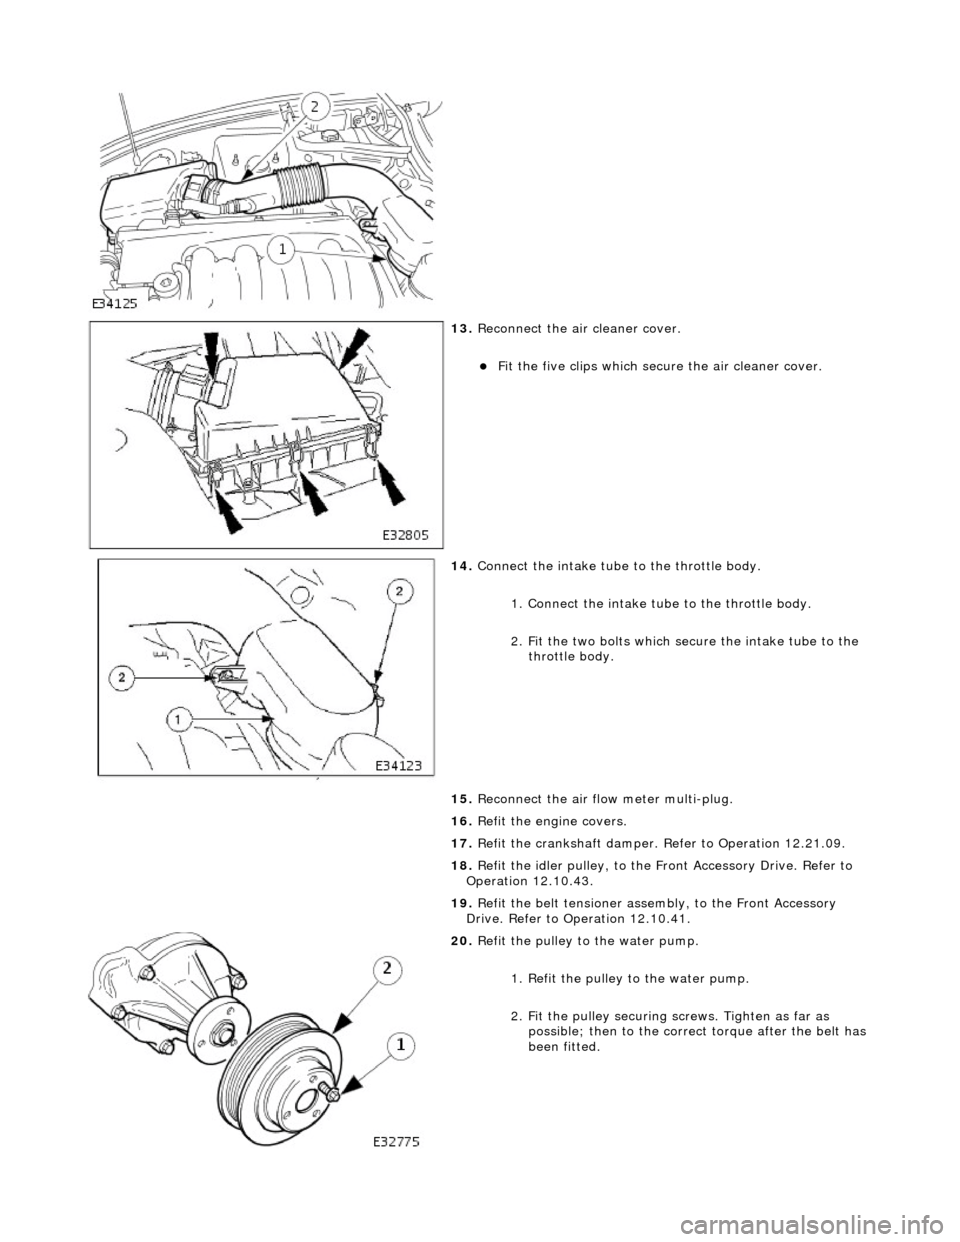
13. Reconnect the air cleaner cover.
пЃ¬Fit the five clips which secu re the air cleaner cover.
14. Connect the intake tube to the throttle body.
1. Connect the intake tube to the throttle body.
2. Fit the two bolts which secure the intake tube to the throttle body.
15. Reconnect the air flow meter multi-plug.
16. Refit the engine covers.
17. Refit the crankshaft damper. Refer to Operation 12.21.09.
18. Refit the idler pulley, to the Front Accessory Drive. Refer to
Operation 12.10.43.
19. Refit the belt tensioner assembly, to the Front Accessory
Drive. Refer to Operation 12.10.41.
20. Refit the pulley to the water pump.
1. Refit the pulley to the water pump.
2. Fit the pulley securing screws. Tighten as far as
possible; then to the correct torque after the belt has
been fitted.
Page 659 of 2490
21
.
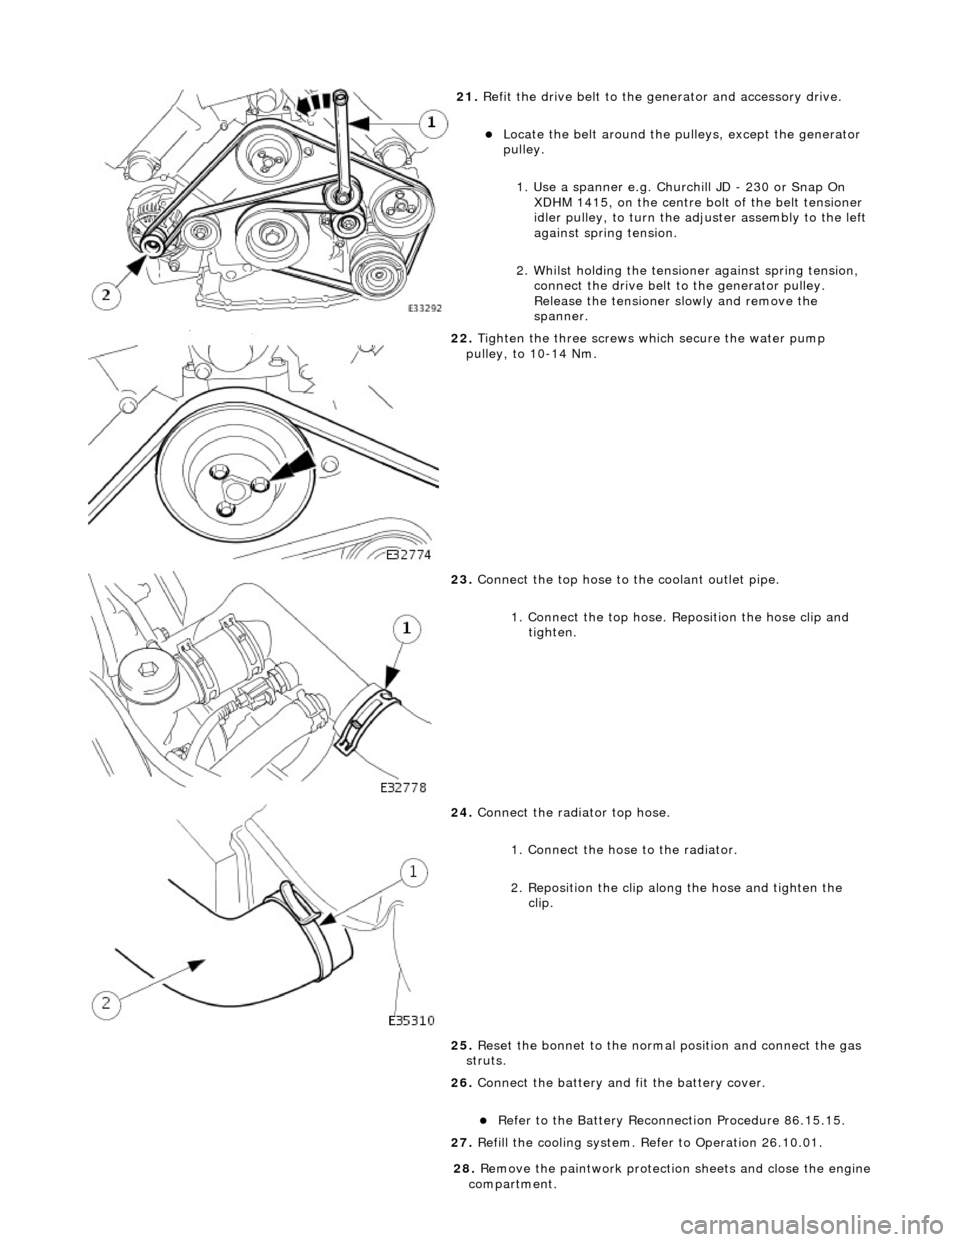
Refit the drive belt to the generator and accessory drive.
пЃ¬Locat
e the belt around the pulleys, except the generator
pulley.
1. Use a spanner e.g. Churchill JD - 230 or Snap On XDHM 1415, on the centre bo lt of the belt tensioner
idler pulley, to turn the adju ster assembly to the left
against spring tension.
2. Whilst holding the tensioner against spring tension, connect the drive belt to the generator pulley.
Release the tensioner sl owly and remove the
spanner.
22
.
Tighten the three screws wh ich secure the water pump
pulley, to 10-14 Nm.
23
.
Connect the top hose to the coolant outlet pipe.
1. Connect the top hose. Reposition the hose clip and tighten.
24
.
Connect the radiator top hose.
1. Connect the hose to the radiator.
2. Reposition the clip along the hose and tighten the clip.
25. Reset the bonnet to the normal position and connect the gas
struts.
26. Connect the battery and fit the battery cover.
пЃ¬Re
fer to the Battery Reconnection Procedure 86.15.15.
27. Refill the cooling system. Refer to Operation 26.10.01.
28
.
Remove the paintwork protection sheets and close the engine
compartment.
Page 660 of 2490
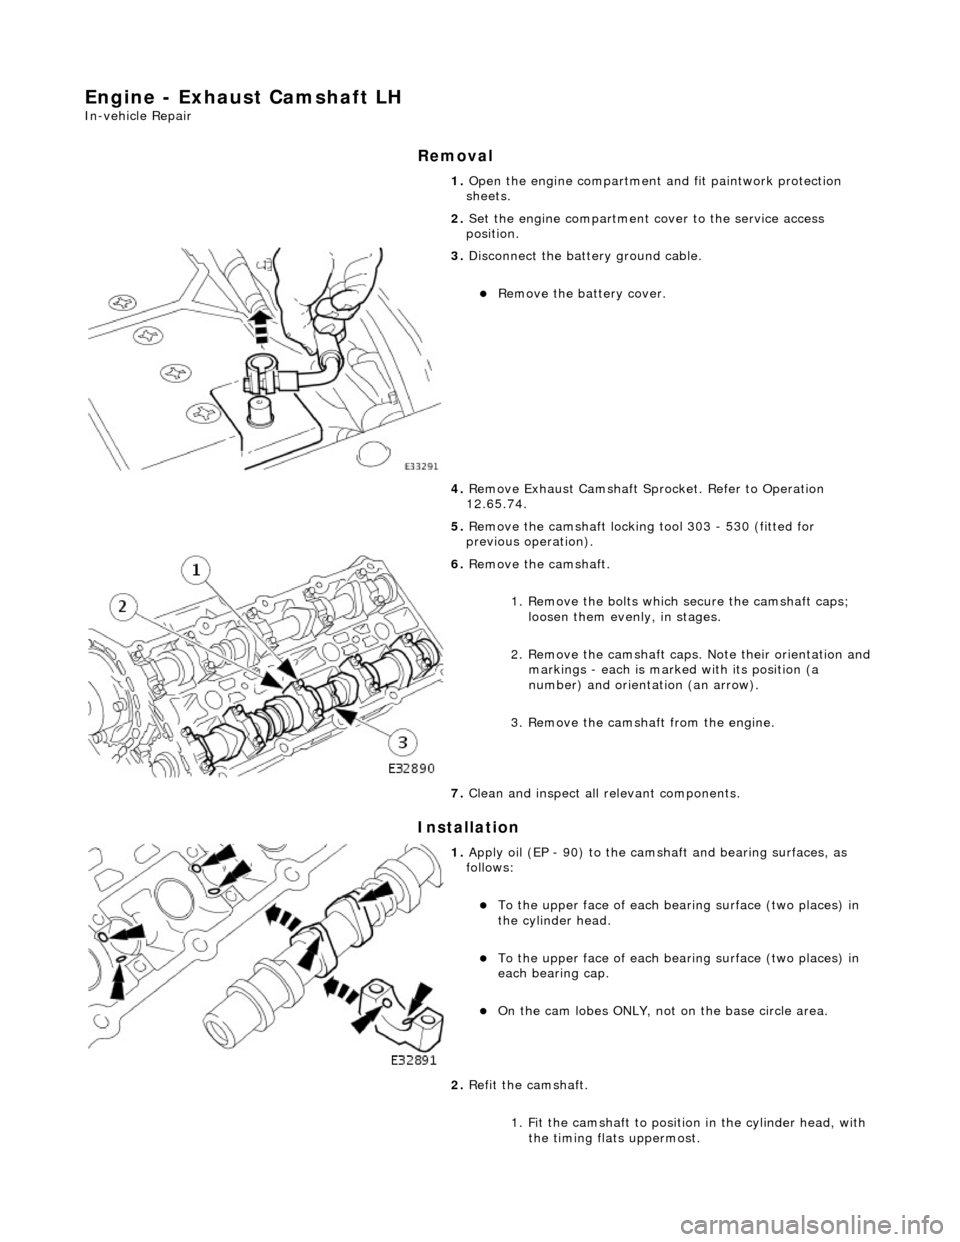
Engine - Exhaust Camshaft LH
In-vehicle Repair
Removal
Installation
1. Open the engine compartment and fit paintwork protection
sheets.
2. Set the engine compartment cover to the service access
position.
3. Disconnect the batt ery ground cable.
пЃ¬Remove the battery cover.
4. Remove Exhaust Camshaft Sp rocket. Refer to Operation
12.65.74.
5. Remove the camshaft locking tool 303 - 530 (fitted for
previous operation).
6. Remove the camshaft.
1. Remove the bolts which secure the camshaft caps; loosen them evenly, in stages.
2. Remove the camshaft caps. Note their orientation and
markings - each is marked with its position (a
number) and orientation (an arrow).
3. Remove the camshaft from the engine.
7. Clean and inspect all relevant components.
1. Apply oil (EP - 90) to the cams haft and bearing surfaces, as
follows:
пЃ¬To the upper face of each be aring surface (two places) in
the cylinder head.
пЃ¬To the upper face of each be aring surface (two places) in
each bearing cap.
пЃ¬On the cam lobes ONLY, not on the base circle area.
2. Refit the camshaft.
1. Fit the camshaft to position in the cylinder head, with the timing flats uppermost.
Page 661 of 2490

2. Fit the camshaft caps to their respective locations (5 to 9 from the front) and in the correct orientation
(arrow to front of engine).
3. Fit and tighten the cap securing bolts. Tighten evenly,
in stages, to 9 - 11 Nm.
3. Fit the camshaft locking tool 303 - 530 (fitted for following
operation) align the camshaft as necessary.
4. Refit Exhaust Camshaft Sprocket . Refer to Operation 12.65.74.
5. With the camshaft (303 - 530) and crankshaft (303 - 531)
setting tools removed, after the previous operation, adjust the
valve clearances on the exhaus t camshaft. refer to Operation
12.29.48.
6. Move the engine compartment co ver from the service position
and connect the gas struts.
7. Remove the paint protection sheets and close the cover.
8. Connect the battery and fit the battery cover.
пЃ¬Refer to the Battery Reconnection Procedure 86.15.15.
Page 662 of 2490
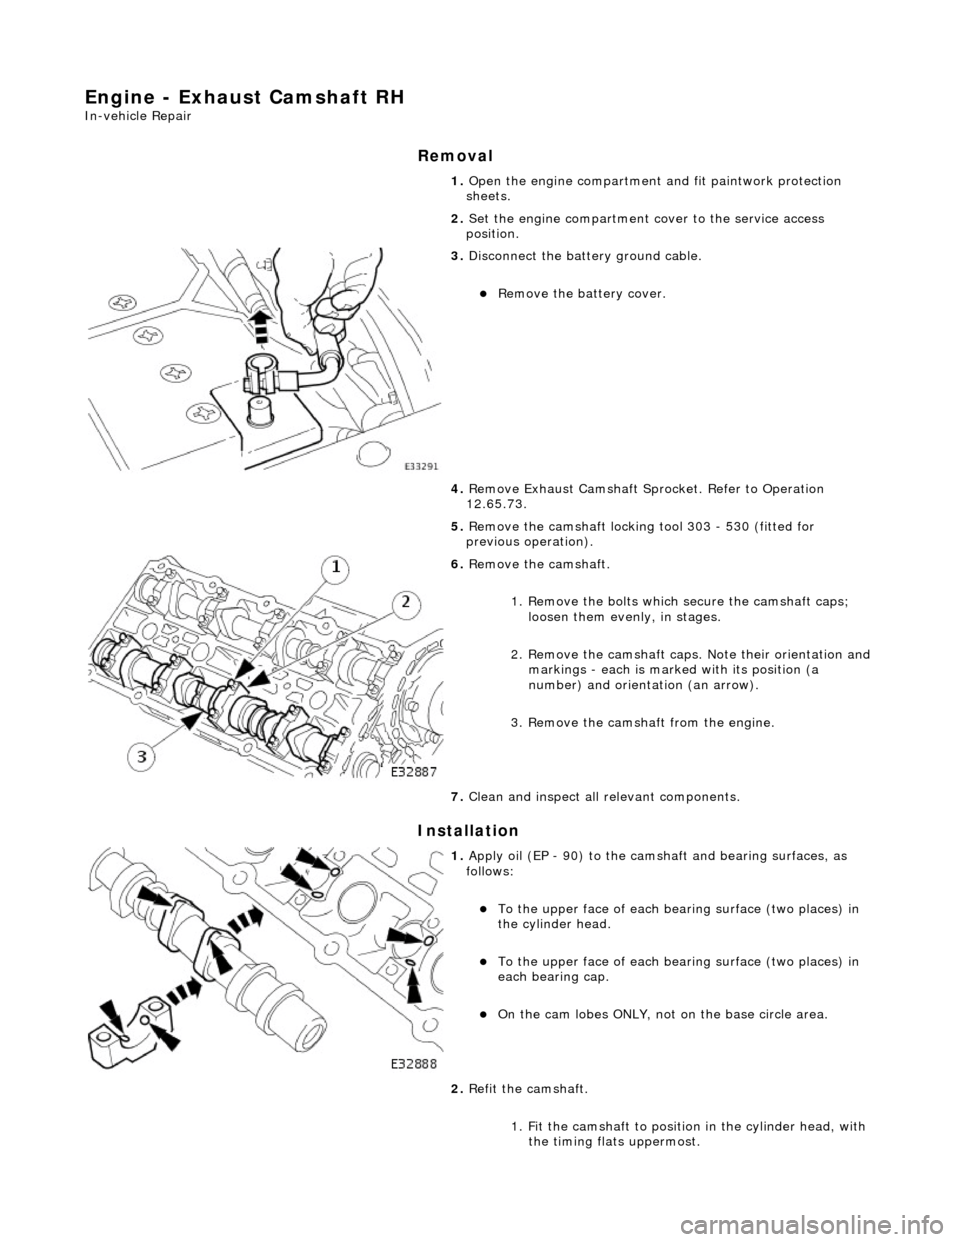
Engine - Exhaust Camshaft RH
In-vehicle Repair
Removal
Installation
1. Open the engine compartment and fit paintwork protection
sheets.
2. Set the engine compartment cover to the service access
position.
3. Disconnect the batt ery ground cable.
пЃ¬Remove the battery cover.
4. Remove Exhaust Camshaft Sp rocket. Refer to Operation
12.65.73.
5. Remove the camshaft locking tool 303 - 530 (fitted for
previous operation).
6. Remove the camshaft.
1. Remove the bolts which secure the camshaft caps; loosen them evenly, in stages.
2. Remove the camshaft caps. Note their orientation and
markings - each is marked with its position (a
number) and orientation (an arrow).
3. Remove the camshaft from the engine.
7. Clean and inspect all relevant components.
1. Apply oil (EP - 90) to the cams haft and bearing surfaces, as
follows:
пЃ¬To the upper face of each be aring surface (two places) in
the cylinder head.
пЃ¬To the upper face of each be aring surface (two places) in
each bearing cap.
пЃ¬On the cam lobes ONLY, not on the base circle area.
2. Refit the camshaft.
1. Fit the camshaft to position in the cylinder head, with the timing flats uppermost.
Page 663 of 2490

2. Fit the camshaft caps to their respective locations (5 to 9 from the front) and in the correct orientation
(arrow to front of engine).
3. Fit and tighten the cap securing bolts. Tighten evenly,
in stages, to 9 - 11 Nm.
3. Fit the camshaft locking tool 303 - 530 (fitted for following
operation) align the camshaft as necessary.
4. Refit Exhaust Camshaft Sprocket . Refer to Operation 12.65.73.
5. With the camshaft (303 - 530) and crankshaft (303 - 531)
setting tools removed, after the previous operation, adjust the
valve clearances on the exhaus t camshaft. refer to Operation
12.29.48.
6. Move the engine compartment co ver from the service position
and connect the gas struts.
7. Remove the paint protection sheets and close the cover.
8. Connect the battery and fit the battery cover.
пЃ¬Refer to the Battery Reconnection Procedure 86.15.15.
Page 664 of 2490
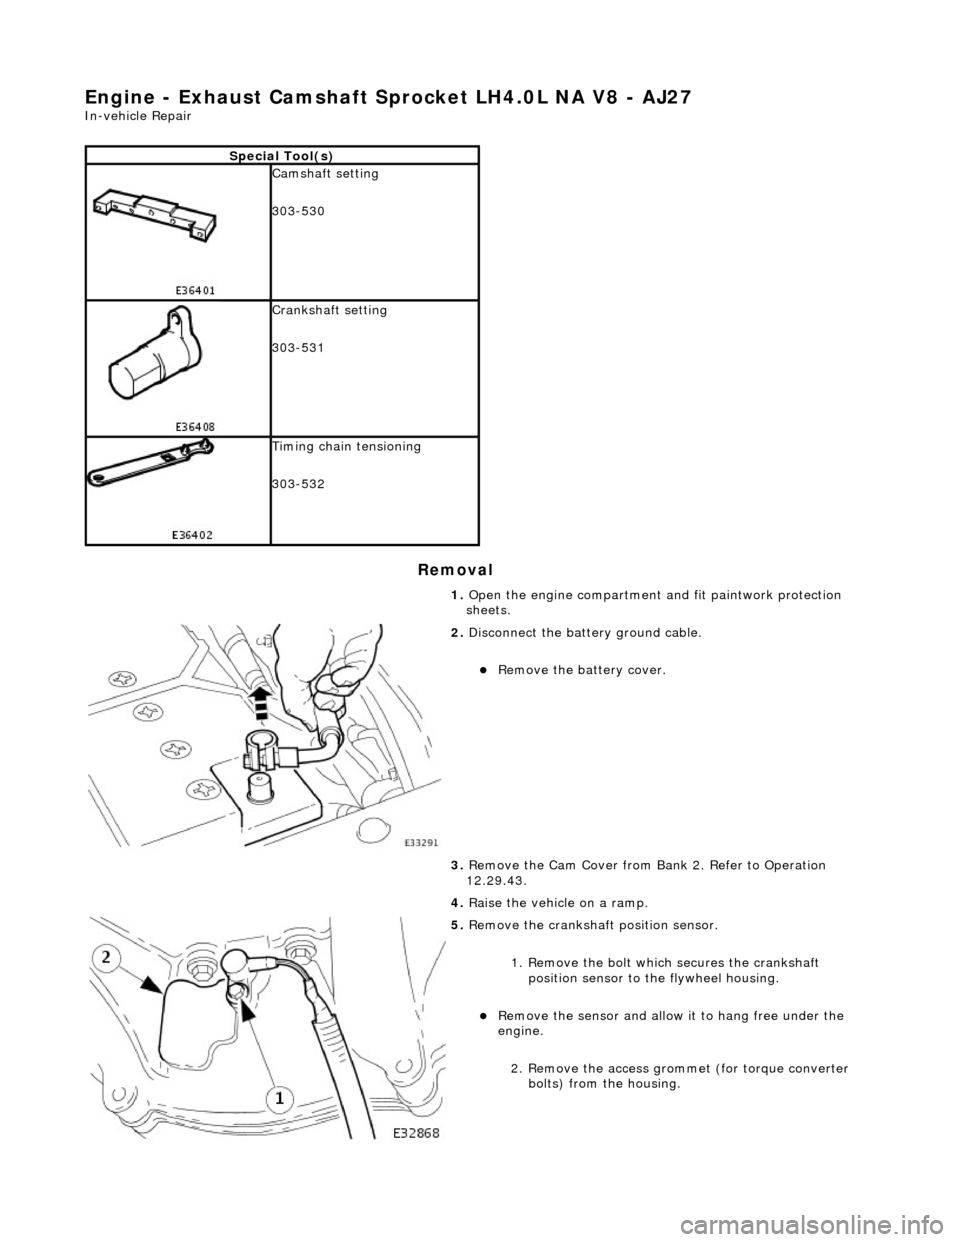
Engine - Exhaust Camshaft Sprocket LH4.0L NA V8 - AJ27
In-vehicle Repair
Removal
Special Tool(s)
Camshaft setting
303-530
Crankshaft setting
303-531
Timing chain tensioning
303-532
1. Open the engine compartment and fit paintwork protection
sheets.
2. Disconnect the batt ery ground cable.
пЃ¬Remove the battery cover.
3. Remove the Cam Cover from Ba nk 2. Refer to Operation
12.29.43.
4. Raise the vehicle on a ramp.
5. Remove the crankshaft position sensor.
1. Remove the bolt which secures the crankshaft position sensor to the flywheel housing.
пЃ¬Remove the sensor and allow it to hang free under the
engine.
2. Remove the access grommet (for torque converter bolts) from the housing.
Page 667 of 2490

4. Remove the tape and steel stri p from the timing cover upper
face. Wipe any residue of tape from the joint face.
5. Remove the camshaft locking tool.
6. Install the Cam Cover to Bank 2. Refer to Operation 12.29.43.
7. Raise the vehicle on the ramp.
8. Remove the crankshaft setting tool 303-531.
9. Install the crankshaft position sensor.
1. Install the sensor to the flywheel housing and fit the
securing bolt. Tighten to 8-12 Nm.
2. Install the access grommet to the housing.
10. Lower the ramp.
11. Remove the paint protection sheets and close the engine
compartment cover.
12. Connect the battery and in stall the battery cover.
пЃ¬Refer to the Battery Reconnection Procedure 86.15.15.