engine JAGUAR X308 1998 2.G Workshop Manual
[x] Cancel search | Manufacturer: JAGUAR, Model Year: 1998, Model line: X308, Model: JAGUAR X308 1998 2.GPages: 2490, PDF Size: 69.81 MB
Page 627 of 2490
E
ngine - Cylinder Head RH
In-ve
hicle Repair
Remova
l
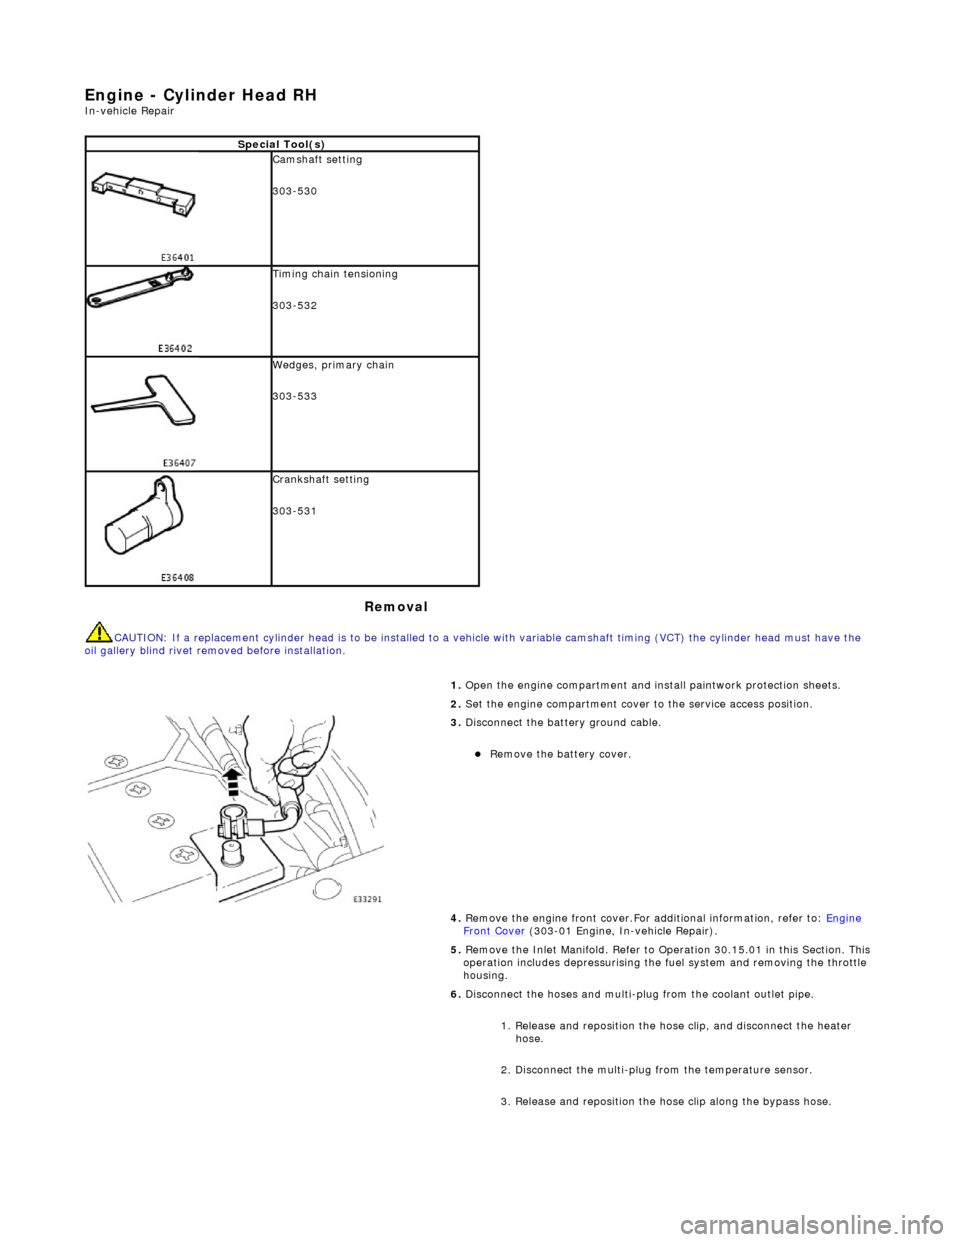
CAU
TION: If a replacement cylinder head is to be installed to a
vehicle with variable camshaft timing (VCT) the cylinder head m ust have the
oil gallery blind rivet removed before installation.
Spe
cial Tool(s)
Cams
haft setting
303-530
Ti
ming chain tensioning
303-532
Wedges, prim
ary chain
303-533
Cr
ankshaft setting
303-531
1.
Open the engine compartment and install paintwork protection sheets.
2. Set the engine compartment cover to the service access position.
3.
Disconnect the battery ground cable.
пЃ¬Re
move the battery cover.
4. Remove the engine front cover.For additional information, refer to: Engine
Front Cover (303-01 Engi
ne, In-vehicle Repair).
5. Remove the Inlet Manifold. Refer to Operation 30.15.01 in this Section. This operation includes depressurising the fuel system and removing the throttle
housing.
6. Disconnect the hoses and multi-plug from the coolant outlet pipe.
1. Release and reposition the hose clip, and disconnect the heater hose.
2. Disconnect the multi-plug from the temperature sensor.
3. Release and reposition the hose clip along the bypass hose.
Page 629 of 2490
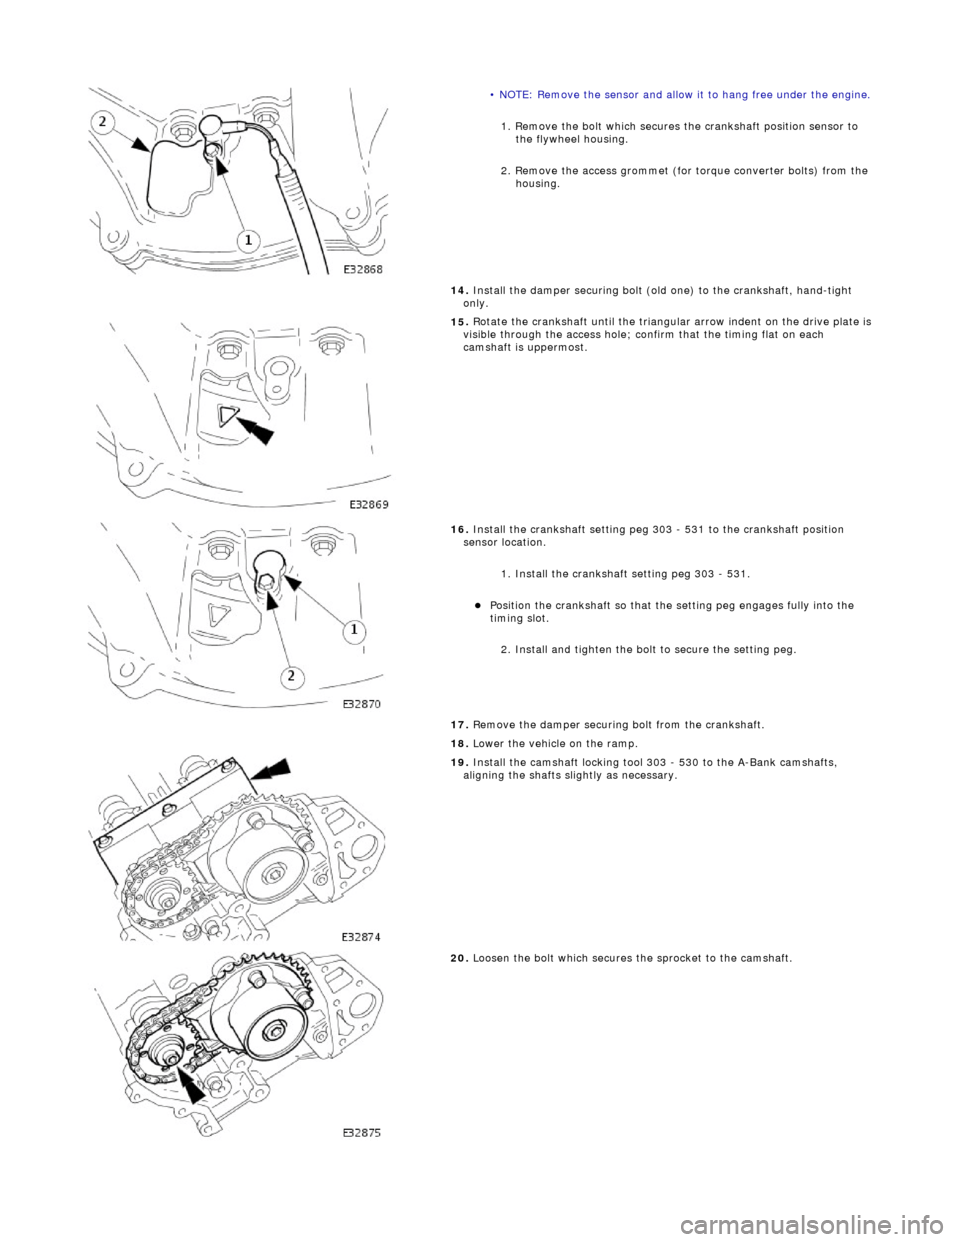
• N
OTE: Remove the sensor and allow it to hang free under the engine.
1
. Remove the bolt which secures the crankshaft position sensor to
the flywheel housing.
2. Remove the access grommet (for torque converter bolts) from the housing.
14. Install the damper securing bolt (old one) to the crankshaft, hand-tight
only.
15
.
Rotate the crankshaft until the triangular arrow indent on the drive plate is
visible through the access hole; confirm that the timing flat on each
camshaft is uppermost.
16
.
Install the crankshaft setting peg 3 03 - 531 to the crankshaft position
sensor location.
1. Install the crankshaft setting peg 303 - 531.
пЃ¬Position
the crankshaft so that the setting peg engages fully into the
timing slot.
2. Install and tighten the bolt to secure the setting peg.
17. Remove the damper securing bolt from the crankshaft.
18. Lower the vehicle on the ramp.
19
.
Install the camshaft locking tool 303 - 530 to the A-Bank camshafts,
aligning the shafts slightly as necessary.
20
.
Loosen the bolt which secures the sprocket to the camshaft.
Page 631 of 2490
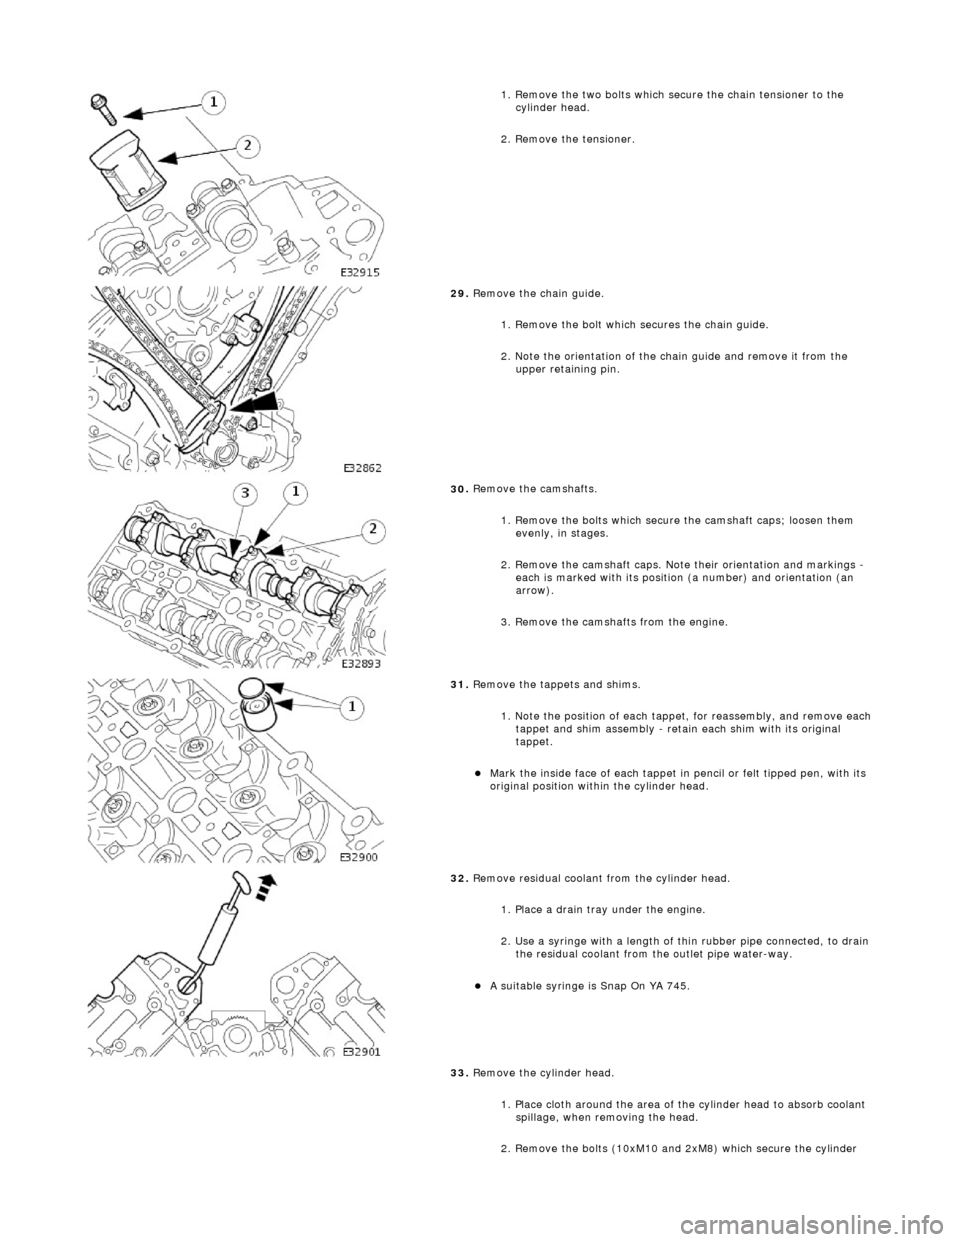
1.
Remove the two bolts which secure the chain tensioner to the
cylinder head.
2. Remove the tensioner.
29
.
Remove the chain guide.
1. Remove the bolt which secures the chain guide.
2. Note the orientation of the chain guide and remove it from the upper retaining pin.
30
.
Remove the camshafts.
1. Remove the bolts which secure the camshaft caps; loosen them evenly, in stages.
2. Remove the camshaft caps. Note their orientation and markings -
each is marked with its position (a number) and orientation (an
arrow).
3. Remove the camshafts from the engine.
31
.
Remove the tappets and shims.
1. Note the position of each tappet, for reassembly, and remove each
tappet and shim assembly - retain each shim with its original
tappet.
пЃ¬Mark
the inside face of each tappet in pencil or felt tipped pen, with its
original position within the cylinder head.
32
.
Remove residual coolant from the cylinder head.
1. Place a drain tray under the engine.
2. Use a syringe with a length of thin rubber pipe connected, to drain the residual coolant from the outlet pipe water-way.
пЃ¬A s
uitable syringe is Snap On YA 745.
33. Remove the cylinder head.
1. Place cloth around the area of th e cylinder head to absorb coolant
spillage, when removing the head.
2. Remove the bolts (10xM10 and 2xM8) which secure the cylinder
Page 632 of 2490

Installation
hea
d.
3. With assistance, remove the cylinder head.
34 . R
emove the cylinder head gasket.
1. Note how the gasket is installed and remove it.
2. Remove and discard the cloth, placed previously to absorb coolant spillage.
пЃ¬Wipe up any l e
aked coolant.
35. Remove the coolant drain tray from under the engine.
36. Remove and discard the gasket from the downpipe catalyst.
пЃ¬Cle
an the gasket faces of the catalyst and the exhaust manifold.
37. Clean cylinder head and cylinder block gasket faces.
пЃ¬Ensu
re that all threaded holes in the cylinder block face are clean and
free from oil.
пЃ¬Cl ean and
inspect the cylinder head bolts. They may be re-used on two
occasions. When re- used, each bolt head should be marked with one
dot from an automatic centre punch.
38. Clean and inspect all relevant components and mating faces.
1. CAUTIONS: If a replacement cylinder head is to be installed to a vehicle with VCT
the cylinder head must have the oil gallery blind rivet removed before
installation.
Make sure that all debris is removed from the cylinder head and cylinder
head oil gallery.
Vehicles fitted with VCT: Remove the blind rivet from the VCT oil gallary. • NOTE: The centre bore of the blind rivet is 6 mm diameter.
Page 633 of 2490

пЃ¬I
dentify the VCT oil supply gallery and the 8 mm blind rivet.
пЃ¬U
sing a suitable 3 mm punch release the centre of the blind rivet until
it is released from the outer part of the blind rivet.
пЃ¬U
sing a suitable extraction tool, remo
ve the remaining part of the blind
rivet.
2. Clean the component mating faces.
3.
Check cylinder head face for distortio
n, across the center and from corner
to corner.
4. For cylinder head face distortion data, refer to specifications.For additional
information, refer to: Specifications
(303
-00 Engine System - General
Information, Specifications).
5.
NOTE: For
cylinder head with
distortion above the
maximum allowance,
the cylinder head
material must be
measured.
Measure the
cylinder head
material.
пЃ¬Che
ck
measurement
from the
centre of the
exhaust
dowel to the
cylinder head
face as
shown.
пЃ¬If the
measurement
is less than
51.88 mm
the cylinder
head requires
replacement.
6.
Install a new gasket to the downpipe catalyst flange.
7. Install and align a new cylinder head gasket to the cylinder block face.
Page 637 of 2490

пЃ¬To th
e upper face of each bearing surface (two places) in the cylinder
head.
пЃ¬To th
e upper face of each bearing surface (two places) in each bearing
cap.
пЃ¬On
the cam lobes ONLY, not on the base circle area.
17
.
Install the camshafts.
1. Install the camshafts to position in the cylinder head, with the timing flats uppermost.
2. Install the camshaft caps to their respective locations (inlet 0 to 4 and exhaust 5 to 9 from the front) and in the correct orientation
(arrow to front of engine).
3. Install and tighten the cap securing bolts. Tighten evenly, in stages, to 10 Nm.
18. Install the camshaft locking tool 303 - 530, align the camshafts as
necessary.
19
.
Install the chain guide.
• NOTE: The chain guide must be installed so that the slotted hole is
towards the top, and the raised shoulder to the cylinder block. 1. Install the chain guide to the block and locate it onto the upper retaining pin.
2. Install the retaining bolt and tighten it to 12 Nm.
20
.
Push the secondary chain tensioner piston into the body to provide
clearance for installing the chain.
1. Insert a thin rigid wire through the hole in the end of the tensioner
piston to displace the ball from the non-return valve seat.
2. With the wire in position, press the piston fully into the tensioner body.
пЃ¬Re
move the wire.
21
.
Install the secondary chain tensioner to the engine.
1. Fully seat the tensioner to the cylinder head.
2. Install the two bolts which secure the tensioner and tighten to 12 Nm.
22. Install the VVT unit to the engine.
пЃ¬A
ssemble the VVT unit, the exhaust camshaft sprocket and the
Page 638 of 2490
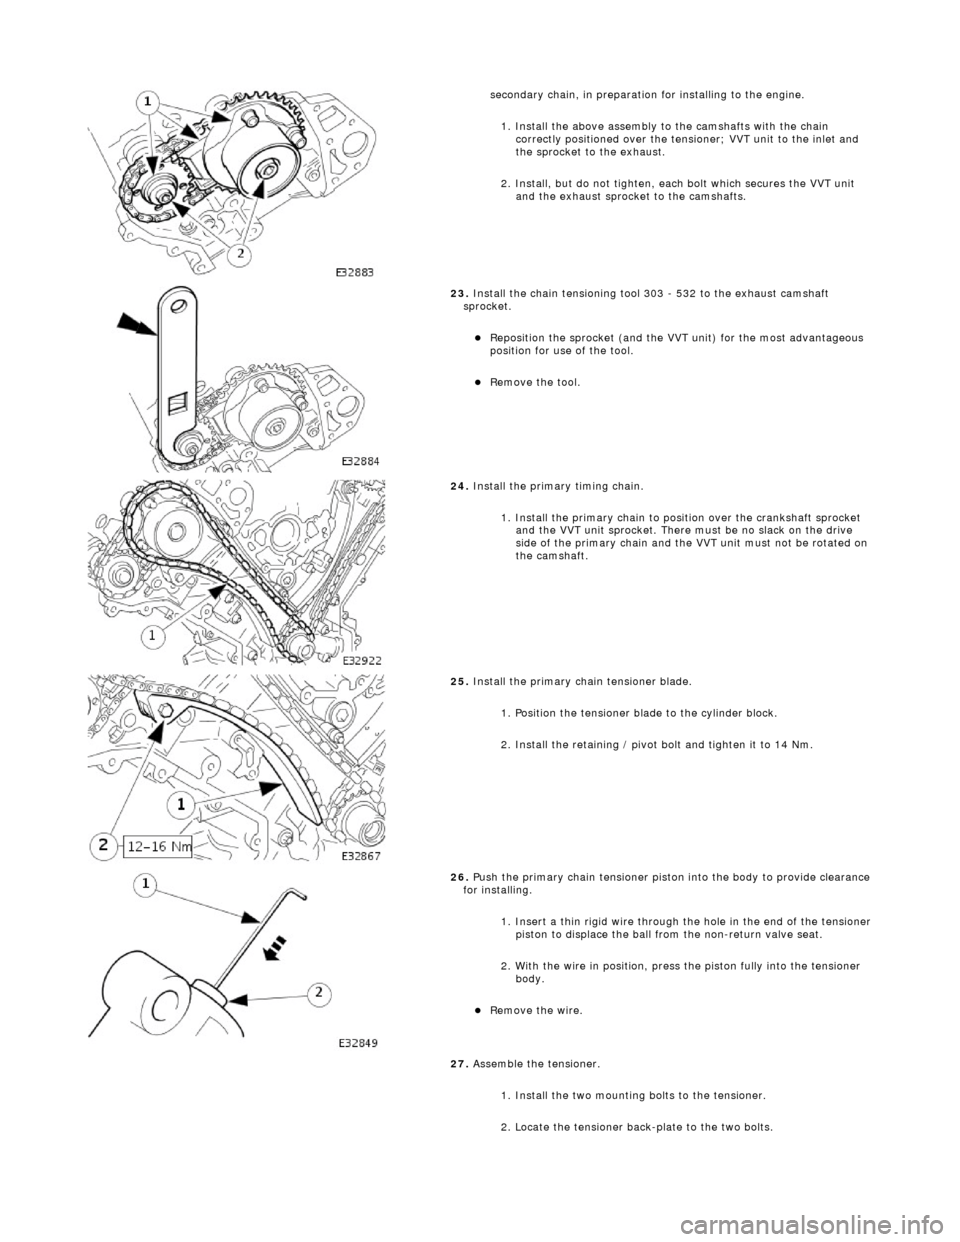
se
condary chain, in preparation for installing to the engine.
1. Install the above assembly to the camshafts with the chain correctly positioned over the tensioner; VVT unit to the inlet and
the sprocket to the exhaust.
2. Install, but do not tighten, each bolt which secures the VVT unit and the exhaust sprocket to the camshafts.
23 .
Install the chain t
ensioning tool 303 - 532 to the exhaust camshaft
sprocket.
пЃ¬Re p
osition the sprocket (and the VVT unit) for the most advantageous
position for use of the tool.
пЃ¬Re
move the tool.
24 . Install the
primary timing chain.
1. Install the primary chain to position over the crankshaft sprocket and the VVT unit sprocket. There mu st be no slack on the drive
side of the primary chain and the VVT unit must not be rotated on
the camshaft.
25 . Install the pri
mary chain tensioner blade.
1. Position the tensioner blade to the cylinder block.
2. Install the retaining / pivot bolt and tighten it to 14 Nm.
26 . P
ush the primary chain tensioner piston into the body to provide clearance
for installing.
1. Insert a thin rigid wire through the hole in the end of the tensioner
piston to displace the ball from the non-return valve seat.
2. With the wire in position, press the piston fully into the tensioner body.
пЃ¬Rem
ove the wire.
27. Assemble the tensioner.
1. Install the two mounting bolts to the tensioner.
2. Locate the tensioner back-plate to the two bolts.
Page 641 of 2490
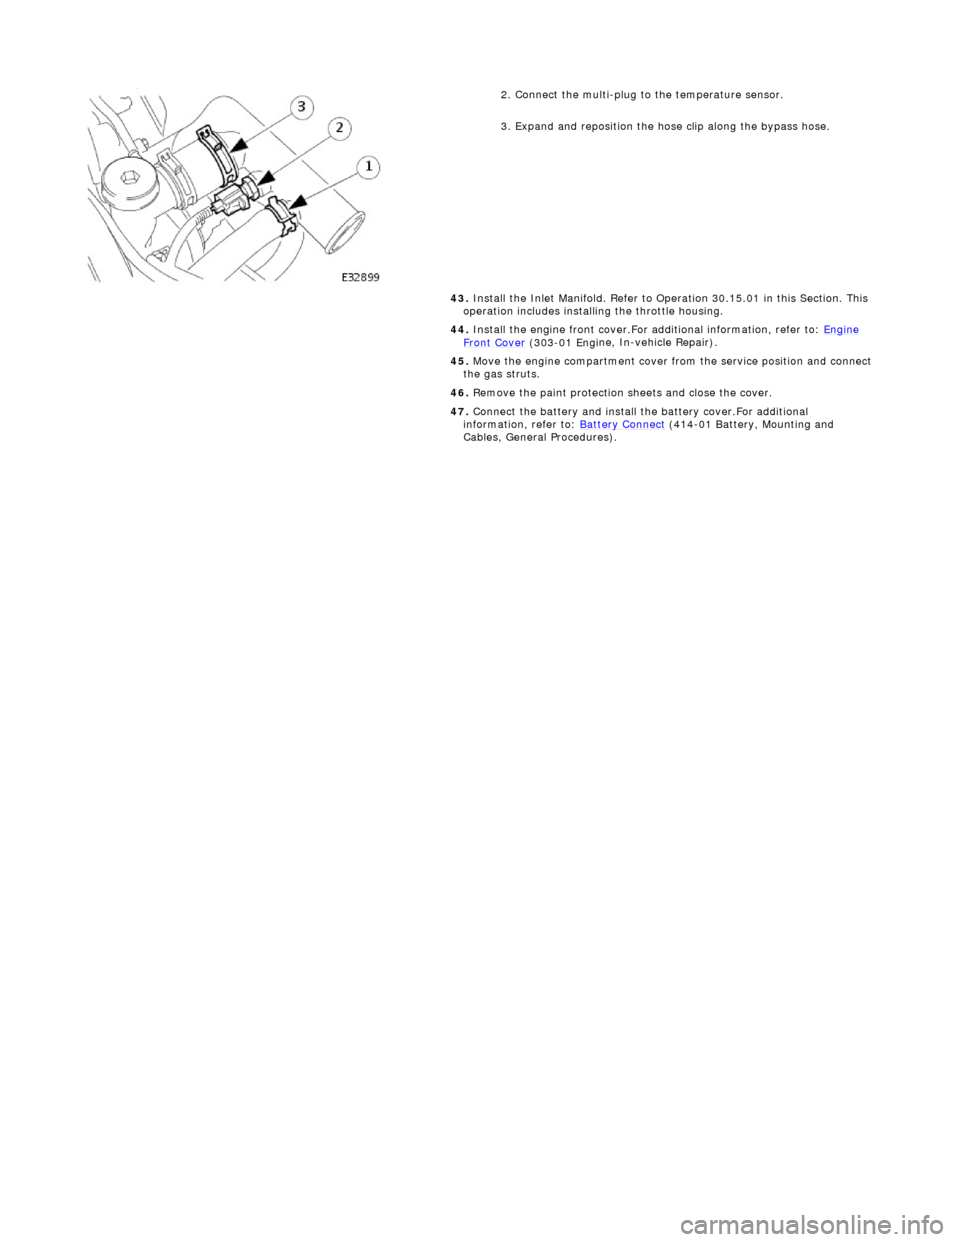
2.
Connect the multi-plug to the temperature sensor.
3. Expand and reposition the hose clip along the bypass hose.
43. Install the Inlet Manifold. Refer to Operation 30.15.01 in this Section. This
operation includes installing the throttle housing.
44. Install the engine front cover.For additional information, refer to: Engine
Front Cover (303-01 Engi
ne, In-vehicle Repair).
45. Move the engine compartment cover from the service position and connect
the gas struts.
46. Remove the paint protection sheets and close the cover.
47. Connect the battery and install th e battery cover.For additional
information, refer to: Battery Connect
(414
-01 Battery, Mounting and
Cables, General Procedures).
Page 642 of 2490
Engine - Engine Front Cover
In-vehic
le Repair
Remov
a
l
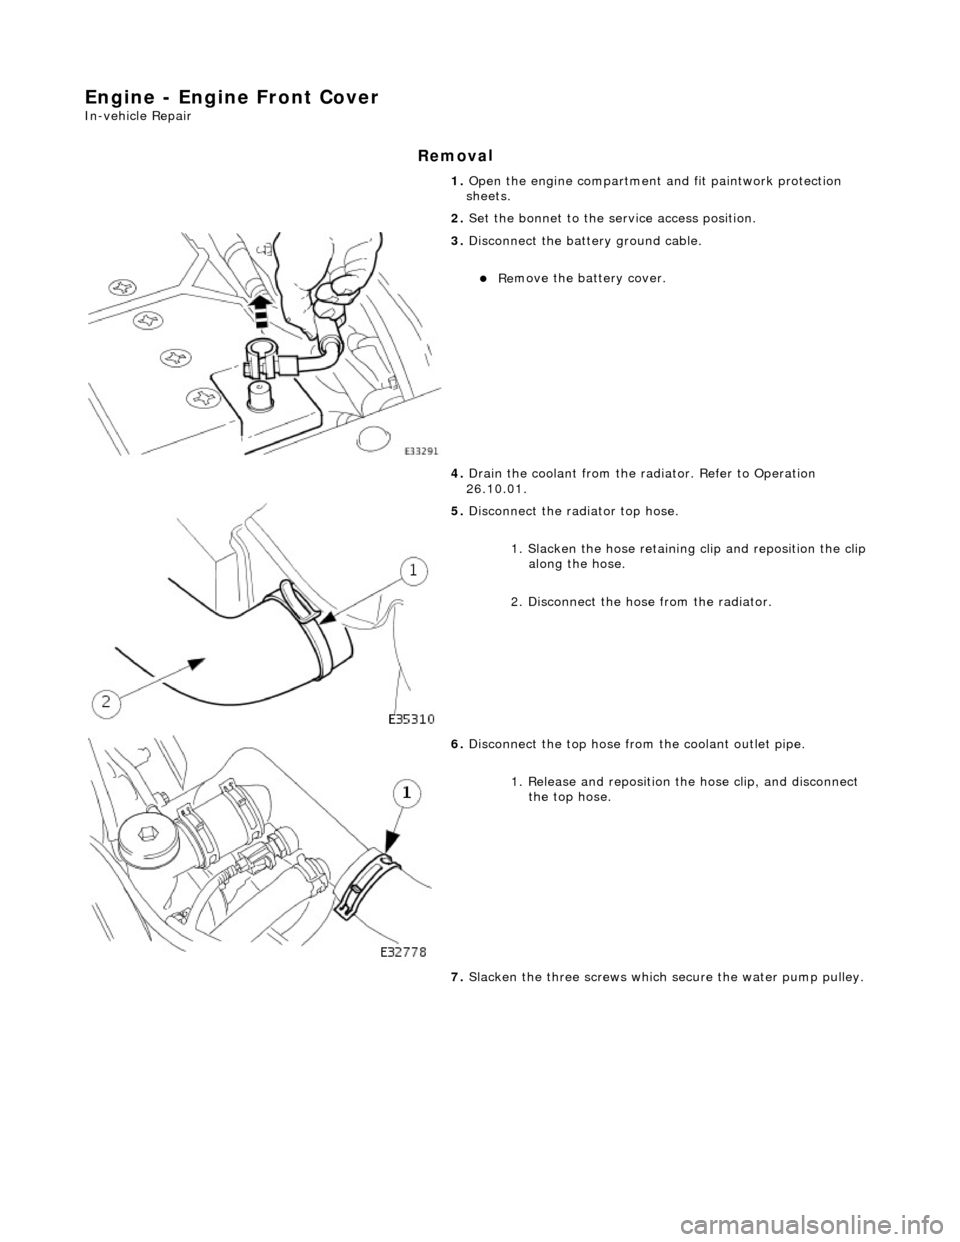
1.
Op
en the engine compartment and fit paintwork protection
sheets.
2. Set the bonnet to the service access position.
3. Disc
onnect the batt
ery ground cable.
пЃ¬Re
move the battery cover.
4. Drain the coolant from the radiator. Refer to Operation
26.10.01.
5. Disc onne
ct the radiator top hose.
1. Slacken the hose retaining clip and reposition the clip
along the hose.
2. Disconnect the hose from the radiator.
6. Disc
onnect the top hose from the coolant outlet pipe.
1. Release and reposition th e hose clip, and disconnect
the top hose.
7. Slacken the three screws which secure the water pump pulley.
Page 643 of 2490
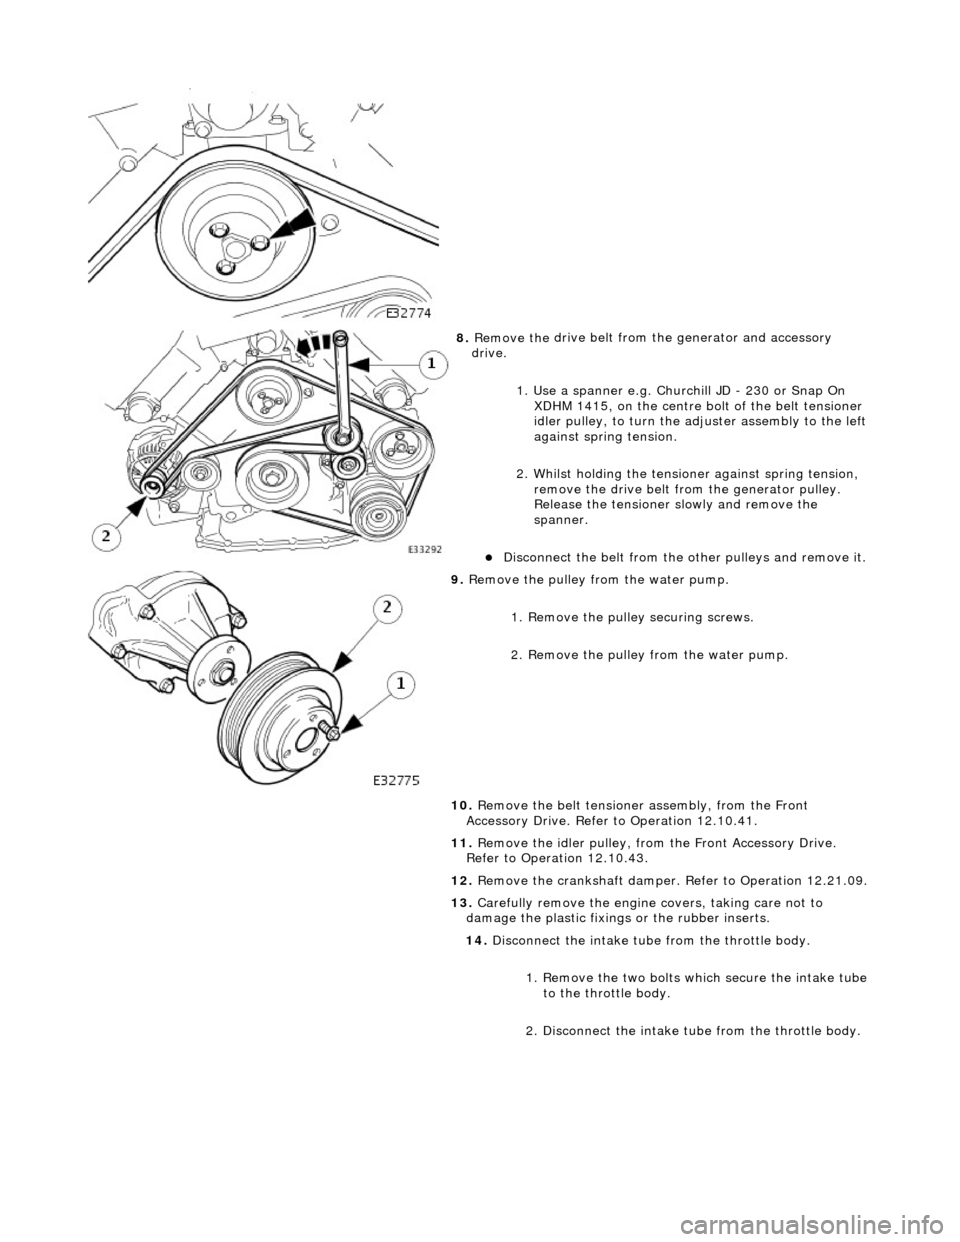
8. Remove the
drive belt from
the generator and accessory
drive.
1. Use a spanner e.g. Churchill JD - 230 or Snap On XDHM 1415, on the centre bo lt of the belt tensioner
idler pulley, to turn the adju ster assembly to the left
against spring tension.
2. Whilst holding the tensioner against spring tension, remove the drive belt from the generator pulley.
Release the tensioner sl owly and remove the
spanner.
пЃ¬D
isconnect the belt from the
other pulleys and remove it.
9. Re
move the pulley from the water pump.
1. Remove the pulley securing screws.
2. Remove the pulley from the water pump.
10. Remove the belt tensione r assembly, from the Front
Accessory Drive. Refer to Operation 12.10.41.
11. Remove the idler pulley, from the Front Accessory Drive.
Refer to Operation 12.10.43.
12. Remove the crankshaft damper. Refer to Operation 12.21.09.
13. Carefully remove the engine covers, taking care not to
damage the plasti c fixings or the rubber inserts.
14. Disconnect the intake tube from the throttle body.
1. Remove the two bolts which secure the intake tube to the throttle body.
2. Disconnect the intake tube from the throttle body.