Radiator JAGUAR X308 1998 2.G User Guide
[x] Cancel search | Manufacturer: JAGUAR, Model Year: 1998, Model line: X308, Model: JAGUAR X308 1998 2.GPages: 2490, PDF Size: 69.81 MB
Page 739 of 2490
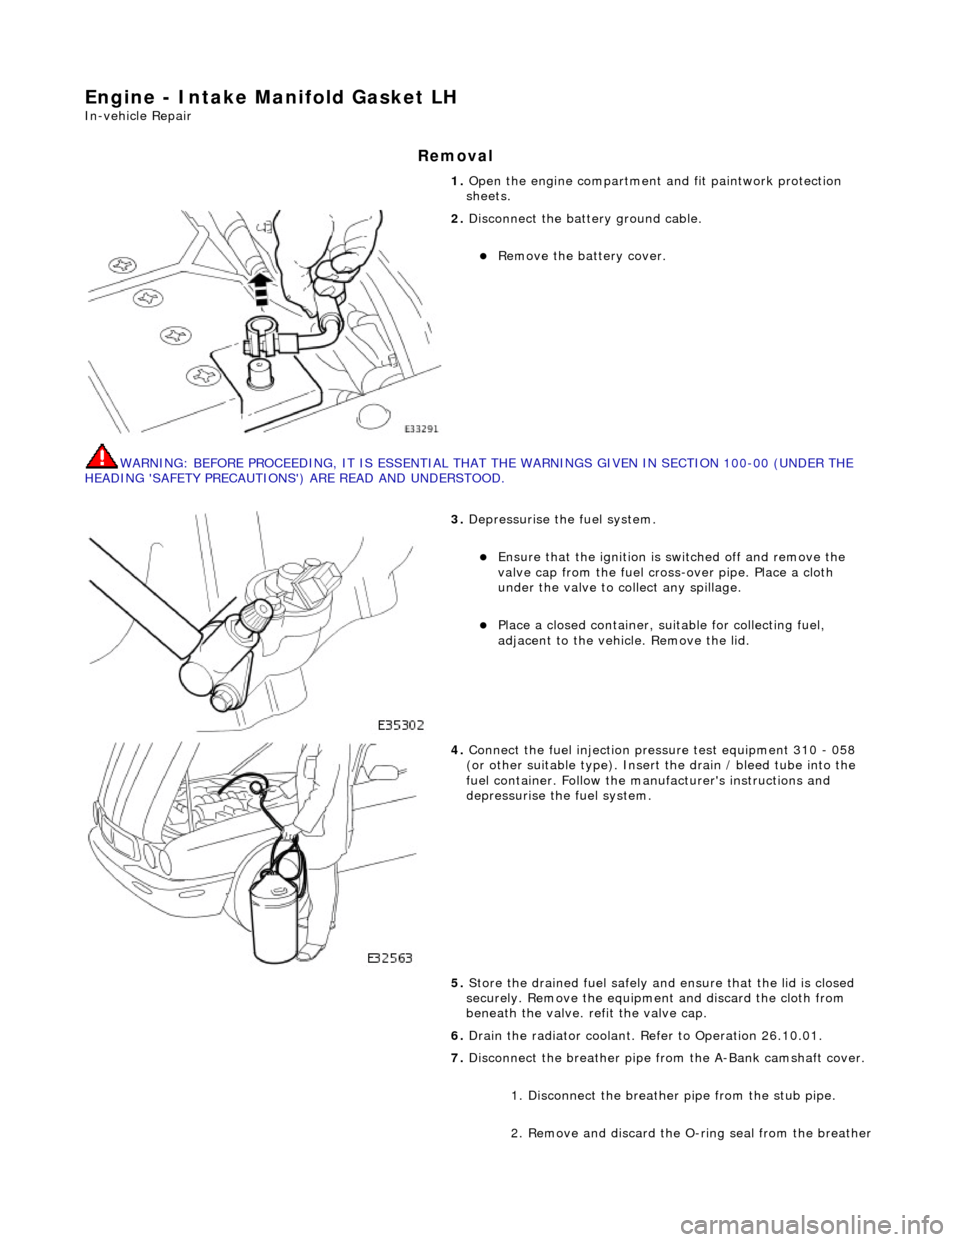
Engine - Intake Manifold Gasket LH
In-vehicle Repair
Removal
WARNING: BEFORE PROCEEDING, IT IS ESSENTIAL THAT THE WARNINGS GIVEN IN SECTION 100-00 (UNDER THE
HEADING 'SAFETY PRECAUTIONS') ARE READ AND UNDERSTOOD. 1.
Open the engine compartment and fit paintwork protection
sheets.
2. Disconnect the batt ery ground cable.
Remove the battery cover.
3. Depressurise the fuel system.
Ensure that the ignition is switched off and remove the
valve cap from the fuel cross-over pipe. Place a cloth
under the valve to collect any spillage.
Place a closed container, su itable for collecting fuel,
adjacent to the vehicle. Remove the lid.
4. Connect the fuel injection pres sure test equipment 310 - 058
(or other suitable type). Insert the drain / bleed tube into the
fuel container. Follow the ma nufacturer's instructions and
depressurise the fuel system.
5. Store the drained fuel safely and ensure that the lid is closed
securely. Remove the equipmen t and discard the cloth from
beneath the valve. refit the valve cap.
6. Drain the radiator coolant. Refer to Operation 26.10.01.
7. Disconnect the breather pipe fro m the A-Bank camshaft cover.
1. Disconnect the breather pipe from the stub pipe.
2. Remove and discard the O-ring seal from the breather
Page 744 of 2490
Engine - Intake Manifold Gasket RH
In-vehicle Repair
1. Open the engine compartment and fit paintwork protection
sheets.
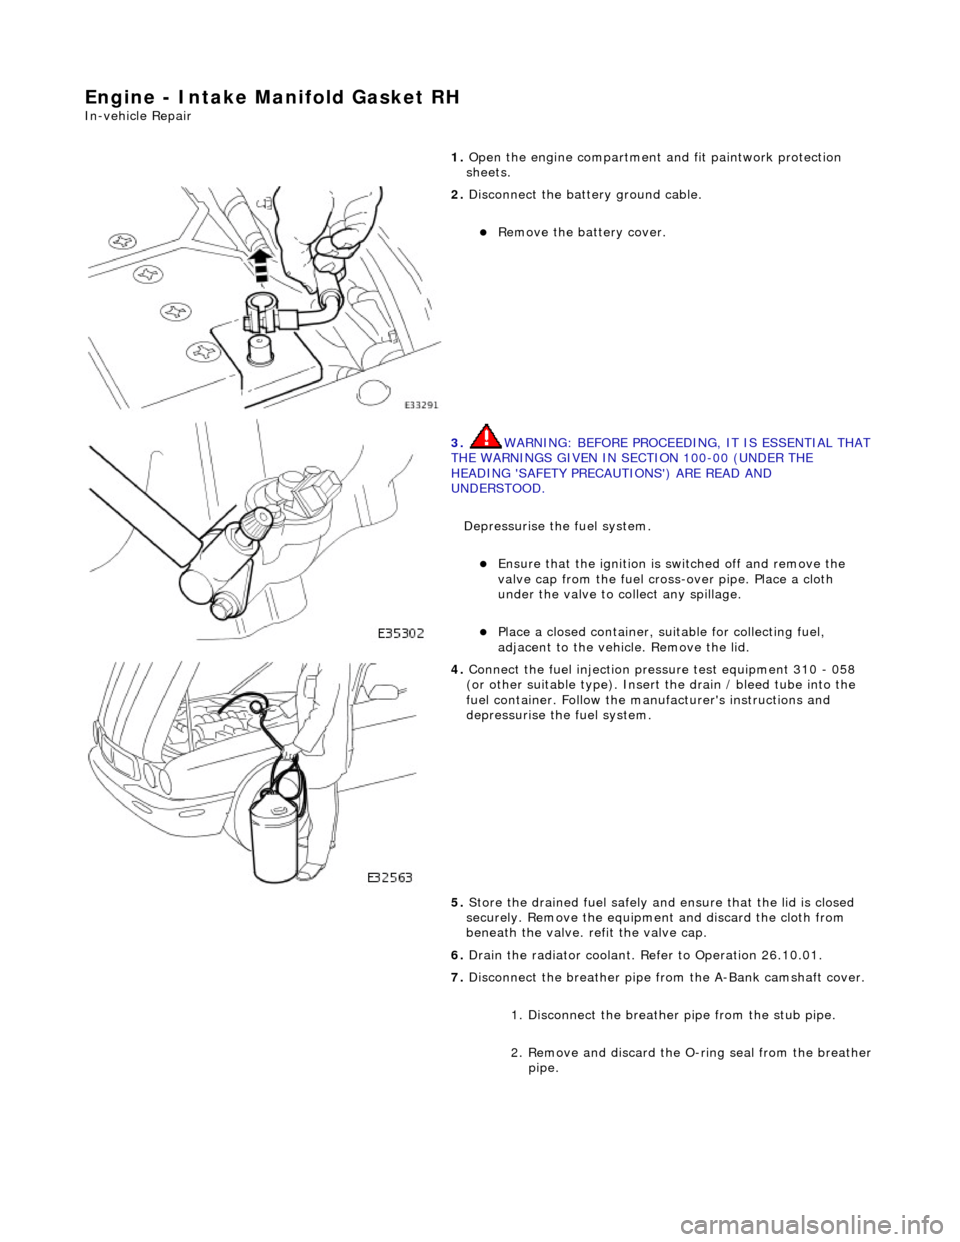
2. Disconnect the batt ery ground cable.
Remove the battery cover.
3. WARNING: BEFORE PROCEEDING, IT IS ESSENTIAL THAT THE WARNINGS GIVEN IN SECTION 100-00 (UNDER THE
HEADING 'SAFETY PRECAUTIONS') ARE READ AND
UNDERSTOOD.
Depressurise the fuel system.
Ensure that the ignition is switched off and remove the
valve cap from the fuel cross-over pipe. Place a cloth
under the valve to collect any spillage.
Place a closed container, su itable for collecting fuel,
adjacent to the vehicle. Remove the lid.
4. Connect the fuel injection pres sure test equipment 310 - 058
(or other suitable type). Insert the drain / bleed tube into the
fuel container. Follow the ma nufacturer's instructions and
depressurise the fuel system.
5. Store the drained fuel safely and ensure that the lid is closed
securely. Remove the equipmen t and discard the cloth from
beneath the valve. refit the valve cap.
6. Drain the radiator coolant. Refer to Operation 26.10.01.
7. Disconnect the breather pipe fro m the A-Bank camshaft cover.
1. Disconnect the breather pipe from the stub pipe.
2. Remove and discard the O-ring seal from the breather
pipe.
Page 875 of 2490
Engine - Valve Springs LH
In-vehicle Repair
Removal
Special Tool(s)
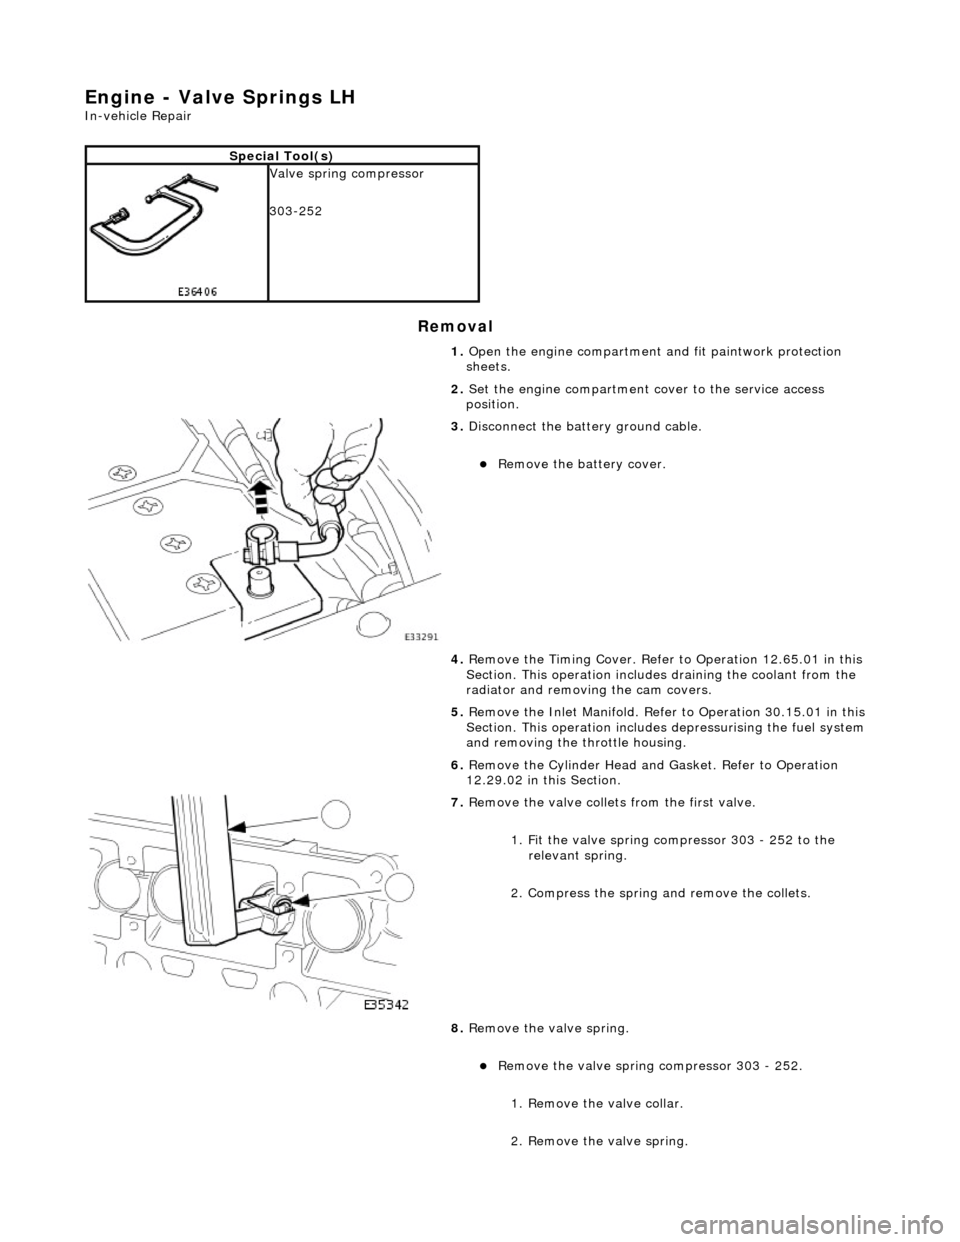
Valve spring compressor
303-252 1. Open the engine compartment and fit paintwork protection
sheets.
2. Set the engine compartment cover to the service access
position.
3. Disconnect the batt ery ground cable.
Remove the battery cover.
4. Remove the Timing Co ver. Refer to Operation 12.65.01 in this
Section. This operation includes draining the coolant from the
radiator and removing the cam covers.
5. Remove the Inlet Manifold. Refer to Operation 30.15.01 in this
Section. This operation includes depressurising the fuel system
and removing the throttle housing.
6. Remove the Cylinder Head an d Gasket. Refer to Operation
12.29.02 in this Section.
7. Remove the valve collets from the first valve.
1. Fit the valve spring compressor 303 - 252 to the relevant spring.
2. Compress the spring and remove the collets.
8. Remove the valve spring.
Remove the valve spring compressor 303 - 252.
1. Remove the valve collar.
2. Remove the valve spring.
Page 877 of 2490
Engine - Valve Springs RH
In-vehicle Repair
Removal
Special Tool(s)
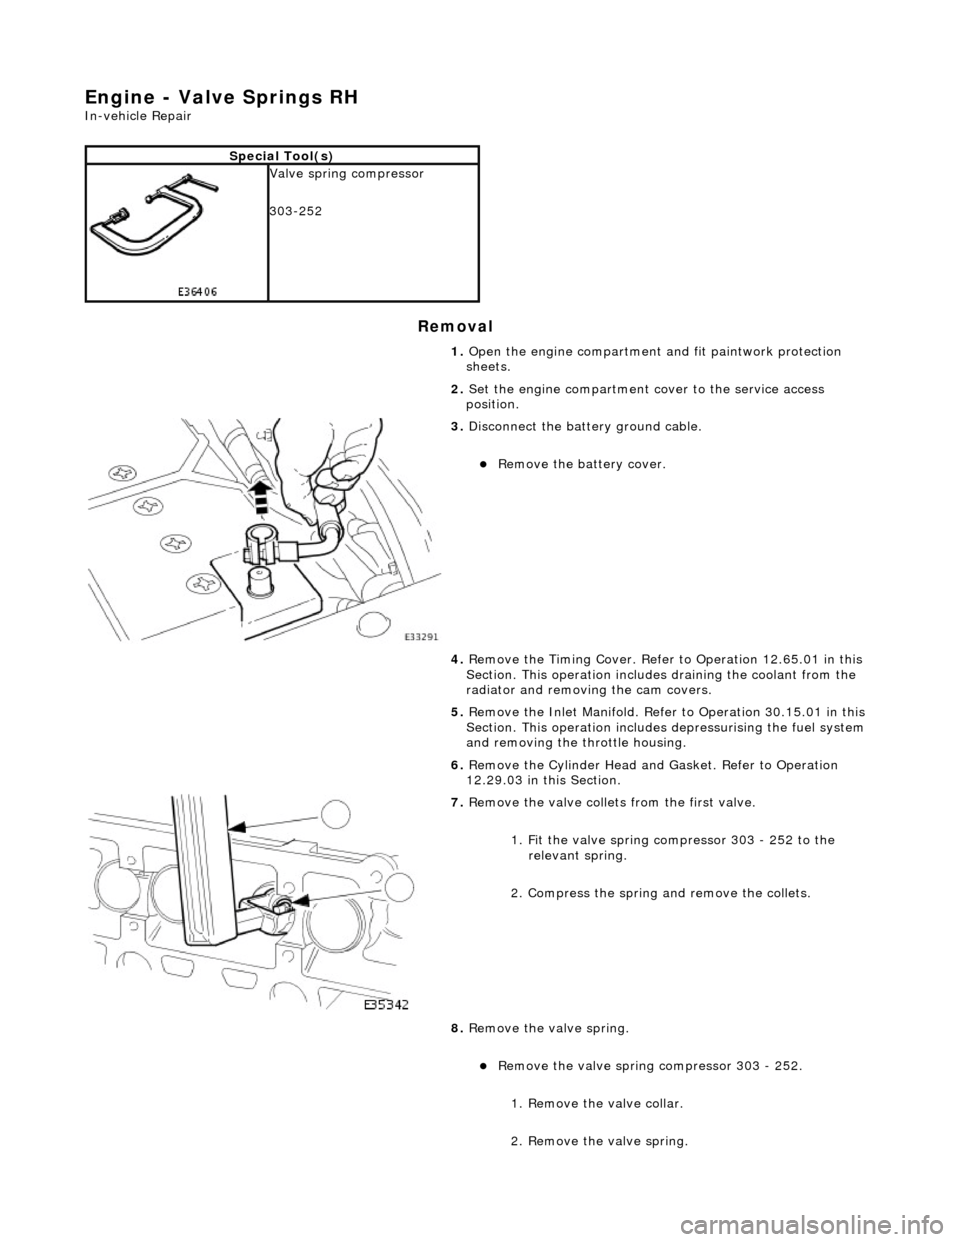
Valve spring compressor
303-252 1. Open the engine compartment and fit paintwork protection
sheets.
2. Set the engine compartment cover to the service access
position.
3. Disconnect the batt ery ground cable.
Remove the battery cover.
4. Remove the Timing Co ver. Refer to Operation 12.65.01 in this
Section. This operation includes draining the coolant from the
radiator and removing the cam covers.
5. Remove the Inlet Manifold. Refer to Operation 30.15.01 in this
Section. This operation includes depressurising the fuel system
and removing the throttle housing.
6. Remove the Cylinder Head an d Gasket. Refer to Operation
12.29.03 in this Section.
7. Remove the valve collets from the first valve.
1. Fit the valve spring compressor 303 - 252 to the relevant spring.
2. Compress the spring and remove the collets.
8. Remove the valve spring.
Remove the valve spring compressor 303 - 252.
1. Remove the valve collar.
2. Remove the valve spring.
Page 900 of 2490
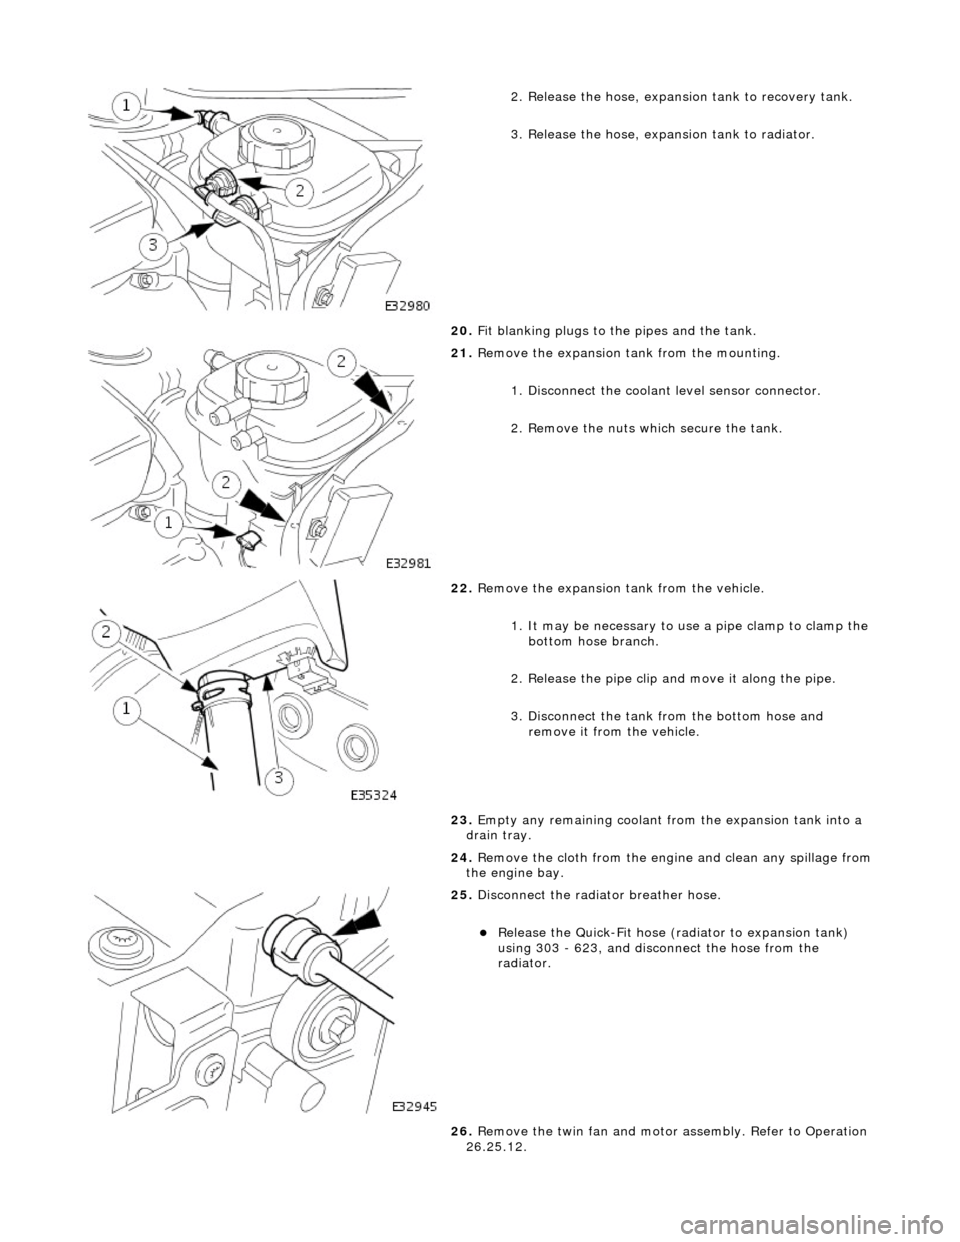
2. Release the hose, expansion tank to recovery tank.
3. Release the hose, expansion tank to radiator.
20. Fit blanking plugs to the pipes and the tank.
21. Remove the expansion tank from the mounting.
1. Disconnect the coolant level sensor connector.
2. Remove the nuts which secure the tank.
22. Remove the expansion tank from the vehicle.
1. It may be necessary to us e a pipe clamp to clamp the
bottom hose branch.
2. Release the pipe clip an d move it along the pipe.
3. Disconnect the tank from the bottom hose and remove it from the vehicle.
23. Empty any remaining coolant from the expansion tank into a
drain tray.
24. Remove the cloth from the engine and clean any spillage from
the engine bay.
25. Disconnect the radiator breather hose.
Release the Quick-Fit hose (radiator to expansion tank)
using 303 - 623, and disconnect the hose from the
radiator.
26. Remove the twin fan and motor assembly. Refer to Operation
26.25.12.
Page 901 of 2490
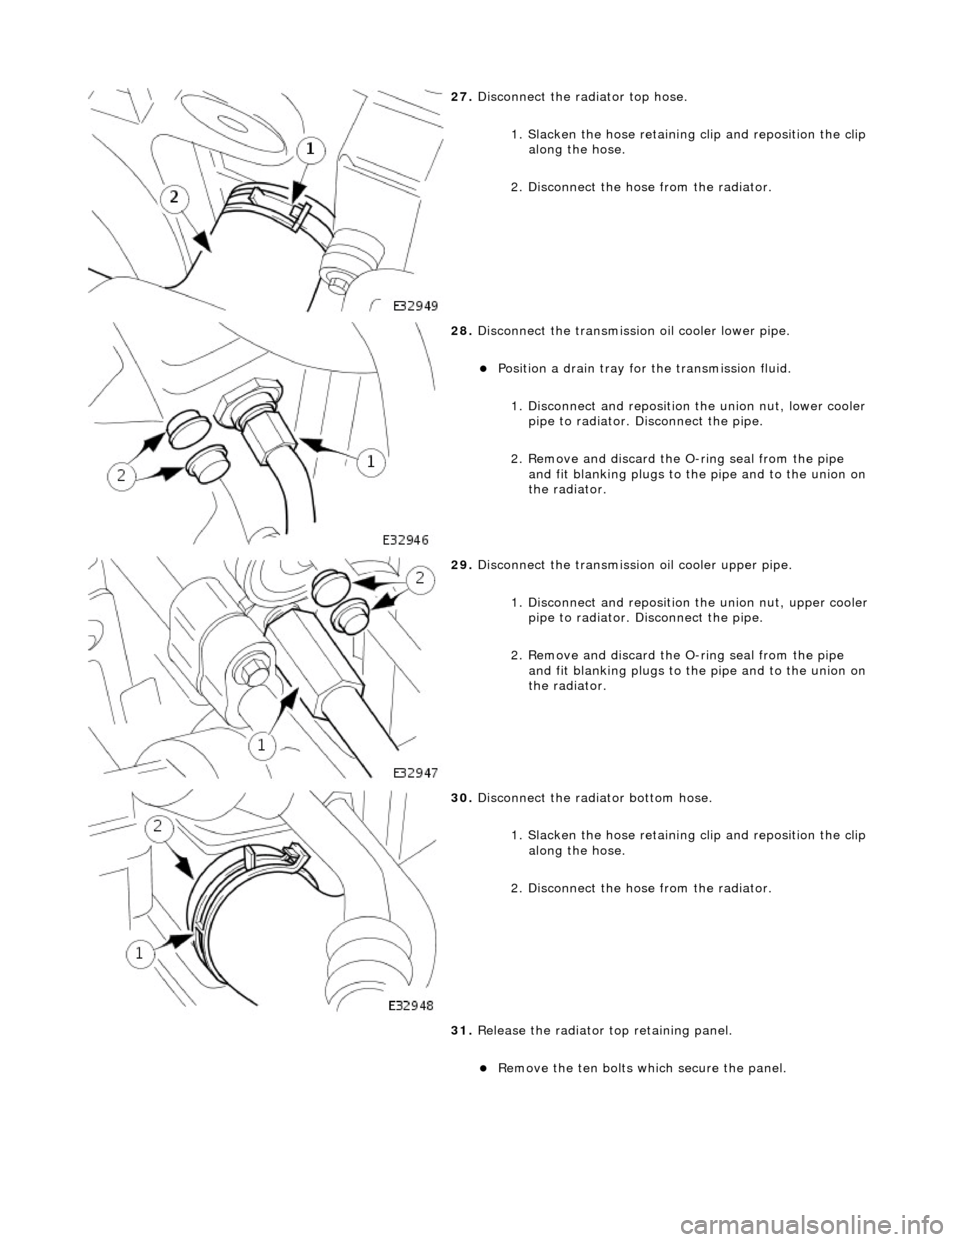
27. Disconnect the radiator top hose.
1. Slacken the hose retaining clip and reposition the clip
along the hose.
2. Disconnect the hose from the radiator.
28. Disconnect the transmission oil cooler lower pipe.
Position a drain tray for the transmission fluid.
1. Disconnect and reposition the union nut, lower cooler pipe to radiator. Di sconnect the pipe.
2. Remove and discard the O- ring seal from the pipe
and fit blanking plugs to the pipe and to the union on
the radiator.
29. Disconnect the transmission oil cooler upper pipe.
1. Disconnect and reposition the union nut, upper cooler pipe to radiator. Di sconnect the pipe.
2. Remove and discard the O- ring seal from the pipe
and fit blanking plugs to the pipe and to the union on
the radiator.
30. Disconnect the radiator bottom hose.
1. Slacken the hose retaining clip and reposition the clip
along the hose.
2. Disconnect the hose from the radiator.
31. Release the radiator top retaining panel.
Remove the ten bolts which secure the panel.
Page 902 of 2490
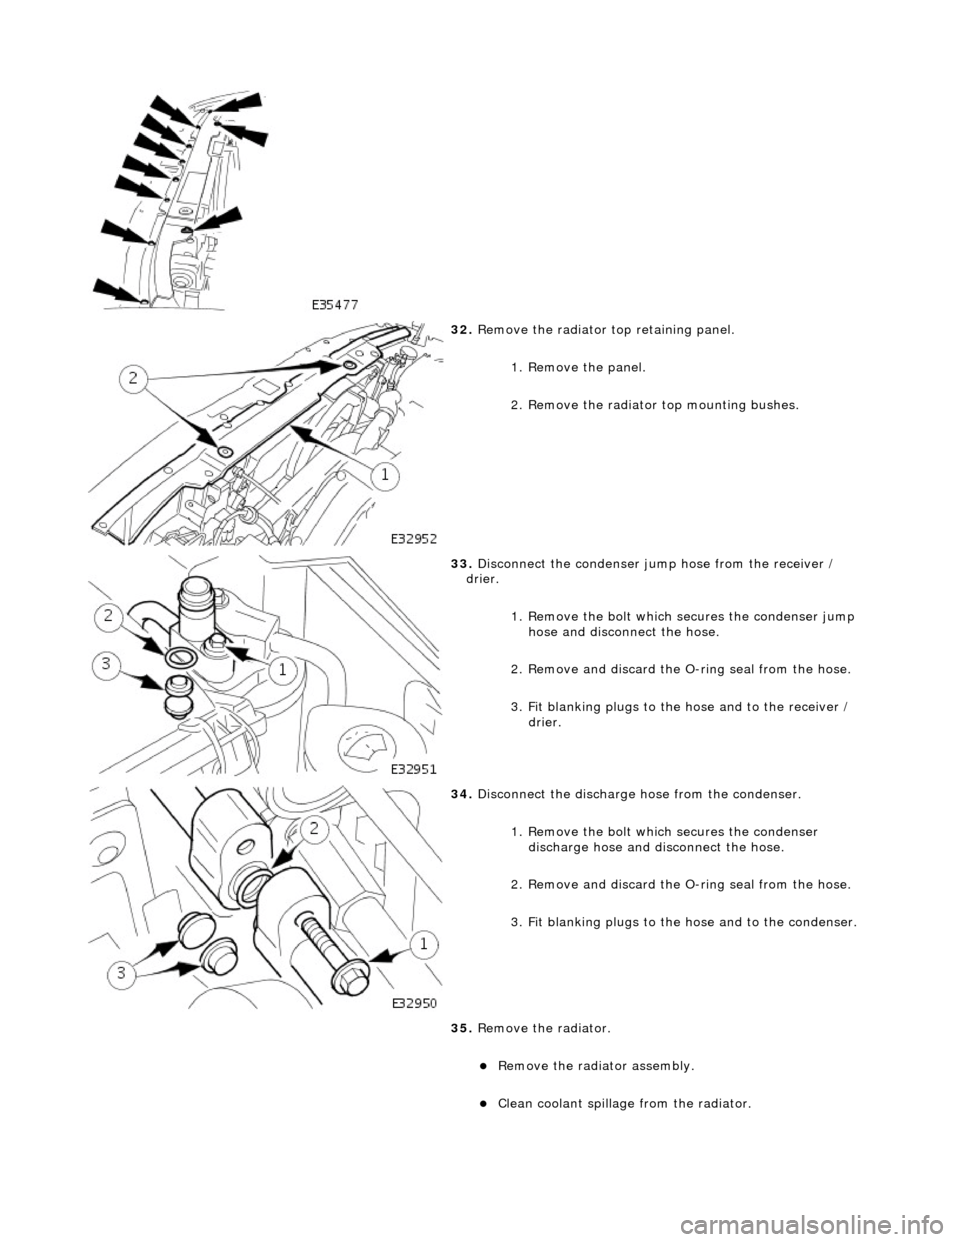
32. Remove the radiator top retaining panel.
1. Remove the panel.
2. Remove the radiator top mounting bushes.
33. Disconnect the condenser jump hose from the receiver /
drier.
1. Remove the bolt which secures the condenser jump hose and discon nect the hose.
2. Remove and discard the O-ring seal from the hose.
3. Fit blanking plugs to the hose and to the receiver / drier.
34. Disconnect the discharge hose from the condenser.
1. Remove the bolt which secures the condenser discharge hose and disconnect the hose.
2. Remove and discard the O-ring seal from the hose.
3. Fit blanking plugs to the hose and to the condenser.
35. Remove the radiator.
Remove the radiator assembly.
Clean coolant spillage from the radiator.
Page 918 of 2490
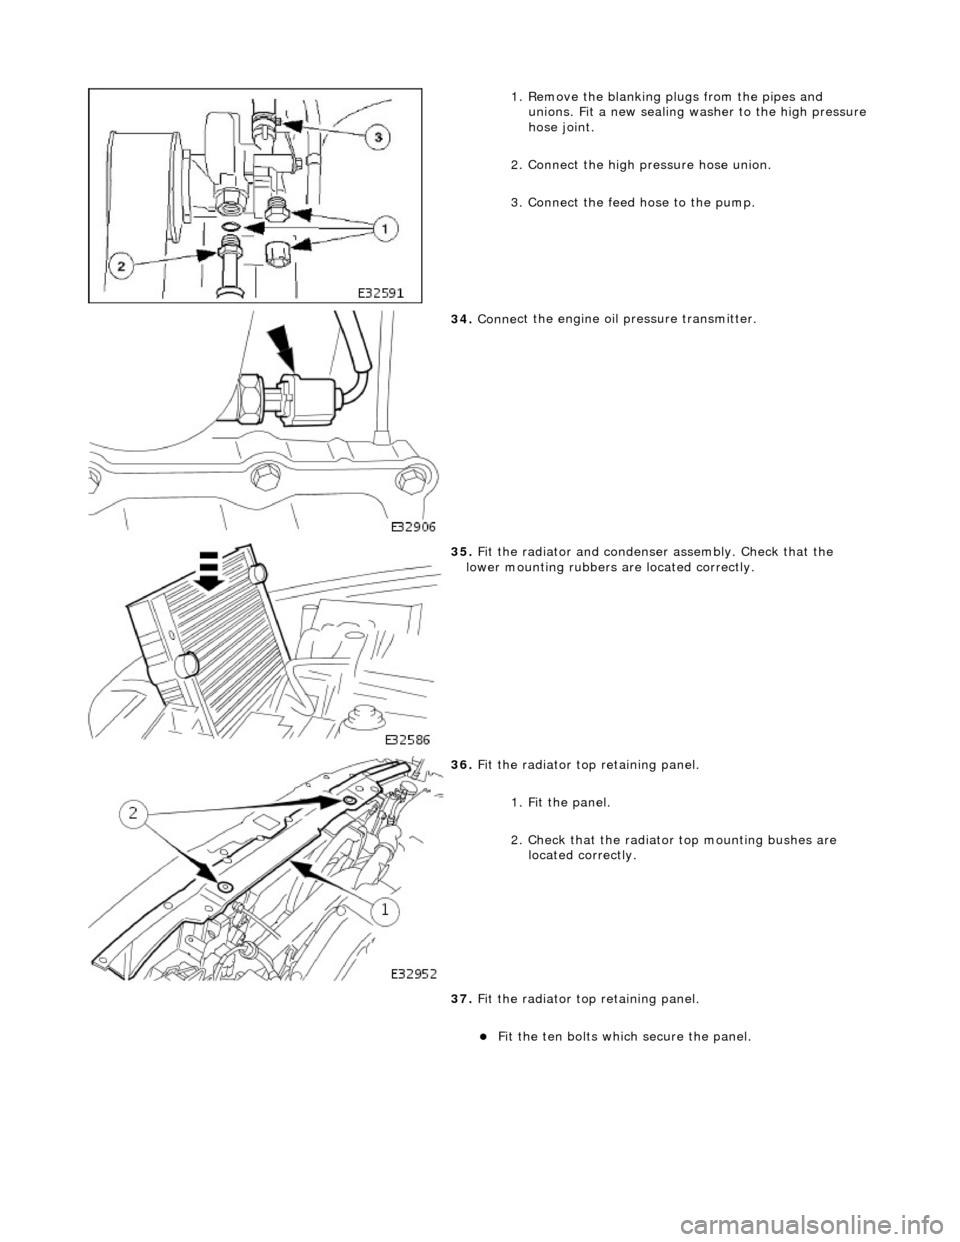
1.
Remove the blanking plugs from the pipes and
unions. Fit a new sealing washer to the high pressure
hose joint.
2. Connect the high pressure hose union.
3. Connect the feed hose to the pump.
34 . Conne
ct the engine oil
pressure transmitter.
35 .
Fit the radiator and
condense
r assembly. Check that the
lower mounting rubbers are located correctly.
36 . Fit the radiator top
retaining panel.
1. Fit the panel.
2. Check that the radiator top mounting bushes are
located correctly.
37. Fit the radiator top retaining panel.
Fit
the ten bolts which secure the panel.
Page 919 of 2490
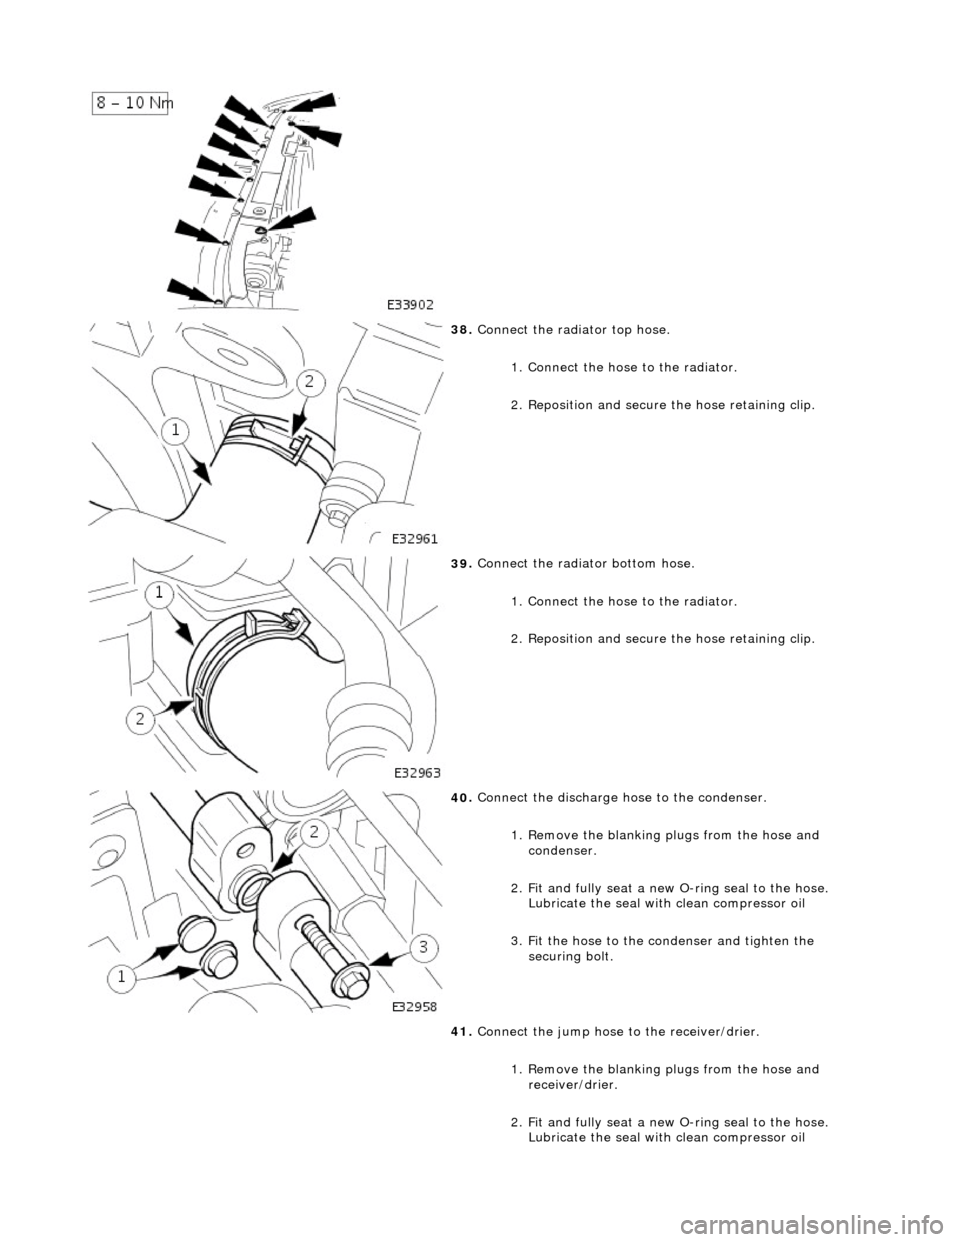
38
.
Connect the radiator top hose.
1. Connect the hose to the radiator.
2. Reposition and secure the hose retaining clip.
39
.
Connect the radiator bottom hose.
1. Connect the hose to the radiator.
2. Reposition and secure the hose retaining clip.
40
.
Connect the discharge hose to the condenser.
1. Remove the blanking plugs from the hose and condenser.
2. Fit and fully seat a new O-ring seal to the hose.
Lubricate the seal with clean compressor oil
3. Fit the hose to the condenser and tighten the securing bolt.
41. Connect the jump hose to the receiver/drier.
1. Remove the blanking plugs from the hose and receiver/drier.
2. Fit and fully seat a new O-ring seal to the hose.
Lubricate the seal with clean compressor oil
Page 920 of 2490
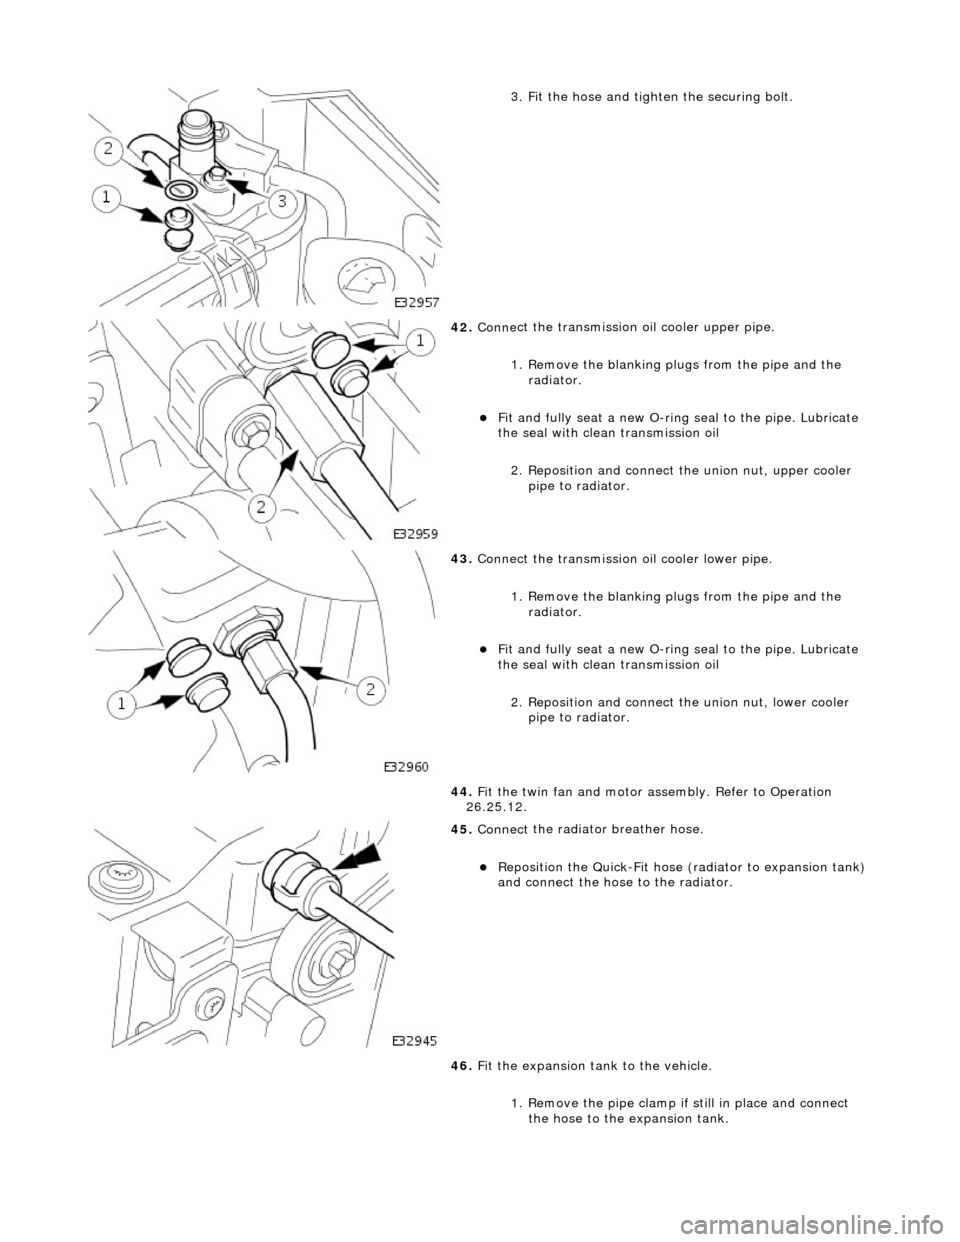
3.
Fit the hose and tighten the securing bolt.
42 . Conne
ct the transmission
oil cooler upper pipe.
1. Remove the blanking plugs from the pipe and the radiator.
Fit and
fully seat a new O-ring
seal to the pipe. Lubricate
the seal with clean transmission oil
2. Reposition and connect the union nut, upper cooler pipe to radiator.
43 . Conne
ct the transmission oil cooler lower pipe.
1. Remove the blanking plugs from the pipe and the radiator.
Fit and
fully seat a new O-ring
seal to the pipe. Lubricate
the seal with clean transmission oil
2. Reposition and connect the union nut, lower cooler
pipe to radiator.
44. Fit the twin fan and motor assembly. Refer to Operation
26.25.12.
45 . Connect
the radiator breather hose.
Re
po
sition the Quick-Fit hose (radiator to expansion tank)
and connect the hose to the radiator.
46. Fit the expansion tank to the vehicle.
1. Remove the pipe clamp if still in place and connect
the hose to the expansion tank.