battery JAGUAR X308 1998 2.G User Guide
[x] Cancel search | Manufacturer: JAGUAR, Model Year: 1998, Model line: X308, Model: JAGUAR X308 1998 2.GPages: 2490, PDF Size: 69.81 MB
Page 282 of 2490
Driveshaft - Driveshaft
Remo
val and Installation
Remov
a
l
CAUTI
O
N: To preserve 'drive line' refine
ment, individual parts, other than fixings, MUST NOT be renewed. In the event
of any balance or driveshaft component related problem, the complete assembly must be renewed. Under no circumstances
may the flexible (Jurid) coupling be remo ved from the driveshaft (or its fixings be loosened). Do not drop or subject the
driveshaft to damage.
1. Disc
onnect the battery ground
lead and raise the vehicle for
access
2. Remove the front exha ust muffler, 30.10.18
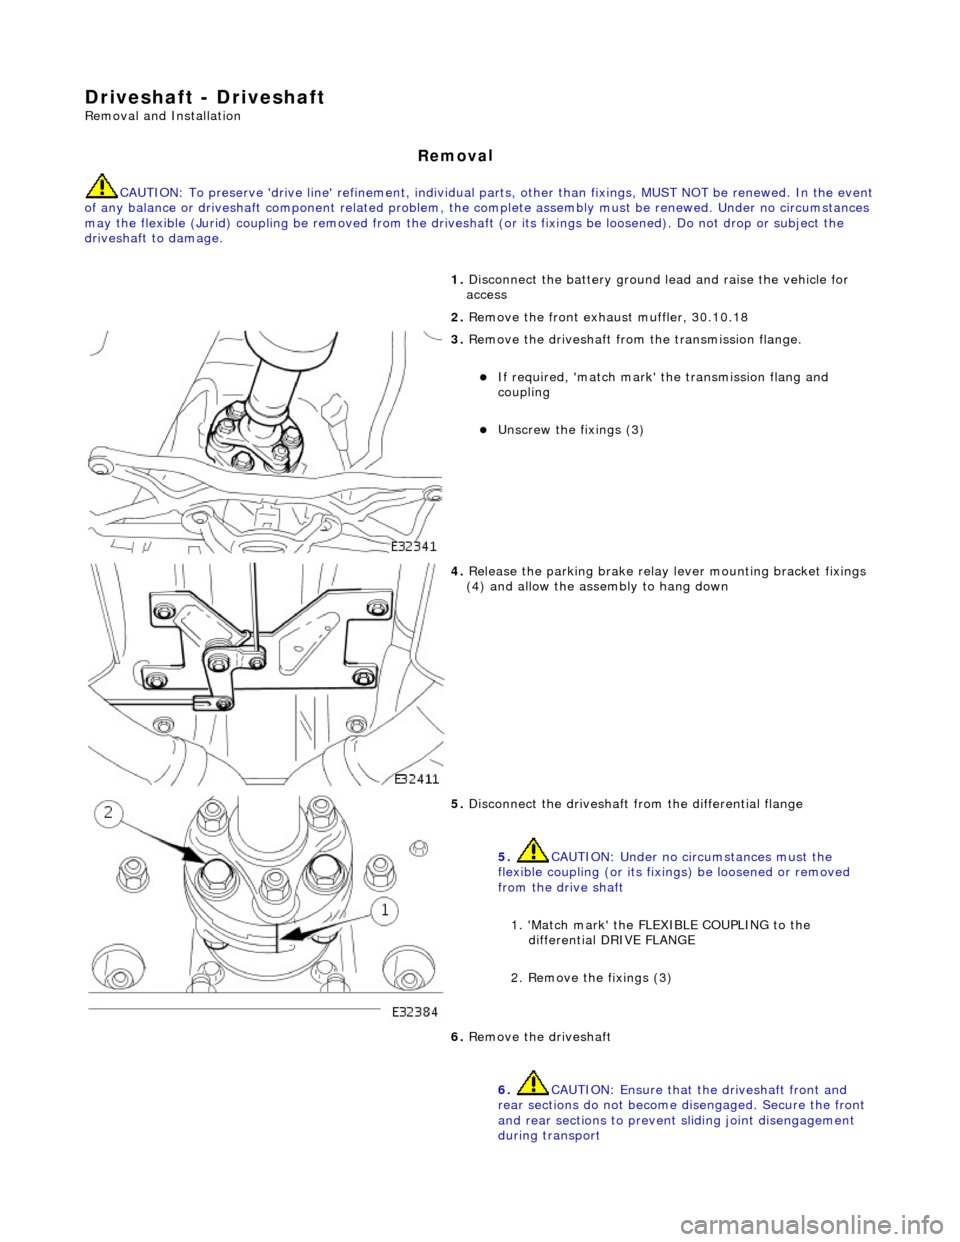
3. Re
move the driveshaft from
the transmission flange.
пЃ¬If required, 'match mark'
the transmissi on flang and
coupling
пЃ¬Unscrew the fi xings (3)
4. Relea s
e the parking brake relay
lever mounting bracket fixings
(4) and allow the assembly to hang down
5. Disc onne
ct the driveshaft fr
om the differential flange
5. CAUTION: Under no circumstances must the
flexible coupling (or its fixings) be loosened or removed
from the drive shaft
1. 'Match mark' the FLEX IBLE COUPLING to the
differential DRIVE FLANGE
2. Remove the fixings (3)
6. Re
move the driveshaft
6. CAUTION: Ensure that the driveshaft front and
rear sections do not become disengaged. Secure the front
and rear sections to preven t sliding joint disengagement
during transport
Page 287 of 2490

R
ear Drive Axle/Differential - Differ
ential Output Shaft End Float Check
Gen
eral Procedures
1.
Di
sconnect the battery ground lead
2. Raise the vehicle for access
3. Mo
unt a dial test indicator (DTI
) to the differential housing with
the probe resting on the axle sh aft flange (the DTI probe must
be parallel to the output shaf t center line and NOT the axle
shaft)
4. Chec
k the end float
пЃ¬Pus
h the wheel / shaft assembly INWARDS
пЃ¬Zero the DTI
пЃ¬P
ull the wheel / shaft assembly OUTWARDS
пЃ¬N
ote the reading
5. Check the specification
пЃ¬0 t
o 0,15 mm GOOD
пЃ¬0,
15 mm + NOT GOOD; Renew the output shaft bearing
Page 288 of 2490
Re
ar Drive Axle/Differential - Axle Shaft
In-v
ehic
le Repair
Remov
a
l
S
p
ecial Tool(s)
Hub remover
2
04-011
Thread protector
JD
1D
/ 7
1. Disc
onnect the battery ground lead.
2. Support the vehicle at the rear and remove the appropriate
rear road wheel.
3. Remove and discard the hub nut, apply the brakes to prevent
rotation.
4. Remove the brake caliper in acco rdance with 70.55.03, but do
not disconnect the hydraulics.
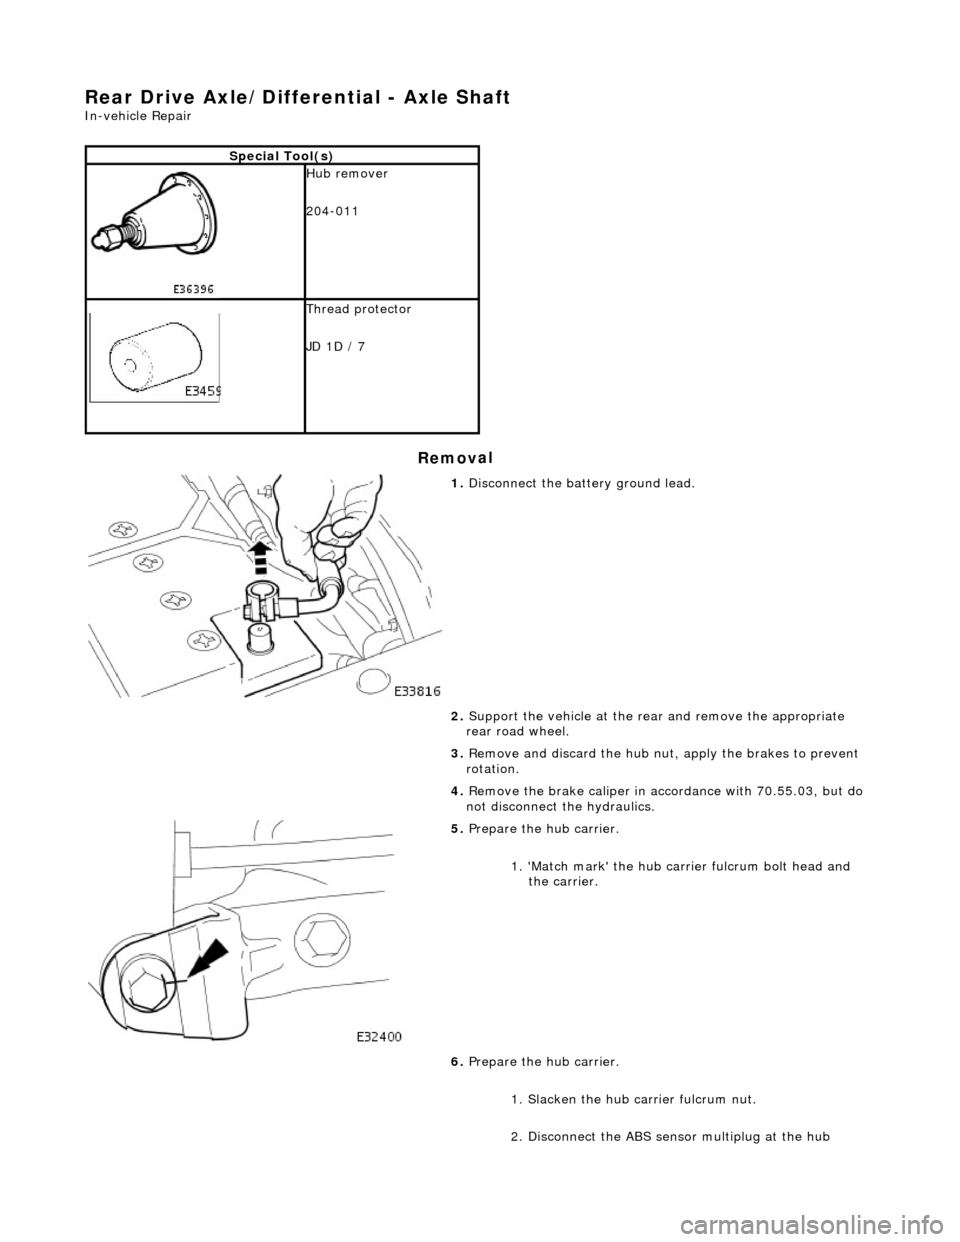
5. Pr
epare the hub carrier.
1. 'Match mark' the hub carr ier fulcrum bolt head and
the carrier.
6. Prepare the hub carrier.
1. Slacken the hub ca rrier fulcrum nut.
2. Disconnect the ABS sensor multiplug at the hub
Page 291 of 2490
R
ear Drive Axle/Differential - Differential Output Shaft Bearing
In-v
ehicle Repair
Remov
al
S
pecial Tool(s)
Replacer hu
b bearing
204-083
1. Di
sconnect the battery ground lead
2. Raise the vehicle for access
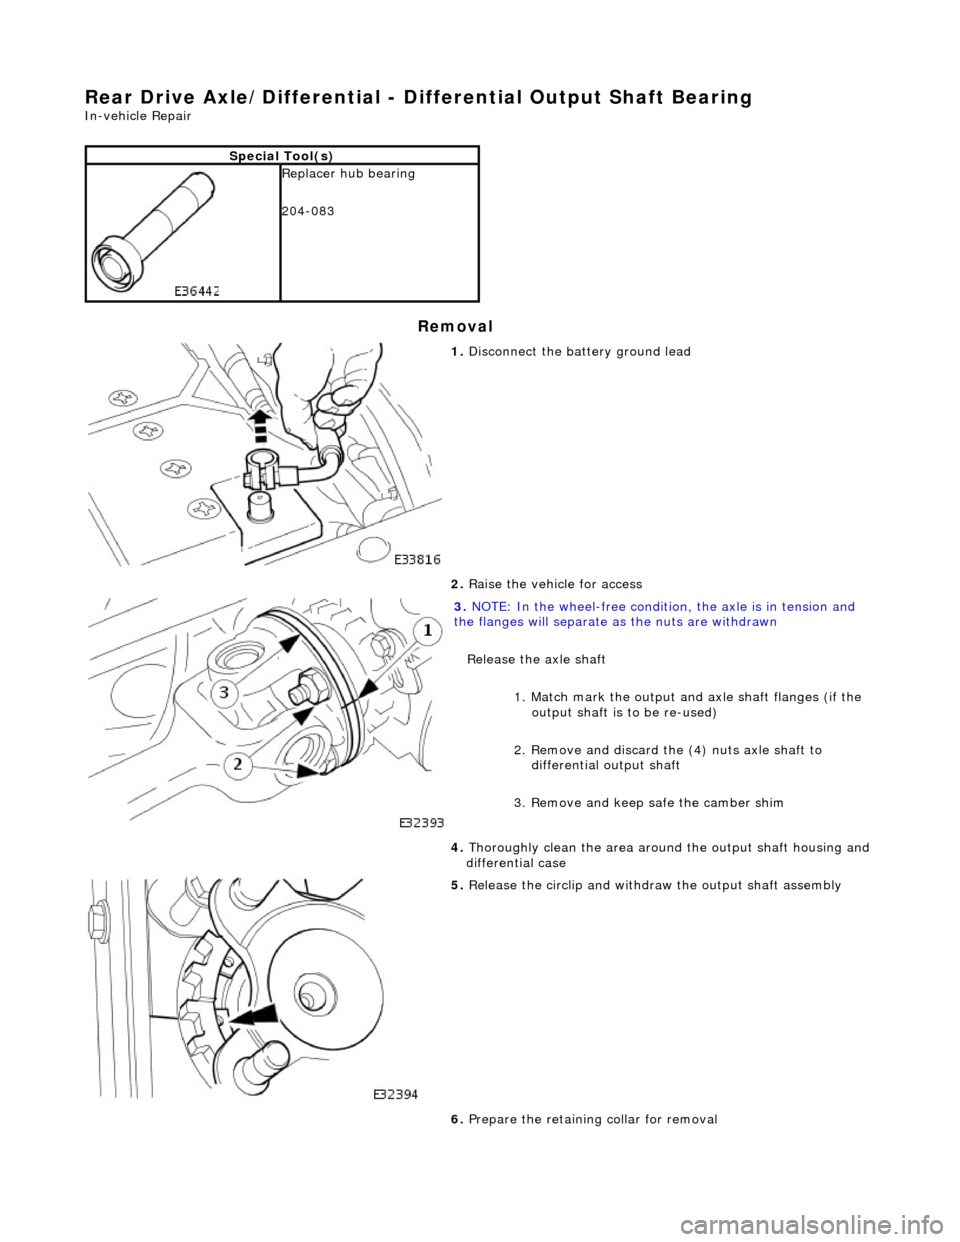
3. NO
TE: In the wheel-free condition, the axle is in tension and
the flanges will separate as the nuts are withdrawn
Release the axle shaft
1. Match mark the output an d axle shaft flanges (if the
output shaft is to be re-used)
2. Remove and discard the (4) nuts axle shaft to differential output shaft
3. Remove and keep safe the camber shim
4. T
horoughly clean the area around the output shaft housing and
differential case
5. Relea
se the circlip and withdraw the output shaft assembly
6. Prepare the retaining collar for removal
Page 295 of 2490
R
ear Drive Axle/Differential - Drive Pinion Flange and Drive Pinion Seal
In-v
ehicle Repair
Remov
al
S
pecial Tool(s)
Drive sh
aft flange wrench
205-053
D
rive shaft flange remover replacer.
205-272
1. Di
sconnect the battery ground lead.
2. Raise the vehicle for access.
3. Disconnect the main parking br ake c
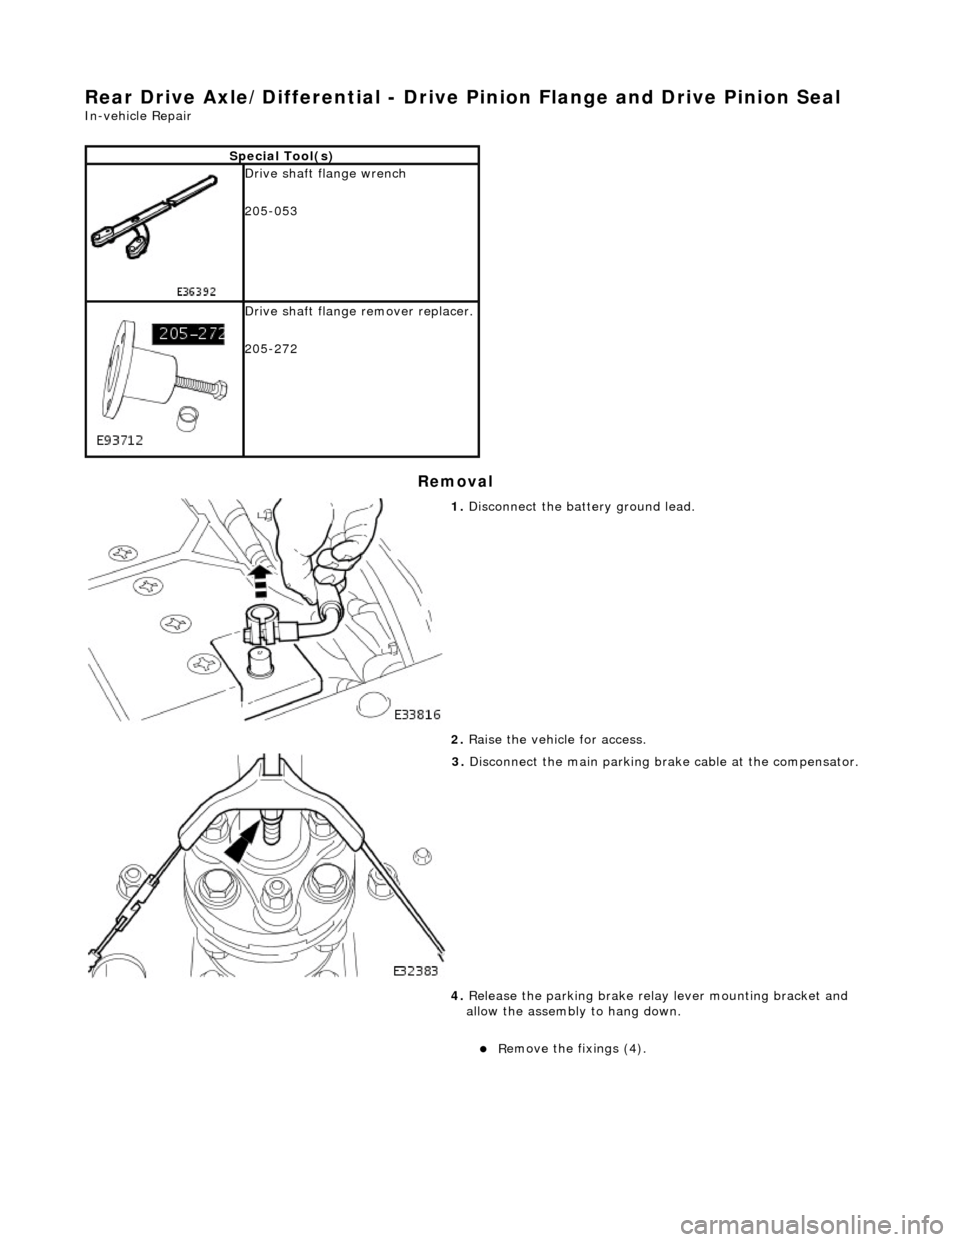
able at the compensator.
4. Release the parking brake relay lever mounting bracket and
allow the assembly to hang down.
пЃ¬R
emove the fixings (4).
Page 300 of 2490
Rea
r Drive Axle/Differential - Axle Assembly
Re
mo
val and Installation
Remov
a
l
•
NOTE: The pinion flange shown in this procedure is NOT intended to be a true representation
S
p
ecial Tool(s)
Suspensi
on
Spring Compressor Tool
204-179
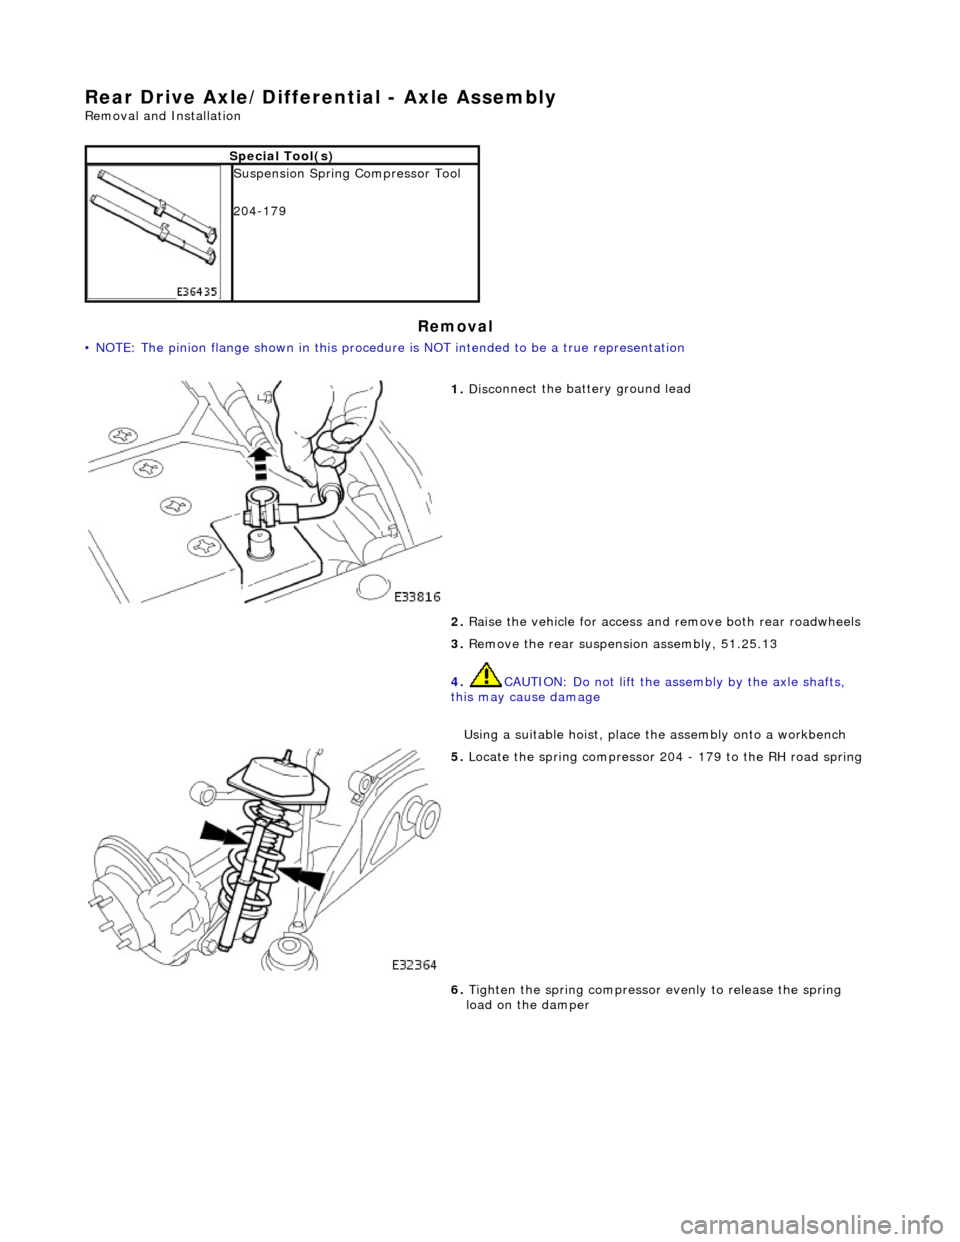
1. Disc
onnect the battery ground lead
2. Raise the vehicle for access and remove both rear roadwheels
3. Remove the rear suspensi on assembly, 51.25.13
4. CAUTION: Do not lift the assembly by the axle shafts,
this may cause damage
Using a suitable hoist, place the assembly onto a workbench
5. Locat e
the spring compressor 204
- 179 to the RH road spring
6. Tighten the spring compressor evenly to release the spring
load on the damper
Page 408 of 2490
Hydraulic Br
ake Actuation
- Brake Fluid Reservoir
Remo
val and Installation
Remov
a
l
• C
A
UTIONS:
Replacement of nuts and bolts: Various thread-locking de vices are used on nuts and bolts throughout the vehicle.
These devices restrict the number of times a nut or bolt can be used. See section 100-00 for information.
Remove brake fluid spilla ge immediately from paint work, with clean water.
1. Position vehicl
e on a four-post lift.
2. Open engine compartment and fit paint work protection covers
to fenders.
3. Disconnect battery ground cable (IMPORTANT, see operation
86.15.19 for further information).
4. Remove engine compartment rear cover. Refer to operation
76.11.35.
5. Remove pedal housing, brake booster and master cylinder
assembly. Refer to operation 70.35.39.
6. Remove reservoir filler cap and empty residual brake fluid into
a container. Refit cap.
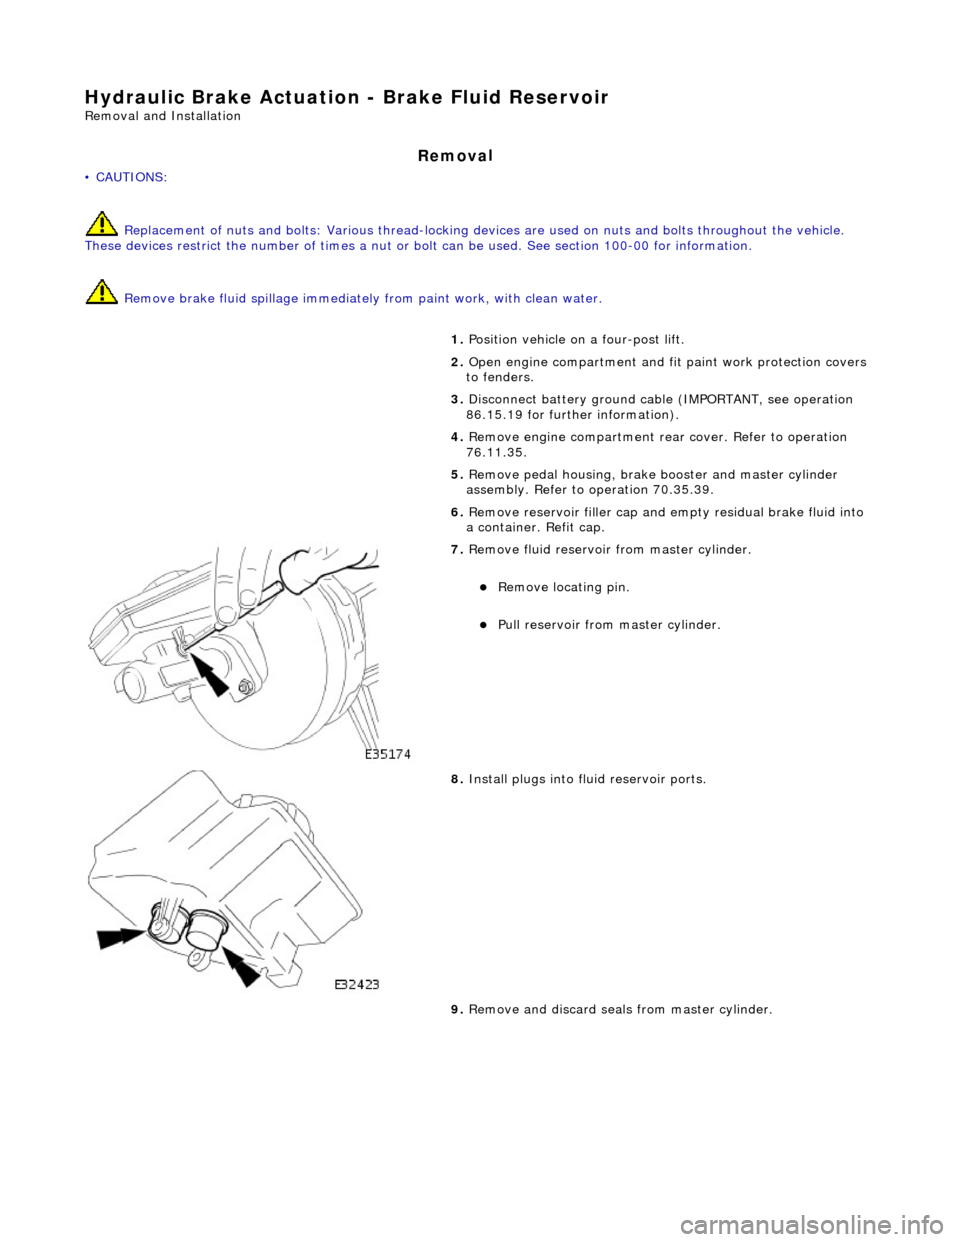
7. Re
move fluid reservoir from master cylinder.
пЃ¬R
e
move locating pin.
пЃ¬Pull reservoir
from master cylinder.
8. Install plugs into f
luid reservoir ports.
9. Remove and discard seal s from master cylinder.
Page 409 of 2490

I
nstallation
10
.
Install plugs into master cylinder ports.
11. Clean components and mating surfaces.
1. Inst
all seals into master cylinder.
пЃ¬Re
move plugs.
пЃ¬Lubricate seals with
cl
ean brake fluid.
пЃ¬Inst
all seals.
2. Install
reservoir to master cylinder.
пЃ¬Re
move plugs.
пЃ¬Install
reservoir, making sure
reservoir is fully seated.
пЃ¬Inst
all locating pin.
3. Install pedal housing, brake booster and master cylinder
assembly. Refer to operation 70.35.39.
4. Install engine compartment rear cover. Refer to operation
76.11.35.
5. Reconnect battery ground cable (IMPORTANT, see operation
Page 411 of 2490
Hydraulic B
rake Actuation
- Brake Master Cylinder
Re
moval and Installation
Remov
al
• C
AUTIONS:
Replacement of nuts and bolts: Various thread-locking de vices are used on nuts and bolts throughout the vehicle.
These devices restrict the number of times a nut or bolt can be used. See section 100-00 for information.
Remove brake fluid spilla ge immediately from paint work, with clean water.
1. Position vehi
cle on a four-post lift.
2. Open engine compartment and fit paint work protection covers
to fenders.
3. Disconnect battery ground cable (IMPORTANT, refer to
operation 86.15.19 for fu rther information).
4. Remove engine compartment rear cover. Refer to operation
76.11.35.
5. Remove pedal housing, brake booster and master cylinder
assembly. Refer to operation 70.35.39.
6. Place assembly on a work bench.
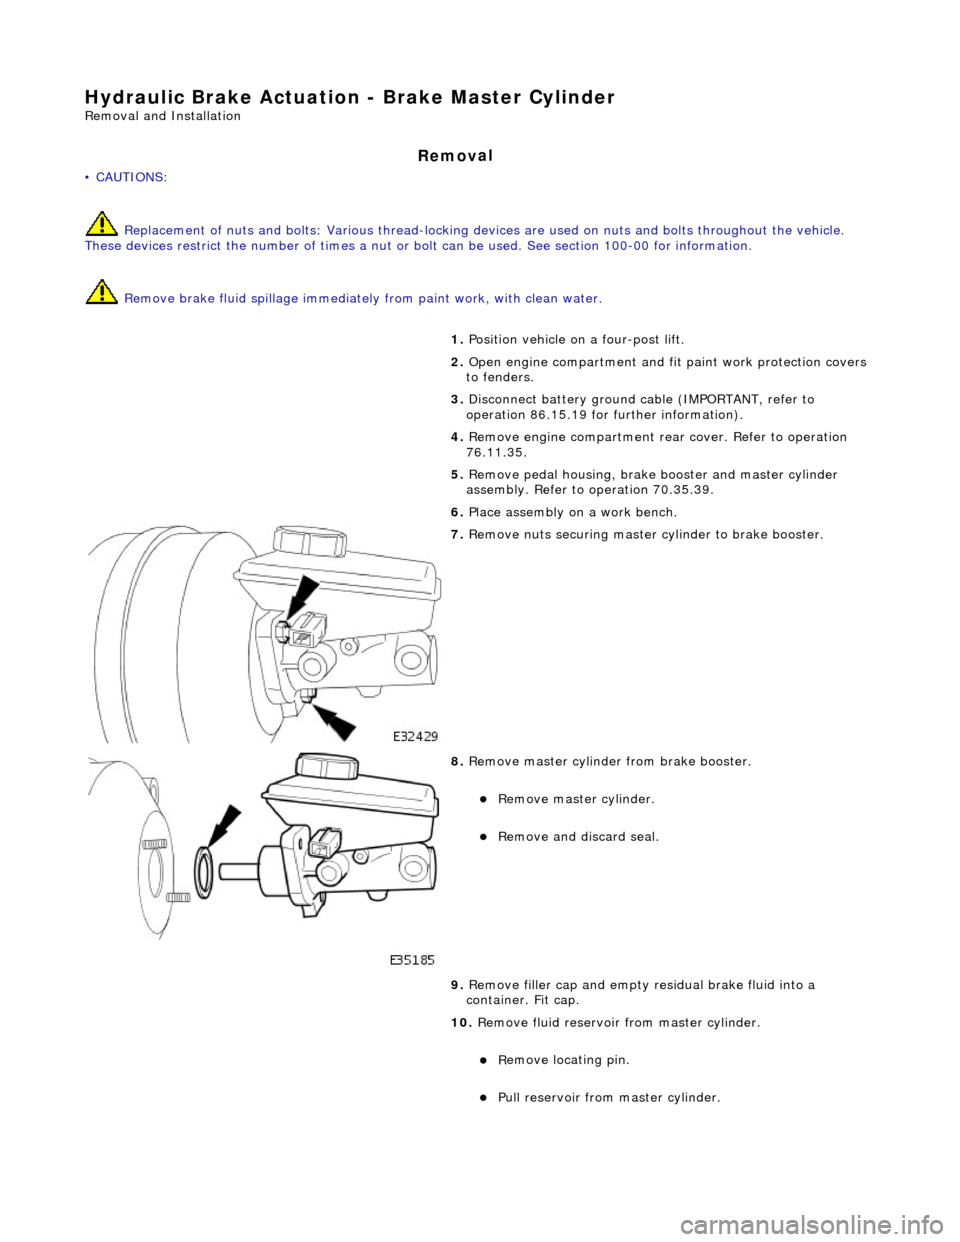
7. R
emove nuts securing master cylinder to brake booster.
8. R
emove master cylinder from brake booster.
пЃ¬Re
move master cylinder.
пЃ¬Remove an
d discard seal.
9. Remove filler cap and empty residual brake fluid into a
container. Fit cap.
10. Remove fluid reservoir from master cylinder.
пЃ¬R
emove locating pin.
пЃ¬Pull
reservoir from master cylinder.
Page 413 of 2490

пЃ¬Lubricate seals with cl
ean brake fluid.
пЃ¬Inst
all seals.
2. Install
fluid reservoir to master cylinder.
пЃ¬R
emove plugs from reservoir
пЃ¬Install
reservoir, making sure
reservoir is fully seated.
пЃ¬Inst
all locating pin.
3. Inst
all master cylinder to brake booster.
пЃ¬Inst
all seal.
пЃ¬Inst
all master cylinder, make sure master cylinder rod
locates brake booster rod.
4. Inst
all and tighten nuts to 21-29 Nm.
5. Install pedal housing, brake booster and master cylinder
assembly. Refer to operation 70.35.39.
6. Install engine compartment rear cover. Refer to operation
76.11.35.
7. Connect battery ground cable (IMPORTANT, see operation
86.15.15 for further information).
8. Bleed brake system. Refer to operation 70.25.03.
9. Remove paint-work protection covers and close engine
com
partment.