light JAGUAR X308 1998 2.G User Guide
[x] Cancel search | Manufacturer: JAGUAR, Model Year: 1998, Model line: X308, Model: JAGUAR X308 1998 2.GPages: 2490, PDF Size: 69.81 MB
Page 297 of 2490

I
nstallation
10
.
Clean the seal counterbore.
1. Installation is the re verse of the removal procedure, noting the
following;
2. Lightly lubricate the seal O/D.
3. Chec
k for the correct assembly condition.
E
nsure that the seal, Ryton
ring and backing are aligned
and in contact with each other.
4. NOTE: Correct pinion seal location is automatic.
`Pull' the pinion flan ge / seal assembly down with the pinion
nut - do not hammer the flange.
5. R
efer to the illustration.
R
otate the pinion prior to final tightening.
St
ake the nut to the pinion.
6. Check the pinion drive flange axial run-out.
0,
08 mm MAX TIR.
If t
his specification is exceeded, renew the flange / seal
assembly.
Page 311 of 2490
P
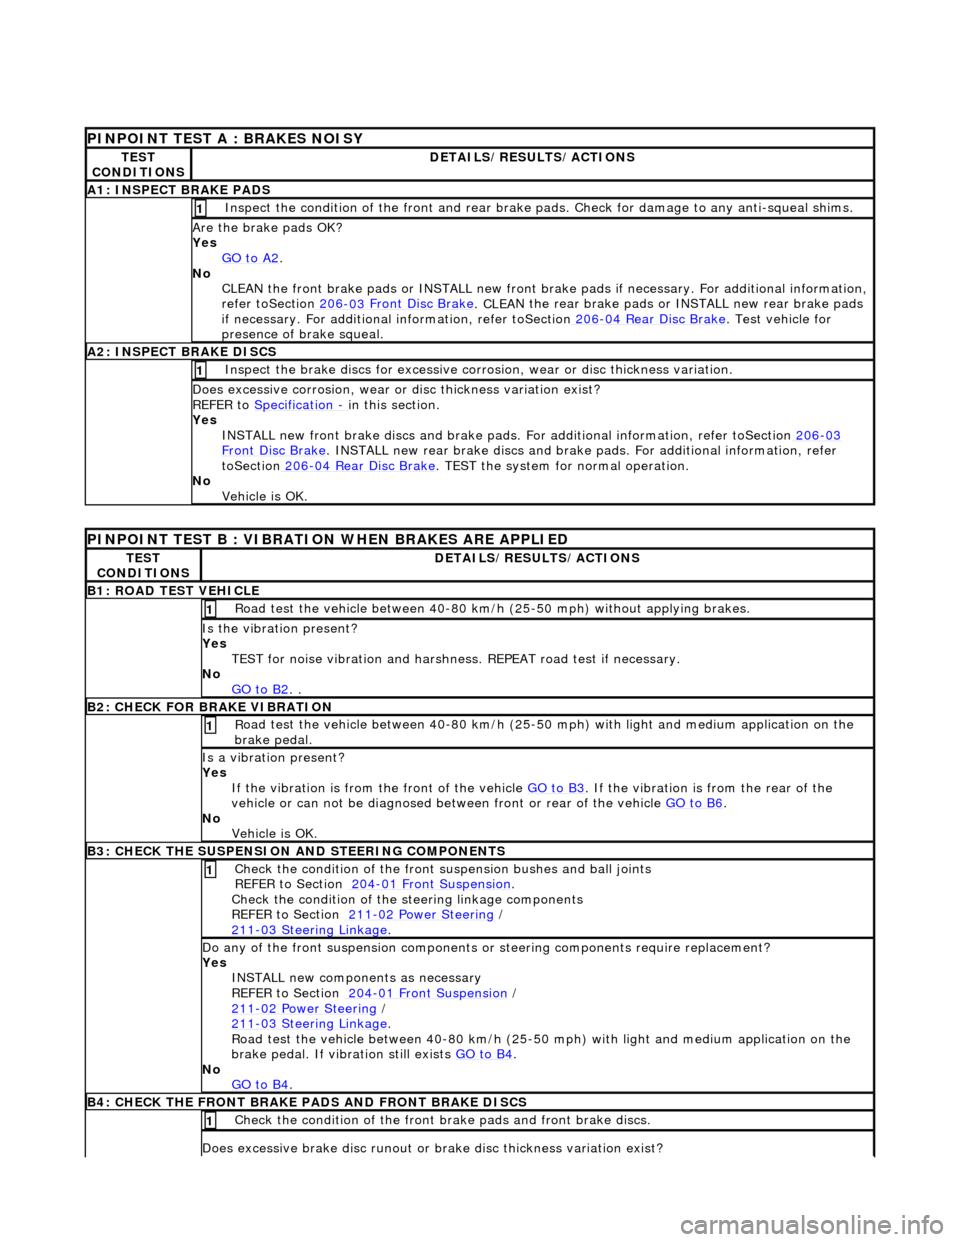
INPOINT TEST A : BRAKES NOISY
TE
ST
CONDITIONS
D
ETAILS/RESULTS/ACTIONS
A1
: INSPECT BRAKE PADS
Inspect the condi
tion of the front and rear brake
pads. Check for damage to any anti-squeal shims.
1
Are th
e brake pads OK?
Yes GO to A2
.
No
CLEAN the front brake pads or INSTALL new front brak e pads if necessary. For additional information,
refer toSection 206
-03
Front Disc Brake
. CLEA
N the rear brake pads or INSTALL new rear brake pads
if necessary. For additional information, refer toSection 206
-0
4 Rear Disc Brake
.
Test vehicle for
presence of brake squeal.
A2
: INSPECT BRAKE DISCS
Inspe
ct the brake discs for excessive corrosi
on, wear or disc thickness variation.
1
D
oes excessive corrosion, wear or
disc thickness variation exist?
REFER to Specification
- in t
his section.
Yes INSTALL new front brake discs and brake pads. For additional information, refer toSection 206
-03
Fr
ont Disc Brake
. INSTALL n
ew rear brake discs and brake
pads. For additional information, refer
toSection 206
-0
4 Rear Disc Brake
. TEST
the system for normal operation.
No Vehicle is OK.
P
INPOINT TEST B : VIBRATIO
N WHEN BRAKES ARE APPLIED
TE
ST
CONDITIONS
D
ETAILS/RESULTS/ACTIONS
B1
: ROAD TEST VEHICLE
R
oad test the vehicle between 40-80 km/h (25-50 mph) without applying brakes.
1
Is th
e vibration present?
Yes TEST for noise vibration and harshness. REPEAT road test if necessary.
No GO to B2
. .
B2
: CHECK FOR BRAKE VIBRATION
R
oad test the vehicle between 40-80 km/h (25-50
mph) with light and medium application on the
brake pedal.
1
Is a vibration
present?
Yes If the vibration is from the front of the vehicle GO to B3
. If
the vibration is
from the rear of the
vehicle or can not be di agnosed between front or rear of the vehicle GO to B6
.
No
Vehicle is OK.
B3: CHECK
THE SUSPENSION
AND STEERING COMPONENTS
Chec
k the condition of the front susp
ension bushes and ball joints
REFER to Section 204
-01
Front Suspension
.
Chec
k the condition of the steering linkage components
REFER to Section 211
-0
2 Power Steering
/
211
-0
3 Steering Linkage
.
1
D
o any of the front suspension components or steering comp
onents require replacement?
Yes INSTALL new components as necessary
REFER to Section 204
-01
Front Suspension
/
211
-0
2 Power Steering
/
211
-0
3 Steering Linkage
.
R
oad test the vehicle between 40-80 km/h (25-50
mph) with light and medium application on the
brake pedal. If vibr ation still exists GO to B4
.
No
GO to B4
.
B4: CHECK
THE FRONT BRAKE PA
DS AND FRONT BRAKE DISCS
Chec
k the condition of the front br
ake pads and front brake discs.
1
D
oes excessive brake disc runout or br
ake disc thickness variation exist?
Page 315 of 2490
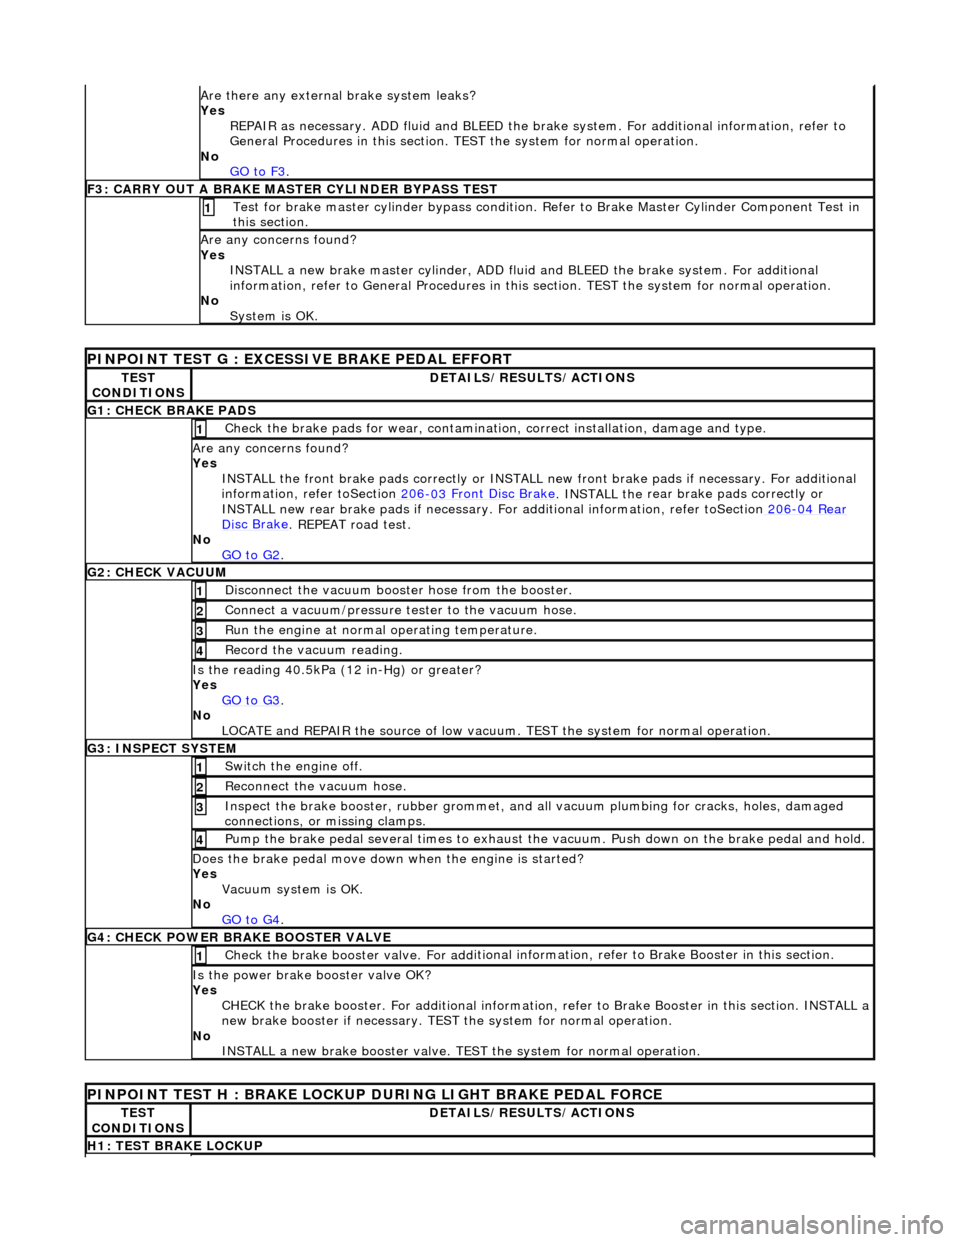
Are th
ere any external brake system leaks?
Yes REPAIR as necessary. ADD fluid and BLEED the brak e system. For additional information, refer to
General Procedures in this section. TEST the system for normal operation.
No GO to F3
.
F
3: CARRY OUT A BRAKE MASTER CYLINDER BYPASS TEST
Te
st for brake master cylinder bypass condition. Re
fer to Brake Master Cylinder Component Test in
this section.
1
A
re any concerns found?
Yes INSTALL a new brake master cylinder, ADD flui d and BLEED the brake system. For additional
information, refer to General Proc edures in this section. TEST the system for normal operation.
No System is OK.
PINPO
INT TEST G : EXCESSIVE BRAKE PEDAL EFFORT
TE
ST
CONDITIONS
D
ETAILS/RESULTS/ACTIONS
G1
: CHECK BRAKE PADS
Check the brake pads for wear, contamin
atio
n, correct installation, damage and type.
1
A
re any concerns found?
Yes INSTALL the front brake pads correctly or INSTALL ne w front brake pads if necessary. For additional
information, refer toSection 206
-03
Front Disc Brake
. INSTALL the
rear brake pads correctly or
INSTALL new rear brake pads if necessary. For additional information, refer toSection 206
-04
Rear
Di
sc Brake
. REPEAT road test.
No
GO to G2
.
G2:
CHECK VACUUM
Di
sconnect the vacuum booster hose from the booster.
1
Conne
ct a vacuum/pressure tester to the vacuum hose.
2
Ru
n the engine at normal operating temperature.
3
Re
cord the vacuum reading.
4
Is
the reading 40.5kPa (1
2 in-Hg) or greater?
Yes GO to G3
.
No
LOCATE and REPAIR the source of low vacuum . TEST the system for normal operation.
G3
: INSPECT SYSTEM
Swi
tch the engine off.
1
Re
connect the vacuum hose.
2
Inspect th
e brake booster, rubber grommet, and al
l vacuum plumbing for cracks, holes, damaged
connections, or missing clamps.
3
Pump th
e brake pedal several time
s to exhaust the vacuum. Push down on the brake pedal and hold.
4
Does th
e brake pedal move down
when the engine is started?
Yes Vacuum system is OK.
No GO to G4
.
G4
: CHECK POWER BRAKE BOOSTER VALVE
Check the brake booster valve. For
add
itional information, refer to
Brake Booster in this section.
1
Is th
e power brake booster valve OK?
Yes CHECK the brake booster. Fo r additional information, refer to Brak e Booster in this section. INSTALL a
new brake booster if necessary. TEST the system for normal operation.
No INSTALL a new brake booster valve. TEST the system for normal operation.
P
INPOINT TEST H : BRAKE LOCKUP
DURING LIGHT BRAKE PEDAL FORCE
TE
ST
CONDITIONS
D
ETAILS/RESULTS/ACTIONS
H1
: TEST BRAKE LOCKUP
Page 316 of 2490
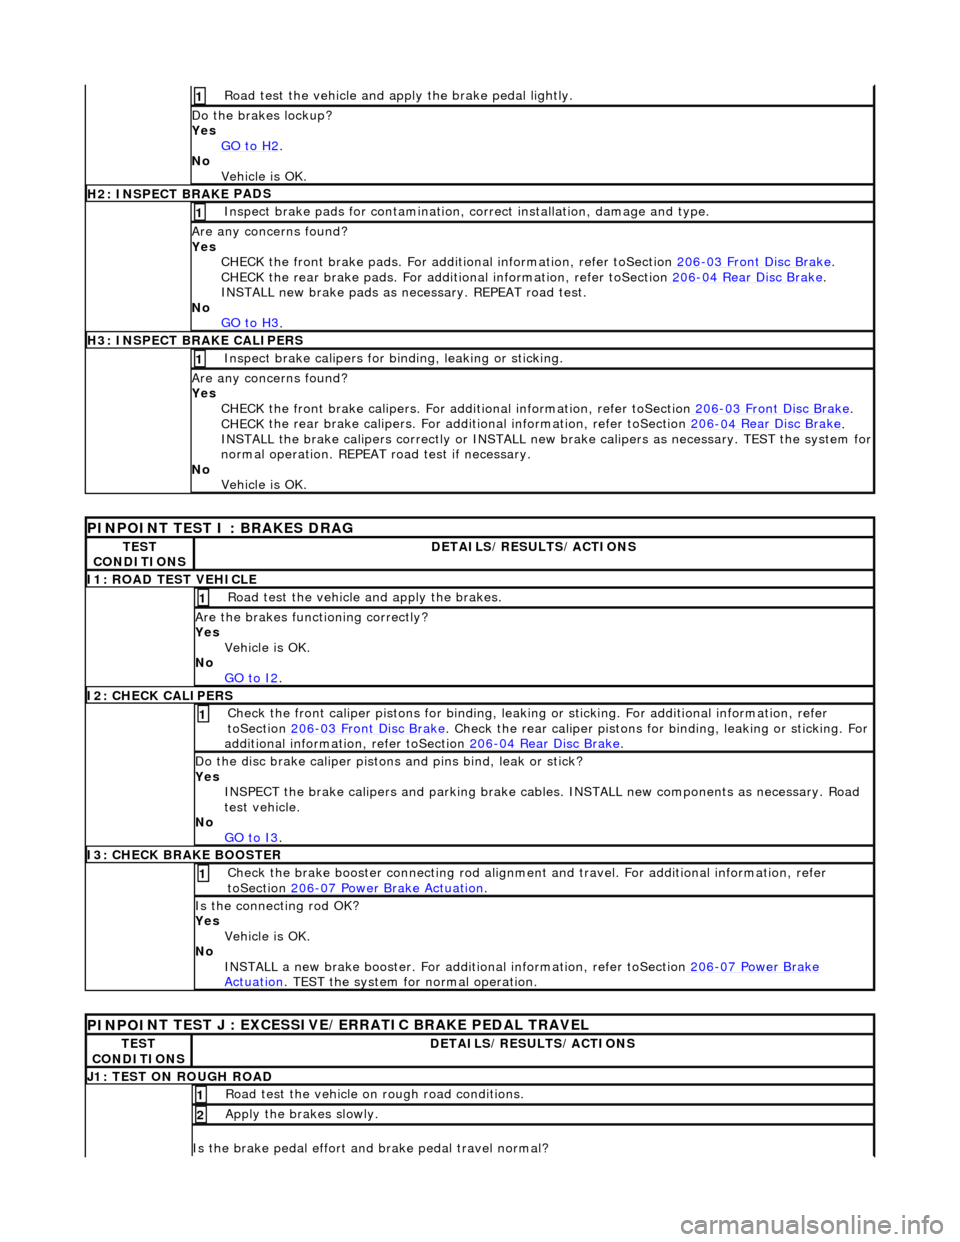
Road test the veh
icle and a
pply the brake pe dal lightly.
1
Do th
e brakes lockup?
Yes GO to H2
.
No
Vehicle is OK.
H2: INSPECT BRAKE PADS
Inspect brake pads for con
t
amination,
correct installation , damage and type.
1
Ar
e any concerns found?
Yes CHECK the front brake pads. For additi onal information, refer toSection 206
-03 Fr
ont Disc Brake
.
CHECK
the rear brake pads. For additi
onal information, refer toSection 206
-04
Rear Disc Brake
.
INST ALL new brake pads as ne ce
ssary. REPEAT
road test.
No GO to H3
.
H3: INSPECT BRAKE CALI
PERS
Inspect brake cali
pers for bindi
ng, leaking or sticking.
1
A
r
e any concerns found?
Yes CHECK the front brake calipers. For addi tional information, refer toSection 206
-03 Fr
ont Disc Brake
.
CHECK
the rear brake calipers. For addi
tional information, refer toSection 206
-04
Rear Disc Brake
.
IN ST
ALL the brake calipers correctly or INSTALL new
brake calipers as necessary. TEST the system for
normal operation. REPEAT road test if necessary.
No Vehicle is OK.
PI
NPOINT TEST I : BRAKES DRAG
TE
S
T
CONDITIONS
D E
TAILS/RESULTS/ACTIONS
I1
:
ROAD TEST VEHICLE
Ro
ad t
est the vehicle
and apply the brakes.
1
Are the brakes
functioning correctly?
Yes Vehicle is OK.
No GO to I2
.
I2
: CHECK CALIPERS
Check the fr
on
t caliper pistons for binding, leakin
g or sticking. For additional information, refer
toSection 206
-03 Fr
ont Disc Brake
. Check the rear cal
i
per pistons for
binding, leaking or sticking. For
additional information, refer toSection 206
-04
Rear Disc Brake
.
1
Do t
h
e disc brake caliper pistons
and pins bind, leak or stick?
Yes INSPECT the brake calipers and pa rking brake cables. INSTALL new co mponents as necessary. Road
test vehicle.
No GO to I3
.
I3
: CHECK BRAKE BOOSTER
Check the brake booster con
n
ecting rod alignment
and travel. For additional information, refer
toSection 206
-0 7
Power Brake Actuation
. 1
Is the co
nnecti
ng rod OK?
Yes Vehicle is OK.
No INSTALL a new brake booster. For addi tional information, refer toSection 206
-07
Power Brake
Actuation. TEST
the system for
normal operation.
PINPO
I
NT TEST J : EXCESSIVE/ERRATIC BRAKE PEDAL TRAVEL
TE
S
T
CONDITIONS
D E
TAILS/RESULTS/ACTIONS
J
1
: TEST ON ROUGH ROAD
R
oad test the vehi
cle on rough road conditions.
1
Apply the brakes slowly. 2
Is th
e brake pedal ef
fort an
d brake pedal travel normal?
Page 318 of 2490
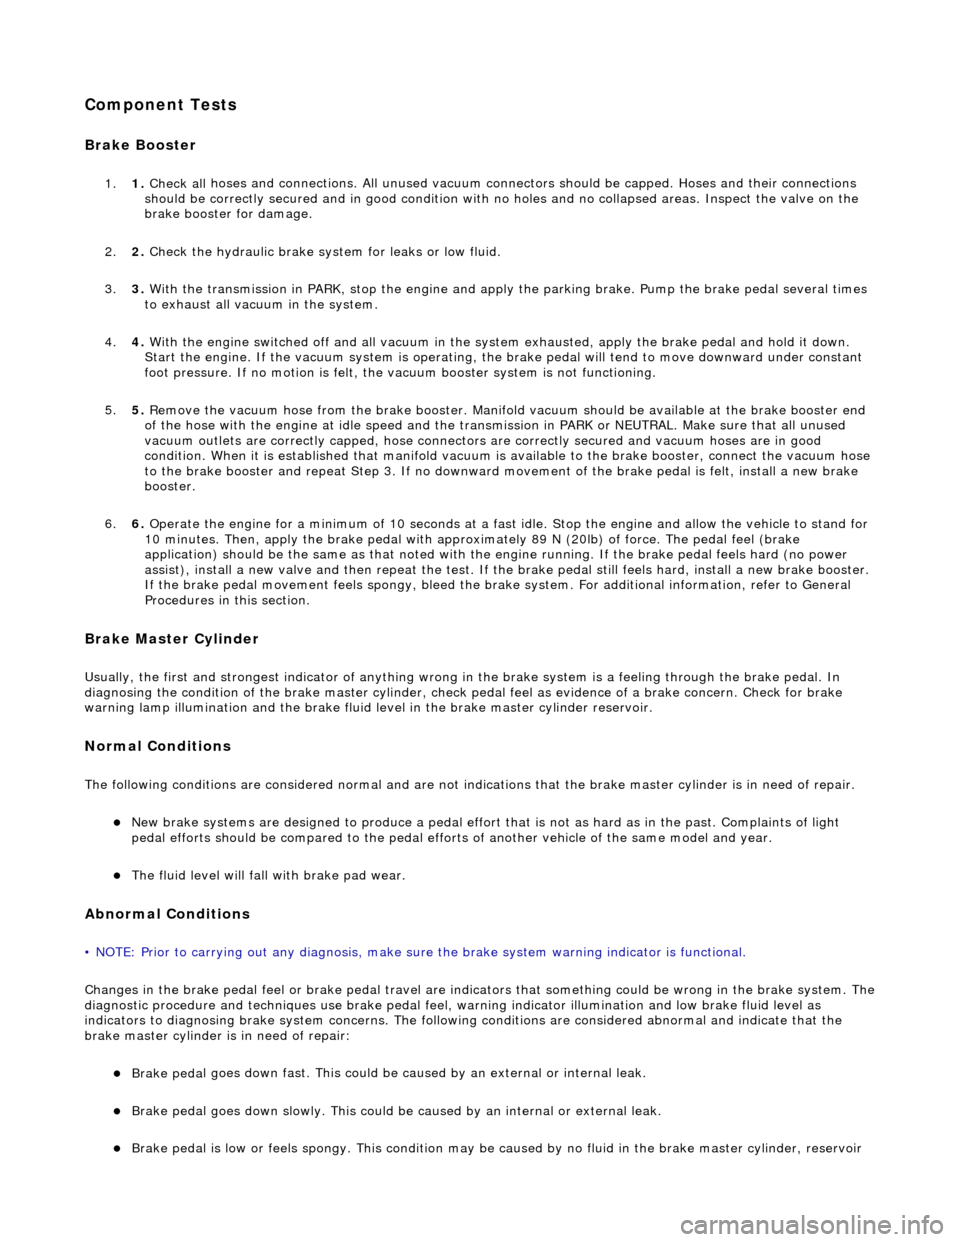
Comp
onent Tests
Bra
k
e Booster
1.
1. Chec k all
hoses and connections. All unused vacuum connectors should be capped. Hoses and their connections
should be correctly secured and in good condition with no holes and no collapsed areas. Inspect the valve on the
brake booster for damage.
2. 2. Check the hydraulic brake system for leaks or low fluid.
3. 3. With the transmission in PARK, stop the engine and apply the parking brake. Pump the brake pedal several times
to exhaust all vacuum in the system.
4. 4. With the engine switched off and all vacuum in the system exhausted, appl y the brake pedal and hold it down.
Start the engine. If the vacuum system is operating, the brake pedal will tend to move downward under constant
foot pressure. If no motion is felt, the vacuum booster system is not functioning.
5. 5. Remove the vacuum hose from the brake booster. Manifold vacuum should be available at the brake booster end
of the hose with the engine at idle speed and the transm ission in PARK or NEUTRAL. Make sure that all unused
vacuum outlets are correctly capped, hose connectors are correctly secured and vacuum hoses are in good
condition. When it is established that manifold vacuum is available to the brake booster, connect the vacuum hose
to the brake booster and repeat Step 3. If no downward movement of the brake pedal is felt, install a new brake
booster.
6. 6. Operate the engine for a minimum of 10 seconds at a fast idle. Stop the engine and allow the vehicle to stand for
10 minutes. Then, apply th e brake pedal with approximately 89 N ( 20lb) of force. The pedal feel (brake
application) should be the same as that noted with the engine running. If the brake pedal feels hard (no power
assist), install a new valve and then re peat the test. If the brake pedal still feels hard, in stall a new brake booster.
If the brake pedal movement feels spongy, bleed the brak e system. For additional information, refer to General
Procedures in this section.
Bra k
e Master Cylinder
Usual
l
y, the first and strongest
indicator of anything wrong in the brake syst em is a feeling through the brake pedal. In
diagnosing the condition of the brake master cylinder, check pedal feel as evidence of a brake concern. Check for brake
warning lamp illumination and the brake fluid le vel in the brake master cylinder reservoir.
Normal Conditio
ns
The fo
llowing conditions are considered norm
al and are not indications that the brake master cylinder is in need of repair.
New bra
ke systems are designed to produc
e a pedal effort that is not as hard as in the past. Complaints of light
pedal efforts should be compared to the pedal effort s of another vehicle of the same model and year.
The fl
uid level will fall with brake pad wear.
Abnormal Conditions
•
NOTE: Prior to carrying out any diag
nosis, make sure the brake system warning indicator is functional.
Changes in the brake pedal feel or brake pedal travel are in dicators that something could be wrong in the brake system. The
diagnostic procedure and techniques use brake pedal feel, warning indicator illu mination and low brake fluid level as
indicators to diagnosing brake system co ncerns. The following conditions are cons idered abnormal and indicate that the
brake master cylinder is in need of repair:
Brake ped a
l goes down fast. Th
is could be caused by an ex ternal or internal leak.
Brake pedal goes down slowly
. This could be
caused by an internal or external leak.
Brak
e pedal is low or feels spongy. This condition may be ca
used by no fluid in the brake master cylinder, reservoir
Page 319 of 2490
cap ven
t holes clogged or air in the hydraulic system.
Brake ped
al effort is excessive. This ma
y be caused by a bind or obstruction in the pedal/linkage, a faulty non return
valve, booster or insuffi cient booster vacuum.
R
ear brakes lock up during light pedal force. This may
be caused by damaged brake pads, an incorrectly adjusted
parking brake, a partially applied parking brake, a damaged ABS sensor or bearing failure.
Brake ped
al effort erratic. This condition could be caused by the brake booste
r or incorrectly installed brake pads.
Brake warning indicator i
s on. This may be caused
by low fluid level or float assembly damaged.
No
n Pressure Leaks
Any reduced fluid v
olume in the brake ma
ster cylinder reservoir condition may be caused by two types of none pressure
external leaks.
Type 1: An external leak may be occur at the master cylinder reservoir cap because of incorre ct positioning of gasket and
cap. Reposition cap and gasket.
Type 2: An external leak may occur at th e reservoir mounting seals. Repair such a leak by installing new seals and make
sure that the reservoir retainin g bolt is correctly installed.
Page 391 of 2490
Parking Brake and Ac
tu
ation - Parking Brake
Description an
d Operation
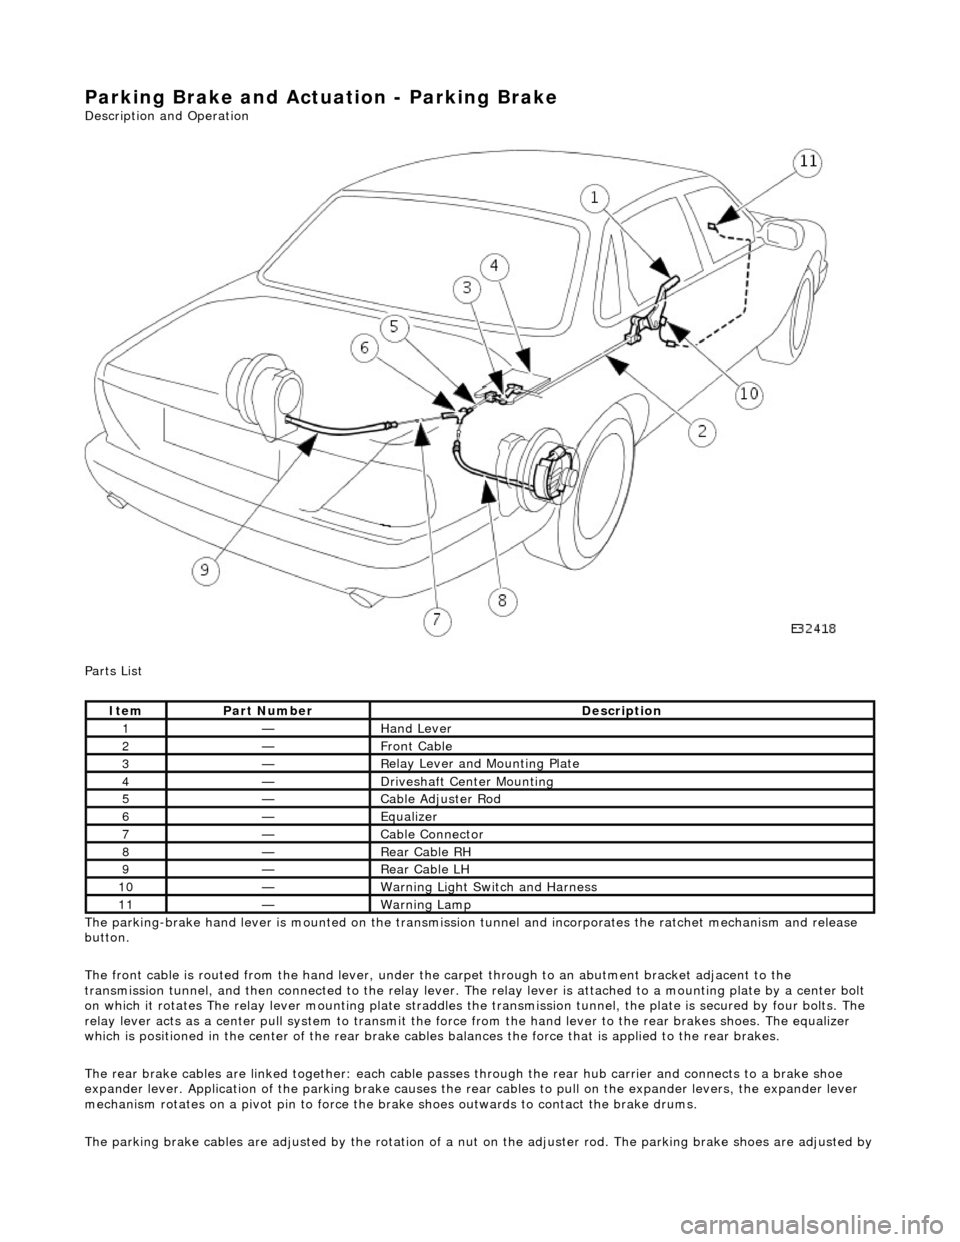
Parts List
The parking-brake hand lever is mounted on the transmission tunnel and incorporates the ratchet mechanism and release
button.
The front cable is routed from the hand lever, under the carpet through to an abutment bracket adjacent to the
transmission tunnel, and then connected to the relay lever. The relay lever is attached to a mounting plate by a center bolt
on which it rotates The relay lever mounting plate straddles the transmission tunnel, the plate is secured by four bolts. The
relay lever acts as a center pu ll system to transmit the force from the hand lever to the rear brakes shoes. The equalizer
which is positioned in the center of the rear brake cables balances the force that is applied to the rear brakes.
The rear brake cables are linked together: each cable passes through the rear hub carrier and connects to a brake shoe
expander lever. Application of the parking brake causes the rear cables to pu ll on the expander levers, the expander lever
mechanism rotates on a pivot pin to force the brake shoes outwards to contact the brake drums.
The parking brake cables are adjusted by the rotation of a nu t on the adjuster rod. The parking brake shoes are adjusted by
It
em
Par
t Number
De
scription
1—Hand Le
ver
2—Front Cable
3—R
elay Lever and Mounting Plate
4—Drivesh
aft Center Mounting
5—Cable Adjuster Rod
6—Equalize
r
7—Cable Connector
8—Rear Ca
ble RH
9—Rear Ca
ble LH
10—Warn
ing Light Switch and Harness
11—War
ning Lamp
Page 396 of 2490
Parking Brake and Actuation - P
arking Brake Control
Re
mo
val and Installation
Remov
a
l
W
A
RNING: BRAKE DUST, IF INHALED CAN DAMAGE YOUR
HEALTH. ALWAYS REMOVE BRAKE DUST USING A VACUUM
BRUSH. DO NOT USE A COMPRESSED-AIR LINE TO DISPERSE BRAKE DUST INTO THE ATMOSPHERE.
CAUTION: Replacement of nuts and bolts: Various thread-locking devices are used on nuts and bolts throughout the
vehicle. These devices restrict the number of times a nut or bolt can be used. See section 100-00 for information.
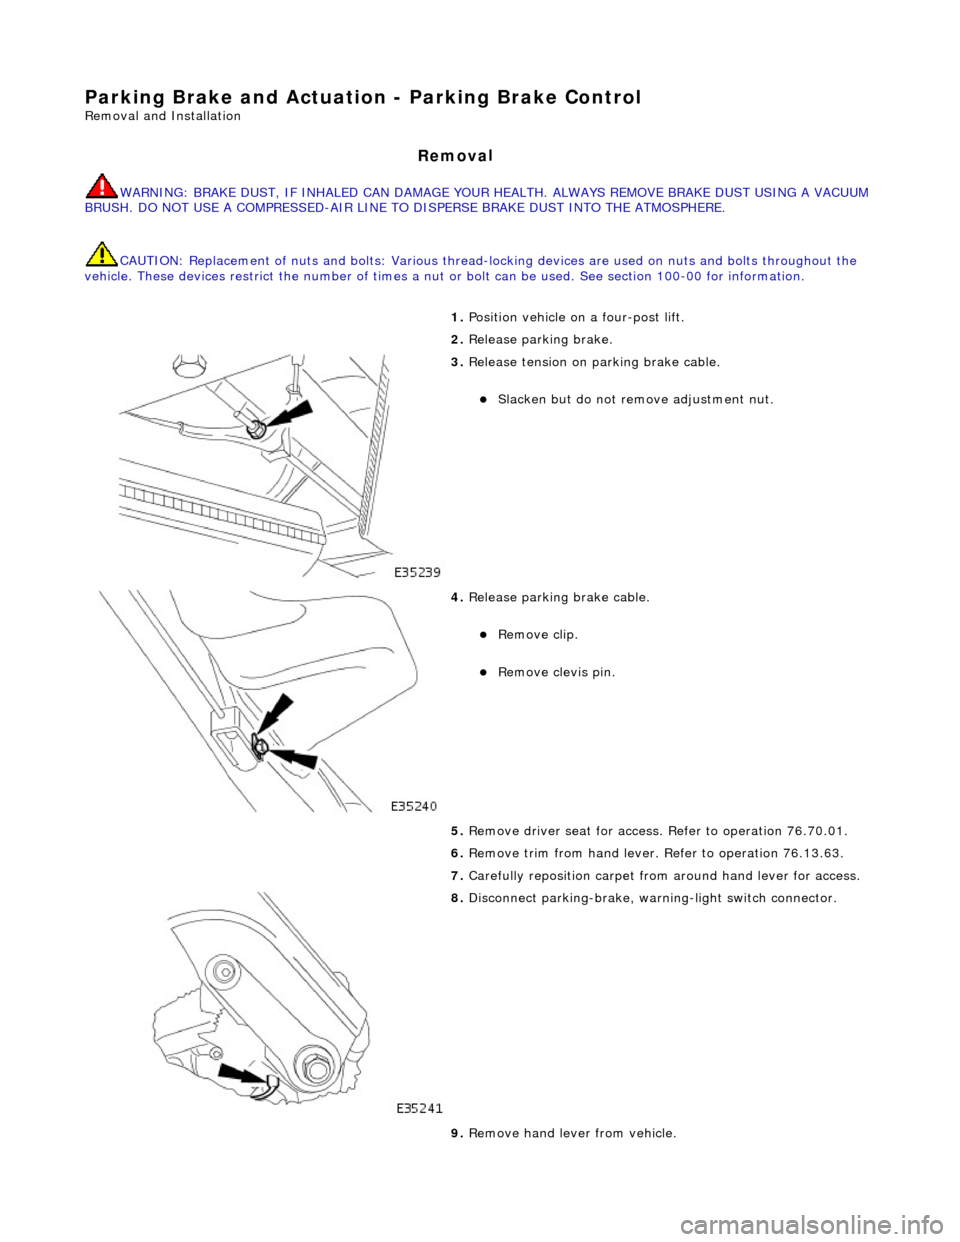
1. Position vehi cl
e on a four-post lift.
2. Release parking brake.
3. Releas
e tension on parking brake cable.
Slacken bu
t do not remove adjustment nut.
4. Releas
e parking brake cable.
Remo
ve clip.
Re
mo
ve clevis pin.
5. Remove driver seat for access . Refer to operation 76.70.01.
6. Remove trim from hand lever. Refer to operation 76.13.63.
7. Carefully reposition carpet from around hand lever for access.
8. Disconnect park ing-br
ake, warning-light switch connector.
9. Remove hand lever from vehicle.
Page 397 of 2490

I
nstallation
Re
move bolts.
R
emove lever.
10
.
Remove gasket.
11
.
Remove warning-light switch from lever.
R
emove screws.
Re
move switch.
1. Inst
all warning-light switch to hand lever.
Install and tigh
ten
screws to 3 Nm.
2. Install gasket to handbrake lever.
Page 398 of 2490
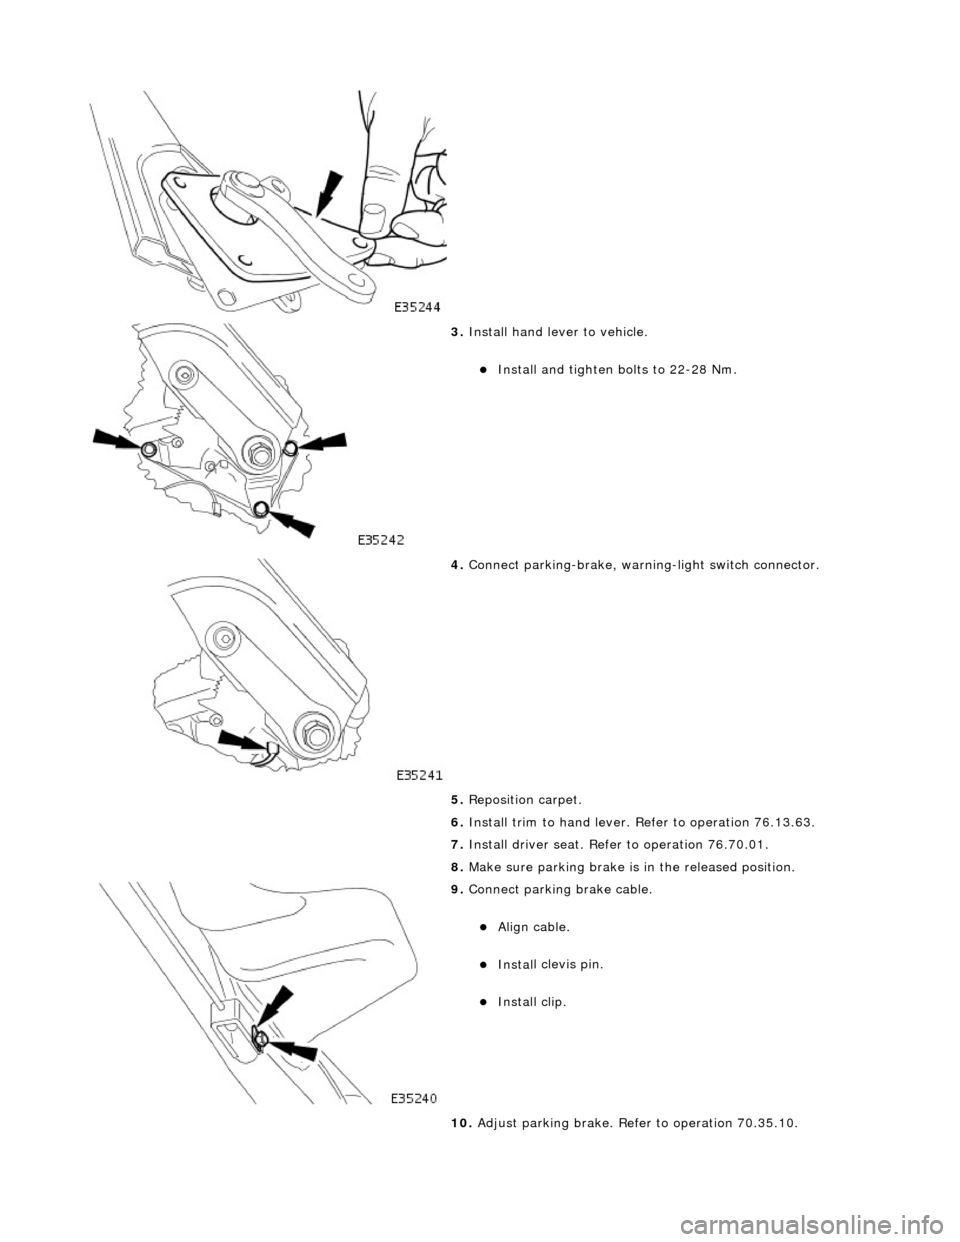
3. Instal
l hand lever to vehicle.
Install and tighten bolts to 2
2-28 Nm.
4. Connect park
ing-brake, warnin
g-light switch connector.
5. Reposition carpet.
6. Install trim to hand lever. Refer to operation 76.13.63.
7. Install driver seat. Refer to operation 76.70.01.
8. Make sure parking brake is in the released position.
9. Connect p a
rking brake cable.
Align ca
ble
.
Inst
al
l clevis pin.
Inst
al
l clip.
10. Adjust parking brake. Refer to operation 70.35.10.