pulley JAGUAR X308 1998 2.G User Guide
[x] Cancel search | Manufacturer: JAGUAR, Model Year: 1998, Model line: X308, Model: JAGUAR X308 1998 2.GPages: 2490, PDF Size: 69.81 MB
Page 598 of 2490

Cr
ankshaft front seal remover
303-541
Cr
ankshaft front seal replacer
303-542
Cr
ankshaft pulley/damper remover
303-588
Removal
1. Open the engine compartment and fit paintwork protection sheets.
2. Set the engine compartment cover to the service access position.
3. Remove the supercharger drive belt. Refer to Operation <<18.50.08>>.
4. Remove the drive belt from the front accessory drive. Refer to Operation <<12.10.40>>.
Page 630 of 2490

21. L
oosen the bolt which secures the VVT unit to the camshaft.
22. Remove the camshaft locking tool 303 - 530 (installed for previous
operation).
23. R
emove the primary chain tensioner bolts.
24 . R
emove the tensioner assembly.
1. Remove the tensioner.
2. Remove the tens ioner back-plate.
25 . R
emove the primary chain tensioner blade.
1. Remove the pivot bolt which secures the tensioner blade.
2. Remove the tensioner blade.
26. Remove the primary chain from the VVT unit and from the crankshaft
pulley.
27 . R
emove the VVT unit and exhaust camshaft sprocket.
1. Remove the securing bolt from both the VVT unit and the exhaust cam sprocket.
2. Remove the VVT unit, exhaust sprocket and secondary chain as an assembly (release the chain from the tensioner which is still
secured to the cylinder head).
Re
move the secondary chain from
the VVT unit and the sprocket.
28. Remove the secondary chain tensioner.
Page 642 of 2490
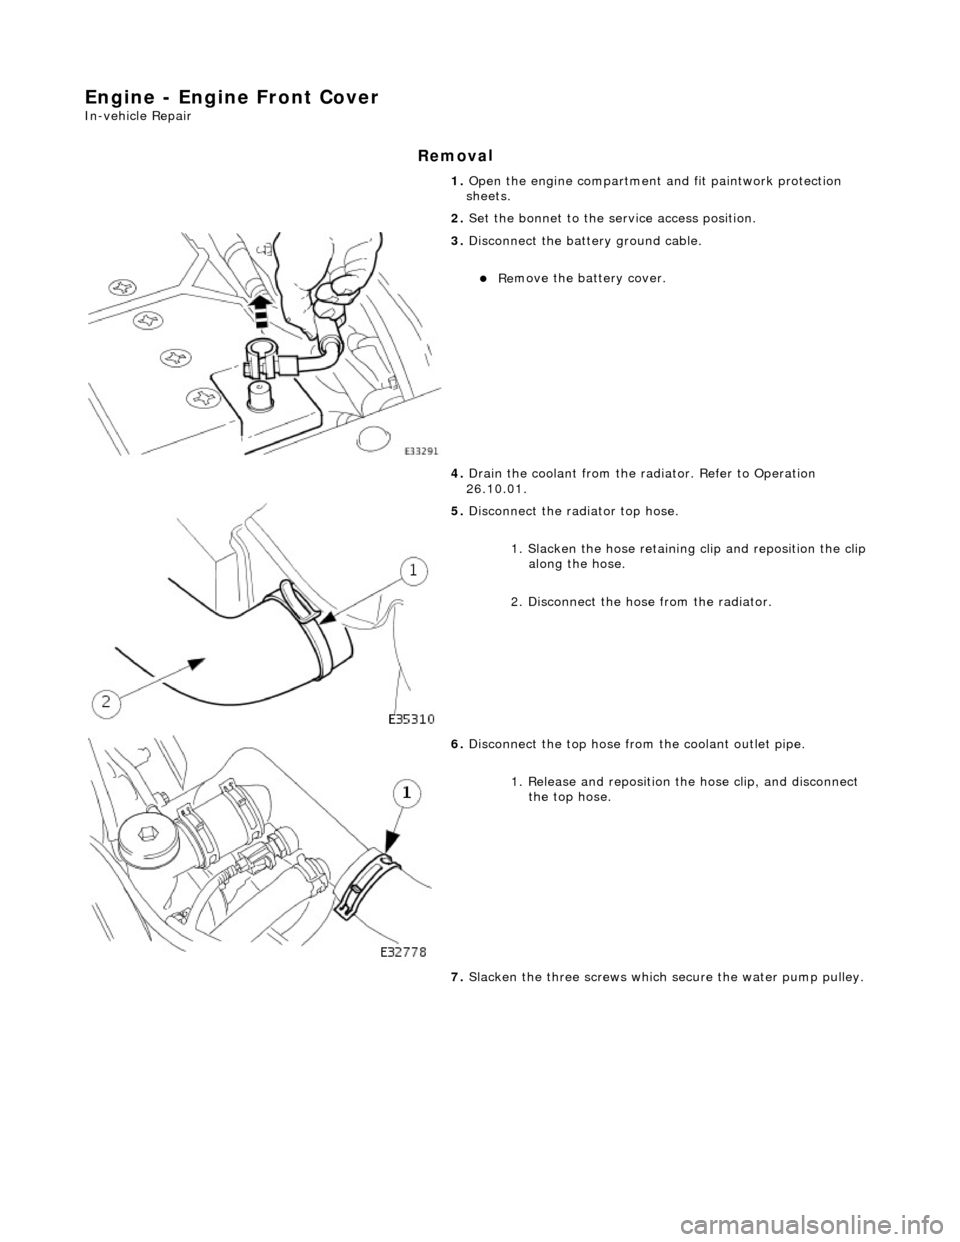
Engine - Engine Front Cover
In-vehic
le Repair
Remov
a
l
1.
Op
en the engine compartment and fit paintwork protection
sheets.
2. Set the bonnet to the service access position.
3. Disc
onnect the batt
ery ground cable.
Re
move the battery cover.
4. Drain the coolant from the radiator. Refer to Operation
26.10.01.
5. Disc onne
ct the radiator top hose.
1. Slacken the hose retaining clip and reposition the clip
along the hose.
2. Disconnect the hose from the radiator.
6. Disc
onnect the top hose from the coolant outlet pipe.
1. Release and reposition th e hose clip, and disconnect
the top hose.
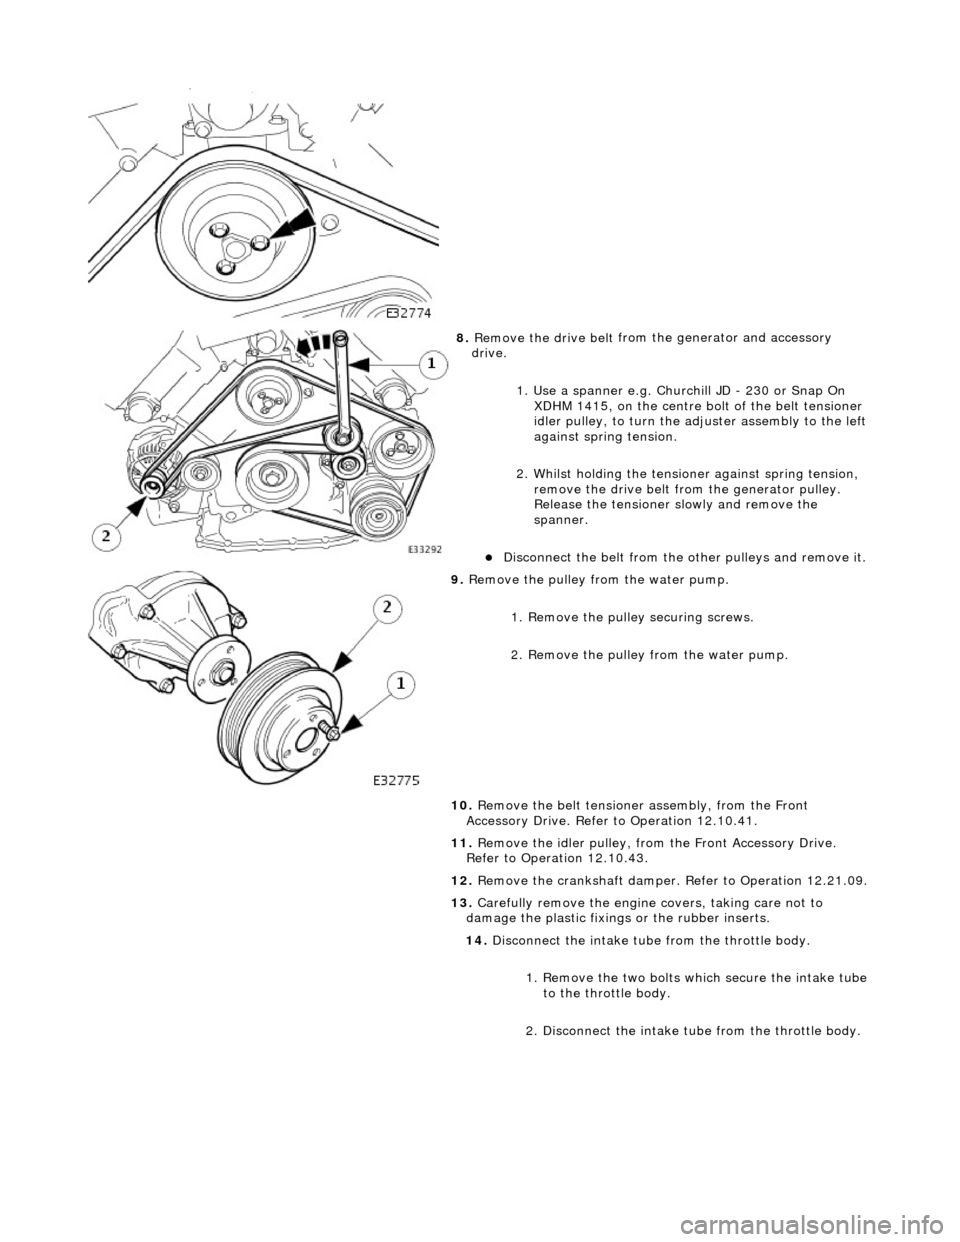
7. Slacken the three screws which secure the water pump pulley.
Page 643 of 2490
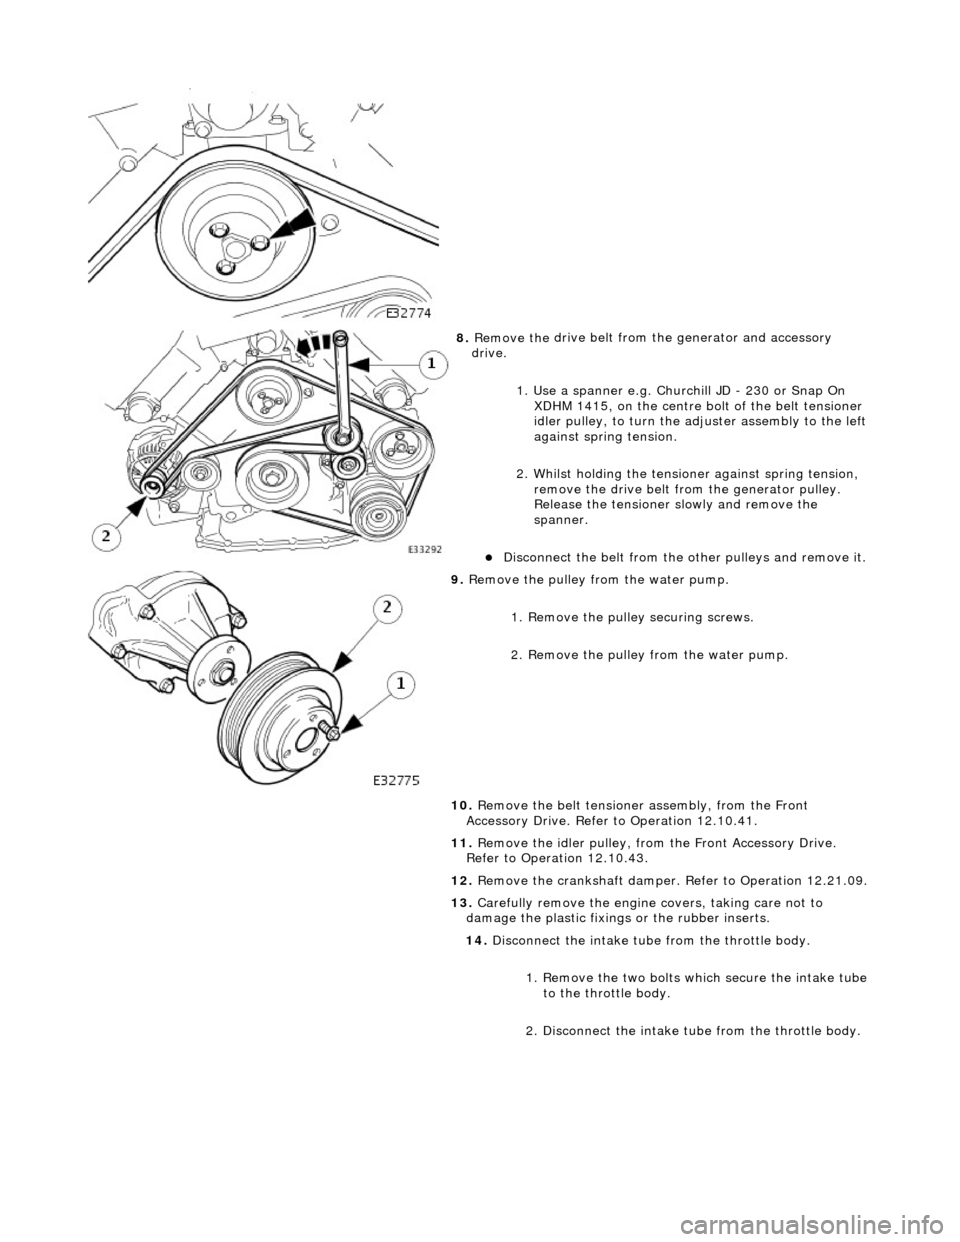
8. Remove the
drive belt from
the generator and accessory
drive.
1. Use a spanner e.g. Churchill JD - 230 or Snap On XDHM 1415, on the centre bo lt of the belt tensioner
idler pulley, to turn the adju ster assembly to the left
against spring tension.
2. Whilst holding the tensioner against spring tension, remove the drive belt from the generator pulley.
Release the tensioner sl owly and remove the
spanner.
D
isconnect the belt from the
other pulleys and remove it.
9. Re
move the pulley from the water pump.
1. Remove the pulley securing screws.
2. Remove the pulley from the water pump.
10. Remove the belt tensione r assembly, from the Front
Accessory Drive. Refer to Operation 12.10.41.
11. Remove the idler pulley, from the Front Accessory Drive.
Refer to Operation 12.10.43.
12. Remove the crankshaft damper. Refer to Operation 12.21.09.
13. Carefully remove the engine covers, taking care not to
damage the plasti c fixings or the rubber inserts.
14. Disconnect the intake tube from the throttle body.
1. Remove the two bolts which secure the intake tube to the throttle body.
2. Disconnect the intake tube from the throttle body.
Page 649 of 2490
15
.
Reconnect the air flow meter multi-plug.
16. Refit the engine covers.
17. Refit the crankshaft damper. Refer to Operation 12.21.09.
18. Refit the idler pulley, to the Front Accessory Drive. Refer to
Operation 12.10.43.
19. Refit the belt tensioner assembly, to the Front Accessory
Drive. Refer to Operation 12.10.41.
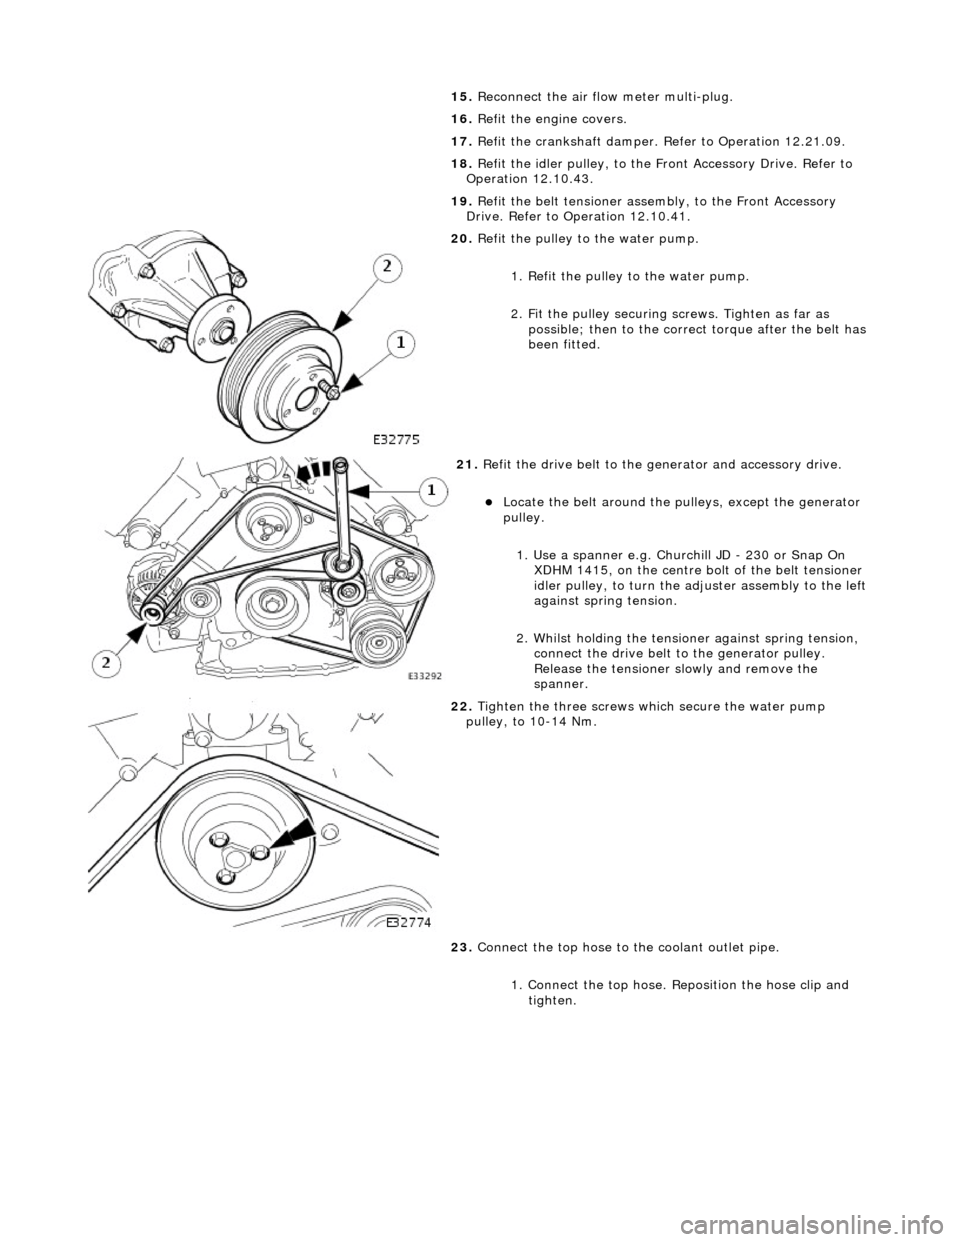
20
.
Refit the pulley to the water pump.
1. Refit the pulley to the water pump.
2. Fit the pulley securing screws. Tighten as far as
possible; then to the correct torque after the belt has
been fitted.
21
.
Refit the drive belt to the generator and accessory drive.
Locat
e the belt around the pulleys, except the generator
pulley.
1. Use a spanner e.g. Churchill JD - 230 or Snap On XDHM 1415, on the centre bo lt of the belt tensioner
idler pulley, to turn the adju ster assembly to the left
against spring tension.
2. Whilst holding the tensioner against spring tension, connect the drive belt to the generator pulley.
Release the tensioner sl owly and remove the
spanner.
22
.
Tighten the three screws wh ich secure the water pump
pulley, to 10-14 Nm.
23. Connect the top hose to the coolant outlet pipe.
1. Connect the top hose. Reposition the hose clip and tighten.
Page 651 of 2490
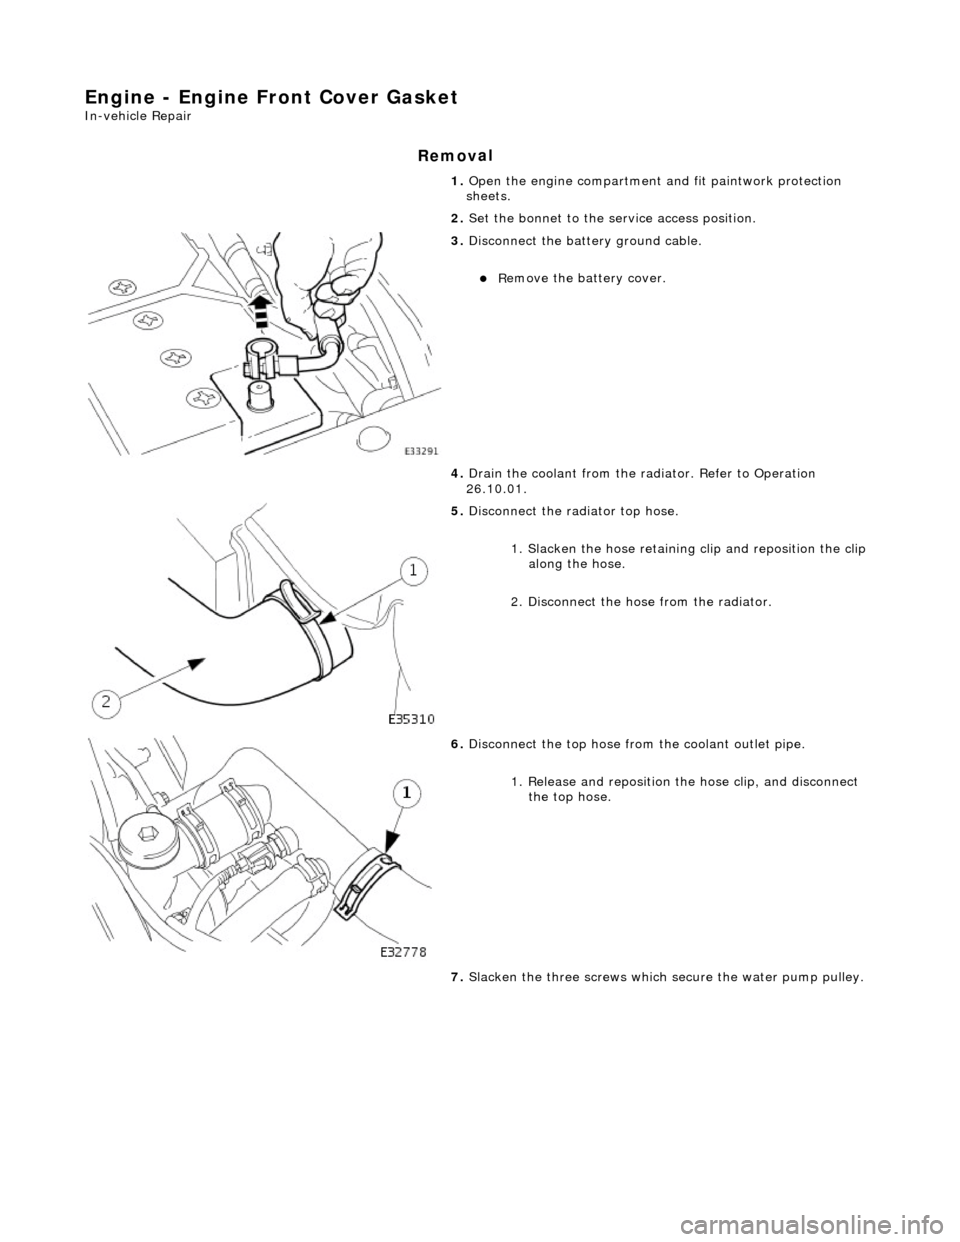
Engine - Engine Fron
t Cover Gasket
In-v
ehicle Repair
Remov
al
1.
O
pen the engine compartment and fit paintwork protection
sheets.
2. Set the bonnet to the service access position.
3. Di
sconnect the batt
ery ground cable.
R
emove the battery cover.
4. Drain the coolant from the radiator. Refer to Operation
26.10.01.
5. Disc
onnect the radiator top hose.
1. Slacken the hose retaining clip and reposition the clip
along the hose.
2. Disconnect the hose from the radiator.
6. Di
sconnect the top hose from the coolant outlet pipe.
1. Release and reposition th e hose clip, and disconnect
the top hose.
7. Slacken the three screws which secure the water pump pulley.
Page 652 of 2490
8. Remove the drive belt
from
the generator and accessory
drive.
1. Use a spanner e.g. Churchill JD - 230 or Snap On XDHM 1415, on the centre bo lt of the belt tensioner
idler pulley, to turn the adju ster assembly to the left
against spring tension.
2. Whilst holding the tensioner against spring tension, remove the drive belt from the generator pulley.
Release the tensioner sl owly and remove the
spanner.
D i
sconnect the belt from the
other pulleys and remove it.
9. Remove t
he pulley from the water pump.
1. Remove the pulley securing screws.
2. Remove the pulley from the water pump.
10. Remove the belt tensione r assembly, from the Front
Accessory Drive. Refer to Operation 12.10.41.
11. Remove the idler pulley, from the Front Accessory Drive.
Refer to Operation 12.10.43.
12. Remove the crankshaft damper. Refer to Operation 12.21.09.
13. Carefully remove the engine covers, taking care not to
damage the plasti c fixings or the rubber inserts.
14. Disconnect the intake tube from the throttle body.
1. Remove the two bolts which secure the intake tube to the throttle body.
2. Disconnect the intake tube from the throttle body.
Page 658 of 2490
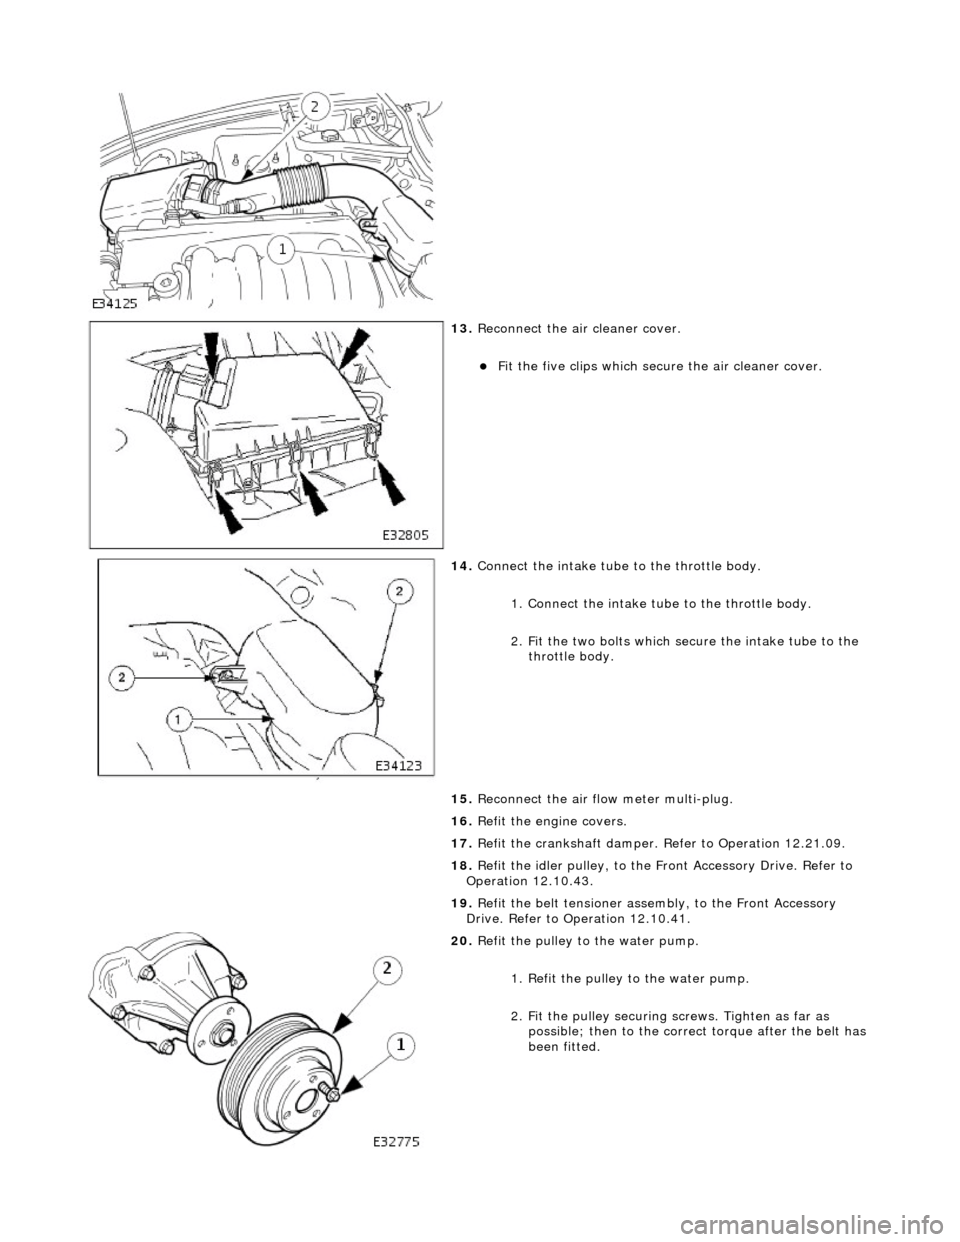
13. Reconnect the air cleaner cover.
Fit the five clips which secu re the air cleaner cover.
14. Connect the intake tube to the throttle body.
1. Connect the intake tube to the throttle body.
2. Fit the two bolts which secure the intake tube to the throttle body.
15. Reconnect the air flow meter multi-plug.
16. Refit the engine covers.
17. Refit the crankshaft damper. Refer to Operation 12.21.09.
18. Refit the idler pulley, to the Front Accessory Drive. Refer to
Operation 12.10.43.
19. Refit the belt tensioner assembly, to the Front Accessory
Drive. Refer to Operation 12.10.41.
20. Refit the pulley to the water pump.
1. Refit the pulley to the water pump.
2. Fit the pulley securing screws. Tighten as far as
possible; then to the correct torque after the belt has
been fitted.
Page 659 of 2490
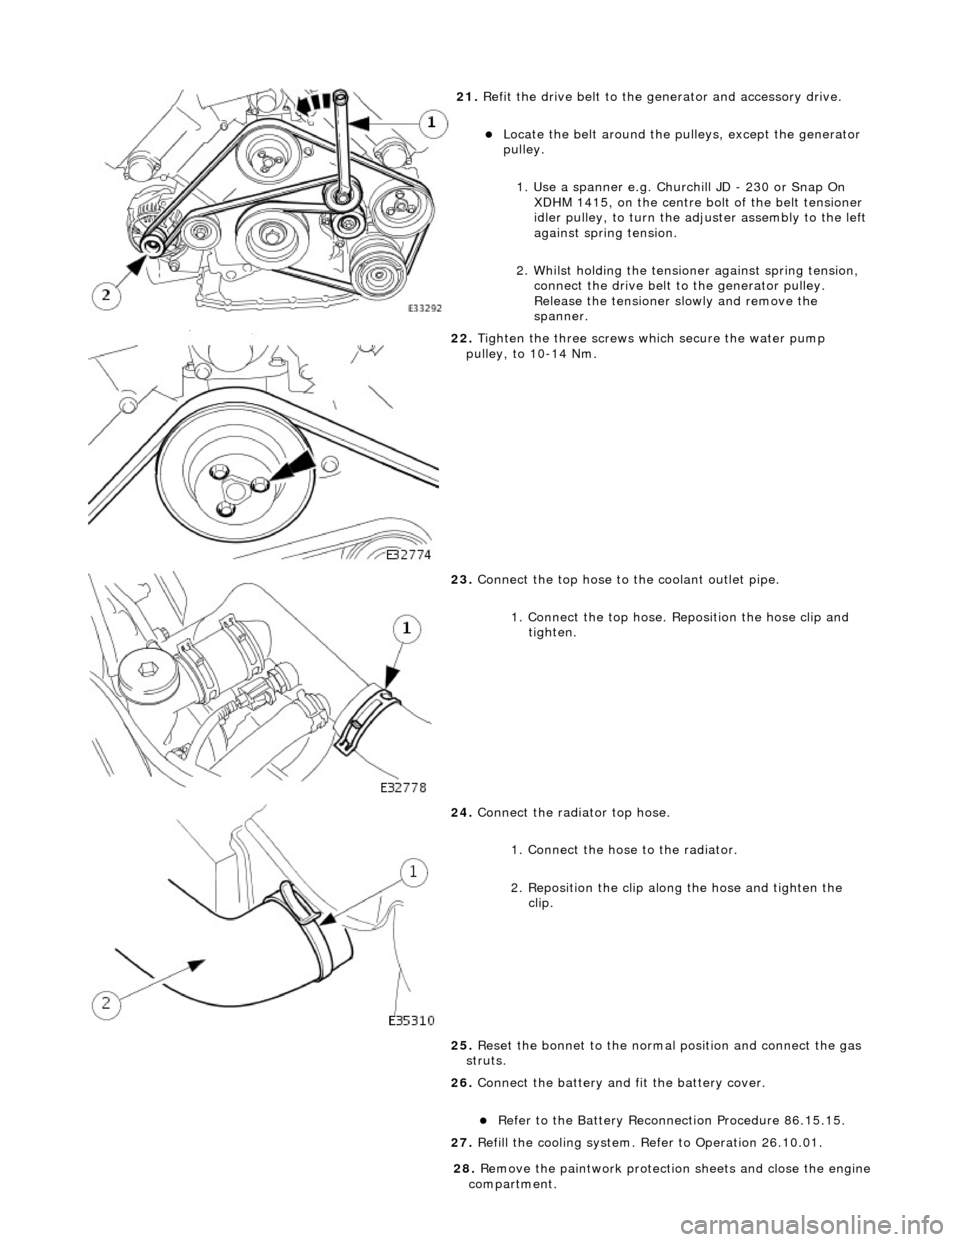
21
.
Refit the drive belt to the generator and accessory drive.
Locat
e the belt around the pulleys, except the generator
pulley.
1. Use a spanner e.g. Churchill JD - 230 or Snap On XDHM 1415, on the centre bo lt of the belt tensioner
idler pulley, to turn the adju ster assembly to the left
against spring tension.
2. Whilst holding the tensioner against spring tension, connect the drive belt to the generator pulley.
Release the tensioner sl owly and remove the
spanner.
22
.
Tighten the three screws wh ich secure the water pump
pulley, to 10-14 Nm.
23
.
Connect the top hose to the coolant outlet pipe.
1. Connect the top hose. Reposition the hose clip and tighten.
24
.
Connect the radiator top hose.
1. Connect the hose to the radiator.
2. Reposition the clip along the hose and tighten the clip.
25. Reset the bonnet to the normal position and connect the gas
struts.
26. Connect the battery and fit the battery cover.
Re
fer to the Battery Reconnection Procedure 86.15.15.
27. Refill the cooling system. Refer to Operation 26.10.01.
28
.
Remove the paintwork protection sheets and close the engine
compartment.
Page 706 of 2490
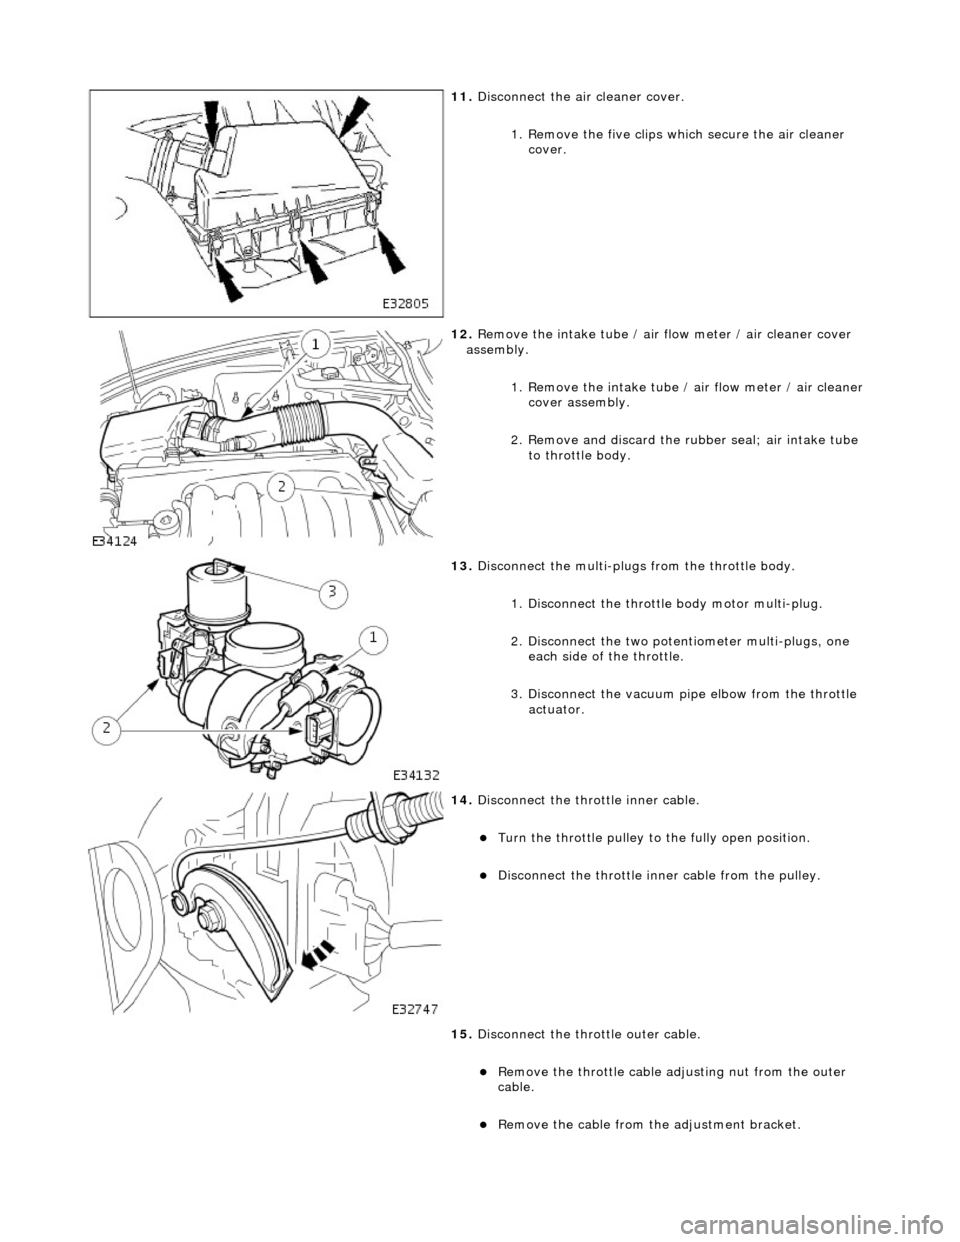
11. Disconnect the air cleaner cover.
1. Remove the five clips wh ich secure the air cleaner
cover.
12. Remove the intake tube / air flow meter / air cleaner cover
assembly.
1. Remove the intake tube / air flow meter / air cleaner
cover assembly.
2. Remove and discard the ru bber seal; air intake tube
to throttle body.
13. Disconnect the multi-plug s from the throttle body.
1. Disconnect the throttle body motor multi-plug.
2. Disconnect the two potentiometer multi-plugs, one each side of the throttle.
3. Disconnect the vacuum pi pe elbow from the throttle
actuator.
14. Disconnect the throttle inner cable.
Turn the throttle pulley to the fully open position.
Disconnect the throttle in ner cable from the pulley.
15. Disconnect the throttle outer cable.
Remove the throttle cable adjusting nut from the outer
cable.
Remove the cable from the adjustment bracket.