Steering column JAGUAR X308 1998 2.G Owner's Manual
[x] Cancel search | Manufacturer: JAGUAR, Model Year: 1998, Model line: X308, Model: JAGUAR X308 1998 2.GPages: 2490, PDF Size: 69.81 MB
Page 497 of 2490

пЃ¬Locate the ti
e rod end into the steering arm.
пЃ¬Inst
all a new nut.
пЃ¬Tigh
ten the nut to 22-28 Nm.
12
.
NOTE: Make sure the steering wheel and wheel and tire
assemblies are in the straight ah ead position before fitting the
steering column lower shaft.
Attach the steering column lower shaft.
1. Attach the steering column lower shaft.
2. Install the steering column lower shaft retaining bolt.
1. Tighten to 28 - 34 Nm
.
3
. Tighten to 28 - 34 Nm.
13. Fit a new power steering fluid re servoir, refill with new power
steering fluid and blee d air from the system.
For additional information, refer to: Power Steering System
Fillin
g and Bleeding
(211-00 Steering System - General
Information, Gene ral Procedures).
14. Check and adjust the front toe.
For additional information, refer to: Front Toe Adjustment
(204-00 Suspen
sion System -
General Information, General
Procedures).
Page 504 of 2490
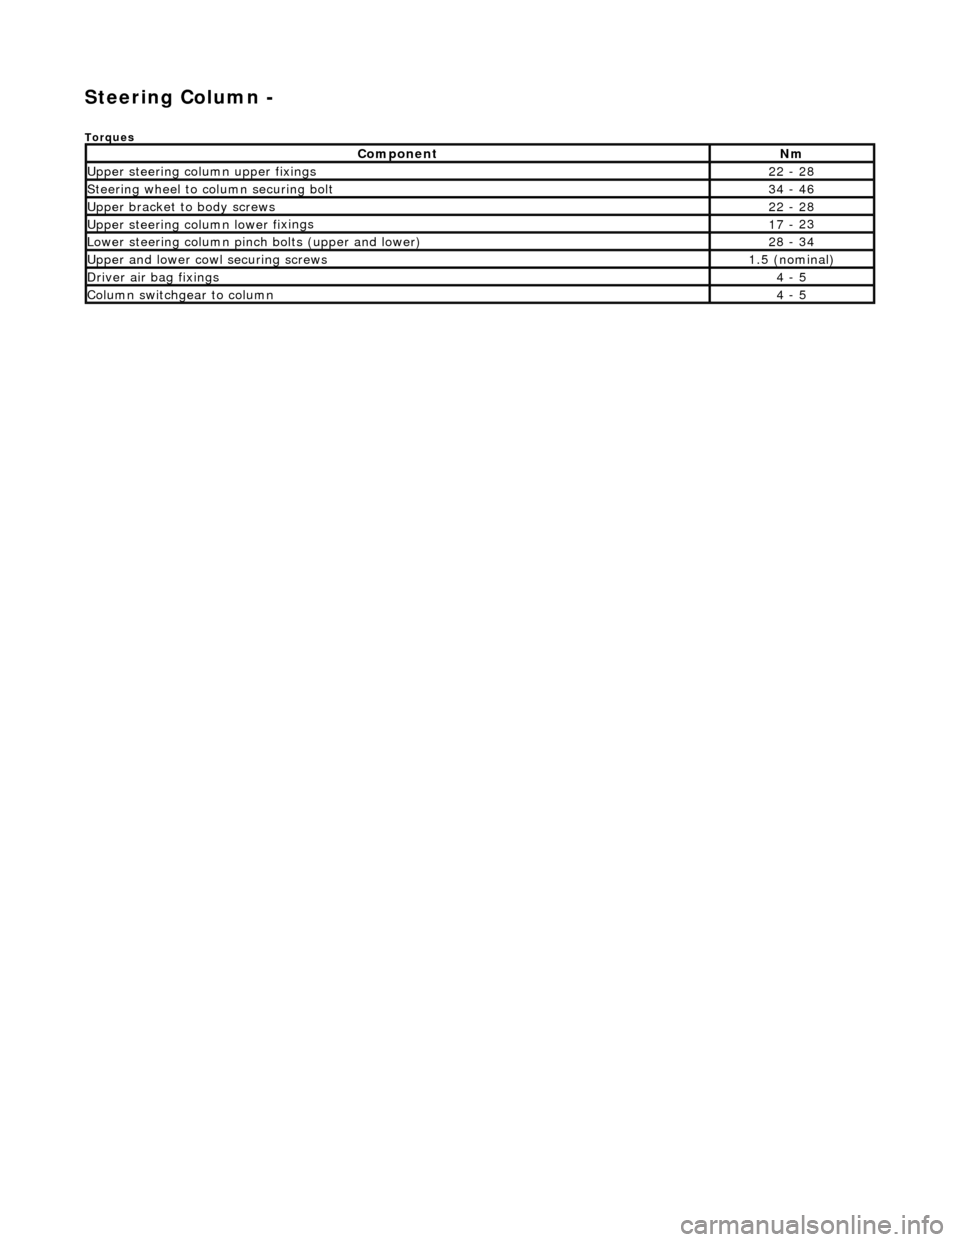
Steering Column -
Torques
Comp
onent
Nm
Upper
steering column upp
er fixings
22
-
28
S
t
eering wheel to column securing bolt
34
-
46
Upper
bracket
to body screws
22
-
28
Upper
steering colu mn lower fi
xings
17
-
23
Lower steeri
ng col
umn pinch bolts (upper and lower)
28
-
34
U
pper
and lower cowl securing screws
1.
5 (
nominal)
D
river ai
r bag fixings
4 -
5
Colum
n switchgear to column
4 -
5
Page 505 of 2490
Steering Column - Steering Column
Description an
d Operation
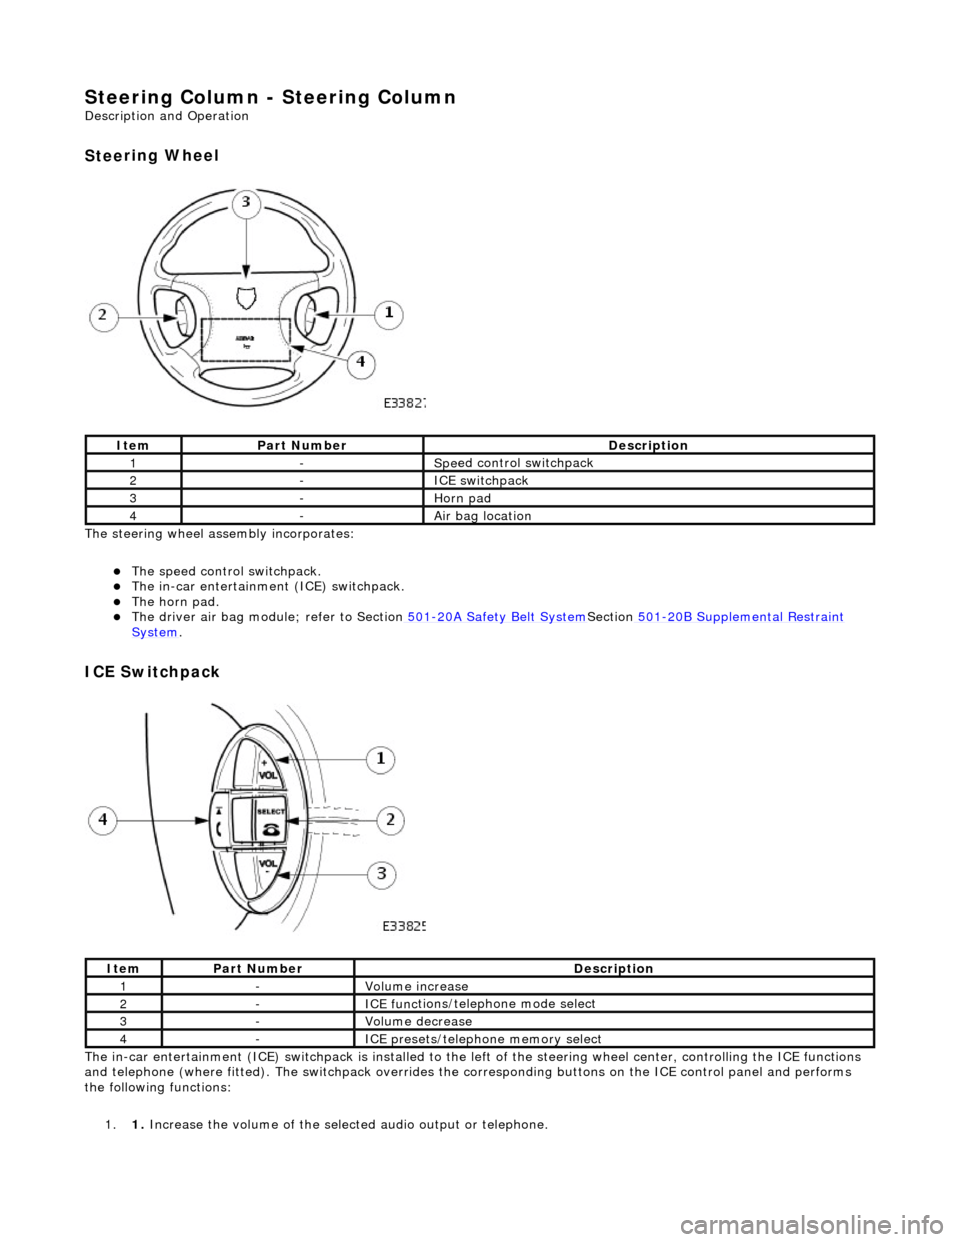
Stee
ring Wheel
T
he steering wheel assembly incorporates:
пЃ¬The s
peed control switchpack.
пЃ¬The i
n-car entertainment (ICE) switchpack.
пЃ¬The h
orn pad.
пЃ¬The driver ai
r bag module; refer to Section
501
-20A Safety Belt
System
Sectio
n
501
-2
0B Supplemental Restraint
Sy
stem
.
I
CE Switchpack
The
in-car entertainment (ICE) switchpack is installed to the le
ft of the steering wheel center, controlling the ICE functions
and telephone (where fitted). The switchpack overrides the corresponding bu ttons on the ICE control panel and performs
the following functions:
1. 1. Increase the volume of the select ed audio output or telephone.
It
em
Par
t Number
De
scription
1-Spe
ed control switchpack
2-I
CE switchpack
3-Horn pad
4-Air bag lo
cation
It
em
Par
t Number
De
scription
1-Vol
ume increase
2-ICE func
tions/teleph
one mode select
3-Volum
e decrease
4-ICE pres
ets/telephone memory select
Page 507 of 2490
The driver air bag is moun
ted below the horn operat
ing pad area, adjacent to the steering wheel hub.
For air bag safety and service information, refer to Section 501
-20A Safety Belt
System
Sectio
n
501
-2
0B Supplemental
Re
straint System
.
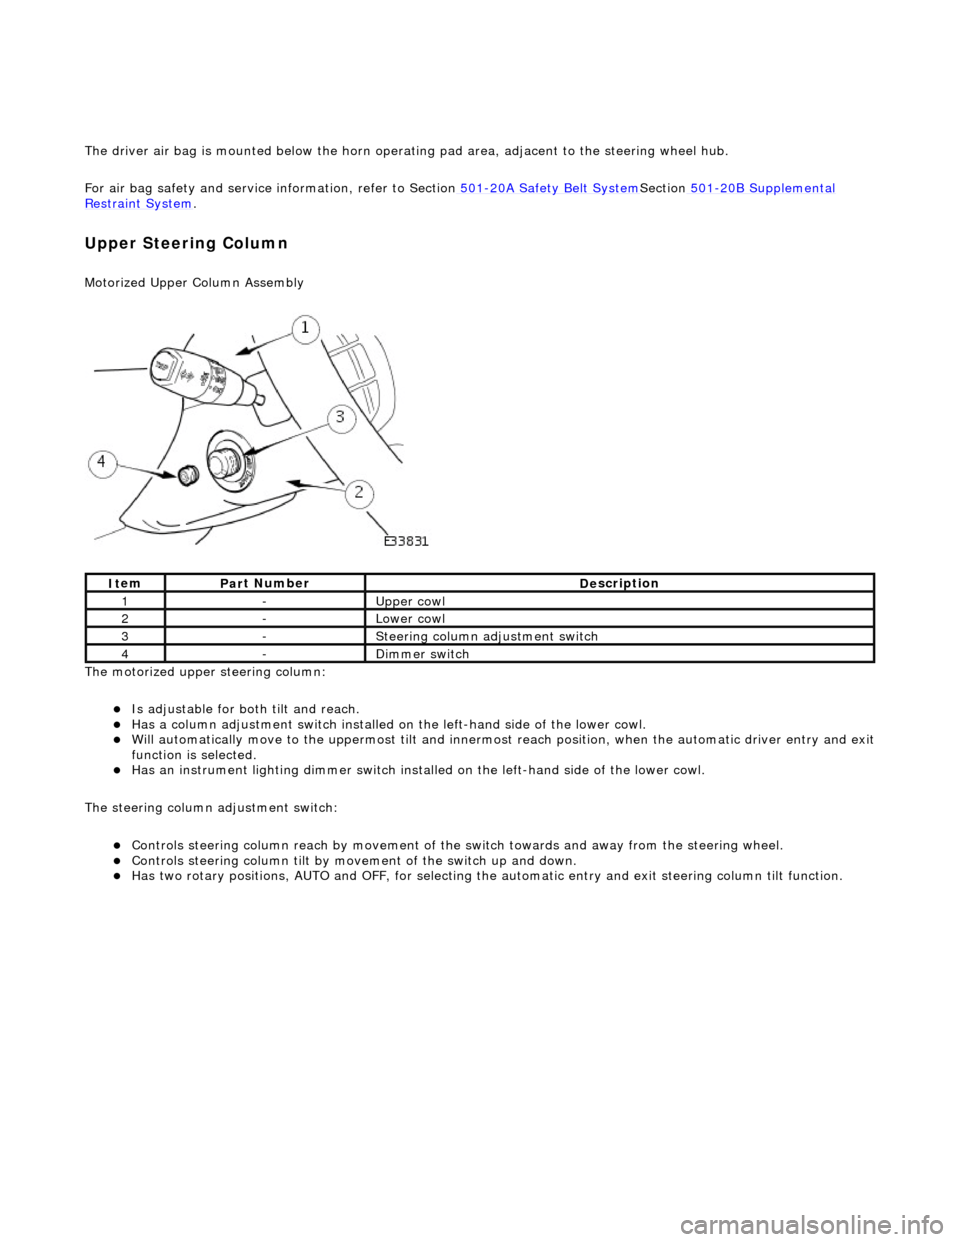
Upper Steering Column
Motorized Upper Colu
mn Assembly
The motorized upper steering column:
пЃ¬Is adjustable for both til
t and reach.
пЃ¬Has a col
umn adjustment switch installed on
the left-hand side of the lower cowl.
пЃ¬W
ill automatically move to the uppermost tilt and innermost reach position, when the automatic driver entry and exit
function is selected.
пЃ¬Has an instrument li
ghti
ng dimmer switch installed on the left-hand side of the lower cowl.
The steering column adjustment switch:
пЃ¬Controls steeri
ng column reach by
movement of the switch towards an d away from the steering wheel.
пЃ¬Controls steeri
ng column tilt by mo
vement of the switch up and down.
пЃ¬Has two
rotary positions, AUTO and OFF, for selecting the
automatic entry and exit steering column tilt function.
It
em
Par
t Number
De
scription
1-Upper
cowl
2-Lower cowl
3-Ste
ering column adjustment switch
4-Di
mmer switch
Page 508 of 2490
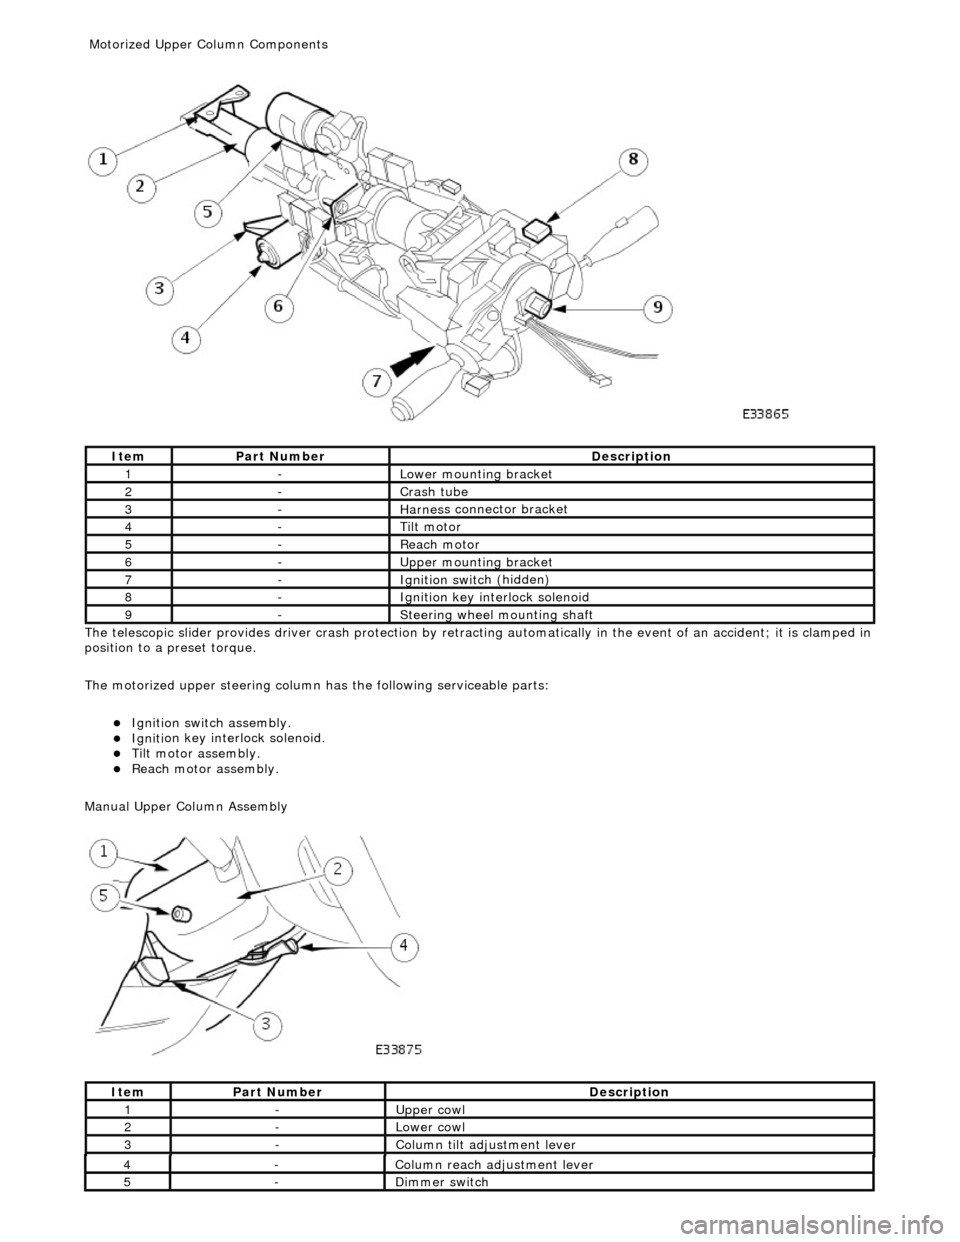
The te
lescopic slider provides driver crash
protection by retracting automatically in the event of an accident; it is clamped in
position to a preset torque.
The motorized upper steering column has the following serviceable parts:
пЃ¬Igniti
on switch assembly.
пЃ¬Igni
ti
on key interlock solenoid.
пЃ¬Ti
lt
motor assembly.
пЃ¬Reach motor assembly.
Manu al Upper Column Assembly
Ite
m
Par
t
Number
De
scr
iption
1-L
o
wer mounting bracket
2-Crash tube
3-Harnes
s c
onnector bracket
4-Tilt motor
5-Reach m
otor
6-Upper
moun
ting bracket
7-Ignition switc
h
(hidden)
8-Igni
ti
on key interlock solenoid
9-S
t
eering wheel mounting shaft
It
e
m
Par
t
Number
De
scr
iption
1-Upper
cowl
2-Lower cowl
3-Colu
mn tilt adjustment lever
4-Col
u
mn reach adjustment lever
5-Di
mm
er switch
Motorized Upper Co
lumn Components
Page 509 of 2490
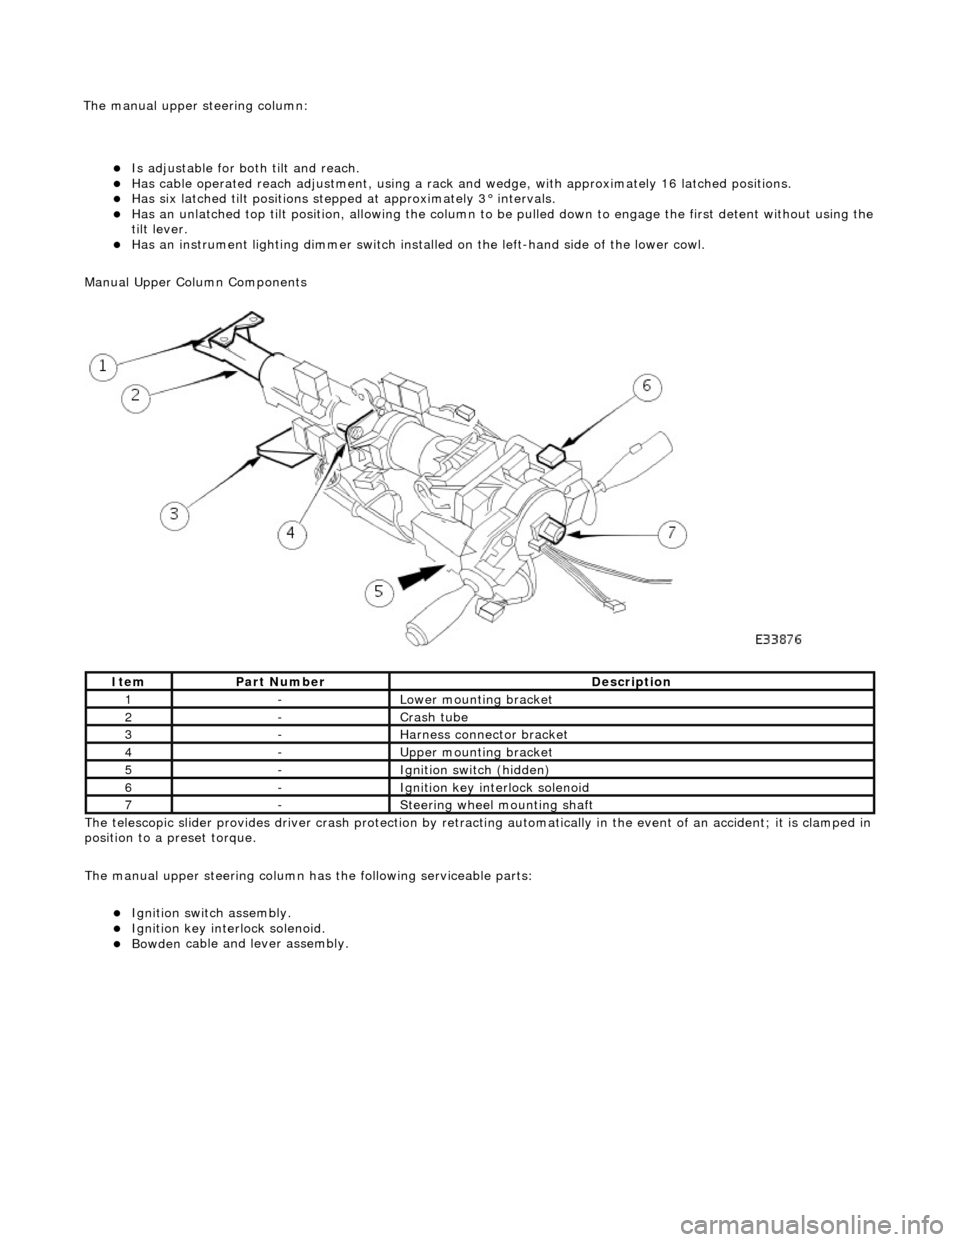
пЃ¬Is adjustable for both til
t and reach.
пЃ¬Has ca
ble operated reach adjustment, using a rack an
d wedge, with approximately 16 latched positions.
пЃ¬Has si
x latched tilt positions steppe
d at approximately 3В° intervals.
пЃ¬Has an u
nlatched top tilt position, allowing the column to be
pulled down to engage the first detent without using the
tilt lever.
пЃ¬Has an instrument li
ghti
ng dimmer switch installed on the left-hand side of the lower cowl.
Manual Upper Column Components
The telescopic slider provides driver crash protection by retracting automatically in the event of an accident; it is clamped in
position to a preset torque.
The manual upper steering column has the following serviceable parts:
пЃ¬Igni
tion switch assembly.
пЃ¬Igni
tion key interlock solenoid.
пЃ¬Bowden
cable and lever assembly.
It
em
Par
t Number
De
scription
1-L
ower mounting bracket
2-Crash tube
3-Harnes
s connector bracket
4-Upper
mounting bracket
5-Ignition switc
h (hidden)
6-Igni
tion key interlock solenoid
7-S
teering wheel mounting shaft
The manu
al upper
steering column:
Page 510 of 2490
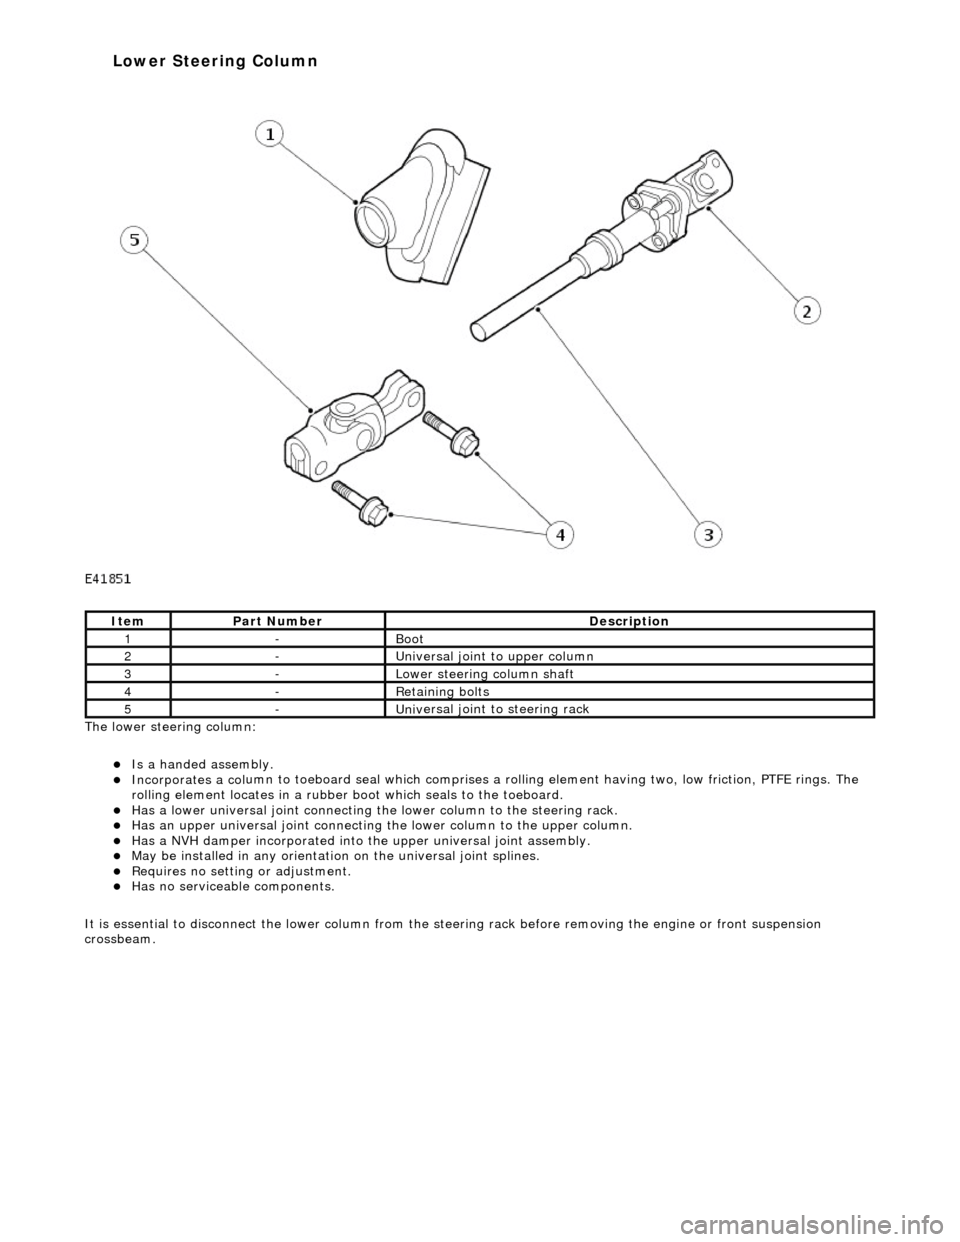
The lower steeri ng col
umn:
пЃ¬Is a han
ded assembly
.
пЃ¬Incorporates
a col
umn to toeboard seal
which comprises a rolling element having two, low friction, PTFE rings. The
rolling element locates in a rubber b oot which seals to the toeboard.
пЃ¬Has a lowe
r universal joint connecting the
lower column to the steering rack.
пЃ¬Has an upper un
iversal joint connecting
the lower column to the upper column.
пЃ¬Has a NVH damper in
corporated into
the upper universal joint assembly.
пЃ¬May be installed in an
y orientation on the universal joint splines.
пЃ¬R
e
quires no setting or adjustment.
пЃ¬Has no s
e
rviceable components.
It is essential to disconnect the lower column from the steer ing rack before removing the engine or front suspension
crossbeam.
It e
m
Par
t
Number
De
scr
iption
1-Boot
2-Uni
v
ersal joint to upper column
3-Lower steeri
ng col
umn shaft
4-R
e
taining bolts
5-Uni
v
ersal joint to steering rack
Lower Steering Column
Page 511 of 2490
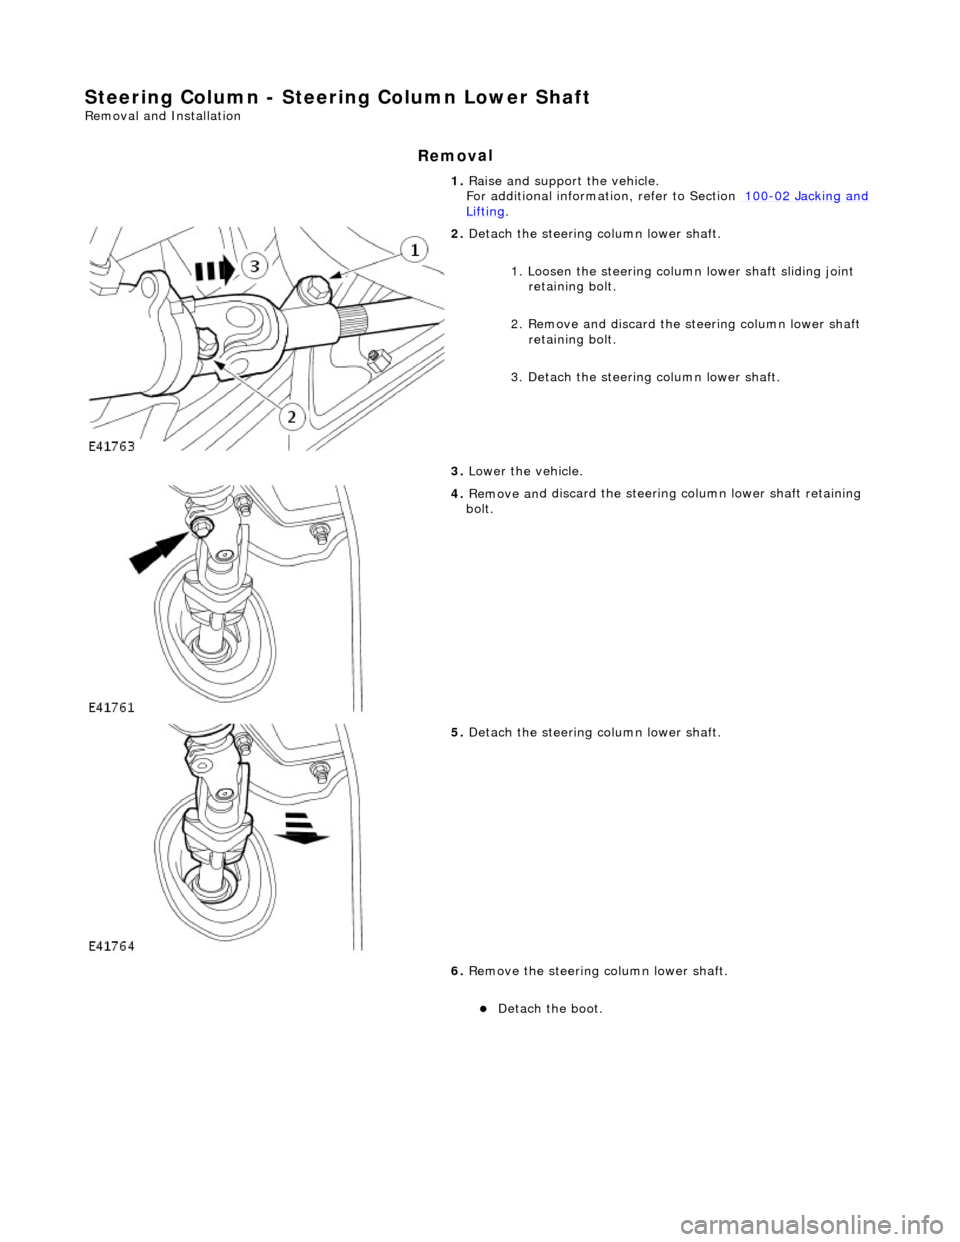
Steering Column - Steering Colu
mn Lower Shaft
Re
moval and Installation
Remov
al
1.
Raise
and support the vehicle.
For additional informat ion, refer to Section 100
-0
2 Jacking and
Liftin
g
.
2. De
tach the steering
column lower shaft.
1. Loosen the steering column lower shaft sliding joint retaining bolt.
2. Remove and discard the st eering column lower shaft
retaining bolt.
3. Detach the steering column lower shaft.
3. Lower the vehicle.
4. Remove an
d discard the steering
column lower shaft retaining
bolt.
5. De
tach the steering
column lower shaft.
6. Remove the steering column lower shaft.
пЃ¬De
tach the boot.
Page 512 of 2490
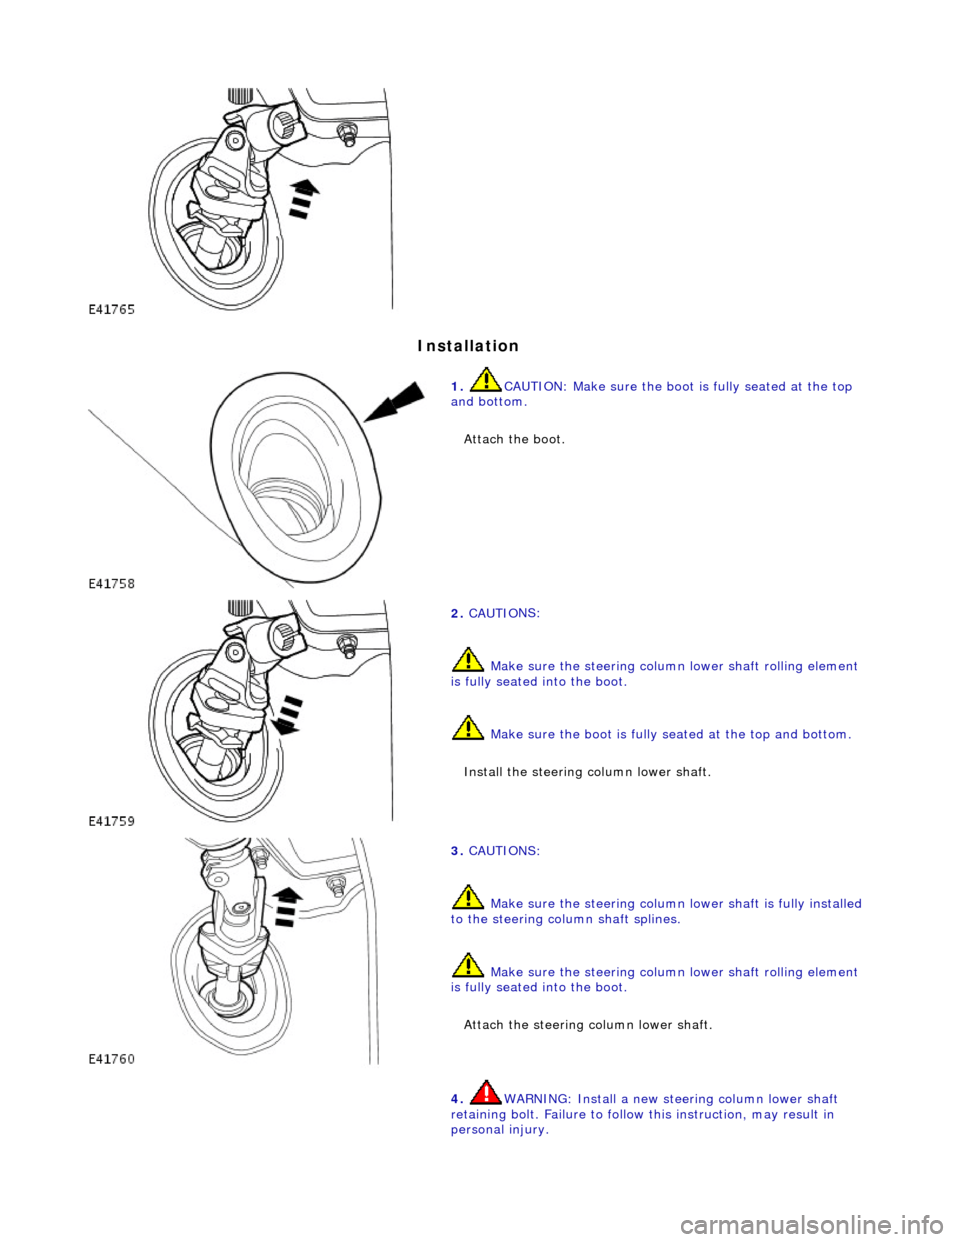
In
stallation
1.
CAUTIO
N: Make sure the boot
is fully seated at the top
and bottom.
Attach the boot.
2. CAUTI O
NS:
Make sure the steering column lower shaft rolling element
is fully seated into the boot.
Make sure the boot is fully seated at the top and bottom.
Install the steering column lower shaft.
3. CAUTI O
NS:
Make sure the steering column lower shaft is fully installed
to the steering column shaft splines.
Make sure the steering column lower shaft rolling element
is fully seated into the boot.
Attach the steering column lower shaft.
4. WARNING: In stall a new stee ring column lower shaft
r
etaining bolt. Failure to follow this instruction, may result in
personal injury.
Page 513 of 2490

CAUTI
ON: Make sure the steering
column lower shaft is fully
installed on the steering column shaft splines.
Install the steering column lower shaft retaining bolt.
пЃ¬Ti
ghten to 28 - 34 Nm.
5.
R
aise the vehicle.
6. WARNING: In
stall a new stee
ring column lower shaft
retaining bolt. Failure to follow this instruction, may result in
personal injury.
Attach the steering column lower shaft. 1. Attach the steering column lower shaft.
2. Install the steering column lower shaft retaining bolt.
1. Tighten to 28 - 34 Nm
.
3
. Tighten to 28 - 34 Nm.