air condition JAGUAR X308 1998 2.G Workshop Manual
[x] Cancel search | Manufacturer: JAGUAR, Model Year: 1998, Model line: X308, Model: JAGUAR X308 1998 2.GPages: 2490, PDF Size: 69.81 MB
Page 20 of 2490

В В В В В В В В В В В В 310‐01: В Fu elВ Tank В and В Lines В
В В В В В В В В В В В В В В В В RemovalВ and В Installation В
В В В В В В В В В В В В В В В В В В В В FuelВ Level В Sensor В (88.25.32) В
В В В В В В В В В В В В В В В В В В В В FuelВ Pump В (19.45.08) В
В В В В В В В В В В В В В В В В В В В В FuelВ Tank В (19.55.01) В
В
            310‐02
:
В Acceleration В Control В
В В В В В В В В В В В В В В В В GeneralВ Procedures В
В В В В В В В В В В В В В В В В В В В В Accelerator В CableВ Adjustment В (12.20.05) В
В В В В В В В В В В В В В В В В RemovalВ and В Installation В
В В В В В В В В В В В В В В В В В В В В Accelerator В CableВ (19.20.06) В
В
В В В В В В В В В В В В 310‐03: В Speed В Control В
В В В В В В В В В В В В В В В В Diagnosis В and В Testing В
В В В В В В В В В В В В В В В В В В В В SpeedВ Con
trolВ
В
В В В В 4: В Electrical В
В
В В В В В В В В 412: В Climate В Control В System В
В
В В В В В В В В В В В В 412‐00: В Climate В Control В System  ‐ General В InformationВ
В В В В В В В В В В В В В В В В Specification В
В В В В В В В В В В В В В В В В Description В and В Operation В
В В В В В В В В В В В В В В В В В В В В ClimateВ ControlВ System В
В В В В В В В В В В В В В В В В Diagnosis В and В Testing В
В В В В В В В В В В В В В В В В В В В В ClimateВ ControlВ System В
В В В В В В В В В В В В В В В В GeneralВ Procedures В
В В В В В В В В В В В В В В В В В В В В AirВ Conditioning В (A/C) В System В Check ‐ RetailВ Procedure В
В В В В В В В В В В В В В В В В В В В В AirВ Conditioning В (A/C) В System В Recovery, В Evacuation В and В ChargingВ (82.30.30) В
В В В В В В В В В В В В В В В В В В В В Contaminated В Refrigerant В Ha
ndling В
В В В В В В В В В В В В В В В В В В В В ManifoldВ GaugeВ SetВ Connection В
В В В В В В В В В В В В В В В В В В В В RefrigerantВ AddingВ (82.30.02) В
В В В В В В В В В В В В В В В В В В В В RefrigerantВ OilВ Adding В
В В В В В В В В В В В В В В В В В В В В RefrigerantВ SystemВ Tests В
В
В В В В В В В В В В В В 412‐01: В Air В Distribution В and В Filtering В
В В В В В В В В В В В В В В В В Description В and В Operation В
Page 21 of 2490

В В В В В В В В В В В В В В В В В В В В AirВ Distributio nВ and В Filt
ering
В
В В В В В В В В В В В В В В В В Diagnosis В and В Testing В
В В В В В В В В В В В В В В В В В В В В AirВ Distribution В and В Filtering В
В В В В В В В В В В В В В В В В RemovalВ and В Installation В
В В В В В В В В В В В В В В В В В В В В CenterВ Registers В (82.20.38) В
В В В В В В В В В В В В В В В В В В В В DriverВ Side В Blower В Motor В (82.25.56) В
В В В В В В В В В В В В В В В В В В В В PassengerВ Side В Blower В Motor В (82.25.55) В
В В В В В В В В В В В В В В В В В В В В PlenumВ Chamber В (82.20.87) В
В
В В В В В В В В В В В В 412‐02: В Heating В and В Ventilation В
В В В В В В В В В В В В В В В В Description В and В Operation В
В В В В В В В В В В В В В В В В В В В В HeatingВ and В Ventilation В
В В В В В В В В В В В В В В В В В В В
В В В В В В В В В В В В В В В В В В В В В
В В
В В В В В В В В В В В В В В В В Removal
В and В Installation В
В В В В В В В В В В В В В В В В В В В В Heater
В Core В (80.20.29) В
В В В В В В В В В В В В В В В В В В В В Heater
В Core В and В Evaporator В Core В Housing В (82.25.21) В
В
В В В В В В В В В В В В 412
‐03: В Air В Conditioning В
В В В В В В В В В В В В В В В В Description
В and В Operation В
В В В В В В В В В В В В В В В В В В В В AirВ
Conditioning В
В В В В В В В В В В В В В В В В Diagnosis
В and В Testing В
В В В В В В В В В В В В В В В В В В В В AirВ
Conditioning В
В В В В В В В В В В В В В В В В Removal
В and В Installation В
В В В В В В В В В В В В В В В В В В В В AirВ
Conditioning В (A/C) В CompressorВ (82.10.20)В
В В В В В В В В В В В В В В В В В В В В Condenser
В Core В (82.15.07) В
В В В В В В В В В В В В В В В В В В В В Evaporator
В Core В (82.25.20) В
В В В В В В В В В В В В В В В В В В В В Press
ureВ Cutoff В Switch В (82.10.32) В
В В В В В В В В В В В В В В В В В В В В Receiver
В Drier В (82.17.01) В
В
В В В В В В В В В В В В 412
‐04: В Control В Components В
В В В В В В В В В В В В В В В В Description
В and В Operation В
В В В В В В В В В В В В В В В В В В В В ControlВ
Components В
В В В В В В В В В В В В В В В В Diagnosis
В and В Testing В
В В В В В В В В В В В В В В В В В В В В ControlВ
Components В
В В В В В В В В В В В В В В В В Removal
В and В Installation В
В В В В В В В В В В В В В В В В В В В В AirВ
Discharge В Temperature В Sensor В (82.20.64) В
Page 35 of 2490
General Infor
mation - Gene
ral Service Information
Description an
d Operation
Safety Notice
Appropri
ate service me
thods and proper repair procedures are essential for the safe, reliable operation of all motor vehicles,
as well as the safety of the person do ing the work. This manual provides genera l directions for accomplishing service and
repair work with tested, effect ive, techniques. Following them will help assure reliability.
There are numerous variations in procedures, techniques, tools, and parts for servicing vehicles, as well as in the skill of the
person doing the work. This manual cannot possibly anticipate all such variations and provide advice or cautions as to each.
Accordingly, anyone who depart s from the instructions provided in the manua l must first establish that neither personal
safety nor vehicle integrity is compromised from choices of methods, tools or parts.
Notes, Ca
utions and Warnings
Throughout
this manual, important inform
ation is highlighted by the use of notes, cautions and warnings. NOTES give
additional information on a topic or proc edure, CAUTIONS are given to prevent da mage to the vehicle, and WARNINGS are
given to prevent personal injury.
Worksh
op Manual Organization
This
manual incorporates descript
ive, diagnostic, and repair information to help trained Jaguar technicians complete service
and rectification procedures. The informat ion can be accessed by choosing the appropriate five digit section number. For
example, Section 412-03 covers air conditioning , which is part of the Climate Control System.
The manual is organized into groups covering generic aspects of the vehicle systems; the first digit of the section
number represents a group se lected from the following:
1. General Information.
2. Chassis.
3. Powertrain.
4. Electrical.
5. Body and Paint.
Each of the groups comprises sections re lating to specific areas of the vehicle.
The second and third digits of the section number indicate the vehicle system.
The last two digits of the se ction number define the system covered, more specifically.
Each section comprises one or more of the following sub-sections:
Specification
Page 36 of 2490
пЃ¬Gener
al specifications (including setting-up information, capacities, lubricants, fluids, sealants and adhesives).
пЃ¬To
r
que specifications.
Description and Operation
пЃ¬A g
eneral illustration and part
s list to identify the components which comp rise a particular system or assembly.
пЃ¬A b
rief description of the system operating characteristics or description of the assembly.
пЃ¬A d
escription of each component and its function.
Diagnosis and Testing
пЃ¬D e
scriptions of how to iden
tify system problems.
пЃ¬Inspection and verifi
cation information.
пЃ¬S
y
mptom charts comprising fault conditions, possible sources and actions.
General Procedures
пЃ¬G e
neral maintenance procedures, including adjustment, alig
nment, bleeding and filling, with illustrated steps and
supporting text.
пЃ¬Tigh te
ning torque specifications, shown in the illustrations.
Removal and Installation
пЃ¬Com p
onent removal and installation maintenance proced
ures, with illustrated steps and supporting text.
пЃ¬Tighte
ning torque specifications, shown in the illustrations.
пЃ¬An i
llustrated tool
chart for each proced
ure requiring the use of special tools.
Disassembly and Assembly
пЃ¬Compon ent disassembly and
assembly
maintenance procedures, with illust rated steps and supporting text.
пЃ¬Tighte
ning torque specifications, shown in the illustrations.
пЃ¬An i
llustrated tool
chart for each proced
ure requiring the use of special tools.
Repairs and Replacem
ents
Wh
en s
ervice parts are required, it is essential that only genuine Jaguar/Daimler replacements are used.
Attention is drawn to the following points concerning repa irs and the fitting of replacement parts and accessories:
пЃ¬Safety feat
ures embodied in the vehicle
may be impaired if other than genuine parts are fitted. In certain territories,
legislation prohibits the fitting of pa rts which are not produced to the vehi cle manufacturer's specification.
пЃ¬Torque wrench setting figures given i
n this manual must be strictly adhered to. Locking devices, where specified,
must be fitted. If the efficiency of a locking device is impaired during removal it must be renewed.
пЃ¬O w
ners purchasing accessories
while travelling abroad should ensure that the accessory and its fitted location on the
vehicle conform to mandatory requirements existing in their country of origin.
пЃ¬The vehicle warranty may be invali
dated by the fitting
of other than genuine Ja guar/Daimler parts. All
Jaguar/Daimler replacements have the fu ll backing of the factory warranty.
пЃ¬Jaguar/Daimler dealers are obliged to
supply only genuine service parts.
Thread Locking Devices
P a
tched Fasteners
Two types
of
patched fastener are essentially used on certai
n suspension, steering and other critical components, where
operational movement of the component necessitates positive thread locking. Standard patched fasteners have part
numbers bearing the suffix le tter M. For identification of special patched fa steners, refer to the list of patched fasteners
below, or the relevant component drawings.
Jaguar Specification JFS 02.01.02 patched fasteners incorporate a micro-encapsulated adhesive which is released into the
mating threads during tightening. Following final tightening, the adhesive in this type of patched fastener must be allowed a
period to cure before the component/vehicle is used. On removal, this type of fastener must be discarded and a new
Page 39 of 2490
Before inspecting a component for wear or per
forming a dimensional check,
ensure that it is absolutely clean; a slight smear
of grease can conceal an incipient failure. When a component is to be checked dimensionally against figures quoted for it,
use the correct equipment (surface plates, micrometers, dial gauges etc.) in serviceable condition. The use of makeshift
equipment can be dangerous. Reject a component if its dimensio ns are outside the limits quoted, or if damage is apparent.
A part may be refitted if its critical di mension is exactly to the limit size and it is otherwise satisfactory. Use Plastigauge 12
Type PG-1 for checking bearing surface clearance, e.g. big end bearing shell to crank jour nal. Instructions for the use of
Plastigauge and a scale giving bearing clearances in steps of 0.0025 mm (0.0001 in) are supplied with the package.
Safety
Precautions
• WAR
NINGS:
WORKING ON THE FUEL SYSTEM RESULTS IN FUEL AND FUEL VAPOUR BEING PRESENT IN THE ATMOSPHERE. FUEL
VAPOUR IS EXTREMELY FLAMMABLE, HENCE GREAT CARE MUST BE TAKEN WHILST WORKING ON THE FUEL SYSTEM.
ADHERE STRICTLY TO THE FOLLOWING PRECAUTIONS:
пЃ¬DO
NOT SMOKE IN THE WORK AREA.
пЃ¬DISP
LAY 'NO SMOKING' SIGNS AROUND THE AREA.
пЃ¬DISCONNECT TH
E BATTERY BEFORE WORKING ON THE FUEL SYSTEM.
пЃ¬DO NOT CONNEC
T/DISCONNECT ELECTRICAL CIRCUITS
, USE ELECTRICAL EQUIPMENT OR OTHER TOOLS OR
ENGAGE IN WORKING PRACTICES WHICH IN ANY WAY MAY RESULT IN THE PRODUCTION OF SPARKS.
пЃ¬ENS
URE THAT A CO2 FIRE EXTINGUISHER IS CLOSE AT HAND.
пЃ¬ENS
URE THAT DRY SAND IS AVAILABLE TO SOAK UP ANY FUEL SPILLAGE.
пЃ¬EMP
TY FUEL USING SUITABLE FIRE PROOF EQUIPMENT IN
TO AN AUTHORIZED EXPLOSION PROOF CONTAINER.
пЃ¬DO NOT EMP
TY FUEL WHILE WORKING IN A WORKSHOP OR A PIT.
пЃ¬ENS
URE THAT WORKING AREA IS WELL VENTILATED.
пЃ¬ENS
URE THAT ANY WORK ON THE FUEL SYSTEM IS ON
LY CARRIED OUT BY EXPERIENCED AND WELL QUALIFIED
MAINTENANCE PERSONNEL.
пЃ¬ENS
URE THAT FUME EXTRACTION EQUIPMENT IS USED WHERE APPROPRIATE.
FUME EXTRACTION EQUIPMENT MUST BE IN OPERATION WHEN SOLVENTS ARE USED E.G. TRICHLOROETHANE,
WHITE SPIRIT, SBP3, METHYLENE CHLORIDE, PERCHLORETHY LENE. DO NOT SMOKE IN THE VICINITY OF VOLATILE
DEGREASING AGENTS.
General workshop practices:
пЃ¬Disc
onnect the grounded termin
al of the vehicle battery.
пЃ¬D
o not apply heat in an attempt to free seized nuts or fitt
ings; as well as causing damage to protective coatings,
there is a risk of damage from stray heat to electronic equipment and brake lines.
пЃ¬Keep oils and solven
ts away from naked flames and other sour
ces of ignition.
пЃ¬Adhere str
ictly to handling and safety inst
ructions given on containers and labels.
пЃ¬E
nsure that a suitab
le form of fire extinguisher is conveniently located.
пЃ¬Wh
en using electrical tools and equipment, inspect the power
lead for damage and check that it is properly earthed.
пЃ¬D
o not leave tools, equipment, spilt oil etc. around the work area.
Working beneath a vehicle:
пЃ¬Wh
enever possible, use a ramp or
pit in preference to jacking.
пЃ¬Posit
ion chocks at the wheels as we
ll as applying the parking brake.
пЃ¬N
ever rely on a jack alone to support a
vehicle; use axle stands, or blocks care fully placed at the jacking points, to
provide a rigid location.
пЃ¬Ch
eck that any lifting equipment used has adeq
uate capacity and is fully serviceable.
Working on air conditioning systems:
пЃ¬D
o not disconnect any pipes of the refrigeration system
unless you are trained and instructed to do so; a refrigerant
is used which can cause blindness if allowed to come into contact with the eyes.
Health Protection
P
rolonged and repeated contact with mineral oil will result in the removal of natural oils from the skin, leading to dryness,
In
spection
Page 42 of 2490
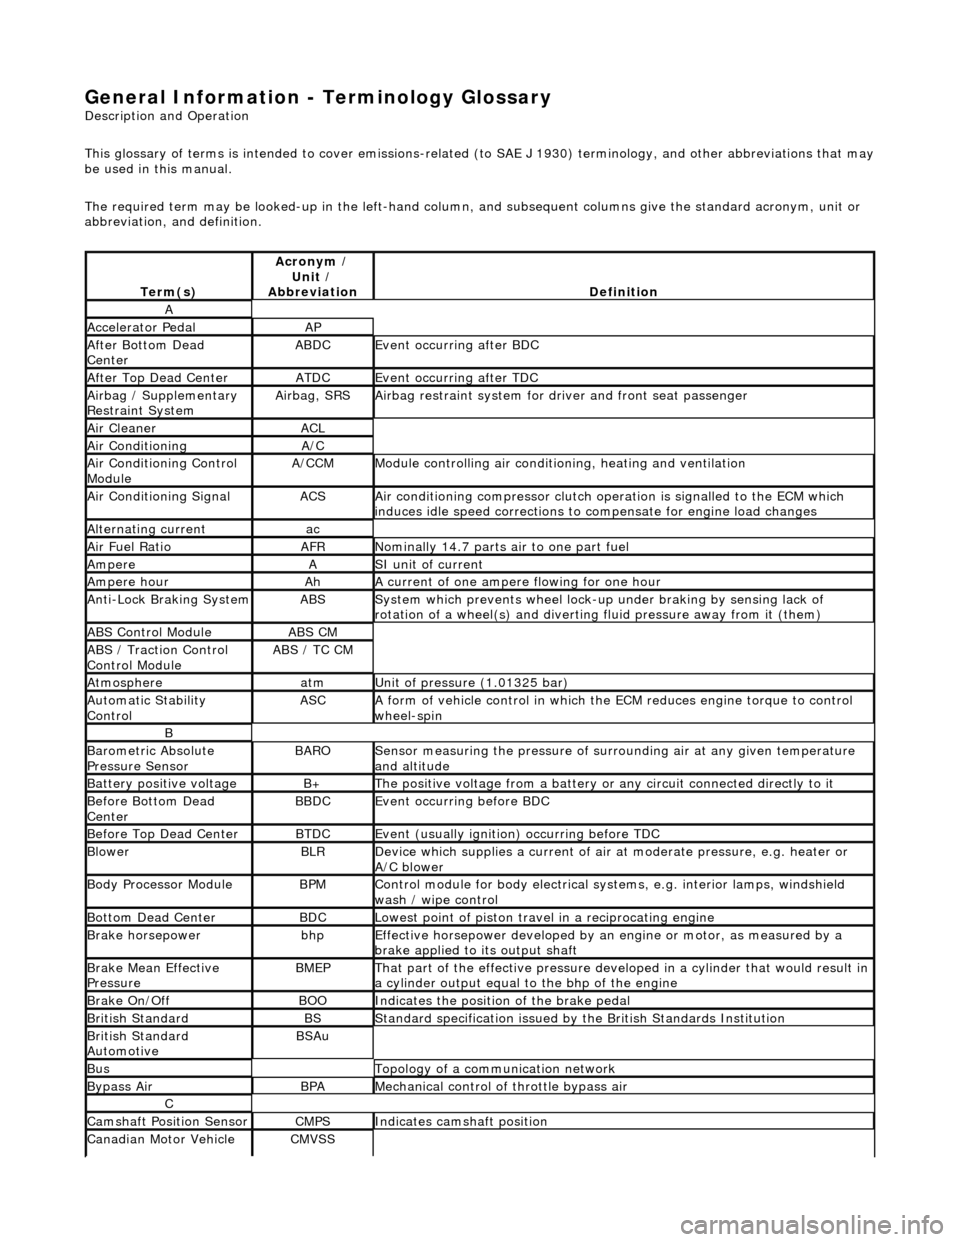
General Information - Terminology Glossary
Description an
d Operation
This glossary of terms is intended to cover emissions-related (to SAE J 1930) term inology, and other abbreviations that may
be used in this manual.
The required term may be looked-up in th e left-hand column, and subsequent columns give the standard acronym, unit or
abbreviation, and definition.
Te rm
(s)
Acr
ony
m /
Unit /
Abbreviation
De fi
nition
A
Accel
e
rator Pedal
AP
Af
ter Botto
m Dead
Center
ABDCEvent occurri ng after
BDC
Af
ter Top Dead CenterATDCEvent occurri ng after
TDC
Ai
rbag /
Supplementary
Restraint System
Airbag, SRSAi rbag restraint system for
dr
iver and front seat passenger
Air Cleane rACL
Air ConditioningA/C
Air Conditioning Con t
rol
Module
A/CCMModule c
ontrolling air conditioning, heating and ventilation
Air Conditioning SignalACSA
i
r conditioning compressor clutch operation is signalled to the ECM which
induces idle speed corrections to co mpensate for engine load changes
Alternating cu
rrent
ac
Ai
r Fuel R
atio
AFRN
omi
nally 14.7 parts air to one part fuel
Ampe
reASI unit of current
Ampere hourAhA current of one ampere
fl
owing for one hour
Anti-Lock Braking SystemABSS
y
stem which prevents wheel lock-up
under braking by sensing lack of
rotation of a wheel(s) and divertin g fluid pressure away from it (them)
ABS Control Mo
dule
ABS CM
ABS /
T
raction Control
Control Module
ABS / T
C CM
Atmosph
e
re
atmU
n
it of pressure (1.01325 bar)
Au
to
matic Stability
Control
ASCA form of vehicle
control
in which the ECM reduces en gine torque to control
wheel-spin
B
Baro me
tric Absolute
Pressure Sensor
BAR OSensor measuring the pressure of surr ou
nding air at any given temperature
and altitude
Bat t
ery positive voltage
B+The posi
ti
ve voltage from a battery or
any circuit connected directly to it
Before Bottom Dead
CenterBBDCEvent occurri ng before BD
C
Before Top Dead
Center
BTD
CEvent (usual ly
ignition) occurring before TDC
Blowe
rBLRDe
vice which supplies a current of air at
moderate pressure, e.g. heater or
A/C blower
Body Processor M
odule
BPMControl modu
le
for body electrical systems, e.g. interior lamps, windshield
wash / wipe control
Bott om D
ead Center
BD
CLowest poin t of piston
travel in a reciprocating engine
Brake hors
epowe
r
bhpEffecti
ve horsepower devel
oped by an
engine or motor, as measured by a
brake applied to its output shaft
Brake Mean Effective
Pres sureBME PThat p
art of the effective
pressure developed in a cyli nder that would result in
a cylinder output equal to the bhp of the engine
Brake On/ O
ff
BOOIn
dic
ates the position of the brake pedal
Br
it
ish Standard
BSStan
dar
d specification issued by the British Standards Institution
Br
it
ish Standard
Automotive
BSAu
BusTopology of a commu n
ication network
Bypass
AirBPAMechanica l
control of throttle bypass air
C
Camshaft Posit
i
on Sensor
CMPSIndi
cat
es camshaft position
Canadian Motor
V
ehicle
CMVSS
Page 43 of 2490
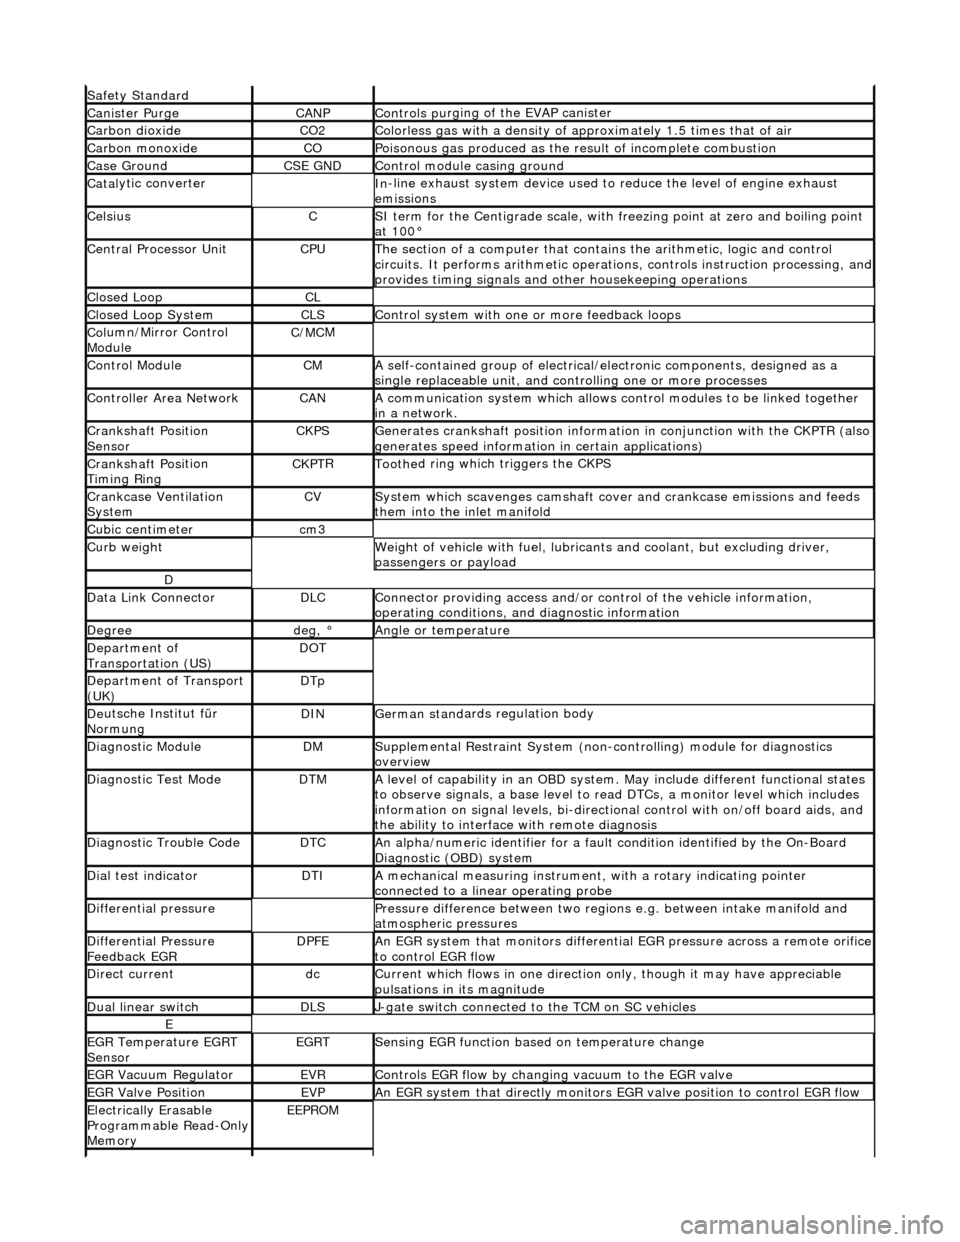
Safety Standard
Canister PurgeCANPControls pu
rging of the EVAP canister
Carbon dioxideCO2Colorless gas with
a density of a
pproximately 1.5 ti mes that of air
Carbon mon
oxide
COPoi
sonous gas produced as the re
sult of incomplete combustion
Case G
round
CSE GNDControl modu
le casing ground
Catal
ytic converter
In
-line exhaust system device used to reduce the level of engine exhaust
emissions
Ce
lsius
CSI ter
m for the Centigrade scale, with
freezing point at zero and boiling point
at 100В°
Central
Processor Unit
CPUTh
e section of a computer that contai
ns the arithmetic, logic and control
circuits. It performs arithm etic operations, controls instruction processing, and
provides timing signals and other housekeeping operations
Cl
osed Loop
CL
Cl
osed Loop System
CLSControl
system with one
or more feedback loops
Col
umn/Mirror Control
Module
C/MC
M
Control ModuleCMA
self-contained group of electrical/electronic components, designed as a
single replaceable un it, and controlling one or more processes
Controll
er Area Network
CANA
communication system which allows control modules to be linked together
in a network.
Crankshaft Posi
tion
Sensor
CKPSGenerates crankshaft positi on informa
tion in conjunct
ion with the CKPTR (also
generates speed information in certain applications)
Crankshaft Posi
tion
Timing Ring
CKPT
R
Toothe
d ring which
triggers the CKPS
Crankcase Ventila
tion
System
CVSys
tem which scavenges camshaft cover and crankcase emissions and feeds
them into the inlet manifold
Cubic ce nt
imeter
cm
3
Curb weightWe
ight of vehicle with fuel, lubrican
ts and coolant, but excluding driver,
passengers or payload
D
Dat
a Link Connector
DLCConne
ctor providing access and/or control of the vehicle information,
operating conditions, and diagnostic information
De
gree
deg, В°Angle or tempe
rature
D
epartment of
Transportation (US)
DO
T
D
epartment of Transport
(UK)
DTp
De
utsche In
stitut fГјr
Normung
DINGerman stand
ards regulation body
Di
agnostic Module
DMSuppl
emental Restraint System (non-c
ontrolling) module for diagnostics
overview
Di
agnostic Test Mode
DTMA le
vel of capability in an OBD system.
May include different functional states
to observe signals, a base level to re ad DTCs, a monitor level which includes
information on signal levels, bi-directional control with on /off board aids, and
the ability to interface with remote diagnosis
Diagnostic Trouble CodeDTCAn al
pha/numeric identifier for a fault
condition identified by the On-Board
Diagnostic (OBD) system
D
ial test indicator
DTIA mechan
ical measuring
instrument, with a rotary indicating pointer
connected to a linear operating probe
D
ifferential pressure
Pressure di
fference betwee
n two regions e.g. between intake manifold and
atmospheric pressures
D
ifferential Pressure
Feedback EGR
DP
FE
An
EGR system that monito
rs differential EGR pressure across a remote orifice
to control EGR flow
D
irect current
dcCurrent which f
lows in on
e direction only, though it may have appreciable
pulsations in its magnitude
Du
al linear switch
DLSJ
-gate switch connected to the TCM on SC vehicles
E
EGR
Temperature EGRT
Sensor
EGRTSens
ing EGR function based on temperature change
EGR Vacu
um Regulator
EVRControls EGR
flow by changi
ng vacuum to the EGR valve
EGR Valve
Position
EVPAn EGR
system that direct
ly monitors EGR valve position to control EGR flow
Electrically E
rasable
Programmable Read-Only
Memory
EEP
ROM
Page 267 of 2490
The
following explanations will help isolate the source of vibration.
Torque Sensitive
This
means that the condition can be impr
oved or made worse by accelerating, dece lerating, coasting, maintaining a steady
vehicle speed, or applying engine torque.
Ve
hicle Speed Sensitive
This means th
at the vibration al
ways occurs at the same vehicle speed and is not affected by engine torque, engine speed
or gear selection.
Engine Speed Sensit
ive
This means th
at the vibration
occurs at varying vehicle spee ds when a different gear is selected. It can sometimes be
isolated by increasing or decreasing engine speed with the tran smission in neutral or by stall testing with the transmission in
gear. If the condition is engine speed sensitive, the cause is probably not related to tires.
If the road test indicates that there is tire wine, but no shake or vibration, the noise originates with the contact between th e
tire and the road surface.
A thumping noise usually means that the tire is flat or has soft spots making a noise as they slap the roadway. Tire whine
can be distinguished from axle no ise, as tire whine remains the same over a range of speeds.
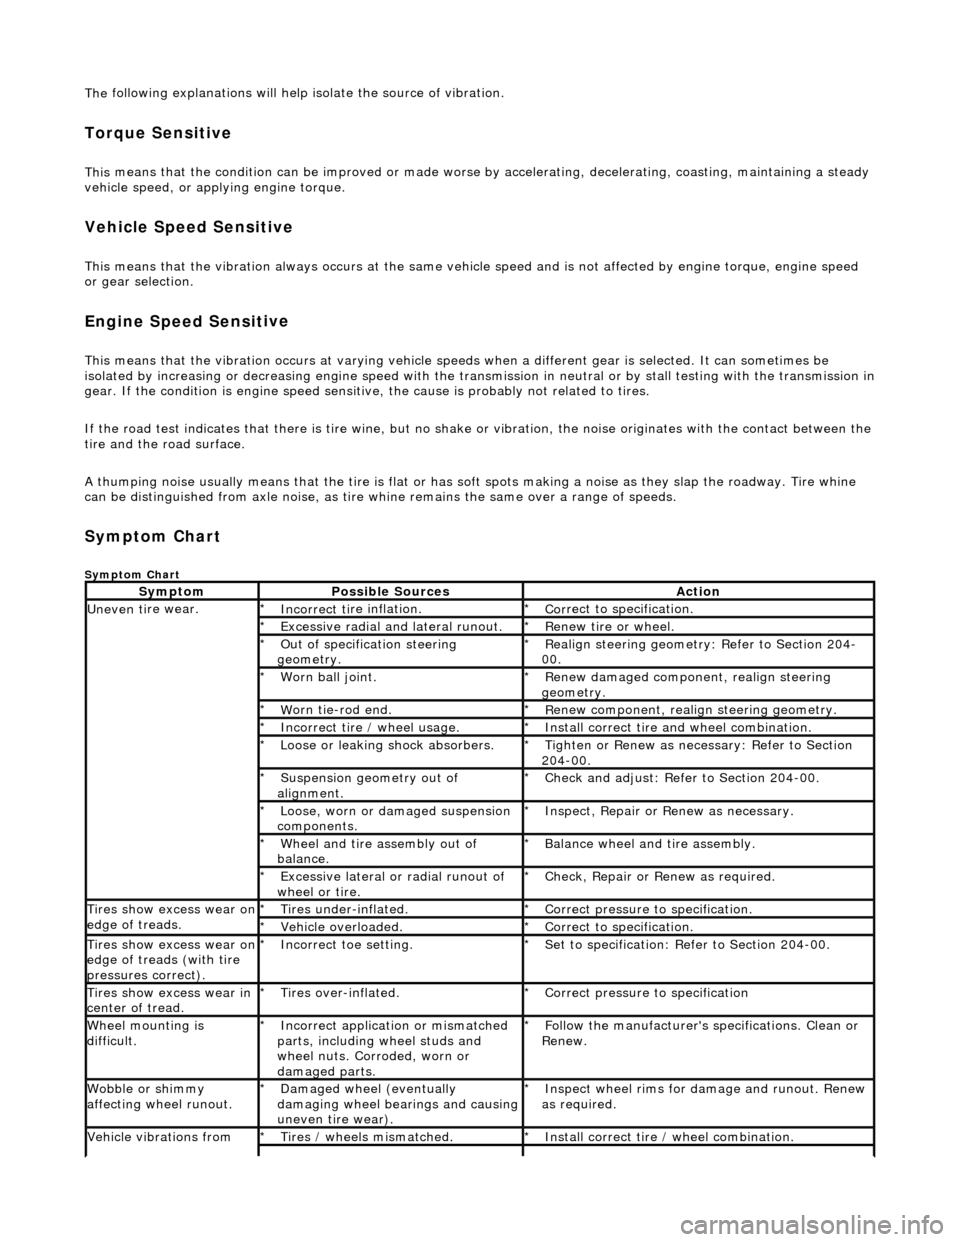
Sym
ptom Chart
Sy
mptom Chart
Sy
mptom
Possib
le Sources
Acti
on
Uneven ti
re wear.
Incorrect ti
re inflation.
*
Cor
rect to specification.
*
Exce
ssive radial an
d lateral runout.
*
Renew tire
or wheel.
*
O
ut of specification steering
geometry.
*
R
ealign steering geometry: Refer to Section 204-
00.
*
W
orn ball joint.
*
Renew
damaged component, realign steering
geometry.
*
W
orn tie-rod end.
*
R
enew component, realign steering geometry.
*
Incorrect
tire / wheel usage.
*
Inst
all correct tire and wheel combination.
*
Loose or leaki
ng shock absorbers.
*
Tigh
ten or Renew as nece
ssary: Refer to Section
204-00.
*
Suspensi
on geometry out of
alignment.
*
Che
ck and adjust: Refer to Section 204-00.
*
Loose, worn or da mage
d suspension
components.
*
In
spect, Repair or Renew as necessary.
*
Wh
eel and tire assembly out of
balance.
*
Balance wheel an
d tire assembly.
*
Excessive later
al or radial runout of
wheel or tire.
*
Check, Repair o
r
Renew as required.
*
Tire
s show excess wear on
edge of treads.
Ti
res under-inflated.
*
Cor
rect pressure to specification.
*
Vehi
cle overloaded.
*
Cor
rect to specification.
*
Tire
s show excess wear on
edge of treads (with tire
pressures correct).
Incorre
ct toe setting.
*
Se
t to specification: Refer to Section 204-00.
*
Tire
s show excess wear in
center of tread.
Tire
s over-inflated.
*
Cor
rect pressure to specification
*
W
heel mounting is
difficult.
Incorrect app
lication or mismatched
parts, including wheel studs and
wheel nuts. Corroded, worn or
damaged parts.
*
Fol
low the manufacturer's specifications. Clean or
Renew.
*
Wobble or sh
immy
affecting wheel runout.
Damaged wh
eel (eventually
damaging wheel bearings and causing
uneven tire wear).
*
Inspect wheel rims for
damage and runout. Renew
as required.
*
Vehicle vibrations from
Tire
s / wheels mismatched.
*
Inst
all correct tire / wheel combination.
*
Page 291 of 2490
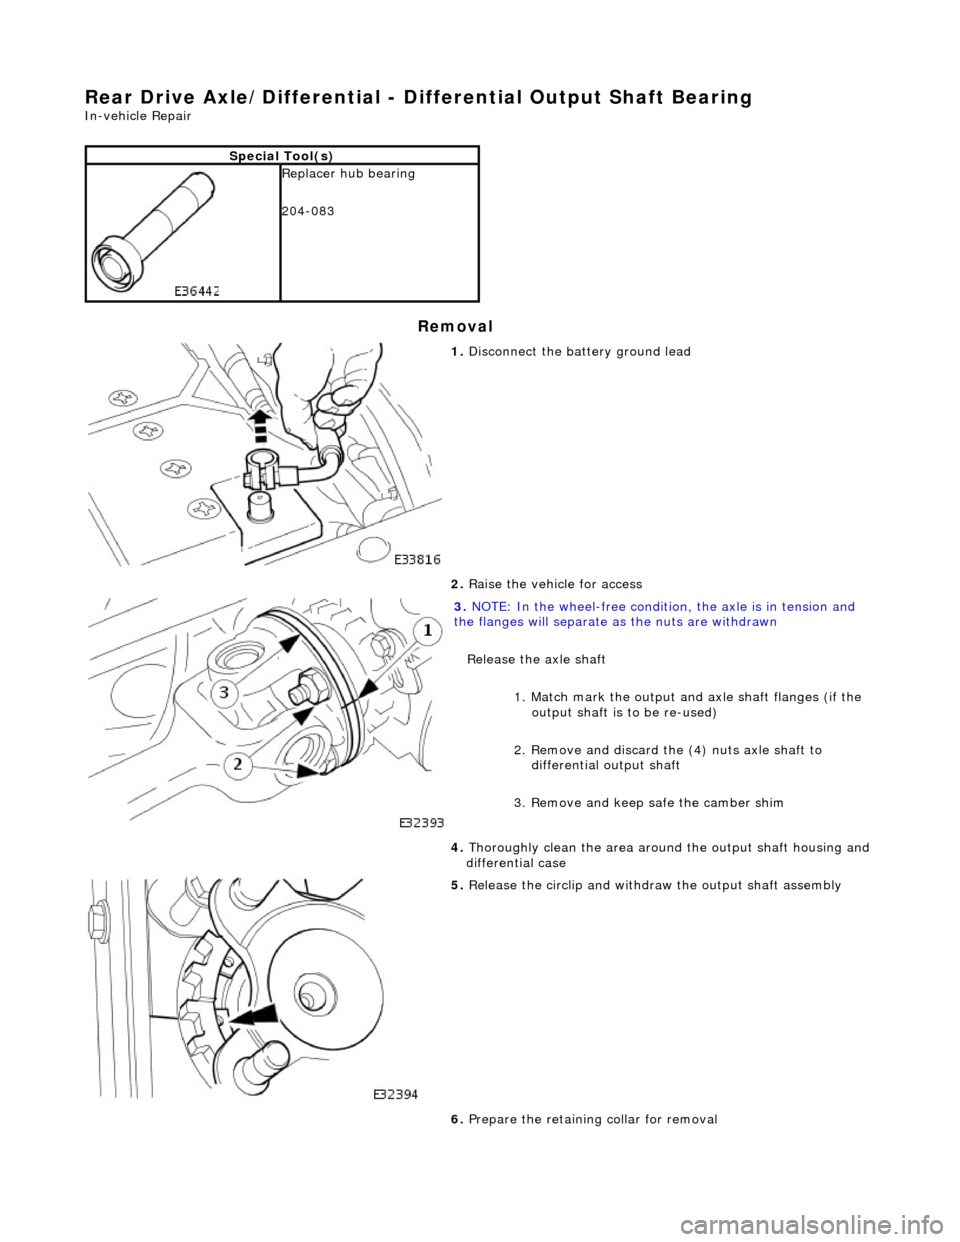
R
ear Drive Axle/Differential - Differential Output Shaft Bearing
In-v
ehicle Repair
Remov
al
S
pecial Tool(s)
Replacer hu
b bearing
204-083
1. Di
sconnect the battery ground lead
2. Raise the vehicle for access
3. NO
TE: In the wheel-free condition, the axle is in tension and
the flanges will separate as the nuts are withdrawn
Release the axle shaft
1. Match mark the output an d axle shaft flanges (if the
output shaft is to be re-used)
2. Remove and discard the (4) nuts axle shaft to differential output shaft
3. Remove and keep safe the camber shim
4. T
horoughly clean the area around the output shaft housing and
differential case
5. Relea
se the circlip and withdraw the output shaft assembly
6. Prepare the retaining collar for removal
Page 310 of 2490
oc
curs only with the parking brake, th
e concern is in the rear brake system.
If the concern becomes evident during this check, verify it fits the description given before the road test. If the concern is
not evident, attempt to duplicate the condition using the information from the description.
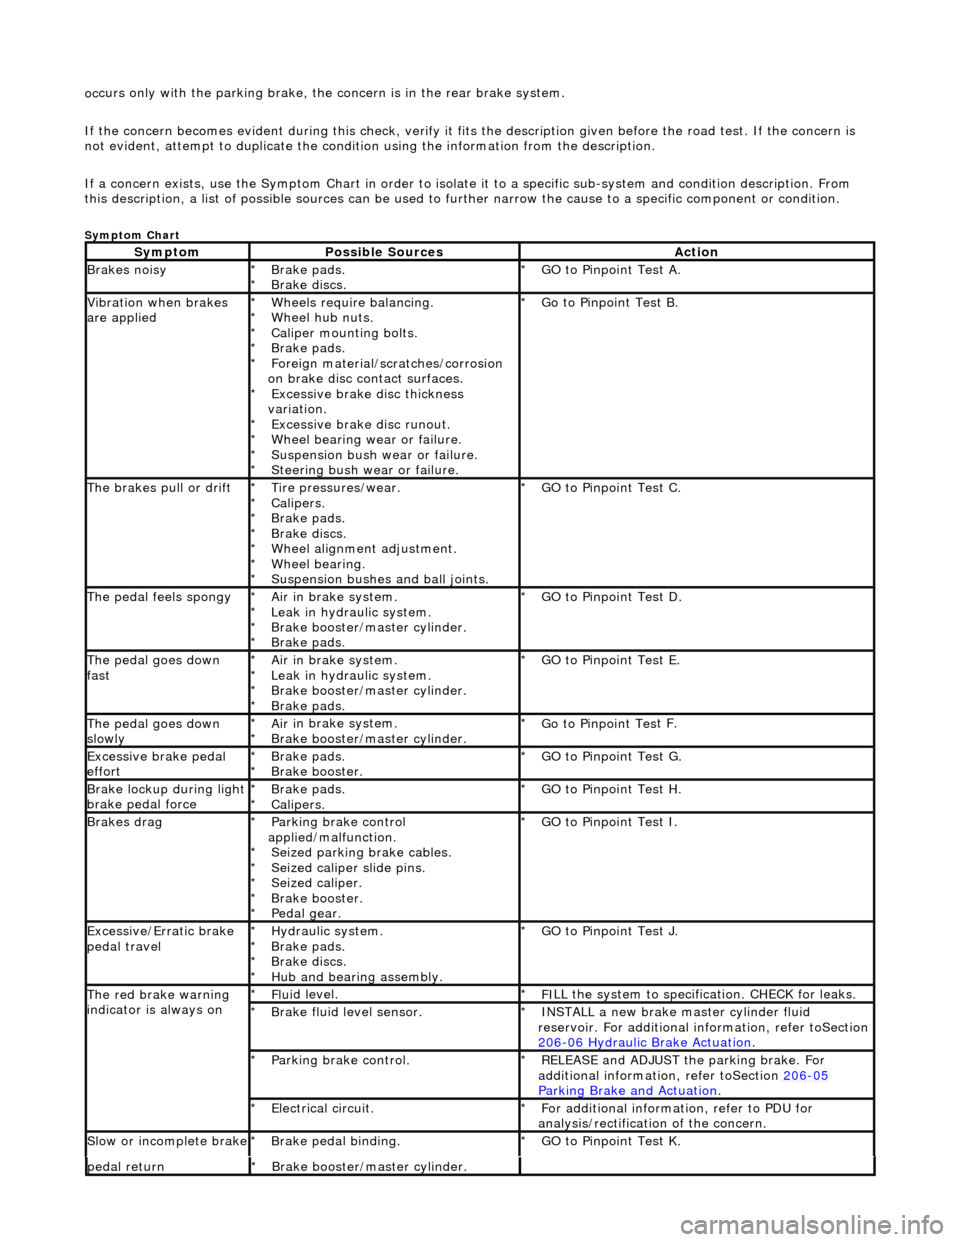
If a concern exists, use the Symptom Chart in order to isolate it to a specific sub-system and condition description. From
this description, a list of possible sources can be used to further narrow the cause to a specific component or condition.
Sym
ptom Chart
Sy
m
ptom
Possib
l
e Sources
Acti
o
n
Brakes
n
oisy
Brake pads.
Brake di
scs
.
*
*
GO to Pinpoint
Tes
t A.
*
Vibration wh
en brakes
are applied
Wh eels require bala
ncing.
Wheel hub nuts.
Caliper mounting bolts.
Brake pads.
Foreign material/scr atches/corrosion
on brake disc contact surfaces. Excessive brake disc thickness
variation. Excessive brake disc runout.
Wheel bearing wear or failure.
Suspension bush wear or failure.
Steering bush wear or failure.
*
*
*
*
*
*
*
*
*
*
Go to Pinpoint
Tes
t B.
*
The brakes pull or drif tTire pressures/wear.
Calipers.
Brake pads.
Brake di
scs.
Wheel alignment adjustment.
Wheel bearing.
Suspension bushes and ball joints.
*
*
*
*
*
*
*
GO to Pinpoint
Tes
t C.
*
The pedal feels spongyAir i
n brake system.
Leak in hydraulic system.
Brake booster/master cylinder.
Brake pads.
*
*
*
*
GO to Pinpoint Tes
t D.
*
The pedal goes down
fa s
t
Ai
r i
n brake system.
Leak in hydraulic system.
Brake booster/master cylinder.
Brake pads.
*
*
*
*
GO to Pinpoint
Tes
t E.
*
The pedal goes down
slowl yAir i
n brake system.
Brake booster/master cylinder.
*
*
Go to Pinpoint
Tes
t F.
*
Excessive brake pedal
effor tBrake pads.
Brake booster.
*
*GO to Pinpoint
Tes
t G.
*
Brake lockup du ring ligh
t
brake pedal force
Brake pads.
Calipers.
*
*GO to Pinpoint
Tes
t H.
*
Brakes d r
ag
Parkin
g brake con
trol
applied/malfunction. Seized parking brake cables.
Seized caliper slide pins.
Seized caliper.
Brake booster.
Pedal gear.
*
*
*
*
*
*
GO to Pinpoint
Tes
t I.
*
Exce ssi
ve/Erratic brake
pedal travel
Hydrau li
c system.
Brake pads.
Brake discs.
Hub and bearing assembly.
*
*
*
*
GO to Pinpoint
Tes
t J.
*
The red brak e warning
indi
cator is always on
Fl
ui
d level.
*
F I
LL the system to specification. CHECK for leaks.
*
Brake flu i
d level sensor.
*
I N
STALL a new brake master cylinder fluid
reservoir. For additional in formation, refer toSection
206
-0 6
Hydraulic Brake Actuation
.
*
Parkin
g brake con
trol.
*
REL
E
ASE and ADJUST the parking brake. For
additional information, refer toSection 206
-05
Parkin g Brake an
d Actuation
.
*
E
l
ectrical circuit.
*
F or additional
information, refer to PDU for
analysis/rectification of the concern.
*
Sl
ow or i
ncomplete brake
Brake peda
l binding.
*
GO to Pinpoint Tes
t K.
*
pedal retu rnBr
ake booster/master cylinder.
*