drive plate JAGUAR X308 1998 2.G Workshop Manual
[x] Cancel search | Manufacturer: JAGUAR, Model Year: 1998, Model line: X308, Model: JAGUAR X308 1998 2.GPages: 2490, PDF Size: 69.81 MB
Page 284 of 2490
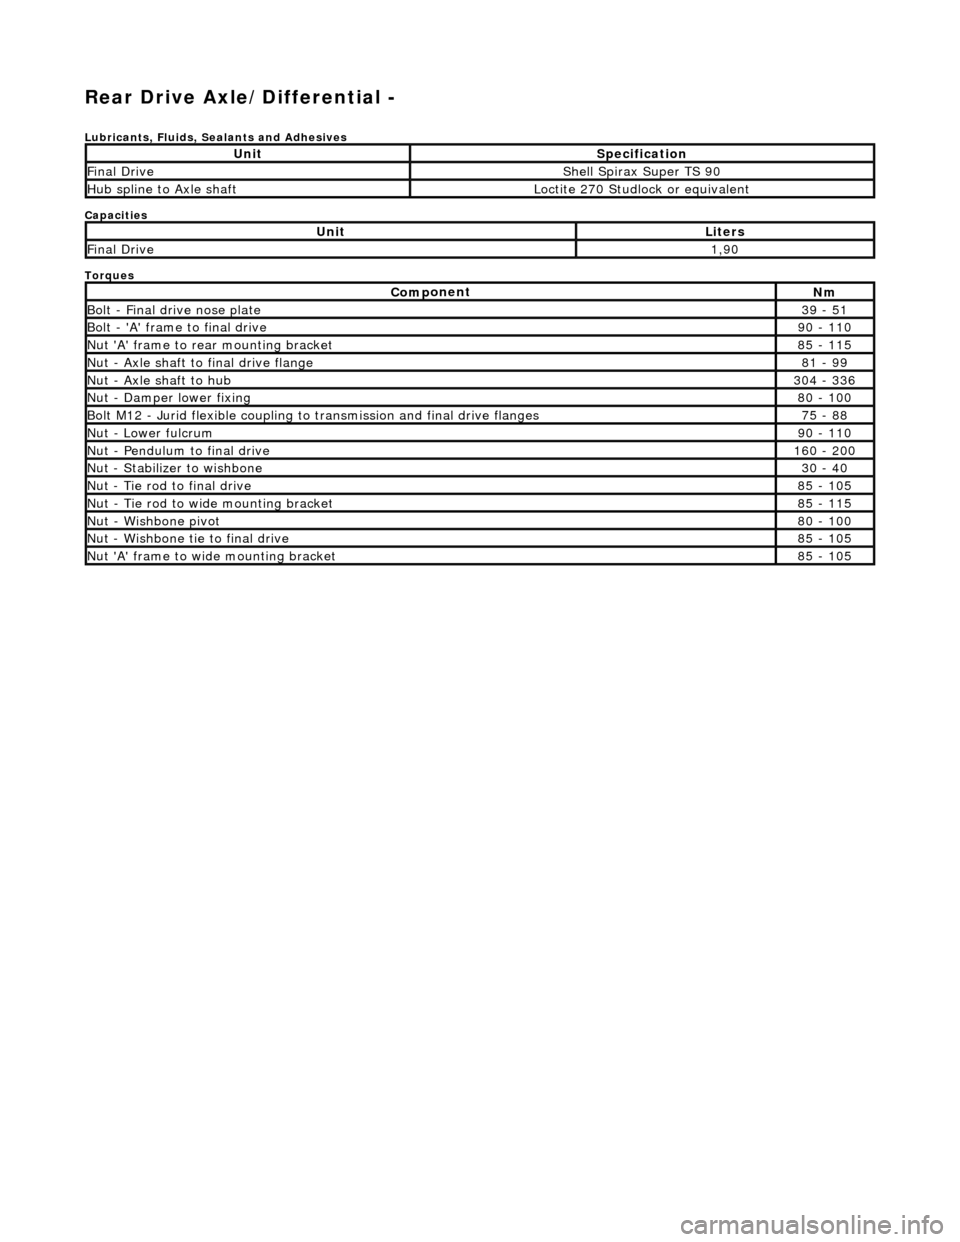
Re
ar Drive Axle/Differential -
Lubric
ants, Fluids, Sealants and Adhesives
Capacities
Torques
UnitSp
ecification
F
i
nal Drive
Shell Sp
irax Supe
r TS 90
Hub s
p
line to Axle shaft
Loct
it
e 270 Studlock or equivalent
UnitLi
t
ers
F
i
nal Drive
1,
90
Com p
onent
Nm
B
ol
t - Final drive nose plate
39
- 51
Bol t
- 'A' frame to final drive
9
0 -
110
Nu
t 'A' f
rame to rear mounting bracket
8
5 -
115
Nu
t -
Axle shaft to final drive flange
81
-
99
Nu
t -
Axle shaft to hub
3
04 -
336
N
u
t - Damper lower fixing
8
0 -
100
Bol
t
M12 - Jurid flexible coupling to
transmission and final drive flanges
75 -
88
N
u
t - Lower fulcrum
9
0 -
110
Nu
t -
Pendulum to final drive
1
60 -
200
N
u
t - Stabilizer to wishbone
30
-
40
N
u
t - Tie rod to final drive
8
5 -
105
Nu
t -
Tie rod to wide mounting bracket
8
5 -
115
Nu
t -
Wishbone pivot
8
0 -
100
N
u
t - Wishbone tie to final drive
8
5 -
105
N
u
t 'A' frame to wide mounting bracket
8
5 -
105
Page 302 of 2490
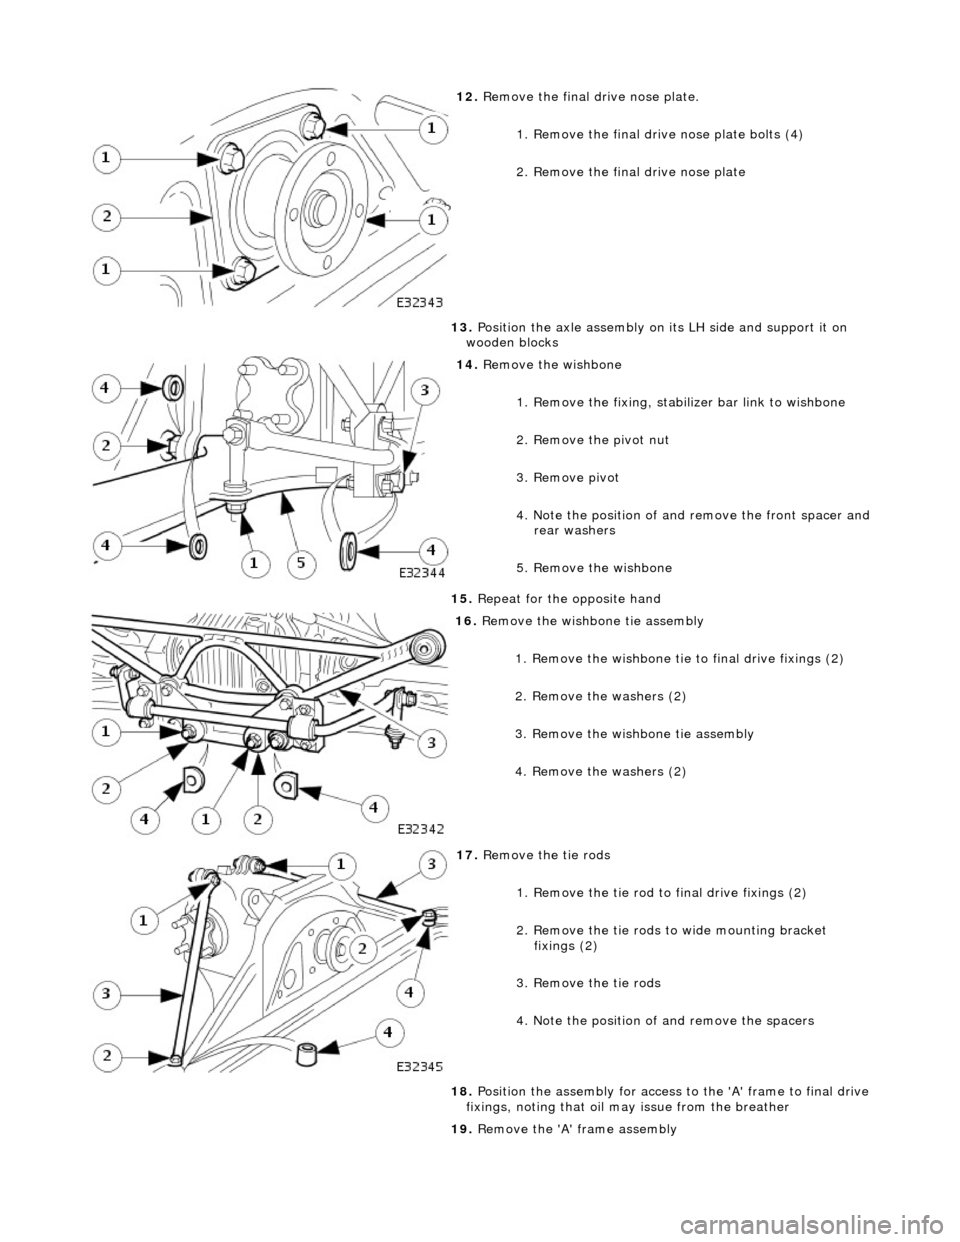
12. R
emove the final dr
ive nose plate.
1. Remove the final drive nose plate bolts (4)
2. Remove the final drive nose plate
13. Position the axle assembly on its LH side and support it on
wooden blocks
14 . Re
move the wishbone
1. Remove the fixing, stabilizer bar link to wishbone
2. Remove the pivot nut
3. Remove pivot
4. Note the position of and remove the front spacer and
rear washers
5. Remove the wishbone
15. Repeat for the opposite hand
16 . R
emove the wishbone tie assembly
1. Remove the wishbone tie to final drive fixings (2)
2. Remove the washers (2)
3. Remove the wishbone tie assembly
4. Remove the washers (2)
17. R
emove the tie rods
1. Remove the tie rod to final drive fixings (2)
2. Remove the tie rods to wide mounting bracket
fixings (2)
3. Remove the tie rods
4. Note the position of and remove the spacers
18. Position the assembly for access to the 'A' frame to final drive
fixings, noting that oil may issue from the breather
19. Remove the 'A' frame assembly
Page 391 of 2490
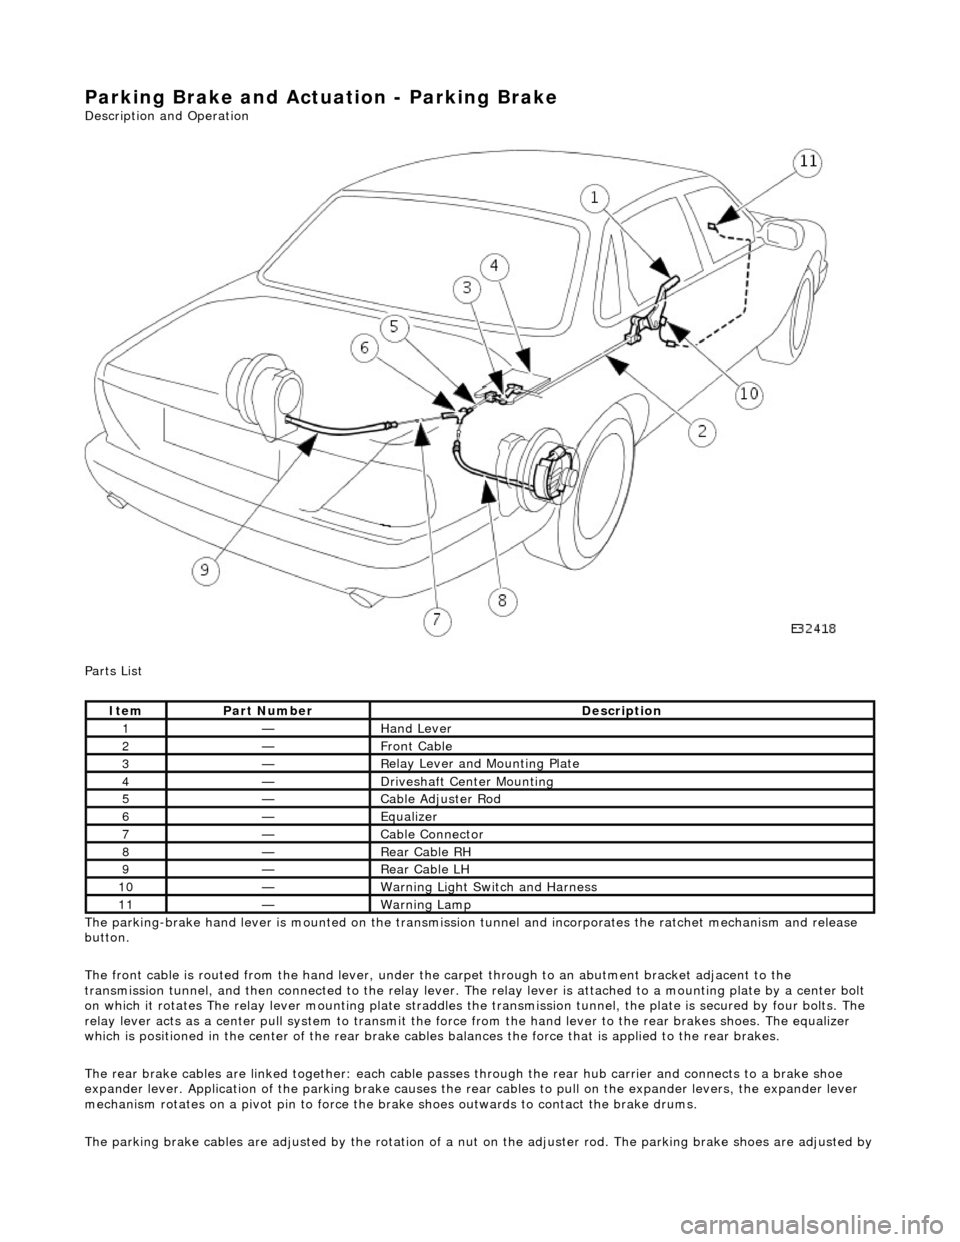
Parking Brake and Ac
tu
ation - Parking Brake
Description an
d Operation
Parts List
The parking-brake hand lever is mounted on the transmission tunnel and incorporates the ratchet mechanism and release
button.
The front cable is routed from the hand lever, under the carpet through to an abutment bracket adjacent to the
transmission tunnel, and then connected to the relay lever. The relay lever is attached to a mounting plate by a center bolt
on which it rotates The relay lever mounting plate straddles the transmission tunnel, the plate is secured by four bolts. The
relay lever acts as a center pu ll system to transmit the force from the hand lever to the rear brakes shoes. The equalizer
which is positioned in the center of the rear brake cables balances the force that is applied to the rear brakes.
The rear brake cables are linked together: each cable passes through the rear hub carrier and connects to a brake shoe
expander lever. Application of the parking brake causes the rear cables to pu ll on the expander levers, the expander lever
mechanism rotates on a pivot pin to force the brake shoes outwards to contact the brake drums.
The parking brake cables are adjusted by the rotation of a nu t on the adjuster rod. The parking brake shoes are adjusted by
It
em
Par
t Number
De
scription
1—Hand Le
ver
2—Front Cable
3—R
elay Lever and Mounting Plate
4—Drivesh
aft Center Mounting
5—Cable Adjuster Rod
6—Equalize
r
7—Cable Connector
8—Rear Ca
ble RH
9—Rear Ca
ble LH
10—Warn
ing Light Switch and Harness
11—War
ning Lamp
Page 486 of 2490
P a
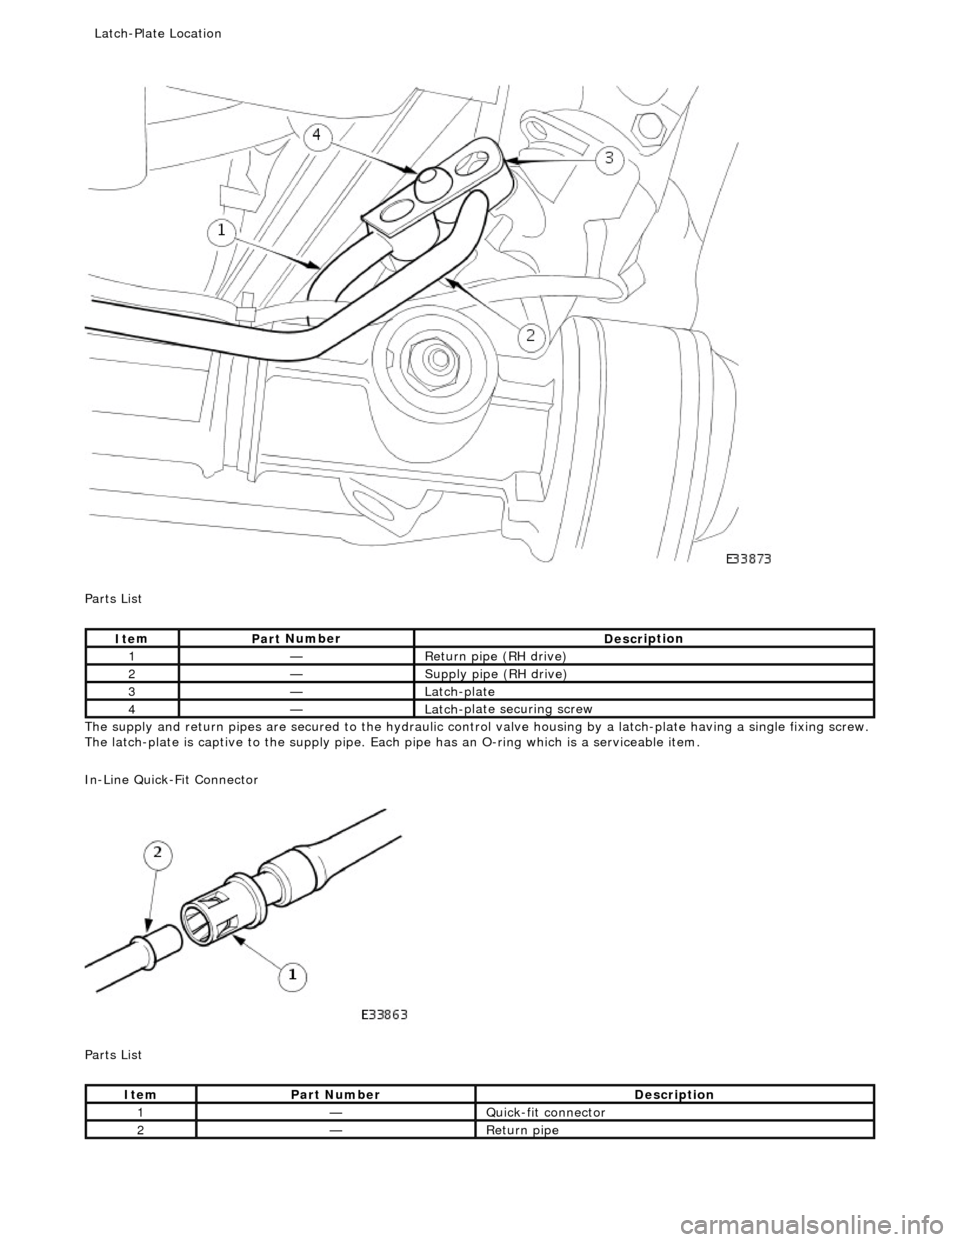
rts List
The supply and return pipes are secured to the hydraulic control valve housing by a latch-plate having a single fixing screw.
The latch-plate is captive to the supply pipe. Each pipe has an O-ri ng which is a serviceable item.
In-Line Quick-Fit Connector
Parts List
Ite
m
Par
t
Number
De
scr
iption
1—Return
pipe (RH drive)
2—Supply pipe (RH
drive)
3—Latc
h-plate
4—Latch-
plate securing screw
It
e
m
Par
t
Number
De
scr
iption
1—Qu
ic
k-fit connector
2—Return
pipe
Latch
-Plate Location
Page 494 of 2490
In
stallation
All vehicles
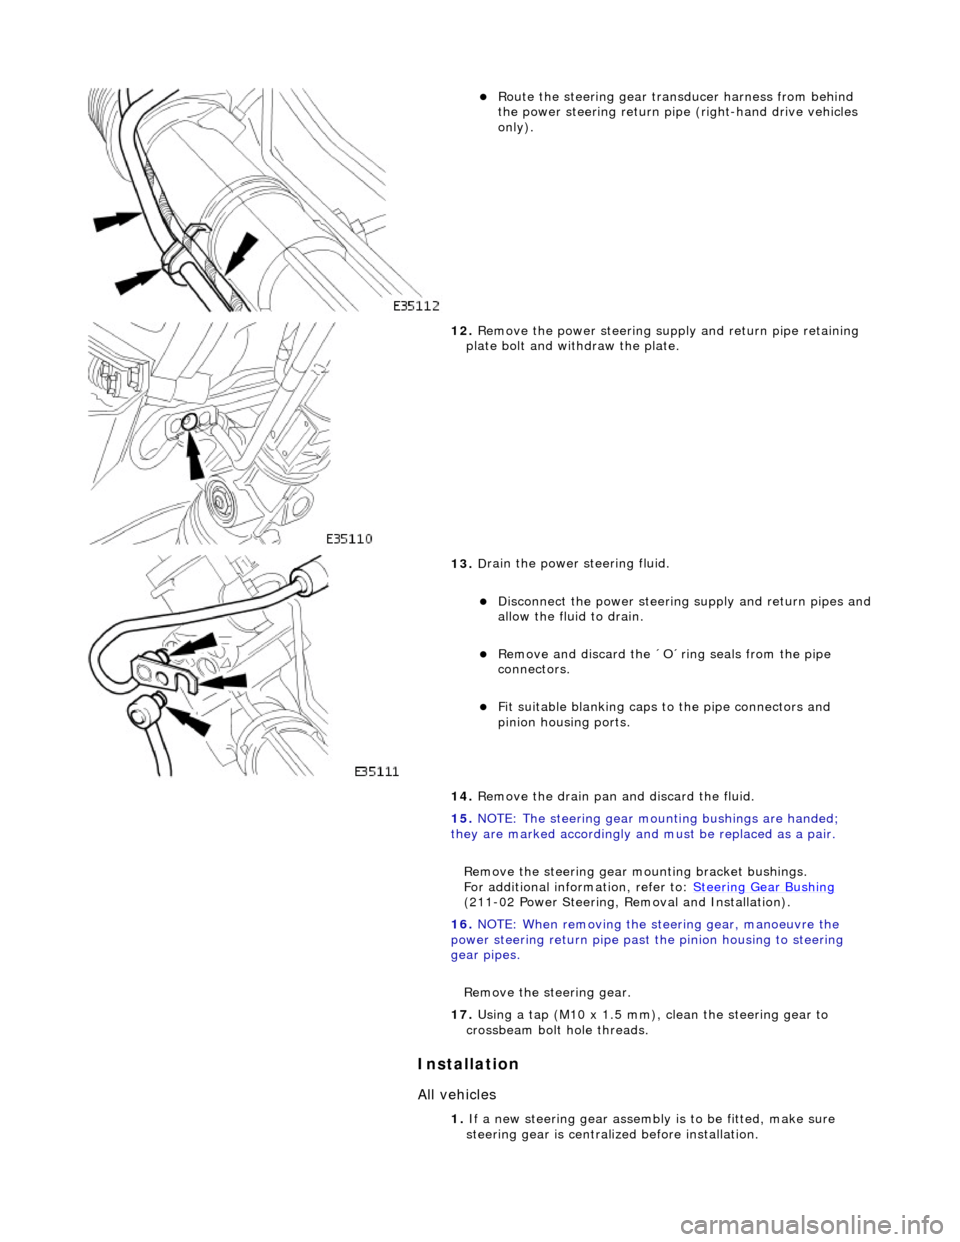
Route t
he steering gear transducer harness from behind
the power steering return pipe (right-hand drive vehicles
only).
12 . Remove the
power steering supply and return pipe retaining
plate bolt and with draw the plate.
13 . D
rain the power steering fluid.
Di
sc
onnect the power steering
supply and return pipes and
allow the fluid to drain.
Remove an d discard the ´O´ring seals from the
pipe
connectors.
Fi t su
itable blanking caps
to the pipe connectors and
pinion housing ports.
14. Remove the drain pan and discard the fluid.
15. NOTE: The steering gear mounting bushings are handed;
they are marked accordingly and must be replaced as a pair.
Remove the steering gear mo unting bracket bushings.
For additional information, refer to: Steering Gear Bushing
( 21
1-02 Power Steering, Removal and Installation).
16. NOTE: When removing the steering gear, manoeuvre the
power steering return pipe past the pinion housing to steering
gear pipes.
Remove the steering gear.
17. Using a tap (M10 x 1.5 mm), clean the steering gear to
crossbeam bolt hole threads.
1. If a new steering gear assembly is to be fitted, make sure
steering gear is centrali zed before installation.
Page 495 of 2490
2. NOTE
: When installing the steering gear, manoeuvre the power
steering return pipe past the pinion housin g to steering gear
pipes.
• NOTE: A new steering gear assembly is supplied with a dirt
protection cover/cent ralizing cap fitted.
Position the steering gear to vehicle.
3. Install the steering gear mo unting bracket bushings.
For additional information, refer to: Steering Gear Bushing
(
211-02 Power Steering, Removal and Installation).
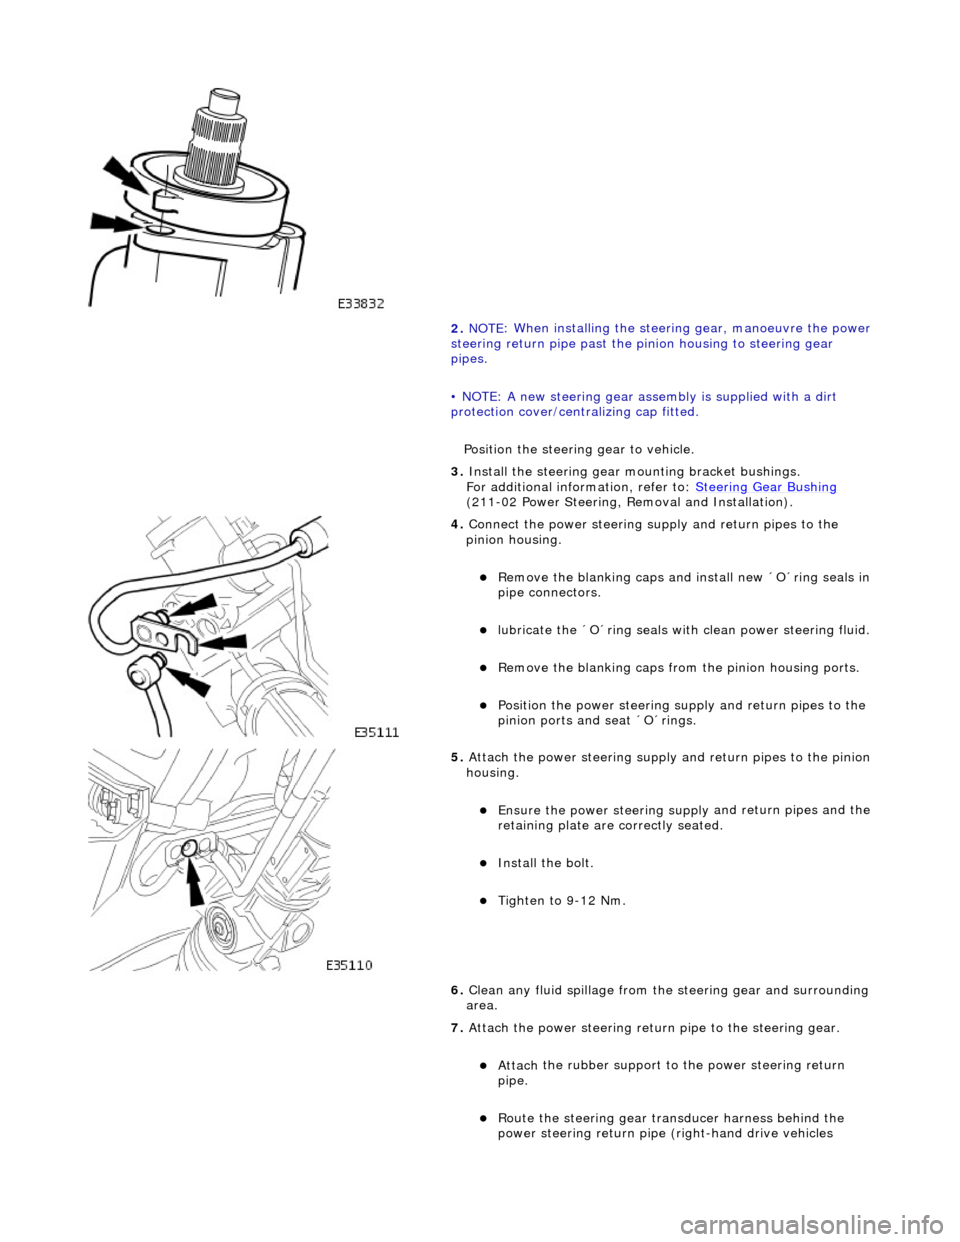
4. Conne
ct the power steering su
pply and return pipes to the
pinion housing.
R
emove the blanking caps an
d install new ´O´ring seals in
pipe connectors.
lubri
cate the ´O´ring seals wi
th clean power steering fluid.
R
emove the blanking caps from
the pinion housing ports.
Position the power
steering su
pply and return pipes to the
pinion ports and seat ´O´rings.
5. Attach
the power steering supply
and return pipes to the pinion
housing.
Ensure the power steering su pply
and return pipes and the
retaining plate are correctly seated.
Install th
e bolt.
Tigh
ten to 9-12 Nm.
6. Clean any fluid spillage from the steering gear and surrounding
area.
7. Attach the power steering return pipe to the steering gear.
Attach
the rubber support to
the power steering return
pipe.
Rout
e the steering gear transducer harness behind the
power steering return pipe (right-hand drive vehicles
Page 567 of 2490
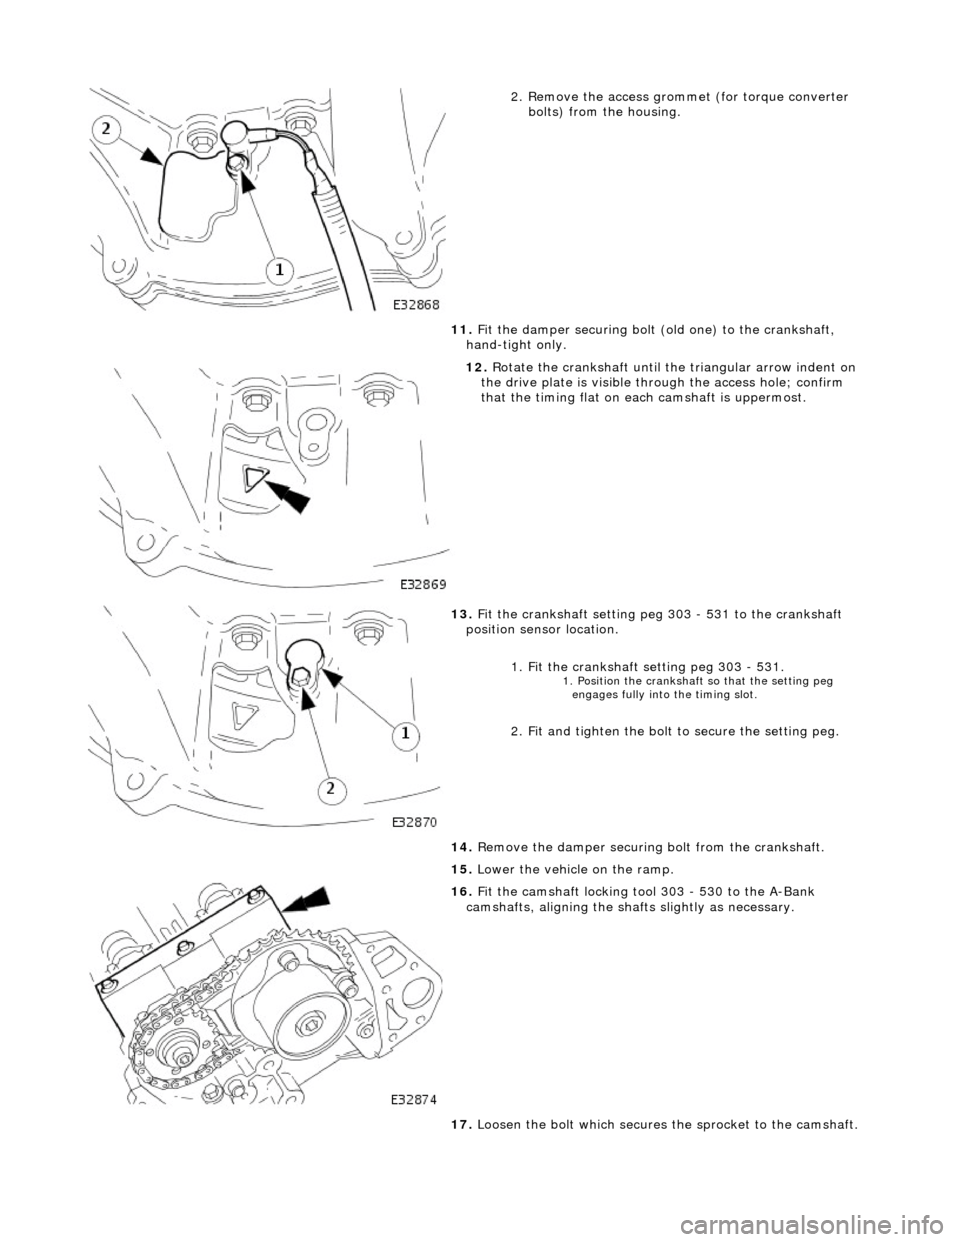
2
. Remove the access grommet (for torque converter
bolts) from the housing.
11. Fit the damper securing bolt (old one) to the crankshaft,
hand-tight only.
12
.
Rotate the crankshaft until the triangular arrow indent on
the drive plate is visible thro ugh the access hole; confirm
that the timing flat on ea ch camshaft is uppermost.
13
.
Fit the crankshaft setting peg 303 - 531 to the crankshaft
position sensor location.
1. Fit the crankshaft setting peg 303 - 531.
1. P
osition the crankshaft so that the setting peg
engages fully into the timing slot.
2
. Fit and tighten the bolt to secure the setting peg.
14. Remove the damper securing bolt from the crankshaft.
15. Lower the vehicle on the ramp.
16
.
Fit the camshaft locking tool 303 - 530 to the A-Bank
camshafts, aligning the shafts slightly as necessary.
17. Loosen the bolt which secures the sprocket to the camshaft.
Page 570 of 2490
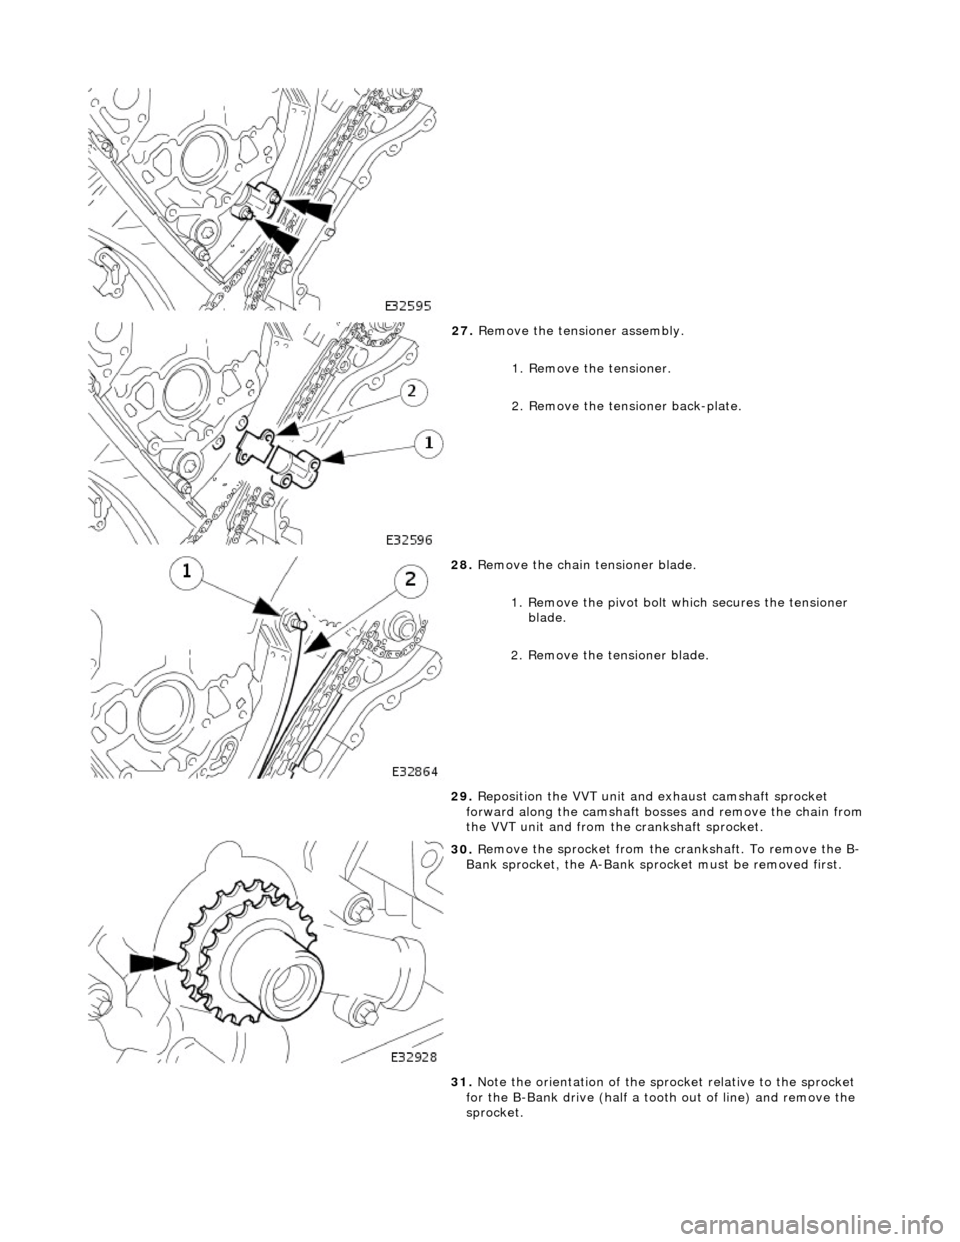
27. R
emove the tensioner assembly.
1. Remove the tensioner.
2. Remove the tensioner back-plate.
28. R
emove the chain tensioner blade.
1. Remove the pivot bolt which secures the tensioner blade.
2. Remove the tensioner blade.
29. Reposition the VVT unit and exhaust camshaft sprocket
forward along the camshaft bosses and remove the chain from
the VVT unit and from th e crankshaft sprocket.
30 . R
emove the sprocket from the
crankshaft. To remove the B-
Bank sprocket, the A-Bank spro cket must be removed first.
31. Note the orientation of the spro cket relative to the sprocket
for the B-Bank drive (half a toot h out of line) and remove the
sprocket.
Page 577 of 2490
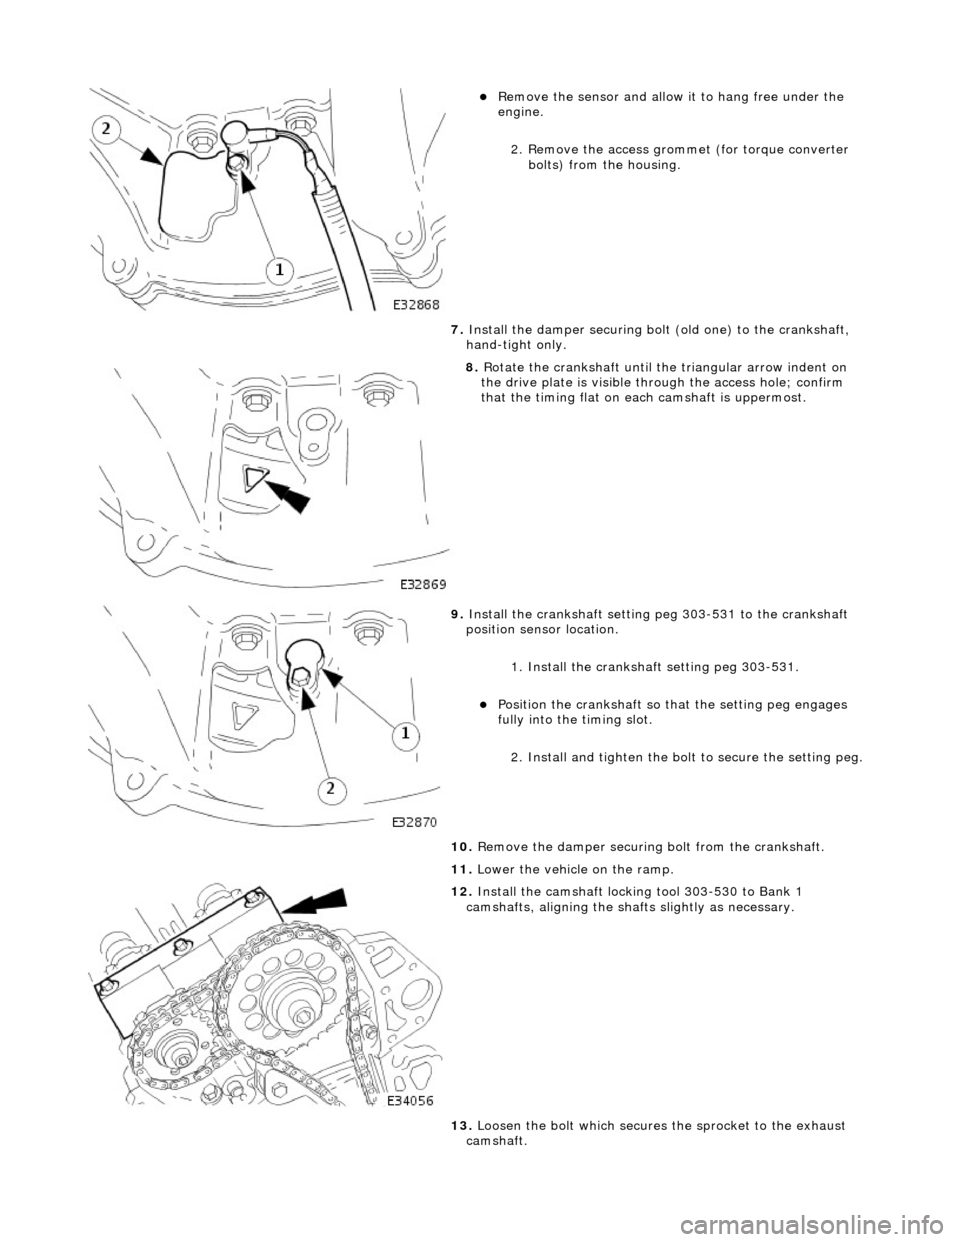
Remove the
sensor and allow
it to hang free under the
engine.
2. Remove the access grommet (for torque converter bolts) from the housing.
7. Install the damper securing bolt (old one) to the crankshaft,
hand-tight only.
8. R
otate the crankshaft until the triangular arrow indent on
the drive plate is visible thro ugh the access hole; confirm
that the timing flat on ea ch camshaft is uppermost.
9. Inst
all the crankshaft setting peg 303-531 to the crankshaft
position sensor location.
1. Install the crankshaft setting peg 303-531.
Position the crankshaft so that the settin
g peg engages
fully into the timing slot.
2. Install and tighten the bolt to secure the setting peg.
10. Remove the damper securing bolt from the crankshaft.
11. Lower the vehicle on the ramp.
12
.
Install the camshaft locking tool 303-530 to Bank 1
camshafts, aligning the shafts slightly as necessary.
13. Loosen the bolt which secures the sprocket to the exhaust
camshaft.
Page 587 of 2490
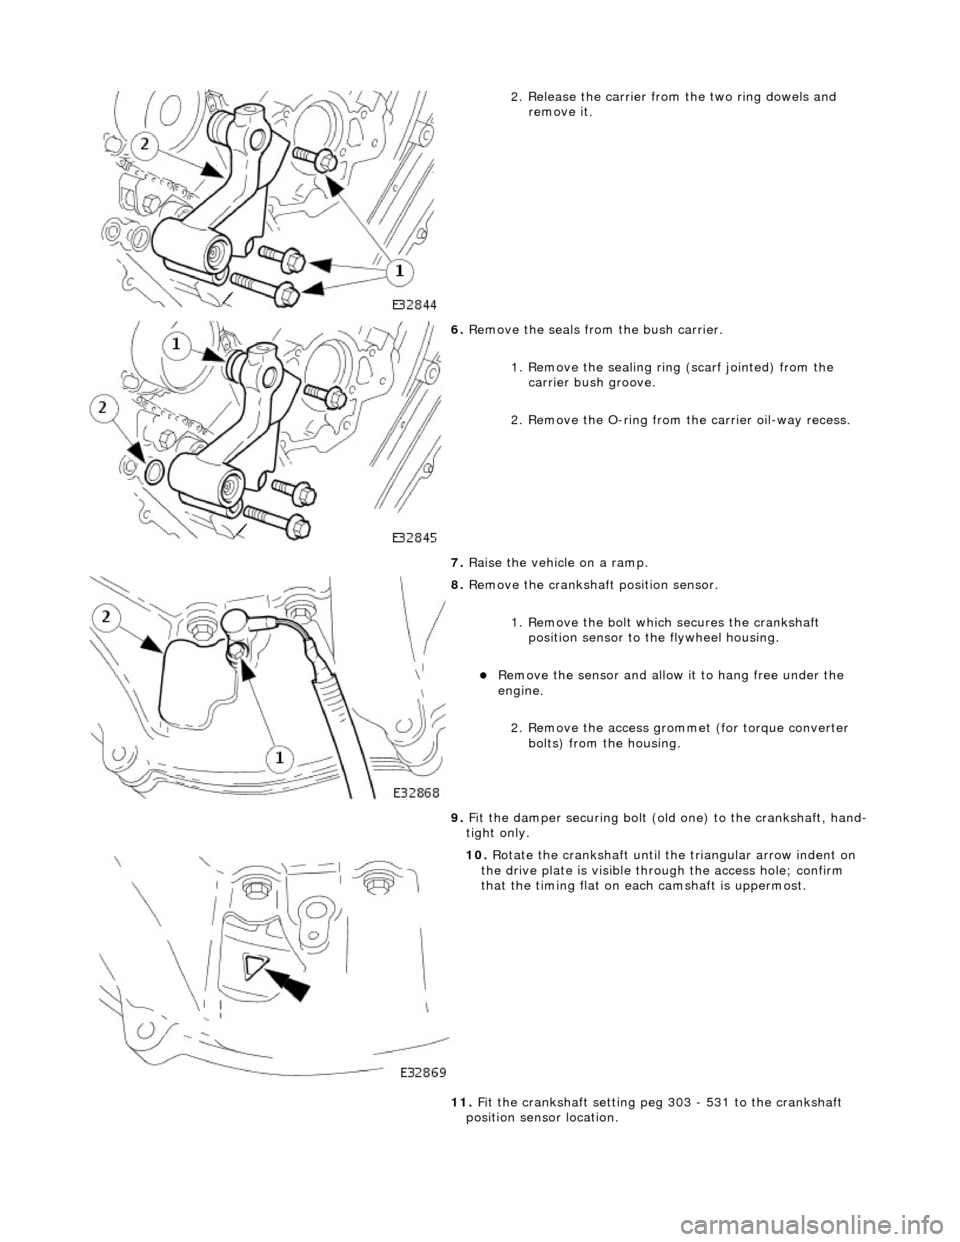
2
. Release the carrier from
the two ring dowels and
remove it.
6. R
emove the seals from the bush carrier.
1. Remove the sealing ring (scarf jointed) from the
carrier bush groove.
2. Remove the O-ring from the carrier oil-way recess.
7. Raise the vehicle on a ramp.
8. R
emove the crankshaft position sensor.
1. Remove the bolt which secures the crankshaft position sensor to the flywheel housing.
Remove the
sensor and allow
it to hang free under the
engine.
2. Remove the access grommet (for torque converter bolts) from the housing.
9. Fit the damper securing bolt (old one) to the crankshaft, hand-
tight only.
10
.
Rotate the crankshaft until the triangular arrow indent on
the drive plate is visible thro ugh the access hole; confirm
that the timing flat on ea ch camshaft is uppermost.
11. Fit the crankshaft setting peg 303 - 531 to the crankshaft
position sensor location.