Head JAGUAR XF 2009 1.G Owners Manual
[x] Cancel search | Manufacturer: JAGUAR, Model Year: 2009, Model line: XF, Model: JAGUAR XF 2009 1.GPages: 391, PDF Size: 19.32 MB
Page 3 of 391
Contents
3
Introduction
SYMBOLS GLOSSARY ...................................... 9
LABEL LOCATIONS ........................................... 9
HEALTH AND SAFETY ..................................... 10
DATA RECORDING.......................................... 11
DISABILITY MODIFICATIONS ......................... 11
FASCIA AND CONTROLS ................................ 12
PARTS AND ACCESSORIES ............................ 14
Keys and remote controls
PRINCIPLE OF OPERATION ............................ 16
GENERAL INFORMATION ON RADIO
FREQUENCIES ................................................ 16
USING THE REMOTE CONTROL ..................... 17
UNLOCKING AND DISARMING THE VEHICLE. 18
LOCKING AND ARMING THE VEHICLE ........... 19
DOCKING/UNDOCKING THE JAGUAR SMART
KEY ................................................................. 20
PROGRAMMING THE REMOTE CONTROL...... 21
CHANGING THE REMOTE CONTROL BATTERY ...
24
EMERGENCY KEY BLADE ............................... 25
Locks
LOCKING AND UNLOCKING............................ 26
USING THE EMERGENCY KEY BLADE ............ 28
VALET MODE .................................................. 30
JAGUAR SMART KEY SYSTEM TRANSMITTERS
32
KEYLESS ENTRY ............................................ 33
GLOBAL OPENING AND CLOSING .................. 35
Alarm
ARMING THE ALARM ..................................... 37
DISARMING THE ALARM ............................... 38
SECURITY SENSORS ...................................... 39
Seats
SITTING IN THE CORRECT POSITION ............ 41
ELECTRIC SEATS ............................................ 42
HEAD RESTRAINTS ........................................ 44
REAR SEATS ................................................... 45
HEATED SEATS............................................... 47
CLIMATE SEATS ............................................. 48
Seat belts
PRINCIPLE OF OPERATION ............................ 49 SEAT BELT REMINDER .................................. 50
USING SEAT BELTS DURING PREGNANCY.... 51
FASTENING THE SEAT BELTS ........................ 51
SEAT BELT HEIGHT ADJUSTMENT ................ 52
Supplementary restraints system
PRINCIPLE OF OPERATION ............................ 53
AIRBAG WARNING LAMP .............................. 57
WHIPLASH PROTECTION ............................... 57
AIRBAG LABELS ............................................. 58
AIRBAG SERVICE INFORMATION................... 58
Child safety
CHILD SEATS ................................................. 59
CHILD SEAT POSITIONING ............................ 60
BOOSTER CUSHIONS ..................................... 61
CHILD SEAT ANCHOR POINTS ....................... 62
CHILD SAFETY LOCKS ................................... 65
Pedestrian protection
PRINCIPLE OF OPERATION ............................ 66
AFTER DEPLOYMENT OF THE PEDESTRIAN
PROTECTION SYSTEM ................................... 66
Steering wheel
ADJUSTING THE STEERING WHEEL .............. 67
HORN ............................................................. 68
HEATED STEERING WHEEL............................ 68
AUDIO CONTROL ........................................... 69
VOICE CONTROL ............................................ 69
CRUISE CONTROL.......................................... 74
Lighting
LIGHTING CONTROL ...................................... 75
AUTOLAMPS .................................................. 76
REAR FOG LAMPS.......................................... 77
HAZARD WARNING FLASHERS...................... 77
DIRECTION INDICATORS ............................... 78
HEADLAMPS - DRIVING ABROAD.................. 78
HEADLAMP LEVELLING ................................. 79
CORNERING OR STATIC BENDING LAMPS.... 79
INTERIOR LAMPS .......................................... 80
APPROACH LAMPS ........................................ 81
REMOVING A HEADLAMP .............................. 81
REMOVING A REAR LAMP ............................. 82
CHANGING A BULB ........................................ 83
HEADLAMP UNIT BULBS ............................... 83
Page 4 of 391
Contents
4
SIDE REPEATER LAMP .................................. 85
REAR LAMP BULBS ....................................... 85
BULB SPECIFICATION CHART ........................ 87
Wipers and washers
WINDSCREEN WIPERS .................................. 88
RAIN SENSOR ................................................ 89
WINDSCREEN WASHERS............................... 89
HEADLAMP WASHERS................................... 90
CHECKING THE WIPER BLADES .................... 90
CHANGING THE WIPER BLADES .................... 91
Windows and mirrors
ELECTRIC WINDOWS ..................................... 93
INTERIOR MIRROR ........................................ 94
EXTERIOR MIRRORS ..................................... 95
BLIND SPOT MONITOR .................................. 97
Instruments
INSTRUMENT PANEL OVERVIEW .................. 99
WARNING LAMPS AND INDICATORS .......... 100
AUDIBLE WARNINGS AND INDICATORS ..... 104
Information displays
GENERAL INFORMATION ............................. 105
WARNING AND INFORMATION MESSAGES. 106
TRIP COMPUTER ......................................... 107
TOUCH-SCREEN ........................................... 109
PERSONALISED SETTINGS .......................... 111
Climate control
AIR VENTS ................................................... 115
AUTOMATIC CLIMATE CONTROL ................. 116
ELECTRIC SUNROOF .................................... 121
Convenience features
SUN VISORS ................................................ 123
SUN BLINDS................................................. 123
INSTRUMENT LIGHTING DIMMER ............... 123
CLOCK .......................................................... 124
AUXILIARY POWER SOCKETS ..................... 125
GLOVE BOX .................................................. 125
CUP HOLDERS ............................................. 126
STORAGE COMPARTMENTS ........................ 127
GARAGE DOOR TRANSCEIVER .................... 128
PORTABLE AUDIO INTERFACE..................... 131
Starting the engine
GENERAL INFORMATION.............................. 132
KEYLESS STARTING ..................................... 133
SWITCHING OFF THE ENGINE....................... 134
DIESEL PARTICULATE FILTER (DPF)............ 135
Transmission
AUTOMATIC TRANSMISSION ....................... 137
Brakes
PRINCIPLE OF OPERATION .......................... 144
HINTS ON DRIVING WITH ABS ..................... 144
ELECTRIC PARKING BRAKE (EPB) ............... 146
Parking aid
PRINCIPLE OF OPERATION .......................... 148
USING THE PARKING AID ............................. 148
Rear view camera
PRINCIPLE OF OPERATION .......................... 152
Driving hints
RUNNING-IN ................................................. 154
ECONOMICAL DRIVING ................................ 155
Cruise control
PRINCIPLE OF OPERATION .......................... 156
USING CRUISE CONTROL............................. 156
Adaptive cruise control (ACC)
PRINCIPLE OF OPERATION .......................... 159
USING ACC ................................................... 159
FORWARD ALERT FUNCTION ....................... 164
ADVANCED EMERGENCY BRAKE ASSIST..... 165
Automatic speed limiter (ASL)
PRINCIPLE OF OPERATION .......................... 167
USING THE ASL ............................................ 167
Driving dynamics
GENERAL INFORMATION.............................. 169
WINTER MODE ............................................. 169
DYNAMIC MODE ........................................... 170
STABILITY CONTROL.................................... 170
Fuel and refuelling
SAFETY PRECAUTIONS................................. 174
Page 13 of 391
13
Introduction
1.Steering wheel audio controls.
See AUDIO CONTROL (page 69).
2. External lamp controls. See LIGHTING
CONTROL (page 75).
3. Sequential gear change down paddle.
See AUTOMATIC TRANSMISSION
(page 137).
4. Speedometer. See INSTRUMENT PANEL
OVERVIEW (page 99).
5. Driver’s horn and airbag. See HORN
(page 68). See Supplementary
restraints system (page 53).
6. Message centre. See WARNING AND
INFORMATION MESSAGES (page 106).
7. Tachometer. See INSTRUMENT PANEL
OVERVIEW (page 99).
8. Sequential gear change up paddle.
See AUTOMATIC TRANSMISSION
(page 137).
9. Wiper and washer control. See Wipers
and washers (page 88).
10. Cruise control and Adaptive cruise
control steering wheel controls.
SeeCruise control (page 156).
See Adaptive cruise control (ACC)
(page 159).
11. Audio control panel. See Audio unit
overview (page 269).
12. Fascia lock/unlock buttons.
SeeLOCKING AND UNLOCKING
(page 26).
13. Touch-screen. See TOUCH-SCREEN
(page 109).
14. Hazard warning lamp switch.
SeeHAZARD WARNING FLASHERS
(page 77).
15. Climate contro l panel. SeeClimate
control (page 115). 16.
Glove box proximity sensor. See GLOVE
BOX (page 125).
17. Engine START/STOP switch.
SeeStarting the engine (page 132).
18. JaguarDrive gear selector.
SeeAUTOMATIC TRANSMISSION
(page
137).
19. JaguarDrive mode selectors. See Driving
dynamics (page 169).
20. Electric Parking Brake (EPB).
SeeELECTRIC PARKIN G BRAKE (EPB)
(page 146).
21. Steering wheel adju stment control.
See ADJUSTING THE STEERING WHEEL
(page 67).
22. Starter control docking unit for the
Jaguar Smart Key.
SeeDOCKING/UNDOCKING THE
JAGUAR SMART KEY (page 20).
23. Bonnet release lever. See OPENING AND
CLOSING THE BONNET (page 195).
24. Luggage compartment release switch.
SeeLOCKING AND UNLOCKING
(page 26).
25. Headlamp levelling control.
SeeHEADLAMP LEVELLING (page 79).
26. Instrument lighting dimmer control.
SeeINSTRUMENT LIGHTING DIMMER
(page 123).
27. Rear fog lamps switch. See REAR FOG
LAMPS (page 77).
28. Adaptive Cruise Control (ACC) Forward
Alert switch. See FORWARD ALERT
FUNCTION (page 164).
Page 16 of 391
Keys and remote controls
16
PRINCIPLE OF OPERATION
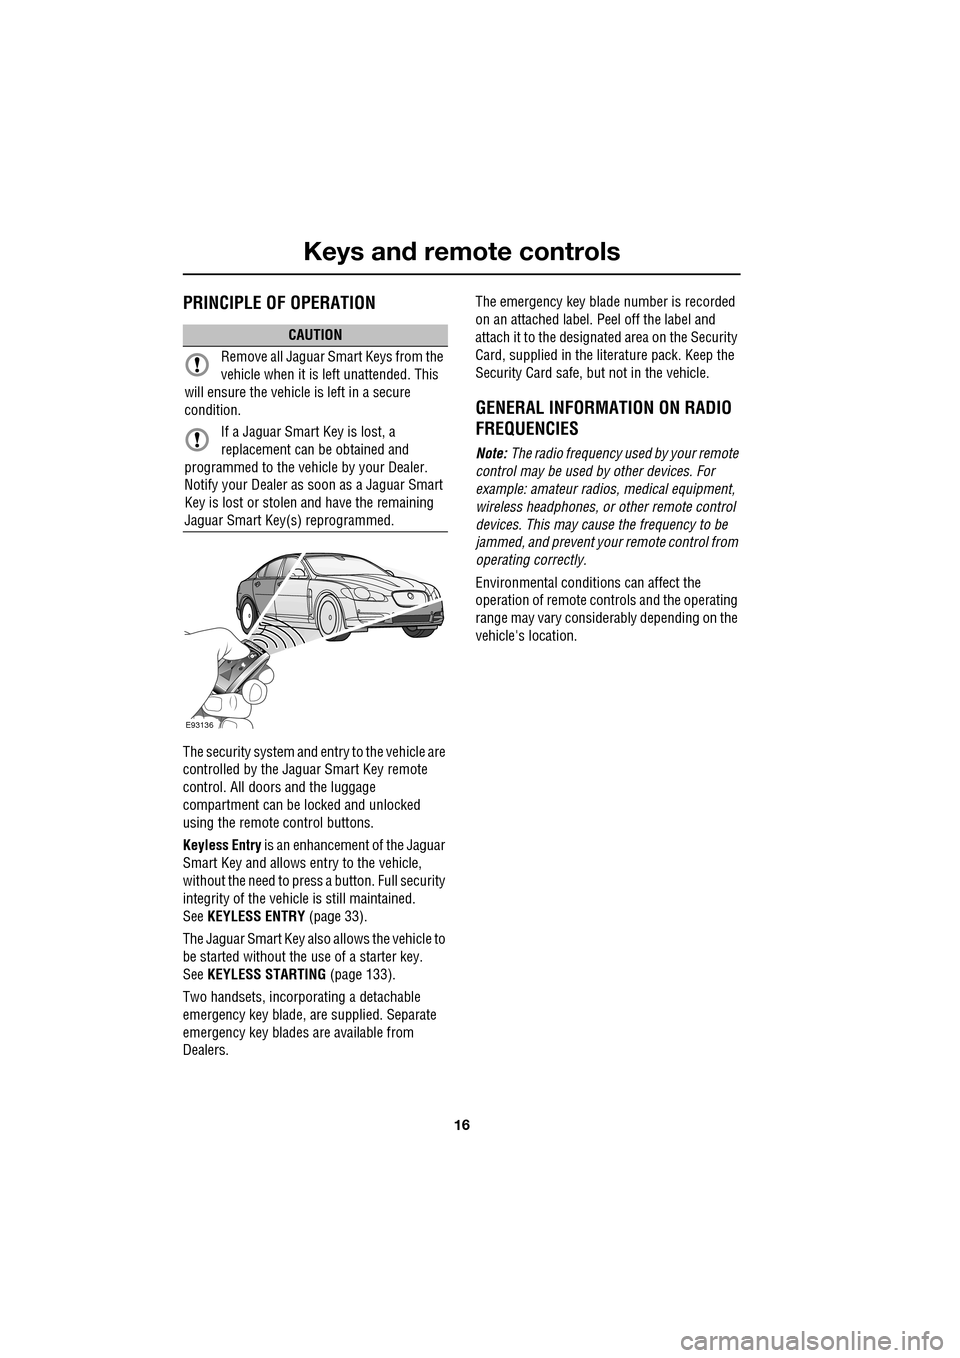
The security system and entry to the vehicle are
controlled by the Jaguar Smart Key remote
control. All doors and the luggage
compartment can be locked and unlocked
using the remote control buttons.
Keyless Entry is an enhancement of the Jaguar
Smart Key and allows entry to the vehicle,
without the need to press a button. Full security
integrity of the vehicl e is still maintained.
See KEYLESS ENTRY (page 33).
The Jaguar Smart Key also allows the vehicle to
be started without the use of a starter key.
See KEYLESS STARTING (page 133).
Two handsets, incorporating a detachable
emergency key blade, are supplied. Separate
emergency key blades are available from
Dealers. The emergency key blade number is recorded
on an attached label. Peel off the label and
attach it to the designated area on the Security
Card, supplied in the lite
rature pack. Keep the
Security Card safe, but not in the vehicle.
GENERAL INFORMATION ON RADIO
FREQUENCIES
Note: The radio frequency used by your remote
control may be used by other devices. For
example: amateur radios , medical equipment,
wireless headphones, or other remote control
devices. This may cause the frequency to be
jammed, and prevent your remote control from
operating correctly.
Environmental conditions can affect the
operation of remote controls and the operating
range may vary considerably depending on the
vehicle's location.
CAUTION
Remove all Jaguar Smart Keys from the
vehicle when it is le ft unattended. This
will ensure the vehicle is left in a secure
condition.
If a Jaguar Smart Key is lost, a
replacement can be obtained and
programmed to the vehi cle by your Dealer.
Notify your Dealer as soon as a Jaguar Smart
Key is lost or stolen and have the remaining
Jaguar Smart Key(s) reprogrammed.
E93136
Page 17 of 391
17
Keys and remote controls
USING THE REMOTE CONTROL
Jaguar Smart Key
Note: The operational range of the Jaguar
Smart Key will vary considerably depending on
atmospheric conditions and interference from
other transmitting devices.
Note: Some features of the security system are
market dependent or ar e options, so may not
be present on your vehicle.
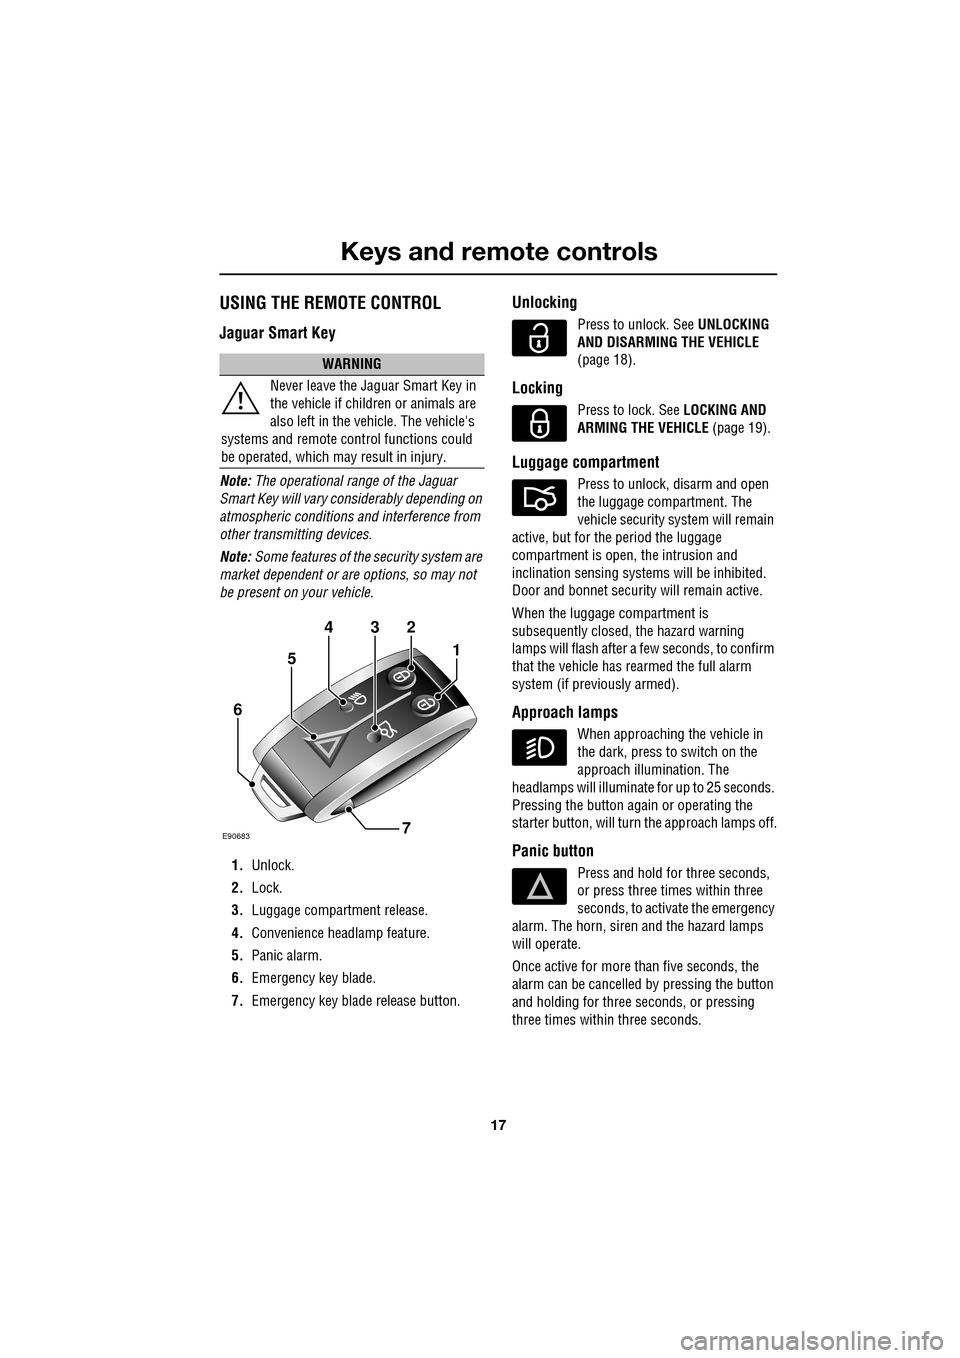
1. Unlock.
2. Lock.
3. Luggage compartment release.
4. Convenience headlamp feature.
5. Panic alarm.
6. Emergency key blade.
7. Emergency key blad e release button.
Unlocking
Press to unlock. See UNLOCKING
AND DISARMING THE VEHICLE
(page 18).
Locking
Press to lock. See LOCKING AND
ARMING THE VEHICLE (page 19).
Luggage compartment
Press to unlock, disarm and open
the luggage compartment. The
vehicle security system will remain
active, but for the period the luggage
compartment is open, the intrusion and
inclination sensing system s will be inhibited.
Door and bonnet security will remain active.
When the luggage compartment is
subsequently closed, the hazard warning
lamps will flash after a few seconds, to confirm
that the vehicle has rearmed the full alarm
system (if previously armed).
Approach lamps
When approaching the vehicle in
the dark, press to switch on the
approach illumination. The
headlamps will illuminate for up to 25 seconds.
Pressing the button again or operating the
starter button, will turn the approach lamps off.
Panic button
Press and hold for three seconds,
or press three times within three
seconds, to activate the emergency
alarm. The horn, siren and the hazard lamps
will operate.
Once active for more than five seconds, the
alarm can be cancelled by pressing the button
and holding for three seconds, or pressing
three times within three seconds.
WARNING
Never leave the Jaguar Smart Key in
the vehicle if children or animals are
also left in the vehicle. The vehicle's
systems and remote c ontrol functions could
be operated, which ma y result in injury.
432
1
7
6
5
E90683
Page 41 of 391
41
Seats
SITTING IN THE CORRECT POSITION
The seat, head restraint, seat belt and airbags,
all contribute to the protection of the user.
Correct use of these components will give you
greater protection, therefore you should
observe the following points:
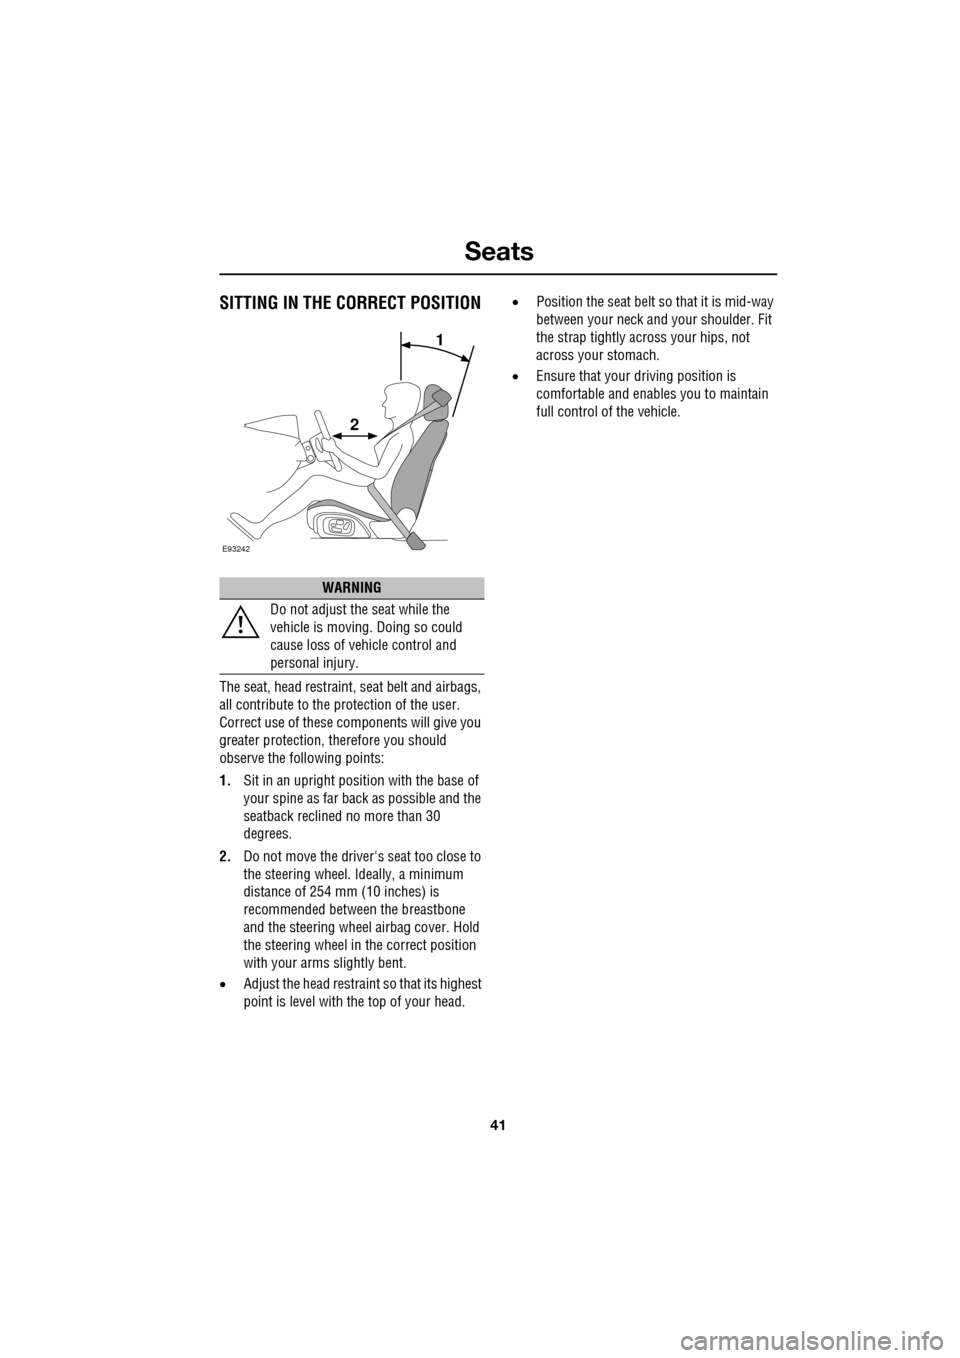
1. Sit in an upright position with the base of
your spine as far back as possible and the
seatback reclined no more than 30
degrees.
2. Do not move the driver's seat too close to
the steering wheel. Ideally, a minimum
distance of 254 mm (10 inches) is
recommended betwee n the breastbone
and the steering wheel airbag cover. Hold
the steering wheel in the correct position
with your arms slightly bent.
• Adjust the head restraint so that its highest
point is level with the top of your head. •
Position the seat belt so that it is mid-way
between your neck an d your shoulder. Fit
the strap tightly across your hips, not
across your stomach.
• Ensure that your driving position is
comfortable and enables you to maintain
full control of the vehicle.
WARNING
Do not adjust the seat while the
vehicle is moving. Doing so could
cause loss of vehicle control and
personal injury.
E93242
1
2
Page 43 of 391
43
Seats
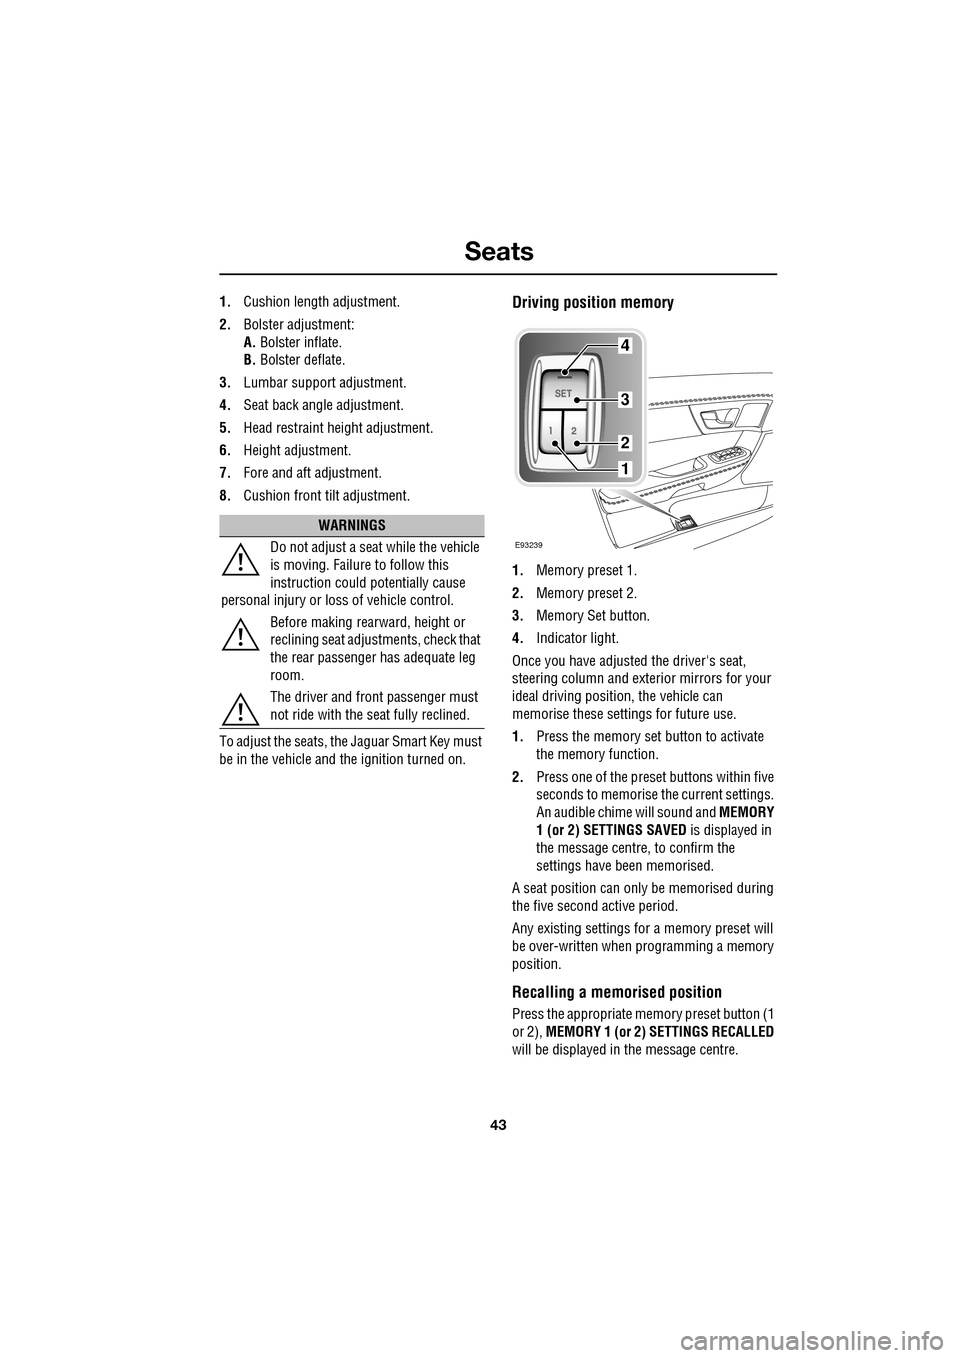
1.Cushion length adjustment.
2. Bolster adjustment:
A. Bolster inflate.
B. Bolster deflate.
3. Lumbar support adjustment.
4. Seat back angle adjustment.
5. Head restraint height adjustment.
6. Height adjustment.
7. Fore and aft adjustment.
8. Cushion front tilt adjustment.
To adjust the seats, the Jaguar Smart Key must
be in the vehicle and the ignition turned on.Driving position memory
1. Memory preset 1.
2. Memory preset 2.
3. Memory Set button.
4. Indicator light.
Once you have adjusted the driver's seat,
steering column and exte rior mirrors for your
ideal driving position, the vehicle can
memorise these settings for future use.
1. Press the memory set button to activate
the memory function.
2. Press one of the preset buttons within five
seconds to memorise the current settings.
An audible chime will sound and MEMORY
1 (or 2) SETTINGS SAVED is displayed in
the message centre, to confirm the
settings have been memorised.
A seat position can onl y be memorised during
the five second active period.
Any existing settings for a memory preset will
be over-written when programming a memory
position.
Recalling a memorised position
Press the appropriate memory preset button (1
or 2), MEMORY 1 (or 2) SETTINGS RECALLED
will be displayed in the message centre.
WARNINGS
Do not adjust a seat while the vehicle
is moving. Failure to follow this
instruction could potentially cause
personal injury or loss of vehicle control.
Before making rearward, height or
reclining seat adjustments, check that
the rear passenger has adequate leg
room.
The driver and front passenger must
not ride with the seat fully reclined.
E93239
4
3
2
1
Page 44 of 391
Seats
44
HEAD RESTRAINTS
For information on adjusting power-operated
head restraints, refer to the Electric seats
section. SeeELECTRIC SEATS (page 42).
Whiplash protection
Both front seats are equi pped with Active Head
Restraints (AHR), which reduce the risk of neck
and spinal injury (whiplash) in the event of a
rear impact. See WHIPLASH PROTECTION
(page 57).
Head restraint tilt adjustment
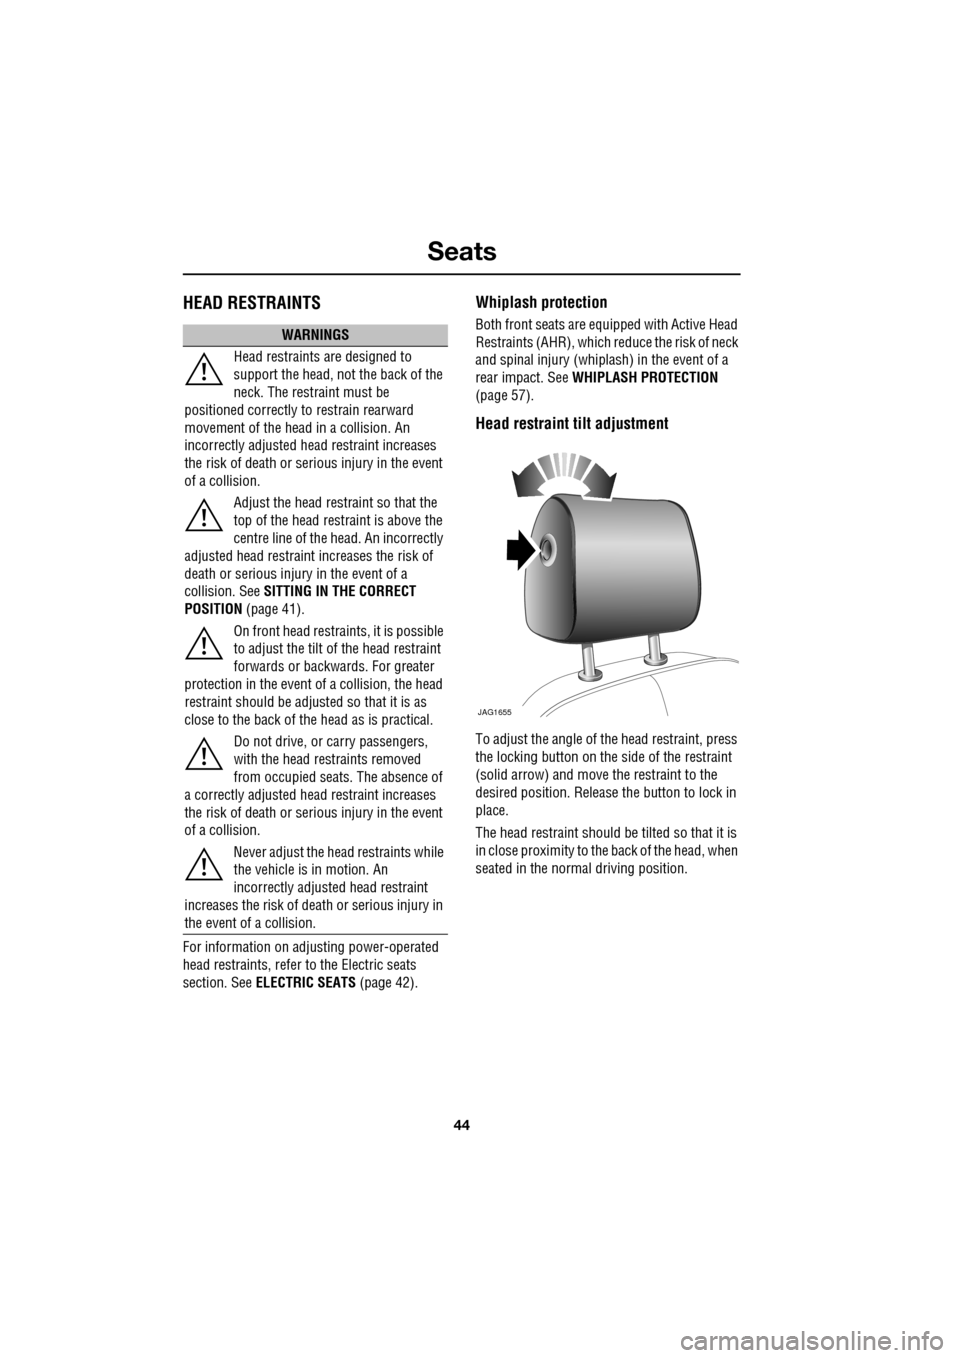
To adjust the angle of the head restraint, press
the locking button on the side of the restraint
(solid arrow) and move the restraint to the
desired position. Release the button to lock in
place.
The head restraint should be tilted so that it is
in close proximity to the back of the head, when
seated in the normal driving position.
WARNINGS
Head restraints are designed to
support the head, not the back of the
neck. The restraint must be
positioned correctly to restrain rearward
movement of the head in a collision. An
incorrectly adjusted head restraint increases
the risk of death or seri ous injury in the event
of a collision.
Adjust the head restraint so that the
top of the head restraint is above the
centre line of the head. An incorrectly
adjusted head restraint increases the risk of
death or serious injury in the event of a
collision. See SITTING IN THE CORRECT
POSITION (page 41).
On front head restra ints, it is possible
to adjust the tilt of the head restraint
forwards or backwards. For greater
protection in the event of a collision, the head
restraint should be adjust ed so that it is as
close to the back of the head as is practical.
Do not drive, or carry passengers,
with the head restraints removed
from occupied seat s. The absence of
a correctly adjusted head restraint increases
the risk of death or seri ous injury in the event
of a collision.
Never adjust the head restraints while
the vehicle is in motion. An
incorrectly adjusted head restraint
increases the risk of death or serious injury in
the event of a collision.
JAG1655
Page 45 of 391
45
Seats
Manual head restraints
1.Press the locking collar to release the head
restraint.
2. Whilst pressing the locking collar, move
the head restraint up or down to the
required position.
Note: It is not necessary to press the locking
collar to adjust the head restraint upwards.
Head restraint removal
Manual head restraints may be removed, if
required, to fit larger child seats. Press the
locking collar and lift the restraint out of the
seat back. Ensure the restraint is refitted once
the child seat is removed.
Note: It is not possible to remove power-
operated head restraints. Note:
Refer to the Child Safety section for
details on correct child restraint fitment.
See CHILD SEATS (page 59).
REAR SEATS
The split fold rear seat can be folded
completely to accommodate large loads, or
partially to accommodate long loads, and still
retain seating for passengers.
CAUTION
Do not attempt to remove a front head
restraint fitted with a display screen.
This may damage elec trical connections.
E93185
WARNINGS
Always ensure that objects carried
within the vehicle are secured
properly. Unsecure d items can cause
death or serious injury in the event of an
impact or sudden manoeuvre.
Never allow passengers to travel in
the luggage compartment under any
circumstances. All vehicle occupants
should be seated correct ly, and wear a seat
belt at all times when the vehicle is in motion.
Failure to do so will greatl y increase the risk of
death and serious injury in the event of an
accident or heavy braking.
Always take note of safety warnings
and labels attached to the rear seats.
The labels give advice on safely
folding and erecting the seats.
Page 46 of 391
Seats
46
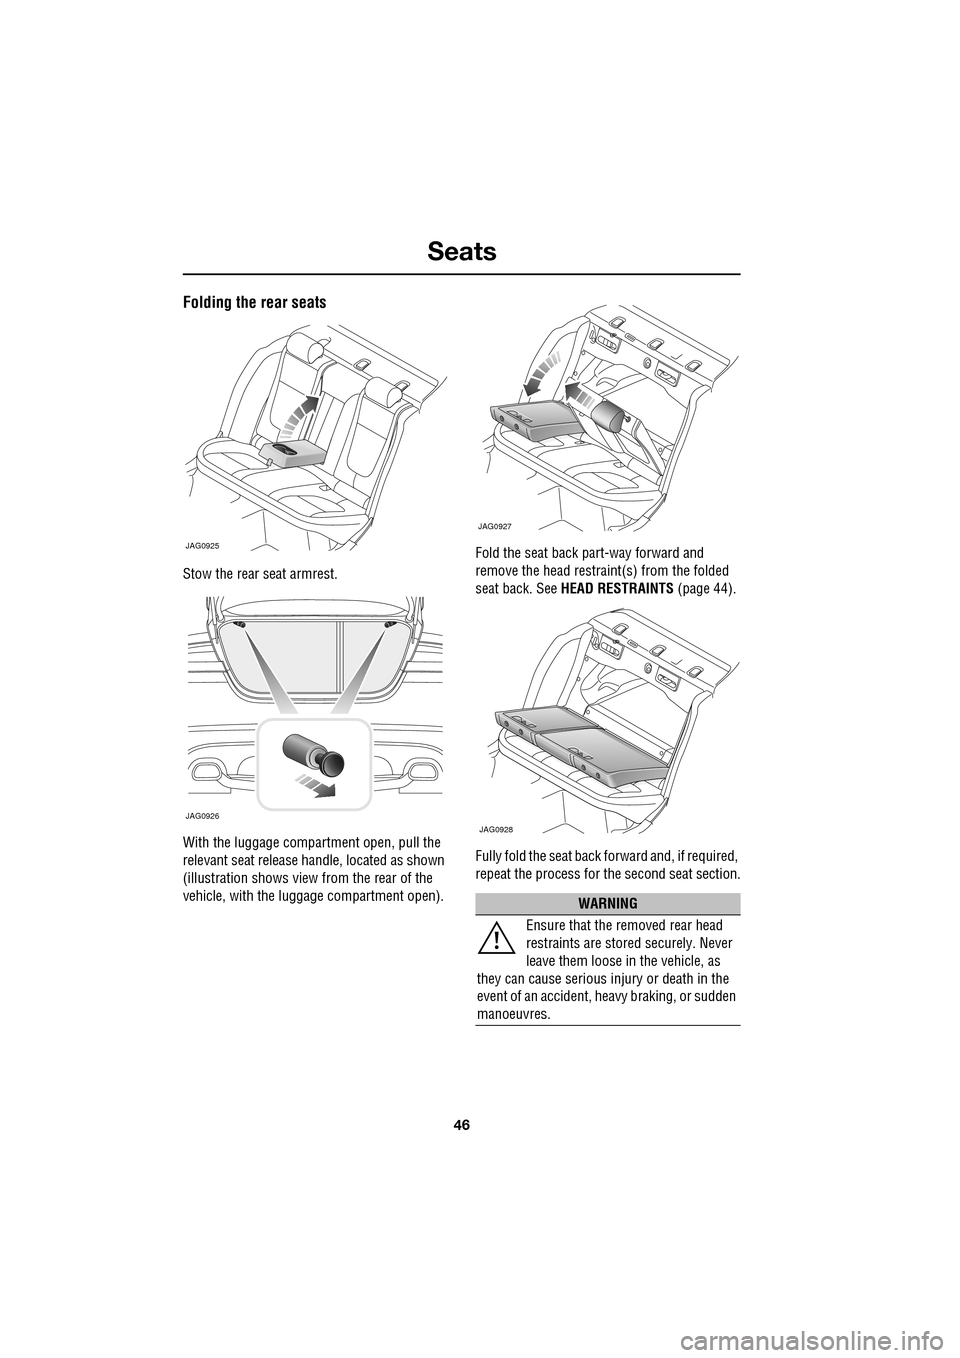
Folding the rear seats
Stow the rear seat armrest.
With the luggage compartment open, pull the
relevant seat release handle, located as shown
(illustration shows view from the rear of the
vehicle, with the luggage compartment open).Fold the seat back part-way forward and
remove the head restraint(s) from the folded
seat back. See
HEAD RESTRAINTS (page 44).
Fully fold the seat back forward and, if required,
repeat the process for the second seat section.
JAG0925
JAG0926
WARNING
Ensure that the removed rear head
restraints are stored securely. Never
leave them loose in the vehicle, as
they can cause serious injury or death in the
event of an accident, he avy braking, or sudden
manoeuvres.
JAG0927
JAG0928