Message centre JAGUAR XF 2009 1.G Owners Manual
[x] Cancel search | Manufacturer: JAGUAR, Model Year: 2009, Model line: XF, Model: JAGUAR XF 2009 1.GPages: 391, PDF Size: 19.32 MB
Page 13 of 391
13
Introduction
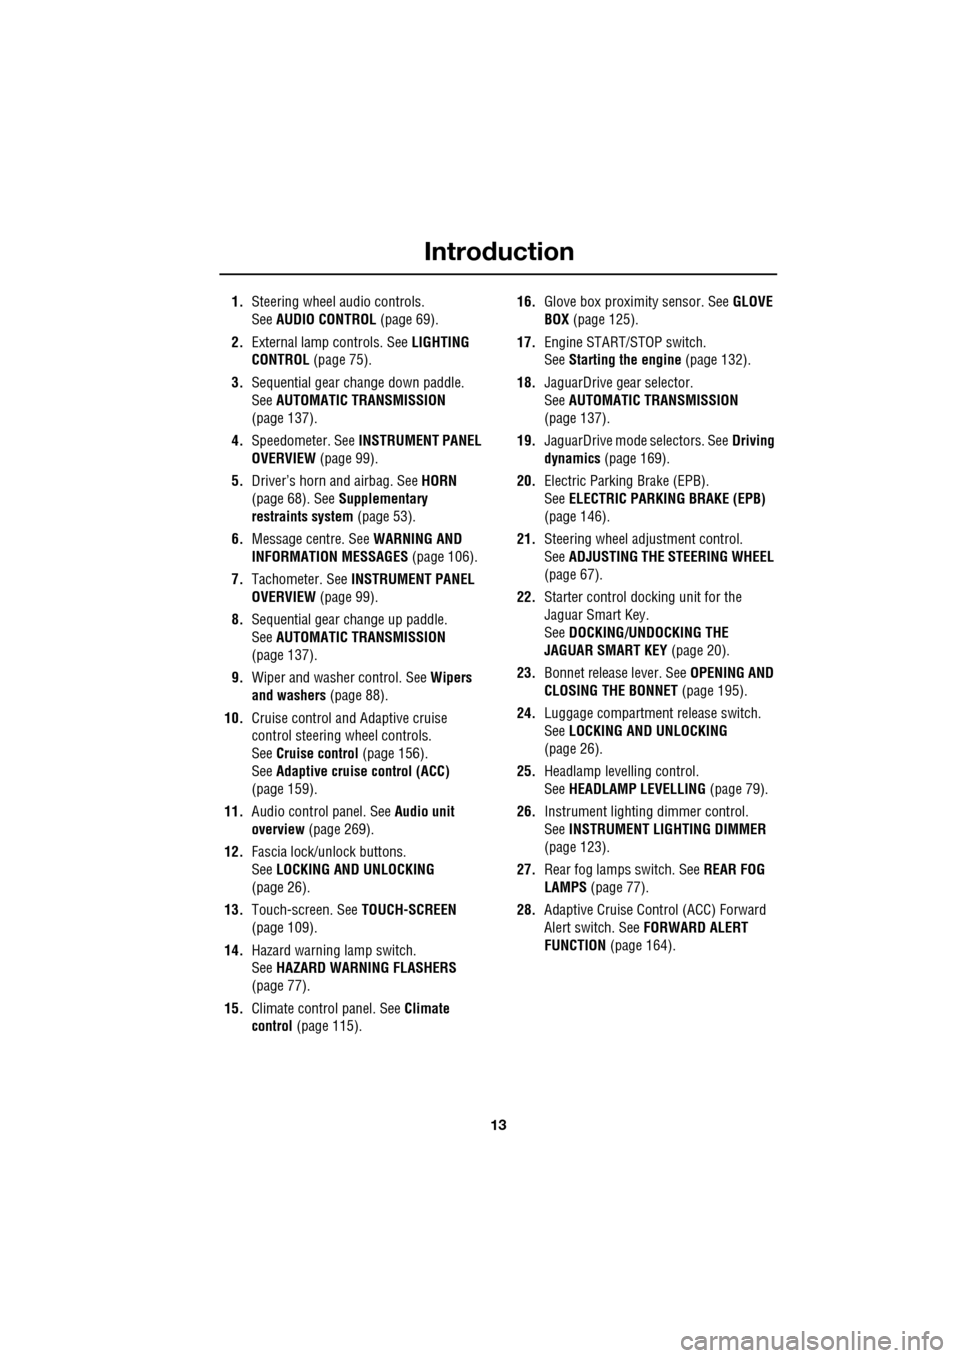
1.Steering wheel audio controls.
See AUDIO CONTROL (page 69).
2. External lamp controls. See LIGHTING
CONTROL (page 75).
3. Sequential gear change down paddle.
See AUTOMATIC TRANSMISSION
(page 137).
4. Speedometer. See INSTRUMENT PANEL
OVERVIEW (page 99).
5. Driver’s horn and airbag. See HORN
(page 68). See Supplementary
restraints system (page 53).
6. Message centre. See WARNING AND
INFORMATION MESSAGES (page 106).
7. Tachometer. See INSTRUMENT PANEL
OVERVIEW (page 99).
8. Sequential gear change up paddle.
See AUTOMATIC TRANSMISSION
(page 137).
9. Wiper and washer control. See Wipers
and washers (page 88).
10. Cruise control and Adaptive cruise
control steering wheel controls.
SeeCruise control (page 156).
See Adaptive cruise control (ACC)
(page 159).
11. Audio control panel. See Audio unit
overview (page 269).
12. Fascia lock/unlock buttons.
SeeLOCKING AND UNLOCKING
(page 26).
13. Touch-screen. See TOUCH-SCREEN
(page 109).
14. Hazard warning lamp switch.
SeeHAZARD WARNING FLASHERS
(page 77).
15. Climate contro l panel. SeeClimate
control (page 115). 16.
Glove box proximity sensor. See GLOVE
BOX (page 125).
17. Engine START/STOP switch.
SeeStarting the engine (page 132).
18. JaguarDrive gear selector.
SeeAUTOMATIC TRANSMISSION
(page
137).
19. JaguarDrive mode selectors. See Driving
dynamics (page 169).
20. Electric Parking Brake (EPB).
SeeELECTRIC PARKIN G BRAKE (EPB)
(page 146).
21. Steering wheel adju stment control.
See ADJUSTING THE STEERING WHEEL
(page 67).
22. Starter control docking unit for the
Jaguar Smart Key.
SeeDOCKING/UNDOCKING THE
JAGUAR SMART KEY (page 20).
23. Bonnet release lever. See OPENING AND
CLOSING THE BONNET (page 195).
24. Luggage compartment release switch.
SeeLOCKING AND UNLOCKING
(page 26).
25. Headlamp levelling control.
SeeHEADLAMP LEVELLING (page 79).
26. Instrument lighting dimmer control.
SeeINSTRUMENT LIGHTING DIMMER
(page 123).
27. Rear fog lamps switch. See REAR FOG
LAMPS (page 77).
28. Adaptive Cruise Control (ACC) Forward
Alert switch. See FORWARD ALERT
FUNCTION (page 164).
Page 21 of 391
21
Keys and remote controls
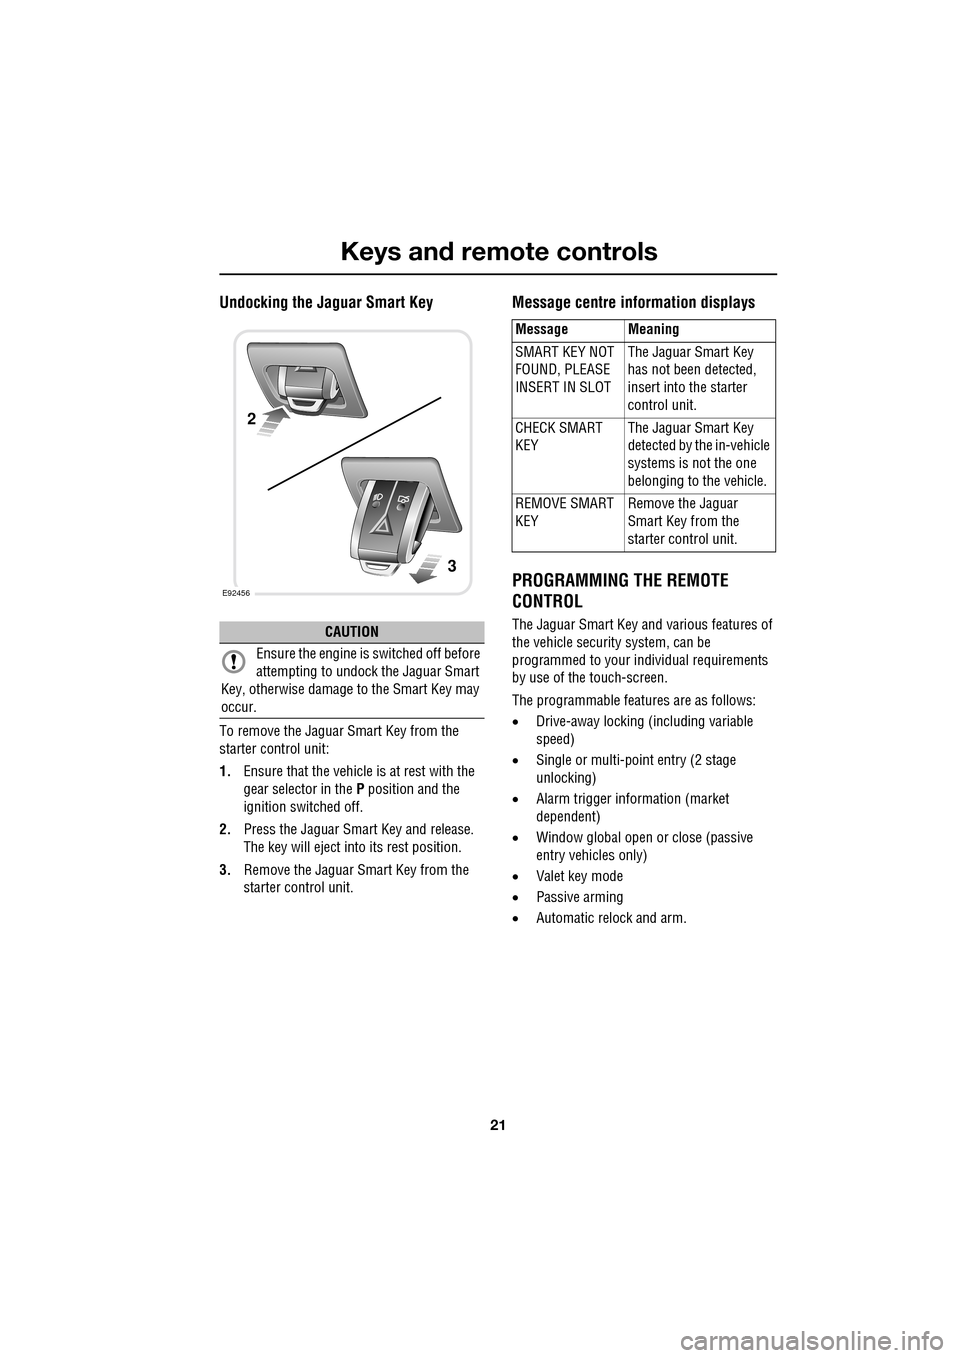
Undocking the Jaguar Smart Key
To remove the Jaguar Smart Key from the
starter control unit:
1.Ensure that the vehicle is at rest with the
gear selector in the P position and the
ignition switched off.
2. Press the Jaguar Smart Key and release.
The key will eject into its rest position.
3. Remove the Jaguar Smart Key from the
starter control unit.
Message centre in formation displays
PROGRAMMING THE REMOTE
CONTROL
The Jaguar Smart Key and various features of
the vehicle security system, can be
programmed to your individual requirements
by use of the touch-screen.
The programmable featur es are as follows:
• Drive-away locking (including variable
speed)
• Single or multi-point entry (2 stage
unlocking)
• Alarm trigger information (market
dependent)
• Window global open or close (passive
entry vehicles only)
• Valet key mode
• Passive arming
• Automatic relock and arm.CAUTION
Ensure the engine is switched off before
attempting to undock the Jaguar Smart
Key, otherwise damage to the Smart Key may
occur.
E92456
2
3
Message Meaning
SMART KEY NOT
FOUND, PLEASE
INSERT IN SLOT The Jaguar Smart Key
has not been detected,
insert into the starter
control unit.
CHECK SMART
KEY The Jaguar Smart Key
detected by the in-vehicle
systems is not the one
belonging to the vehicle.
REMOVE SMART
KEY Remove the Jaguar
Smart Key from the
starter control unit.
Page 24 of 391
Keys and remote controls
24
Selecting automatic relock and arm
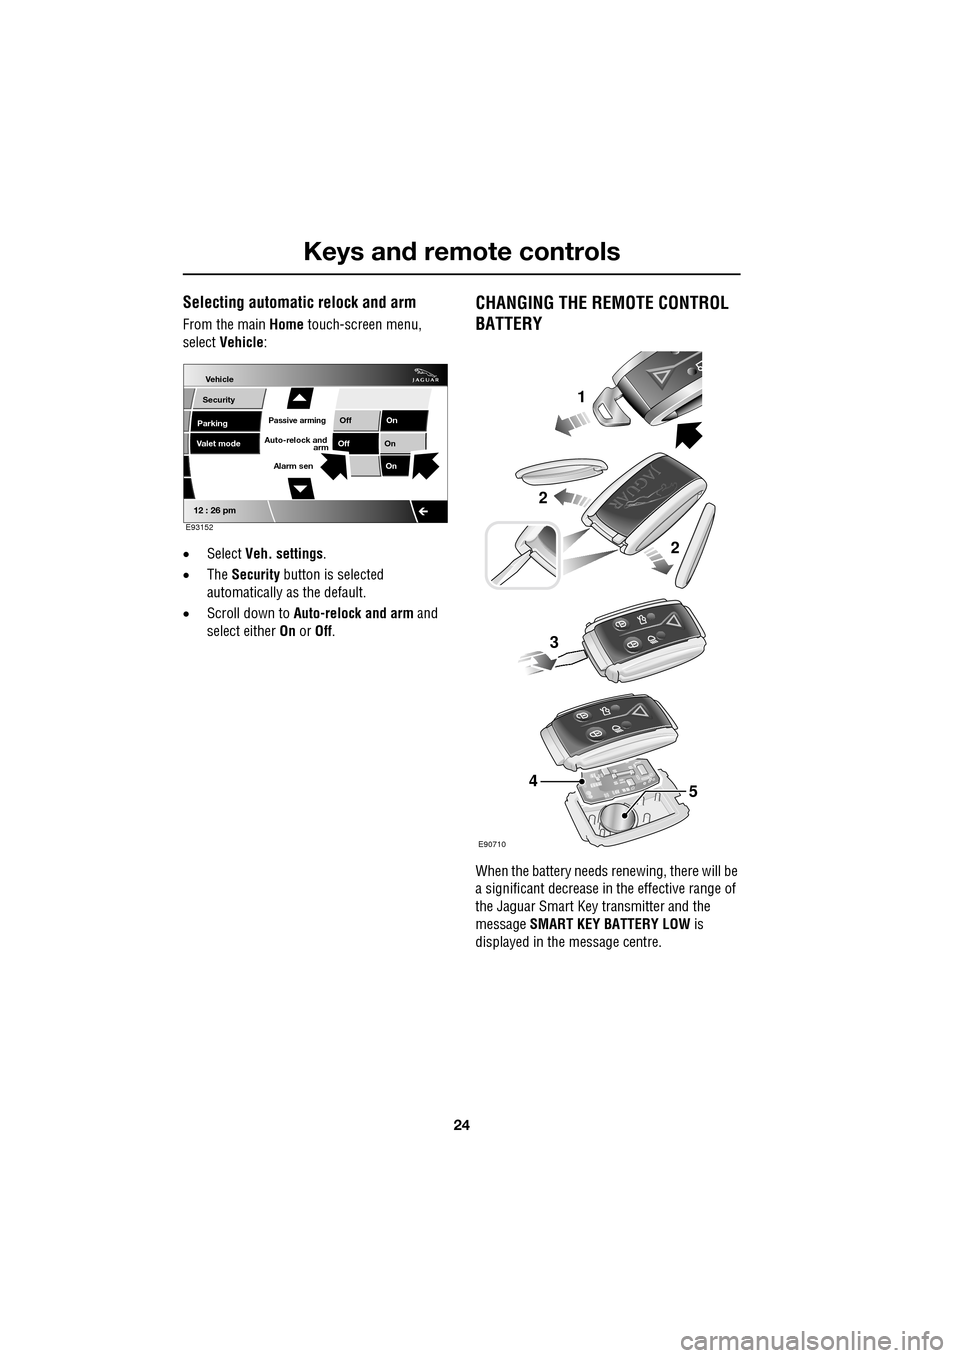
From the main Home touch-screen menu,
select Vehicle:
• Select Veh. settings .
• The Security button is selected
automatically as the default.
• Scroll down to Auto-relock and arm and
select either On or Off.
CHANGING THE REMOTE CONTROL
BATTERY
When the battery needs renewing, there will be
a significant decrease in the effective range of
the Jaguar Smart Key transmitter and the
message SMART KEY BATTERY LOW is
displayed in the message centre.
Vehicle
Security
Parking
Passive armingOff On
Alarm sen On
12 : 26 pm
OffOnAuto-relock and
armValet mode
E93152
2
3
5
2
4
1
E90710
Page 33 of 391
33
Locks
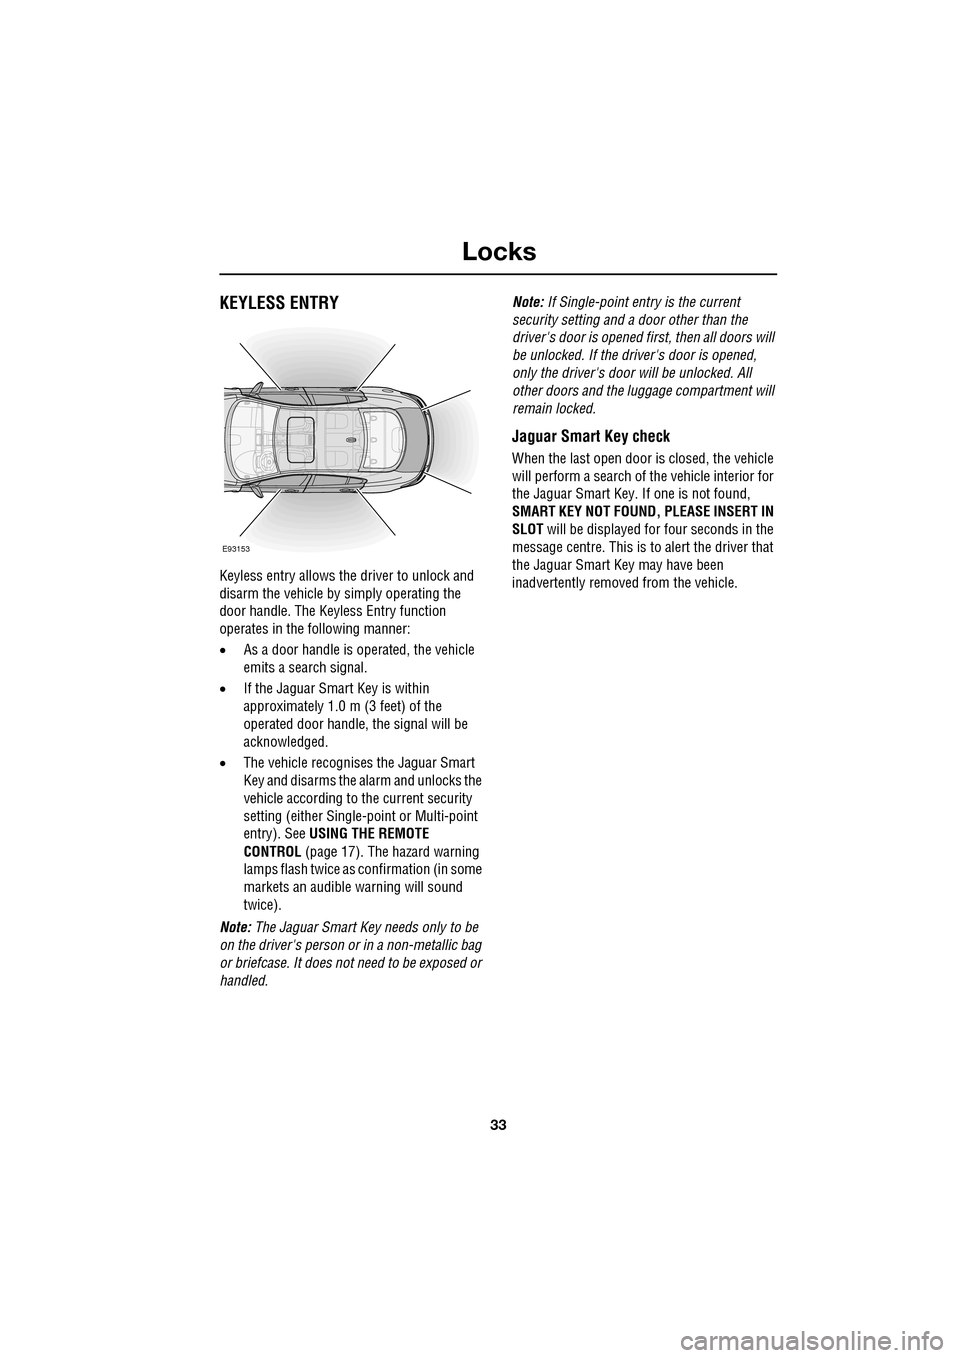
KEYLESS ENTRY
Keyless entry allows the driver to unlock and
disarm the vehicle by simply operating the
door handle. The Keyless Entry function
operates in the following manner:
•As a door handle is operated, the vehicle
emits a search signal.
• If the Jaguar Smart Key is within
approximately 1.0 m (3 feet) of the
operated door handle, the signal will be
acknowledged.
• The vehicle recognise s the Jaguar Smart
Key and disarms the alarm and unlocks the
vehicle according to the current security
setting (either Single-point or Multi-point
entry). See USING THE REMOTE
CONTROL (page 17). The hazard warning
lamps flash twice as confirmation (in some
markets an audible warning will sound
twice).
Note: The Jaguar Smart Key needs only to be
on the driver's person or in a non-metallic bag
or briefcase. It does not need to be exposed or
handled. Note:
If Single-point entry is the current
security setting and a door other than the
driver's door is opened fi rst, then all doors will
be unlocked. If the driver's door is opened,
only the driver's door will be unlocked. All
other doors and the luggage compartment will
remain locked.
Jaguar Smart Key check
When the last open door is closed, the vehicle
will perform a search of the vehicle interior for
the Jaguar Smart Key. If one is not found,
SMART KEY NOT FOUND, PLEASE INSERT IN
SLOT will be displayed for four seconds in the
message centre. This is to alert the driver that
the Jaguar Smart Key may have been
inadvertently removed from the vehicle.
E93153
Page 34 of 391
Locks
34
Keyless locking
The vehicle will not lock automatically.
The vehicle will only lock if all doors, luggage
compartment and bonnet are closed. If a lock
attempt is made with an open aperture, the
vehicle will not lock and two audible error
warnings will sound.
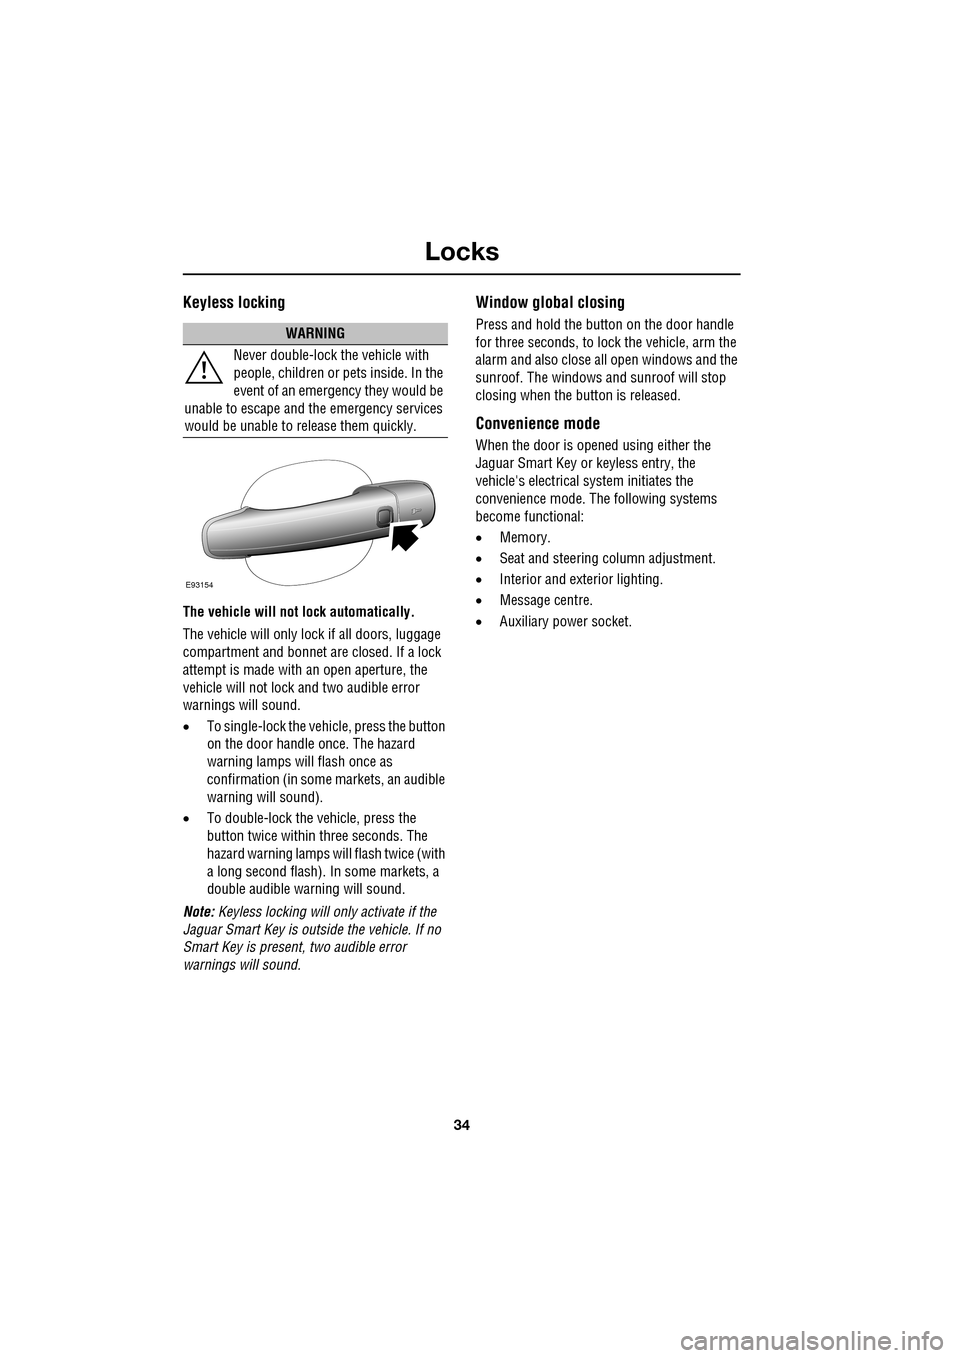
• To single-lock the vehicle, press the button
on the door handle once. The hazard
warning lamps will flash once as
confirmation (in some markets, an audible
warning will sound).
• To double-lock the ve hicle, press the
button twice within three seconds. The
hazard warning lamps will flash twice (with
a long second flash). In some markets, a
double audible warning will sound.
Note: Keyless locking will only activate if the
Jaguar Smart Key is outside the vehicle. If no
Smart Key is present, two audible error
warnings will sound.
Window global closing
Press and hold the button on the door handle
for three seconds, to lock the vehicle, arm the
alarm and also close all open windows and the
sunroof. The windows and sunroof will stop
closing when the button is released.
Convenience mode
When the door is opened using either the
Jaguar Smart Key or keyless entry, the
vehicle's electrical system initiates the
convenience mode. The following systems
become functional:
• Memory.
• Seat and steering column adjustment.
• Interior and exterior lighting.
• Message centre.
• Auxiliary power socket.
WARNING
Never double-lock the vehicle with
people, children or pets inside. In the
event of an emergency they would be
unable to escape and the emergency services
would be unable to release them quickly.
E93154
Page 35 of 391
35
Locks
Steering column lock
Your vehicle is fitted with an electronic steering
column lock. The column unlocks when it
detects a Jaguar Smart Key inside the vehicle.
The steering column automatically locks when
the starter switch is turned off and the driver's
door is opened.
Any malfunction of the steering column lock
will be indicated by the message STEERING
COLUMN LOCKED displaying in the message
centre. If this occurs:
1. Press the starter button to return to the
convenience mode.
2. Try again to unlock the steering column
lock, by turning the steering wheel gently
to the left and right.
3. If the malfunction st ill persists, seek
qualified assistance as soon as possible.
GLOBAL OPENING AND CLOSING
Global opening and closi ng is enabled/disabled
via the touch-screen.See PROGRAMMING THE
REMOTE CONTROL (page 21).
Window global opening
Press and hold the unlock button
on the Jaguar Smart Key for at least
three seconds. The alarm will
disarm, all doors and the luggage
compartment will unlock and all the windows
and sunroof will open.
Note: The windows and sunroof will continue
to open when the unlock button is released.
Press and hold the inte rior unlock button on
the fascia. After three seconds, all the windows
and the sunroof will open.
Note: The windows and sunroof will stop
opening when the unlock button is released.
CAUTION
During vehicle recovery, the Jaguar
Smart Key must remain inside the
vehicle (or be stowed in the starter control unit
in the centre console), so that the steering
column remains unlocked.WARNING
Accidental closing of an electrically
operated window or sunroof on
fingers, hands or any vulnerable part
of the body, can result in serious injury.
Always observe the following precautions:
Ensure that you have a clear view of all open
apertures on the vehicle and that all apertures
are unobstructed before activating global
closing.
Page 43 of 391
43
Seats
1.Cushion length adjustment.
2. Bolster adjustment:
A. Bolster inflate.
B. Bolster deflate.
3. Lumbar support adjustment.
4. Seat back angle adjustment.
5. Head restraint height adjustment.
6. Height adjustment.
7. Fore and aft adjustment.
8. Cushion front tilt adjustment.
To adjust the seats, the Jaguar Smart Key must
be in the vehicle and the ignition turned on.Driving position memory
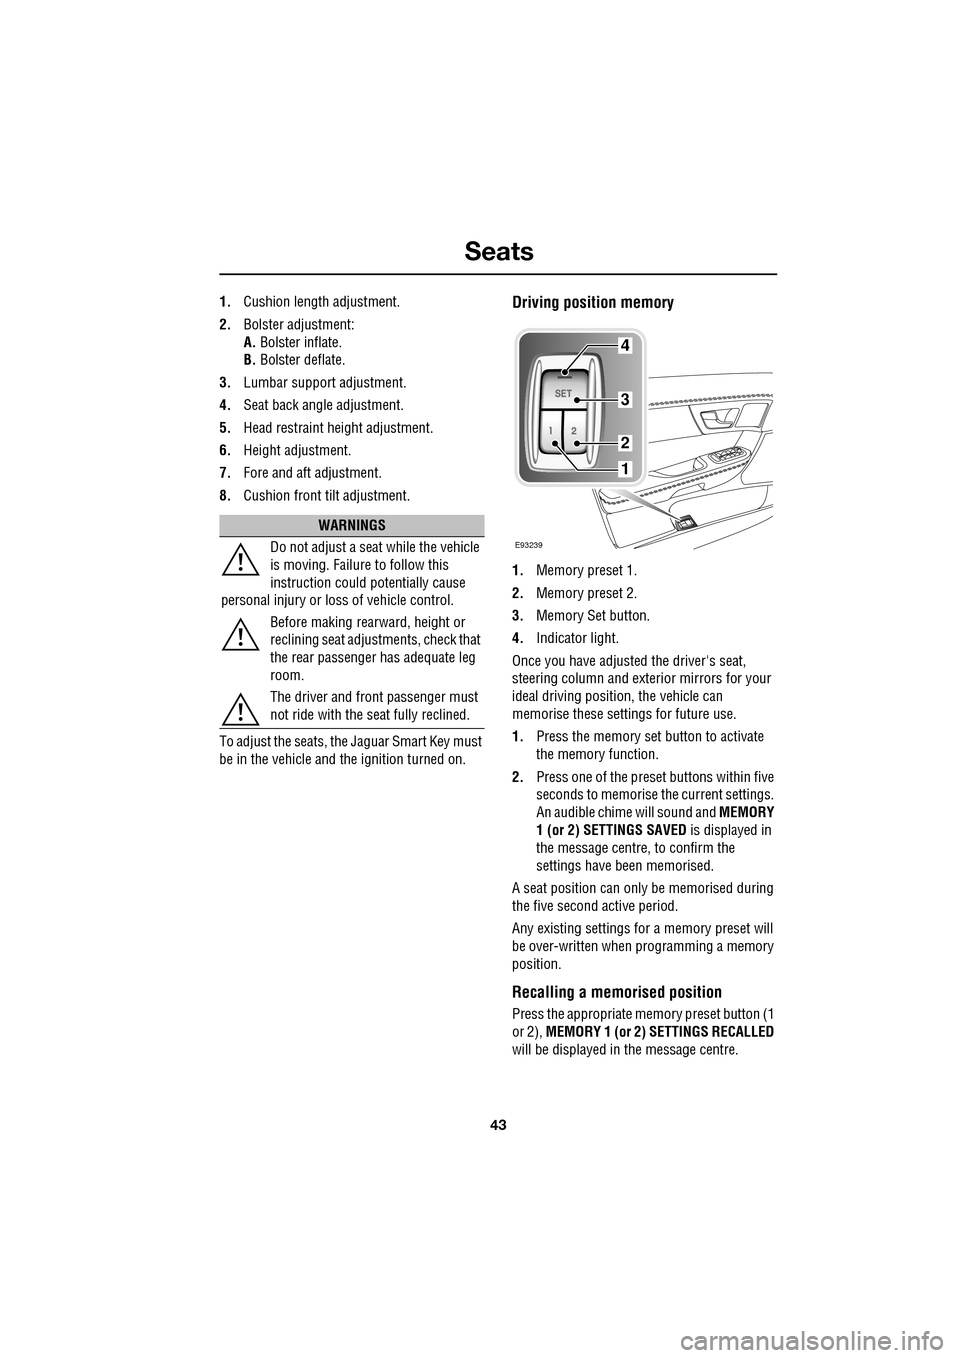
1. Memory preset 1.
2. Memory preset 2.
3. Memory Set button.
4. Indicator light.
Once you have adjusted the driver's seat,
steering column and exte rior mirrors for your
ideal driving position, the vehicle can
memorise these settings for future use.
1. Press the memory set button to activate
the memory function.
2. Press one of the preset buttons within five
seconds to memorise the current settings.
An audible chime will sound and MEMORY
1 (or 2) SETTINGS SAVED is displayed in
the message centre, to confirm the
settings have been memorised.
A seat position can onl y be memorised during
the five second active period.
Any existing settings for a memory preset will
be over-written when programming a memory
position.
Recalling a memorised position
Press the appropriate memory preset button (1
or 2), MEMORY 1 (or 2) SETTINGS RECALLED
will be displayed in the message centre.
WARNINGS
Do not adjust a seat while the vehicle
is moving. Failure to follow this
instruction could potentially cause
personal injury or loss of vehicle control.
Before making rearward, height or
reclining seat adjustments, check that
the rear passenger has adequate leg
room.
The driver and front passenger must
not ride with the seat fully reclined.
E93239
4
3
2
1
Page 66 of 391
Pedestrian protection
66
PRINCIPLE OF OPERATION
The pedestrian protection system has been
designed to reduce lower leg and head injuries
in the event of a frontal collision with a
pedestrian.
The bumper includes energy absorbing foam
and plastics in its cons truction to reduce leg
injuries and sensors th at detect the collision
with a pedestrian.
Deployment
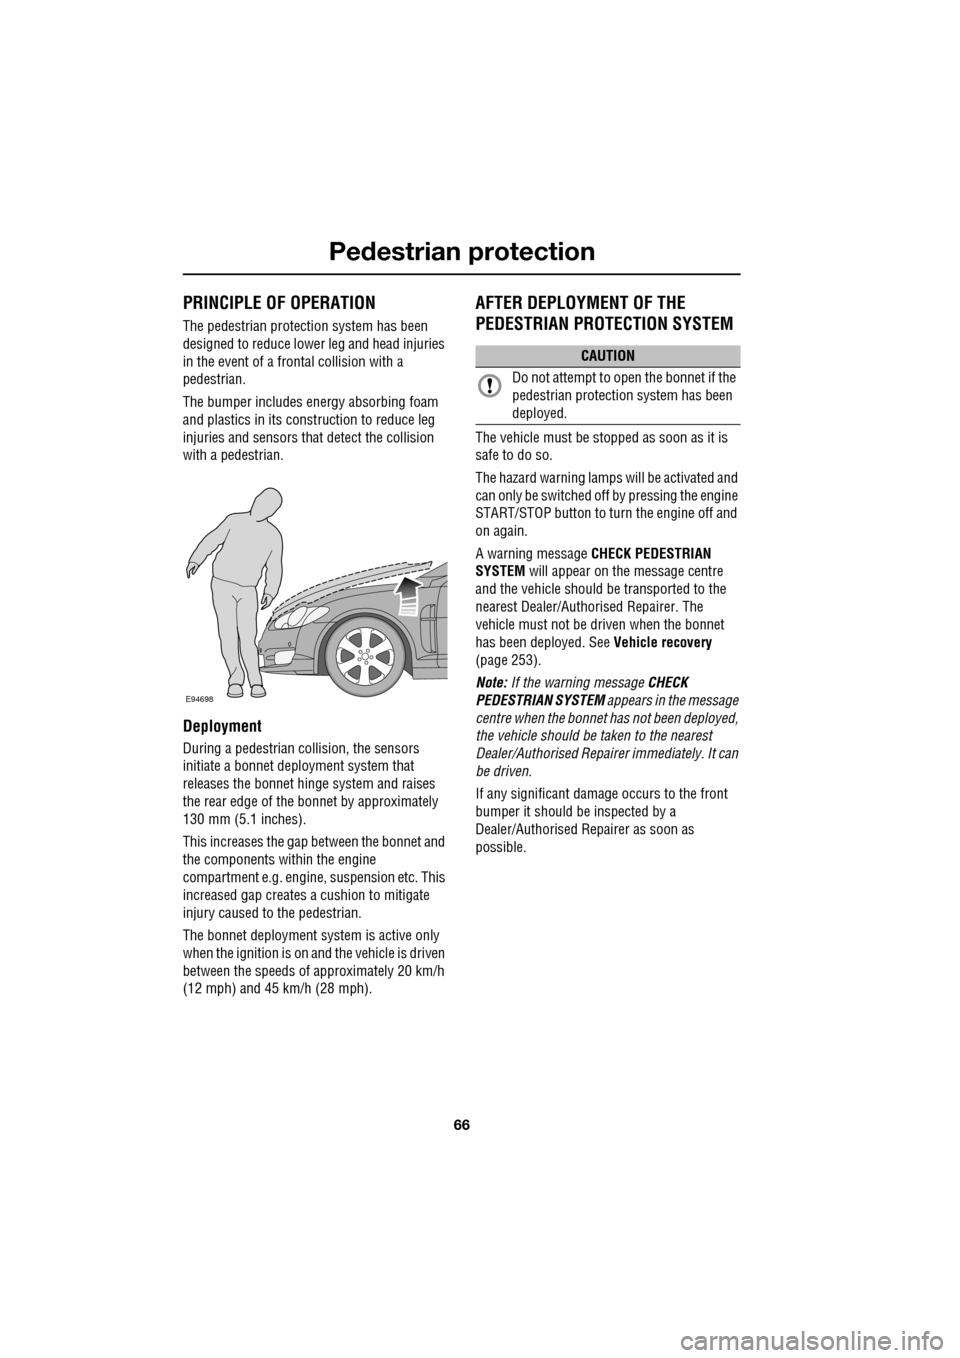
During a pedestrian co llision, the sensors
initiate a bonnet deploy ment system that
releases the bonnet hinge system and raises
the rear edge of the bonnet by approximately
130 mm (5.1 inches).
This increases the gap between the bonnet and
the components within the engine
compartment e.g. engine, suspension etc. This
increased gap creates a cushion to mitigate
injury caused to the pedestrian.
The bonnet deployment system is active only
when the ignition is on and the vehicle is driven
between the speeds of approximately 20 km/h
(12 mph) and 45 km/h (28 mph).
AFTER DEPLOYMENT OF THE
PEDESTRIAN PROTECTION SYSTEM
The vehicle must be stopped as soon as it is
safe to do so.
The hazard warning lamp s will be activated and
can only be switched off by pressing the engine
START/STOP button to turn the engine off and
on again.
A warning message CHECK PEDESTRIAN
SYSTEM will appear on the message centre
and the vehicle should be transported to the
nearest Dealer/Author ised Repairer. The
vehicle must not be driven when the bonnet
has been deployed. See Vehicle recovery
(page 253).
Note: If the warning message CHECK
PEDESTRIAN SYSTEM appears in the message
centre when the bonnet ha s not been deployed,
the vehicle should be taken to the nearest
Dealer/Authorised Repairer immediately. It can
be driven.
If any significant damage occurs to the front
bumper it should be inspected by a
Dealer/Authorised Repairer as soon as
possible.
E94698
CAUTION
Do not attempt to open the bonnet if the
pedestrian protection system has been
deployed.
Page 67 of 391
67
Steering wheel
ADJUSTING THE STEERING WHEEL
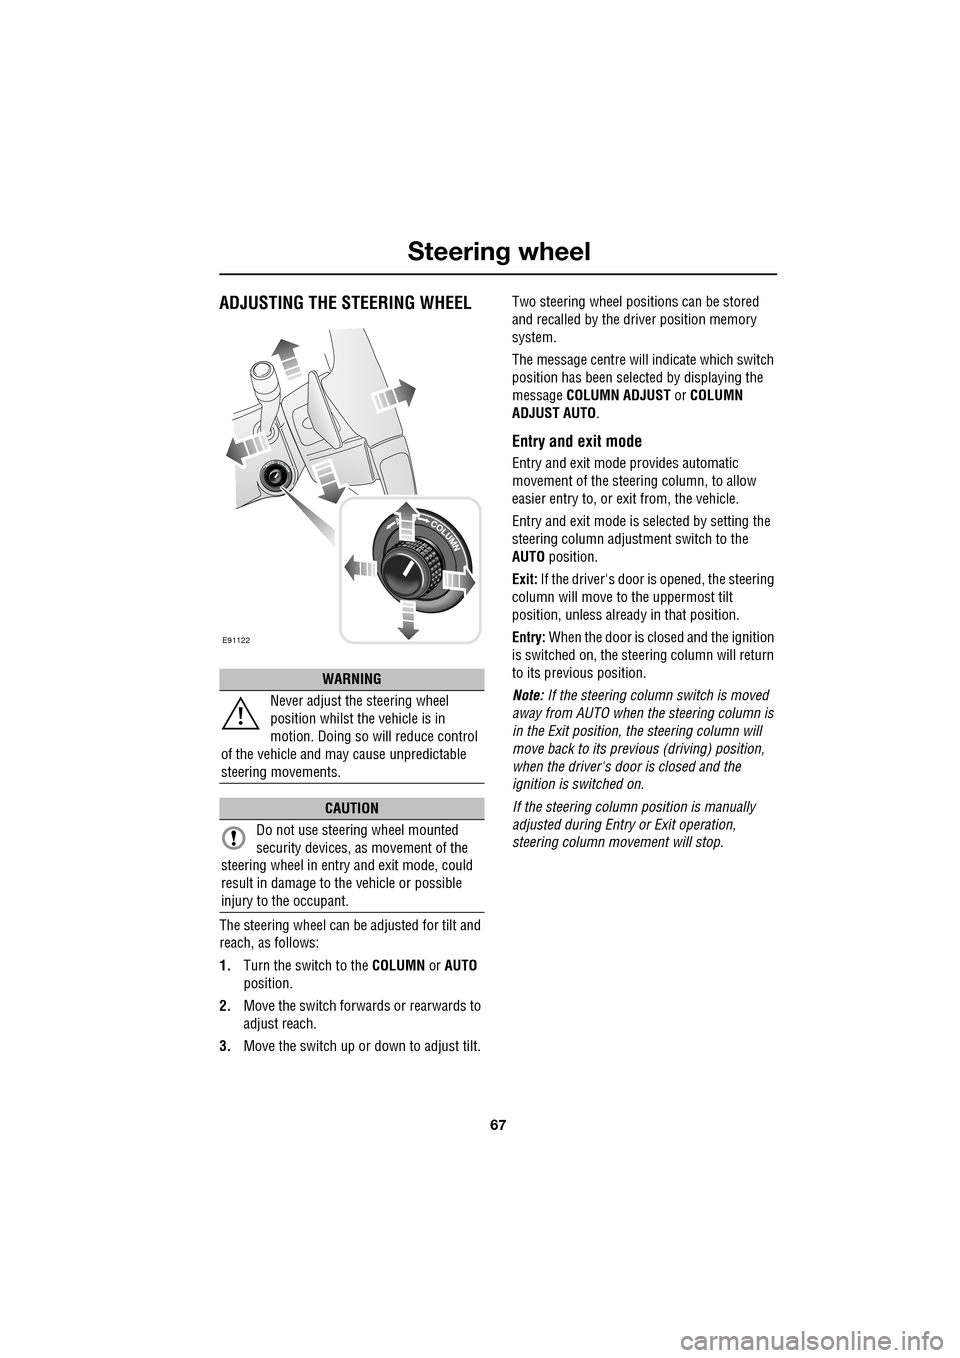
The steering wheel can be adjusted for tilt and
reach, as follows:
1.Turn the switch to the COLUMN or AUTO
position.
2. Move the switch forwards or rearwards to
adjust reach.
3. Move the switch up or down to adjust tilt. Two steering wheel positions can be stored
and recalled by the dr
iver position memory
system.
The message centre will indicate which switch
position has been select ed by displaying the
message COLUMN ADJUST or COLUMN
ADJUST AUTO .
Entry and exit mode
Entry and exit mode provides automatic
movement of the steering column, to allow
easier entry to, or exit from, the vehicle.
Entry and exit mode is selected by setting the
steering column adjustment switch to the
AUTO position.
Exit: If the driver's door is opened, the steering
column will move to the uppermost tilt
position, unless alread y in that position.
Entry: When the door is closed and the ignition
is switched on, the steering column will return
to its previous position.
Note: If the steering column switch is moved
away from AUTO when the steering column is
in the Exit position, the steering column will
move back to its previous (driving) position,
when the driver's door is closed and the
ignition is switched on.
If the steering column position is manually
adjusted during Entry or Exit operation,
steering column movement will stop.
WARNING
Never adjust the steering wheel
position whilst the vehicle is in
motion. Doing so will reduce control
of the vehicle and may cause unpredictable
steering movements.
CAUTION
Do not use steering wheel mounted
security devices, as movement of the
steering wheel in entr y and exit mode, could
result in damage to the vehicle or possible
injury to the occupant.
E91122
Page 70 of 391
Steering wheel
70
Activating the system
To activate voice control, press the voice
button on the steering wheel. A tone will be
heard and LISTENING will be displayed in the
message centre, to indicate that the system is
now waiting for a voice command.
Note: It is only necessary to press the voice
button at the beginning of each voice session.
Language and accent
Voice feedback is give n in the same language
as is set for Voice recognition. For example, if
the Voice recognition language is set to UK
English, the system wi ll not recognise other
languages (e.g. US English). The language for
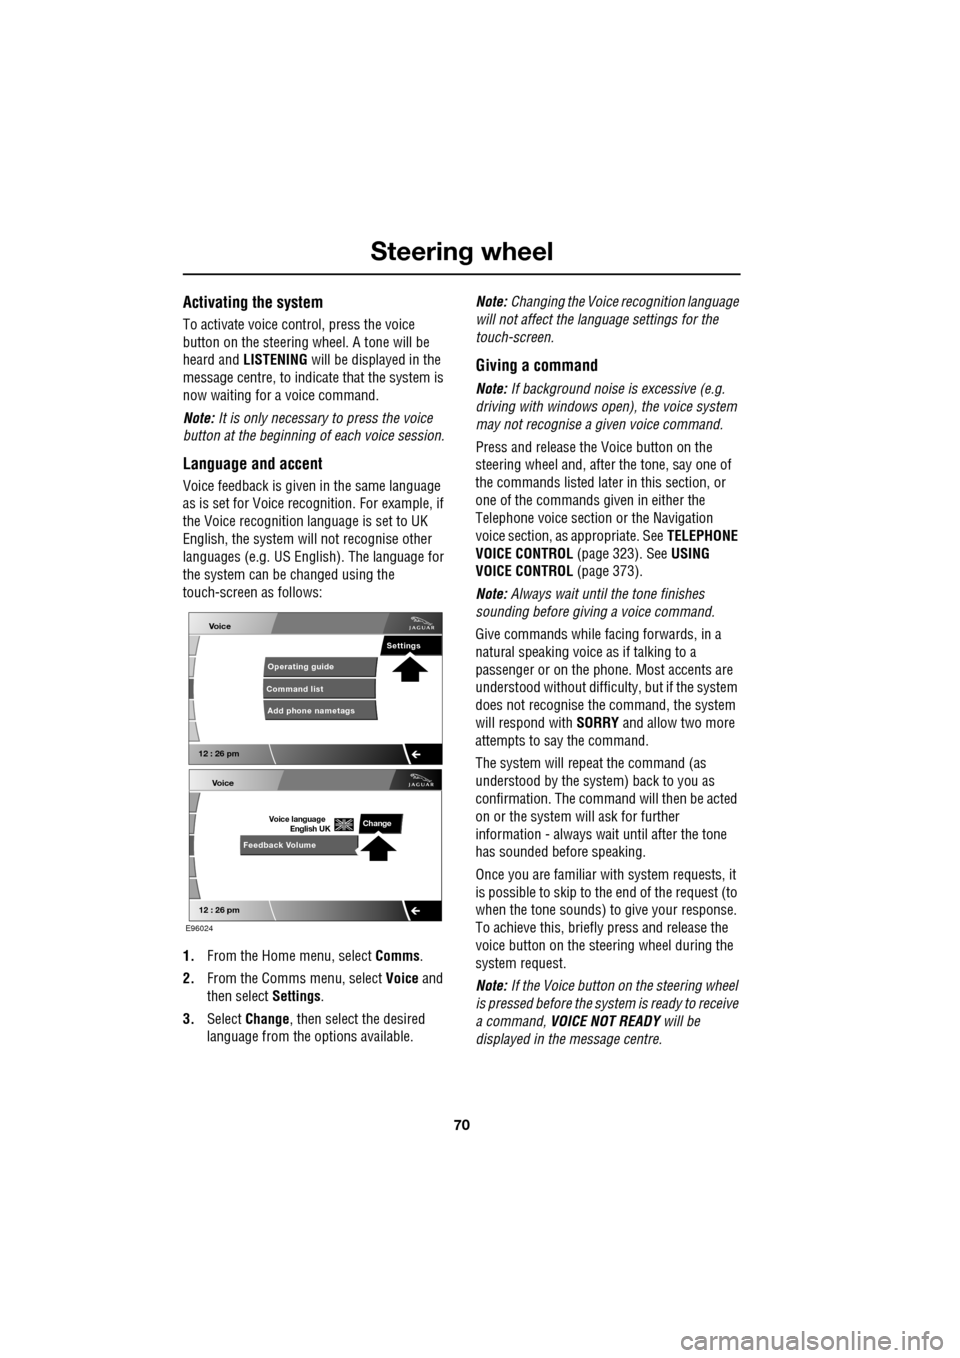
the system can be changed using the
touch-screen as follows:
1. From the Home menu, select Comms.
2. From the Comms menu, select Voice and
then select Settings.
3. Select Change, then select the desired
language from the options available. Note:
Changing the Voice recognition language
will not affect the language settings for the
touch-screen.
Giving a command
Note: If background noise is excessive (e.g.
driving with windows open), the voice system
may not recognise a given voice command.
Press and release the Voice button on the
steering wheel and, after the tone, say one of
the commands listed later in this section, or
one of the commands given in either the
Telephone voice section or the Navigation
voice section, as appropriate. See TELEPHONE
VOICE CONTROL (page 323). SeeUSING
VOICE CONTROL (page 373).
Note: Always wait until the tone finishes
sounding before giving a voice command.
Give commands while facing forwards, in a
natural speaking voice as if talking to a
passenger or on the phon e. Most accents are
understood without difficul ty, but if the system
does not recognise the command, the system
will respond with SORRY and allow two more
attempts to say the command.
The system will repe at the command (as
understood by the system ) back to you as
confirmation. The comma nd will then be acted
on or the system will ask for further
information - always wait until after the tone
has sounded before speaking.
Once you are familiar with system requests, it
is possible to skip to the end of the request (to
when the tone sounds) to give your response.
To achieve this, briefly press and release the
voice button on the steering wheel during the
system request.
Note: If the Voice button on the steering wheel
is pressed before the system is ready to receive
a command, VOICE NOT READY will be
displayed in the message centre.
Voice
12 : 26 pm
Add phone nametags
Command list Operating guide
Settings
E96024
Voice
12 : 26 pm
Feedback Volume
Voice language
English UKChange