steering JAGUAR XF 2009 1.G Quick Start Guide
[x] Cancel search | Manufacturer: JAGUAR, Model Year: 2009, Model line: XF, Model: JAGUAR XF 2009 1.GPages: 16, PDF Size: 2.11 MB
Page 4 of 16
Mirror dip when reversing
This feature can be used to improve lower side views
while reversing. It can be enabled or disabled via the
touch screen. From theHomescreen, select Vehicle,
then Veh. settings , thenParking.
To set a dip position:
• with the hand brake on, select reverse gear
• adjust the mirror position to view the lower rear kerb and vehicle.
Subsequently, each time reverse gear is selected, the
set dip position will be automatically selected. The
mirrors will return to their normal position when
another gear is selected.
Operating note
To prevent automatic movement of the steering
column, turn the control to the COLUMNposition.
Comfort adjustments
Steering wheel adjustment
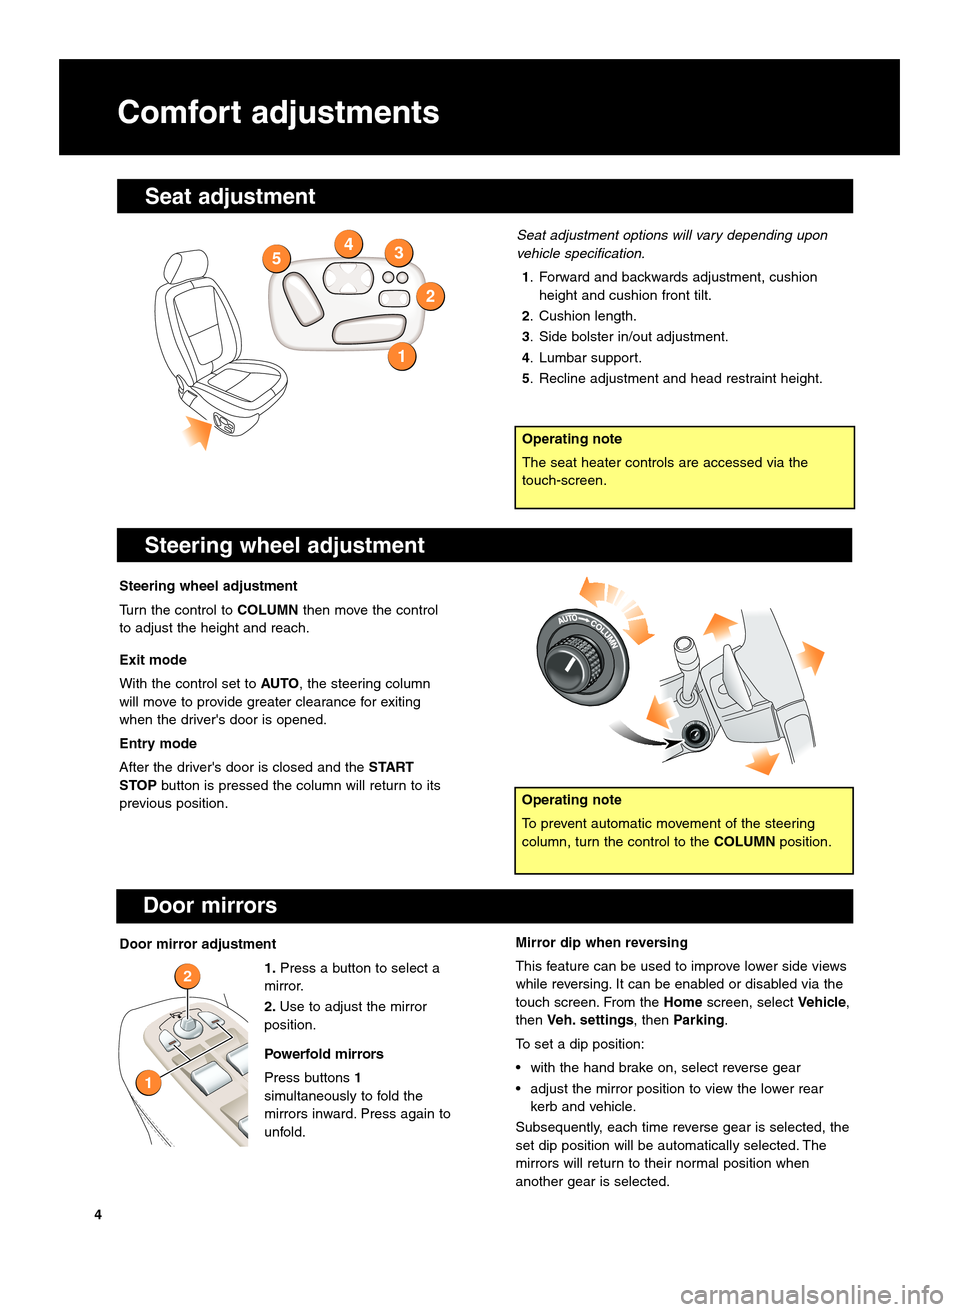
Seat adjustment options will vary depending upon
vehicle specification.
1. Forward and backwards adjustment, cushion height and cushion front tilt.
2. Cushion length.
\f. Side bolster in/out adjustment.
4. Lumbar support.
5. Recline adjustment and head restraint height.
Steering wheel adjustment
Turn the control to COLUMNthen move the control
to adjust the height and reach.
Exit mode
With the control set to AUTO, the steering column
will move to provide greater clearance for exiting
when the driver's door is opened.
Entry mode
After the driver's door is closed and the START
STOP button is pressed the column will return to its
previous position.
1
2
354
4
Operating note
The seat heater controls are accessed via the
touch\bscreen.
Door mirrors
Door mirror adjustment
1.Press a button to select a
mirror.
2. Use to adjust the mirror
position.
Powerfold mirrors
Press buttons 1
simultaneously to fold the
mirrors inward. Press again to
unfold.
2
1
Seat adjustment
Page 5 of 16
Driving position memory
Seat belts
Ensure that passengers do not fully extend the
restraints and inadvertently engage the ALR feature
during normal use.A warning indicator on the instrument
pack will illuminate if a front seat belt is
unbuckled.
Automatic Locking Reels (ALR)
All passenger seat belts have ALR fitted primarily for
use with child seats but also for securing large items.
Refer to Child safety in the Owner’s Handbook for
further details.
Glovebox and valet mode
To set your personal security code:
• On the touch\bscreen select HomethenVehicle
followed by Veh. settings.
• Now select Valet mode.
• Enter a four digit code and touch OK.Valet on is
displayed as a confirmation.
To deselect valet mode
Access the Valet mode screen and enter your
personal four digit code. Now press OK.Valet off is
displayed and the glovebox and luggage
compartment are now accessible.
Insert the emergency key blade back into the Jaguar
Smart Key.
Driver's seat
When you have found your ideal driving position, the
vehicle can memorise seat, steering column and
mirror settings for future use.
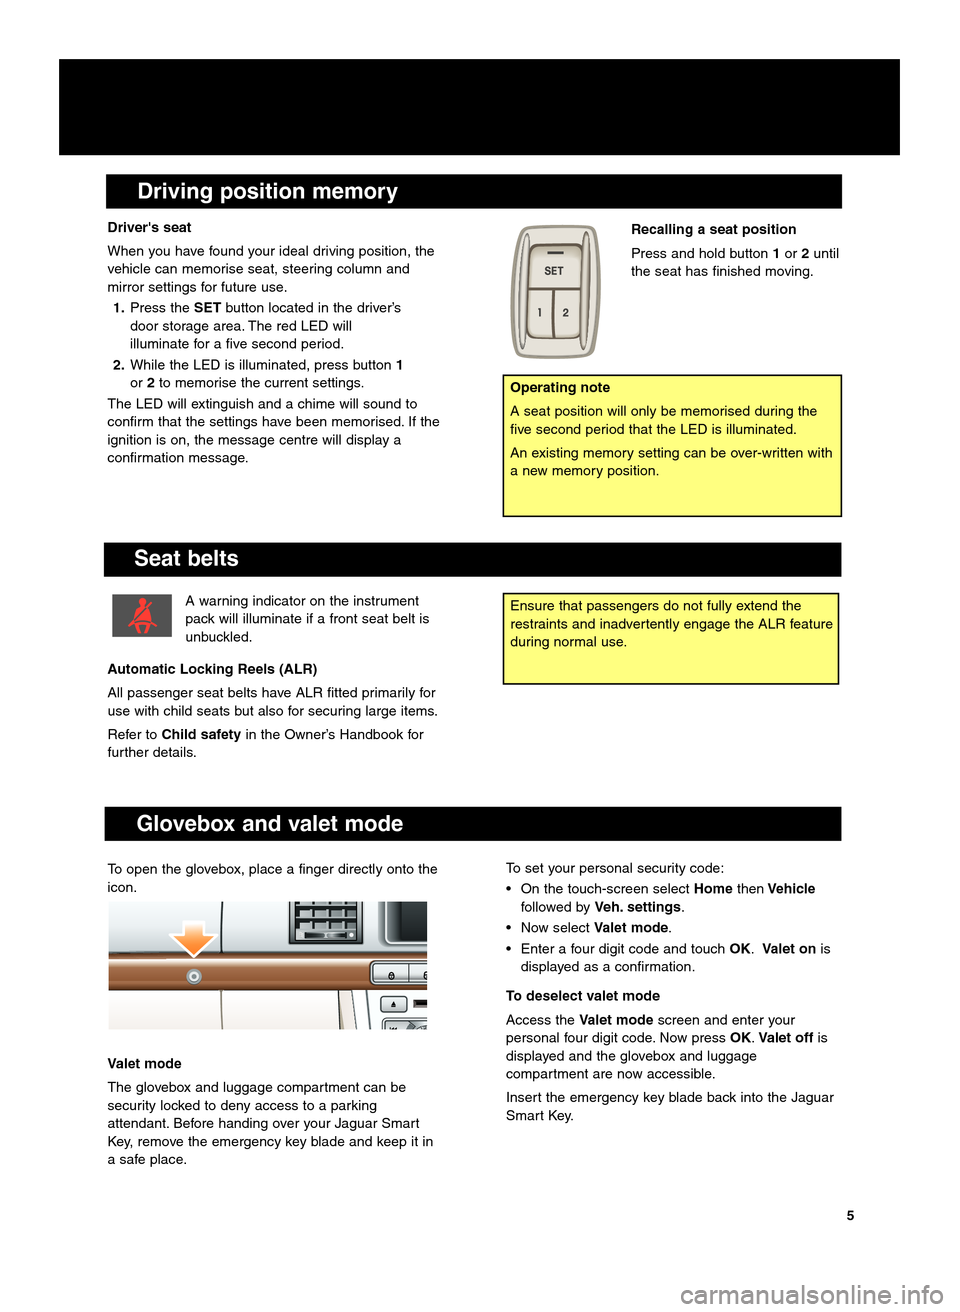
1. Press the SETbutton located in the driver’s
door storage area. The red LED will
illuminate for a five second period.
2. While the LED is illuminated, press button 1
or 2to memorise the current settings.
The LED will extinguish and a chime will sound to
confirm that the settings have been memorised. If the
ignition is on, the message centre will display a
confirmation message.
Operating note
A seat position will only be memorised during the
five second period that the LED is illuminated.
An existing memory setting can be over\bwritten with
a new memory position.
Recalling a seat position
Press and hold button 1or 2until
the seat has finished moving.
5
To open the glovebox, place a finger directly onto the
icon.
Valet mode
The glovebox and luggage compartment can be
security locked to deny access to a parking
attendant. Before handing over your Jaguar Smart
Key, remove the emergency key blade and keep it in
a safe place.
Page 6 of 16
Comfort adjustments
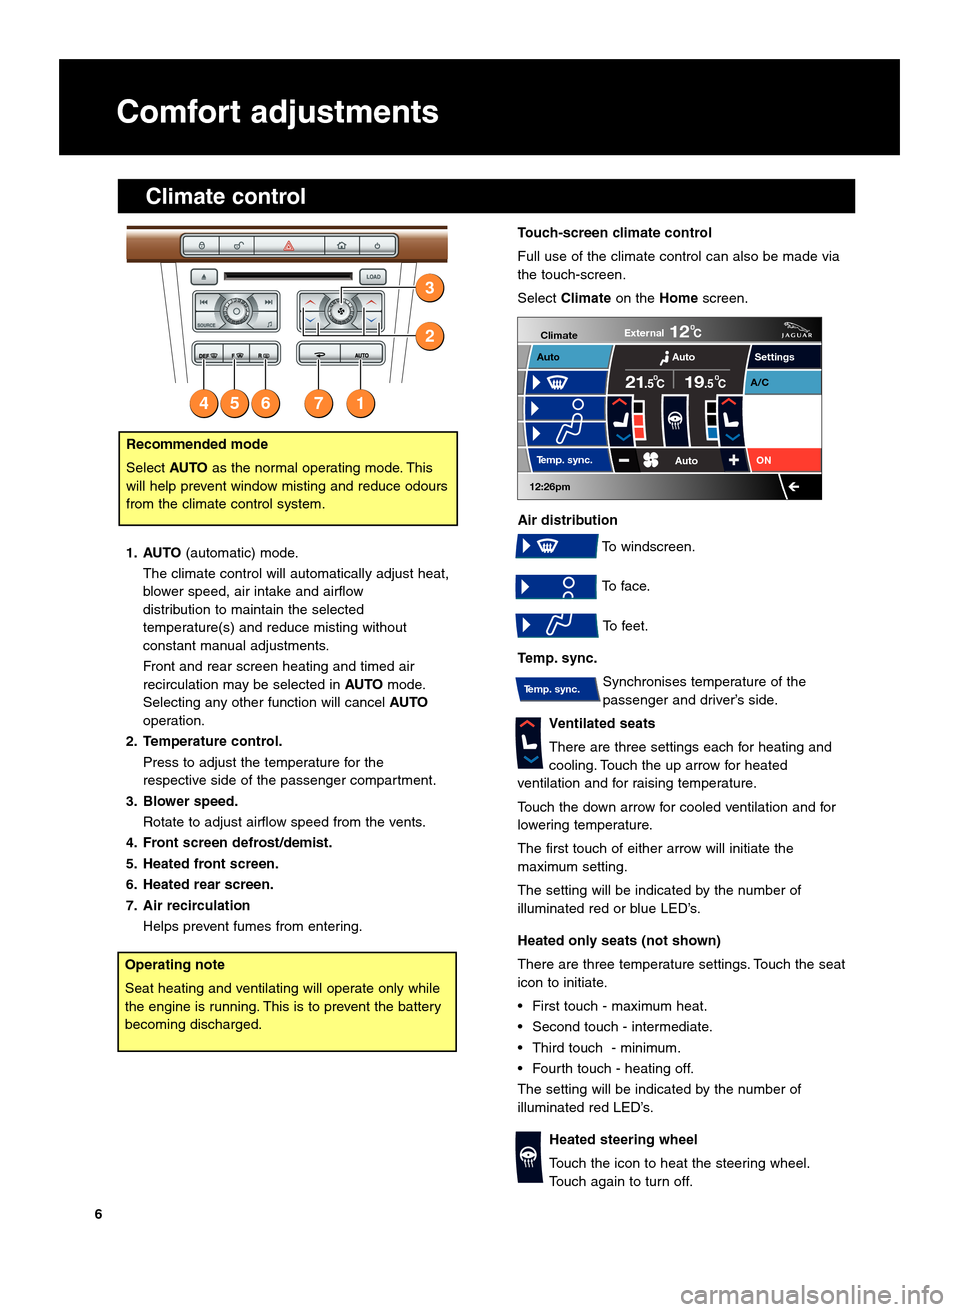
1. AUTO(automatic) mode.
The climate control will automatically adjust heat,
blower speed, air intake and airflow
distribution to maintain the selected
temperature(s) and reduce misting without
constant manual adjustments.
Front and rear screen heating and timed air
recirculation may be selected in AUTOmode.
Selecting any other function will cancel AUTO
operation.
2. Temperature control. Press to adjust the temperature for the
respective side of the passenger compartment.
\f. Blower speed. Rotate to adjust airflow speed from the vents.
4. Front screen defrost\bdemist.
5. Heated front screen.
6. Heated rear screen.
7. Air recirculation Helps prevent fumes from entering.
2
3
16547
Touch�screen climate control
Full use of the climate control can also be made via
the touch\bscreen.
Select Climate on theHomescreen.
Air distribution To windscreen.
To face. To feet.
Temp. sync. Synchronises temperature of the
passenger and driver’s side.
Ventilated seats
There are three settings each for heating and
cooling. Touch the up arrow for heated
ventilation and for raising temperature.
Touch the down arrow for cooled ventilation and for
lowering temperature.
The first touch of either arrow will initiate the
maximum setting.
The setting will be indicated by the number of
illuminated red or blue LED’s.
Heated only seats (not shown)
There are three temperature settings. Touch the seat
icon to initiate.
• First touch \b maximum heat.
• Second touch \b intermediate.
• Third touch \b minimum.
• Fourth touch \b heating off.
The setting will be indicated by the number of
illuminated red LED’s.
Heated steering wheel
Touch the icon to heat the steering wheel.
Touch again to turn off.
Settings
Temp. sync. External
12C
Auto
21
19C.5 C
Auto
A/C
ON
.5
Climate
12:26pm
AutoRecommended mode
Select AUTOas the normal operating mode. This
will help prevent window misting and reduce odours
from the climate control system.
Temp. sync.
Operating note
Seat heating and ventilating will operate only while
the engine is running. This is to prevent the battery
becoming discharged.
6
Climate control
Page 9 of 16
JaguarDrive Selector
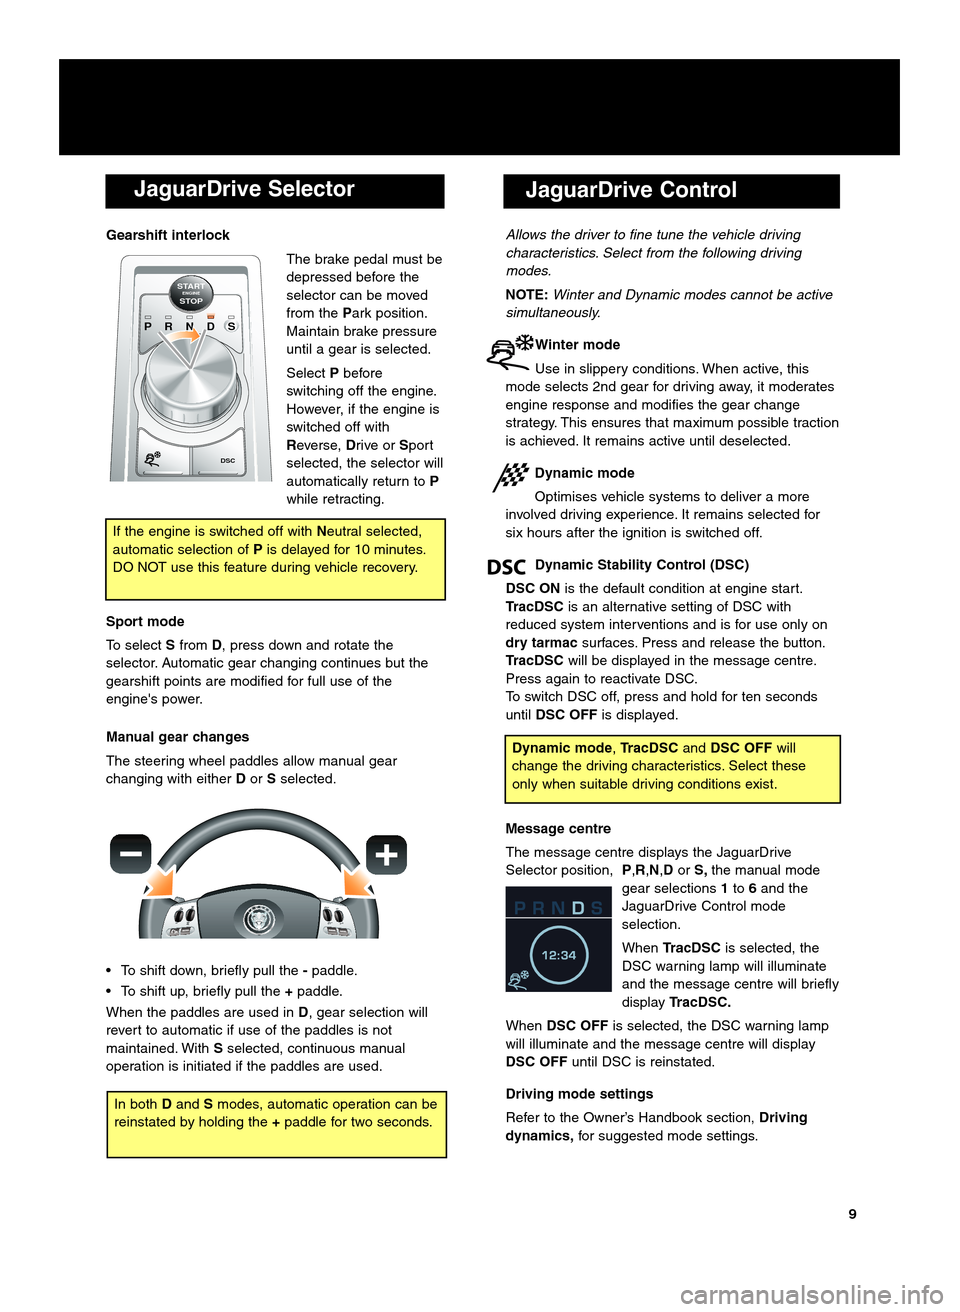
Gearshift interlockThe brake pedal must be
depressed before the
selector can be moved
from thePark position.
Maintain brake pressure
until a gear is selected.
Select Pbefore
switching off the engine.
However, if the engine is
switched off with
Reverse, Drive orSport
selected, the selector will
automatically return to P
while retracting.
Sport mode
To select Sfrom D, press down and rotate the
selector. Automatic gear changing continues but the
gearshift points are modified for full use of the
engine's power.
Manual gear changes
The steering wheel paddles allow manual gear
changing with either Dor Sselected.
• To shift down, briefly pull the �paddle.
• To shift up, briefly pull the +paddle.
When the paddles are used in D, gear selection will
revert to automatic if use of the paddles is not
maintained. With Sselected, continuous manual
operation is initiated if the paddles are used.
P R N D S
STARTENGINESTOP
DSC
If the engine is switched off with Neutral selected,
automatic selection of Pis delayed for \f0 minutes.
DO NOT use this feature during vehicle recovery.
JaguarDrive Control
Allows the driver to fine tune the vehicle driving
characteristics. Select from the following driving
modes.
NOTE: Winter and Dynamic modes cannot be active
simultaneously.
Winter mode
Use in slippery conditions. When active, this
mode selects 2nd gear for driving away, it moderates
engine response and modifies the gear change
strategy. This ensures that maximum possible traction
is achieved. It remains active until deselected.
Dynamic mode
Optimises vehicle systems to deliver a more
involved driving experience. It remains selected for
six hours after the ignition is switched off.
Dynamic Stability Control (DSC)
DSC ON is the default condition at engine start.
TracDSC is an alternative setting of DSC with
reduced system interventions and is for use only on
dry tarmac surfaces. Press and release the button.
TracDSC will be displayed in the message centre.
Press again to reactivate DSC.
To switch DSC off, press and hold for ten seconds
until DSC OFF is displayed.
Message centre
The message centre displays the JaguarDrive
Selector position, P,R,N,DorS, the manual mode
gear selections 1to 6and the
JaguarDrive Control mode
selection.
When TracDSC is selected, the
DSC warning lamp will illuminate
and the message centre will briefly
display TracDSC.
When DSC OFF is selected, the DSC warning lamp
will illuminate and the message centre will display
DSC OFF until DSC is reinstated.
Driving mode settings
Refer to the Owner’s Handbook section, Driving
dynamics, for suggested mode settings.
Dynamic mode ,TracDSC andDSC OFF will
change the driving characteristics. Select these
only when suitable driving conditions exist.
9
In both Dand Smodes, automatic operation can be
reinstated by holding the +paddle for two seconds.
Page 10 of 16
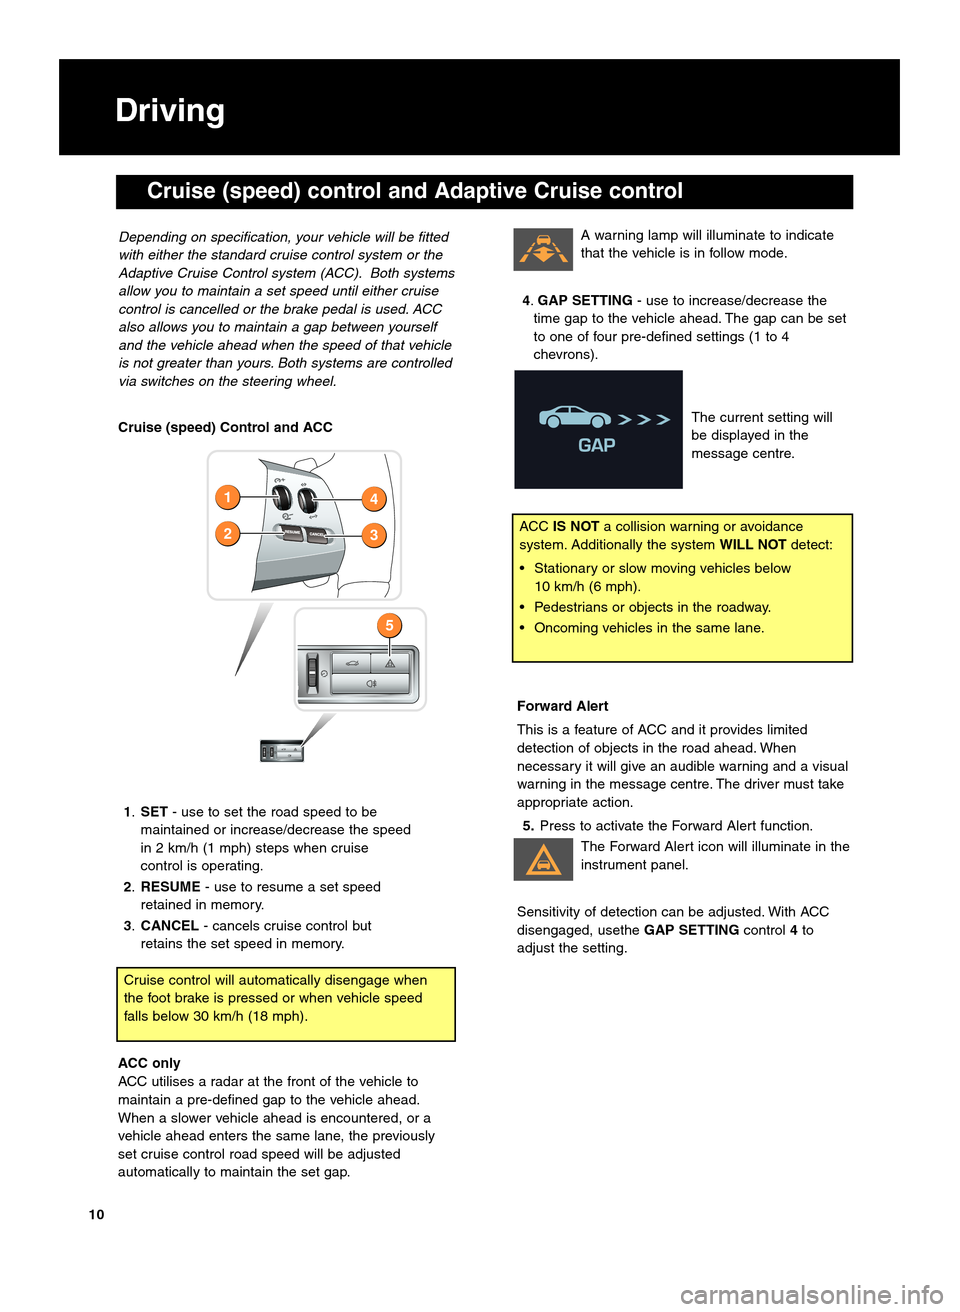
Cruise (speed) Control and ACC1. SET \b use to set the road speed to be
maintained or increase/decrease the speed
in 2 km/h (\f mph) steps when cruise
control is operating.
2. RESUME \b use to resume a set speed
retained in memory.
\f. CANCEL \b cancels cruise control but
retains the set speed in memory.
ACC only
ACC utilises a radar at the front of the vehicle to
maintain a pre\bdefined gap to the vehicle ahead.
When a slower vehicle ahead is encountered, or a
vehicle ahead enters the same lane, the previously
set cruise control road speed will be adjusted
automatically to maintain the set gap.
Cruise control will automatically disengage when
the foot brake is pressed or when vehicle speed
falls below 30 km/h (\f8 mph).
Depending on specification, your vehicle will be fitted
with either the standard cruise control system or the
Adaptive \fruise \fontrol system (A\f\f). Both systems
allow you to maintain a set speed until either cruise
control is cancelled or the brake pedal is used. A\f\f
also allows you to maintain a gap between yourself
and the vehicle ahead when the speed of that vehicle
is not greater than yours. Both systems are controlled
via switches on the steering wheel.
Driving
2
1
5
3
4
ACC
IS NOT a collision warning or avoidance
system. Additionally the system WILL NOTdetect:
• Stationary or slow moving vehicles below \f0 km/h (6 mph).
• Pedestrians or objects in the roadway.
• Oncoming vehicles in the same lane.
10
A warning lamp will illuminate to indicate
that the vehicle is in follow mode.
4. GAP SETTING \b use to increase/decrease the
time gap to the vehicle ahead. The gap can be set
to one of four pre\bdefined settings (\f to 4
chevrons).
The current setting will
be displayed in the
message centre.
Forward Alert
This is a feature of ACC and it provides limited
detection of objects in the road ahead. When
necessary it will give an audible warning and a visual
warning in the message centre. The driver must take
appropriate action.5. Press to activate the Forward Alert function.
The Forward Alert icon will illuminate in the
instrument panel.
Sensitivity of detection can be adjusted. With ACC
disengaged, usethe GAP SETTINGcontrol4to
adjust the setting.
Cruise (speed) control and Adaptive Cruise control
Page 12 of 16
Touch�screen and Audio
The touch\bscreen requires only light touches.
Excess pressure could result in damage.
12
AM\bFM radio
From the touch\bscreen menu, selectAudiothen
AM\bFM . Subsequent touches of AM\bFMwill scroll
through FM1, FM2 andAM.
Use the Seek Up or Seek Down controls to manually
find stations.
Touch and hold any of the nine station preset buttons
to store a station. Alternatively, touch and hold the
Autostore icon.
Autostore can automatically select and store up to
nine stations. Touch any preset button to listen to a
stored sation.
Touch Settings for additional tuner features and
sound settings.
DAB radio (Digital Audio Broadcast)
From the Homescreen, select AudiothenDAB
radio. Subsequent touches of DAB radiowill scroll
through DAB1,DAB2andDAB\f.
To build a list of available digital ensembles and
channels, select DAB searchthenAuto�tune .
Storing channels as presets
Select a channel from the list to start playing. Hold a
preset to store the channel.
Repeat the procedure with other channels of your
choice.
Recalling a preset channel
Touch the preset you require.
Audio
DAB radio
CD
AM/FM
12:26 pm
BBC R2 Viking
Trent Century BBC LeicRadio 1
Settings
DAB search
TA FM DAB i Link DPL IDAB1 BBC Radio2
Portable audio
DAB radio text
BBC National DAB
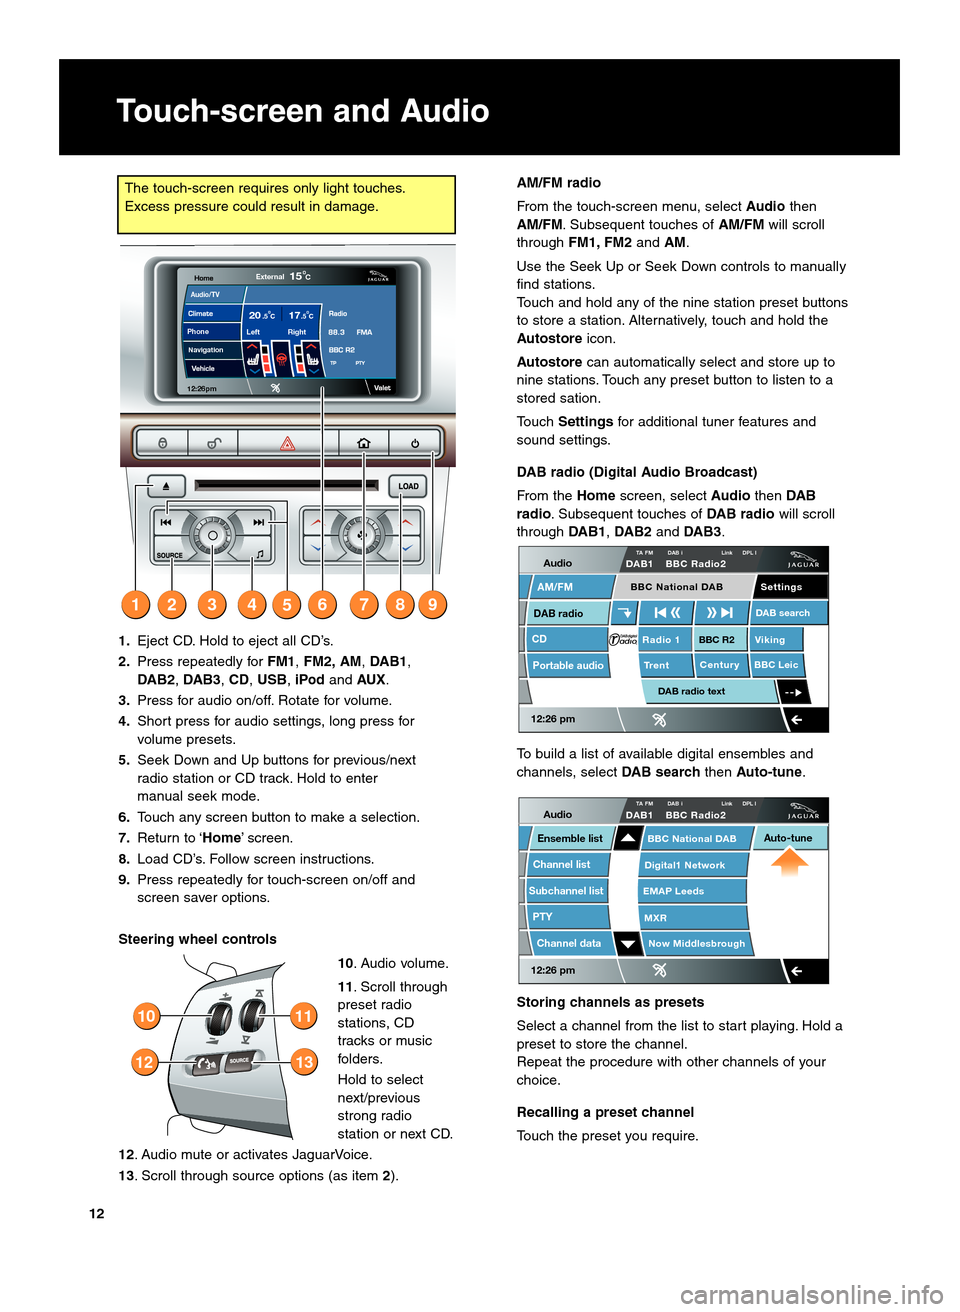
1.
Eject CD. Hold to eject all CD’s.
2. Press repeatedly for FM1,FM2, AM, DAB1,
DAB2, DAB\f,CD,USB, iPodandAUX.
\f. Press for audio on/off. Rotate for volume.
4. Short press for audio settings, long press for
volume presets.
5. Seek Down and Up buttons for previous/next
radio station or CD track. Hold to enter
manual seek mode.
6. Touch any screen button to make a selection.
7. Return to ‘Home’ screen.
8. Load CD’s. Follow screen instructions.
9. Press repeatedly for touch\bscreen on/off and
screen saver options.
Steering wheel controls 10. Audio volume.
11. Scroll through
preset radio
stations, CD
tracks or music
folders.
Hold to select
next/previous
strong radio
station or next CD.
12. Audio mute or activates JaguarVoice.
1\f. Scroll through source options (as item 2).
12
10
13
11
12:26 pm
Now Middlesbrough
BBC National DAB
Digital1 Network
EMAP Leeds
MXR
AudioTA FM DAB i Link DPL IDAB1 BBC Radio2
Channel list
Subchannel list
Ensemble list
PTY
Channel data
Auto�tune
Audio/TV
Left Right20 17CC.5
.5
External15C
12:26pm
NavigationPhone
379842516
Page 14 of 16
Telephone
Bluetooth® phones
Compatible Bluetooth phones can communicate with
the inbuilt telephone system. Connection must be
made with ignition on or engine running.
Use the following procedure in conjunction with your
Bluetooth phone manufacturer's instructions.
Pairing a mobile phone to the vehicle
With the ignition on, touch\bscreen active and no
phone currently docked:1. Start the Bluetooth search function on your
mobile phone.
2. The phone will list any Bluetooth devices
found. Select Jaguarfrom the list.
\f. Now enter the Bluetooth PIN 1\f1\finto the
mobile phone.
The phone should now pair and dock to the vehicle
system.
To undock a mobile phone, select Phonevia the
touch\bscreen then Settingsfollowed by Undock.
Downloading phonebook entries
When a mobile phone with phonebook download
capability is paired and docked, its phonebook
directory will automatically download to the vehicle
system.
The vehicle phonebook will be updated each time a
mobile phone is docked to the system.
To change the Auto download setting via the touch\b
screen, touch Phone, select Phone options then
Phonebook . Apply the change.
Jaguar Bluetooth Connectivity
For the latest list of compatible phones and their
software, refer to
www.jaguar.co.uk\buk\ben\bowners\bowner_informati
on\bbluetooth.htm
Operating note
‘Docking’ and ‘docked’ are terms used in relation to
a paired phone that is fully linked to the vehicle
system and can be used for calls. The phone is not
physically docked in a cradle.
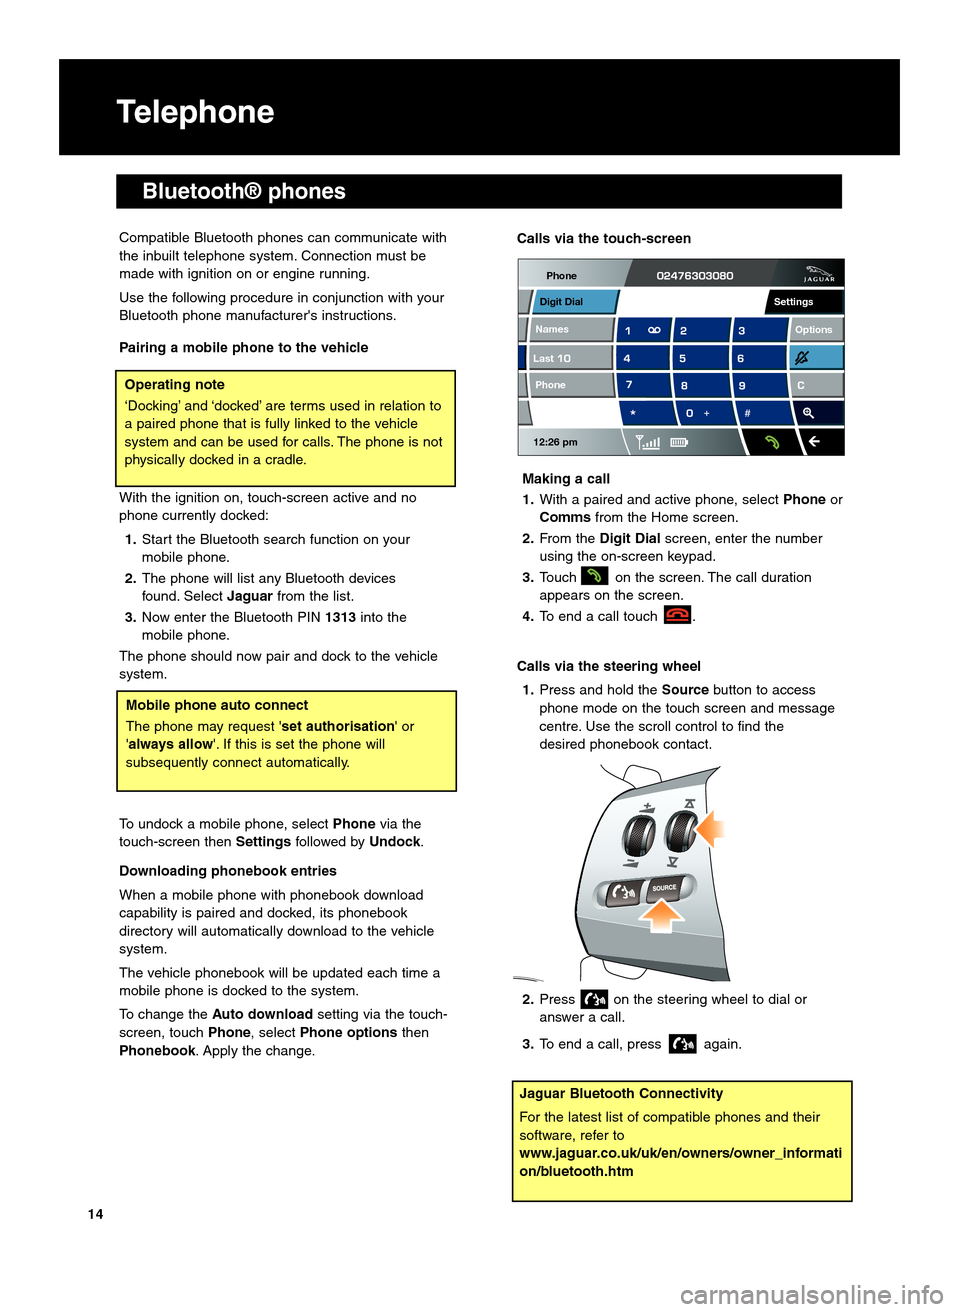
Calls via the touch�screen
Making a call
1. With a paired and active phone, select Phoneor
Comms from the Home screen.
2. From the Digit Dial screen, enter the number
using the on\bscreen keypad.
\f. Touch on the screen. The call duration
appears on the screen.
4. To end a call touch .
Calls via the steering wheel 1. Press and hold the Sourcebutton to access
phone mode on the touch screen and message
centre. Use the scroll control to find the
desired phonebook contact.
2. Press on the steering wheel to dial or
answer a call.
\f. To end a call, press again.
Phone
12:26 pm
LastNames Phone
Digit Dial
Options
Settings
14
Mobile phone auto connect
The phone may request 'set authorisation
' or
'always allow'. If this is set the phone will
subsequently connect automatically.