ESP JAGUAR XFR 2010 1.G Repair Manual
[x] Cancel search | Manufacturer: JAGUAR, Model Year: 2010, Model line: XFR, Model: JAGUAR XFR 2010 1.GPages: 3039, PDF Size: 58.49 MB
Page 243 of 3039

DTC Description Possible Causes Action check CAN Network B100D-87
Column Lock
Authorisation -
Missing message
Missing message
CAN fault
No response from
electric steering column
lock control module,
instrument cluster,
central junction box
Battery voltage at
electric steering column
lock control module too
low
Electric steering column
lock control module,
instrument cluster,
central junction box fault
NOTE: Prior to clearing this DTC, carry out the Vehicle
Functional Reset application using the manufacturer approved
diagnostic system
Clear DTC, repeatedly lock and unlock car using the key
fob and retest. Check for related DTCs and refer to the
relevant DTC index
If the fault is cleared, notify the customer that the
steering column lock may fail to unlock if the vehicle is
parked with a high steering angle or with the road wheel
against a curb. If the column lock is failing to disengage,
the customer may be able to rectify this by rotating the
steering wheel while pressing the engine start button
If fault persists, complete a CAN network integrity test
using the manufacturers approved diagnostic system.
Alternatively, refer to the electrical circuit diagrams and
check CAN circuits between the central junction box, the
instrument cluster and the electronic steering column
lock. Refer to the electrical circuit diagrams and check the
central junction box, the instrument cluster and the
electronic steering column lock power and ground supply
circuits for short circuit to ground, short circuit to power,
open circuit, high resistance. Repair circuit(s) as required.
Clear DTC, perform an on demand self-test and retest
If fault persists, check that the vehicle battery supply
voltage is between 9-16 volts. Rectify as required U0001-88
High Speed CAN
Communication
Bus - Bus off
Bus off
Refer to the electrical circuit diagrams and check the
power and ground connections to the module. Using the
manufacturer approved diagnostic system, complete a
CAN network integrity test. Refer to the electrical circuit
diagrams and check the CAN network U0300-00
Internal Control
Module Software
Incompatibility -
No sub type
information
No sub type information
Refer to network communication section of the workshop
manual. Clear the DTC and ensure the vehicle battery
supply voltage is between 9-16Volts. Using the
manufacturers approved diagnostic system, complete a
CAN integrity test. Perform an on demand self-test and
retest U3000-49
Control Module -
Internal electronic
failure
Internal electronic
failure detected during
self test or lock/unlock
operation
Refer to network communication section of the workshop
manual. Clear the DTC and ensure the vehicle battery
supply voltage is between 9-16Volts. Perform an on
demand self-test and if the DTC returns suspect the
electric steering column lock, refer to the warranty policy
and procedures manual if a module/component is suspect U3000-87
Control Module -
Missing message
Configuration message
not received
Refer to the electrical circuit diagrams and check the
power and ground connections to the module. Using the
manufacturer approved diagnostic system, complete a
CAN network integrity test. Refer to the electrical circuit
diagrams and check the CAN network. Check modules are
configured correctly using the manufacturer approved
diagnostic system U3002-81
Vehicle
Identification
Number - Invalid
serial data
received
Invalid vehicle
identification number
Confirm the correct VIN details are stored in Steering
Column Lock Module using the approved diagnostic
system
Page 244 of 3039
Published: 12-May-2014
General Information - Diagnostic Trouble Code (DTC) Index DTC: Television
Module (TVM)
Description and Operation
Television Control Module (TVCM)
CAUTION: Diagnosis by substitution from a donor vehicle is NOT acceptable. Substitution of control modules does not
guarantee confirmation of a fault, and may also cause additional faults in the vehicle being tested and/or the donor vehicle.
NOTES:
If a control module or a component is suspect and the vehicle remains under manufacturer warranty, refer to the Warranty
Policy and Procedures manual, or determine if any prior approval programme is in operation, prior to the installation of a new
module/component.
Generic scan tools may not read the codes listed, or may read only 5-digit codes. Match the 5 digits from the scan tool to
the first 5 digits of the 7-digit code listed to identify the fault (the last 2 digits give extra information read by the
manufacturer-approved diagnostic system).
When performing voltage or resistance tests, always use a digital multimeter accurate to three decimal places, and with
an up-to-date calibration certificate. When testing resistance always take the resistance of the digital multimeter leads into
account.
Check and rectify basic faults before beginning diagnostic routines involving pinpoint tests.
Inspect connectors for signs of water ingress, and pins for damage and/or corrosion.
If DTCs are recorded and, after performing the pinpoint tests, a fault is not present, an intermittent concern may be the
cause. Always check for loose connections and corroded terminals.
Check DDW for open campaigns. Refer to the corresponding bulletins and SSMs which may be valid for the specific
customer complaint and carry out the recommendations as required.
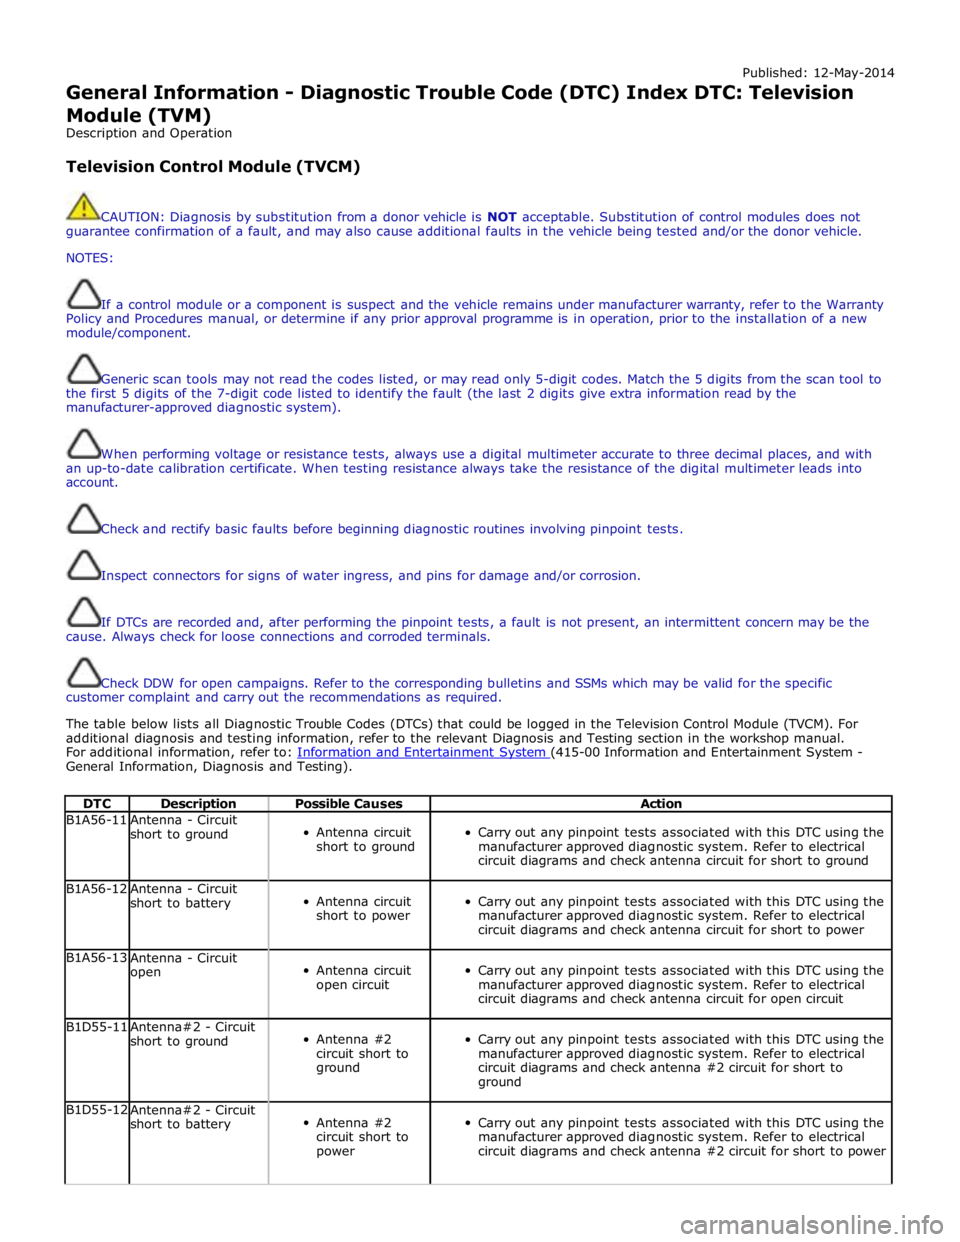
The table below lists all Diagnostic Trouble Codes (DTCs) that could be logged in the Television Control Module (TVCM). For
additional diagnosis and testing information, refer to the relevant Diagnosis and Testing section in the workshop manual.
For additional information, refer to: Information and Entertainment System (415-00 Information and Entertainment System - General Information, Diagnosis and Testing).
DTC Description Possible Causes Action B1A56-11
Antenna - Circuit
short to ground
Antenna circuit
short to ground
Carry out any pinpoint tests associated with this DTC using the
manufacturer approved diagnostic system. Refer to electrical
circuit diagrams and check antenna circuit for short to ground B1A56-12
Antenna - Circuit
short to battery
Antenna circuit
short to power
Carry out any pinpoint tests associated with this DTC using the
manufacturer approved diagnostic system. Refer to electrical
circuit diagrams and check antenna circuit for short to power B1A56-13
Antenna - Circuit
open
Antenna circuit
open circuit
Carry out any pinpoint tests associated with this DTC using the
manufacturer approved diagnostic system. Refer to electrical
circuit diagrams and check antenna circuit for open circuit B1D55-11
Antenna#2 - Circuit
short to ground
Antenna #2
circuit short to
ground
Carry out any pinpoint tests associated with this DTC using the
manufacturer approved diagnostic system. Refer to electrical
circuit diagrams and check antenna #2 circuit for short to
ground B1D55-12
Antenna#2 - Circuit
short to battery
Antenna #2
circuit short to
power
Carry out any pinpoint tests associated with this DTC using the
manufacturer approved diagnostic system. Refer to electrical
circuit diagrams and check antenna #2 circuit for short to power
Page 246 of 3039
Published: 17-Apr-2014
General Information - Diagnostic Trouble Code (DTC) Index DTC: Tire
Pressure Monitoring System Module (TPM)
Description and Operation
Tire Pressure Monitoring System (TPM)
CAUTION: Diagnosis by substitution from a donor vehicle is NOT acceptable. Substitution of control modules does not
guarantee confirmation of a fault and may also cause additional faults in the vehicle being checked and/or the donor vehicle.
NOTES:
If the control module or a component is suspect and the vehicle remains under manufacturer warranty, refer to the
Warranty Policy and Procedures manual, or determine if any prior approval programme is in operation, prior to the installation
of a new module/component.
Generic scan tools may not read the codes listed, or may read only 5-digit codes. Match the 5 digits from the scan tool to
the first 5 digits of the 7-digit code listed to identify the fault (the last 2 digits give extra information read by the
manufacturer approved diagnostic system).
When performing voltage or resistance tests, always use a digital multimeter (DMM) accurate to three decimal places,
and with an up-to-date calibration certificate. When testing resistance, always take the resistance of the DMM leads into
account.
Check and rectify basic faults before beginning diagnostic routines involving pinpoint tests.
If DTCs are recorded and, after performing the pinpoint tests a fault is not present, an intermittent concern may be the
cause. Always check for loose connections and corroded terminals.
Where an 'on demand self-test' is referred to, this can be accessed via the 'DTC Monitor' tab on the manufacturers
approved diagnostic system.
Check DDW for open campaigns. Refer to the corresponding bulletins and SSMs which may be valid for the specific
customer complaint and carry out the recommendations as required.
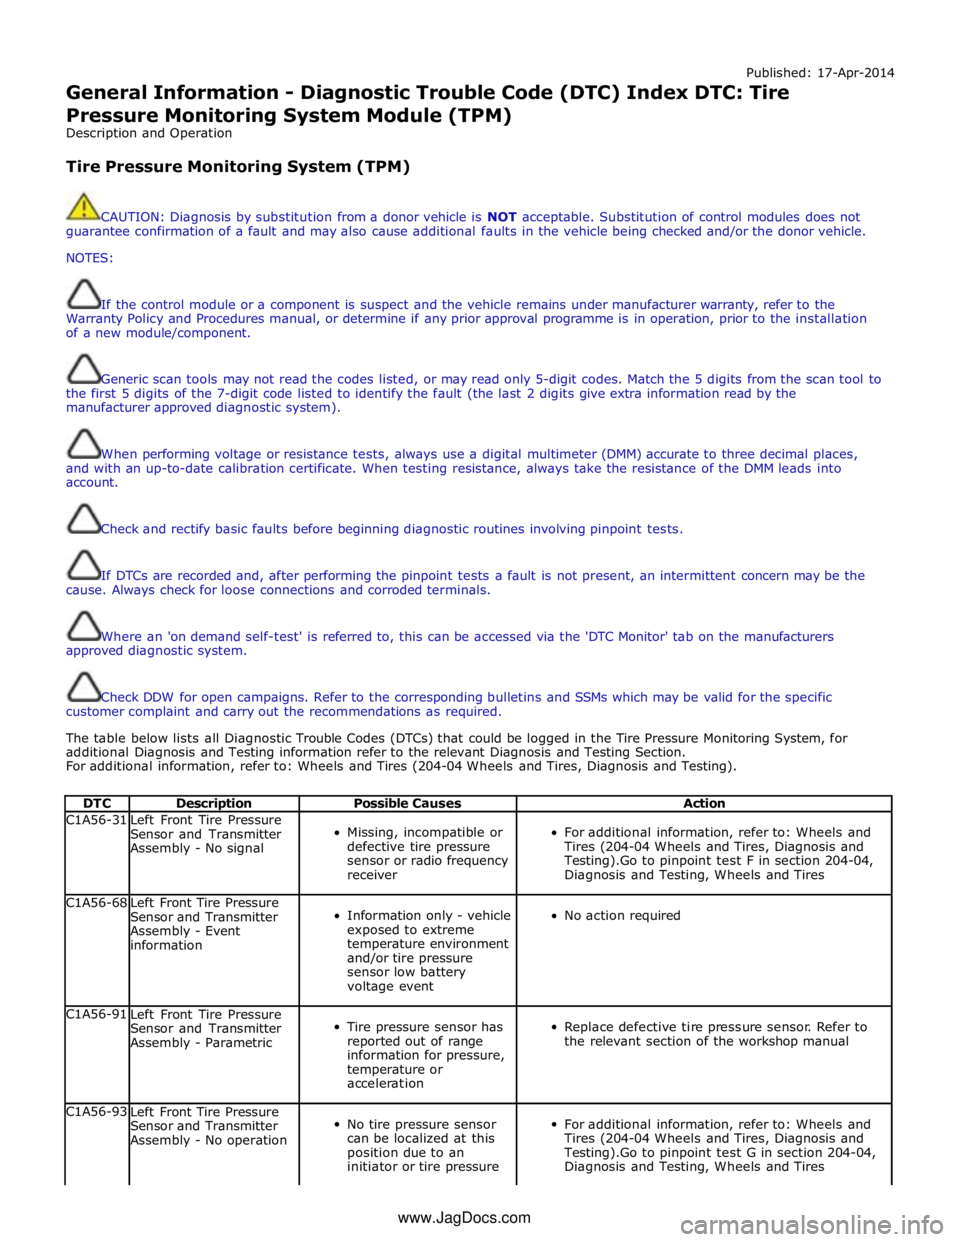
The table below lists all Diagnostic Trouble Codes (DTCs) that could be logged in the Tire Pressure Monitoring System, for
additional Diagnosis and Testing information refer to the relevant Diagnosis and Testing Section.
For additional information, refer to: Wheels and Tires (204-04 Wheels and Tires, Diagnosis and Testing).
DTC Description Possible Causes Action C1A56-31
Left Front Tire Pressure
Sensor and Transmitter
Assembly - No signal
Missing, incompatible or
defective tire pressure
sensor or radio frequency
receiver
For additional information, refer to: Wheels and
Tires (204-04 Wheels and Tires, Diagnosis and
Testing).Go to pinpoint test F in section 204-04,
Diagnosis and Testing, Wheels and Tires C1A56-68
Left Front Tire Pressure
Sensor and Transmitter
Assembly - Event
information
Information only - vehicle
exposed to extreme
temperature environment
and/or tire pressure
sensor low battery
voltage event
No action required C1A56-91
Left Front Tire Pressure
Sensor and Transmitter
Assembly - Parametric
Tire pressure sensor has
reported out of range
information for pressure,
temperature or
acceleration
Replace defective tire pressure sensor. Refer to
the relevant section of the workshop manual C1A56-93
Left Front Tire Pressure
Sensor and Transmitter
Assembly - No operation
No tire pressure sensor
can be localized at this
position due to an
initiator or tire pressure
For additional information, refer to: Wheels and
Tires (204-04 Wheels and Tires, Diagnosis and
Testing).Go to pinpoint test G in section 204-04,
Diagnosis and Testing, Wheels and Tires www.JagDocs.com
Page 251 of 3039

Published: 12-May-2014
General Information - Diagnostic Trouble Code (DTC) Index DTC: Touch
Screen Display (FCDIM)
Description and Operation
Touch Screen (TS)
CAUTION: Diagnosis by substitution from a donor vehicle is NOT acceptable. Substitution of control modules does not
guarantee confirmation of a fault, and may also cause additional faults in the vehicle being tested and/or the donor vehicle.
NOTES:
If a control module or a component is suspect and the vehicle remains under manufacturer warranty, refer to the Warranty
Policy and Procedures manual, or determine if any prior approval programme is in operation, prior to the installation of a new
module/component.
Generic scan tools may not read the codes listed, or may read only 5-digit codes. Match the 5 digits from the scan tool to
the first 5 digits of the 7-digit code listed to identify the fault (the last 2 digits give extra information read by the
manufacturer-approved diagnostic system).
When performing voltage or resistance tests, always use a digital multimeter accurate to three decimal places, and with
an up-to-date calibration certificate. When testing resistance always take the resistance of the digital multimeter leads into
account.
Check and rectify basic faults before beginning diagnostic routines involving pinpoint tests.
Inspect connectors for signs of water ingress, and pins for damage and/or corrosion.
If DTCs are recorded and, after performing the pinpoint tests, a fault is not present, an intermittent concern may be the
cause. Always check for loose connections and corroded terminals.
Check DDW for open campaigns. Refer to the corresponding bulletins and SSMs which may be valid for the specific
customer complaint and carry out the recommendations as required.
The table below lists all Diagnostic Trouble Codes (DTCs) that could be logged in the Touch Screen (TS). For additional
diagnosis and testing information, refer to the relevant Diagnosis and Testing section in the workshop manual.
For additional information, refer to: Information and Entertainment System (415-00 Information and Entertainment System - General Information, Diagnosis and Testing).
DTC Description Possible Causes Action B100E-25
Video Input 'A' - Signal
shape/waveform
failure
ODST Only - TV video
synch mis-match
Carry out any pinpoint tests associated with this DTC
using the manufacturer approved diagnostic system B100F-25
Video Input 'B' - Signal
shape/waveform
failure
ODST Only - Reverse
Camera video synch
mis-match
Carry out any pinpoint tests associated with this DTC
using the manufacturer approved diagnostic system U1A01-01
Communication Link -
General electrical
failure
ODST Only - cable
from navigation
module not correctly
installed
Carry out any pinpoint tests associated with this DTC
using the manufacturer approved diagnostic system.
Check electrical harness from navigation module is
correctly installed U1A01-15
Communication Link -
Circuit short to battery
or open
TSD to navigation
module circuit - short
to power, open circuit
Carry out any pinpoint tests associated with this DTC
using the manufacturer approved diagnostic system.
Refer to the electrical circuit diagrams and check TSD to
navigation module circuit for short to power, open circuit U1A4B-48
Control Module
Processor B -
Supervision software
failure
Supervision software
failure
Re-configure the TSD using the manufacturer approved
diagnostic system www.JagDocs.com
Page 253 of 3039
Published: 17-Apr-2014
General Information - Diagnostic Trouble Code (DTC) Index Vehicles With:
6HP28 6-Speed Automatic Transmission, DTC: Transmission Control Module
(TCM)
Description and Operation
Transmission Control Module (TCM) 6 speed (6HP28 Applications)
CAUTION: Diagnosis by substitution from a donor vehicle is NOT acceptable. Substitution of control modules does not
guarantee confirmation of a fault, and may also cause additional faults in the vehicle being tested and/or the donor vehicle
NOTES:
If the control module or a component is suspect and the vehicle remains under manufacturer warranty, refer to the
warranty policy and procedures manual, or determine if any prior approval programme is in operation, prior to the installation
of a new module/component
Generic scan tools may not read the codes listed, or may read only 5-digit codes. Match the 5 digits from the scan tool to
the first 5 digits of the 7-digit code listed to identify the fault (the last 2 digits give extra information read by the
manufacturer-approved diagnostic system)
When performing voltage or resistance tests, always use a digital multimeter accurate to three decimal places and with a
current calibration certificate. When testing resistance, always take the resistance of the digital multimeter leads into account
Check and rectify basic faults before beginning diagnostic routines involving pinpoint tests
Inspect connectors for signs of water ingress, and pins for damage and/or corrosion
If diagnostic trouble codes are recorded and, after performing the pinpoint tests, a fault is not present, an intermittent
concern may be the cause. Always check for loose connections and corroded terminals
Where an 'on demand self-test' is referred to, this can be accessed via the 'diagnostic trouble code monitor' tab on the
manufacturers approved diagnostic system
Check DDW for open campaigns. Refer to the corresponding bulletins and SSMs which may be valid for the specific
customer complaint and carry out the recommendations as needed
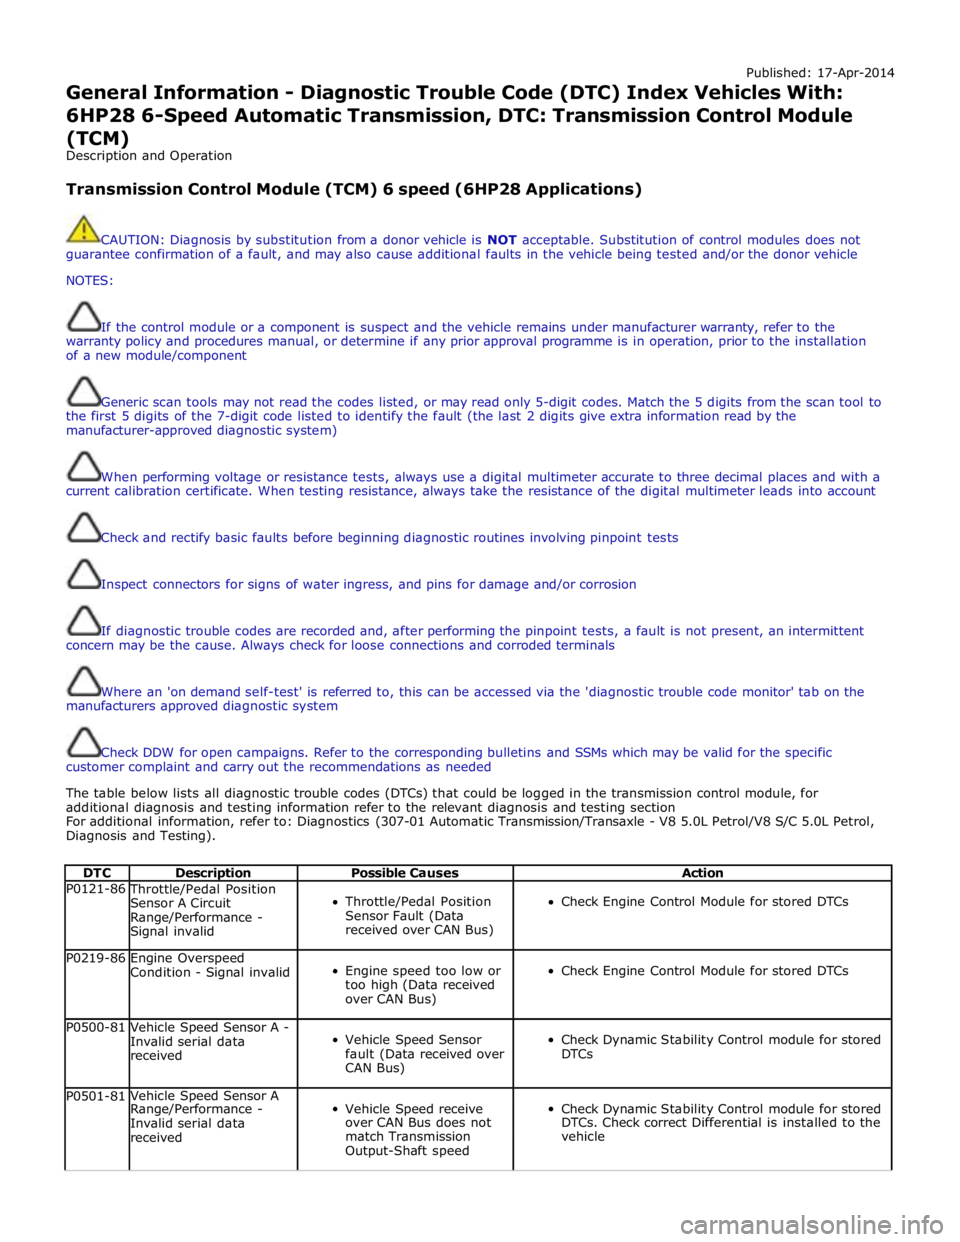
The table below lists all diagnostic trouble codes (DTCs) that could be logged in the transmission control module, for
additional diagnosis and testing information refer to the relevant diagnosis and testing section
For additional information, refer to: Diagnostics (307-01 Automatic Transmission/Transaxle - V8 5.0L Petrol/V8 S/C 5.0L Petrol,
Diagnosis and Testing).
DTC Description Possible Causes Action P0121-86 Throttle/Pedal Position
Sensor A Circuit
Range/Performance -
Signal invalid
Throttle/Pedal Position
Sensor Fault (Data
received over CAN Bus)
Check Engine Control Module for stored DTCs P0219-86
Engine Overspeed
Condition - Signal invalid
Engine speed too low or
too high (Data received
over CAN Bus)
Check Engine Control Module for stored DTCs P0500-81
Vehicle Speed Sensor A -
Invalid serial data
received
Vehicle Speed Sensor
fault (Data received over
CAN Bus)
Check Dynamic Stability Control module for stored
DTCs P0501-81 Vehicle Speed Sensor A
Vehicle Speed receive
Check Dynamic Stability Control module for stored Range/Performance - Invalid serial data over CAN Bus does not DTCs. Check correct Differential is installed to the received match Transmission vehicle Output-Shaft speed
Page 261 of 3039

DTC Description Possible Causes Action P0829-77
6-5 Shift - Commanded
Position Not Reachable
Gear Ratio Monitoring.
Mechanical Failures
Check and correct oil level. Clear DTC. If code
re-detects suspect Transmission (mechanical)
internal fault. Install a new Transmission as
required, refer to the warranty policy and
procedures manual if a module/component is
suspect. P084F-01
Park / Neutral Switch
Input Circuit - General
Electrical Failure
Wrong voltage level
detected on Park/No Park
signal
Check for correct output at Transmission Control
Module park signal pin (check in all positions) 12
volts in Park, 0 volts in all other positions. If fault
identified, suspect the Transmission Control
Module. Install a new Transmission Control Module
as required, refer to the warranty policy and
procedures manual if a module/component is
suspect. If no fault identified, check Park signal
circuit to Transmission Shift Module for short, open
circuit P0850-01
Park / Neutral Switch
Input Circuit - General
Electrical Failure
General electrical failure
Suspect the Transmission Control Module. Install a
new Transmission Control Module as required,
refer to the warranty policy and procedures manual
if a module/component is suspect. P0850-02
Park / Neutral Switch
Input Circuit - General
signal failure
General signal failure
Check Parklock mechanism, If Parklock operation
correct suspect the Transmission Control Module.
Install a new Transmission Control Module as
required, refer to the warranty policy and
procedures manual if a module/component is
suspect. P0850-29
Park / Neutral Switch
Input Circuit - Signal
invalid
Signal Invalid
Check Parklock mechanism, If Parklock operation
correct suspect the Transmission Control Module.
Install a new Transmission Control Module as
required, refer to the warranty policy and
procedures manual if a module/component is
suspect. P0850-1C
Park / Neutral Switch
Input Circuit - Circuit
voltage out of range
Circuit voltage out of
range
Suspect the Transmission Control Module. Install a
new Transmission Control Module as required,
refer to the warranty policy and procedures manual
if a module/component is suspect. P0919-93
Gear Shift Position
Control Error - No
operation
No shifting despite driver
request
Suspect the Transmission Control Module. Install a
new Transmission Control Module as required,
refer to the warranty policy and procedures manual
if a module/component is suspect. P0919-94
Gear Shift Position
Control Error -
Unexpected operation
Shifting without driver
request
Suspect the Transmission Control Module. Install a
new Transmission Control Module as required,
refer to the warranty policy and procedures manual
if a module/component is suspect. P0938-29
Hydraulic Oil Temperature
Sensor
Range/Performance -
Signal invalid
Transmission fluid
temperature compared
with module temperature
fault
Clear DTC. Carry out cold start road test, continue
driving vehicle until normal operating temperature
is achieved. Read DTCs, if DTC returns, suspect
the Transmission Control Module. Install a new
Transmission Control Module as required, refer to
the warranty policy and procedures manual if a
module/component is suspect. P0963-12
Pressure Control Solenoid
A Control Circuit High -
Circuit Short to Battery
Pressure control solenoid
1 Circuit Short to Power
Suspect the Transmission Control Module. Install a
new Transmission Control Module as required,
refer to the warranty policy and procedures manual
if a module/component is suspect. P0964-13
Pressure Control Solenoid
B Control Circuit / Open -
Circuit Open
Pressure Control Solenoid
B Control Circuit Open
Suspect the Transmission Control Module. Install a
new Transmission Control Module as required,
refer to the warranty policy and procedures manual
Page 269 of 3039
Published: 17-Apr-2014
General Information - Diagnostic Trouble Code (DTC) Index DTC: Transmission
Shift Module (GSM)
Description and Operation
Gear Shift Module (GSM)
CAUTION: Diagnosis by substitution from a donor vehicle is NOT acceptable. Substitution of control modules does not
guarantee confirmation of a fault, and may also cause additional faults in the vehicle being tested and/or the donor vehicle
NOTES:
If the control module or a component is suspect and the vehicle remains under manufacturer warranty, refer to the
warranty policy and procedures manual, or determine if any prior approval programme is in operation, prior to the installation
of a new module/component
Generic scan tools may not read the codes listed, or may read only 5-digit codes. Match the 5 digits from the scan tool to
the first 5 digits of the 7-digit code listed to identify the fault (the last 2 digits give extra information read by the
manufacturer-approved diagnostic system)
When performing voltage or resistance tests, always use a digital multimeter accurate to three decimal places and with a
current calibration certificate. When testing resistance, always take the resistance of the digital multimeter leads into account
Check and rectify basic faults before beginning diagnostic routines involving pinpoint tests
Inspect connectors for signs of water ingress, and pins for damage and/or corrosion
If diagnostic trouble codes are recorded and, after performing the pinpoint tests, a fault is not present, an intermittent
concern may be the cause. Always check for loose connections and corroded terminals
Where an 'on demand self-test' is referred to, this can be accessed via the 'diagnostic trouble code monitor' tab on the
manufacturers approved diagnostic system
Check DDW for open campaigns. Refer to the corresponding bulletins and SSMs which may be valid for the specific
customer complaint and carry out the recommendations as needed
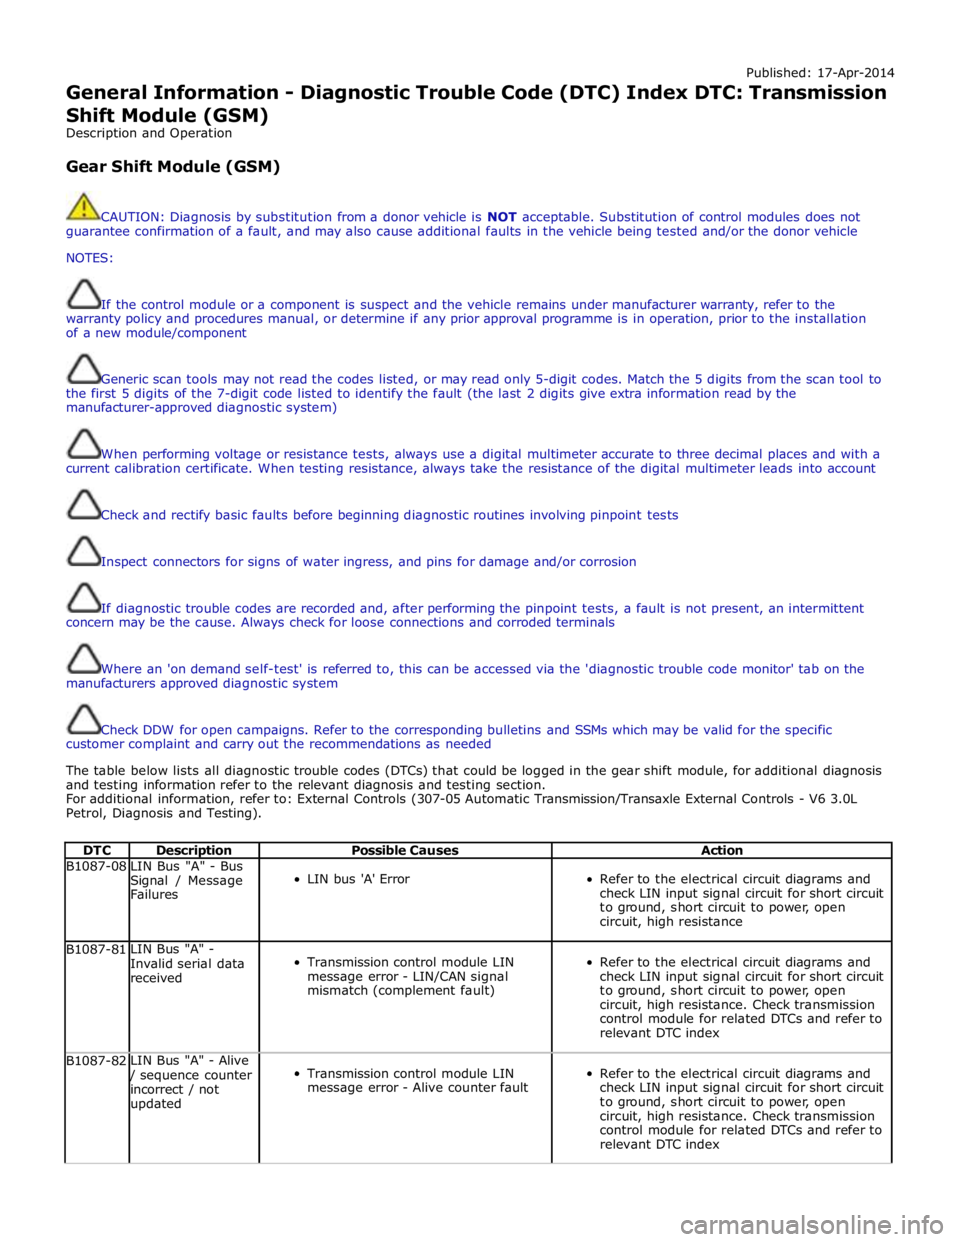
The table below lists all diagnostic trouble codes (DTCs) that could be logged in the gear shift module, for additional diagnosis
and testing information refer to the relevant diagnosis and testing section.
For additional information, refer to: External Controls (307-05 Automatic Transmission/Transaxle External Controls - V6 3.0L
Petrol, Diagnosis and Testing).
DTC Description Possible Causes Action B1087-08
LIN Bus "A" - Bus
Signal / Message
Failures
LIN bus 'A' Error
Refer to the electrical circuit diagrams and
check LIN input signal circuit for short circuit
to ground, short circuit to power, open
circuit, high resistance B1087-81 LIN Bus "A" -
Invalid serial data
received
Transmission control module LIN
message error - LIN/CAN signal
mismatch (complement fault)
Refer to the electrical circuit diagrams and
check LIN input signal circuit for short circuit
to ground, short circuit to power, open
circuit, high resistance. Check transmission
control module for related DTCs and refer to
relevant DTC index B1087-82 LIN Bus "A" - Alive / sequence counter
incorrect / not
updated
Transmission control module LIN
message error - Alive counter fault
Refer to the electrical circuit diagrams and
check LIN input signal circuit for short circuit
to ground, short circuit to power, open
circuit, high resistance. Check transmission
control module for related DTCs and refer to
relevant DTC index
Page 271 of 3039
Published: 12-May-2014
General Information - Diagnostic Trouble Code (DTC) Index DTC: Portable
Audio Interface Control Module (PAICM)
Description and Operation
Portable Audio Interface Control Module (PAICM)
CAUTION: Diagnosis by substitution from a donor vehicle is NOT acceptable. Substitution of control modules does not
guarantee confirmation of a fault, and may also cause additional faults in the vehicle being tested and/or the donor vehicle.
NOTES:
If a control module or a component is suspect and the vehicle remains under manufacturer warranty, refer to the Warranty
Policy and Procedures manual, or determine if any prior approval programme is in operation, prior to the installation of a new
module/component.
Generic scan tools may not read the codes listed, or may read only 5-digit codes. Match the 5 digits from the scan tool to
the first 5 digits of the 7-digit code listed to identify the fault (the last 2 digits give extra information read by the
manufacturer-approved diagnostic system).
When performing voltage or resistance tests, always use a digital multimeter accurate to three decimal places, and with
an up-to-date calibration certificate. When testing resistance always take the resistance of the digital multimeter leads into
account.
Check and rectify basic faults before beginning diagnostic routines involving pinpoint tests.
Inspect connectors for signs of water ingress, and pins for damage and/or corrosion.
If DTCs are recorded and, after performing the pinpoint tests, a fault is not present, an intermittent concern may be the
cause. Always check for loose connections and corroded terminals.
Check DDW for open campaigns. Refer to the corresponding bulletins and SSMs which may be valid for the specific
customer complaint and carry out the recommendations as required.
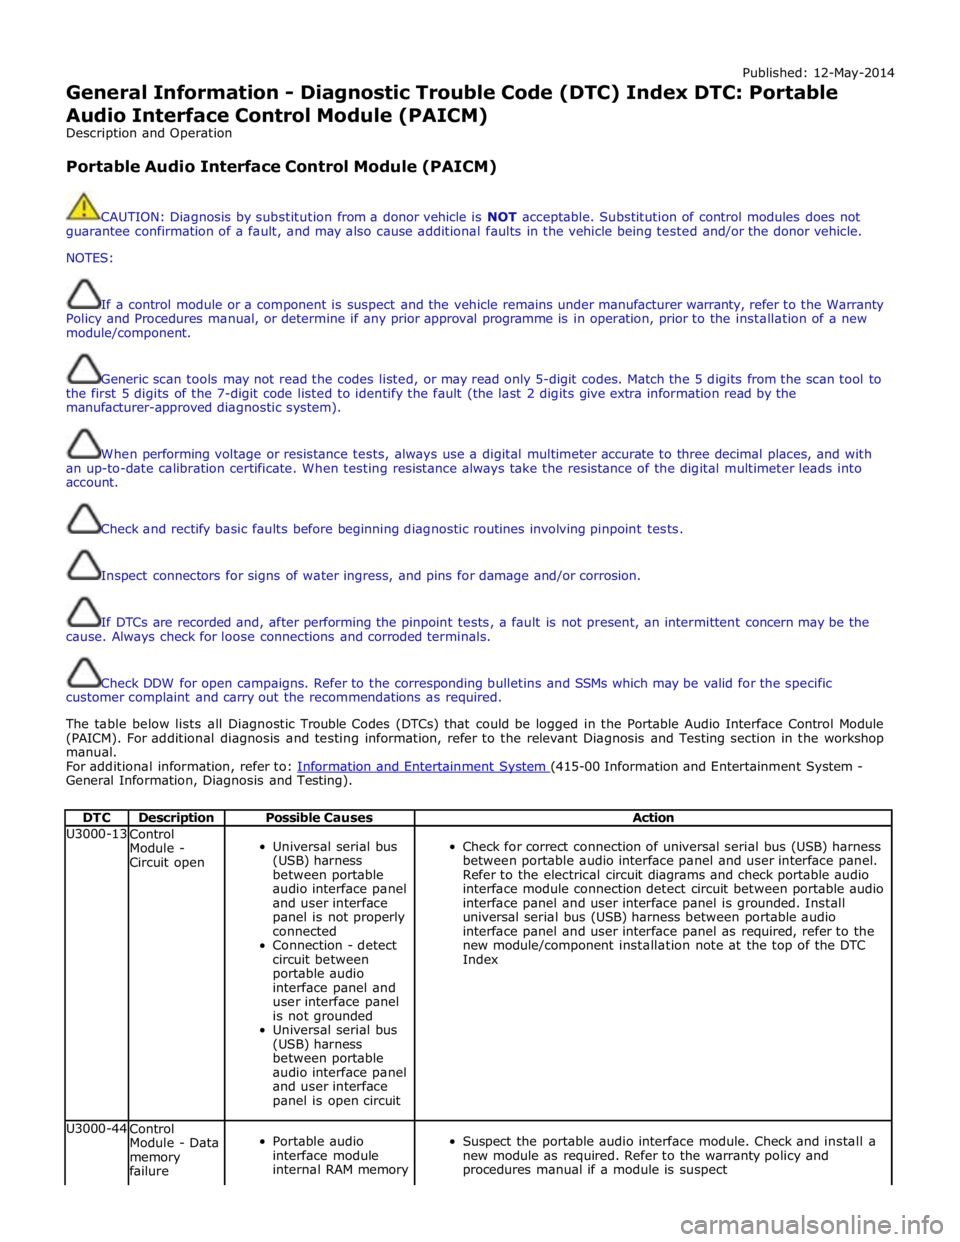
The table below lists all Diagnostic Trouble Codes (DTCs) that could be logged in the Portable Audio Interface Control Module
(PAICM). For additional diagnosis and testing information, refer to the relevant Diagnosis and Testing section in the workshop
manual.
For additional information, refer to: Information and Entertainment System (415-00 Information and Entertainment System - General Information, Diagnosis and Testing).
DTC Description Possible Causes Action U3000-13
Control
Module -
Circuit open
Universal serial bus
(USB) harness
between portable
audio interface panel
and user interface
panel is not properly
connected
Connection - detect
circuit between
portable audio
interface panel and
user interface panel
is not grounded
Universal serial bus
(USB) harness
between portable
audio interface panel
and user interface
panel is open circuit
Check for correct connection of universal serial bus (USB) harness
between portable audio interface panel and user interface panel.
Refer to the electrical circuit diagrams and check portable audio
interface module connection detect circuit between portable audio
interface panel and user interface panel is grounded. Install
universal serial bus (USB) harness between portable audio
interface panel and user interface panel as required, refer to the
new module/component installation note at the top of the DTC
Index U3000-44
Control
Module - Data
memory
failure
Portable audio
interface module
internal RAM memory
Suspect the portable audio interface module. Check and install a
new module as required. Refer to the warranty policy and
procedures manual if a module is suspect
Page 273 of 3039

Published: 12-May-2014
General Information - Diagnostic Trouble Code (DTC) Index DTC: Hybrid
Digital Radio Control Module (HDRCM)
Description and Operation
Hybrid Digital Radio Control Module (HDRCM)
CAUTION: Diagnosis by substitution from a donor vehicle is NOT acceptable. Substitution of control modules does not
guarantee confirmation of a fault, and may also cause additional faults in the vehicle being tested and/or the donor vehicle.
NOTES:
If a control module or a component is suspect and the vehicle remains under manufacturer warranty, refer to the Warranty
Policy and Procedures manual, or determine if any prior approval programme is in operation, prior to the installation of a new
module/component.
Generic scan tools may not read the codes listed, or may read only 5-digit codes. Match the 5 digits from the scan tool to
the first 5 digits of the 7-digit code listed to identify the fault (the last 2 digits give extra information read by the
manufacturer-approved diagnostic system).
When performing voltage or resistance tests, always use a digital multimeter accurate to three decimal places, and with
an up-to-date calibration certificate. When testing resistance always take the resistance of the digital multimeter leads into
account.
Check and rectify basic faults before beginning diagnostic routines involving pinpoint tests.
Inspect connectors for signs of water ingress, and pins for damage and/or corrosion.
If DTCs are recorded and, after performing the pinpoint tests, a fault is not present, an intermittent concern may be the
cause. Always check for loose connections and corroded terminals.
Check DDW for open campaigns. Refer to the corresponding bulletins and SSMs which may be valid for the specific
customer complaint and carry out the recommendations as required.
The table below lists all Diagnostic Trouble Codes (DTCs) that could be logged in the Hybrid Digital Radio Control Module
(HDRCM). For additional diagnosis and testing information, refer to the relevant Diagnosis and Testing section in the workshop
manual.
For additional information, refer to: Information and Entertainment System (415-00 Information and Entertainment System - General Information, Diagnosis and Testing).
DTC Description Possible Causes Action B1A56-02
Antenna - General
signal failure
Antenna general signal failure
Renew the diversity antenna amplifier B1A56-11
Antenna - Circuit
short to ground
Diversity antenna amplifier circuit short
to ground
Refer to the electrical guides and check
the diversity antenna amplifier circuit and
the antenna for short circuit to ground B1A56-12
Antenna - Circuit
short to battery
Diversity antenna amplifier circuit short
to power
Refer to the electrical guides and check
the diversity antenna amplifier circuit and
the antenna for short circuit to power B1A56-13
Antenna - Circuit
open
Diversity antenna amplifier circuit open
circuit
Refer to the electrical guides and check
the diversity antenna amplifier circuit and
the antenna for open circuit U200D-14
Control Module
Output Power A -
Circuit short to
ground or open
Diversity antenna amplifier power supply
circuit short to ground or open circuit
Refer to the electrical guides and check
the diversity antenna amplifier power
circuit
Page 275 of 3039
Published: 12-May-2014
General Information - Diagnostic Trouble Code (DTC) Index DTC: Infotainment Control Module (ICM)
Description and Operation
Infotainment Control Module (ICM)
CAUTION: Diagnosis by substitution from a donor vehicle is NOT acceptable. Substitution of control modules does not
guarantee confirmation of a fault, and may also cause additional faults in the vehicle being tested and/or the donor vehicle.
NOTES:
If a control module or a component is suspect and the vehicle remains under manufacturer warranty, refer to the Warranty
Policy and Procedures manual, or determine if any prior approval programme is in operation, prior to the installation of a new
module/component.
Generic scan tools may not read the codes listed, or may read only 5-digit codes. Match the 5 digits from the scan tool to
the first 5 digits of the 7-digit code listed to identify the fault (the last 2 digits give extra information read by the
manufacturer-approved diagnostic system).
When performing voltage or resistance tests, always use a digital multimeter accurate to three decimal places, and with
an up-to-date calibration certificate. When testing resistance always take the resistance of the digital multimeter leads into
account.
Check and rectify basic faults before beginning diagnostic routines involving pinpoint tests.
Inspect connectors for signs of water ingress, and pins for damage and/or corrosion.
If DTCs are recorded and, after performing the pinpoint tests, a fault is not present, an intermittent concern may be the
cause. Always check for loose connections and corroded terminals.
Check DDW for open campaigns. Refer to the corresponding bulletins and SSMs which may be valid for the specific
customer complaint and carry out the recommendations as required.
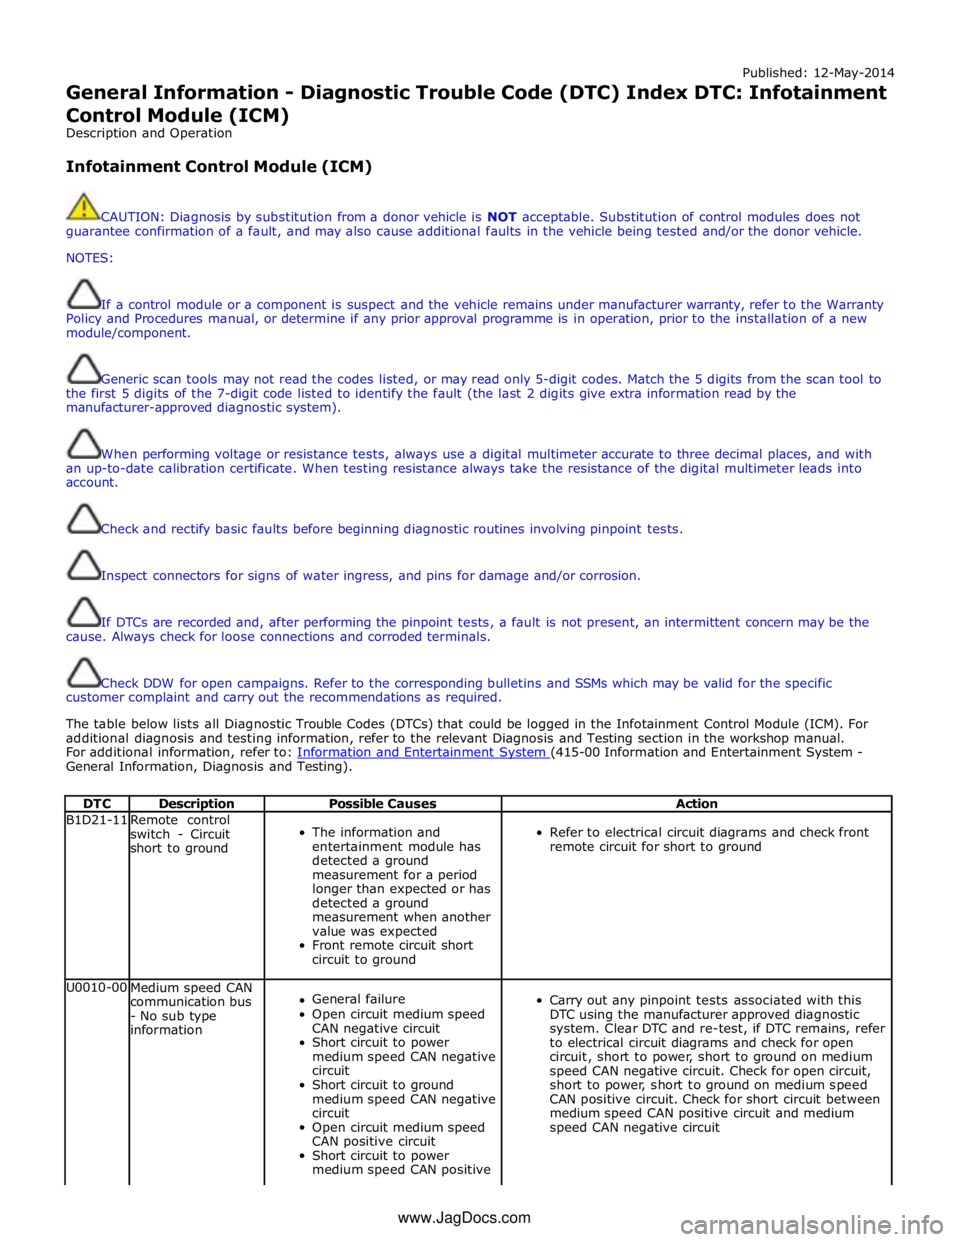
The table below lists all Diagnostic Trouble Codes (DTCs) that could be logged in the Infotainment Control Module (ICM). For
additional diagnosis and testing information, refer to the relevant Diagnosis and Testing section in the workshop manual.
For additional information, refer to: Information and Entertainment System (415-00 Information and Entertainment System - General Information, Diagnosis and Testing).
DTC Description Possible Causes Action B1D21-11
Remote control
switch - Circuit
short to ground
The information and
entertainment module has
detected a ground
measurement for a period
longer than expected or has
detected a ground
measurement when another
value was expected
Front remote circuit short
circuit to ground
Refer to electrical circuit diagrams and check front
remote circuit for short to ground U0010-00
Medium speed CAN
communication bus
- No sub type
information
General failure
Open circuit medium speed
CAN negative circuit
Short circuit to power
medium speed CAN negative
circuit
Short circuit to ground
medium speed CAN negative
circuit
Open circuit medium speed
CAN positive circuit
Short circuit to power
medium speed CAN positive
Carry out any pinpoint tests associated with this
DTC using the manufacturer approved diagnostic
system. Clear DTC and re-test, if DTC remains, refer
to electrical circuit diagrams and check for open
circuit, short to power, short to ground on medium
speed CAN negative circuit. Check for open circuit,
short to power, short to ground on medium speed
CAN positive circuit. Check for short circuit between
medium speed CAN positive circuit and medium
speed CAN negative circuit www.JagDocs.com