Cylinder head JAGUAR XFR 2010 1.G Workshop Manual
[x] Cancel search | Manufacturer: JAGUAR, Model Year: 2010, Model line: XFR, Model: JAGUAR XFR 2010 1.GPages: 3039, PDF Size: 58.49 MB
Page 10 of 3039

211-05: Steering Column Switches
Description and OperationComponent Location
Overview
System Operation and Component DescriptionDiagnosis and TestingSteering Column SwitchesRemoval and InstallationHazard Flasher Switch
Steering Column Multifunction Switch LH
Steering Column Multifunction Switch RH
Steering Column Lock Actuator3: Powertrain
303: Engine
303-00: Engine System - General Information
Diagnosis and TestingEngine - 5.0LGeneral ProceduresBearing Inspection
Camshaft Bearing Journal Diameter
Camshaft End Play
Camshaft Lobe Lift
Camshaft Surface Inspection
Connecting Rod Cleaning
Connecting Rod Large End Bore
Crankshaft End Play
Cylinder Bore Out-of-Round
Exhaust Manifold Cleaning and Inspection
Leakage Test Using Smoke Test Equipment
Piston Inspection
Piston Pin Diameter
Piston Pin to Bore Diameter
Piston Ring End Gap
Piston Ring-to-Groove Clearance
Valve Spring Free Length
Valve Stem Diameter
Cylinder Head Distortion
Cylinder Compression Test - V8 S/C 5.0L Petrol303-01D: Engine - V8 S/C 5.0L PetrolSpecificationDescription and OperationComponent Location
Page 11 of 3039

Overview
System Operation and Component DescriptionDiagnosis and TestingEngineGeneral ProceduresEngine Oil Draining and Filling
Engine Oil Vacuum Draining and Filling
Fuel Pump Camshaft Timing Check
Fuel Pump Camshaft Timing Adjustment
Valve Clearance Check
Valve Clearance AdjustmentRemoval and InstallationCamshaft LH
Camshaft RH
Crankshaft Front Seal
Crankshaft Pulley
Crankshaft Rear Seal
Cylinder Head LH
Cylinder Head RH
Engine Mount LH
Engine Mount RH
Exhaust Manifold LH
Exhaust Manifold RH
Flexplate
Oil Cooler
Oil Filter Element
Oil Pan
Oil Pan Extension
Oil Pump
Timing Cover
Timing Drive Components
Valve Cover LH
Valve Cover RH
Cylinder Block Oil Gallery Plug
Fuel Pump Camshaft - Assembly Part Number: INA Timing Drive
Fuel Pump Camshaft - Assembly Part Number: Tsubaki Timing Drive
Lower Timing Cover
ValvesRemovalEngineInstallationEngine
Page 28 of 3039

Instrument Panel Console
Instrument Panel Lower Trim Panel
Overhead Console501-14: Handles, Locks, Latches and Entry SystemsSpecificationDescription and OperationComponent Location
Overview
System Operation and Component DescriptionDiagnosis and TestingLocks, Latches and Entry SystemsRemoval and InstallationDoor Lock Cylinder Cover
Exterior Front Door Handle
Exterior Luggage Compartment Lid Release Switch
Exterior Rear Door Handle
Front Door Latch
Front Door Lock Cylinder
Interior Front Door Handle
Luggage Compartment Lid Latch Actuator
Luggage Compartment Lid Lock Cylinder
Rear Door Latch501-16: Wipers and WashersSpecificationDescription and OperationComponent Location
Overview
System Operation and Component DescriptionDiagnosis and TestingWipers and WashersRemoval and InstallationHeadlamp Washer Jet
Headlamp Washer Pump
Rain Sensor
Windshield Washer Reservoir
Windshield Wiper Motor
Windshield Wiper Pivot Arm
Windshield Washer Pump501-17: Roof Opening PanelSpecificationDescription and OperationComponent Location
Page 53 of 3039
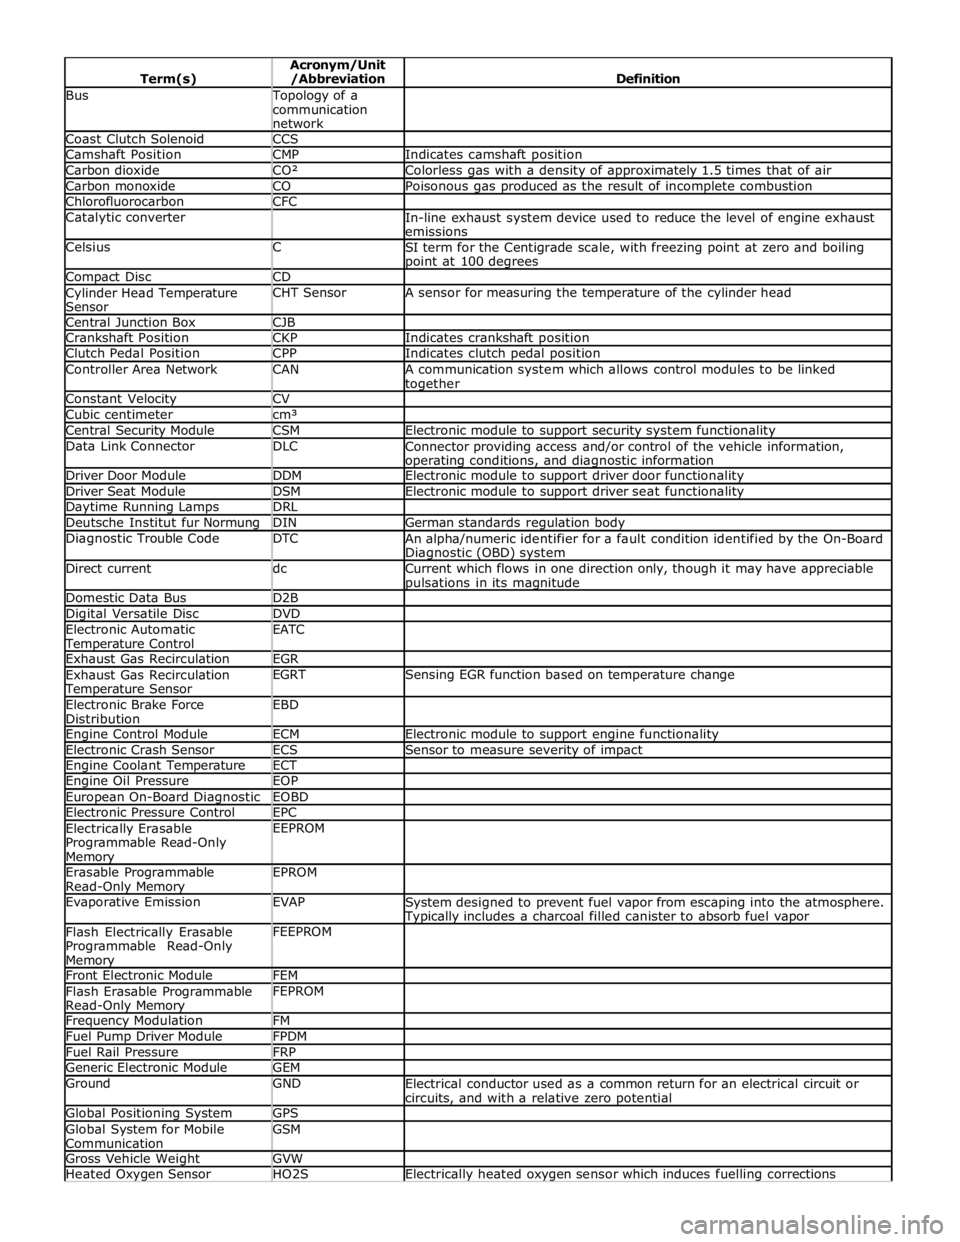
Bus Topology of a
communication
network Coast Clutch Solenoid CCS Camshaft Position CMP Indicates camshaft position Carbon dioxide CO² Colorless gas with a density of approximately 1.5 times that of air Carbon monoxide CO Poisonous gas produced as the result of incomplete combustion Chlorofluorocarbon CFC Catalytic converter
In-line exhaust system device used to reduce the level of engine exhaust
emissions Celsius C
SI term for the Centigrade scale, with freezing point at zero and boiling point at 100 degrees Compact Disc CD Cylinder Head Temperature
Sensor CHT Sensor A sensor for measuring the temperature of the cylinder head Central Junction Box CJB Crankshaft Position CKP Indicates crankshaft position Clutch Pedal Position CPP Indicates clutch pedal position Controller Area Network CAN
A communication system which allows control modules to be linked together Constant Velocity CV Cubic centimeter cm³ Central Security Module CSM Electronic module to support security system functionality Data Link Connector DLC
Connector providing access and/or control of the vehicle information, operating conditions, and diagnostic information Driver Door Module DDM Electronic module to support driver door functionality Driver Seat Module DSM Electronic module to support driver seat functionality Daytime Running Lamps DRL Deutsche Institut fur Normung DIN German standards regulation body Diagnostic Trouble Code DTC
An alpha/numeric identifier for a fault condition identified by the On-Board Diagnostic (OBD) system Direct current dc
Current which flows in one direction only, though it may have appreciable pulsations in its magnitude Domestic Data Bus D2B Digital Versatile Disc DVD Electronic Automatic Temperature Control EATC
Exhaust Gas Recirculation EGR Exhaust Gas Recirculation Temperature Sensor EGRT Sensing EGR function based on temperature change Electronic Brake Force
Distribution EBD
Engine Control Module ECM Electronic module to support engine functionality Electronic Crash Sensor ECS Sensor to measure severity of impact Engine Coolant Temperature ECT Engine Oil Pressure EOP European On-Board Diagnostic EOBD Electronic Pressure Control EPC Electrically Erasable
Programmable Read-Only Memory EEPROM
Erasable Programmable
Read-Only Memory EPROM
Evaporative Emission EVAP
System designed to prevent fuel vapor from escaping into the atmosphere. Typically includes a charcoal filled canister to absorb fuel vapor Flash Electrically Erasable
Programmable Read-Only Memory FEEPROM
Front Electronic Module FEM Flash Erasable Programmable
Read-Only Memory FEPROM
Frequency Modulation FM Fuel Pump Driver Module FPDM Fuel Rail Pressure FRP Generic Electronic Module GEM Ground GND
Electrical conductor used as a common return for an electrical circuit or
circuits, and with a relative zero potential Global Positioning System GPS Global System for Mobile
Communication GSM
Gross Vehicle Weight GVW Heated Oxygen Sensor HO2S Electrically heated oxygen sensor which induces fuelling corrections
Page 743 of 3039
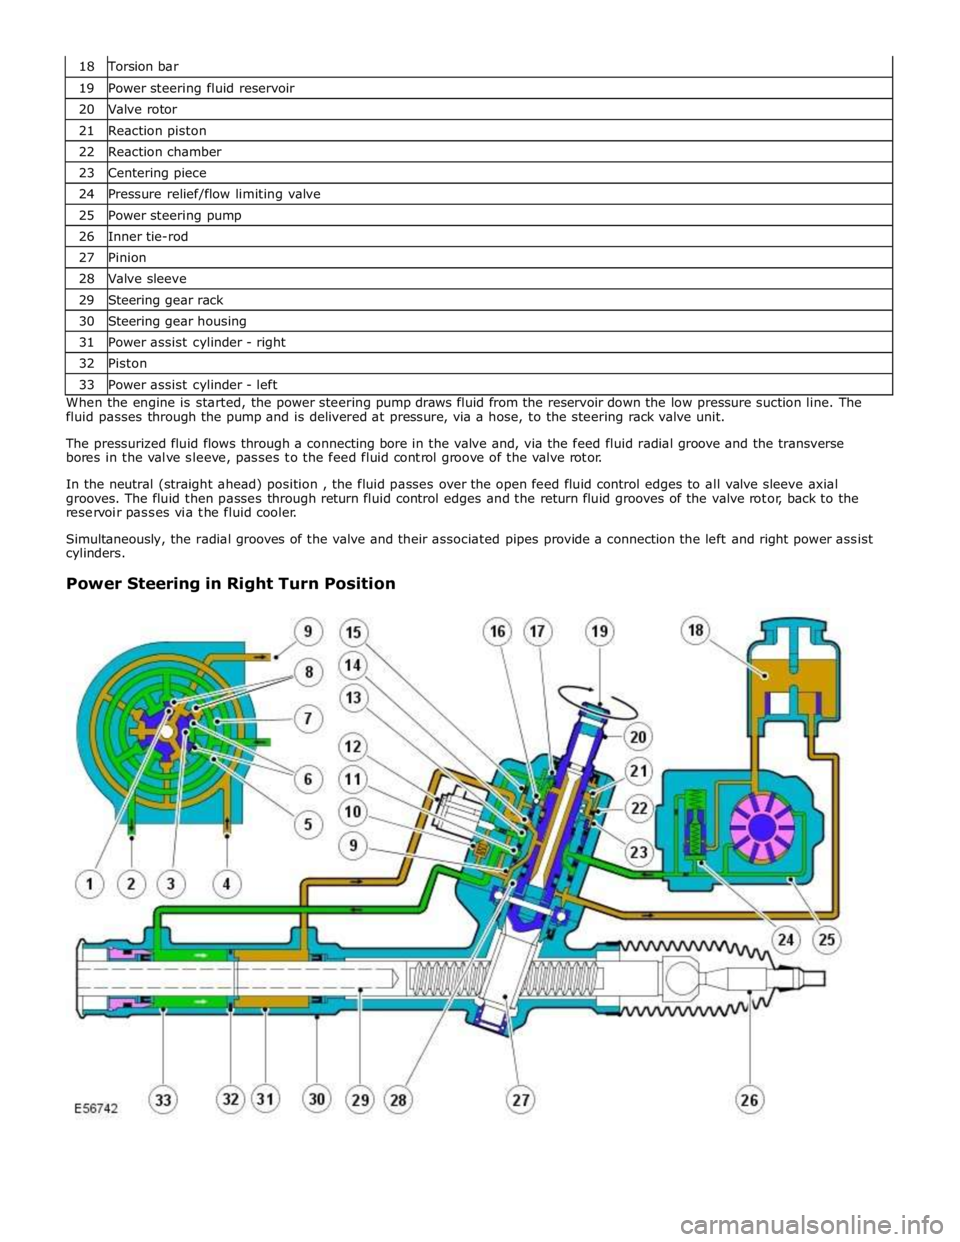
Torsion bar 19 Power steering fluid reservoir 20 Valve rotor 21 Reaction piston 22 Reaction chamber 23 Centering piece 24 Pressure relief/flow limiting valve 25 Power steering pump 26 Inner tie-rod 27 Pinion 28 Valve sleeve 29 Steering gear rack 30 Steering gear housing 31 Power assist cylinder - right 32 Piston 33 Power assist cylinder - left When the engine is started, the power steering pump draws fluid from the reservoir down the low pressure suction line. The
fluid passes through the pump and is delivered at pressure, via a hose, to the steering rack valve unit.
The pressurized fluid flows through a connecting bore in the valve and, via the feed fluid radial groove and the transverse
bores in the valve sleeve, passes to the feed fluid control groove of the valve rotor.
In the neutral (straight ahead) position , the fluid passes over the open feed fluid control edges to all valve sleeve axial
grooves. The fluid then passes through return fluid control edges and the return fluid grooves of the valve rotor, back to the
reservoir passes via the fluid cooler.
Simultaneously, the radial grooves of the valve and their associated pipes provide a connection the left and right power assist
cylinders.
Power Steering in Right Turn Position
Page 813 of 3039
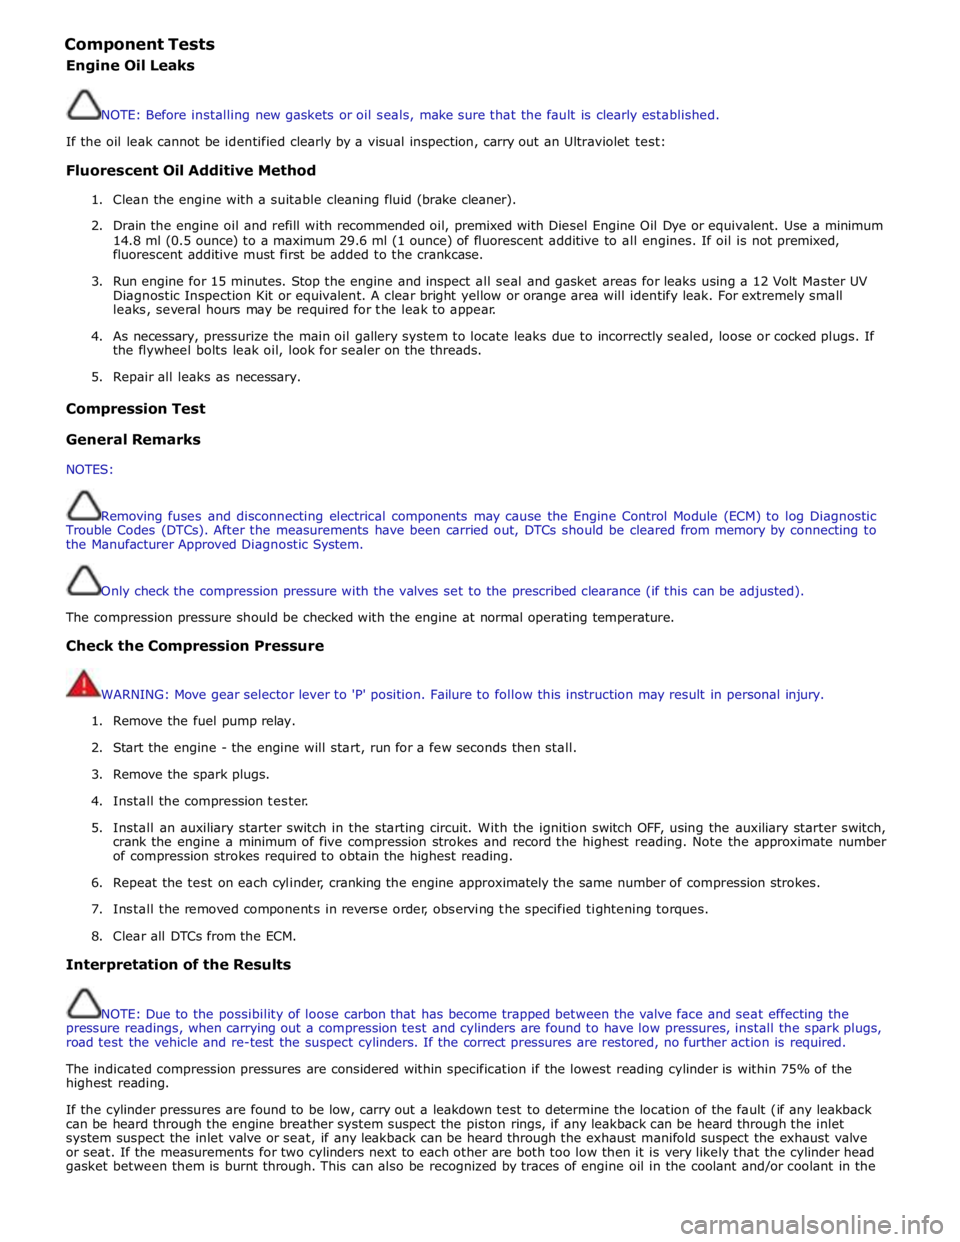
Component Tests
Engine Oil Leaks
NOTE: Before installing new gaskets or oil seals, make sure that the fault is clearly established.
If the oil leak cannot be identified clearly by a visual inspection, carry out an Ultraviolet test:
Fluorescent Oil Additive Method
1. Clean the engine with a suitable cleaning fluid (brake cleaner).
2. Drain the engine oil and refill with recommended oil, premixed with Diesel Engine Oil Dye or equivalent. Use a minimum
14.8 ml (0.5 ounce) to a maximum 29.6 ml (1 ounce) of fluorescent additive to all engines. If oil is not premixed,
fluorescent additive must first be added to the crankcase.
3. Run engine for 15 minutes. Stop the engine and inspect all seal and gasket areas for leaks using a 12 Volt Master UV
Diagnostic Inspection Kit or equivalent. A clear bright yellow or orange area will identify leak. For extremely small
leaks, several hours may be required for the leak to appear.
4. As necessary, pressurize the main oil gallery system to locate leaks due to incorrectly sealed, loose or cocked plugs. If
the flywheel bolts leak oil, look for sealer on the threads.
5. Repair all leaks as necessary.
Compression Test General Remarks
NOTES:
Removing fuses and disconnecting electrical components may cause the Engine Control Module (ECM) to log Diagnostic
Trouble Codes (DTCs). After the measurements have been carried out, DTCs should be cleared from memory by connecting to
the Manufacturer Approved Diagnostic System.
Only check the compression pressure with the valves set to the prescribed clearance (if this can be adjusted).
The compression pressure should be checked with the engine at normal operating temperature.
Check the Compression Pressure
WARNING: Move gear selector lever to 'P' position. Failure to follow this instruction may result in personal injury.
1. Remove the fuel pump relay.
2. Start the engine - the engine will start, run for a few seconds then stall.
3. Remove the spark plugs.
4. Install the compression tester.
5. Install an auxiliary starter switch in the starting circuit. With the ignition switch OFF, using the auxiliary starter switch,
crank the engine a minimum of five compression strokes and record the highest reading. Note the approximate number
of compression strokes required to obtain the highest reading.
6. Repeat the test on each cylinder, cranking the engine approximately the same number of compression strokes.
7. Install the removed components in reverse order, observing the specified tightening torques.
8. Clear all DTCs from the ECM.
Interpretation of the Results
NOTE: Due to the possibility of loose carbon that has become trapped between the valve face and seat effecting the
pressure readings, when carrying out a compression test and cylinders are found to have low pressures, install the spark plugs,
road test the vehicle and re-test the suspect cylinders. If the correct pressures are restored, no further action is required.
The indicated compression pressures are considered within specification if the lowest reading cylinder is within 75% of the
highest reading.
If the cylinder pressures are found to be low, carry out a leakdown test to determine the location of the fault (if any leakback
can be heard through the engine breather system suspect the piston rings, if any leakback can be heard through the inlet
system suspect the inlet valve or seat, if any leakback can be heard through the exhaust manifold suspect the exhaust valve
or seat. If the measurements for two cylinders next to each other are both too low then it is very likely that the cylinder head
gasket between them is burnt through. This can also be recognized by traces of engine oil in the coolant and/or coolant in the
Page 814 of 3039
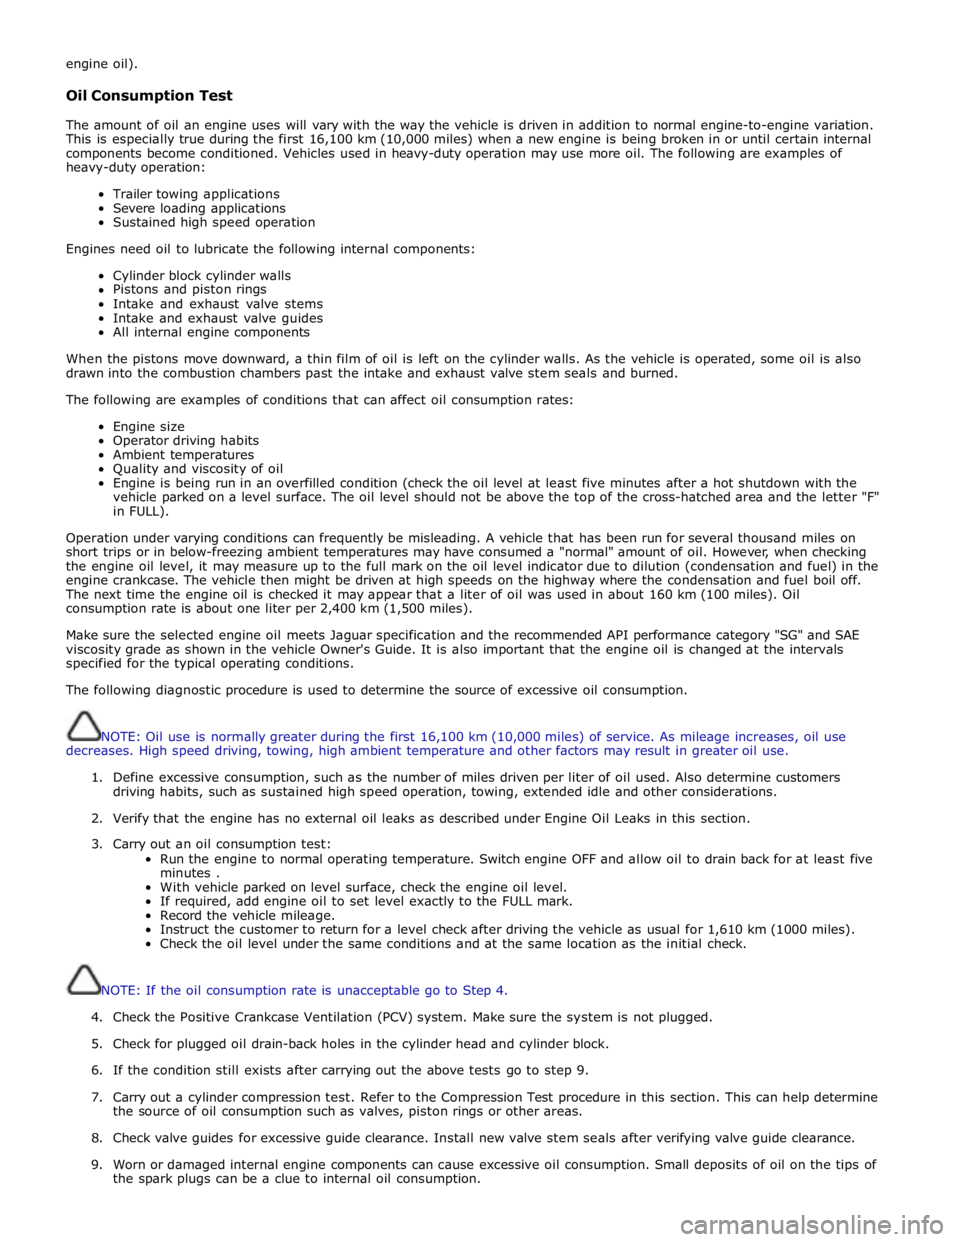
engine oil).
Oil Consumption Test
The amount of oil an engine uses will vary with the way the vehicle is driven in addition to normal engine-to-engine variation.
This is especially true during the first 16,100 km (10,000 miles) when a new engine is being broken in or until certain internal
components become conditioned. Vehicles used in heavy-duty operation may use more oil. The following are examples of
heavy-duty operation:
Trailer towing applications
Severe loading applications
Sustained high speed operation
Engines need oil to lubricate the following internal components:
Cylinder block cylinder walls
Pistons and piston rings
Intake and exhaust valve stems
Intake and exhaust valve guides
All internal engine components
When the pistons move downward, a thin film of oil is left on the cylinder walls. As the vehicle is operated, some oil is also
drawn into the combustion chambers past the intake and exhaust valve stem seals and burned.
The following are examples of conditions that can affect oil consumption rates:
Engine size
Operator driving habits
Ambient temperatures
Quality and viscosity of oil
Engine is being run in an overfilled condition (check the oil level at least five minutes after a hot shutdown with the
vehicle parked on a level surface. The oil level should not be above the top of the cross-hatched area and the letter "F"
in FULL).
Operation under varying conditions can frequently be misleading. A vehicle that has been run for several thousand miles on
short trips or in below-freezing ambient temperatures may have consumed a "normal" amount of oil. However, when checking
the engine oil level, it may measure up to the full mark on the oil level indicator due to dilution (condensation and fuel) in the
engine crankcase. The vehicle then might be driven at high speeds on the highway where the condensation and fuel boil off.
The next time the engine oil is checked it may appear that a liter of oil was used in about 160 km (100 miles). Oil
consumption rate is about one liter per 2,400 km (1,500 miles).
Make sure the selected engine oil meets Jaguar specification and the recommended API performance category "SG" and SAE
viscosity grade as shown in the vehicle Owner's Guide. It is also important that the engine oil is changed at the intervals
specified for the typical operating conditions.
The following diagnostic procedure is used to determine the source of excessive oil consumption.
NOTE: Oil use is normally greater during the first 16,100 km (10,000 miles) of service. As mileage increases, oil use
decreases. High speed driving, towing, high ambient temperature and other factors may result in greater oil use.
1. Define excessive consumption, such as the number of miles driven per liter of oil used. Also determine customers
driving habits, such as sustained high speed operation, towing, extended idle and other considerations.
2. Verify that the engine has no external oil leaks as described under Engine Oil Leaks in this section.
3. Carry out an oil consumption test:
Run the engine to normal operating temperature. Switch engine OFF and allow oil to drain back for at least five
minutes .
With vehicle parked on level surface, check the engine oil level.
If required, add engine oil to set level exactly to the FULL mark.
Record the vehicle mileage.
Instruct the customer to return for a level check after driving the vehicle as usual for 1,610 km (1000 miles).
Check the oil level under the same conditions and at the same location as the initial check.
NOTE: If the oil consumption rate is unacceptable go to Step 4.
4. Check the Positive Crankcase Ventilation (PCV) system. Make sure the system is not plugged.
5. Check for plugged oil drain-back holes in the cylinder head and cylinder block.
6. If the condition still exists after carrying out the above tests go to step 9.
7. Carry out a cylinder compression test. Refer to the Compression Test procedure in this section. This can help determine
the source of oil consumption such as valves, piston rings or other areas.
8. Check valve guides for excessive guide clearance. Install new valve stem seals after verifying valve guide clearance.
9. Worn or damaged internal engine components can cause excessive oil consumption. Small deposits of oil on the tips of
the spark plugs can be a clue to internal oil consumption.
Page 816 of 3039
9. WEAK VALVE SPRINGS: When the needle oscillation becomes more violent as engine RPM is increased, weak valve
springs are indicated. The reading at idle could be relatively steady.
10. LATE VALVE TIMING: A steady but low reading could be caused by late valve timing.
11.
IGNITION TIMING RETARDED: Retarded ignition timing will produce a steady but somewhat low reading.
12.
INSUFFICIENT SPARK PLUG GAP: When spark plugs are gapped too close, a regular, small pulsation of the needle can
occur.
13. INTAKE LEAK: A low, steady reading can be caused by an intake manifold or throttle body gasket leak.
14.
BLOWN HEAD GASKET: A regular drop of fair magnitude can be caused by a blown head gasket or warped cylinder head
to cylinder block surface.
15.
RESTRICTED EXHAUST SYSTEM: When the engine is first started and is idled, the reading may be normal, but as the
engine RPM is increased, the back pressure caused by a clogged muffler, kinked tail pipe or other concerns will cause
the needle to slowly drop to 0 kPa (0 in-Hg). The needle then may slowly rise. Excessive exhaust clogging will cause
the needle to drop to a low point even if the engine is only idling.
When vacuum leaks are indicated, search out and correct the cause. Excess air leaking into the system will upset the fuel
mixture and cause concerns such as rough idle, missing on acceleration or burned valves. If the leak exists in an accessory
such as the power brake booster, the unit will not function correctly. Always repair vacuum leaks.
Engine Oil Pressure Check
NOTE: Prior to checking the engine oil pressure, a road test of 6 miles (10 kilometres), must be carried out. Do not
attempt to attain engine normal operating temperature by allowing the engine to idle.
1. Disconnect the battery ground cable. Refer to section 414-00 - Charging System - General Information of the workshop
manual
2. WARNINGS:
The spilling of hot engine oil is unavoidable during this procedure, care must be taken to prevent scalding.
Wear protective gloves.
Remove the engine oil filter element
REFER to: Oil Filter Element (303-01C Engine - V8 5.0L Petrol, Removal and Installation).
NOTE: Ensure the oil filter element is not contaminated during this procedure
3. Install the oil filter element into special tool (Oil filter adapter number 303-1451)
4. Install the special tool (Oil filter adapter number 303-1451) to the engine. Torque: 25 Nm
5. Install the special tool (Oil pressure testing gauge, 303-871) and tighten the union
6. Connect the battery ground cable
7. Refer to owner hand book, check and top-up the engine oil if required
8. Start and run the engine
9. Note the oil pressure readings with the engine running at idle and 3500 RPM
10.
Turn off the engine
11.
Disconnect the battery ground cable
12. Remove the special tools
1. Clean the components
13.
Install the engine oil filter element
REFER to: Oil Filter Element (303-01C Engine - V8 5.0L Petrol, Removal and Installation).
NOTE: Ensure the oil filter element is not contaminated during this procedure
14.
Connect the battery ground cable
15. Refer to owner hand book, check and top-up the engine oil if required
www.JagDocs.com
Page 826 of 3039

Published: 11-May-2011
Engine System - General Information - Exhaust Manifold Cleaning and
Inspection
General Procedures
1. Inspect the cylinder head joining flanges of the exhaust manifold for
evidence of exhaust gas leaks.
2. Inspect the exhaust manifold for cracks, damaged gasket surfaces, or
other damage that would make it unfit for further use.
Page 837 of 3039

Engine System - General Information - Cylinder Head Distortion
General Procedures
Check Published: 17-Jun-2014
1. Using a suitable metallic straight edge and feeler gauge, measure the
cylinder head face in the areas illustrated. Note the maximum value.
2. CAUTION: Machine the minimum thickness of material from the cylinder
head to meet specification. If a selection of cylinder head gaskets are
available, increase the thickness of the cylinder head gasket by one
size.
NOTES: www.JagDocs.com