Cylinder head JAGUAR XFR 2010 1.G Owner's Guide
[x] Cancel search | Manufacturer: JAGUAR, Model Year: 2010, Model line: XFR, Model: JAGUAR XFR 2010 1.GPages: 3039, PDF Size: 58.49 MB
Page 957 of 3039

7. Torque: 25 Nm 8. Torque: 12 Nm 9. CAUTIONS:
If a new cylinder head has been installed then new
tappets must be installed.
If the cylinder head is being removed without a new
component being installed, the tappets must be installed in
their original positions.
Lubricate the valve tappets with clean engine oil.
Page 973 of 3039
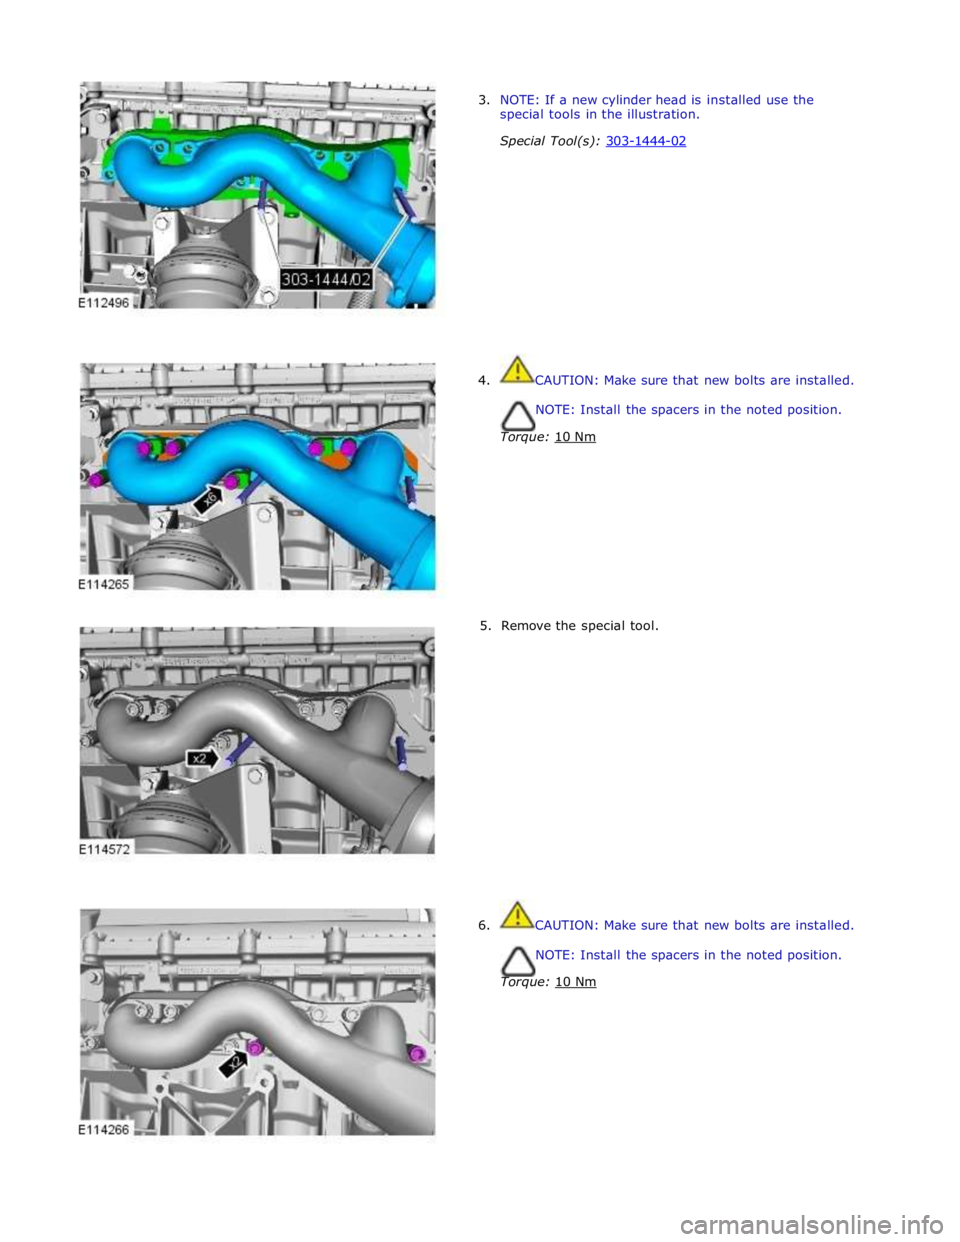
3. NOTE: If a new cylinder head is installed use the
special tools in the illustration.
Special Tool(s): 303-1444-02
4. CAUTION: Make sure that new bolts are installed.
NOTE: Install the spacers in the noted position.
Torque: 10 Nm
5. Remove the special tool.
6. CAUTION: Make sure that new bolts are installed.
NOTE: Install the spacers in the noted position.
Torque: 10 Nm
Page 981 of 3039
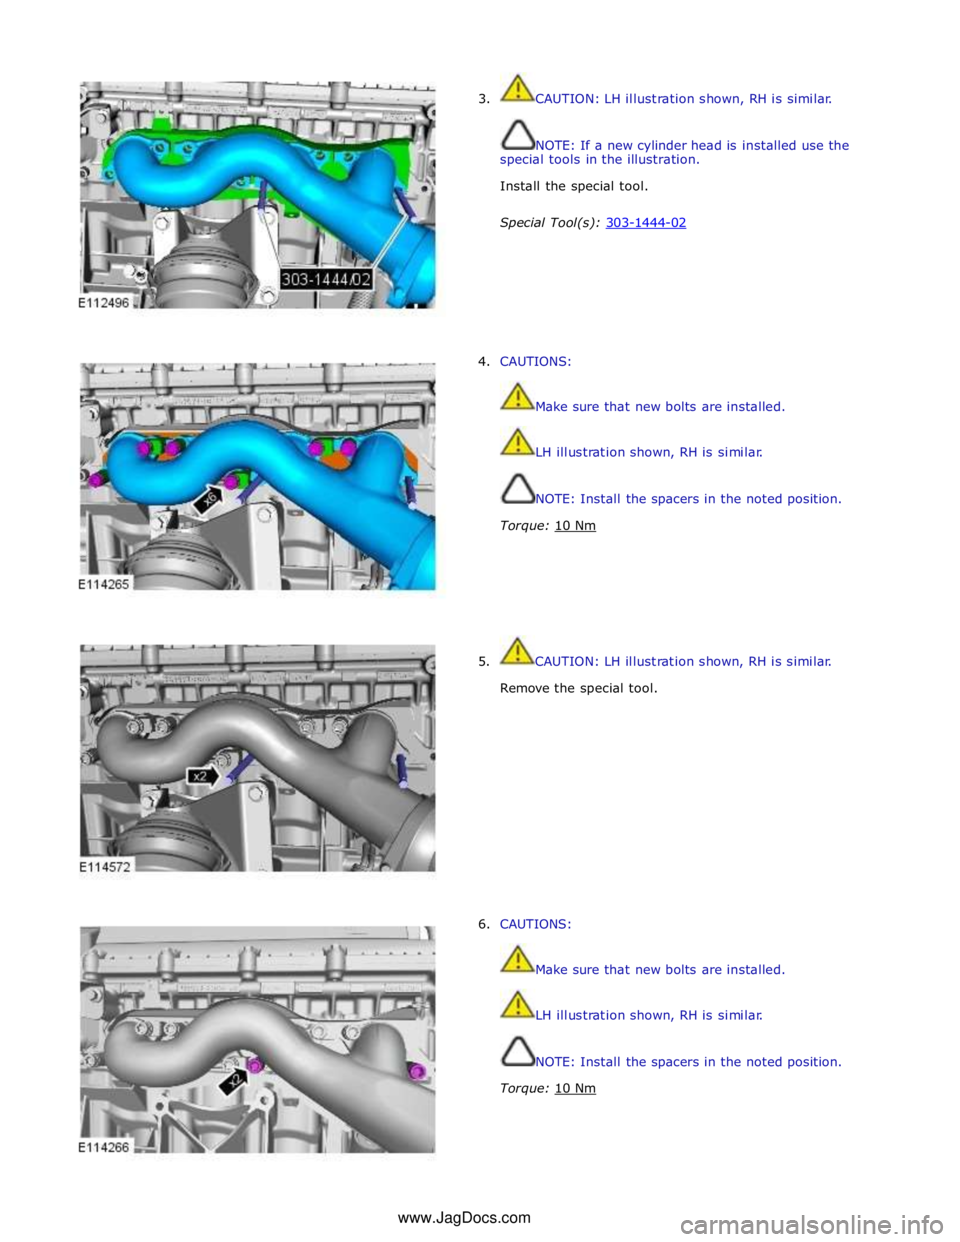
3. CAUTION: LH illustration shown, RH is similar.
NOTE: If a new cylinder head is installed use the
special tools in the illustration.
Install the special tool.
Special Tool(s): 303-1444-02
4. CAUTIONS:
Make sure that new bolts are installed.
LH illustration shown, RH is similar.
NOTE: Install the spacers in the noted position.
Torque: 10 Nm
5. CAUTION: LH illustration shown, RH is similar.
Remove the special tool.
6. CAUTIONS:
Make sure that new bolts are installed.
LH illustration shown, RH is similar.
NOTE: Install the spacers in the noted position.
Torque: 10 Nm www.JagDocs.com
Page 1041 of 3039
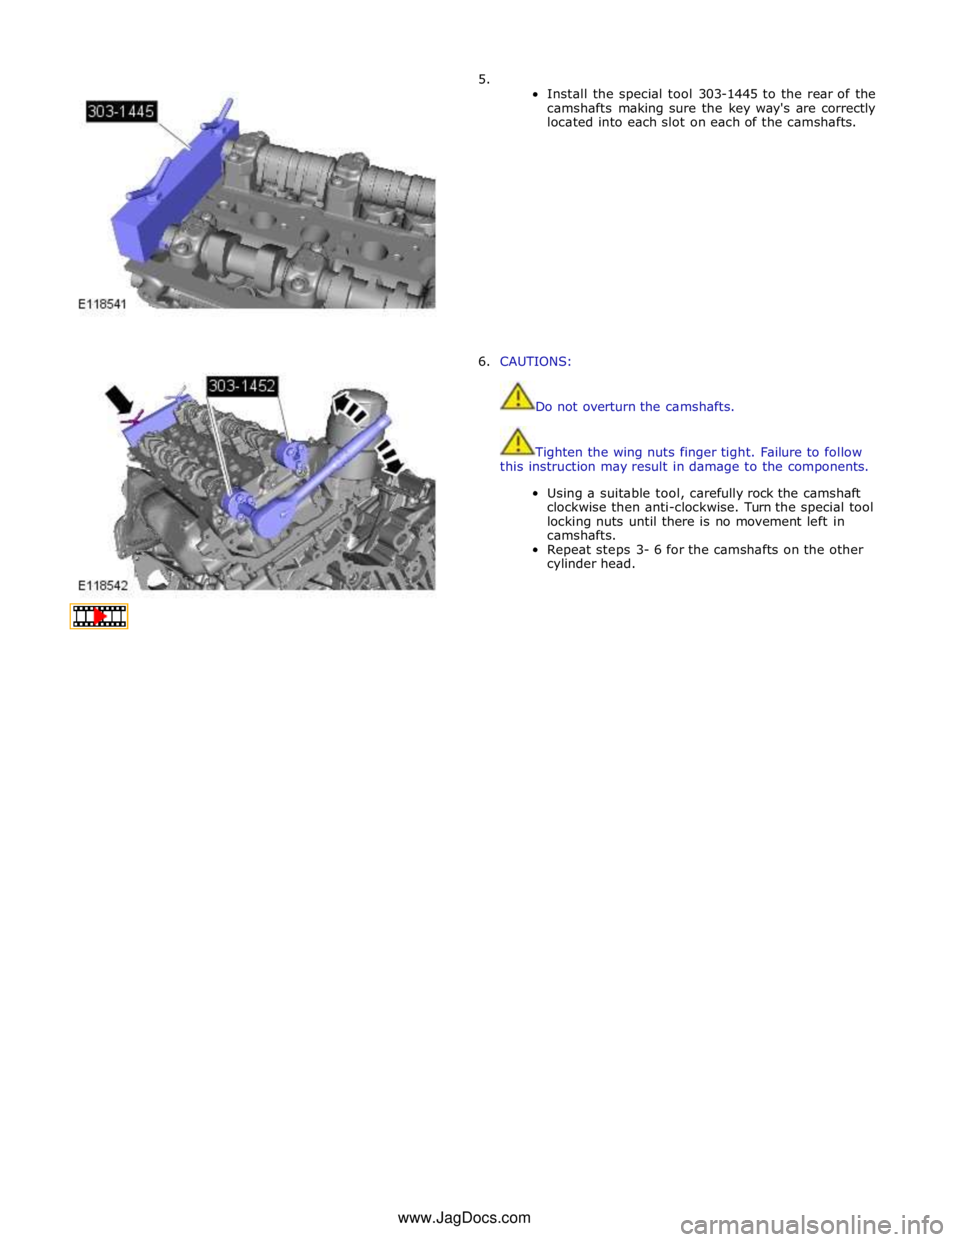
5.
Install the special tool 303-1445 to the rear of the
camshafts making sure the key way's are correctly
located into each slot on each of the camshafts.
6. CAUTIONS:
Do not overturn the camshafts.
Tighten the wing nuts finger tight. Failure to follow
this instruction may result in damage to the components.
Using a suitable tool, carefully rock the camshaft
clockwise then anti-clockwise. Turn the special tool
locking nuts until there is no movement left in
camshafts.
Repeat steps 3- 6 for the camshafts on the other
cylinder head. www.JagDocs.com
Page 1084 of 3039
Engine - V8 S/C 5.0L Petrol - Valves
Removal and Installation
Removal Published: 10-Jul-2013
1. Refer to: Battery Disconnect and Connect (414-01 Battery, Mounting and Cables, General Procedures).
2. WARNING: Do not work on or under a vehicle supported only by a jack.
Always support the vehicle on safety stands.
Raise and support the vehicle.
3. Refer to: Cylinder Head LH (303-01D Engine - V8 S/C 5.0L Petrol, Removal and Installation).
4. Refer to: Cylinder Head RH (303-01D Engine - V8 S/C 5.0L Petrol, Removal and Installation).
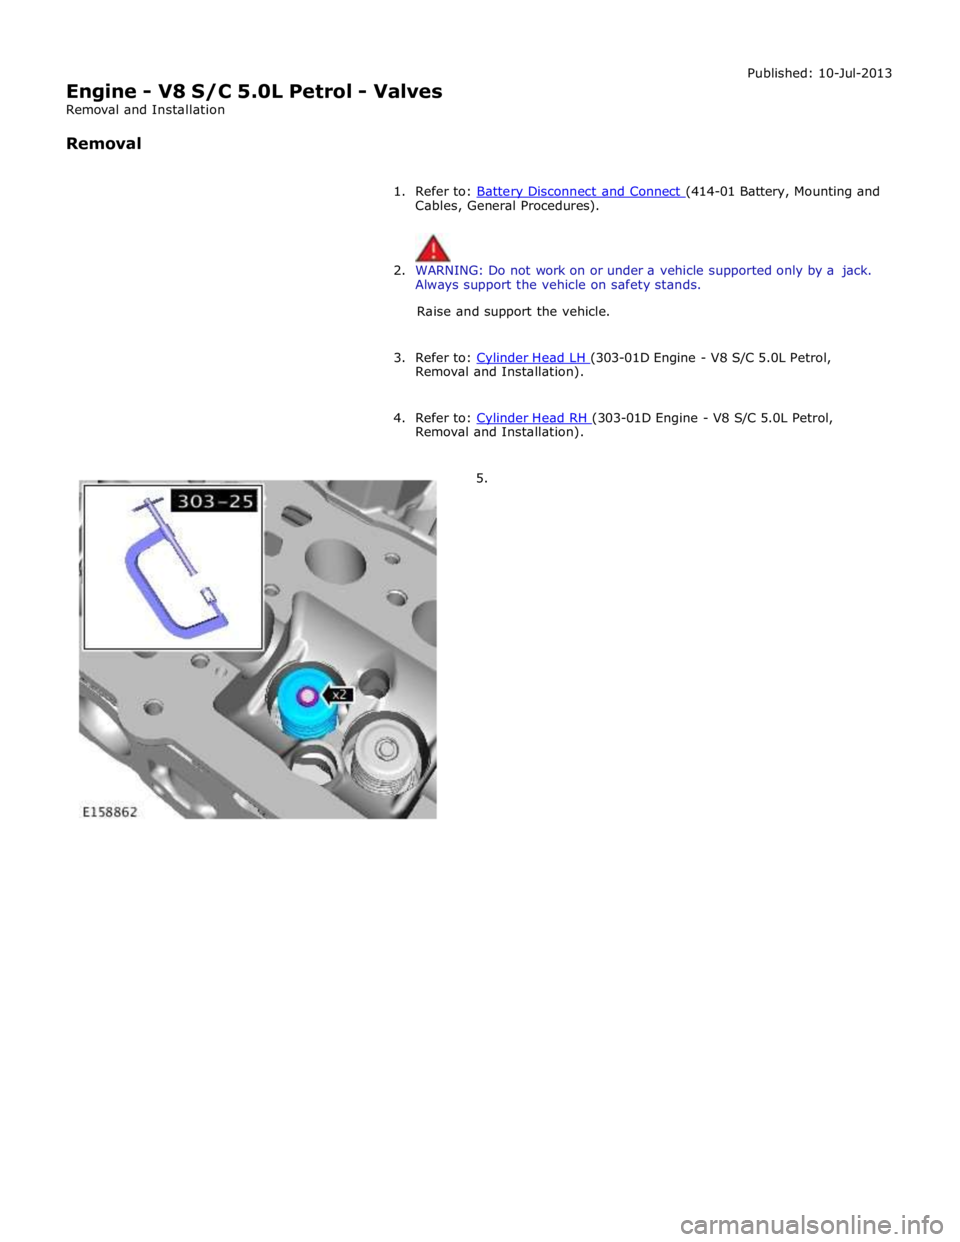
5.
Page 1086 of 3039
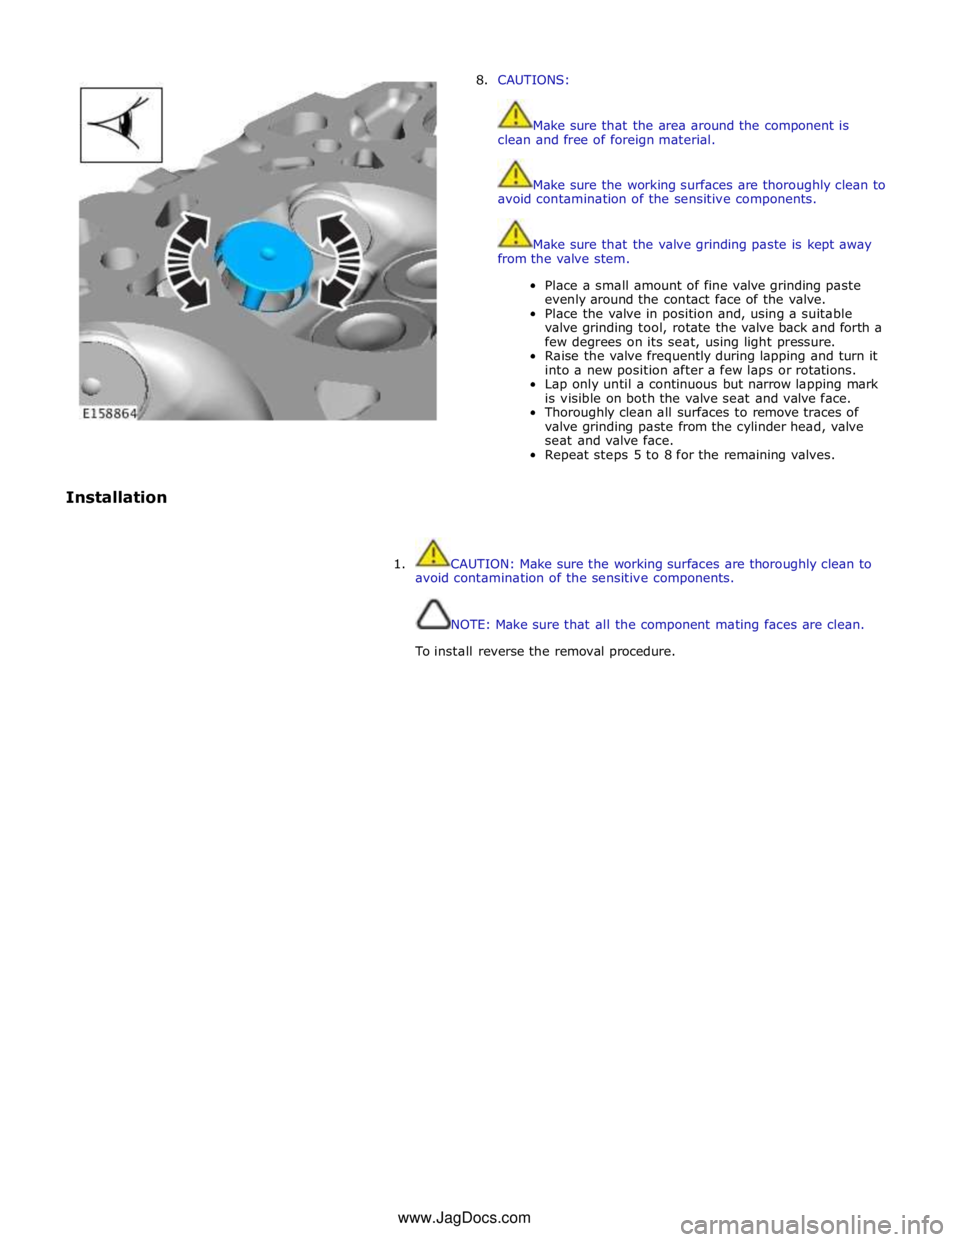
8. CAUTIONS:
Make sure that the area around the component is
clean and free of foreign material.
Make sure the working surfaces are thoroughly clean to
avoid contamination of the sensitive components.
Make sure that the valve grinding paste is kept away
from the valve stem.
Place a small amount of fine valve grinding paste
evenly around the contact face of the valve.
Place the valve in position and, using a suitable
valve grinding tool, rotate the valve back and forth a
few degrees on its seat, using light pressure.
Raise the valve frequently during lapping and turn it
into a new position after a few laps or rotations.
Lap only until a continuous but narrow lapping mark
is visible on both the valve seat and valve face.
Thoroughly clean all surfaces to remove traces of
valve grinding paste from the cylinder head, valve
seat and valve face.
Repeat steps 5 to 8 for the remaining valves.
Installation
1. CAUTION: Make sure the working surfaces are thoroughly clean to
avoid contamination of the sensitive components.
NOTE: Make sure that all the component mating faces are clean.
To install reverse the removal procedure. www.JagDocs.com
Page 1113 of 3039
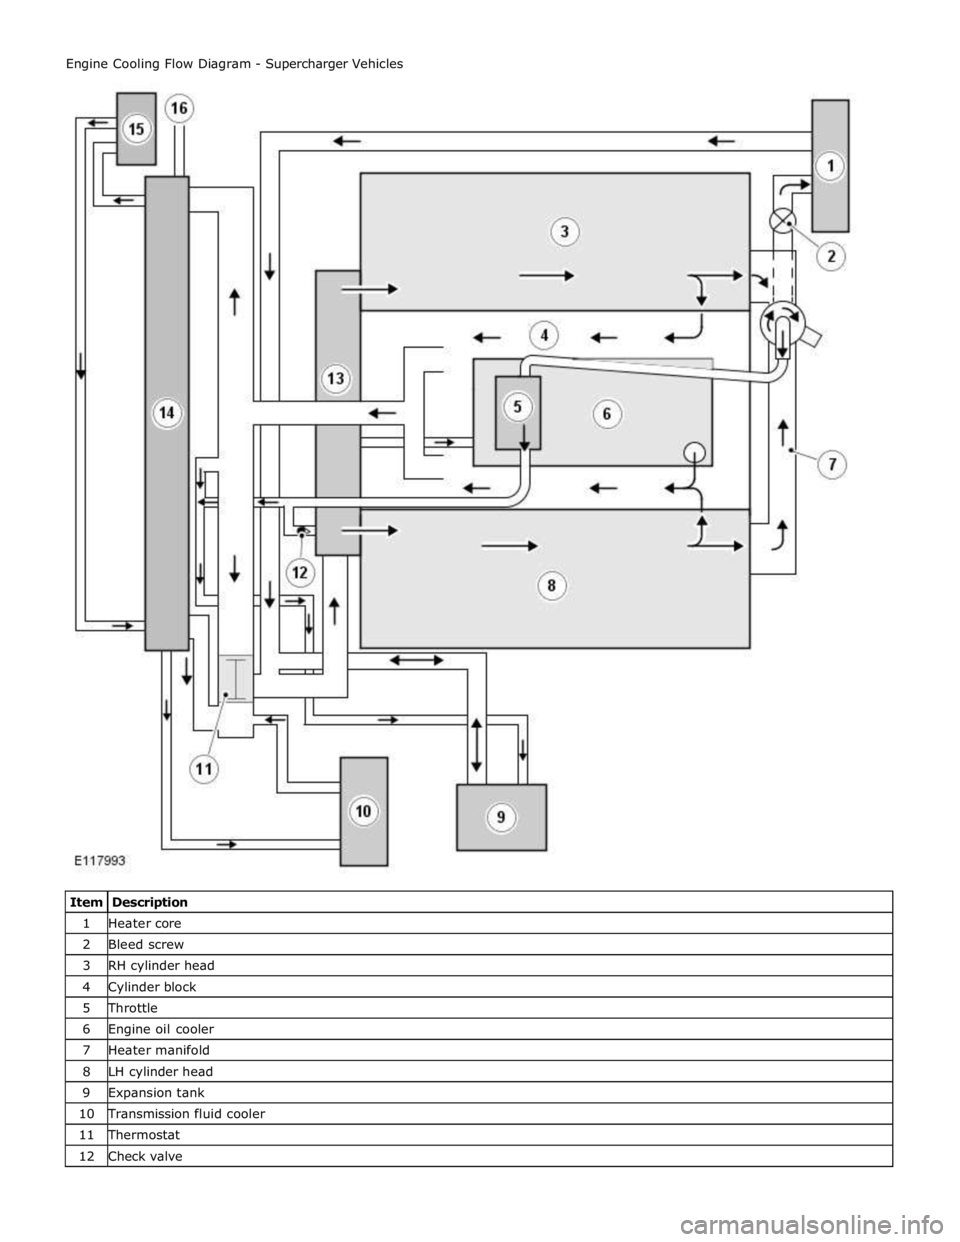
1 Heater core 2 Bleed screw 3 RH cylinder head 4 Cylinder block 5 Throttle 6 Engine oil cooler 7 Heater manifold 8 LH cylinder head 9 Expansion tank 10 Transmission fluid cooler 11 Thermostat 12 Check valve
Page 1114 of 3039
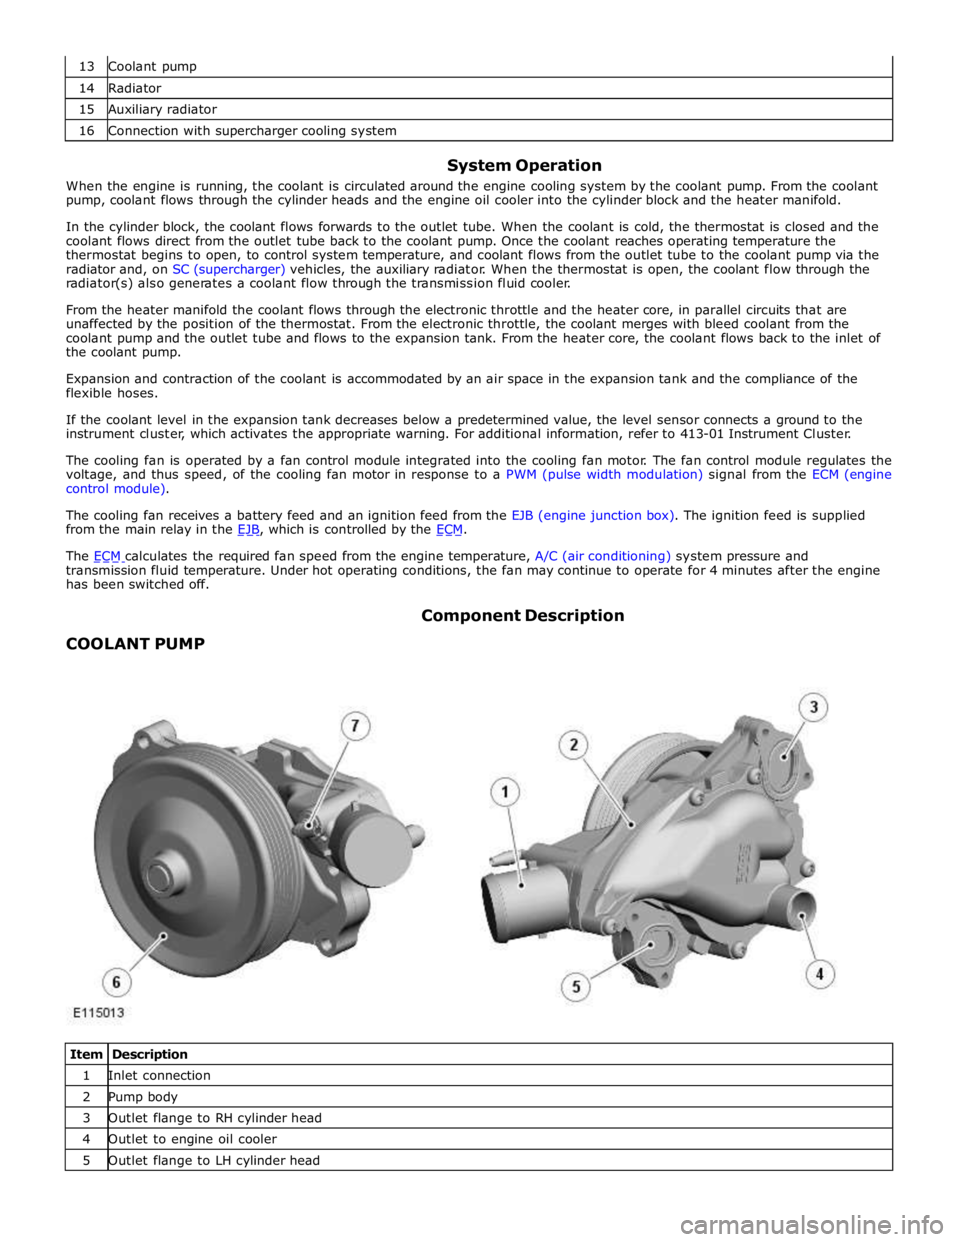
14 Radiator 15 Auxiliary radiator 16 Connection with supercharger cooling system
System Operation
When the engine is running, the coolant is circulated around the engine cooling system by the coolant pump. From the coolant
pump, coolant flows through the cylinder heads and the engine oil cooler into the cylinder block and the heater manifold.
In the cylinder block, the coolant flows forwards to the outlet tube. When the coolant is cold, the thermostat is closed and the
coolant flows direct from the outlet tube back to the coolant pump. Once the coolant reaches operating temperature the
thermostat begins to open, to control system temperature, and coolant flows from the outlet tube to the coolant pump via the
radiator and, on SC (supercharger) vehicles, the auxiliary radiator. When the thermostat is open, the coolant flow through the
radiator(s) also generates a coolant flow through the transmission fluid cooler.
From the heater manifold the coolant flows through the electronic throttle and the heater core, in parallel circuits that are
unaffected by the position of the thermostat. From the electronic throttle, the coolant merges with bleed coolant from the
coolant pump and the outlet tube and flows to the expansion tank. From the heater core, the coolant flows back to the inlet of
the coolant pump.
Expansion and contraction of the coolant is accommodated by an air space in the expansion tank and the compliance of the
flexible hoses.
If the coolant level in the expansion tank decreases below a predetermined value, the level sensor connects a ground to the
instrument cluster, which activates the appropriate warning. For additional information, refer to 413-01 Instrument Cluster.
The cooling fan is operated by a fan control module integrated into the cooling fan motor. The fan control module regulates the
voltage, and thus speed, of the cooling fan motor in response to a PWM (pulse width modulation) signal from the ECM (engine
control module).
The cooling fan receives a battery feed and an ignition feed from the EJB (engine junction box). The ignition feed is supplied
from the main relay in the EJB, which is controlled by the ECM.
The ECM calculates the required fan speed from the engine temperature, A/C (air conditioning) system pressure and transmission fluid temperature. Under hot operating conditions, the fan may continue to operate for 4 minutes after the engine
has been switched off.
COOLANT PUMP Component Description
Item Description 1 Inlet connection 2 Pump body 3 Outlet flange to RH cylinder head 4 Outlet to engine oil cooler 5 Outlet flange to LH cylinder head
Page 1115 of 3039
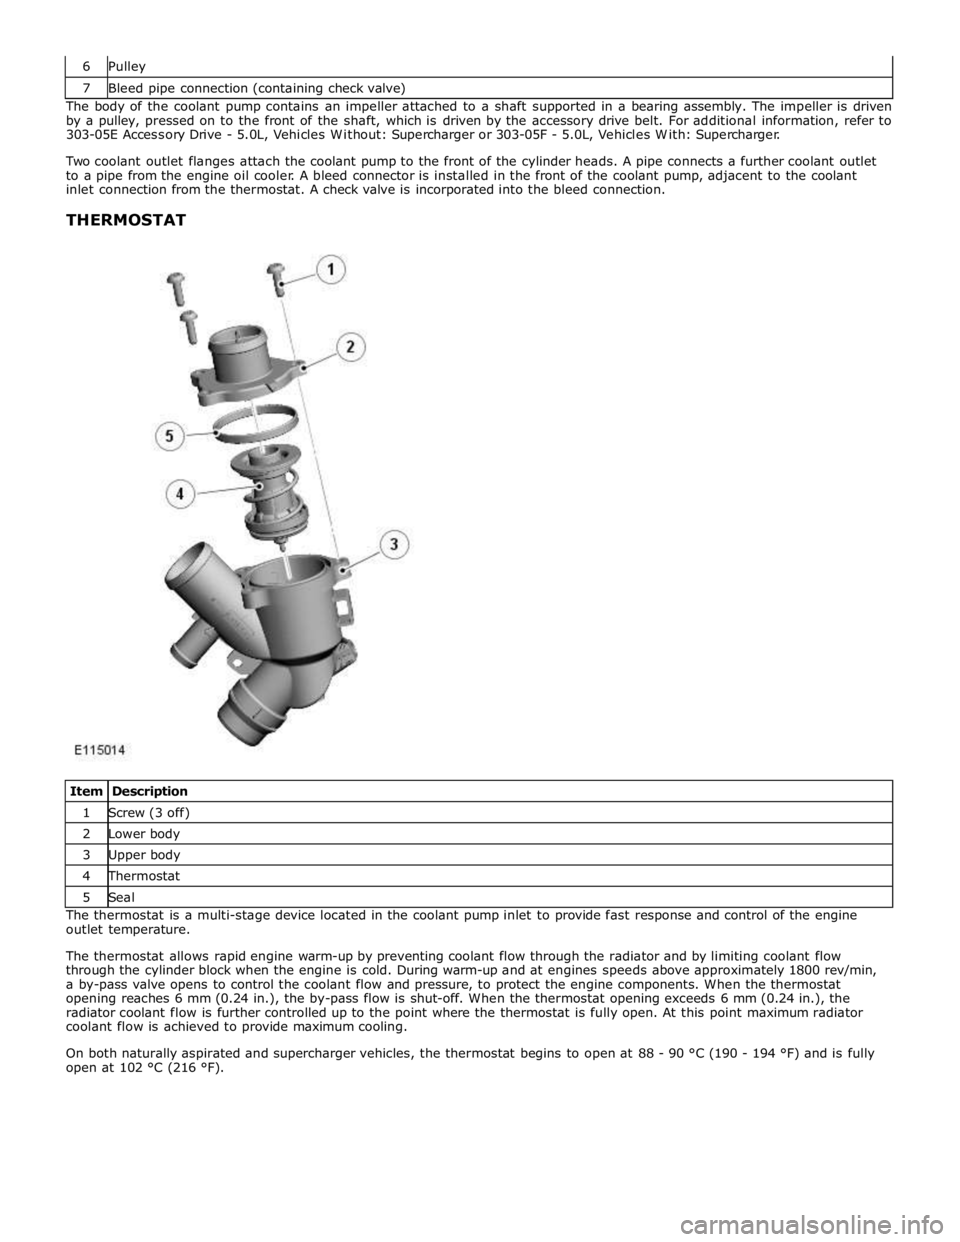
7 Bleed pipe connection (containing check valve) The body of the coolant pump contains an impeller attached to a shaft supported in a bearing assembly. The impeller is driven
by a pulley, pressed on to the front of the shaft, which is driven by the accessory drive belt. For additional information, refer to
303-05E Accessory Drive - 5.0L, Vehicles Without: Supercharger or 303-05F - 5.0L, Vehicles With: Supercharger.
Two coolant outlet flanges attach the coolant pump to the front of the cylinder heads. A pipe connects a further coolant outlet
to a pipe from the engine oil cooler. A bleed connector is installed in the front of the coolant pump, adjacent to the coolant
inlet connection from the thermostat. A check valve is incorporated into the bleed connection.
THERMOSTAT
Item Description 1 Screw (3 off) 2 Lower body 3 Upper body 4 Thermostat 5 Seal The thermostat is a multi-stage device located in the coolant pump inlet to provide fast response and control of the engine
outlet temperature.
The thermostat allows rapid engine warm-up by preventing coolant flow through the radiator and by limiting coolant flow
through the cylinder block when the engine is cold. During warm-up and at engines speeds above approximately 1800 rev/min,
a by-pass valve opens to control the coolant flow and pressure, to protect the engine components. When the thermostat
opening reaches 6 mm (0.24 in.), the by-pass flow is shut-off. When the thermostat opening exceeds 6 mm (0.24 in.), the
radiator coolant flow is further controlled up to the point where the thermostat is fully open. At this point maximum radiator
coolant flow is achieved to provide maximum cooling.
On both naturally aspirated and supercharger vehicles, the thermostat begins to open at 88 - 90 °C (190 - 194 °F) and is fully
open at 102 °C (216 °F).
Page 1121 of 3039
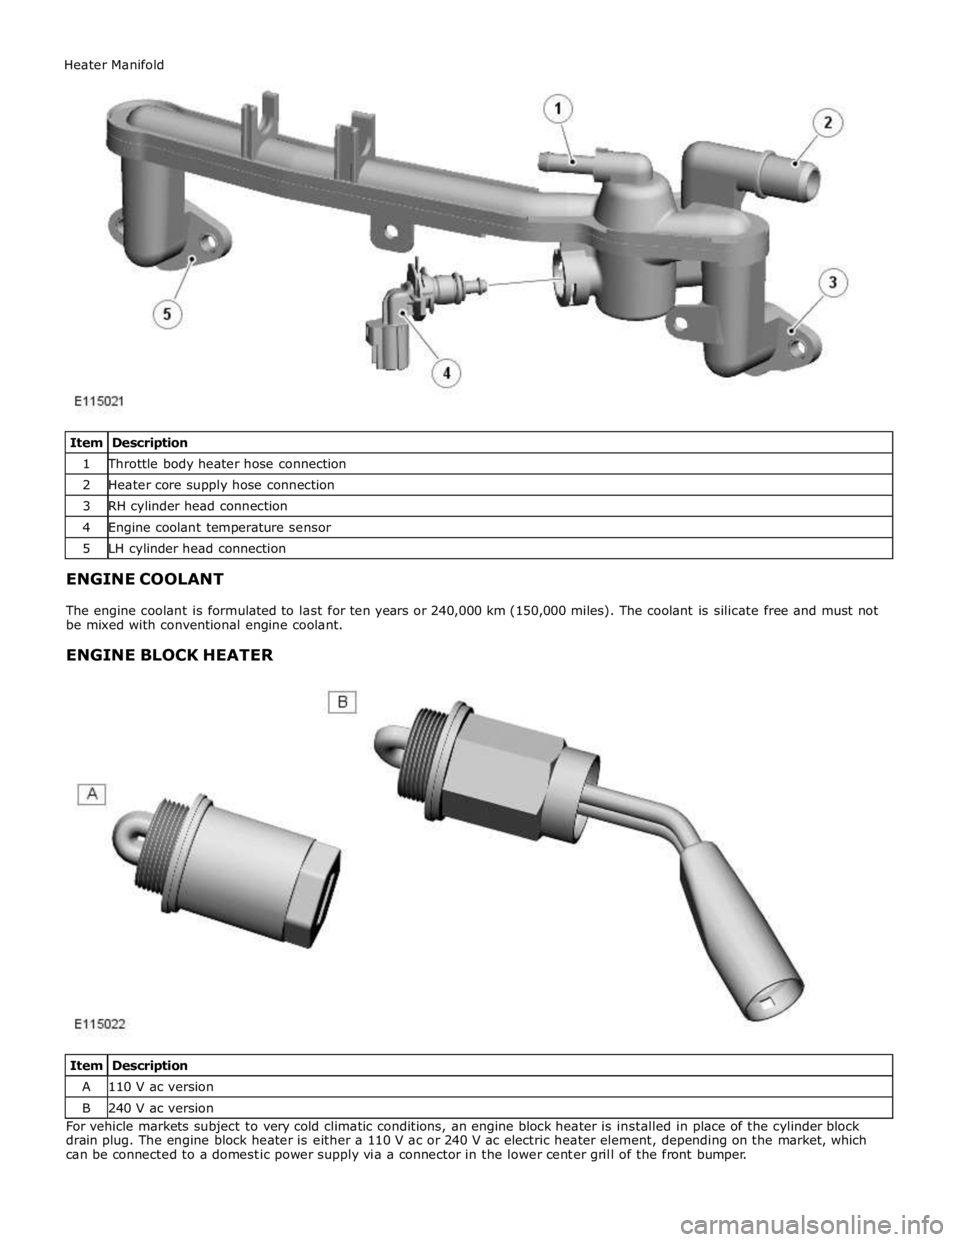
1 Throttle body heater hose connection 2 Heater core supply hose connection 3 RH cylinder head connection 4 Engine coolant temperature sensor 5 LH cylinder head connection
ENGINE COOLANT
The engine coolant is formulated to last for ten years or 240,000 km (150,000 miles). The coolant is silicate free and must not
be mixed with conventional engine coolant.
ENGINE BLOCK HEATER
Item Description A 110 V ac version B 240 V ac version For vehicle markets subject to very cold climatic conditions, an engine block heater is installed in place of the cylinder block
drain plug. The engine block heater is either a 110 V ac or 240 V ac electric heater element, depending on the market, which
can be connected to a domestic power supply via a connector in the lower center grill of the front bumper. Heater Manifold