wheel alignment JAGUAR XFR 2010 1.G Workshop Manual
[x] Cancel search | Manufacturer: JAGUAR, Model Year: 2010, Model line: XFR, Model: JAGUAR XFR 2010 1.GPages: 3039, PDF Size: 58.49 MB
Page 4 of 3039

Four-Wheel Alignment
Front Toe Adjustment (57.65.01)
Rear Toe Adjustment (57.65.08)
Front Wheel Bearing and Wheel Hub Runout Check
Rear Wheel Bearing and Wheel Hub Runout Check204-01: Front SuspensionSpecificationDescription and OperationComponent Location
Overview
System Operation and Component DescriptionDiagnosis and TestingFront SuspensionRemoval and InstallationFront Shock Absorber (60.30.04)
Front Lower Arm (60.35.53)
Rear Lower Arm (60.35.54)
Rear Lower Arm Bushing (60.40.12)
Shock Absorber Bushing (60.30.16) (60.30.23)
Front Stabilizer Bar - V8 5.0L Petrol/V8 S/C 5.0L Petrol
Front Stabilizer Bar Link (60.10.02)
Stabilizer Bar Link Bushing (60.10.03)
Upper Arm LH (60.35.41)
Upper Arm RH (60.35.42)
Front Wheel Bearing and Wheel Hub - TDV6 3.0L Diesel /V8 5.0L Petrol/V8 S/C 5.0L Petrol
Wheel Knuckle (60.25.23)
Front Lower Arm Bushing204-02: Rear SuspensionSpecificationDescription and OperationComponent Location
Overview
System Operation and Component DescriptionDiagnosis and TestingRear SuspensionRemoval and InstallationLower Arm (64.35.43)
Shock Absorber and Spring Assembly
Shock Absorber Lower Bushing (64.30.39)
Rear Stabilizer Bar (64.35.08)
Rear Wheel Bearing
Upper Arm
Page 109 of 3039
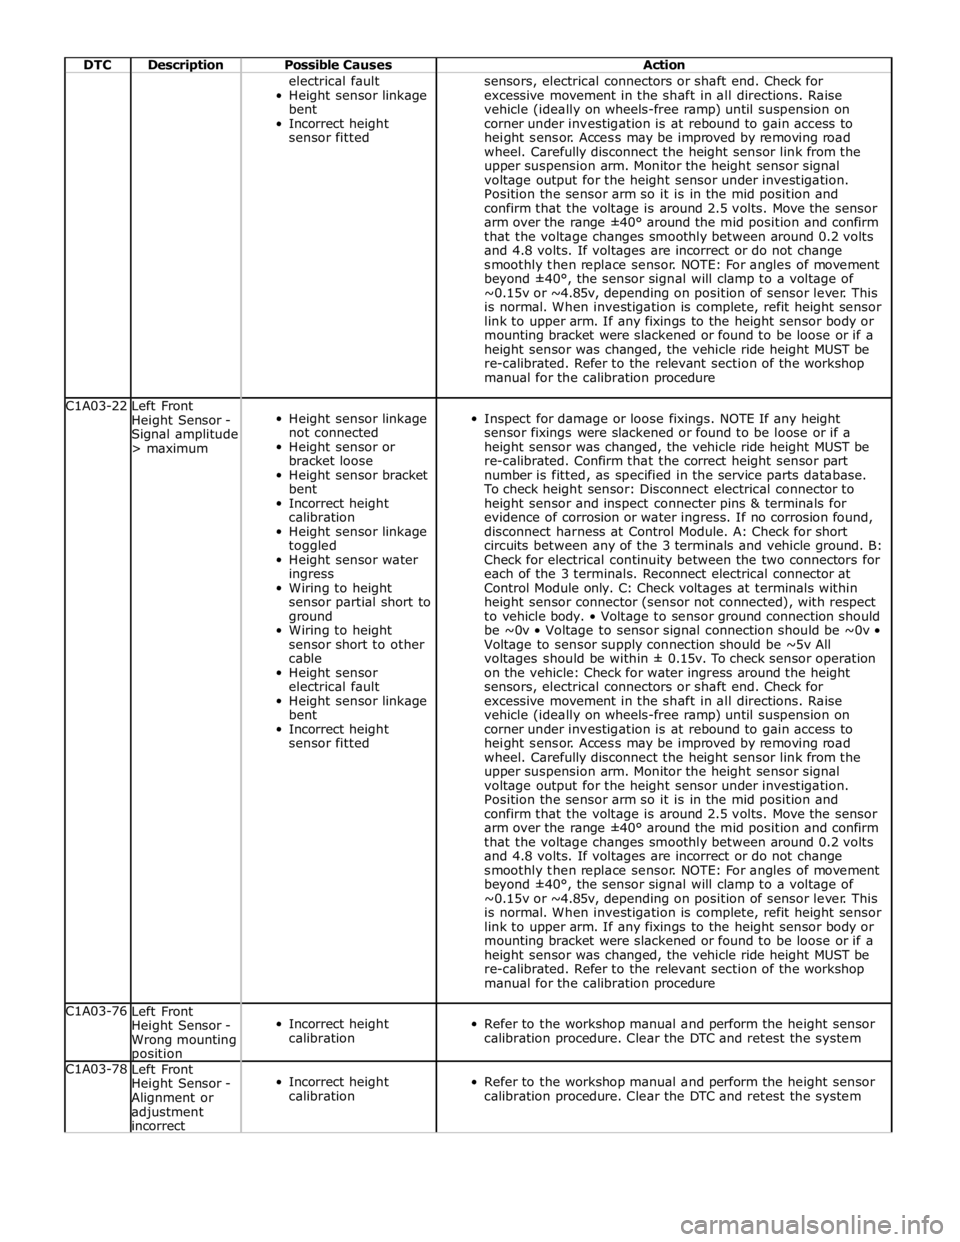
DTC Description Possible Causes Action electrical fault
Height sensor linkage
bent
Incorrect height
sensor fitted sensors, electrical connectors or shaft end. Check for
excessive movement in the shaft in all directions. Raise
vehicle (ideally on wheels-free ramp) until suspension on
corner under investigation is at rebound to gain access to
height sensor. Access may be improved by removing road
wheel. Carefully disconnect the height sensor link from the
upper suspension arm. Monitor the height sensor signal
voltage output for the height sensor under investigation.
Position the sensor arm so it is in the mid position and
confirm that the voltage is around 2.5 volts. Move the sensor
arm over the range ±40° around the mid position and confirm
that the voltage changes smoothly between around 0.2 volts
and 4.8 volts. If voltages are incorrect or do not change
smoothly then replace sensor. NOTE: For angles of movement
beyond ±40°, the sensor signal will clamp to a voltage of
~0.15v or ~4.85v, depending on position of sensor lever. This
is normal. When investigation is complete, refit height sensor
link to upper arm. If any fixings to the height sensor body or
mounting bracket were slackened or found to be loose or if a
height sensor was changed, the vehicle ride height MUST be
re-calibrated. Refer to the relevant section of the workshop
manual for the calibration procedure C1A03-22
Left Front
Height Sensor -
Signal amplitude
> maximum
Height sensor linkage
not connected
Height sensor or
bracket loose
Height sensor bracket
bent
Incorrect height
calibration
Height sensor linkage
toggled
Height sensor water
ingress
Wiring to height
sensor partial short to
ground
Wiring to height
sensor short to other
cable
Height sensor
electrical fault
Height sensor linkage
bent
Incorrect height
sensor fitted
Inspect for damage or loose fixings. NOTE If any height
sensor fixings were slackened or found to be loose or if a
height sensor was changed, the vehicle ride height MUST be
re-calibrated. Confirm that the correct height sensor part
number is fitted, as specified in the service parts database.
To check height sensor: Disconnect electrical connector to
height sensor and inspect connecter pins & terminals for
evidence of corrosion or water ingress. If no corrosion found,
disconnect harness at Control Module. A: Check for short
circuits between any of the 3 terminals and vehicle ground. B:
Check for electrical continuity between the two connectors for
each of the 3 terminals. Reconnect electrical connector at
Control Module only. C: Check voltages at terminals within
height sensor connector (sensor not connected), with respect
to vehicle body. • Voltage to sensor ground connection should
be ~0v • Voltage to sensor signal connection should be ~0v •
Voltage to sensor supply connection should be ~5v All
voltages should be within ± 0.15v. To check sensor operation
on the vehicle: Check for water ingress around the height
sensors, electrical connectors or shaft end. Check for
excessive movement in the shaft in all directions. Raise
vehicle (ideally on wheels-free ramp) until suspension on
corner under investigation is at rebound to gain access to
height sensor. Access may be improved by removing road
wheel. Carefully disconnect the height sensor link from the
upper suspension arm. Monitor the height sensor signal
voltage output for the height sensor under investigation.
Position the sensor arm so it is in the mid position and
confirm that the voltage is around 2.5 volts. Move the sensor
arm over the range ±40° around the mid position and confirm
that the voltage changes smoothly between around 0.2 volts
and 4.8 volts. If voltages are incorrect or do not change
smoothly then replace sensor. NOTE: For angles of movement
beyond ±40°, the sensor signal will clamp to a voltage of
~0.15v or ~4.85v, depending on position of sensor lever. This
is normal. When investigation is complete, refit height sensor
link to upper arm. If any fixings to the height sensor body or
mounting bracket were slackened or found to be loose or if a
height sensor was changed, the vehicle ride height MUST be
re-calibrated. Refer to the relevant section of the workshop
manual for the calibration procedure C1A03-76
Left Front
Height Sensor -
Wrong mounting position
Incorrect height
calibration
Refer to the workshop manual and perform the height sensor
calibration procedure. Clear the DTC and retest the system C1A03-78
Left Front
Height Sensor -
Alignment or
adjustment
incorrect
Incorrect height
calibration
Refer to the workshop manual and perform the height sensor
calibration procedure. Clear the DTC and retest the system
Page 111 of 3039
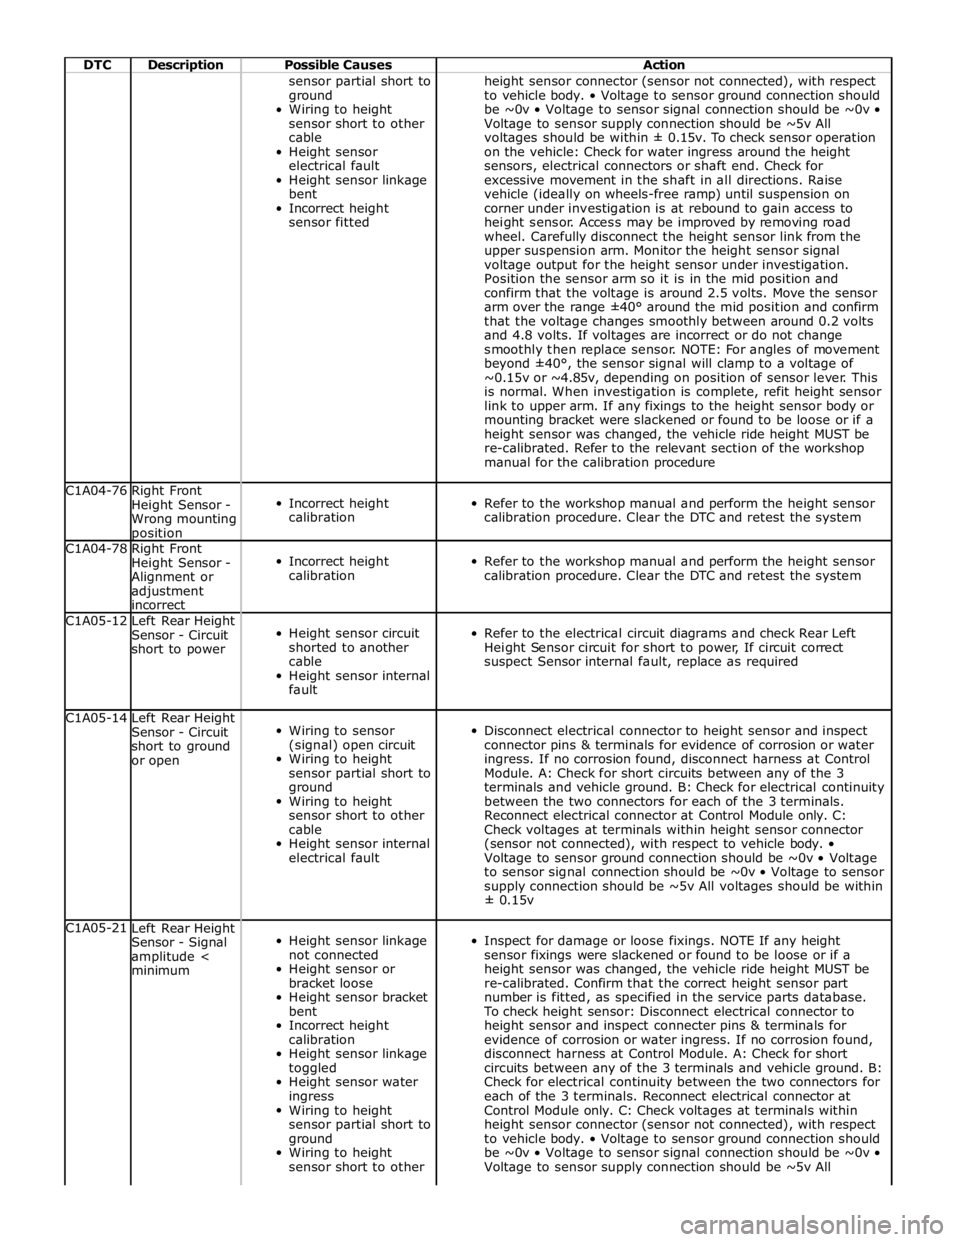
DTC Description Possible Causes Action sensor partial short to
ground
Wiring to height
sensor short to other
cable
Height sensor
electrical fault
Height sensor linkage
bent
Incorrect height
sensor fitted height sensor connector (sensor not connected), with respect
to vehicle body. • Voltage to sensor ground connection should
be ~0v • Voltage to sensor signal connection should be ~0v •
Voltage to sensor supply connection should be ~5v All
voltages should be within ± 0.15v. To check sensor operation
on the vehicle: Check for water ingress around the height
sensors, electrical connectors or shaft end. Check for
excessive movement in the shaft in all directions. Raise
vehicle (ideally on wheels-free ramp) until suspension on
corner under investigation is at rebound to gain access to
height sensor. Access may be improved by removing road
wheel. Carefully disconnect the height sensor link from the
upper suspension arm. Monitor the height sensor signal
voltage output for the height sensor under investigation.
Position the sensor arm so it is in the mid position and
confirm that the voltage is around 2.5 volts. Move the sensor
arm over the range ±40° around the mid position and confirm
that the voltage changes smoothly between around 0.2 volts
and 4.8 volts. If voltages are incorrect or do not change
smoothly then replace sensor. NOTE: For angles of movement
beyond ±40°, the sensor signal will clamp to a voltage of
~0.15v or ~4.85v, depending on position of sensor lever. This
is normal. When investigation is complete, refit height sensor
link to upper arm. If any fixings to the height sensor body or
mounting bracket were slackened or found to be loose or if a
height sensor was changed, the vehicle ride height MUST be
re-calibrated. Refer to the relevant section of the workshop
manual for the calibration procedure C1A04-76
Right Front
Height Sensor -
Wrong mounting position
Incorrect height
calibration
Refer to the workshop manual and perform the height sensor
calibration procedure. Clear the DTC and retest the system C1A04-78
Right Front
Height Sensor -
Alignment or
adjustment
incorrect
Incorrect height
calibration
Refer to the workshop manual and perform the height sensor
calibration procedure. Clear the DTC and retest the system C1A05-12
Left Rear Height
Sensor - Circuit
short to power
Height sensor circuit
shorted to another
cable
Height sensor internal
fault
Refer to the electrical circuit diagrams and check Rear Left
Height Sensor circuit for short to power, If circuit correct
suspect Sensor internal fault, replace as required C1A05-14
Left Rear Height
Sensor - Circuit
short to ground
or open
Wiring to sensor
(signal) open circuit
Wiring to height
sensor partial short to
ground
Wiring to height
sensor short to other
cable
Height sensor internal
electrical fault
Disconnect electrical connector to height sensor and inspect
connector pins & terminals for evidence of corrosion or water
ingress. If no corrosion found, disconnect harness at Control
Module. A: Check for short circuits between any of the 3
terminals and vehicle ground. B: Check for electrical continuity
between the two connectors for each of the 3 terminals.
Reconnect electrical connector at Control Module only. C:
Check voltages at terminals within height sensor connector
(sensor not connected), with respect to vehicle body. •
Voltage to sensor ground connection should be ~0v • Voltage
to sensor signal connection should be ~0v • Voltage to sensor
supply connection should be ~5v All voltages should be within
± 0.15v C1A05-21
Left Rear Height
Sensor - Signal
amplitude <
minimum
Height sensor linkage
not connected
Height sensor or
bracket loose
Height sensor bracket
bent
Incorrect height
calibration
Height sensor linkage
toggled
Height sensor water
ingress
Wiring to height
sensor partial short to
ground
Wiring to height
sensor short to other
Inspect for damage or loose fixings. NOTE If any height
sensor fixings were slackened or found to be loose or if a
height sensor was changed, the vehicle ride height MUST be
re-calibrated. Confirm that the correct height sensor part
number is fitted, as specified in the service parts database.
To check height sensor: Disconnect electrical connector to
height sensor and inspect connecter pins & terminals for
evidence of corrosion or water ingress. If no corrosion found,
disconnect harness at Control Module. A: Check for short
circuits between any of the 3 terminals and vehicle ground. B:
Check for electrical continuity between the two connectors for
each of the 3 terminals. Reconnect electrical connector at
Control Module only. C: Check voltages at terminals within
height sensor connector (sensor not connected), with respect
to vehicle body. • Voltage to sensor ground connection should
be ~0v • Voltage to sensor signal connection should be ~0v •
Voltage to sensor supply connection should be ~5v All
Page 112 of 3039
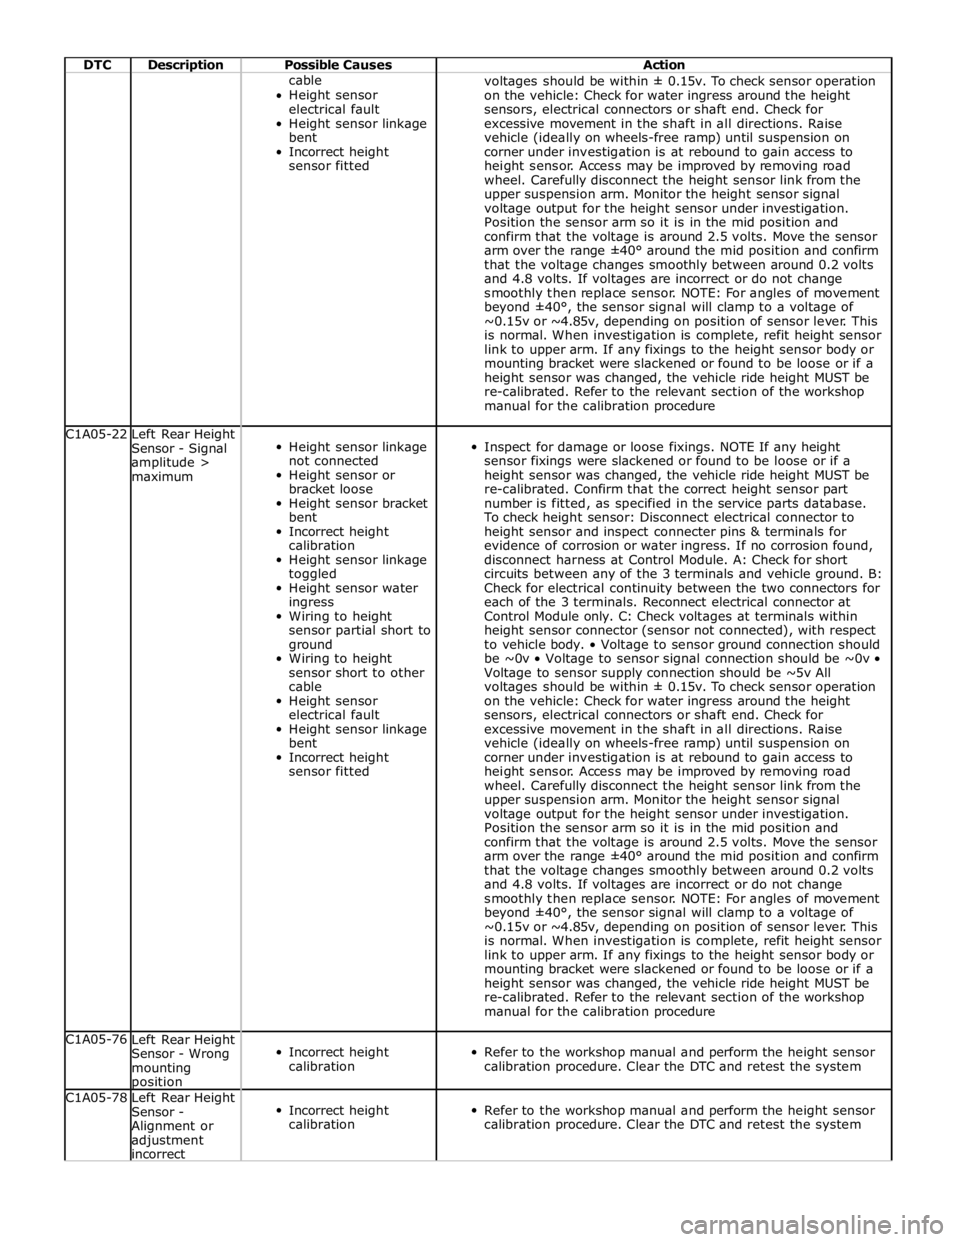
DTC Description Possible Causes Action cable
Height sensor
electrical fault
Height sensor linkage
bent
Incorrect height
sensor fitted voltages should be within ± 0.15v. To check sensor operation
on the vehicle: Check for water ingress around the height
sensors, electrical connectors or shaft end. Check for
excessive movement in the shaft in all directions. Raise
vehicle (ideally on wheels-free ramp) until suspension on
corner under investigation is at rebound to gain access to
height sensor. Access may be improved by removing road
wheel. Carefully disconnect the height sensor link from the
upper suspension arm. Monitor the height sensor signal
voltage output for the height sensor under investigation.
Position the sensor arm so it is in the mid position and
confirm that the voltage is around 2.5 volts. Move the sensor
arm over the range ±40° around the mid position and confirm
that the voltage changes smoothly between around 0.2 volts
and 4.8 volts. If voltages are incorrect or do not change
smoothly then replace sensor. NOTE: For angles of movement
beyond ±40°, the sensor signal will clamp to a voltage of
~0.15v or ~4.85v, depending on position of sensor lever. This
is normal. When investigation is complete, refit height sensor
link to upper arm. If any fixings to the height sensor body or
mounting bracket were slackened or found to be loose or if a
height sensor was changed, the vehicle ride height MUST be
re-calibrated. Refer to the relevant section of the workshop
manual for the calibration procedure C1A05-22
Left Rear Height
Sensor - Signal
amplitude >
maximum
Height sensor linkage
not connected
Height sensor or
bracket loose
Height sensor bracket
bent
Incorrect height
calibration
Height sensor linkage
toggled
Height sensor water
ingress
Wiring to height
sensor partial short to
ground
Wiring to height
sensor short to other
cable
Height sensor
electrical fault
Height sensor linkage
bent
Incorrect height
sensor fitted
Inspect for damage or loose fixings. NOTE If any height
sensor fixings were slackened or found to be loose or if a
height sensor was changed, the vehicle ride height MUST be
re-calibrated. Confirm that the correct height sensor part
number is fitted, as specified in the service parts database.
To check height sensor: Disconnect electrical connector to
height sensor and inspect connecter pins & terminals for
evidence of corrosion or water ingress. If no corrosion found,
disconnect harness at Control Module. A: Check for short
circuits between any of the 3 terminals and vehicle ground. B:
Check for electrical continuity between the two connectors for
each of the 3 terminals. Reconnect electrical connector at
Control Module only. C: Check voltages at terminals within
height sensor connector (sensor not connected), with respect
to vehicle body. • Voltage to sensor ground connection should
be ~0v • Voltage to sensor signal connection should be ~0v •
Voltage to sensor supply connection should be ~5v All
voltages should be within ± 0.15v. To check sensor operation
on the vehicle: Check for water ingress around the height
sensors, electrical connectors or shaft end. Check for
excessive movement in the shaft in all directions. Raise
vehicle (ideally on wheels-free ramp) until suspension on
corner under investigation is at rebound to gain access to
height sensor. Access may be improved by removing road
wheel. Carefully disconnect the height sensor link from the
upper suspension arm. Monitor the height sensor signal
voltage output for the height sensor under investigation.
Position the sensor arm so it is in the mid position and
confirm that the voltage is around 2.5 volts. Move the sensor
arm over the range ±40° around the mid position and confirm
that the voltage changes smoothly between around 0.2 volts
and 4.8 volts. If voltages are incorrect or do not change
smoothly then replace sensor. NOTE: For angles of movement
beyond ±40°, the sensor signal will clamp to a voltage of
~0.15v or ~4.85v, depending on position of sensor lever. This
is normal. When investigation is complete, refit height sensor
link to upper arm. If any fixings to the height sensor body or
mounting bracket were slackened or found to be loose or if a
height sensor was changed, the vehicle ride height MUST be
re-calibrated. Refer to the relevant section of the workshop
manual for the calibration procedure C1A05-76
Left Rear Height
Sensor - Wrong
mounting position
Incorrect height
calibration
Refer to the workshop manual and perform the height sensor
calibration procedure. Clear the DTC and retest the system C1A05-78
Left Rear Height
Sensor -
Alignment or
adjustment
incorrect
Incorrect height
calibration
Refer to the workshop manual and perform the height sensor
calibration procedure. Clear the DTC and retest the system
Page 114 of 3039
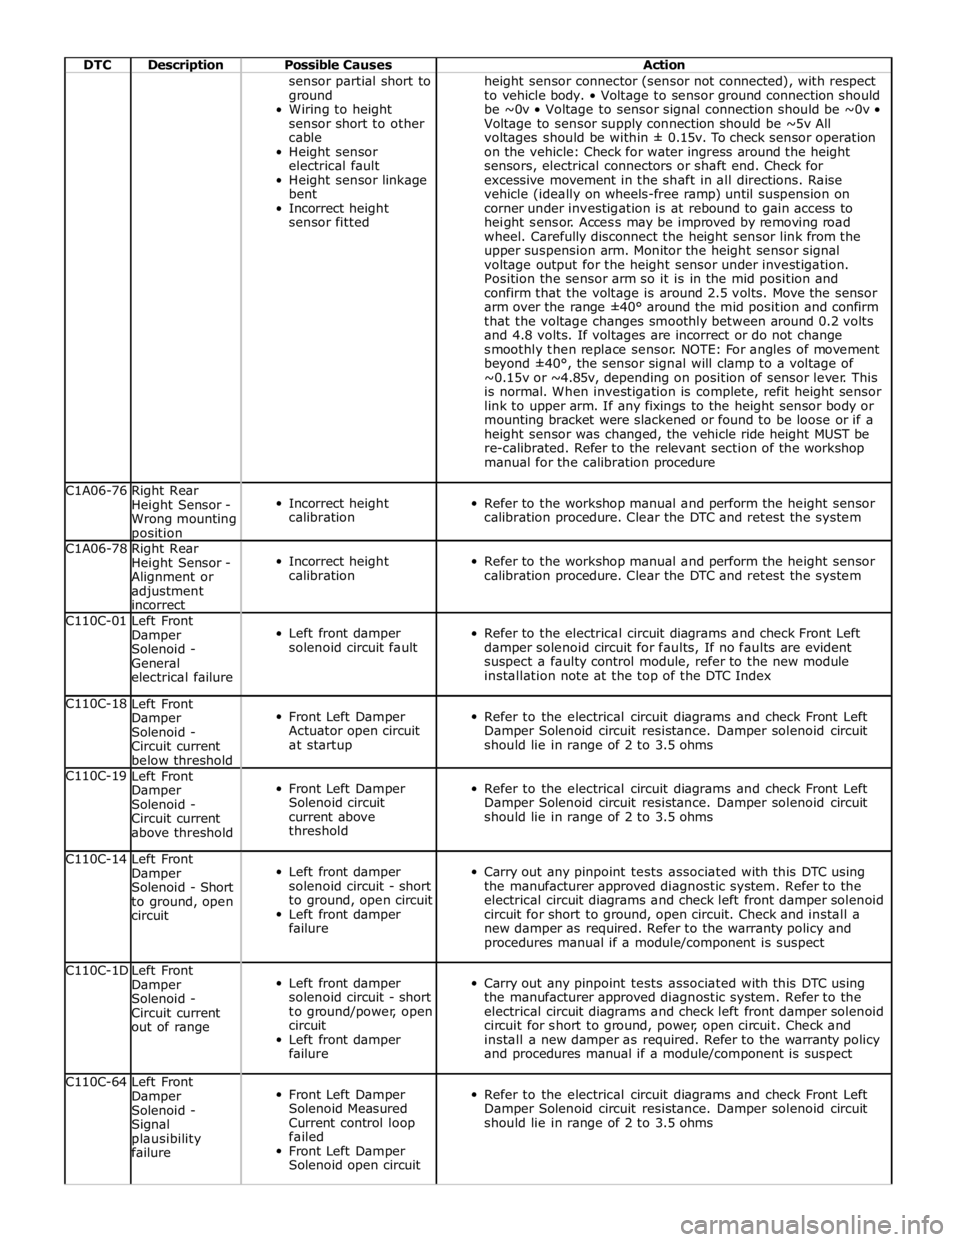
DTC Description Possible Causes Action sensor partial short to
ground
Wiring to height
sensor short to other
cable
Height sensor
electrical fault
Height sensor linkage
bent
Incorrect height
sensor fitted height sensor connector (sensor not connected), with respect
to vehicle body. • Voltage to sensor ground connection should
be ~0v • Voltage to sensor signal connection should be ~0v •
Voltage to sensor supply connection should be ~5v All
voltages should be within ± 0.15v. To check sensor operation
on the vehicle: Check for water ingress around the height
sensors, electrical connectors or shaft end. Check for
excessive movement in the shaft in all directions. Raise
vehicle (ideally on wheels-free ramp) until suspension on
corner under investigation is at rebound to gain access to
height sensor. Access may be improved by removing road
wheel. Carefully disconnect the height sensor link from the
upper suspension arm. Monitor the height sensor signal
voltage output for the height sensor under investigation.
Position the sensor arm so it is in the mid position and
confirm that the voltage is around 2.5 volts. Move the sensor
arm over the range ±40° around the mid position and confirm
that the voltage changes smoothly between around 0.2 volts
and 4.8 volts. If voltages are incorrect or do not change
smoothly then replace sensor. NOTE: For angles of movement
beyond ±40°, the sensor signal will clamp to a voltage of
~0.15v or ~4.85v, depending on position of sensor lever. This
is normal. When investigation is complete, refit height sensor
link to upper arm. If any fixings to the height sensor body or
mounting bracket were slackened or found to be loose or if a
height sensor was changed, the vehicle ride height MUST be
re-calibrated. Refer to the relevant section of the workshop
manual for the calibration procedure C1A06-76
Right Rear
Height Sensor -
Wrong mounting position
Incorrect height
calibration
Refer to the workshop manual and perform the height sensor
calibration procedure. Clear the DTC and retest the system C1A06-78
Right Rear
Height Sensor -
Alignment or
adjustment
incorrect
Incorrect height
calibration
Refer to the workshop manual and perform the height sensor
calibration procedure. Clear the DTC and retest the system C110C-01
Left Front
Damper
Solenoid -
General
electrical failure
Left front damper
solenoid circuit fault
Refer to the electrical circuit diagrams and check Front Left
damper solenoid circuit for faults, If no faults are evident
suspect a faulty control module, refer to the new module
installation note at the top of the DTC Index C110C-18
Left Front
Damper
Solenoid -
Circuit current
below threshold
Front Left Damper
Actuator open circuit
at startup
Refer to the electrical circuit diagrams and check Front Left
Damper Solenoid circuit resistance. Damper solenoid circuit
should lie in range of 2 to 3.5 ohms C110C-19
Left Front
Damper
Solenoid -
Circuit current
above threshold
Front Left Damper
Solenoid circuit
current above
threshold
Refer to the electrical circuit diagrams and check Front Left
Damper Solenoid circuit resistance. Damper solenoid circuit
should lie in range of 2 to 3.5 ohms C110C-14
Left Front
Damper
Solenoid - Short
to ground, open
circuit
Left front damper
solenoid circuit - short
to ground, open circuit
Left front damper
failure
Carry out any pinpoint tests associated with this DTC using
the manufacturer approved diagnostic system. Refer to the
electrical circuit diagrams and check left front damper solenoid
circuit for short to ground, open circuit. Check and install a
new damper as required. Refer to the warranty policy and
procedures manual if a module/component is suspect C110C-1D
Left Front
Damper
Solenoid -
Circuit current
out of range
Left front damper
solenoid circuit - short
to ground/power, open
circuit
Left front damper
failure
Carry out any pinpoint tests associated with this DTC using
the manufacturer approved diagnostic system. Refer to the
electrical circuit diagrams and check left front damper solenoid
circuit for short to ground, power, open circuit. Check and
install a new damper as required. Refer to the warranty policy
and procedures manual if a module/component is suspect C110C-64
Left Front
Damper
Solenoid -
Signal
plausibility
failure
Front Left Damper
Solenoid Measured
Current control loop
failed
Front Left Damper
Solenoid open circuit
Refer to the electrical circuit diagrams and check Front Left
Damper Solenoid circuit resistance. Damper solenoid circuit
should lie in range of 2 to 3.5 ohms
Page 300 of 3039
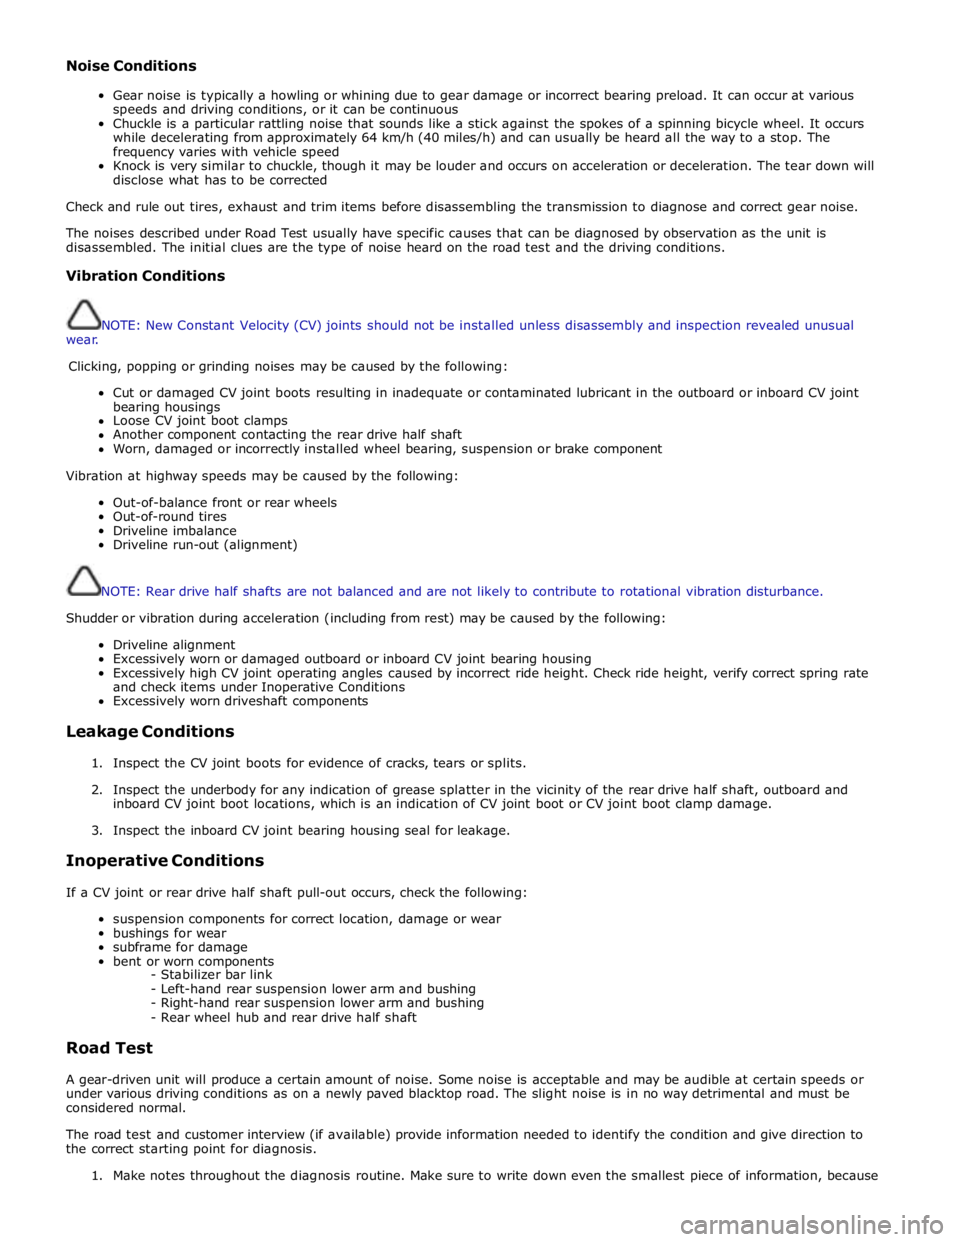
Noise Conditions
Gear noise is typically a howling or whining due to gear damage or incorrect bearing preload. It can occur at various
speeds and driving conditions, or it can be continuous
Chuckle is a particular rattling noise that sounds like a stick against the spokes of a spinning bicycle wheel. It occurs
while decelerating from approximately 64 km/h (40 miles/h) and can usually be heard all the way to a stop. The
frequency varies with vehicle speed
Knock is very similar to chuckle, though it may be louder and occurs on acceleration or deceleration. The tear down will
disclose what has to be corrected
Check and rule out tires, exhaust and trim items before disassembling the transmission to diagnose and correct gear noise.
The noises described under Road Test usually have specific causes that can be diagnosed by observation as the unit is
disassembled. The initial clues are the type of noise heard on the road test and the driving conditions.
Vibration Conditions
wear. NOTE: New Constant Velocity (CV) joints should not be installed unless disassembly and inspection revealed unusual
Clicking, popping or grinding noises may be caused by the following:
Cut or damaged CV joint boots resulting in inadequate or contaminated lubricant in the outboard or inboard CV joint
bearing housings
Loose CV joint boot clamps
Another component contacting the rear drive half shaft
Worn, damaged or incorrectly installed wheel bearing, suspension or brake component
Vibration at highway speeds may be caused by the following:
Out-of-balance front or rear wheels
Out-of-round tires
Driveline imbalance
Driveline run-out (alignment)
NOTE: Rear drive half shafts are not balanced and are not likely to contribute to rotational vibration disturbance.
Shudder or vibration during acceleration (including from rest) may be caused by the following:
Driveline alignment
Excessively worn or damaged outboard or inboard CV joint bearing housing
Excessively high CV joint operating angles caused by incorrect ride height. Check ride height, verify correct spring rate
and check items under Inoperative Conditions
Excessively worn driveshaft components
Leakage Conditions
1. Inspect the CV joint boots for evidence of cracks, tears or splits.
2. Inspect the underbody for any indication of grease splatter in the vicinity of the rear drive half shaft, outboard and
inboard CV joint boot locations, which is an indication of CV joint boot or CV joint boot clamp damage.
3. Inspect the inboard CV joint bearing housing seal for leakage.
Inoperative Conditions
If a CV joint or rear drive half shaft pull-out occurs, check the following:
suspension components for correct location, damage or wear
bushings for wear
subframe for damage
bent or worn components
- Stabilizer bar link
- Left-hand rear suspension lower arm and bushing
- Right-hand rear suspension lower arm and bushing
- Rear wheel hub and rear drive half shaft
Road Test
A gear-driven unit will produce a certain amount of noise. Some noise is acceptable and may be audible at certain speeds or
under various driving conditions as on a newly paved blacktop road. The slight noise is in no way detrimental and must be
considered normal.
The road test and customer interview (if available) provide information needed to identify the condition and give direction to
the correct starting point for diagnosis.
1. Make notes throughout the diagnosis routine. Make sure to write down even the smallest piece of information, because
Page 306 of 3039
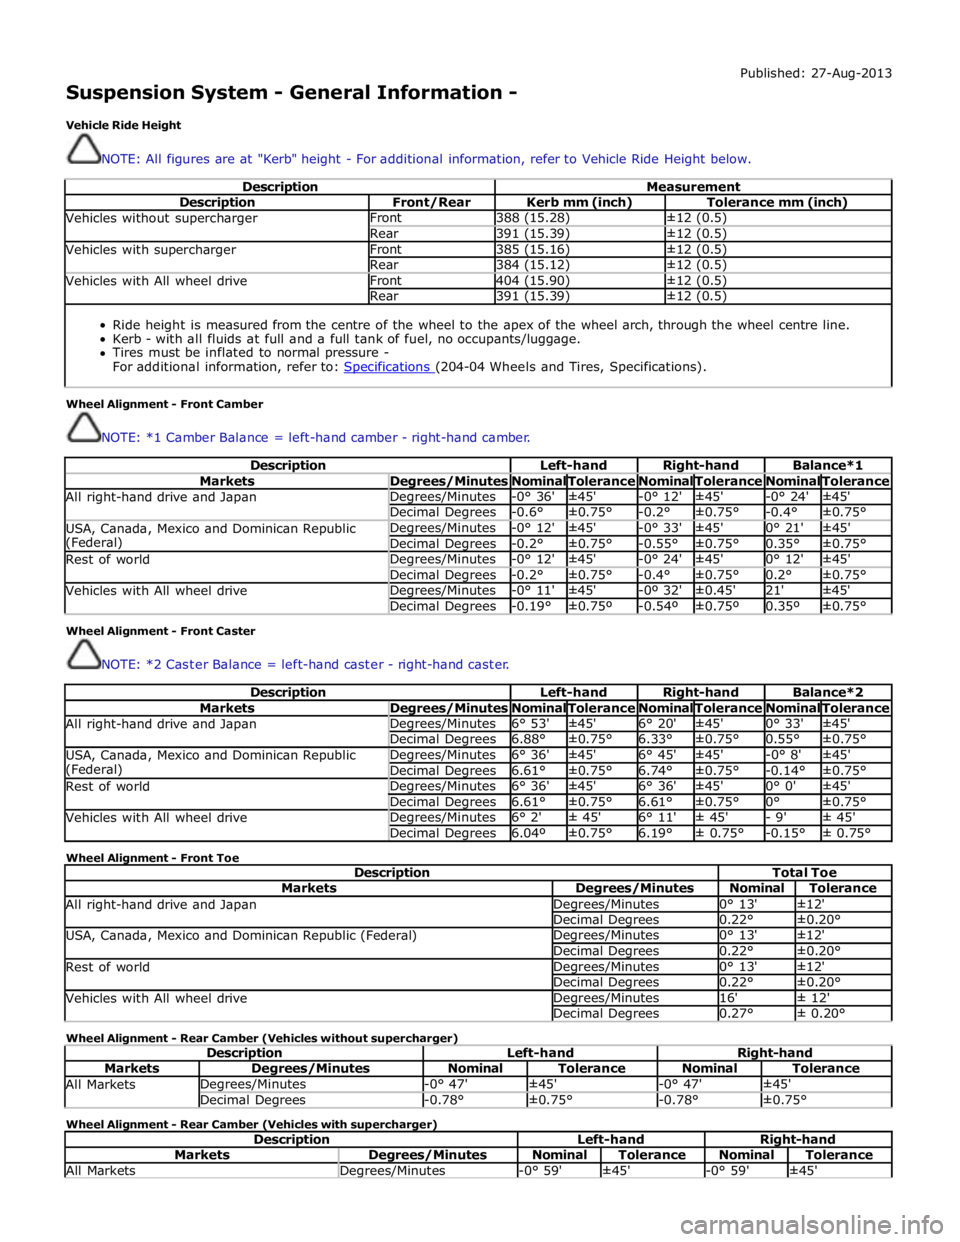
Suspension System - General Information -
Vehicle Ride Height Published: 27-Aug-2013
NOTE: All figures are at "Kerb" height - For additional information, refer to Vehicle Ride Height below.
Description Measurement Description Front/Rear Kerb mm (inch) Tolerance mm (inch) Vehicles without supercharger Front 388 (15.28) ±12 (0.5) Rear 391 (15.39) ±12 (0.5) Vehicles with supercharger Front 385 (15.16) ±12 (0.5) Rear 384 (15.12) ±12 (0.5) Vehicles with All wheel drive Front 404 (15.90) ±12 (0.5) Rear 391 (15.39) ±12 (0.5)
Ride height is measured from the centre of the wheel to the apex of the wheel arch, through the wheel centre line.
Kerb - with all fluids at full and a full tank of fuel, no occupants/luggage.
Tires must be inflated to normal pressure -
For additional information, refer to: Specifications (204-04 Wheels and Tires, Specifications). Wheel Alignment - Front Camber
NOTE: *1 Camber Balance = left-hand camber - right-hand camber.
Description Left-hand Right-hand Balance*1 Markets Degrees/Minutes Nominal Tolerance Nominal Tolerance Nominal Tolerance All right-hand drive and Japan Degrees/Minutes -0° 36' ±45' -0° 12' ±45' -0° 24' ±45' Decimal Degrees -0.6° ±0.75° -0.2° ±0.75° -0.4° ±0.75° USA, Canada, Mexico and Dominican Republic
(Federal) Degrees/Minutes -0° 12' ±45' -0° 33' ±45' 0° 21' ±45' Decimal Degrees -0.2° ±0.75° -0.55° ±0.75° 0.35° ±0.75° Rest of world Degrees/Minutes -0° 12' ±45' -0° 24' ±45' 0° 12' ±45' Decimal Degrees -0.2° ±0.75° -0.4° ±0.75° 0.2° ±0.75° Vehicles with All wheel drive Degrees/Minutes -0° 11' ±45' -0º 32' ±0.45' 21' ±45' Decimal Degrees -0.19° ±0.75º -0.54º ±0.75º 0.35º ±0.75° Wheel Alignment - Front Caster
NOTE: *2 Caster Balance = left-hand caster - right-hand caster.
Description Left-hand Right-hand Balance*2 Markets Degrees/Minutes Nominal Tolerance Nominal Tolerance Nominal Tolerance All right-hand drive and Japan Degrees/Minutes 6° 53' ±45' 6° 20' ±45' 0° 33' ±45' Decimal Degrees 6.88° ±0.75° 6.33° ±0.75° 0.55° ±0.75° USA, Canada, Mexico and Dominican Republic
(Federal) Degrees/Minutes 6° 36' ±45' 6° 45' ±45' -0° 8' ±45' Decimal Degrees 6.61° ±0.75° 6.74° ±0.75° -0.14° ±0.75° Rest of world Degrees/Minutes 6° 36' ±45' 6° 36' ±45' 0° 0' ±45' Decimal Degrees 6.61° ±0.75° 6.61° ±0.75° 0° ±0.75° Vehicles with All wheel drive Degrees/Minutes 6° 2' ± 45' 6° 11' ± 45' - 9' ± 45' Decimal Degrees 6.04º ±0.75° 6.19° ± 0.75° -0.15° ± 0.75° Wheel Alignment - Front Toe
Description Total Toe Markets Degrees/Minutes Nominal Tolerance All right-hand drive and Japan Degrees/Minutes 0° 13' ±12' Decimal Degrees 0.22° ±0.20° USA, Canada, Mexico and Dominican Republic (Federal) Degrees/Minutes 0° 13' ±12' Decimal Degrees 0.22° ±0.20° Rest of world Degrees/Minutes 0° 13' ±12' Decimal Degrees 0.22° ±0.20° Vehicles with All wheel drive Degrees/Minutes 16' ± 12' Decimal Degrees 0.27° ± 0.20° Wheel Alignment - Rear Camber (Vehicles without supercharger)
Description Left-hand Right-hand Markets Degrees/Minutes Nominal Tolerance Nominal Tolerance All Markets Degrees/Minutes -0° 47' ±45' -0° 47' ±45' Decimal Degrees -0.78° ±0.75° -0.78° ±0.75° Wheel Alignment - Rear Camber (Vehicles with supercharger)
Description Left-hand Right-hand Markets Degrees/Minutes Nominal Tolerance Nominal Tolerance All Markets Degrees/Minutes -0° 59' ±45' -0° 59' ±45'
Page 307 of 3039
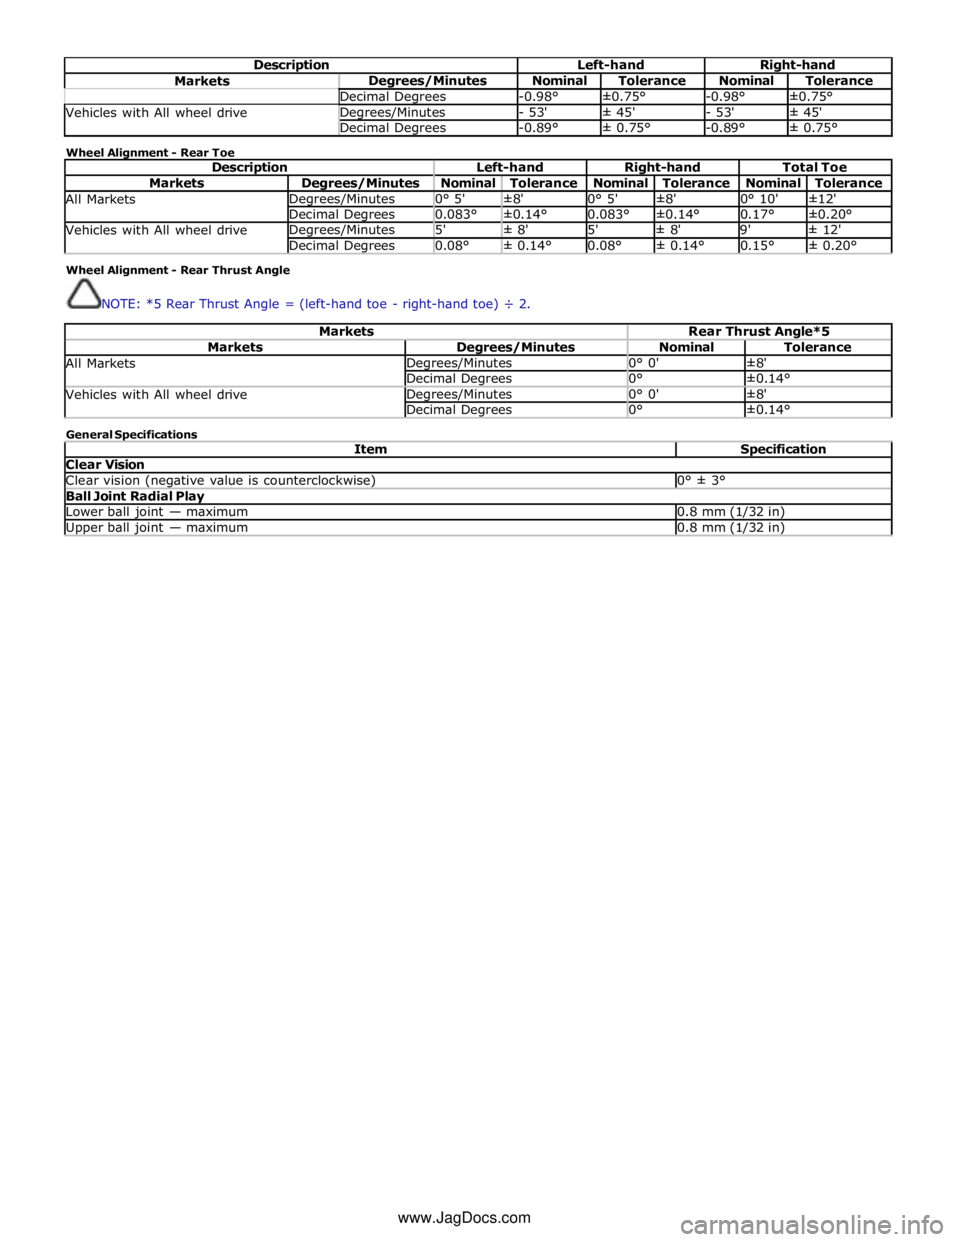
Description Left-hand Right-hand Markets Degrees/Minutes Nominal Tolerance Nominal Tolerance Decimal Degrees -0.98° ±0.75° -0.98° ±0.75° Vehicles with All wheel drive Degrees/Minutes - 53' ± 45' - 53' ± 45' Decimal Degrees -0.89° ± 0.75° -0.89° ± 0.75° Wheel Alignment - Rear Toe
Description Left-hand Right-hand Total Toe Markets Degrees/Minutes Nominal Tolerance Nominal Tolerance Nominal Tolerance All Markets Degrees/Minutes 0° 5' ±8' 0° 5' ±8' 0° 10' ±12' Decimal Degrees 0.083° ±0.14° 0.083° ±0.14° 0.17° ±0.20° Vehicles with All wheel drive Degrees/Minutes 5' ± 8' 5' ± 8' 9' ± 12' Decimal Degrees 0.08° ± 0.14° 0.08° ± 0.14° 0.15° ± 0.20° Wheel Alignment - Rear Thrust Angle
NOTE: *5 Rear Thrust Angle = (left-hand toe - right-hand toe) ÷ 2.
Markets Rear Thrust Angle*5 Markets Degrees/Minutes Nominal Tolerance All Markets Degrees/Minutes 0° 0' ±8' Decimal Degrees 0° ±0.14° Vehicles with All wheel drive Degrees/Minutes 0° 0' ±8' Decimal Degrees 0° ±0.14° General Specifications
Item Specification Clear Vision Clear vision (negative value is counterclockwise) 0° ± 3° Ball Joint Radial Play Lower ball joint — maximum 0.8 mm (1/32 in) Upper ball joint — maximum 0.8 mm (1/32 in) www.JagDocs.com
Page 308 of 3039
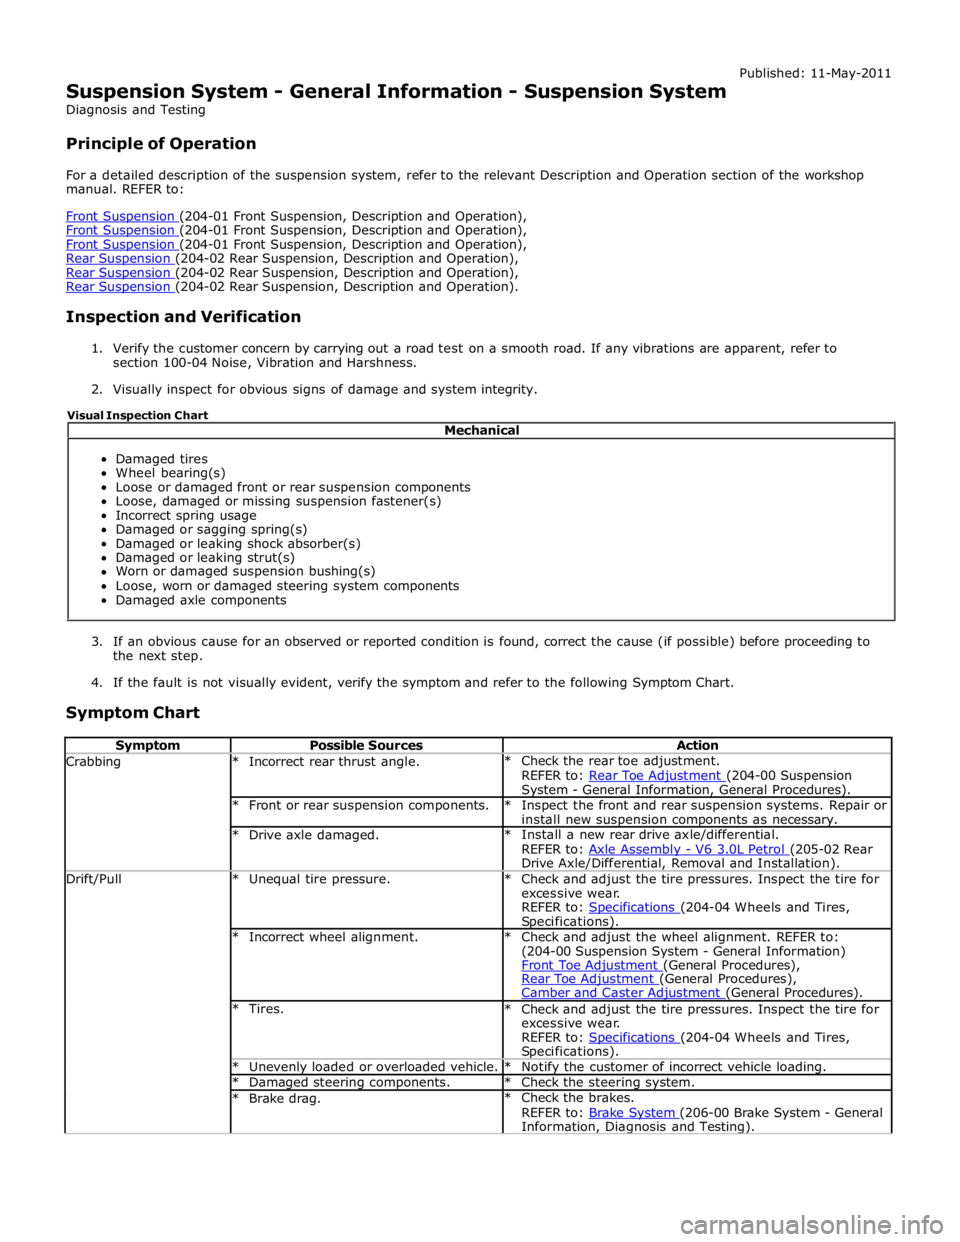
Front Suspension (204-01 Front Suspension, Description and Operation), Front Suspension (204-01 Front Suspension, Description and Operation), Rear Suspension (204-02 Rear Suspension, Description and Operation), Rear Suspension (204-02 Rear Suspension, Description and Operation), Rear Suspension (204-02 Rear Suspension, Description and Operation).
Inspection and Verification
1. Verify the customer concern by carrying out a road test on a smooth road. If any vibrations are apparent, refer to
section 100-04 Noise, Vibration and Harshness.
2. Visually inspect for obvious signs of damage and system integrity.
3. If an obvious cause for an observed or reported condition is found, correct the cause (if possible) before proceeding to
the next step.
4. If the fault is not visually evident, verify the symptom and refer to the following Symptom Chart.
Symptom Chart
Symptom Possible Sources Action Crabbing * Incorrect rear thrust angle. * Check the rear toe adjustment.
REFER to: Rear Toe Adjustment (204-00 Suspension System - General Information, General Procedures). * Front or rear suspension components.
* Inspect the front and rear suspension systems. Repair or
install new suspension components as necessary. * Drive axle damaged. * Install a new rear drive axle/differential.
REFER to: Axle Assembly - V6 3.0L Petrol (205-02 Rear Drive Axle/Differential, Removal and Installation). Drift/Pull * Unequal tire pressure.
* Check and adjust the tire pressures. Inspect the tire for
excessive wear.
REFER to: Specifications (204-04 Wheels and Tires, Specifications). * Incorrect wheel alignment.
* Check and adjust the wheel alignment. REFER to:
(204-00 Suspension System - General Information)
Front Toe Adjustment (General Procedures), Rear Toe Adjustment (General Procedures), Camber and Caster Adjustment (General Procedures). * Tires.
* Check and adjust the tire pressures. Inspect the tire for
excessive wear.
REFER to: Specifications (204-04 Wheels and Tires, Specifications). * Unevenly loaded or overloaded vehicle. * Notify the customer of incorrect vehicle loading. * Damaged steering components. * Check the steering system. * Brake drag. * Check the brakes.
REFER to: Brake System (206-00 Brake System - General Information, Diagnosis and Testing). Mechanical
Damaged tires
Wheel bearing(s)
Loose or damaged front or rear suspension components
Loose, damaged or missing suspension fastener(s)
Incorrect spring usage
Damaged or sagging spring(s)
Damaged or leaking shock absorber(s)
Damaged or leaking strut(s)
Worn or damaged suspension bushing(s)
Loose, worn or damaged steering system components
Damaged axle components Visual Inspection Chart
Page 309 of 3039
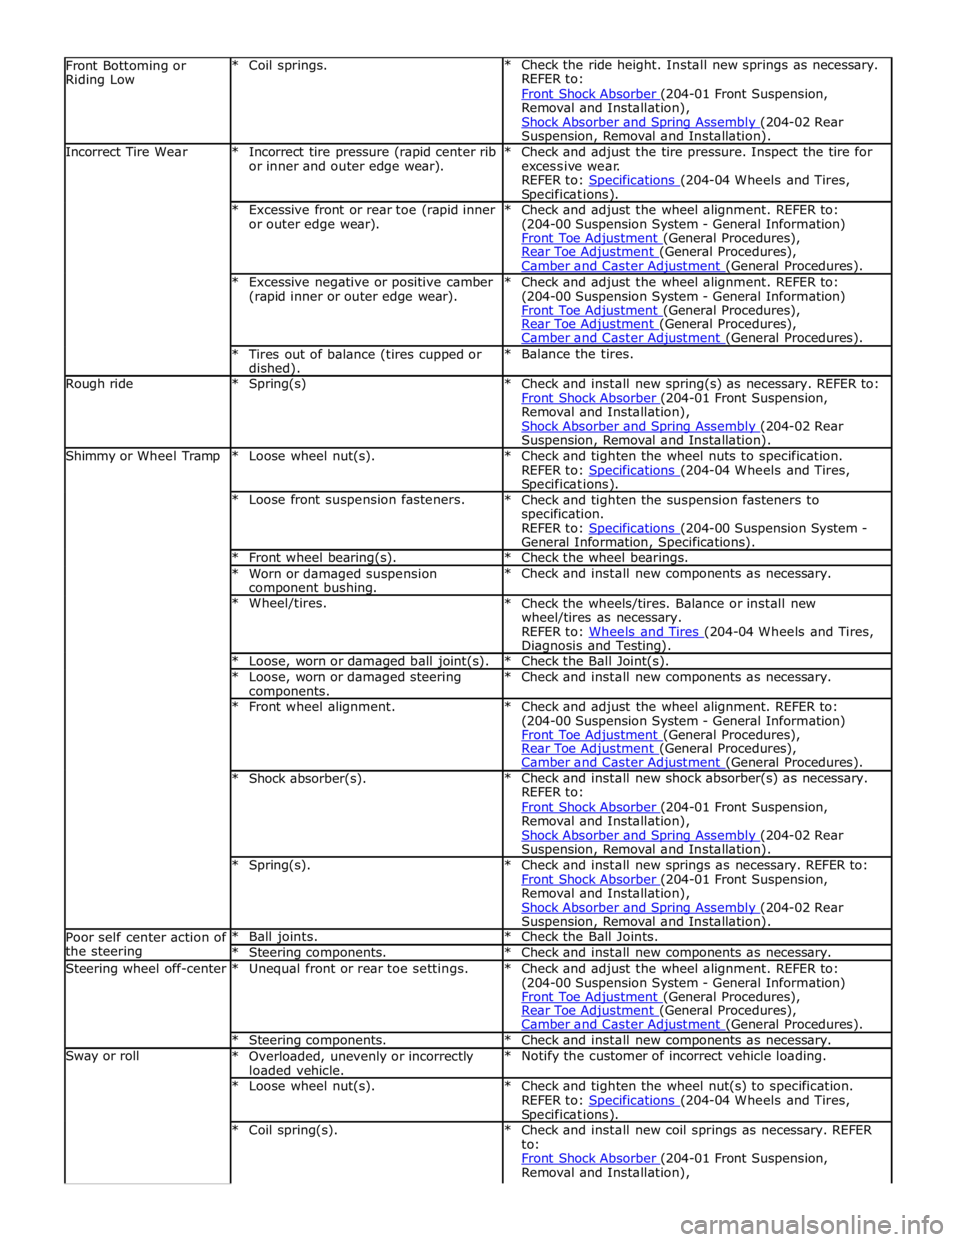
Removal and Installation),
Shock Absorber and Spring Assembly (204-02 Rear Suspension, Removal and Installation). Incorrect Tire Wear
* Incorrect tire pressure (rapid center rib
or inner and outer edge wear). * Check and adjust the tire pressure. Inspect the tire for
excessive wear.
REFER to: Specifications (204-04 Wheels and Tires, Specifications). * Excessive front or rear toe (rapid inner
or outer edge wear). * Check and adjust the wheel alignment. REFER to:
(204-00 Suspension System - General Information)
Front Toe Adjustment (General Procedures), Rear Toe Adjustment (General Procedures), Camber and Caster Adjustment (General Procedures). * Excessive negative or positive camber
(rapid inner or outer edge wear). * Check and adjust the wheel alignment. REFER to:
(204-00 Suspension System - General Information)
Front Toe Adjustment (General Procedures), Rear Toe Adjustment (General Procedures), Camber and Caster Adjustment (General Procedures). * Tires out of balance (tires cupped or dished). * Balance the tires. Rough ride * Spring(s)
* Check and install new spring(s) as necessary. REFER to:
Front Shock Absorber (204-01 Front Suspension, Removal and Installation),
Shock Absorber and Spring Assembly (204-02 Rear Suspension, Removal and Installation). Shimmy or Wheel Tramp * Loose wheel nut(s).
* Check and tighten the wheel nuts to specification.
REFER to: Specifications (204-04 Wheels and Tires, Specifications). * Loose front suspension fasteners.
* Check and tighten the suspension fasteners to
specification.
REFER to: Specifications (204-00 Suspension System - General Information, Specifications). * Front wheel bearing(s). * Check the wheel bearings. * Worn or damaged suspension component bushing. * Check and install new components as necessary. * Wheel/tires.
* Check the wheels/tires. Balance or install new
wheel/tires as necessary.
REFER to: Wheels and Tires (204-04 Wheels and Tires, Diagnosis and Testing). * Loose, worn or damaged ball joint(s). * Check the Ball Joint(s). * Loose, worn or damaged steering components. * Check and install new components as necessary. * Front wheel alignment.
* Check and adjust the wheel alignment. REFER to:
(204-00 Suspension System - General Information)
Front Toe Adjustment (General Procedures), Rear Toe Adjustment (General Procedures), Camber and Caster Adjustment (General Procedures). * Shock absorber(s). * Check and install new shock absorber(s) as necessary.
REFER to:
Front Shock Absorber (204-01 Front Suspension, Removal and Installation),
Shock Absorber and Spring Assembly (204-02 Rear Suspension, Removal and Installation). * Spring(s).
* Check and install new springs as necessary. REFER to:
Front Shock Absorber (204-01 Front Suspension, Removal and Installation),
Shock Absorber and Spring Assembly (204-02 Rear Suspension, Removal and Installation). Poor self center action of
the steering * Ball joints. * Check the Ball Joints. * Steering components. * Check and install new components as necessary. Steering wheel off-center * Unequal front or rear toe settings.
* Check and adjust the wheel alignment. REFER to:
(204-00 Suspension System - General Information)
Front Toe Adjustment (General Procedures), Rear Toe Adjustment (General Procedures), Camber and Caster Adjustment (General Procedures). * Steering components. * Check and install new components as necessary. Sway or roll
* Overloaded, unevenly or incorrectly
loaded vehicle. * Notify the customer of incorrect vehicle loading. * Loose wheel nut(s).
* Check and tighten the wheel nut(s) to specification.
REFER to: Specifications (204-04 Wheels and Tires, Specifications). * Coil spring(s).
* Check and install new coil springs as necessary. REFER
to:
Front Shock Absorber (204-01 Front Suspension, Removal and Installation),