sensor JAGUAR XJ6 1994 2.G Electrical Diagnostic Manual
[x] Cancel search | Manufacturer: JAGUAR, Model Year: 1994, Model line: XJ6, Model: JAGUAR XJ6 1994 2.GPages: 327, PDF Size: 13.73 MB
Page 173 of 327
rl E I ect r ical
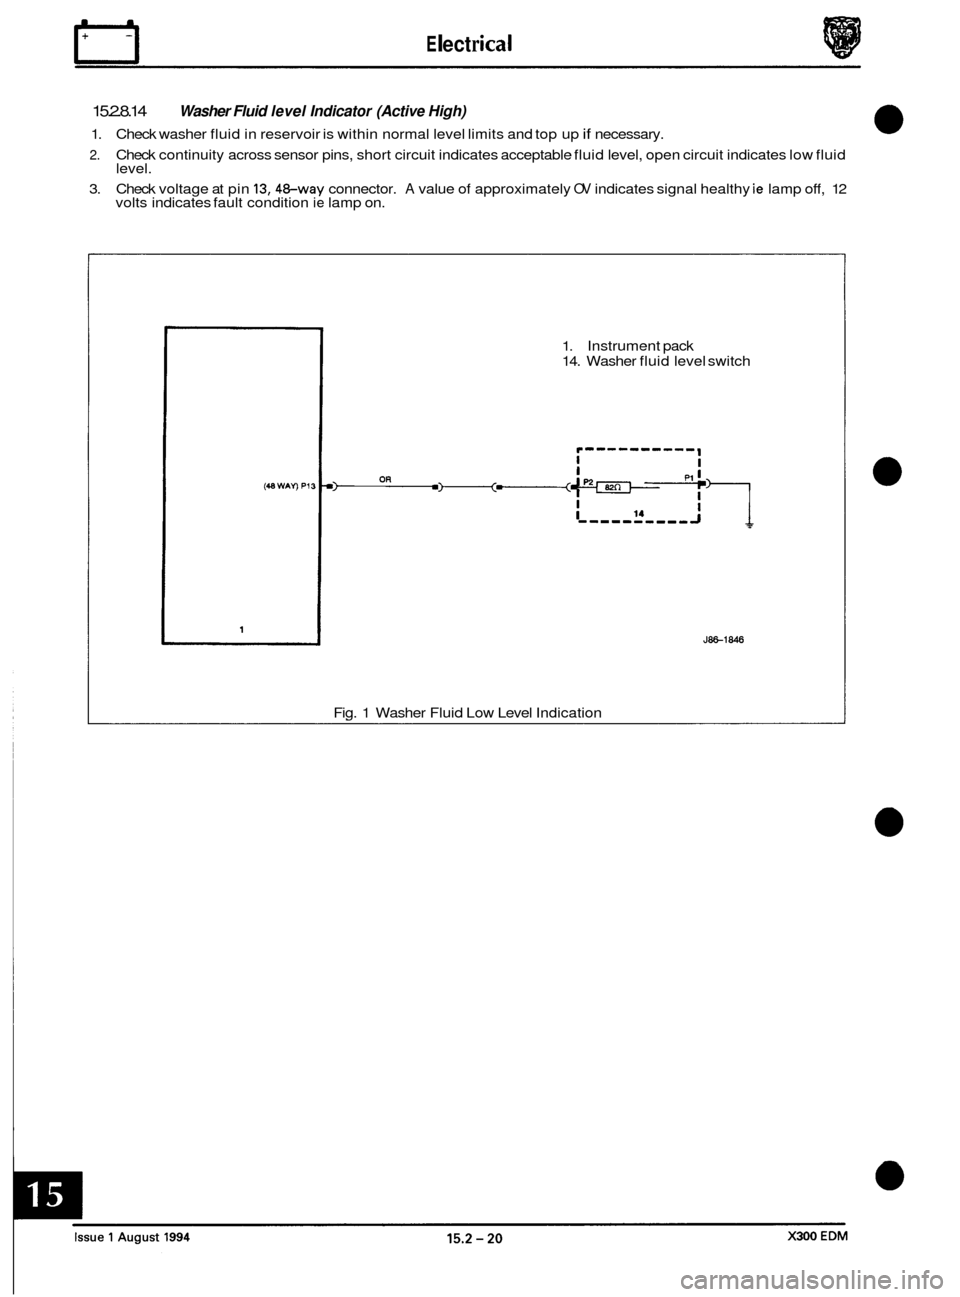
15.2.8.14
1. Check washer fluid in reservoir is within normal level limits and top up if necessary.
2. Check continuity across sensor pins, short circuit indicates acceptable fluid level, open circuit indicates low fluid
level.
3. Check voltage at pin
13,48-way connector. A value of approximately OV indicates signal healthy ie lamp off, 12
volts indicates fault condition ie lamp on.
Washer Fluid level Indicator (Active High)
1. Instrument pack
14. Washer fluid level switch
JE-1846
Fig. 1 Washer Fluid Low Level Indication
Page 174 of 327
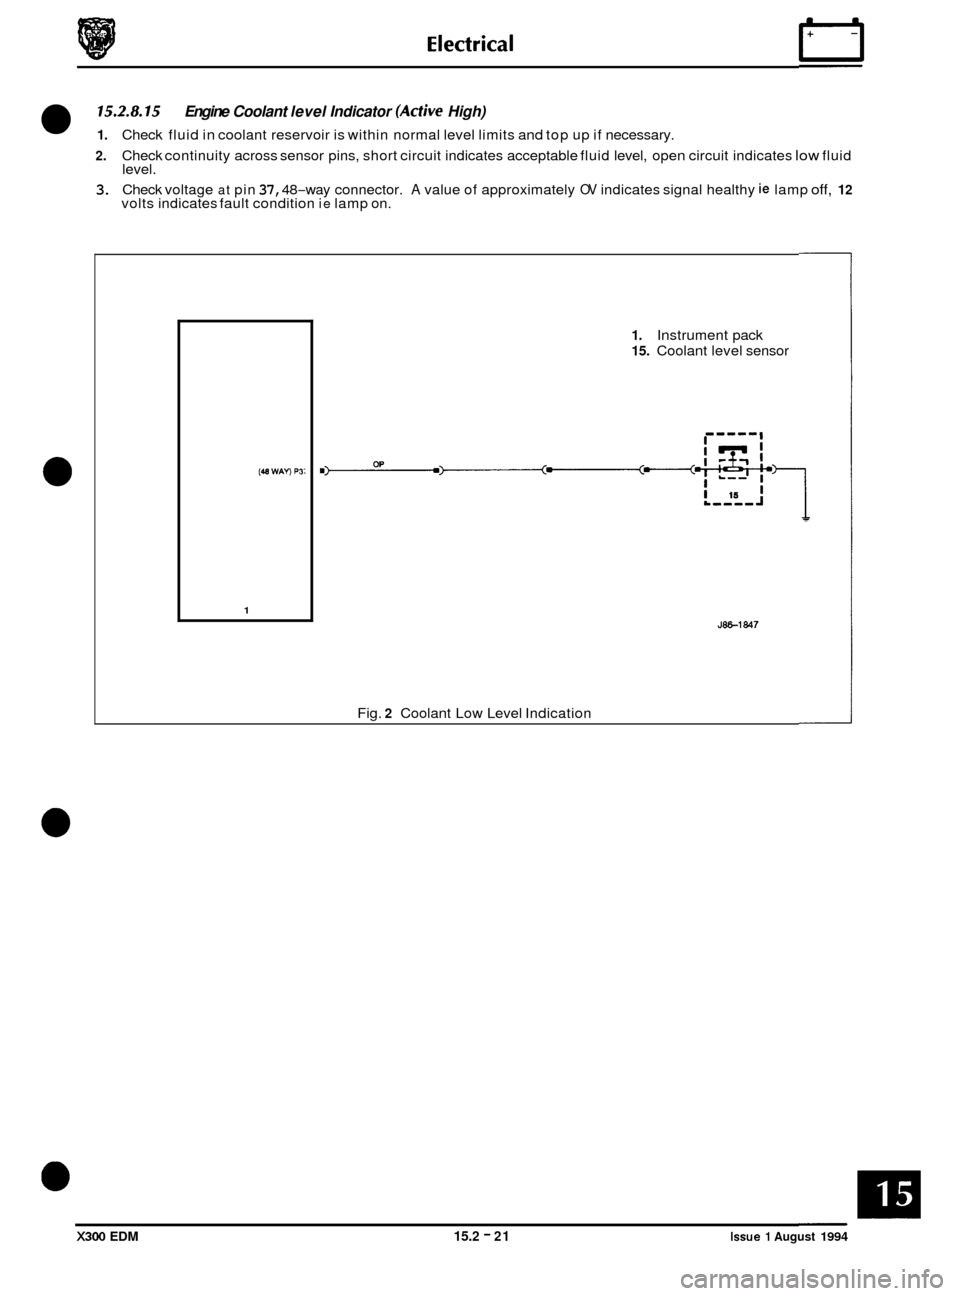
15.2.8.15
2. Check continuity across sensor pins, short circuit indicates acceptable fluid level, open circuit indicates low fluid
level.
3. Check voltage at pin 37, 48-way connector. A value of approximately OV indicates signal healthy ie lamp off, 12 volts indicates fault condition ie lamp on.
Engine Coolant level Indicator (Active High)
1. Check fluid in coolant reservoir is within normal level limits and top up if necessary.
(48 WAV P3i
1
1. Instrument pack
15. Coolant level sensor
JW-1847
Fig. 2 Coolant Low Level Indication
X300 EDM 15.2 - 21 Issue 1 August 1994
Page 175 of 327
rl E I ect r ical
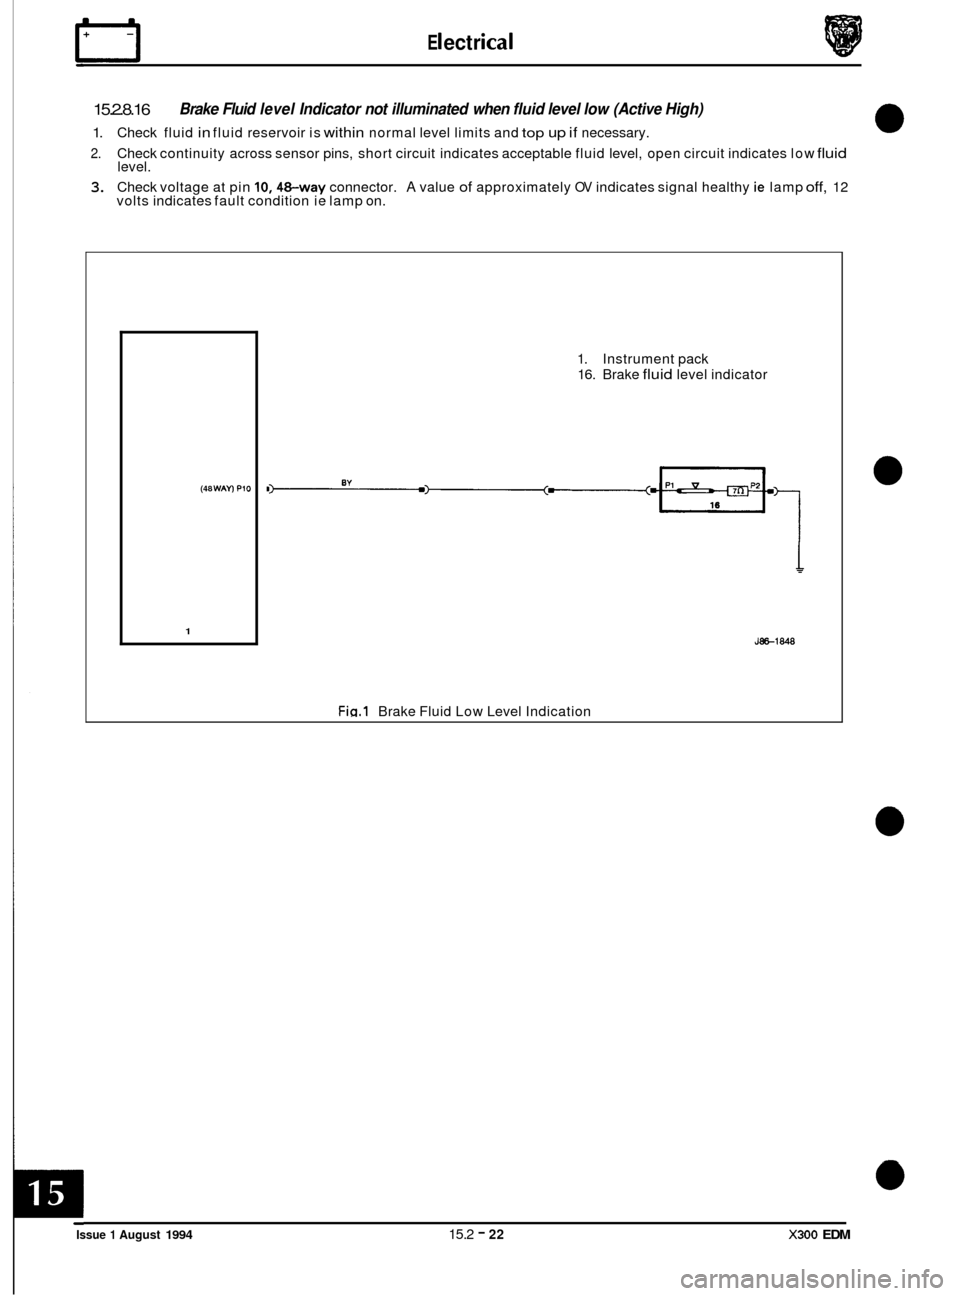
15.2.8.16
1. Check fluid in fluid reservoir is within normal level limits and top up if necessary.
2. Check continuity across sensor pins, short circuit indicates acceptable fluid level, open circuit indicates low fluid level.
3. Check voltage at pin 10,48-way connector. A value of approximately OV indicates signal healthy ie lamp off, 12
volts indicates fault condition ie lamp on.
Brake Fluid level Indicator not illuminated when fluid level low (Active High)
(48 WAYl P10
1
1. Instrument pack
16. Brake
fluid level indicator
J86-1848
Fia.1 Brake Fluid Low Level Indication
0
0
0
0
Issue 1 August 1994 15.2 - 22 X300 EDM
Page 178 of 327
E I ect r ical IT
SPEED CONTROL
System Description
0 15.3 15.3.1
The speed control system provides an automatic cruise facility, allowing a constant speed to be maintained without
accelerator pedal operation. The system comprises the following components:
0 Electronic control unit
0 Vacuum dump valve
0 Control valve
0 Vacuum pump
0 Mechanical throttle linkage and bellows
0 Selection switch
0 Brake and clutch pedal switches
On selection of speed control, via the switches mounted on the driver's side fascia, the vacuum dump valve, pump and
control valve will energize, creating
a partial vacuum in the bellows assembly. The bellows assembly acts upon the
throttle linkage to adjust throttle position, maintaining vehicle speed at the value when control is selected.
Speed control is determined by the Speed Control Control Module
(SC CM) which monitors a speed signal delivered
from the instrument pack (initially from the ABS rear LH wheel speed sensor) to determine vehicle speed.
Speedcontrol isdisabled, returning control tothedriver,
byoperationofthevacuumdumpvalve,ifanyofthefollowing situations occur: 0
0 Braking
0 Clutch operation (3.2 / 4.0 litre manual transmission vehicles only)
o Drive de-select ie P, N or R (automatic transmissions only, both electronic and hydraulic)
0 Traction control system (where fitted) in operation
0 Rapid speed reduction without braking input, ie double brake switch failure
0 Actual speed drop to 3/4 of cruise setting (eg when towing excessive loads under adverse conditions)
0 Vehicle speeds below w 25 mph
0 Ignition OFF
0 De-selection at switch controls
15.3.2 COMPONENT DESCRlPTlO NS
15.3.2.1 Electronic Control Module
The Speed Control Control Module (SC CM), located behind the fascia, adjacent to the steering column, provides sys- tem control and an interface to external input signals from the instrument pack, gear selector module, traction control
system, control switches, and foot pedal switches. The set speed value is retained in SC CM memory and continuously
compared to actual vehicle speed. Adjustments are made, as necessary, to maintain set speed by control of the vac- uum pump and control valve. Connections to the SC CM are listed in the table on page 3.
X300 EDM 15.3 - 1 Issue 1 August 1994
Page 233 of 327
E I ect r ica I
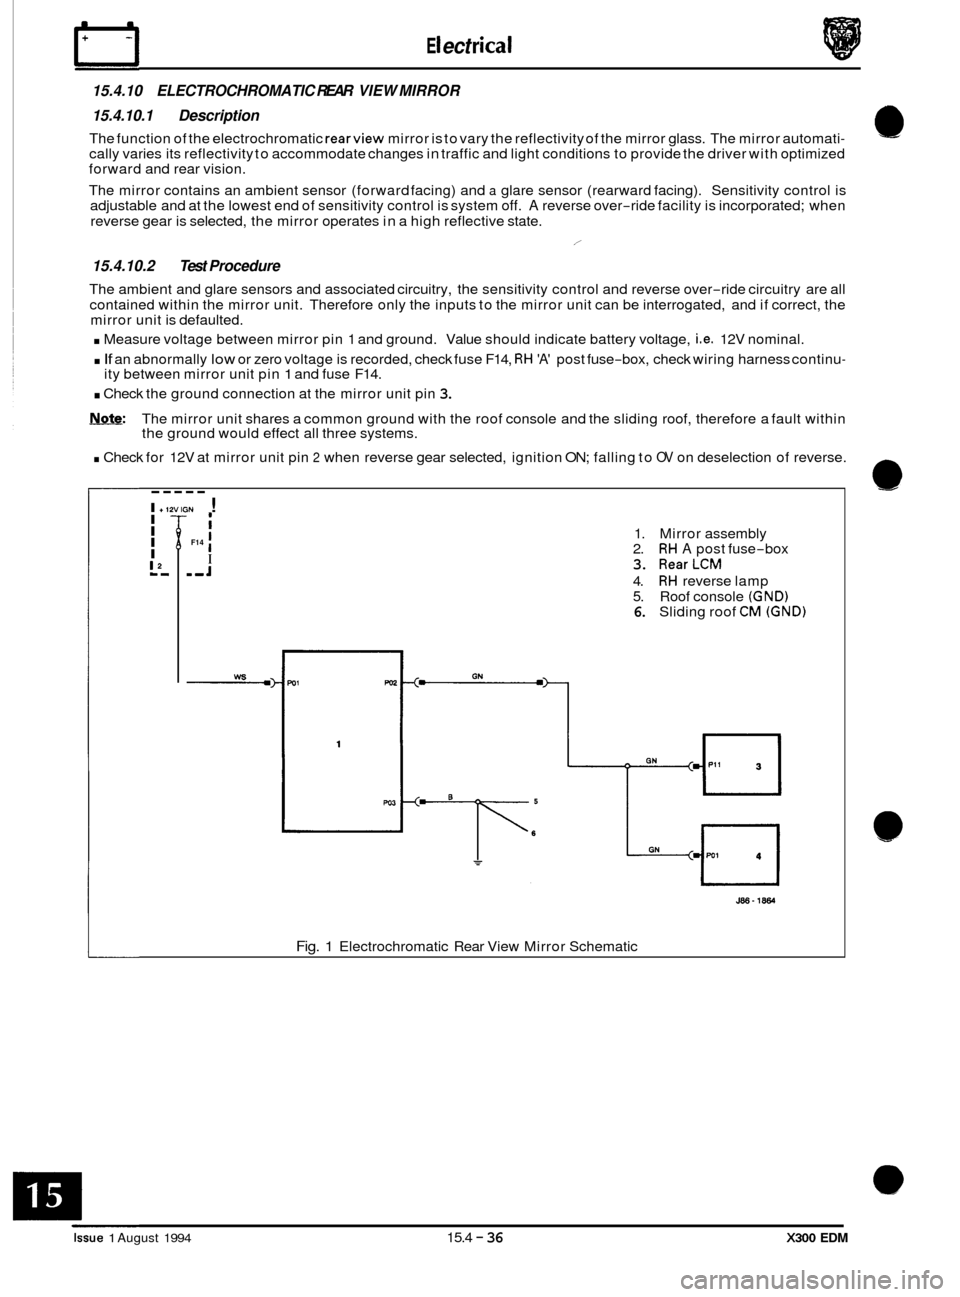
15.4.10 ELECTROCHROMATIC REAR VIEW MIRROR
15.4.10.1 Description
The function of the electrochromatic rearview mirror is to vary the reflectivity of the mirror glass. The mirror automati- cally varies its reflectivity to accommodate changes in traffic and light conditions to provide the driver with optimized
forward and rear vision.
The mirror contains an ambient sensor (forward facing) and
a glare sensor (rearward facing). Sensitivity control is
adjustable and at the lowest end of sensitivity control is system off. A reverse over-ride facility is incorporated; when
reverse gear is selected, the mirror operates in a high reflective state.
15.4.10.2 Test Procedure
The ambient and glare sensors and associated circuitry, the sensitivity control and reverse over-ride circuitry are all
contained within the mirror unit. Therefore only the inputs to the mirror unit can be interrogated, and if correct, the
mirror unit is defaulted.
. Measure voltage between mirror pin 1 and ground. Value should indicate battery voltage, i.e. 12V nominal.
. If an abnormally low or zero voltage is recorded, check fuse F14, RH 'A' post fuse-box, check wiring harness continu-
. Check the ground connection at the mirror unit pin 3.
Note: The mirror unit shares a common ground with the roof console and the sliding roof, therefore a fault within
the ground would effect all three systems.
. Check for 12V at mirror unit pin 2 when reverse gear selected, ignition ON; falling to OV on deselection of reverse.
/
ity between mirror unit pin 1 and fuse F14.
----- I +12VIGN ! I I I
I
L',
I I
I ,,J
F14 1. Mirror assembly
2. RH A post fuse-box
3. RearLCM
4. RH reverse lamp
5. Roof console (GND) 6. Sliding roof CM (GND)
J86-1864
Fig. 1 Electrochromatic Rear View Mirror Schematic
Issue 1 August 1994 15.4 - 36 X300 EDM