clock JAGUAR XJ6 1994 2.G User Guide
[x] Cancel search | Manufacturer: JAGUAR, Model Year: 1994, Model line: XJ6, Model: JAGUAR XJ6 1994 2.GPages: 521, PDF Size: 17.35 MB
Page 317 of 521
Climate Control Systems
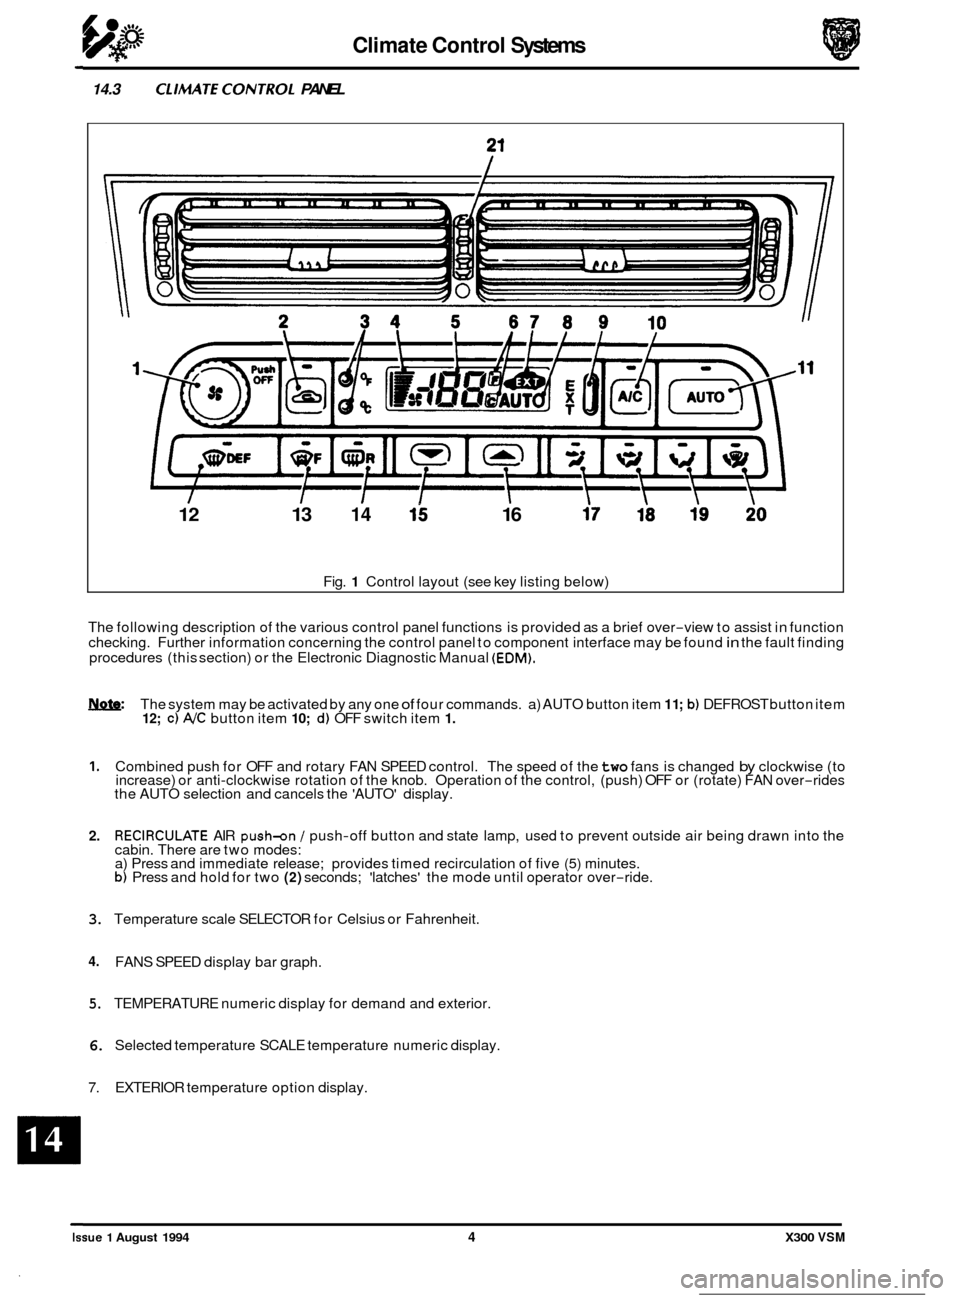
14.3 CLIMATECONTROL PANEL
12 13 14 15 16
Fig. 1 Control layout (see key listing below)
The following description of the various control panel functions is provided as a brief over
-view to assist in function
checking. Further information concerning the control panel to component interface may be found in the fault finding
procedures (this section) or the Electronic Diagnostic Manual (EDM).
Iynfe: The system may be activated by any one of four commands. a) AUTO button item 1 1; b) DEFROST button item 12; c) NC button item 10; d) OFF switch item 1.
1. Combined push for OFF and rotary FAN SPEED control. The speed of the two fans is changed by clockwise (to
increase) or anti-clockwise rotation of the knob. Operation of the control, (push) OFF or (rotate) FAN over-rides
the AUTO selection and cancels the 'AUTO' display.
2. RECIRCULATE AIR push-on / push-off button and state lamp, used to prevent outside air being drawn into the
cabin. There are two modes:
a) Press and immediate release; provides timed recirculation of five
(5) minutes. b) Press and hold for two (2) seconds; 'latches' the mode until operator over-ride.
3. Temperature scale SELECTOR for Celsius or Fahrenheit.
4. FANS SPEED display bar graph.
5. TEMPERATURE numeric display for demand and exterior.
6. Selected temperature SCALE temperature numeric display.
7. EXTERIOR temperature option display.
Issue 1 August 1994 4 X300 VSM
Page 332 of 521
Climate Control Systems
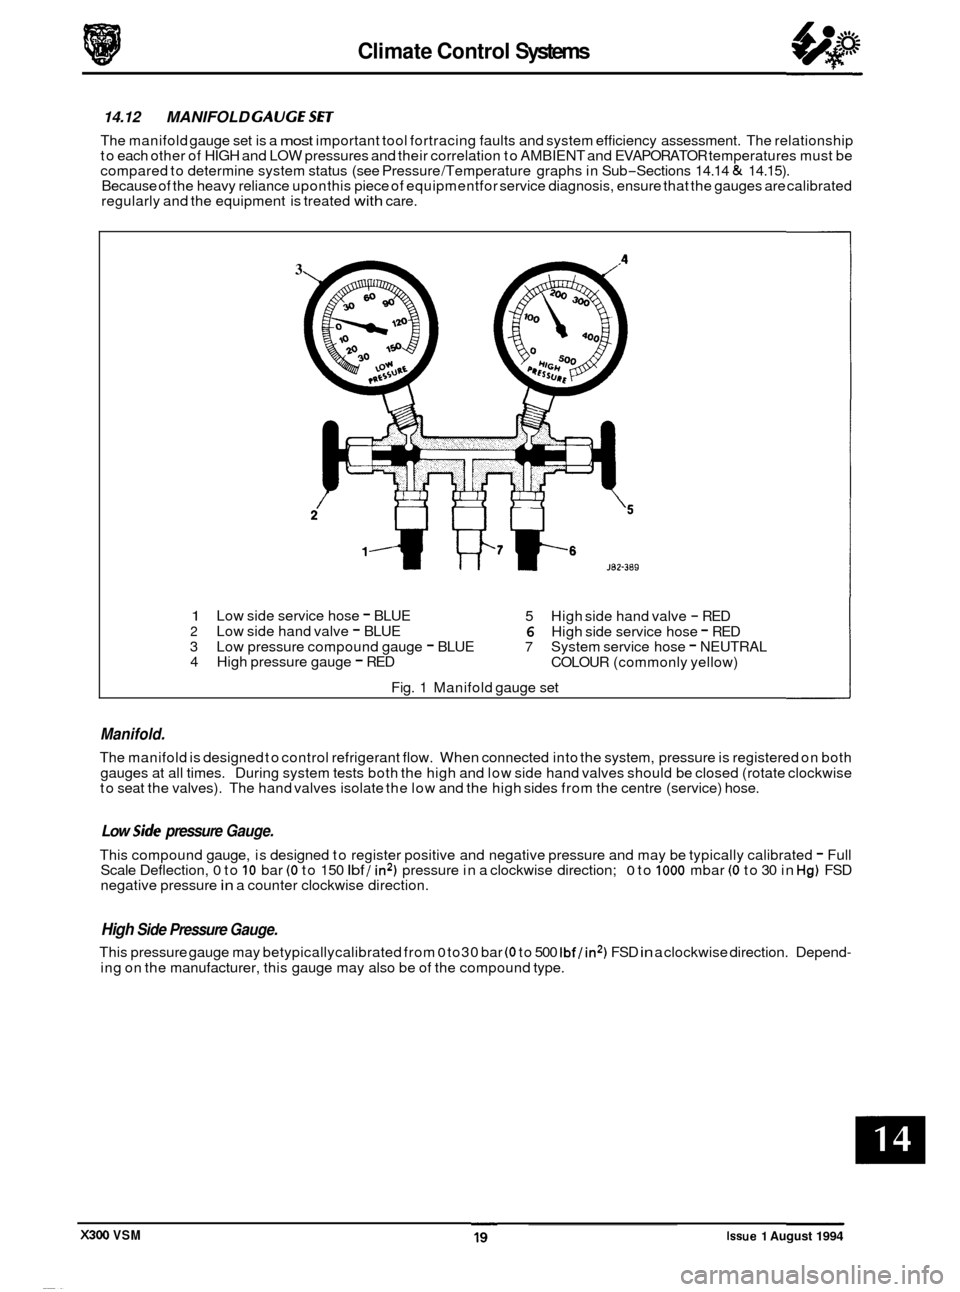
14.12 MANIFOLD GAUGESET
The manifold gauge set is a most important tool fortracing faults and system efficiency assessment. The relationship
to each other of HIGH and LOW pressures and their correlation to AMBIENT and EVAPORATOR temperatures must be
compared to determine system status (see Pressure /Temperature graphs in Sub
-Sections 14.14 & 14.15).
Because of the heavy reliance upon this piece of equipmentfor service diagnosis, ensure that the gauges are calibrated
regularly and the equipment is treated
with care.
3
1 Low side service hose - BLUE
5 High side hand valve - RED 2 Low side hand valve - BLUE 6 High side service hose - RED
3 Low pressure compound gauge - BLUE 7 System service hose - NEUTRAL
4 High pressure gauge - RED
COLOUR (commonly yellow)
Fig. 1 Manifold gauge set
Manifold.
The manifold is designed to control refrigerant flow. When connected into the system, pressure is registered on both
gauges at all times. During system tests both the high and low side hand valves should be closed (rotate clockwise
to seat the valves). The hand valves isolate the low and the high sides from the centre (service) hose.
0 Low side pressure Gauge.
This compound gauge, is designed to register positive and negative pressure and may be typically calibrated - Full
Scale Deflection, 0 to 10 bar (0 to 150 Ibf / in2) pressure in a clockwise direction; 0 to 1000 mbar (0 to 30 in Hg) FSD
negative pressure in a counter clockwise direction.
High Side Pressure Gauge.
This pressure gauge may betypicallycalibrated from 0 to30 bar (0 to 500 Ibf/in2) FSD in a clockwise direction. Depend-
ing on the manufacturer, this gauge may also be of the compound type.
X300 VSM Issue 1 August 1994
Page 345 of 521
rl Electrical
15.1.6 Fire Hazard Infonnath
Thermal decomposition or combustion may produce dense smoke and other dangerous fumes which in fire situations
form
a highly toxic explosive.
In the event of fire the surrounding area must be evacuated and
all personnel kept well upwind of the area.
Full fire fighting protective gear and
a self contained breathing apparatus operating in the positive pressure mode must
be worn for combating fire. Material near fires must be cooled with water spray to prevent ignition.
Fires should be allowed to burn themselves
out if not threatening to life or property. If fire is threatening to life or prop- erty use copious quantities of water to extinguish.
15.1.7 Ventilath
Local exhaust ventilation designed by a professional engineer should be provided if vapours, fumes, or dusts are gen- erated whilst working with airbag module.
The latest issue of the manual for recommended practices on 'Industrial Ventilation' is available from the
ACGIH Com- mittee on Industrial Ventilation, PO Box 16153, Lansing, MI 48910, USA.
The need for local exhaust ventilation should be evaluated by a professional industrial hygienist.
15.1.8 Respiratory Precauth
To prevent the inhalation of dangerous fumes and dusts, an approved mask should be worn.
15.1.9 Eye Protection
Chemical protective goggles are recommended where there is a possibility of eye contact with the propellant.
Safety glasses with side shields are recommended for
all other operations.
15.1. I0 Protective Clothing
Approved protective gloves, overalls and shoes / boots should be worn.
15.1.1 1 Handling and Storage Precautions
Do not store airbag module near live electrical equipment or circuitry. Store in a dry environment at ambient tempera-
tures.
Good housekeeping and engineering practices should be employed to prevent the generation and accumulation of
dusts. Store in compliance with
all local state and federal regulations.
15.1.12 Driver And Passenger Airbag Modules Assembly / Removal / Service Instructions
Before starting work, ensure ignition switch is in 'IocK position, key is removed and negative terminal cable
is disconnected from the battery.
As the airbag is equipped with a back up power source and due to the risk of airbag being inadvertently
deployed, wait one minute or longer before starting work.
0 Disconnecting the battery cancels the memory for clock, radio, seats, mirrors, steering column and any other
components using battery power. Reset memory after work is completed.
0 Never use airbags from other vehicles, always use new parts.
0 After work is completed, reconnect battery and perform warning light check see diagnostic manual.
0 Never use electrical probes to check voltage or electrical resistance.
0 Disconnect the airbag before carrying out any work on, or in the vicinity of module, or when using electric weld- ing equipment.
0 Always ensure that battery negative has been disconnected for one minute or longer before commencing any
removal procedure.
EB
Issue 1 August 1994 4 X300 VSM
Page 393 of 521
Tire Replacement And Wheel hterchanging
WARNING: UNDER NO CIRCUMSTANCES SHOULD CROSS-PLY TIRES BE FITTED.
When renewal of tires is necessary, it is preferable to fit a complete set.
Should eitherfront or reartires only (i.e.
notthe full set) show a necessityfor renewal, newtires must befitted to replace
the worn ones.
No attempt must be made to interchange tires from the front to the rear orvice-versa, as wear produces a characteristic
pattern on each tire depending upon its position on the vehicle. If this position is changed after wear has occurred, the
performance of the tire will be adversely affected.
It should be remembered that new tires must be balanced.
The radial ply tires specified here are designed to meet the high speed performance of this vehicle. Only tires of ident
- ical specification as shown in this section must be fitted as replacements. If two replacement tires are fitted to one axle,
they must be of the same type and pattern as those on the other axle, i.e. tires must be used in sets of four of the same
manufacturer and tread pattern,
not intermixed.
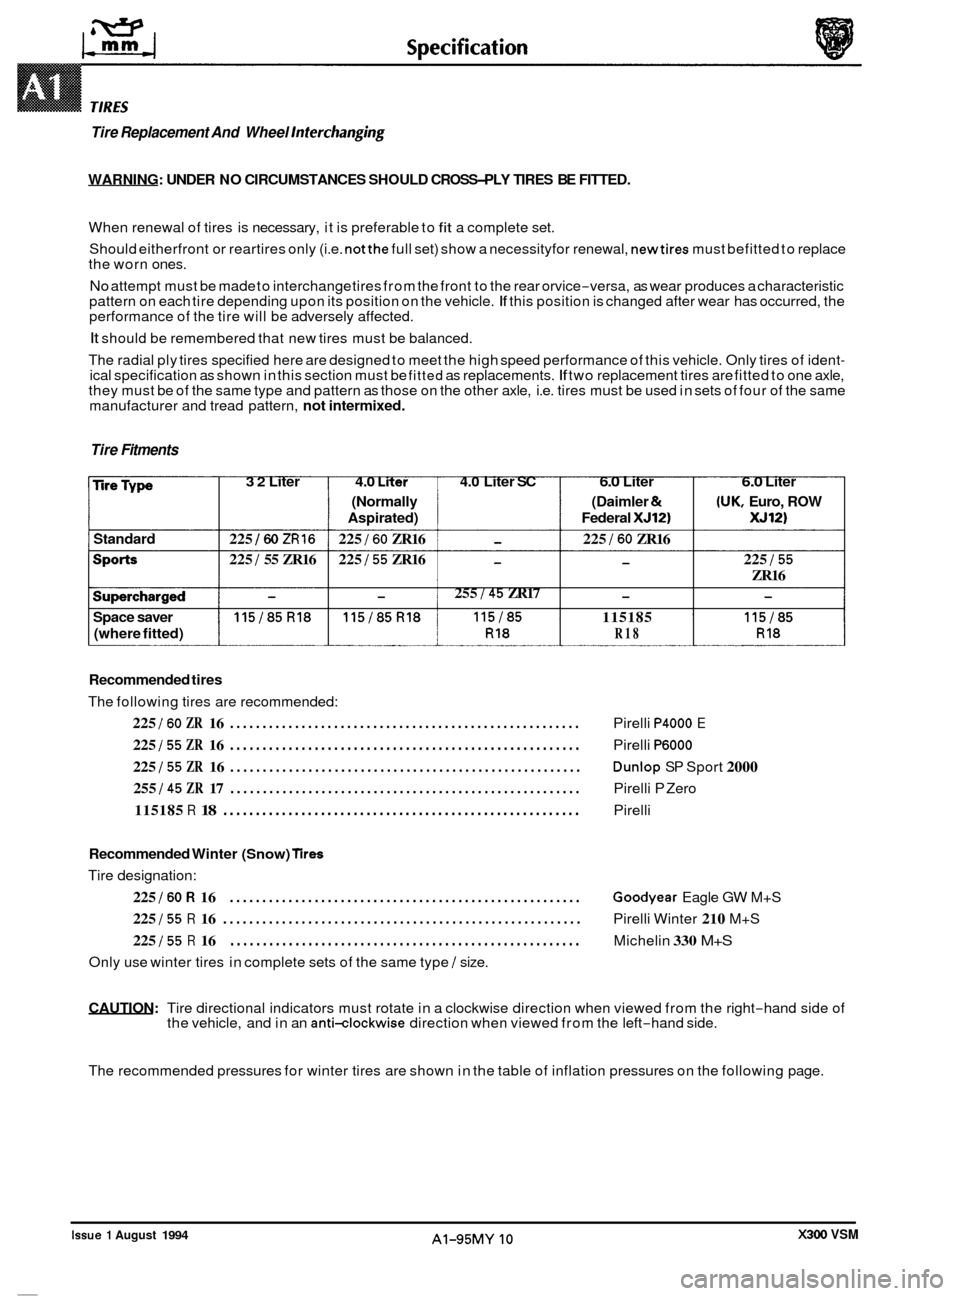
Tire Fitments
32 Liter 4.0 Liier 4.0 Liter SC 6.0 Liter 6.0 Liter 0
(Normally (Daimler & (UK, Euro, ROW
Aspirated) Federal
XJ12) XJ12)
Standard 225 160 ZR16 225 I60 ZR16 - 225 I60 ZR16
225
1 55 ZR16 225 I55 ZR16 - - 225 I55
ZR16
- 255 I45 ZR17 - -
Space saver 115/85R18 115/85R18 115185 115185 115185
(where fitted) RI8 R18 RI8
Recommended tires
The following tires are recommended:
225 I60 ZR 16 ...................................................... Pirelli P4000 E
225 155 ZR 16 ...................................................... Pirelli P6000
225 155 ZR 16 ...................................................... Dunlop SP Sport 2000
255
145 ZR 17 ...................................................... Pirelli P Zero
115185 R 18 Pirelli .......................................................
0
Recommended Winter (Snow) Tires
Tire designation:
225 I60 R 16 ...................................................... Goodyear Eagle GW M+S
225 155 R 16 ....................................................... Pirelli Winter 210 M+S
225 I55 R 16 ...................................................... Michelin 330 M+S
Only use winter tires in complete sets of the same type I size.
CAUTION: Tire directional indicators must rotate in a clockwise direction when viewed from the right-hand side of
the vehicle, and in an anti-clockwise direction when viewed from the left-hand side.
The recommended pressures for winter tires are shown in the table of inflation pressures on the following page.
0
X300 VSM Issue 1 August 1994 AI-95MY 10
Page 400 of 521
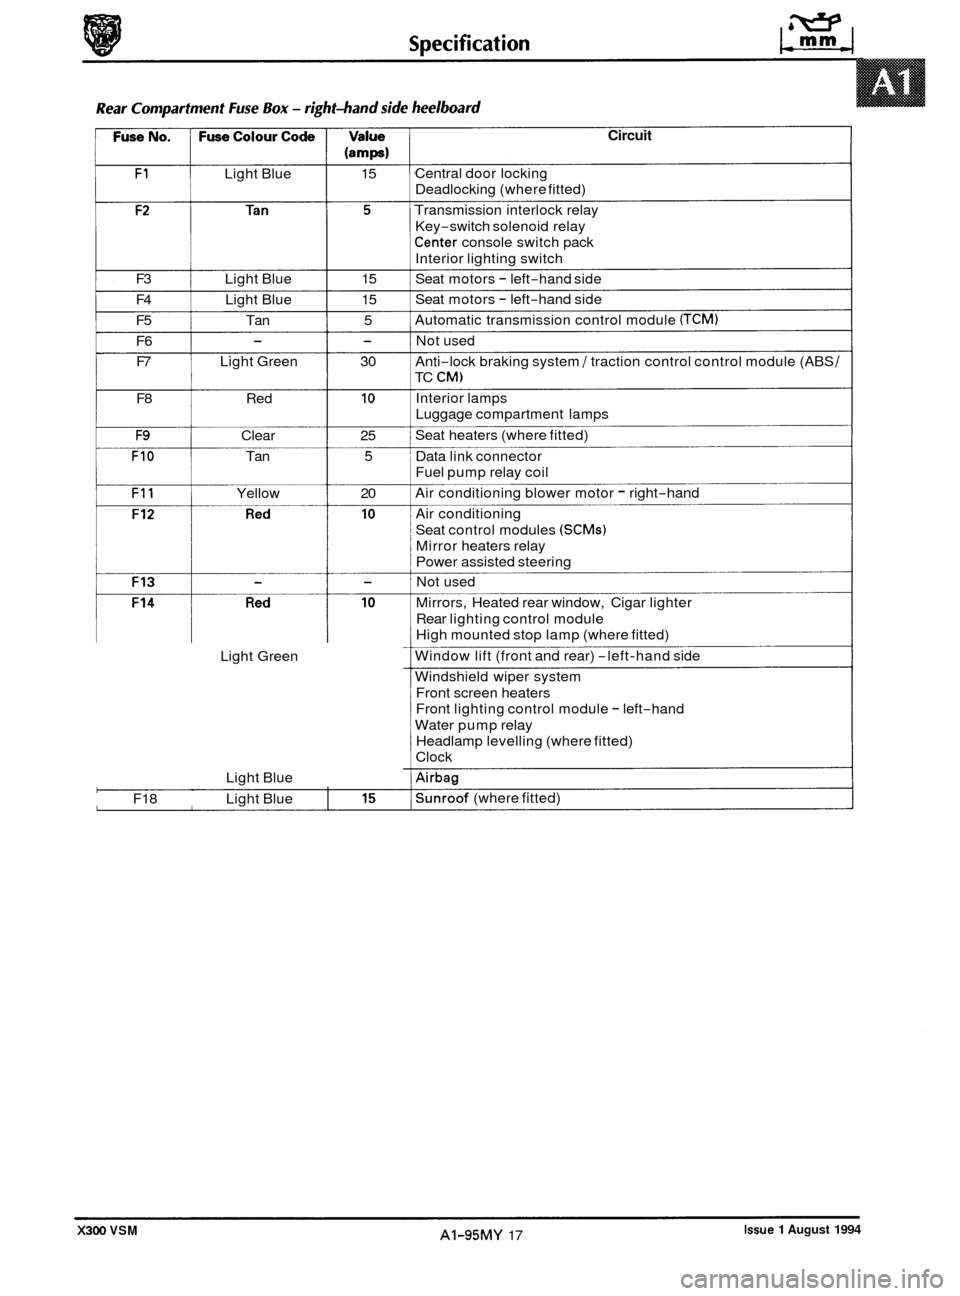
(amps)
F1 Light Blue 15
F3 Light Blue 15
F4 Light Blue 15
F5 Tan 5
F6 F7 Light Green 30
- -
F8 Red 10
F9 Clear 25
FIO Tan 5
F11 Yellow 20 0
Light Green
Light Blue
F18 Light Blue
0'
I
Circuit
Central door locking
Deadlocking (where fitted)
Transmission interlock relay
Key
-switch solenoid relay
Center console switch pack
Interior lighting switch
Seat motors
- left-hand side
Seat motors
- left-hand side
Automatic transmission control module
(TCM)
Not used
Anti
-lock braking system / traction control control module (ABS /
TC CM)
Interior lamps
Luggage compartment lamps
Seat heaters (where fitted)
Data link connector
Fuel pump relay coil
Air conditioning blower motor
- right-hand
Air conditioning
Seat control modules
(SCMs)
Mirror heaters relay
Power assisted steering
Not used
Mirrors, Heated rear window, Cigar lighter
Rear lighting control module
High mounted stop lamp (where fitted)
Window lift (front and rear)
-left-hand side
Windshield wiper system Front screen heaters
Front lighting control module
- left-hand
Water pump relay
Headlamp levelling (where fitted)
Clock
Airbag
Sunroof (where fitted)
Issue 1 August 1994 AI-95MY 17 X300 VSM
Page 415 of 521
General Fitting Instructions
Pressordrifttheseal in tothefull depthofthe housing ifthe housing is shouldered,orflush withthefaceofthe housing
where no shoulder is provided.
Note: Careless fitting of oil seals, which can result in damage to the seal and sealing surfaces, accounts for most
cases of failure of seals. Care in fitting is essential
if good results are to be obtained.
A3.2.7 joints And joint Faces
Remove all traces of old jointing materials prior to reassembly. Inspect joint faces for scratches or burrs and remove
with a fine file or oilstone; do not allow swarf or dirt to enter tapped holes or enclosed parts. Blow out any pipes, chan- nels or crevices with compressed air, refitting or renewing any 0-rings or seals which have been displaced by the com- pressed air.
Always use the specified gaskets. Use jointing compound only when recommended, otherwise fit joints dry. When
jointing compound is used, apply in
a thin film to metal surfaces; take great care to prevent it from entering oilways, pipes or blind tapped holes.
A3.2.8
Before removing a hose from the brake or power steering systems, thoroughly clean the end fittings and the area sur- rounding them. Obtain blanking caps beforedetaching hosefittings,sothat portscan becovered to excludedirt. Clean
the hose externally and blow through with compressed air. Examine the hose carefully for cracks, separation of plies,
security of end fittings and external damage. Reject any hose found to be faulty. When refitting the hose, ensure that
no unnecessary bends are introduced and that the hose is not twisted before or during tightening of union nuts.
Do not store hydraulic fluid in an unsealed container because it will absorb water. Fluid in this condition would be dan- gerous to use due to a lowering of its boiling point. Do not allow hydraulic fluid to be contaminated with mineral oil,
or use a container which has previously contained mineral oil.
Do not re-use fluid bled from the system. Always use clean brake fluid, or a recommended alternative, to clean the
hydraulic components. Fit a blanking cap to the hydraulic union and
a plug to its mating socket, after removal from
the vehicle, to prevent ingress of dirt. Absolute cleanliness must be observed with hydraulic components at all times.
After any work has been performed on hydraulicsystems, inspect carefully for leaks underneath the car while a second
operator applies maximum pressure to the brakes (with the engine running) and operates the steering.
Hydraulic Flexible Pipes And Hoses
A3.2.9 Metric
Bolt Identification
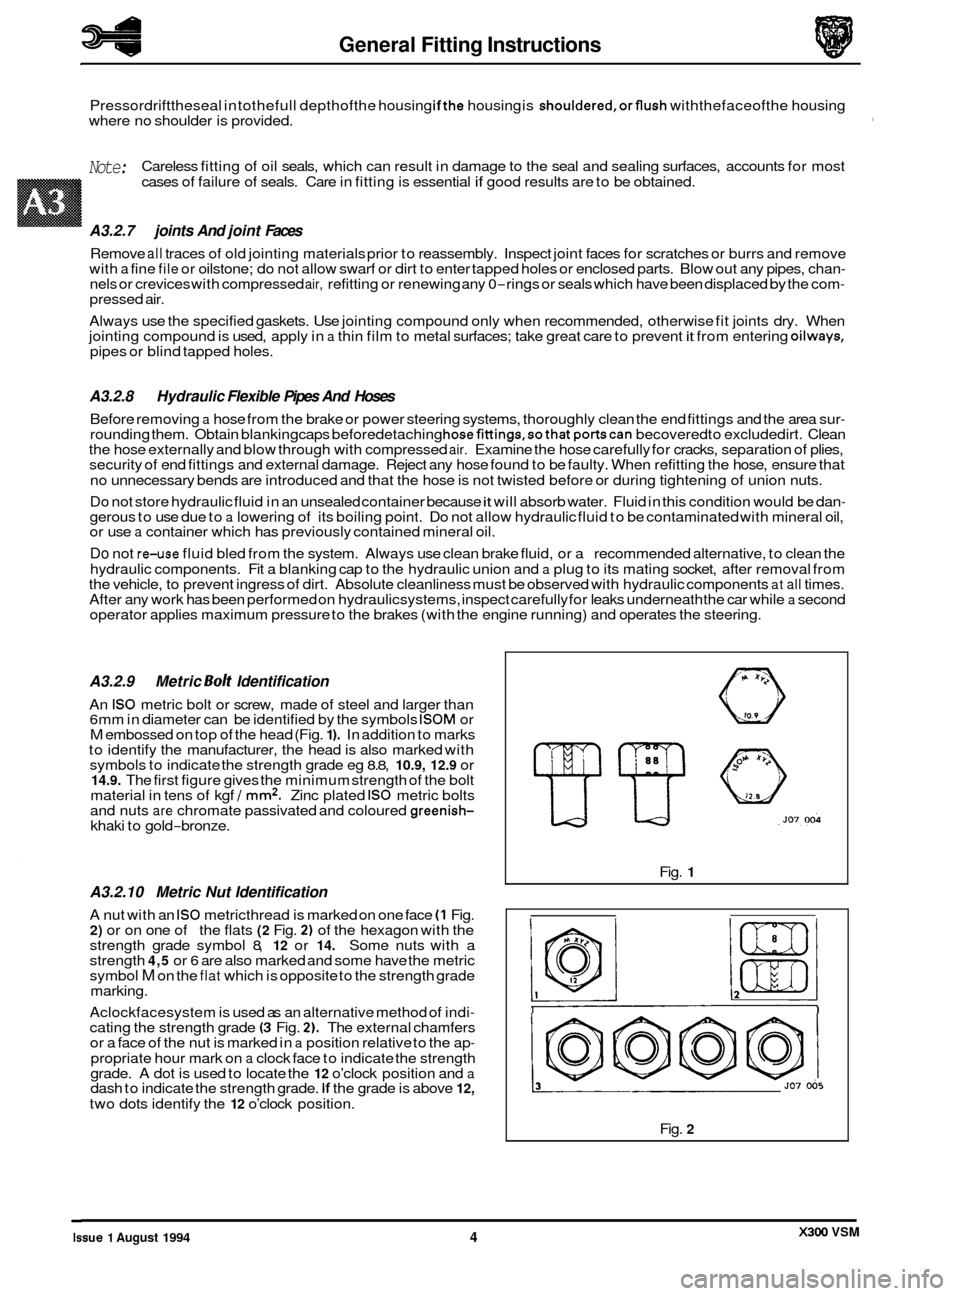
An IS0 metric bolt or screw, made of steel and larger than
6mm in diameter can be identified by the symbols ISOM or M embossed on top of the head (Fig. 1 ). In addition to marks
to identify the manufacturer, the head is also marked with
symbols to indicate the strength grade eg
8.8, 10.9, 12.9 or 14.9. The first figure gives the minimum strength of the bolt
material in tens of kgf / mm2. Zinc plated IS0 metric bolts
and nuts are chromate passivated and coloured greenish- khaki to gold-bronze.
A3.2.10 Metric Nut Identification
A nut with an IS0 metricthread is marked on one face (1 Fig. 2) or on one of the flats (2 Fig. 2) of the hexagon with the
strength grade symbol 8, 12 or 14. Some nuts with a
strength 4,5 or 6 are also marked and some have the metric
symbol M on the flat which is opposite to the strength grade
marking.
Aclockfacesystem is used as an alternative method of indi
- cating the strength grade (3 Fig. 2). The external chamfers
or a face of the nut is marked in a position relative to the ap-
propriate hour mark on a clock face to indicate the strength
grade. A dot is used to locate the 12 o’clock position and a dash to indicate the strength grade. If the grade is above 12,
two dots identify the 12 o’clock position. Fig.
1
I I
Fig. 2
X300 VSM Issue 1 August 1994 4
Page 477 of 521
page e
Sub-Section Title SRO
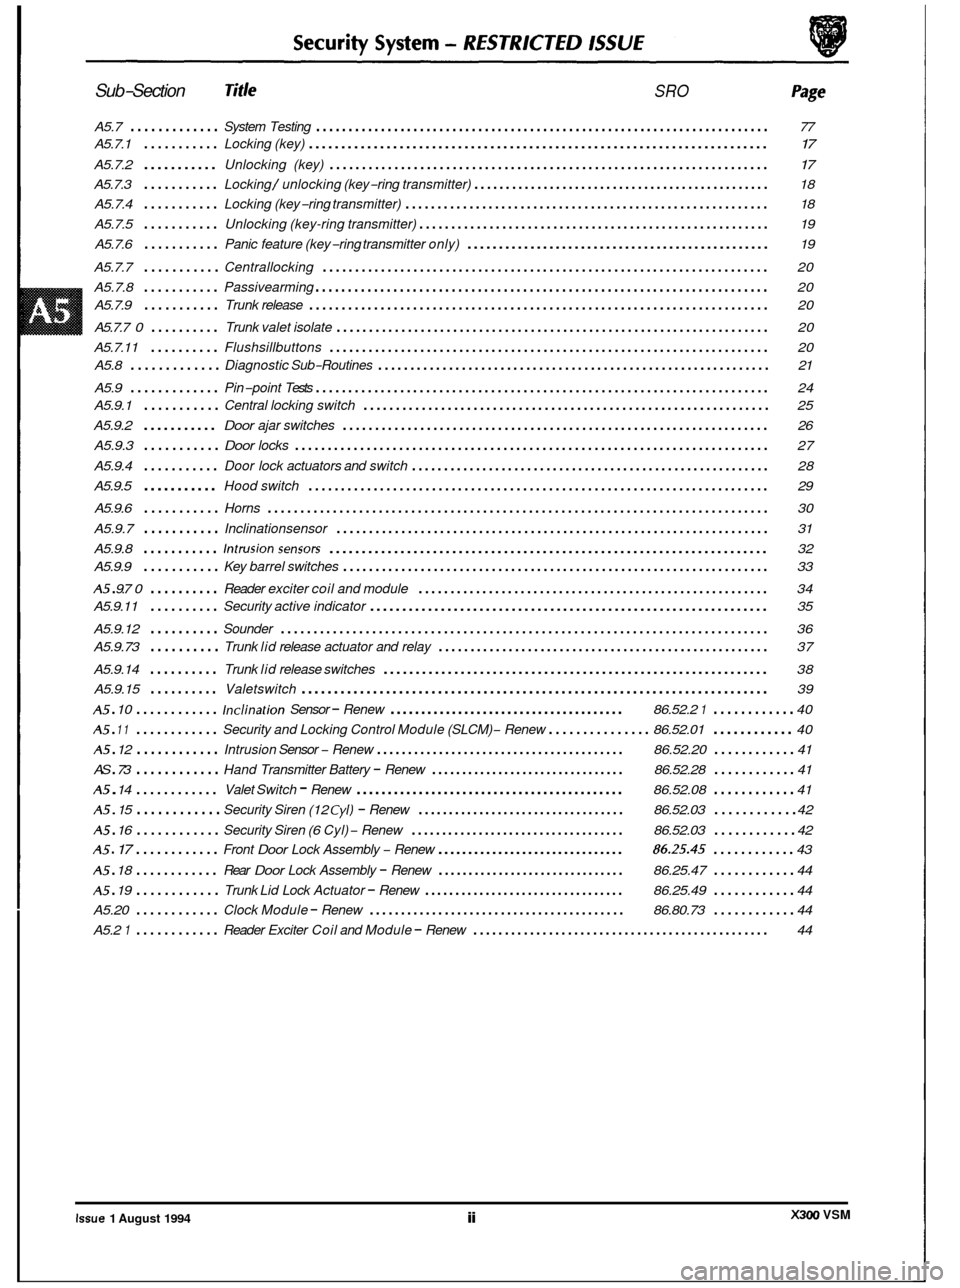
A5.7 ............. System Testing ...................................................................... 77
A5.7.1
........... Locking (key) ....................................................................... \
17
A5.7.2 ........... Unlocking (key) .................................................................... 17
A5.7.3 ........... Locking / unlocking (key-ring transmitter) ............................................... 18
A5.7.4
........... Locking (key-ring transmitter) ......................................................... 18
A5.7.5
........... Unlocking (key-ring transmitter) ....................................................... 19
A5.7.6
........... Panic feature (key-ring transmitter only) ................................................ 19
A5.7.7
........... Centrallocking ..................................................................... 20
A5.7.8
........... Passivearming ...................................................................... 20
A5.7.9
........... Trunk release ....................................................................... \
20
A5.7.7
0 .......... Trunk valet isolate ................................................................... 20
A5.7.11
.......... Flushsillbuttons .................................................................... 20
A5.9
............. Pin-point Tests ...................................................................... 24
A5.8
............. Diagnostic
Sub-Routines ............................................................. 21
A5.9.1
........... Central locking switch ............................................................... 25
A5.9.2
........... Door ajar switches .................................................................. 26
A5.9.3
........... Door locks ........................................................................\
. 27
A5.9.4
........... Door lock actuators and switch ........................................................ 28
A5.9.5
........... Hood switch ....................................................................... \
29 e
A5.9.6 ........... Horns ........................................................................\
..... 30
A5.9.7
........... Inclinationsensor ................................................................... 31
A5.9.8
........... Intrusionsensors .................................................................... 32
A5 . 9.7 0 .......... Reader exciter coil and module ....................................................... 34
A5.9.12
.......... Sounder ........................................................................\
... 36
A5.9.14
.......... Trunk lid release switches ............................................................ 38
A5.9.15
.......... Valetswitch ........................................................................\
39
A5 . 10 ............ Inclination Sensor - Renew ...................................... 86.52.2 1 ............ 40
A5 . 12 ............ Intrusion Sensor - Renew ........................................ 86.52.20 ............ 41
A5 . 14 ............ Valet Switch - Renew ........................................... 86.52.08 ............ 41
A5.9.9
........... Key
barrel switches .................................................................. 33
A5.9.11
.......... Security active indicator .............................................................. 35
A5.9.73
.......... Trunk lid release actuator and relay .................................................... 37
A5 . 11 ............ Security and Locking Control Module (SLCM) - Renew ............... 86.52.01 ............ 40
AS
. 73 ............ Hand Transmitter Battery - Renew ................................ 86.52.28 ............ 41
A5 . 15 ............ Security Siren (12 Cyl) - Renew .................................. 86.52.03 ............ 42
A5 . 16 ............ Security Siren (6 Cyl) - Renew ................................... 86.52.03 ............ 42
A5 . 17 ............ Front Door Lock Assembly - Renew ............................... 86.25.45 ............ 43
A5 . 18 ............ Rear Door Lock Assembly - Renew ............................... 86.25.47 ............ 44
Trunk Lid Lock Actuator - Renew ................................. 86.25.49 ............ 44
Clock Module - Renew ......................................... 86.80.73 ............ 44
Reader Exciter Coil and Module - Renew ............................................... 44
e
A5 . 19 ............
A5.20 ............
A5.2 1 ............
e
X300 VSM Issue 1 August 1994 ii
Page 480 of 521
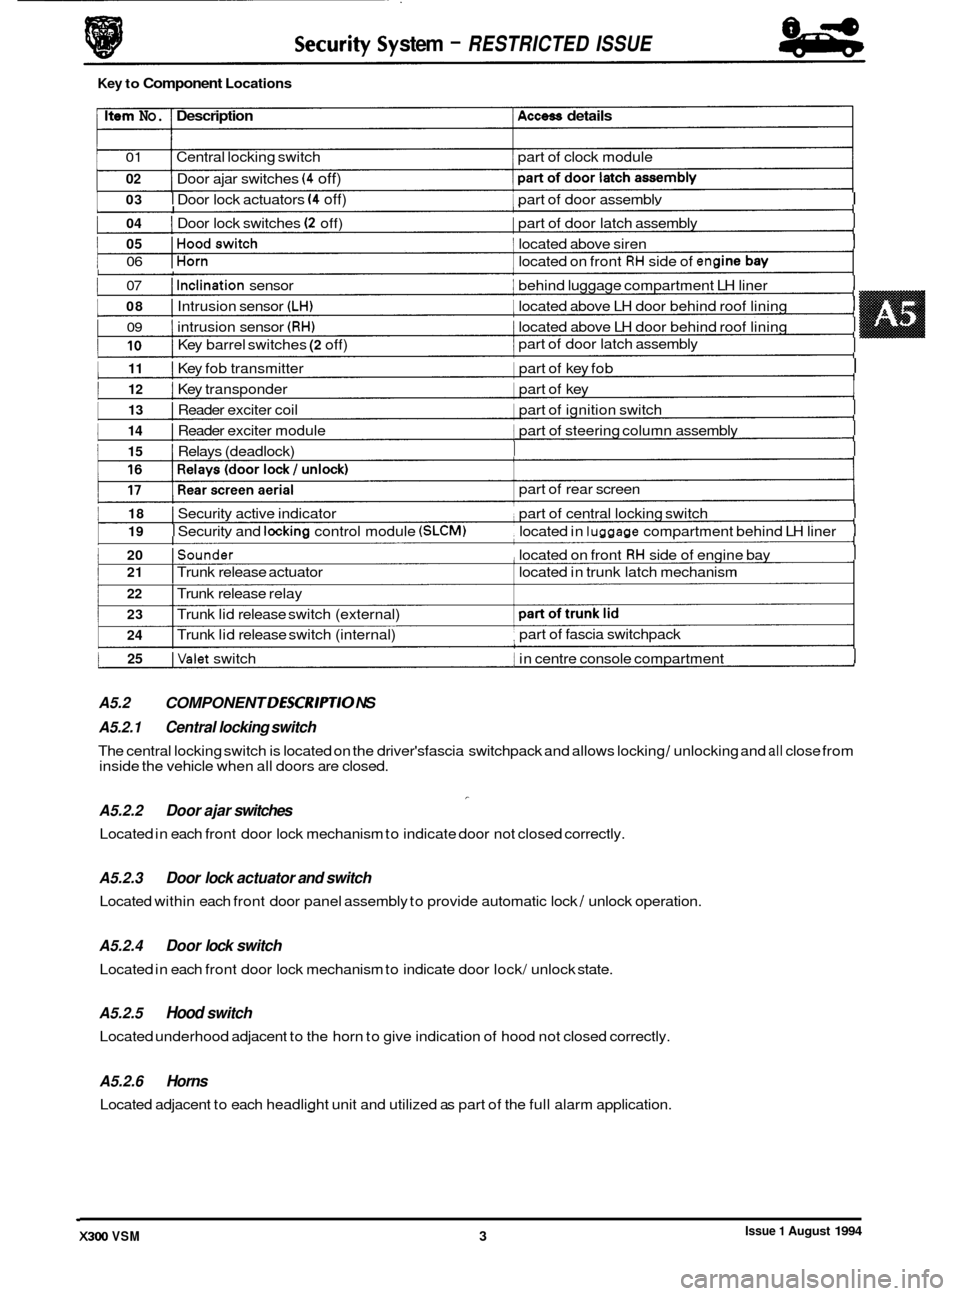
I 03 I Door lock actuators (4 off) 1 part of door assemblv I I
Issue 1 August 1994 X300 VSM 3 I
1 04 I Door lock switches (2 off) I part of door latch assembly I I
1 05 IHoodswitch 1 located above siren I I
1 06 IHorn 1 located on front RH side of en(
1 07 I Inclination sensor I behind luggage compartment LH liner I I
I 08 I Intrusion sensor (LH) I located above LH door behind roof lining I
I 09 I intrusion sensor (RH) 1 located above LH door behind roof lining I
I
1 1 part of door latch assembly I 10 I Key barrel switches (2 off)
1 11 I Key fob transmitter 1 part of key fob I I
I 12 I Key transponder 1 part of key I I
I 13 I Reader exciter coil 1 part of ignition switch I I
I 14 I Reader exciter module 1 part of steering column assembly I I
1 15 I Relays (deadlock) I I I
1 18 I Security active indicator part of central locking switch I I
I 19 I Securitv and lockina control module (SLCM) located in luaaaae compartment behind LH liner I I
1 20 ISounder , located on front RH side of engine bay I I
1 25 IValet switch 1 in centre console compartment I I
A5.2 COMPONENT DESCR/PT/O NS I
stem - RESTRICTED ISSUE
Key to Component Locations
Item No. Description Access details
01 Central locking switch part of clock module
02
1 I
Door ajar switches (4 off)
I I
part of rear screen
I 21 I Trunk release actuator located in trunk latch mechanism
22 I Trunk release relay
23
24 I Trunk lid release switch (external)
I Trunk lid release switch (internal) part of
fascia switchpack ,
A5.2.1 Central locking switch
A5.2.2 Door ajar switches
Located in each front door lock mechanism to indicate door not closed correctly.
-
The central locking switch is located on the driver'sfascia switchpack and allows locking / unlocking and all close from
inside the vehicle when all doors are closed.
A5.2.3
Located within each front door panel assembly to provide automatic lock / unlock operation.
Door lock actuator and switch
A5.2.4 Door lock switch
Located in each front door lock mechanism to indicate door lock/ unlock state.
A5.2.5 Hood switch
Located underhood adjacent to the horn to give indication of hood not closed correctly.
A5.2.6 Horns
Located adjacent to each headlight unit and utilized as part of the full alarm application.
Page 502 of 521
I
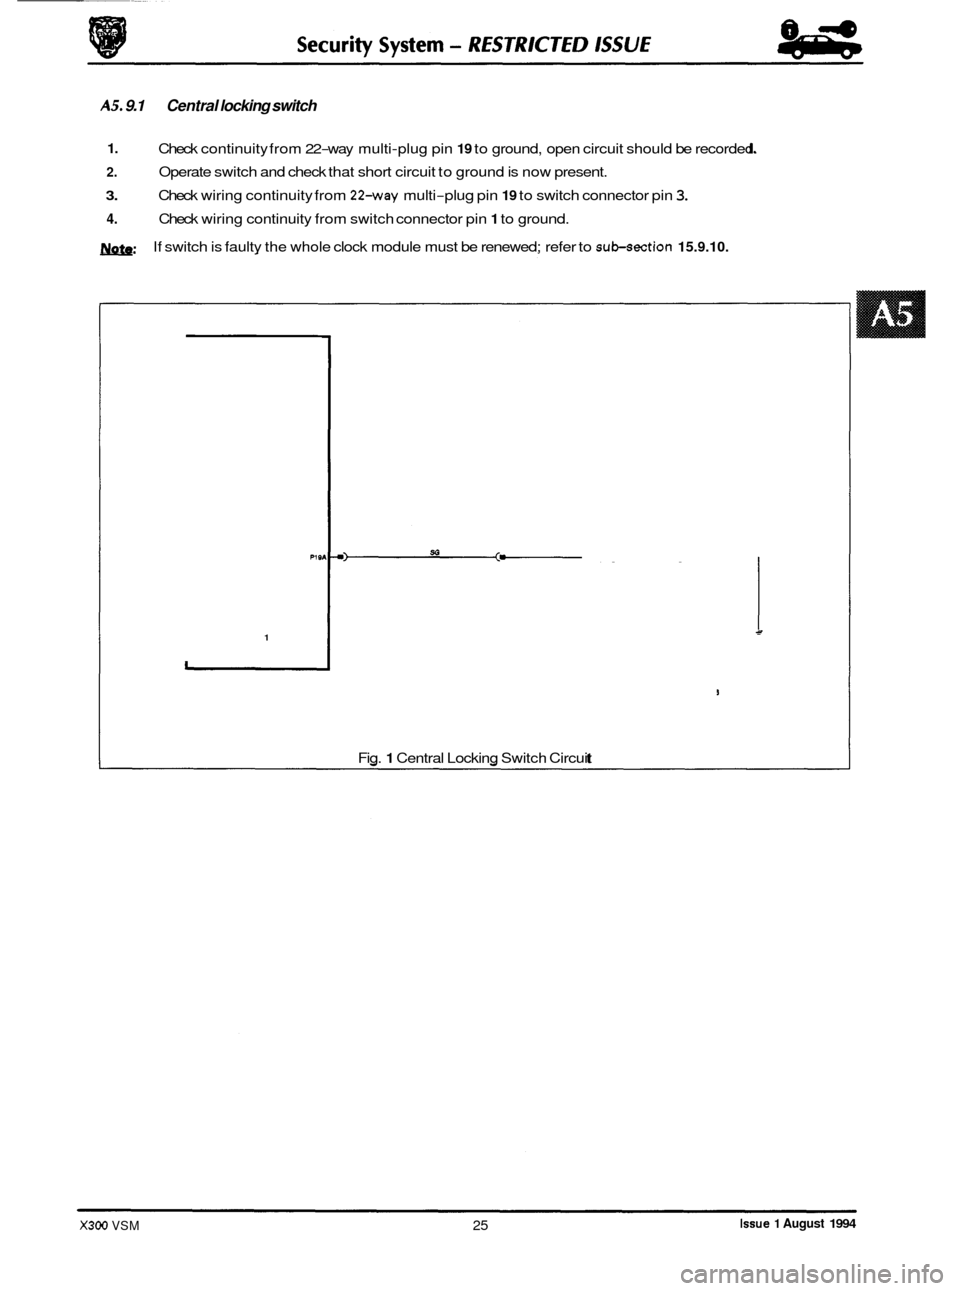
AS. 9.1 Central locking switch
1.
2.
3.
4.
Check continuity from 22-way multi-plug pin 19 to ground, open circuit should be recorded.
Operate switch and check that short circuit to ground is now present.
Check wiring continuity from
224vay multi-plug pin 19 to switch connector pin 3.
Check wiring continuity from switch connector pin 1 to ground.
If switch is faulty the whole clock module must be renewed; refer to
sub-section 15.9.10. m:
PI 9
1
Fig. 1 Central Locking Switch Circuit
Issue 1 August 1994 X300 VSM 25
Page 512 of 521
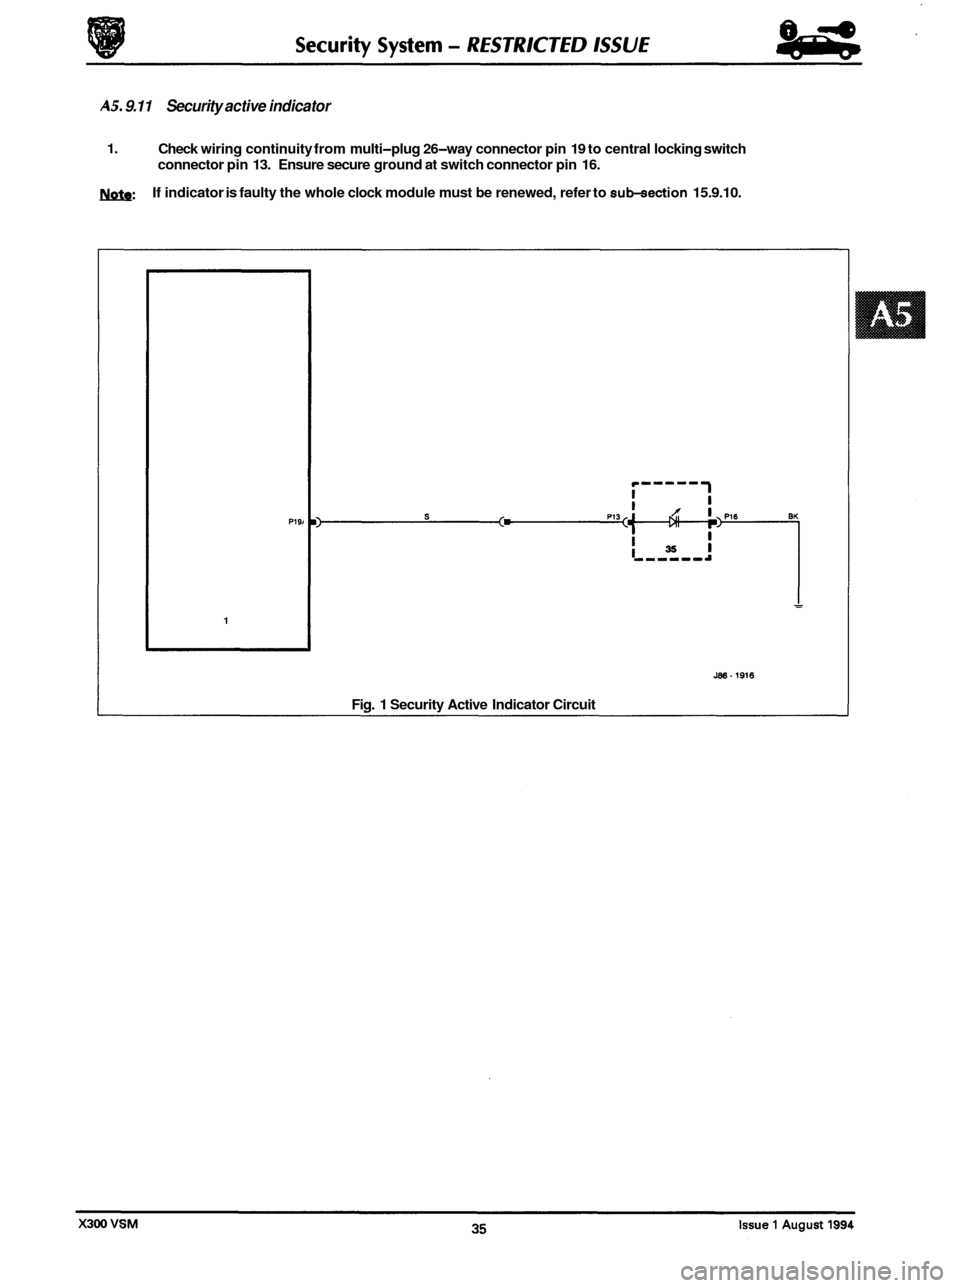
AS. 9.11 Security active indicator
0
1. Check wiring continuity from multi-plug 26-way connector pin 19 to central locking switch
connector pin 13. Ensure secure ground at switch connector pin 16.
If indicator is faulty the whole clock module must be renewed, refer to
sub-section 15.9.10. U&Q:
0
e
0
P191
1
J86.1916
Fig. 1 Security Active Indicator Circuit