electrical JAGUAR XJ6 1994 2.G User Guide
[x] Cancel search | Manufacturer: JAGUAR, Model Year: 1994, Model line: XJ6, Model: JAGUAR XJ6 1994 2.GPages: 521, PDF Size: 17.35 MB
Page 24 of 521
0
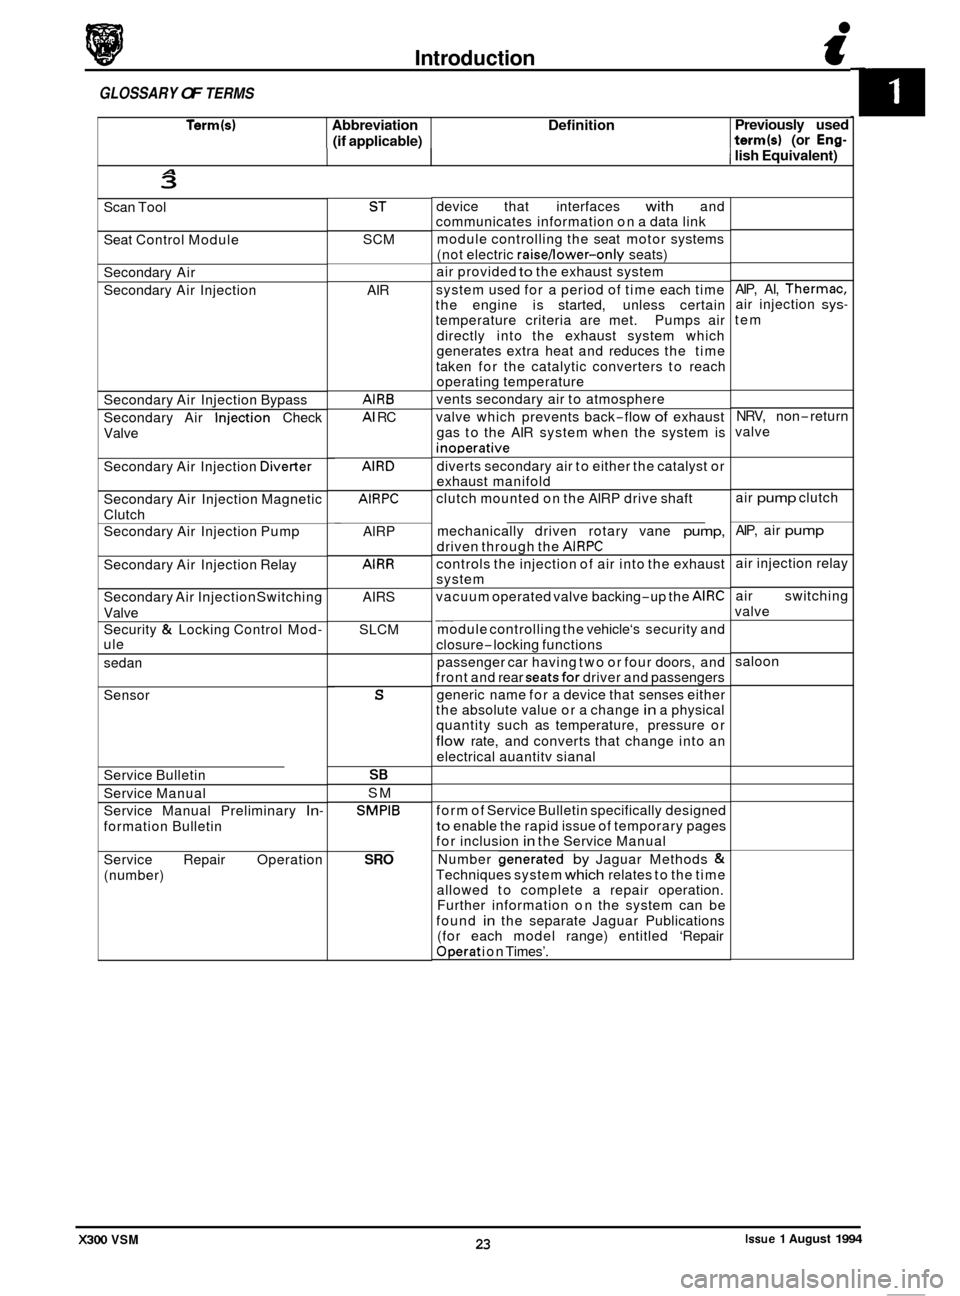
Term(s) Abbreviation Definition
(if applicable)
Introduction i
Previously used term(s) (or Eng-
GLOSSARY OF TERMS
I lish Equivalent) A 3
Scan Tool
Seat Control Module
Secondary Air
Secondary Air Injection
Secondary Air Injection Bypass
..
Secondary Air -Injection Check
Valve
Secondary Air Injection
Diverter
Secondary Air Injection Magnetic
Clutch
Secondary Air Injection Pump
Secondary Air Injection Relay
Secondary Air Injection Switching
Valve
Security
& Locking Control Mod- ule
sedan
Sensor
Service Bulletin
Service Manual
Service Manual Preliminary
In-
formation Bulletin
Service Repair Operation
(number)
ST
SCM
AIR
AlRB
AI RC
AlRD
AIRPC
AlRP
AlRR
AIRS
SLCM
-
S
SE
SM
SMPlB
SRO
device that interfaces with and
communicates information on a data link
module controlling the seat motor systems
(not electric
raisejower-only seats)
air provided
to the exhaust system
system used for a period of time each time
the engine is started, unless certain
temperature criteria are met. Pumps air
directly into the exhaust system which
generates extra heat and reduces the time
taken for the catalytic converters to reach
operating temperature
vents secondary air to atmosphere
valve which prevents back
-flow of exhaust
gas to the AIR system when the system is
inoDerative
diverts secondary air to either the catalyst or
exhaust manifold
clutch mounted on the AlRP drive shaft
mechanically driven rotary vane
pump,
driven through the AIRPC
controls the injection of air into the exhaust
system
vacuum operated valve backing
-up the AlRC
module controlling the vehicle‘s security and
closure
-locking functions
passenger car having two or four doors, and
front and rear
seatsfor driver and passengers
generic name for a device that senses either
the absolute value or a change
in a physical
quantity such as temperature, pressure or
flow rate, and converts that change into an
electrical auantitv sianal
__
form of Service Bulletin specifically designed
to enable the rapid issue of temporary pages
for inclusion in the Service Manual
Number
generated by Jaguar Methods &
Techniques system which relates to the time
allowed to complete a repair operation.
Further information on the system can be
found
in the separate Jaguar Publications
(for each model range) entitled ‘Repair
Operat ion Times’. AIP,
AI,
Thermac, air injection sys-
tem
NRV, non-return
valve
air
pump clutch
AIP, air
pump
air injection relay
air switching
valve
saloon
Issue 1 August 1994 23 X300 VSM
Page 25 of 521
i Introduction
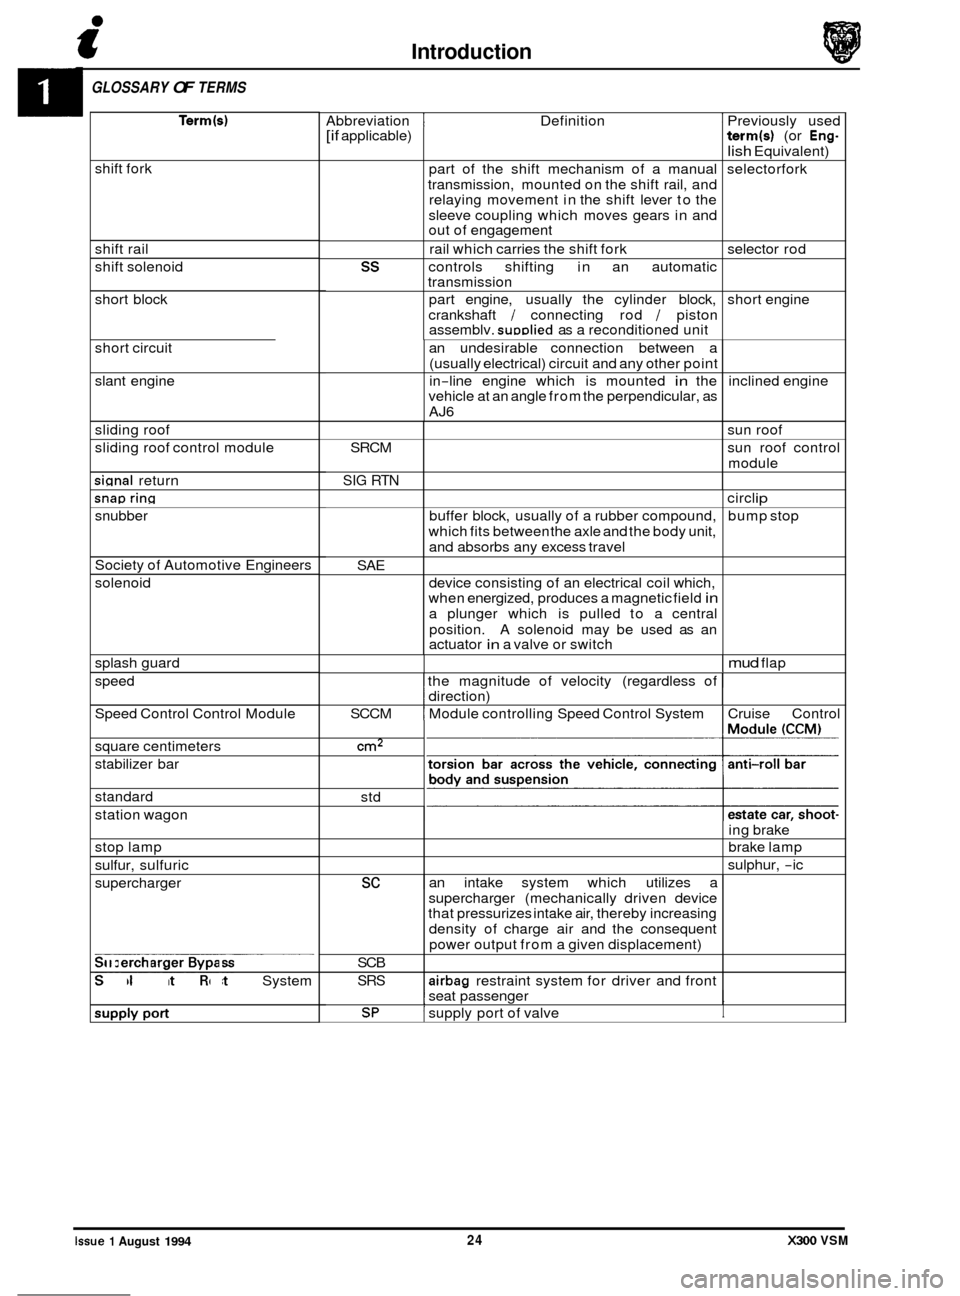
GLOSSARY OF TERMS
0 [if applicable)
ss
Term(s) term(s) (or Eng-
lish Equivalent)
part of the shift mechanism of a manual selectorfork
transmission, mounted on the shift rail, and
relaying movement in the shift lever to the
sleeve coupling which moves gears in and
out of engagement
rail which carries the shift fork
controls shifting in an automatic
transmission
part engine, usually the cylinder block, short engine
crankshaft
I connecting rod I piston
assemblv. suDDlied as a reconditioned unit selector
rod
shift
fork
an undesirable connection between a
(usually electrical) circuit and any other point
in
-line engine which is mounted in the
vehicle at an angle from the perpendicular, as
AJ6
shift rail
shift
solenoid
inclined engine
short
block
SRCM
SIG RTN
short circuit
sun roof
sun roof control
module
slant engine
buffer block, usually of a rubber compound,
which fits between the axle and the body unit,
and absorbs any excess travel
device consisting of an electrical coil which,
when energized, produces a magnetic field
in
a plunger which is pulled to a central
position. A solenoid may be used as an
actuator
in a valve or switch
SAE
sliding roof
sliding roof control module
ci rcl
ip
bump stop
signal return
sc
snap ring
ing brake
brake lamp
sulphur,
-ic
an intake system which utilizes a
snubber
SCB
SRS
Society of Automotive Engineers
solenoid
supercharger (mechanically driven device
that pressurizes intake air, thereby increasing
density of charge air and the consequent
power output from a given displacement)
airbag restraint system for driver and front
splash
guard
speed
Speed Control Control Module
square centimeters
stabilizer bar
standard
station wagon
stop lamp
sulfur, sulfuric
supercharger
- - __. . . . ... - . Supercharger Bypass
Supplementary Restraint System Abbreviation
I Definition 1 Previously used
I mud flap
I the
magnitude of velocity (regardless of I I direction)
SCCM
I Module controlling Speed Control System I Cruise Control
cm2
std
1 seat passenger
SP I supply port of valve I
0
0
0
Issue 1 August 1994 24 X300 VSM
Page 26 of 521
Introduction i
II
Issue 1 August 1994 I 25 X300 VSM
sleeve which ensures that the sleeve and the
gear are turning at the same speed as they
mach
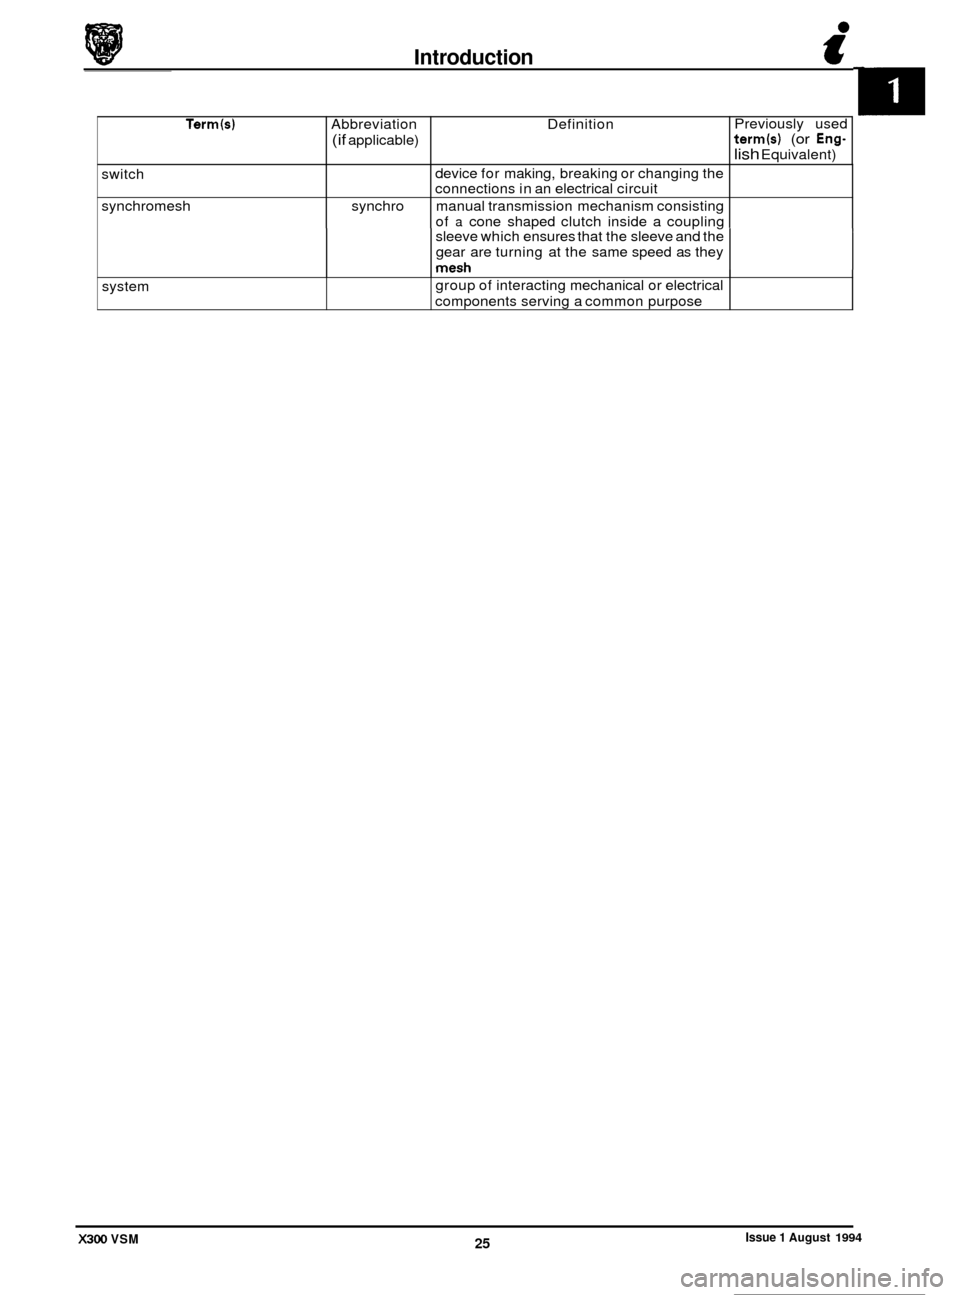
Term(s) Abbreviation Definition
(if applicable)
switch device
for making, breaking or changing the
connections in an electrical circuit
synchromesh synchro manual transmission mechanism consisting of
a cone shaped clutch inside a coupling Previously used
term(s) (or Eng-
lish Equivalent)
system
I. ."". *
group of interacting mechanical or electrical
components serving a common purpose
Page 28 of 521
GLOSSARY Of
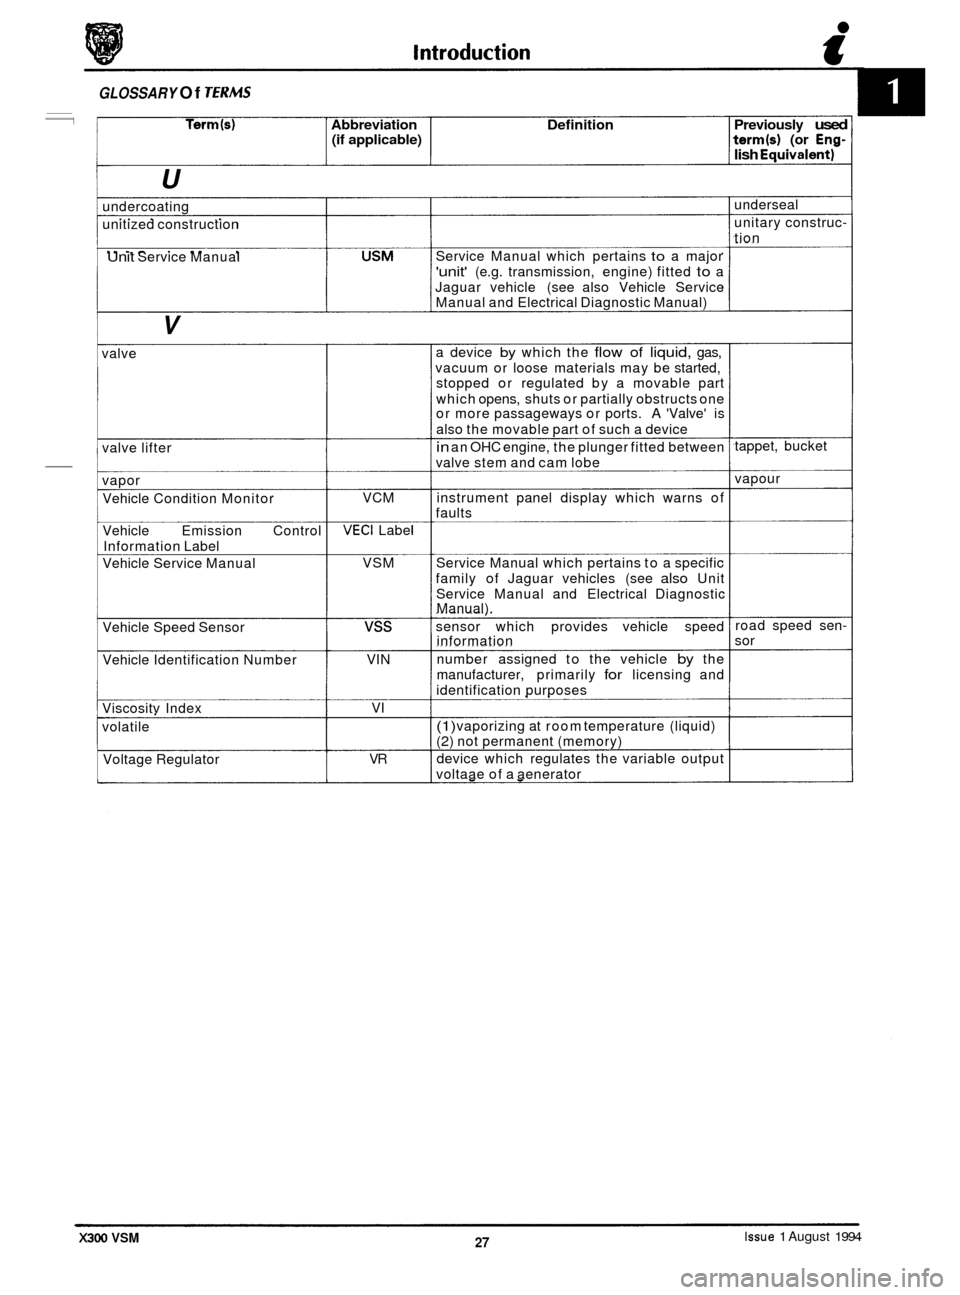
Term(s) Abbreviation Definition Previously used (if applicable) term(s) (or Eng- lish Eauivalent)
U
undercoating
unitized construction
Unit Service Manual
V
valve
valve lifter
vapor Vehicle Condition Monitor
Vehicle Emission Control
Information Label
Vehicle Service Manual
Vehicle Speed Sensor
Vehicle Identification Number
Viscositv Index
volatile
Voltage Regulator VCM
VECl Label
VSM
vss
VI N
VI
VR Service
Manual which pertains
to a major
'unit' (e.g. transmission, engine) fitted to a
Jaguar vehicle (see also Vehicle Service
Manual and Electrical Diagnostic Manual)
a device
by which the flow of liquid, gas,
vacuum or loose materials may be started,
stopped or regulated by a movable part
which opens, shuts or partially obstructs one
or more passageways or ports.
A 'Valve' is
also the movable part of such a device
in an OHC engine, the plunger fitted between
valve stem and cam lobe
instrument panel display which warns of
faults
Service Manual which pertains to a specific
family of Jaguar vehicles (see
also Unit
Service Manual and Electrical Diagnostic
Manual).
sensor which provides vehicle speed
information
number assigned to the vehicle
by the
manufacturer, primarily
for licensing and
identification purposes
(1) vaporizing at room temperature (liquid) (2) not permanent (memory)
device which regulates the variable output
voltaae of a aenerator underseal
unitary
construc
-
tion
tappet, bucket
vapour
road speed sen
- sor
Issue 1 August 1994 27 X300 VSM
Page 34 of 521
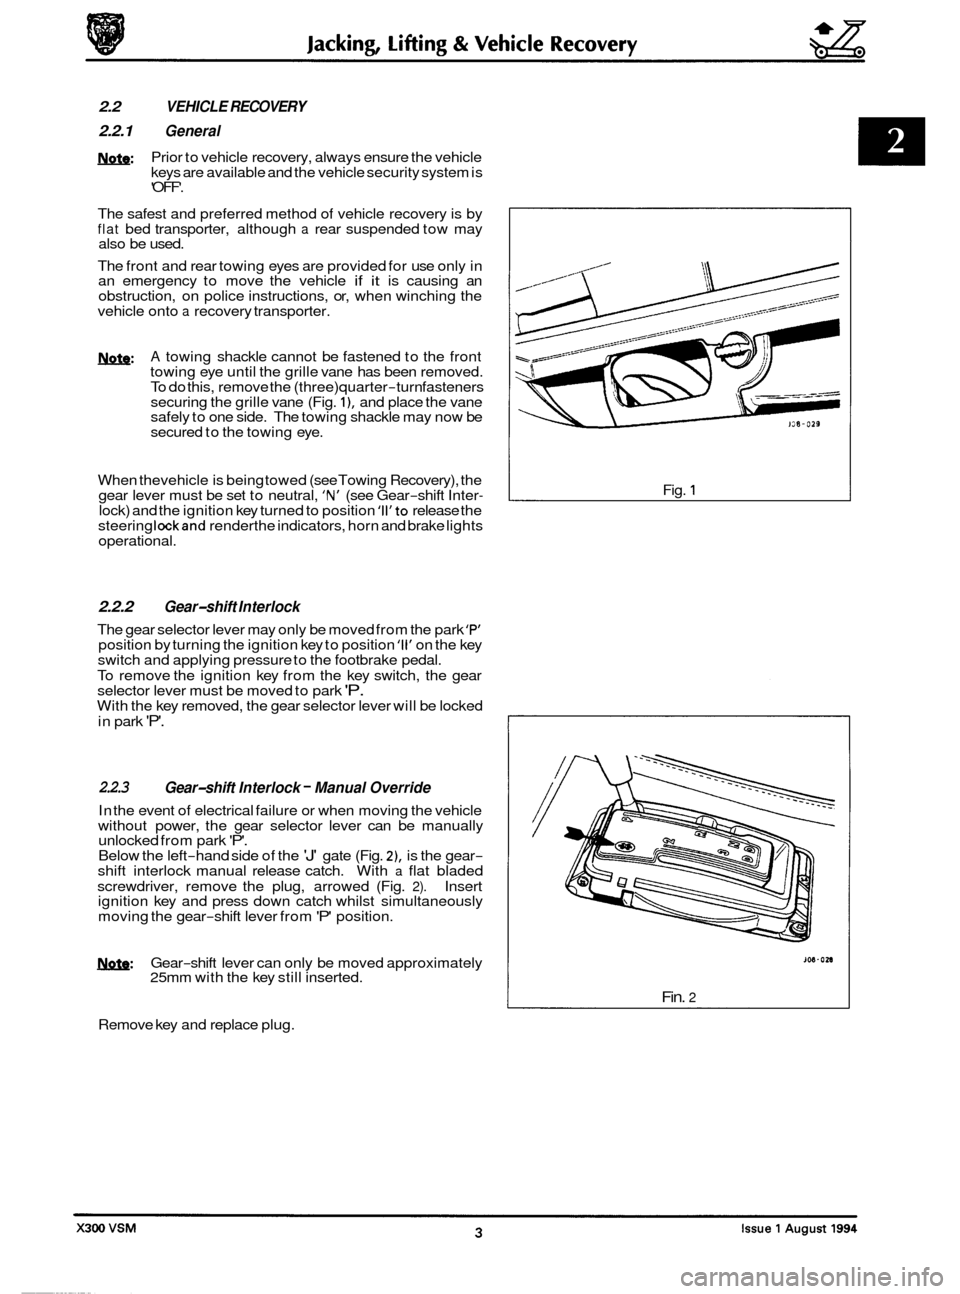
2.2 VEHICLE RECOVERY
8 2.2.1 General
m: Prior to vehicle recovery, always ensure the vehicle
keys are available and the vehicle security system is
'OFF'.
The safest and preferred method of vehicle recovery is by
flat bed transporter, although a rear suspended tow may
also be used.
The front and rear towing eyes are provided for use only in
an emergency to move the vehicle
if it is causing an
obstruction, on police instructions, or, when winching the
vehicle onto a recovery transporter.
m: A towing shackle cannot be fastened to the front
towing eye until the grille vane has been removed.
To do this, remove the (three) quarter
-turn fasteners
securing the grille vane (Fig. I), and place the vane
safely to one side. The towing shackle may now be
secured to the towing eye.
0 When thevehicle is being towed (see Towing Recovery), the
gear lever must be set to neutral, 'N' (see Gear-shift Inter- lock) and the ignition key turned to position 'II'to release the
steering lockand renderthe indicators, horn and brake lights
operational.
2.2.2 Gear-shift Interlock
The gear selector lever may only be moved from the park 'F" position by turning the ignition key to position '11' on the key
switch and applying pressure to the footbrake pedal.
To remove the ignition key from the key switch, the gear
selector lever must be moved to park
'P. With the key removed, the gear selector lever will be locked
in park
'P'.
2.2.3
In the event of electrical failure or when moving the vehicle
without power, the gear selector lever can be manually
unlocked from park
'P'. Below the left-hand side of the 'J' gate (Fig. Z), is the gear- shift interlock manual release catch. With a flat bladed
screwdriver, remove the plug, arrowed (Fig. 2). Insert
ignition key and press down catch whilst simultaneously
moving the gear
-shift lever from 'P' position.
Gear-shift Interlock - Manual Override
U: Gear-shift lever can only be moved approximately
25mm with the key still inserted.
Remove key and replace plug. Fig.
1
Fin. 2
Page 43 of 521
Engine (AJ16)
3.1.2 ENGlNE/ TRANSMlSSlON UN/& RENEW
SRO 12.41.02/20
The engine/transmission unit on the AJ 16 normally aspirated and supercharged engined vehicles are fitted ontothree
engine mounting/bracket assemblies. The two front engine mountings for the 3.2/4.0 liter normally aspirated and the
4.0 liter supercharged engined vehicles are identical. They are fitted to the front crossmember on either side of the
engine bay. Rubber to metal
engine/transmission rear mounts used for both engine types, are secured to a support
bracket which traverses the two body underframe longitudinal members. For access to remove the engine carry out the following procedures:
WARNING: WHEN WORKING WlTHlN THE ENGINE COMPARTMENT, KEEP CLEAR OF THE RADIATOR COOLING
FANS AS THEY COULD START WITHOUT WARNING EVEN IF THE ENGINE IS NOT RUNNING.
. Remove the hood, see SRO 76.16.01, section 13
. Remove the air cleaner assembly.
. Depressurize the fuel system, see SRO 19.50.02, section 5.1.
Disconnect the battery.
. In line with the relevant SRO's and sections, remove all appropriate obstructing parts, including their fixing and
. Disconnect all mechanical and isolate all electrical linkages leading to and from the engine.
. De-gas the airconditioning system, see section 14, Charge Recovery (System depressurization).
mounting
arrangements.
CAUTION : Do not vent refrigerant directly to the atmosphere and always use Jaguar approved recovery/recycle/re- charge equipment.
. Drain the engine oil, see 3.1.3 this section.
. Drain the coolant, see SRO 26.10.01, section 4.1.
WARNING: DO NOT REMOVE THE HEADER TANK PRESSURE CAP WHILE THE ENGINE IS HOT. IF THE CAP MUST
BE REMOVED, PROTECT THE HANDS AGAINST ESCAPING STEAM AND SLOWLY TURN THE CAP ANTI- CLOCKWISE UNTILTHE EXCESS PRESSURE CAN ESCAPE. LEAVETHE CAP IN THIS POSITION UNTIL ALL
STEAM AND PRESSURE HAS ESCAPED AND THEN REMOVE THE CAP COMPLETELY.
Before lifting the complete engine/transmission unit with an engine hoist from the engine bay, ensure that two engine
lifting brackets (tool 18G. 1465) are secured equally spaced to the inlet manifold studs. The engine lifting brackets
should be positioned towards the front and the rear of the assembly. Ensure the front of the vehicle is jacked
up secure- ly on stands when removing the assembly.
e
0
0
X300 VSM Issue 1 August 1994 2
Page 49 of 521
3.2.2 ENGINE - GEARBOX/ TRANSMISSION
ASSEMBLY, RENEW
SRO 12.37.01/90
The engine /transmission unit on the V12 6.0 liter model is mounted on three engine mounting / bracket assemblies
fitted to the front crossmember on either side of the engine bay. The engine/ transmission rear mount is a mounting
bracket and spring assembly fitted and secured to body underframe longitudinal members. For access to remove the
engine carry
out the following procedures:
WARNING: WHEN WORKING WITHIN THE ENGINE COMPARTMENT, KEEP CLEAR OF THE RADIATOR COOLING
FANS AS THEY COULD START WITHOUT WARNING, EVEN IF THE ENGINE IS NOT RUNNING.
. Remove the hood, see SRO 76.16.01, section 13.
. Remove the two air cleaner assemblies, see SRO’s 19.10.01 & 19.10.02.
. Remove the engine cover, see SRO 12.29.93 (V12 Engine Service Manual).
Depressurize the fuel system, see SRO 19.50.02, section 5.1.
In line with the relevant SRO’s and sections, remove all appropriate obstructing parts, including their fixing and
. Disconnect all mechanical and isolate all electrical linkages leading to and from the engine.
. De-gas the air conditioning system, see section 14, Charge Recovery (System depressurization).
Disconnect
the battery.
mounting arrangements.
CAUTION: Do
not vent refrigerant directly to the atmosphere and always use Jaguar approved recovery/recycle/ra charge equipment.
Drain the engine oil, see 3.2.3 this section.
Drain the coolant, see SRO 26.10.01, section 4.1.
WARNING: DO NOT REMOVE THE HEADER TANK PRESSURE CAP WHILE THE ENGINE IS HOT. IF THE CAP MUST
BE REMOVED, PROTECT THE HANDS AGAINST ESCAPING STEAM AND SLOWLY TURN THE CAP ANTI- CLOCKWISE UNTIL THE EXCESS PRESSURE CAN ESCAPE. LEAVE THE CAP IN THIS POSITION UNTIL ALL
STEAM AND PRESSURE HAS ESCAPED AND THEN REMOVE THE CAP COMPLETELY.
Before
lifting the complete engine/transmission unit with an engine hoist from the engine bay, ensure that two engine
lifting brackets (tool 18G. 1465) are secured equallyspaced to the inlet manifold studs. The four engine lifting brackets
should be positioned towards the front and the rear of the assembly. Ensure the front of thevehicle is jacked
up secure- ly on stands when removing the assembly.
X300 VSM Issue 1 August 1994 2
Page 56 of 521
Cooling System (AJl6) m
4.1.1 COOLING SYSTEM DESCRIPTION
4.1.1.1 Major Components
o Main engine crossflow radiator, incorporating a concentric tube cooler for the power steering fluid mounted in
the right
-hand radiator side tank. Vehicles with automatic transmission have a transmission fluid cooler
mounted in the left
-hand radiator side tank; for 4,O liter supercharged engines a six-plate cooler is fitted; other
vehicles have
a tube-type cooler. Adouble-action temperature switch, for controlling the radiator cooling fans,
is mounted in the left
-hand radiator side tank.
0 Two electrically operated radiator cooling fans, mounted behind the main radiator.
0 Coolant circulating pump, belt driven from the engine crankshaft.
0 Coolant header tank with pressure relief cap and coolant level probe.
o Engine thermostat.
4.1.1.2
0 Heater matrix.
o Electrically operated coolant circulating pump, mounted on the left-hand side of the engine bulkhead.
o Solenoid operated valve, located adjacent to the coolant circulating pump.
Components for Climate Control System
4.1.1.3 Components for Supercharged Engine
0 0 Supercharger crossflow radiator, mounted in front of the main radiator. The supercharger radiator is reverse- circuited, i.e. the coolant inlet is at the bottom of the radiator.
0 Electrically operated coolant circulating pump, located at the left-hand side of the main radiator.
4.1.1.4 Operation
The configuration of the cooling system for normally aspirated and supercharged (4,O liter) engines is shown in Sub- section 4.1.2.
The cooling system is pressurized, which allows the system to operate at a higher temperature without overheating.
The header tank is fitted with a pressure relief cap to protect the system against overpressure.
Under cold start conditions, coolant is forced by the engine driven water pump through the cylinder block and cylinder
head to the thermostat housing. The thermostat is closed to give rapid engine warm up, hence the coolant is returned
directly to the water pump inlet. When normal engine operating temperature is reached, the thermostat opens and
coolant is diverted through the radiator before returning to the water pump inlet. In vehicles fitted with
a supercharger,
coolant is circulated through the supercharger radiator and intercooler by the supercharger water pump. The super- charger cooling circuit uses the same coolant header tank as the main engine cooling system.
The radiator cooling fans operate in series and parallel under the control of the double
-action radiator mounted tem- perature switch. The fans are also controlled by the climate control system on vehicles fitted with air conditioning.
Under hot operating conditions, the fans may continue to operate after the engine has been switched off. The fans
stop automatically when the coolant temperature has been reduced sufficiently.
The system also provides the coolant supply for the climate control system, which is described in Section
14.
X300 VSM 1 Issue 1 August 1994
Page 58 of 521
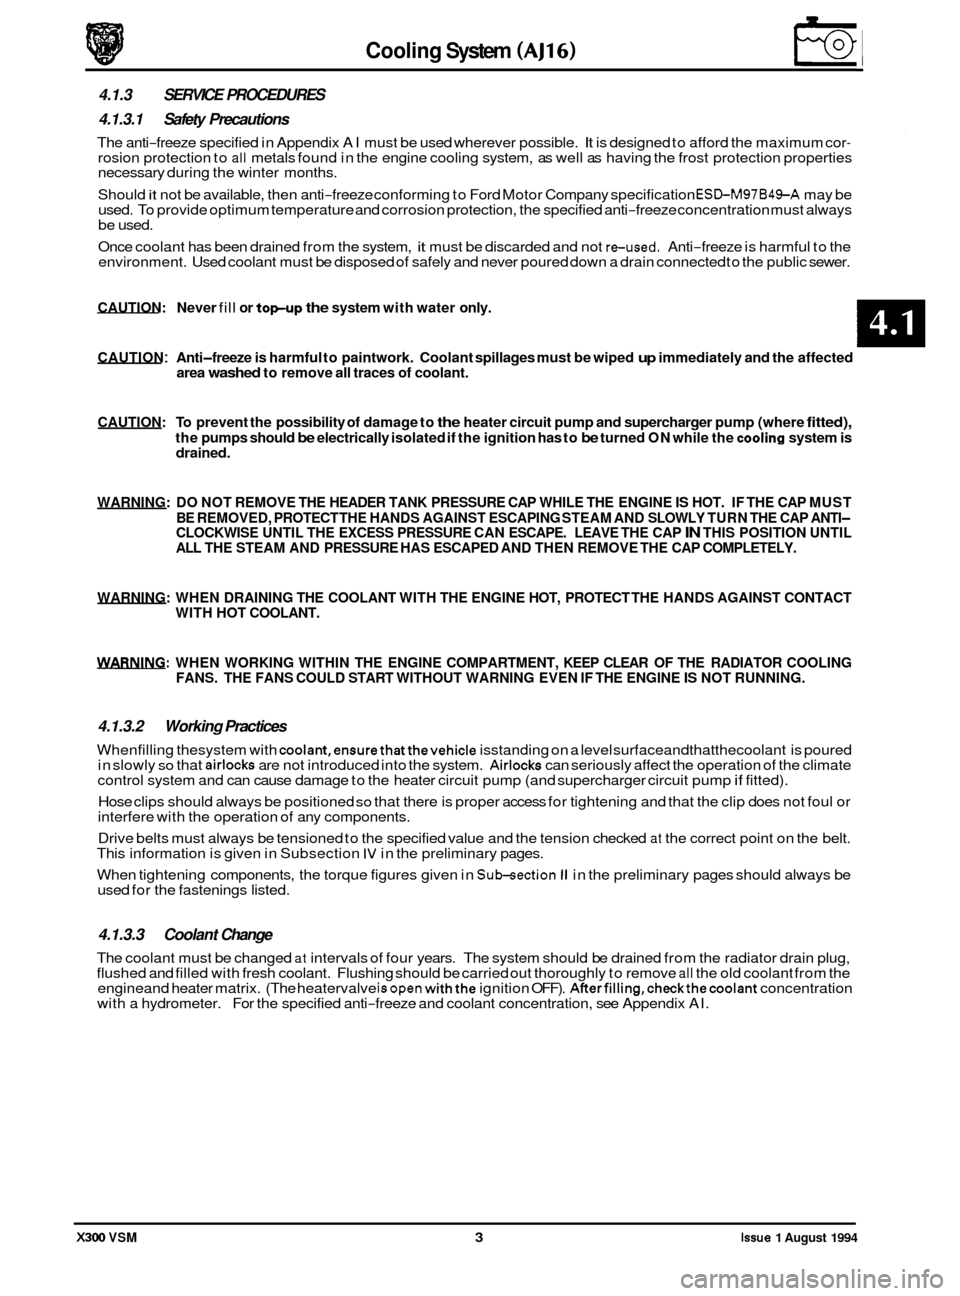
area washed to remove all traces of coolant.
CAUTION: To prevent the possibility of damage to the heater circuit pump and supercharger pump (where fitted),
the pumps should be electrically isolated if the ignition has to be turned ON while the cooling system is
drained.
WARNING: DO NOT REMOVE THE HEADER TANK PRESSURE CAP WHILE THE ENGINE IS HOT. IF THE CAP MUST
BE REMOVED, PROTECT THE HANDS AGAINST ESCAPING STEAM AND SLOWLY TURN THE CAP ANTI
- CLOCKWISE UNTIL THE EXCESS PRESSURE CAN ESCAPE. LEAVE THE CAP IN THIS POSITION UNTIL
ALL THE STEAM AND PRESSURE HAS ESCAPED AND THEN REMOVE THE CAP COMPLETELY.
WARNING: WHEN DRAINING THE COOLANT WITH THE ENGINE HOT, PROTECT THE HANDS AGAINST CONTACT
WITH HOT COOLANT.
WARNING: WHEN WORKING WITHIN THE ENGINE COMPARTMENT, KEEP CLEAR OF THE RADIATOR COOLING
FANS. THE FANS COULD START WITHOUT WARNING EVEN IF THE ENGINE IS NOT RUNNING.
4.1.3.2 Working Practices
Whenfilling thesystem with coolant,ensurethatthevehicle isstanding on a level surfaceandthatthecoolant is poured
in slowly so that airlocks are not introduced into the system. Airlocks can seriously affect the operation of the climate
control system and can cause damage to the heater circuit pump (and supercharger circuit pump if fitted).
Cooling System (AJ16)
4.1.3 SERVICE PROCEDURES
4.1.3.1 Safety Precautions
The anti-freeze specified in Appendix AI must be used wherever possible. It is designed to afford the maximum cor- rosion protection to all metals found in the engine cooling system, as well as having the frost protection properties
necessary during the winter months.
Should
it not be available, then anti-freeze conforming to Ford Motor Company specification ESLbM97B49-A may be
used. To provide optimum temperature and corrosion protection, the specified anti-freeze concentration must always
be used.
Once coolant has been drained from the system,
it must be discarded and not reused. Anti-freeze is harmful to the
environment. Used coolant must be disposed of safely and never poured down a drain connected to the public sewer.
CAUTION: Never fill or topup the system with water only.
CAUTION : Anti-freeze is harmful to paintwork. Coolant spillages must be wiped up immediately and the affected
Hose clips should always be positioned so that there is proper access for tightening and that the clip does not foul or
interfere with the operation of any components.
Drive belts must always be tensioned to the specified value and the tension checked
at the correct point on the belt.
This information is given in Subsection IV in the preliminary pages.
0
When tightening components, the torque figures given in Sukection II in the preliminary pages should always be
used for the fastenings listed.
4.1.3.3 Coolant Change
The coolant must be changed at intervals of four years. The system should be drained from the radiator drain plug,
flushed and filled with fresh coolant. Flushing should be carried out thoroughly to remove all the old coolant from the
engineand heater matrix. (The heatervalve isopen withthe ignition OFF). AfterfiIling,checkthecoolant concentration
with a hydrometer. For the specified anti-freeze and coolant concentration, see Appendix AI.
X300 VSM 3 Issue 1 August 1994
Page 61 of 521
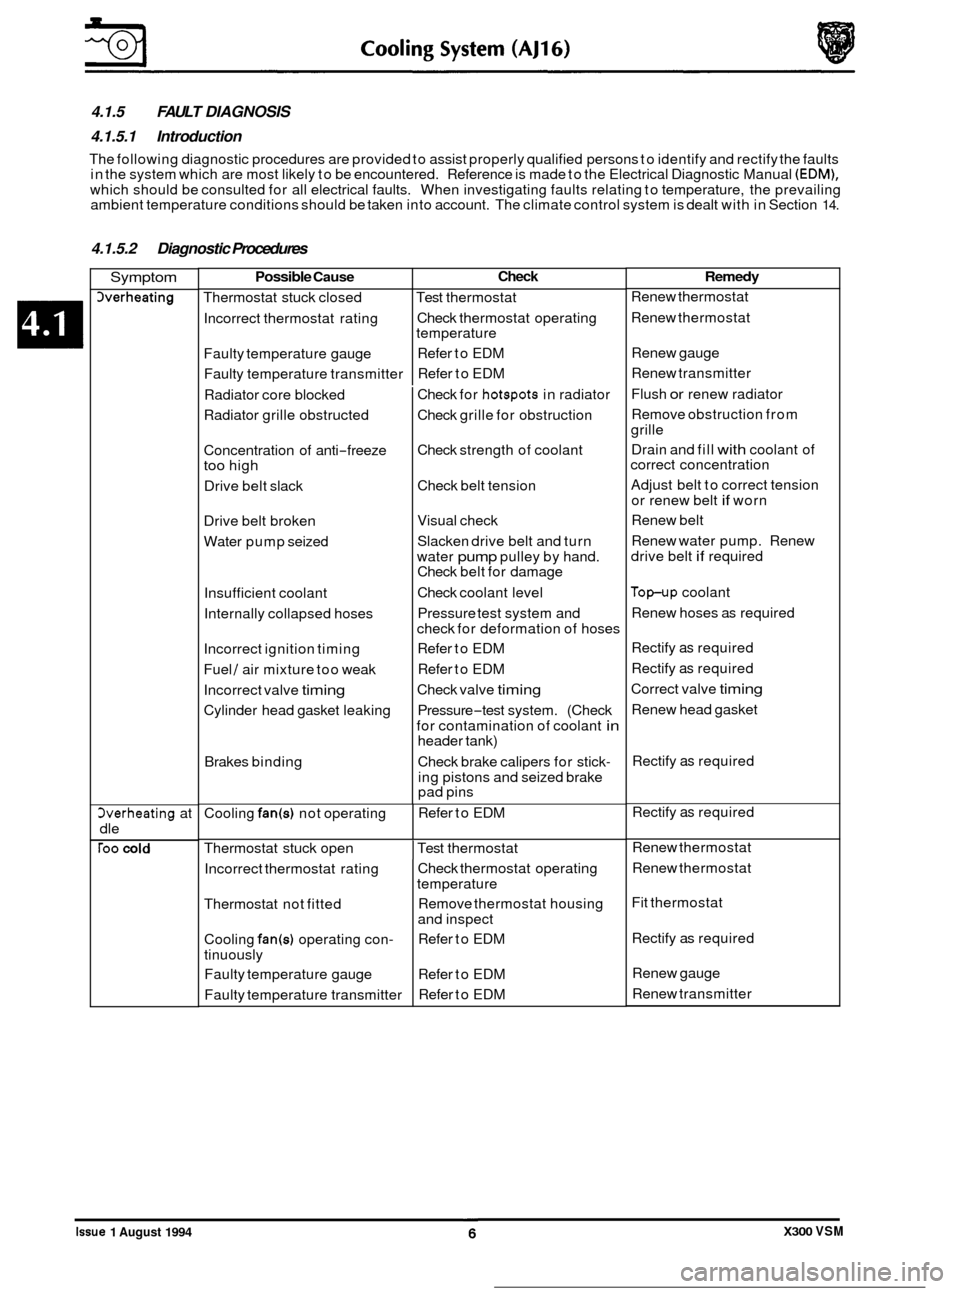
4.1.5 FAULT DIAGNOSIS
4.1.5.1 Introduction
The following diagnostic procedures are provided to assist properly qualified persons to identify and rectify the faults
in the system which are most likely to be encountered. Reference is made to the Electrical Diagnostic Manual (EDM),
which should be consulted for all electrical faults. When investigating faults relating to temperature, the prevailing
ambient temperature conditions should be taken into account. The climate control system is dealt with in Section 14.
Possible Cause
Thermostat stuck closed
Incorrect thermostat rating
Faulty temperature gauge
Faulty temperature transmitter
4.1.5.2 Diagnostic Procedures
Check
Test thermostat
Check thermostat operating
temperature
Refer to EDM
Refer to EDM
Symptom
herheating
Cooling fan(s) not operating 3verheating at
dle
roo cold
Refer to EDM
Incorrect thermostat rating
Thermostat not fitted
Cooling
fan(s) operating con-
tinuously Faulty temperature gauge
Faulty temperature transmitter
Radiator
core blocked
Radiator grille obstructed
Check thermostat operating
temperature
Remove thermostat housing
and inspect
Refer to EDM
Refer to EDM
Refer to EDM
Concentration of
anti
-freeze too high
Drive belt slack
Drive belt broken
Water pump seized
Insufficient coolant
Internally collapsed hoses
Incorrect ignition timing
Fuel
/ air mixture too weak
Incorrect valve
timing
Cylinder head gasket leaking
Brakes binding Check
for
hotspots in radiator
Check grille for obstruction
Check strength of coolant
Check belt tension
Visual check
Slacken drive belt and turn
water
pump pulley by hand.
Check belt for damage
Check coolant level
Pressure test system and
check for deformation of hoses
Refer to EDM
Refer to EDM
Check valve
timing
Pressure-test system. (Check
for contamination of coolant
in header tank)
Check brake calipers for stick
-
ing pistons and seized brake
pad pins
Thermostat stuck open
I Test thermostat
Remedy
Renew thermostat
Renew thermostat
Renew gauge
Renew transmitter
Flush
or renew radiator
Remove obstruction from
grille
Drain and fill
with coolant of
correct concentration
Adjust belt to correct tension
or renew belt
if worn
Renew belt
Renew water pump. Renew
drive belt
if required
Top-up coolant
Renew hoses as required
Rectify
as required
Rectify
as required
Correct valve
timing
Renew head gasket
Rectify
as required
Rectify
as required
Renew thermostat
Renew thermostat
Fit thermostat
Rectify
as required
Renew gauge
Renew transmitter
0
e
0
0
Issue 1 August 1994 X300 VSM