JEEP CHEROKEE 1994 Service Repair Manual
Manufacturer: JEEP, Model Year: 1994, Model line: CHEROKEE, Model: JEEP CHEROKEE 1994Pages: 1784, PDF Size: 77.09 MB
Page 1711 of 1784

New service ports are used to ensure that the sys-
tem is not accidentally filled with the wrong refriger-
ant.
Due to the different characteristics of R-134a it re-
quires all new service procedures. Refer to Refriger-
ant Service Procedures in this section before making
any repairs to the air conditioning system.
Chrysler Corporation recommends that a
R-134a refrigerant Recovery/Recycling Station
that meets SAE standard J2210 be used.Refer tothe operating instructions provided with the equip-
ment for proper operation.
REFRIGERANT OIL
R-134a refrigerant requires a special type of com-
pressor oil. The system uses polyalklene glycol syn-
thetic wax-free refrigerant oil SP-20 PAG. No other
oil should be used.
R-12 compressor oil can not be mixed with the
R-134a compressor oil. They ARE NOT compatible.
2 AIR CONDITIONINGJ
Page 1712 of 1784
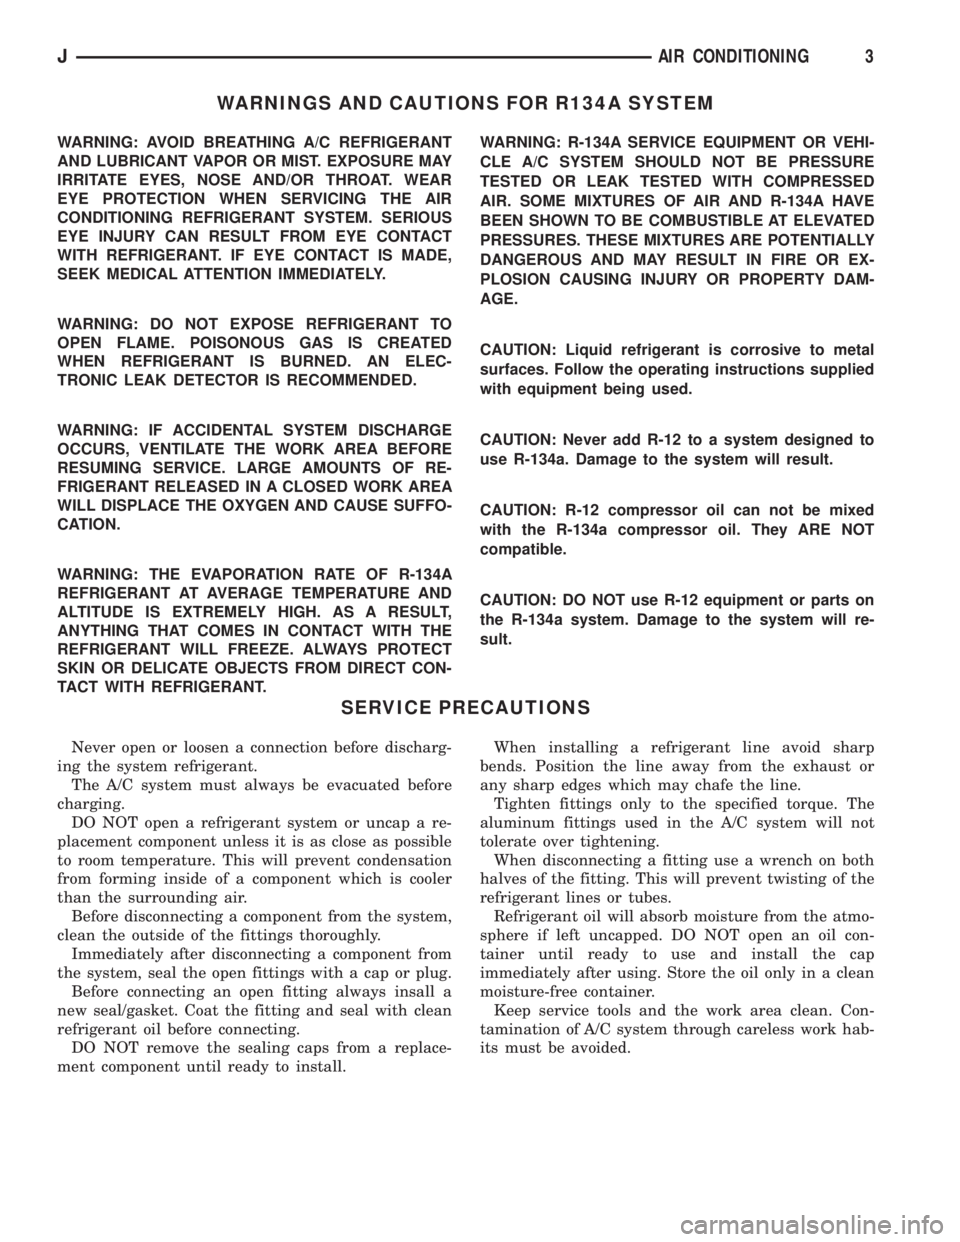
WARNINGS AND CAUTIONS FOR R134A SYSTEM
WARNING: AVOID BREATHING A/C REFRIGERANT
AND LUBRICANT VAPOR OR MIST. EXPOSURE MAY
IRRITATE EYES, NOSE AND/OR THROAT. WEAR
EYE PROTECTION WHEN SERVICING THE AIR
CONDITIONING REFRIGERANT SYSTEM. SERIOUS
EYE INJURY CAN RESULT FROM EYE CONTACT
WITH REFRIGERANT. IF EYE CONTACT IS MADE,
SEEK MEDICAL ATTENTION IMMEDIATELY.
WARNING: DO NOT EXPOSE REFRIGERANT TO
OPEN FLAME. POISONOUS GAS IS CREATED
WHEN REFRIGERANT IS BURNED. AN ELEC-
TRONIC LEAK DETECTOR IS RECOMMENDED.
WARNING: IF ACCIDENTAL SYSTEM DISCHARGE
OCCURS, VENTILATE THE WORK AREA BEFORE
RESUMING SERVICE. LARGE AMOUNTS OF RE-
FRIGERANT RELEASED IN A CLOSED WORK AREA
WILL DISPLACE THE OXYGEN AND CAUSE SUFFO-
CATION.
WARNING: THE EVAPORATION RATE OF R-134A
REFRIGERANT AT AVERAGE TEMPERATURE AND
ALTITUDE IS EXTREMELY HIGH. AS A RESULT,
ANYTHING THAT COMES IN CONTACT WITH THE
REFRIGERANT WILL FREEZE. ALWAYS PROTECT
SKIN OR DELICATE OBJECTS FROM DIRECT CON-
TACT WITH REFRIGERANT.WARNING: R-134A SERVICE EQUIPMENT OR VEHI-
CLE A/C SYSTEM SHOULD NOT BE PRESSURE
TESTED OR LEAK TESTED WITH COMPRESSED
AIR. SOME MIXTURES OF AIR AND R-134A HAVE
BEEN SHOWN TO BE COMBUSTIBLE AT ELEVATED
PRESSURES. THESE MIXTURES ARE POTENTIALLY
DANGEROUS AND MAY RESULT IN FIRE OR EX-
PLOSION CAUSING INJURY OR PROPERTY DAM-
AGE.
CAUTION: Liquid refrigerant is corrosive to metal
surfaces. Follow the operating instructions supplied
with equipment being used.
CAUTION: Never add R-12 to a system designed to
use R-134a. Damage to the system will result.
CAUTION: R-12 compressor oil can not be mixed
with the R-134a compressor oil. They ARE NOT
compatible.
CAUTION: DO NOT use R-12 equipment or parts on
the R-134a system. Damage to the system will re-
sult.
SERVICE PRECAUTIONS
Never open or loosen a connection before discharg-
ing the system refrigerant.
The A/C system must always be evacuated before
charging.
DO NOT open a refrigerant system or uncap a re-
placement component unless it is as close as possible
to room temperature. This will prevent condensation
from forming inside of a component which is cooler
than the surrounding air.
Before disconnecting a component from the system,
clean the outside of the fittings thoroughly.
Immediately after disconnecting a component from
the system, seal the open fittings with a cap or plug.
Before connecting an open fitting always insall a
new seal/gasket. Coat the fitting and seal with clean
refrigerant oil before connecting.
DO NOT remove the sealing caps from a replace-
ment component until ready to install.When installing a refrigerant line avoid sharp
bends. Position the line away from the exhaust or
any sharp edges which may chafe the line.
Tighten fittings only to the specified torque. The
aluminum fittings used in the A/C system will not
tolerate over tightening.
When disconnecting a fitting use a wrench on both
halves of the fitting. This will prevent twisting of the
refrigerant lines or tubes.
Refrigerant oil will absorb moisture from the atmo-
sphere if left uncapped. DO NOT open an oil con-
tainer until ready to use and install the cap
immediately after using. Store the oil only in a clean
moisture-free container.
Keep service tools and the work area clean. Con-
tamination of A/C system through careless work hab-
its must be avoided.
JAIR CONDITIONING3
Page 1713 of 1784
AIR CONDITIONING EQUIPMENT
WARNING: EYE PROTECTION MUST BE USED
WHEN SERVICING AN AIR CONDITIONING REFRIG-
ERANT SYSTEM. TURN OFF (ROTATE CLOCKWISE)
ALL VALVES ON THE EQUIPMENT BEING USED
BEFORE PROCEEDING WITH THIS OPERATION.
PERSONNEL INJURY CAN RESULT.
When servicing an air conditioning system, a
R-134a Charging Station and a Recovery/Recycling
Station is required. These devices must meet SAE
standard J2210. Refer to the operating instructions
provided with the equipment for proper operation.
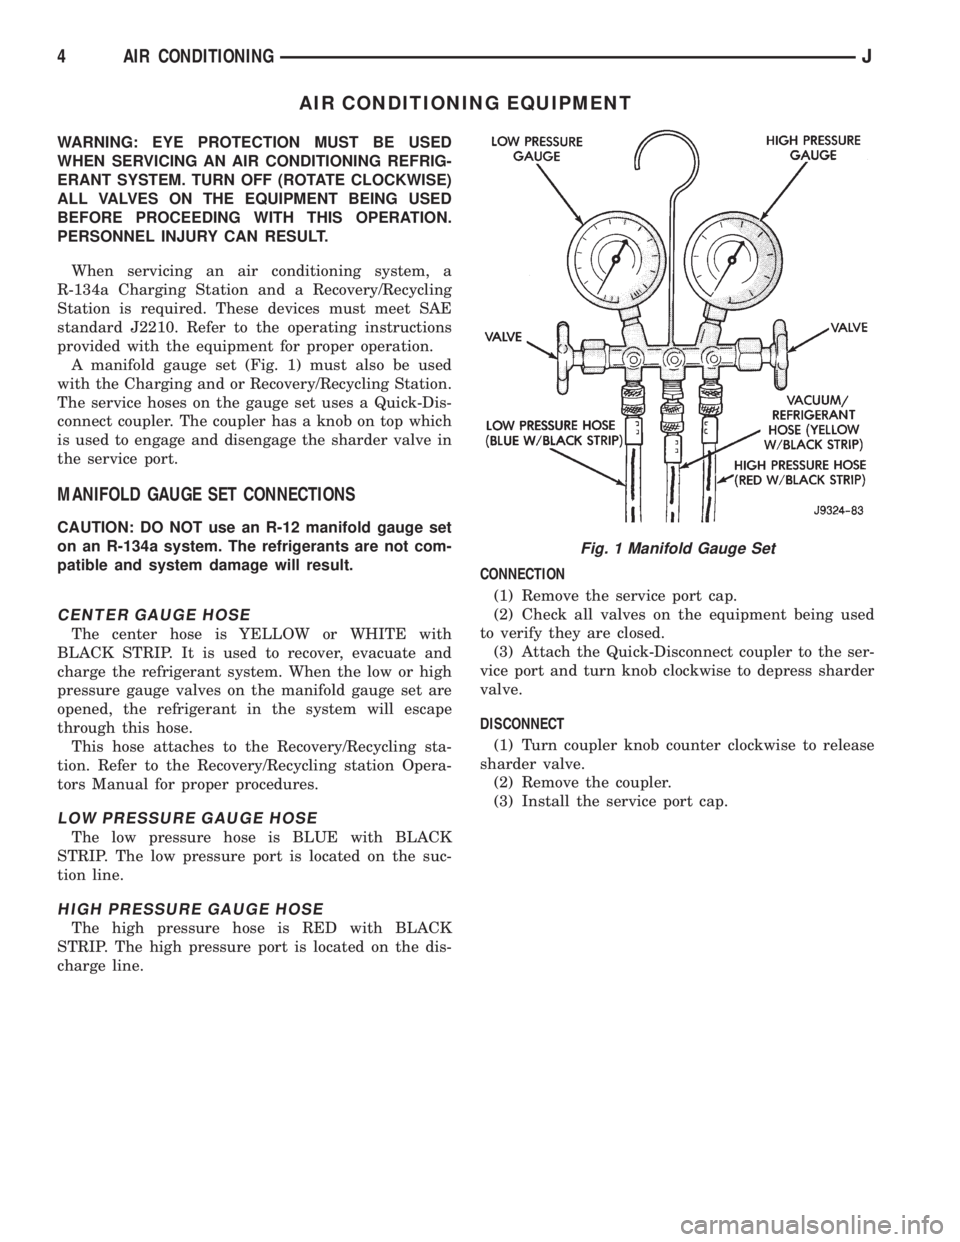
A manifold gauge set (Fig. 1) must also be used
with the Charging and or Recovery/Recycling Station.
The service hoses on the gauge set uses a Quick-Dis-
connect coupler. The coupler has a knob on top which
is used to engage and disengage the sharder valve in
the service port.
MANIFOLD GAUGE SET CONNECTIONS
CAUTION: DO NOT use an R-12 manifold gauge set
on an R-134a system. The refrigerants are not com-
patible and system damage will result.
CENTER GAUGE HOSE
The center hose is YELLOW or WHITE with
BLACK STRIP. It is used to recover, evacuate and
charge the refrigerant system. When the low or high
pressure gauge valves on the manifold gauge set are
opened, the refrigerant in the system will escape
through this hose.
This hose attaches to the Recovery/Recycling sta-
tion. Refer to the Recovery/Recycling station Opera-
tors Manual for proper procedures.
LOW PRESSURE GAUGE HOSE
The low pressure hose is BLUE with BLACK
STRIP. The low pressure port is located on the suc-
tion line.
HIGH PRESSURE GAUGE HOSE
The high pressure hose is RED with BLACK
STRIP. The high pressure port is located on the dis-
charge line.CONNECTION
(1) Remove the service port cap.
(2) Check all valves on the equipment being used
to verify they are closed.
(3) Attach the Quick-Disconnect coupler to the ser-
vice port and turn knob clockwise to depress sharder
valve.
DISCONNECT
(1) Turn coupler knob counter clockwise to release
sharder valve.
(2) Remove the coupler.
(3) Install the service port cap.
Fig. 1 Manifold Gauge Set
4 AIR CONDITIONINGJ
Page 1714 of 1784
AIR CONDITIONING PERFORMANCE TESTS
Humidity has an improtant bearing on the tempra-
ture of the air delivered to the vehicle's interior. It is
important to understand the effect humidity has on
the performance of the system. When humidity is
high, the evaporator has to perform a double duty. It
must lower the air temperature and the temperature
of the moisture carried in the air. Condensing the
moisture in the air transfers heat energy into the
evaporator fins and tubing. This reduces the amount
of heat the evaporator can absorb from the air. High
humidity greatly reduces the evaporator 's ability to
lower the temperature of the air.
Evaporator capacity used to reduce the amount of
moisture in the air is not wasted. Wringing some of
the moisture out of the air entering the vehicle adds
to the comfort of the passengers. However, an owner
may expect too much from their air conditioning sys-
tem on humid days. A performance test is the best
way to determine whether or not the system is per-
forming up to standard. This test also provides valu-
able clues to the possible cause of trouble.
PERFORMANCE TEST
Air temperature in test room must be 21ÉC (70ÉF)
minimum for this test.
(1) Connect a Tachometer and manifold gauge set.
(2) Set A/C controls to Max A/C, temperature lever
on full cool and blower on high.
(3) Start engine and adjust idle to 1,000 RPM with
A/C clutch engaged.
(4) Engine should be warmed up with doors, win-
dows and hood closed.(5) Insert a thermometer in the left center A/C out-
let. Operate the engine for 5 minutes. The A/C clutch
may cycle depending on ambient temperatures.
(6) After 5 minutes note the discharge air temper-
ature. If the clutch cycles, take the reading before
the clutch disengages.
(7) Open the hood and disconnect vacuum line go-
ing to the heater water control valve. Observe the
valve arm for movement as the line is disconnected.
If it does not move repair vacuum circuit. Plug the
vacuum line to prevent leakage.
(8) Operate the A/C for 2 more minutes and take
the discharge air temperature reading again. On XJ
vehicles if the temperature increased by more than
2ÉC (5ÉF) check the blend air door cable for correct
operation.
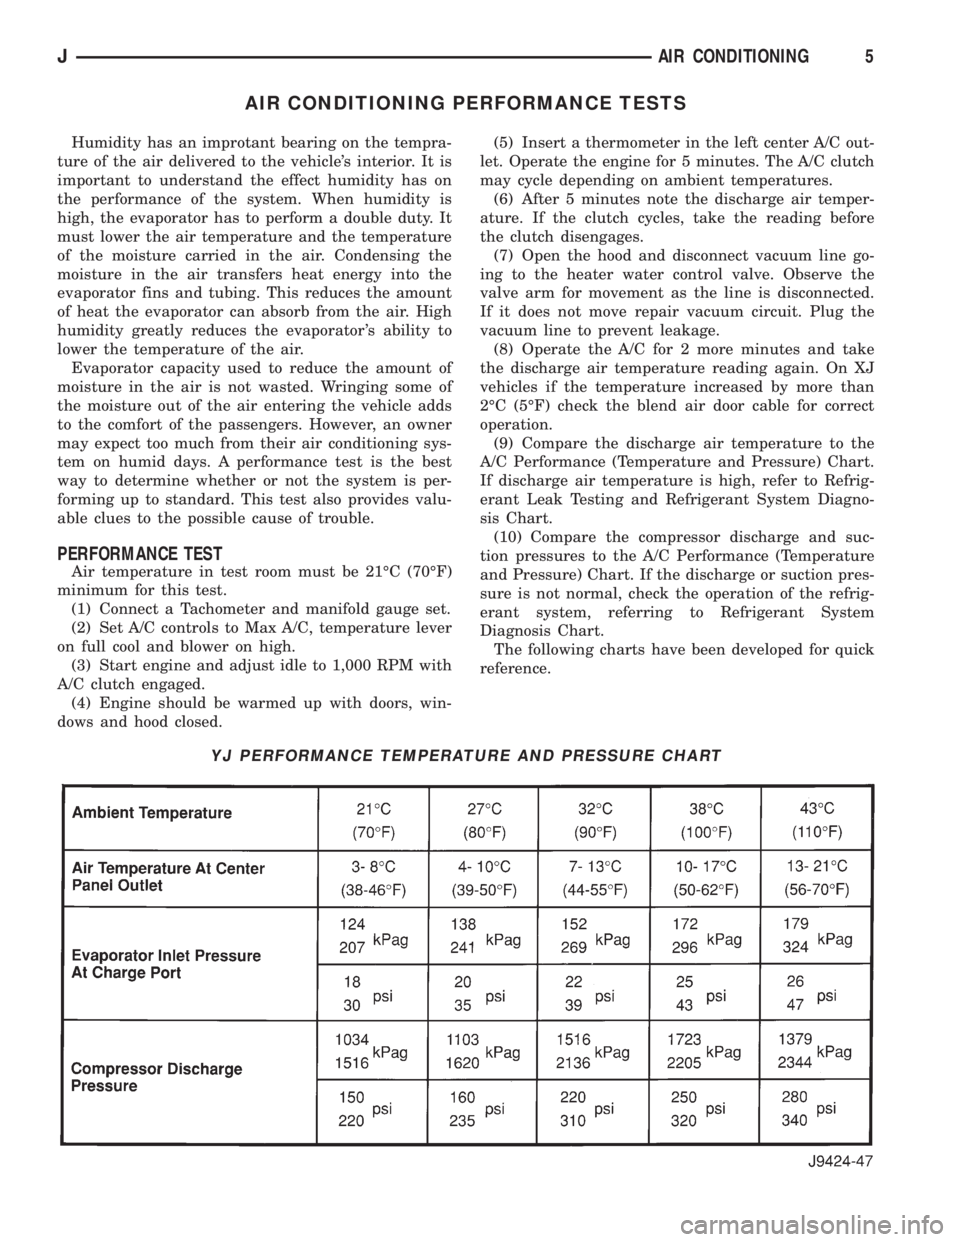
(9) Compare the discharge air temperature to the
A/C Performance (Temperature and Pressure) Chart.
If discharge air temperature is high, refer to Refrig-
erant Leak Testing and Refrigerant System Diagno-
sis Chart.
(10) Compare the compressor discharge and suc-
tion pressures to the A/C Performance (Temperature
and Pressure) Chart. If the discharge or suction pres-
sure is not normal, check the operation of the refrig-
erant system, referring to Refrigerant System
Diagnosis Chart.
The following charts have been developed for quick
reference.
YJ PERFORMANCE TEMPERATURE AND PRESSURE CHART
JAIR CONDITIONING5
Page 1715 of 1784
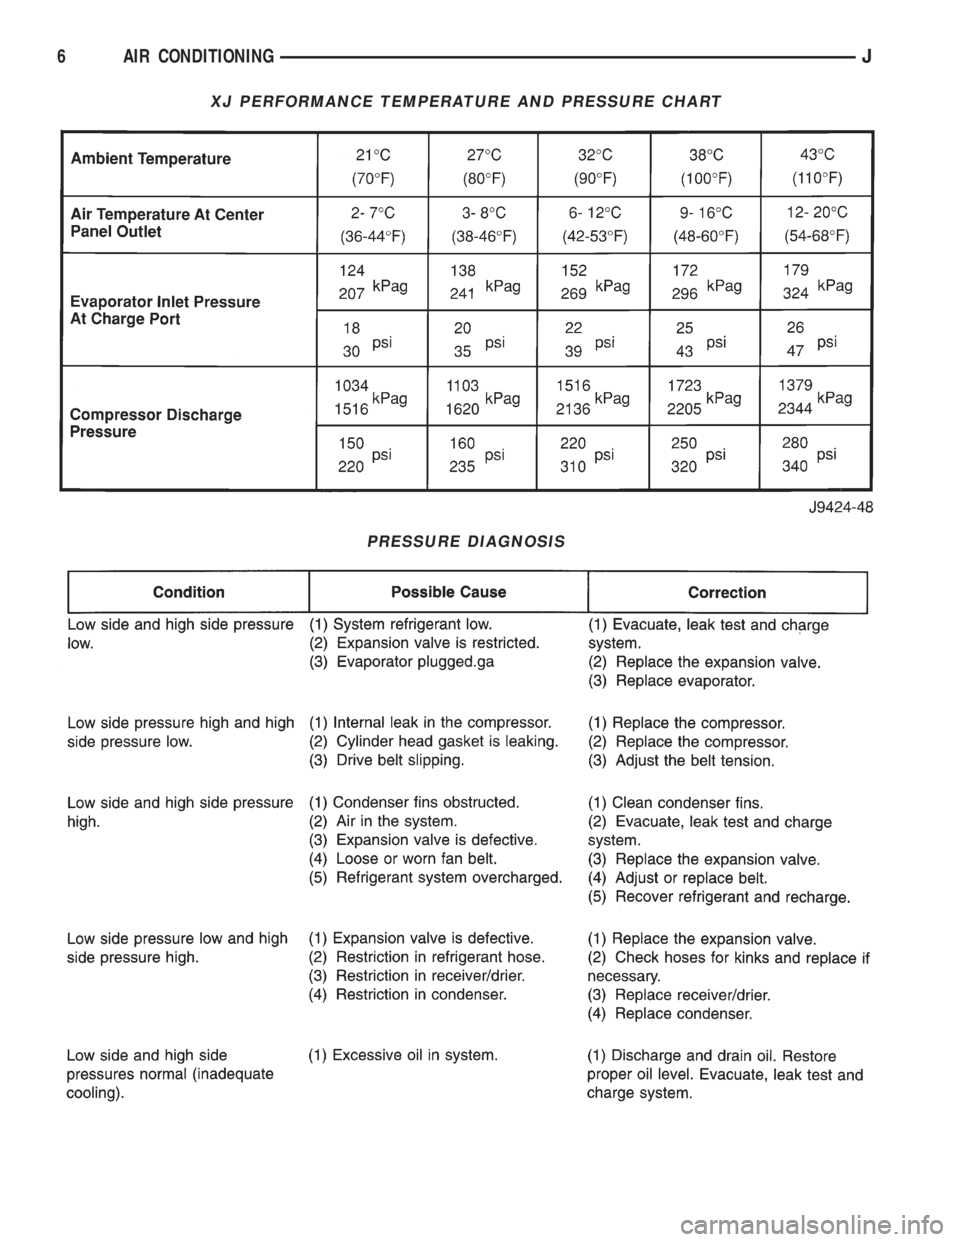
XJ PERFORMANCE TEMPERATURE AND PRESSURE CHART
PRESSURE DIAGNOSIS
6 AIR CONDITIONINGJ
Page 1716 of 1784
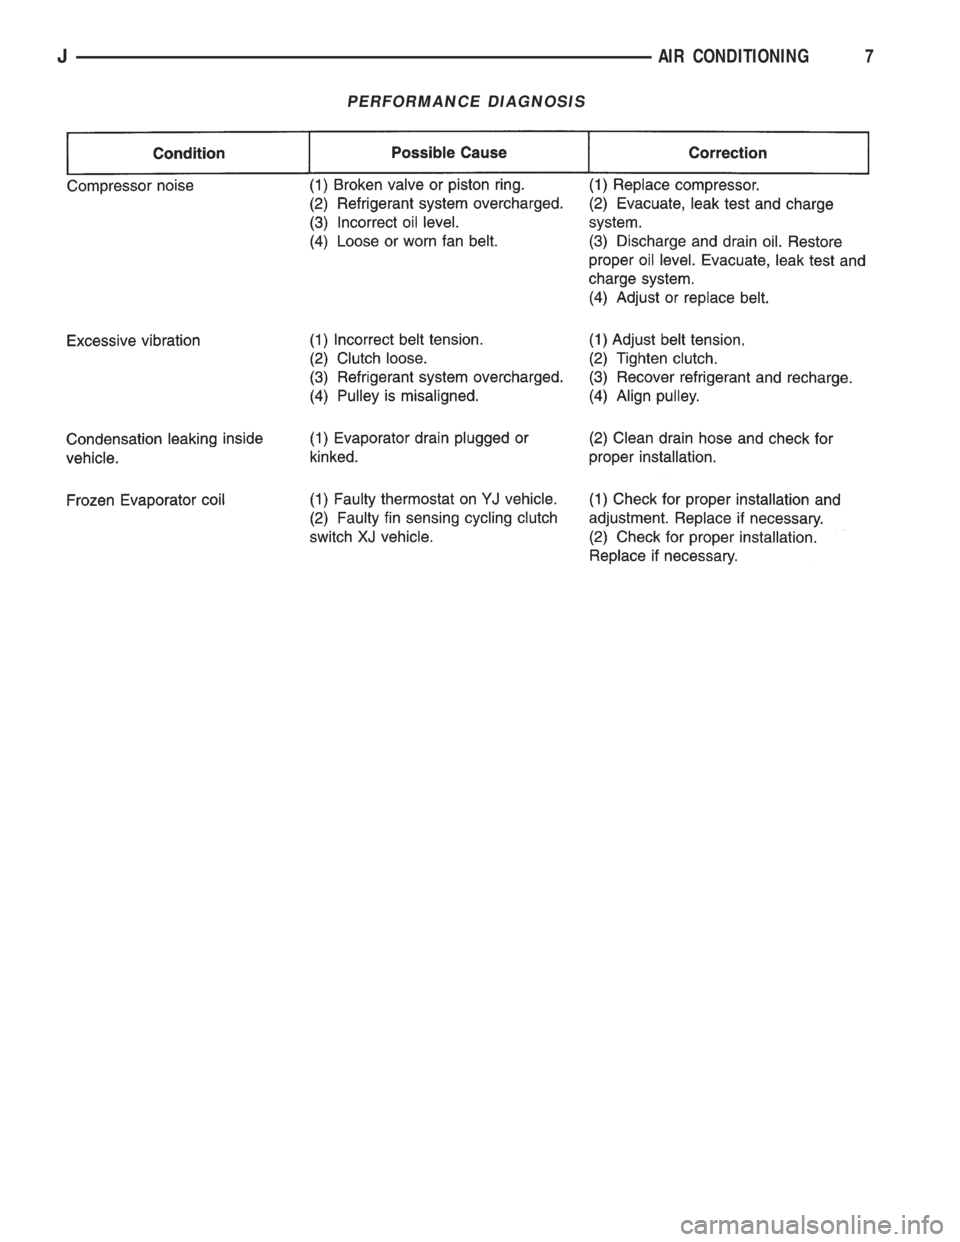
PERFORMANCE DIAGNOSIS
JAIR CONDITIONING7
Page 1717 of 1784
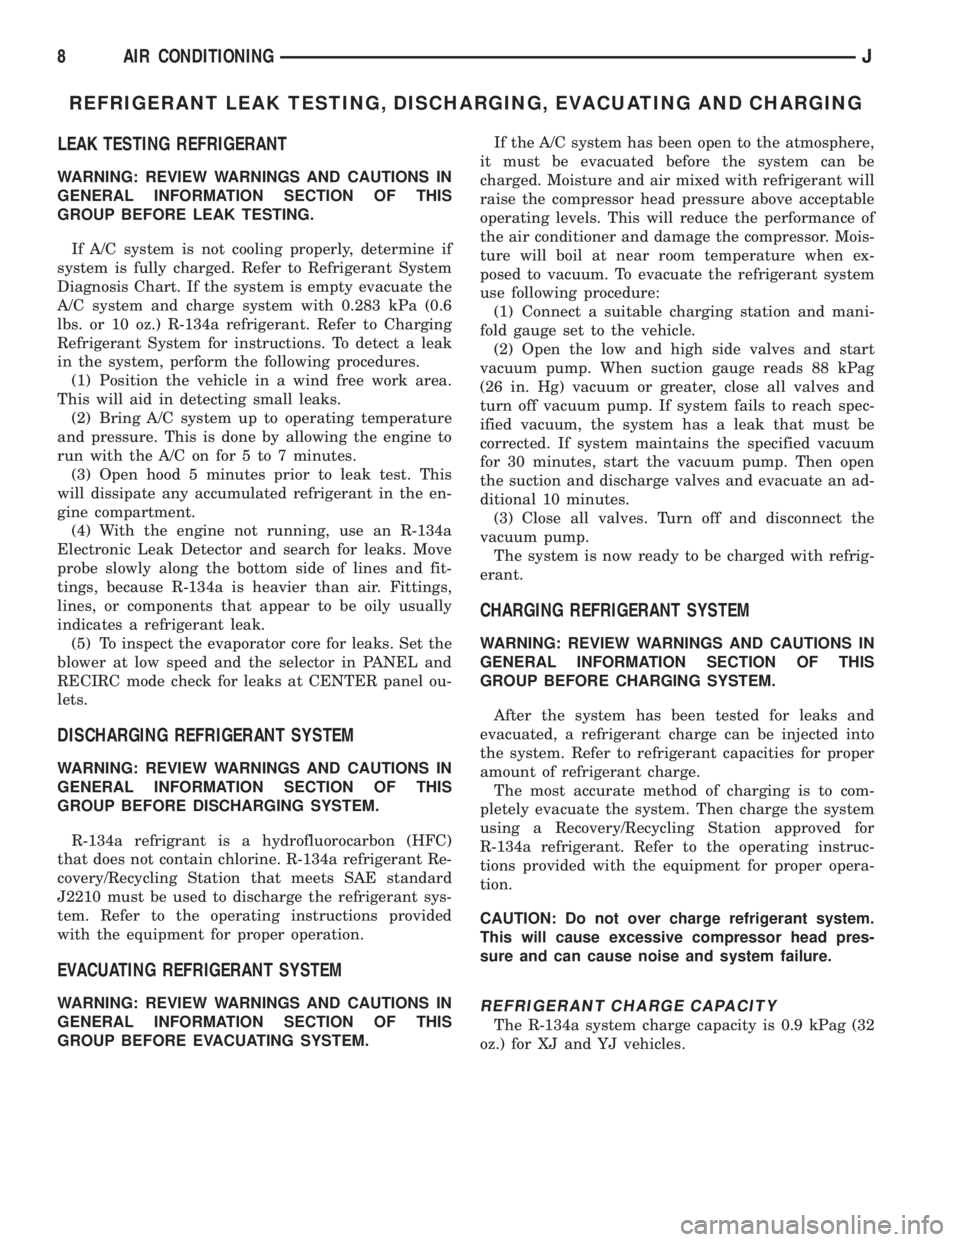
REFRIGERANT LEAK TESTING, DISCHARGING, EVACUATING AND CHARGING
LEAK TESTING REFRIGERANT
WARNING: REVIEW WARNINGS AND CAUTIONS IN
GENERAL INFORMATION SECTION OF THIS
GROUP BEFORE LEAK TESTING.
If A/C system is not cooling properly, determine if
system is fully charged. Refer to Refrigerant System
Diagnosis Chart. If the system is empty evacuate the
A/C system and charge system with 0.283 kPa (0.6
lbs. or 10 oz.) R-134a refrigerant. Refer to Charging
Refrigerant System for instructions. To detect a leak
in the system, perform the following procedures.
(1) Position the vehicle in a wind free work area.
This will aid in detecting small leaks.
(2) Bring A/C system up to operating temperature
and pressure. This is done by allowing the engine to
run with the A/C on for 5 to 7 minutes.
(3) Open hood 5 minutes prior to leak test. This
will dissipate any accumulated refrigerant in the en-
gine compartment.
(4) With the engine not running, use an R-134a
Electronic Leak Detector and search for leaks. Move
probe slowly along the bottom side of lines and fit-
tings, because R-134a is heavier than air. Fittings,
lines, or components that appear to be oily usually
indicates a refrigerant leak.
(5) To inspect the evaporator core for leaks. Set the
blower at low speed and the selector in PANEL and
RECIRC mode check for leaks at CENTER panel ou-
lets.
DISCHARGING REFRIGERANT SYSTEM
WARNING: REVIEW WARNINGS AND CAUTIONS IN
GENERAL INFORMATION SECTION OF THIS
GROUP BEFORE DISCHARGING SYSTEM.
R-134a refrigrant is a hydrofluorocarbon (HFC)
that does not contain chlorine. R-134a refrigerant Re-
covery/Recycling Station that meets SAE standard
J2210 must be used to discharge the refrigerant sys-
tem. Refer to the operating instructions provided
with the equipment for proper operation.
EVACUATING REFRIGERANT SYSTEM
WARNING: REVIEW WARNINGS AND CAUTIONS IN
GENERAL INFORMATION SECTION OF THIS
GROUP BEFORE EVACUATING SYSTEM.If the A/C system has been open to the atmosphere,
it must be evacuated before the system can be
charged. Moisture and air mixed with refrigerant will
raise the compressor head pressure above acceptable
operating levels. This will reduce the performance of
the air conditioner and damage the compressor. Mois-
ture will boil at near room temperature when ex-
posed to vacuum. To evacuate the refrigerant system
use following procedure:
(1) Connect a suitable charging station and mani-
fold gauge set to the vehicle.
(2) Open the low and high side valves and start
vacuum pump. When suction gauge reads 88 kPag
(26 in. Hg) vacuum or greater, close all valves and
turn off vacuum pump. If system fails to reach spec-
ified vacuum, the system has a leak that must be
corrected. If system maintains the specified vacuum
for 30 minutes, start the vacuum pump. Then open
the suction and discharge valves and evacuate an ad-
ditional 10 minutes.
(3) Close all valves. Turn off and disconnect the
vacuum pump.
The system is now ready to be charged with refrig-
erant.
CHARGING REFRIGERANT SYSTEM
WARNING: REVIEW WARNINGS AND CAUTIONS IN
GENERAL INFORMATION SECTION OF THIS
GROUP BEFORE CHARGING SYSTEM.
After the system has been tested for leaks and
evacuated, a refrigerant charge can be injected into
the system. Refer to refrigerant capacities for proper
amount of refrigerant charge.
The most accurate method of charging is to com-
pletely evacuate the system. Then charge the system
using a Recovery/Recycling Station approved for
R-134a refrigerant. Refer to the operating instruc-
tions provided with the equipment for proper opera-
tion.
CAUTION: Do not over charge refrigerant system.
This will cause excessive compressor head pres-
sure and can cause noise and system failure.
REFRIGERANT CHARGE CAPACITY
The R-134a system charge capacity is 0.9 kPag (32
oz.) for XJ and YJ vehicles.
8 AIR CONDITIONINGJ
Page 1718 of 1784
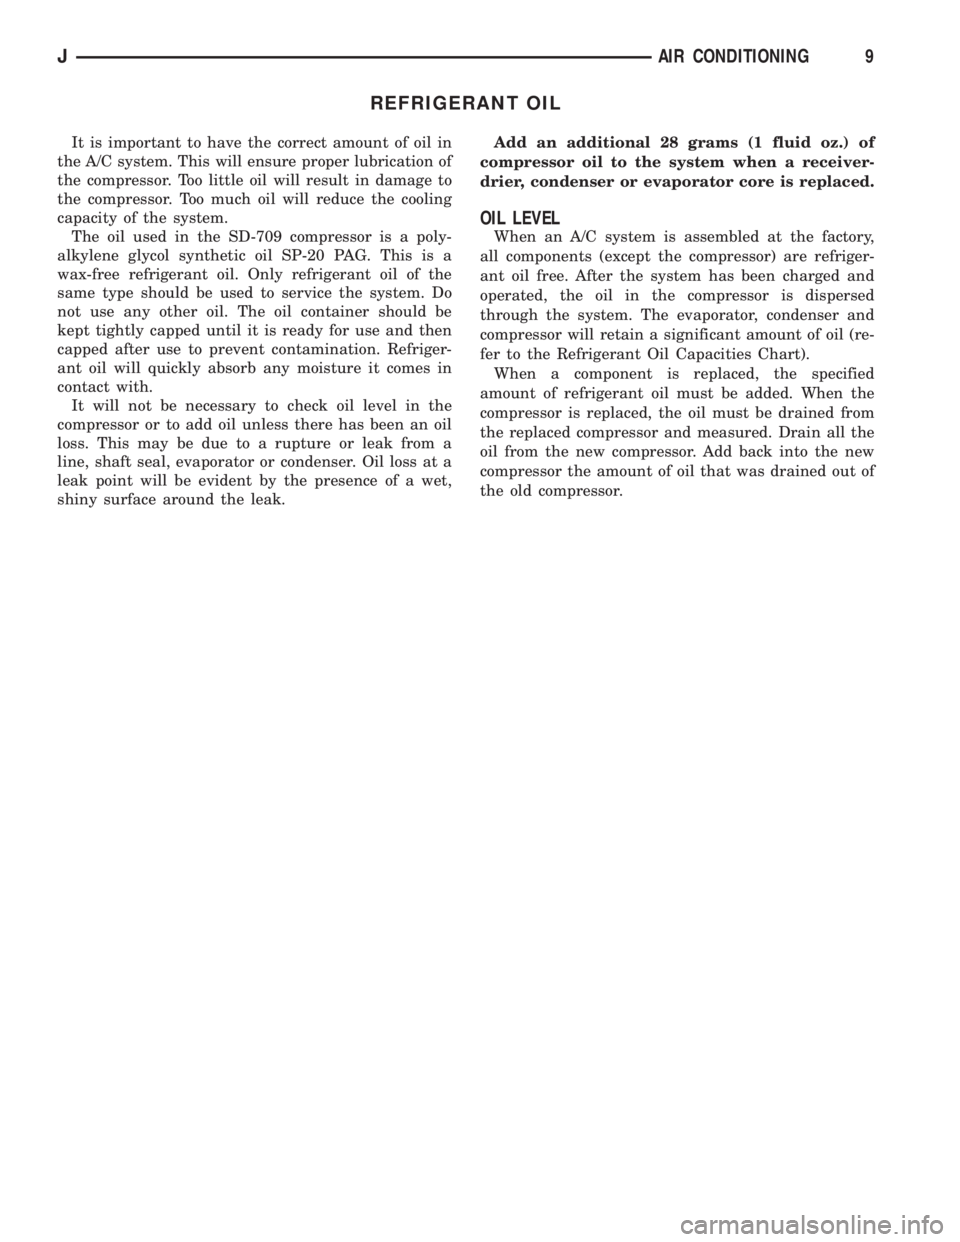
REFRIGERANT OIL
It is important to have the correct amount of oil in
the A/C system. This will ensure proper lubrication of
the compressor. Too little oil will result in damage to
the compressor. Too much oil will reduce the cooling
capacity of the system.
The oil used in the SD-709 compressor is a poly-
alkylene glycol synthetic oil SP-20 PAG. This is a
wax-free refrigerant oil. Only refrigerant oil of the
same type should be used to service the system. Do
not use any other oil. The oil container should be
kept tightly capped until it is ready for use and then
capped after use to prevent contamination. Refriger-
ant oil will quickly absorb any moisture it comes in
contact with.
It will not be necessary to check oil level in the
compressor or to add oil unless there has been an oil
loss. This may be due to a rupture or leak from a
line, shaft seal, evaporator or condenser. Oil loss at a
leak point will be evident by the presence of a wet,
shiny surface around the leak.Add an additional 28 grams (1 fluid oz.) of
compressor oil to the system when a receiver-
drier, condenser or evaporator core is replaced.
OIL LEVEL
When an A/C system is assembled at the factory,
all components (except the compressor) are refriger-
ant oil free. After the system has been charged and
operated, the oil in the compressor is dispersed
through the system. The evaporator, condenser and
compressor will retain a significant amount of oil (re-
fer to the Refrigerant Oil Capacities Chart).
When a component is replaced, the specified
amount of refrigerant oil must be added. When the
compressor is replaced, the oil must be drained from
the replaced compressor and measured. Drain all the
oil from the new compressor. Add back into the new
compressor the amount of oil that was drained out of
the old compressor.
JAIR CONDITIONING9
Page 1719 of 1784
EMISSION CONTROL SYSTEMS
CONTENTS
page page
COMPONENT REMOVAL/INSTALLATION...... 8
EVAPORATIVE EMISSION CONTROLS....... 4EXHAUST EMISSION CONTROLS........... 7
GENERAL INFORMATION.................. 1
GENERAL INFORMATION
INDEX
page page
DRB Scan Tool........................... 2
Service Reminder Indicator (SRI) Lamp......... 1Vacuum Hose Routing Schematics............ 1
Vehicle Emission Control Information (VECI) Label . 1
SERVICE REMINDER INDICATOR (SRI) LAMP
The instrument panel mounted SRI lamp was for-
merly referred to as the emission maintenance re-
minder (EMR) lamp. It isnot usedon any Jeep
model for the 1994 model year.
VEHICLE EMISSION CONTROL INFORMATION
(VECI) LABEL
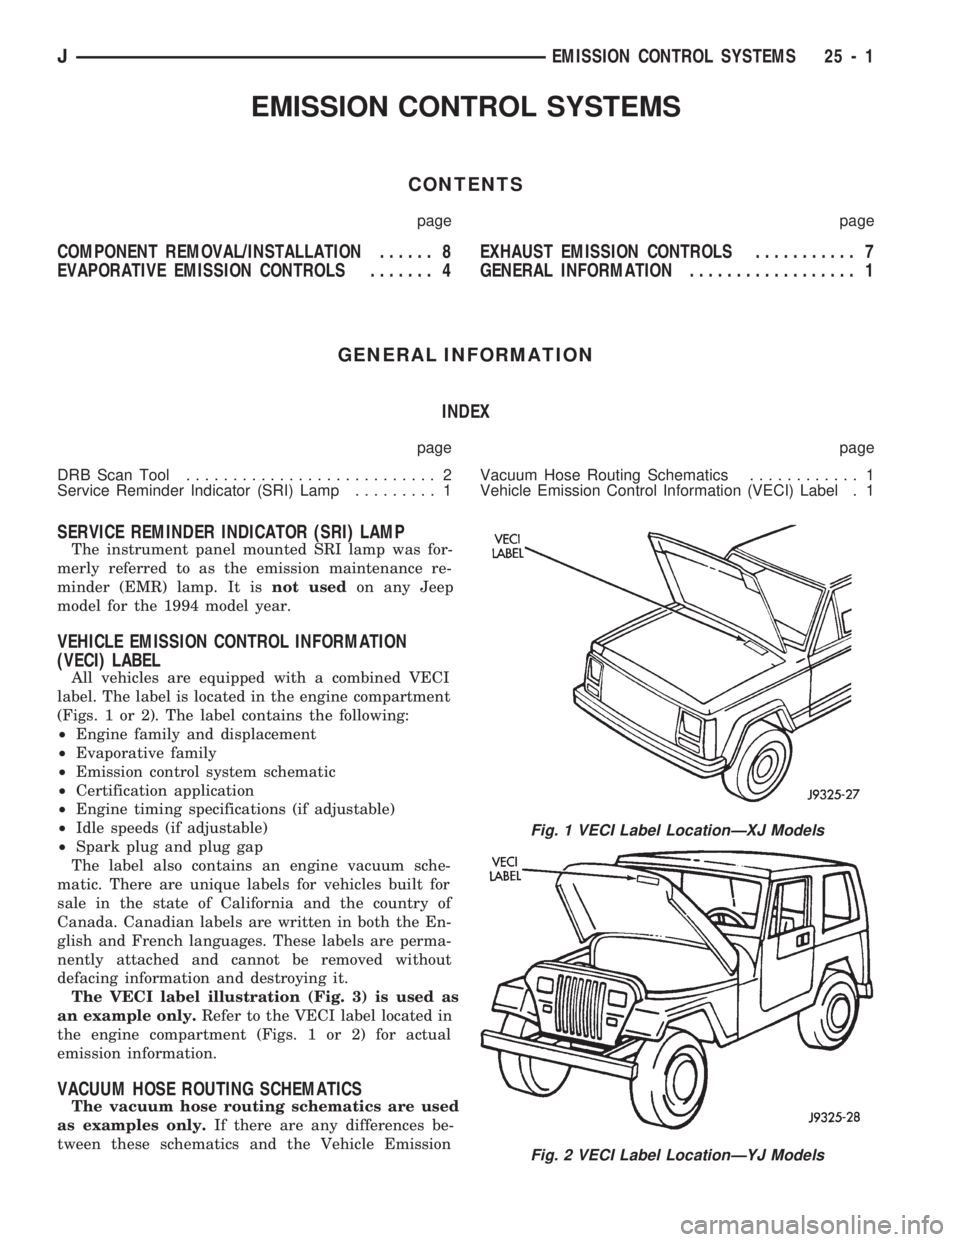
All vehicles are equipped with a combined VECI
label. The label is located in the engine compartment
(Figs. 1 or 2). The label contains the following:
²Engine family and displacement
²Evaporative family
²Emission control system schematic
²Certification application
²Engine timing specifications (if adjustable)
²Idle speeds (if adjustable)
²Spark plug and plug gap
The label also contains an engine vacuum sche-
matic. There are unique labels for vehicles built for
sale in the state of California and the country of
Canada. Canadian labels are written in both the En-
glish and French languages. These labels are perma-
nently attached and cannot be removed without
defacing information and destroying it.
The VECI label illustration (Fig. 3) is used as
an example only.Refer to the VECI label located in
the engine compartment (Figs. 1 or 2) for actual
emission information.
VACUUM HOSE ROUTING SCHEMATICS
The vacuum hose routing schematics are used
as examples only.If there are any differences be-
tween these schematics and the Vehicle Emission
Fig. 1 VECI Label LocationÐXJ Models
Fig. 2 VECI Label LocationÐYJ Models
JEMISSION CONTROL SYSTEMS 25 - 1
Page 1720 of 1784
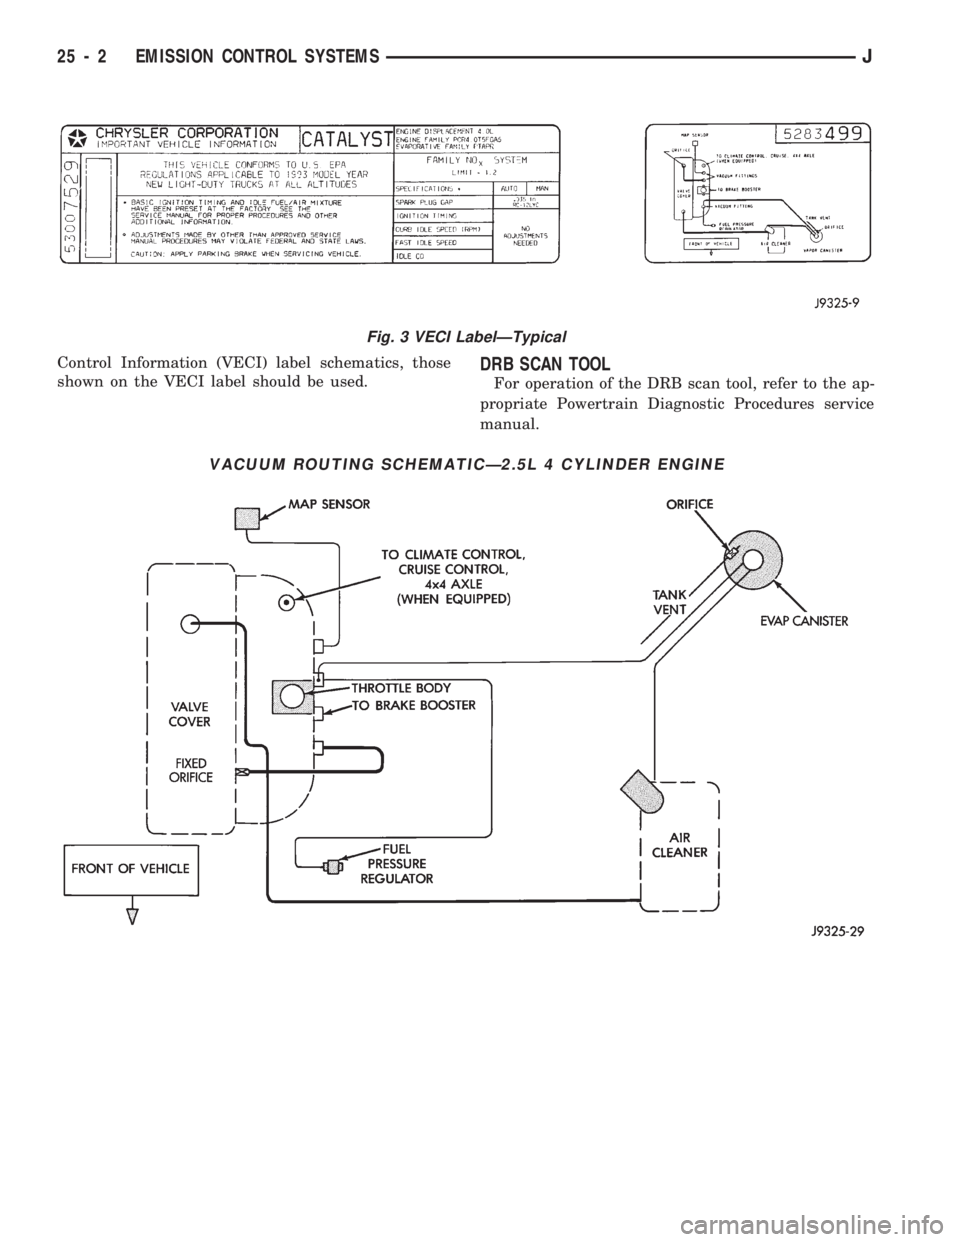
Control Information (VECI) label schematics, those
shown on the VECI label should be used.DRB SCAN TOOL
For operation of the DRB scan tool, refer to the ap-
propriate Powertrain Diagnostic Procedures service
manual.
VACUUM ROUTING SCHEMATICÐ2.5L 4 CYLINDER ENGINE
Fig. 3 VECI LabelÐTypical
25 - 2 EMISSION CONTROL SYSTEMSJ