JEEP CHEROKEE 2018 Owner handbook (in English)
Manufacturer: JEEP, Model Year: 2018, Model line: CHEROKEE, Model: JEEP CHEROKEE 2018Pages: 312, PDF Size: 4.91 MB
Page 191 of 312
GEAR SELECTOR OVERRIDE
If a malfunction occurs and the gear selector
cannot be moved out of the PARK position,
you can use the following procedure to tem-
porarily move the gear selector:
1. Turn the engine OFF.
2. Apply the parking brake.
3. Using a screwdriver or similar tool, care-fully separate the shifter bezel and boot
assembly from the center console, and
raise it up to access the gear selector
mechanism.
4. Press and maintain firm pressure on the brake pedal.
5. Insert a small screwdriver or similar tool down into the gear selector override ac-
cess hole (at the left front corner of the
gear selector assembly), and push and
hold the override release lever down.
6. Move the gear selector to the NEUTRAL position.
7. The vehicle may then be started in NEUTRAL.
8. Reinstall the gear selector boot.
FREEING A STUCK VEHICLE
If your vehicle becomes stuck in mud, sand or
snow, it can often be moved using a rocking
motion. Turn the steering wheel right and left
to clear the area around the front wheels. For
vehicles with automatic transmission, push
and hold the lock button on the gear selector.
Then shift back and forth between DRIVE and
REVERSE (with automatic transmission) or
SECOND GEAR and REVERSE (with manual
transmission), while gently pressing the ac-
celerator.
NOTE:
For vehicles with automatic transmission:
Shifts between DRIVE and REVERSE can
only be achieved at wheel speeds of 5 mph
(8 km/h) or less. Whenever the transmission
remains in NEUTRAL for more than two sec-
onds, you must press the brake pedal to
engage DRIVE or REVERSE.
Use the least amount of accelerator pedal
pressure that will maintain the rocking mo-
tion without spinning the wheels or racing the
engine.
CAUTION!
• Racing the engine or spinning the wheels may lead to transmission over-
heating and failure. Allow the engine to
idle with the transmission in NEUTRAL
for at least one minute after every five
rocking-motion cycles. This will mini-
mize overheating and reduce the risk of
clutch or transmission failure during
prolonged efforts to free a stuck vehicle.
• When “rocking” a stuck vehicle by shift-
ing between DRIVE/SECOND GEAR and
REVERSE, do not spin the wheels faster
than 15 mph (24 km/h), or drivetrain
damage may result.
• Revving the engine or spinning the
wheels too fast may lead to transmission
overheating and failure. It can also dam-
age the tires. Do not spin the wheels
above 30 mph (48 km/h) while in gear
(no transmission shifting occurring).
189
Page 192 of 312
NOTE:
Push the “ESC Off” switch (if necessary), to
place the Electronic Stability Control (ESC)
system in “Partial Off” mode, before rocking
the vehicle. Refer to “Electronic Brake Con-
trol System” in “Safety” for further informa-
tion. Once the vehicle has been freed, push
the "ESC Off" switch again to restore “ESC
On” mode.WARNING!
Fast spinning tires can be dangerous.
Forces generated by excessive wheel
speeds may cause damage, or even failure,
of the axle and tires. A tire could explode
and injure someone. Do not spin your
vehicle's wheels faster than 30 mph
(48 km/h) or for longer than 30 seconds
continuously without stopping when you
are stuck and do not let anyone near a
spinning wheel, no matter what the speed.
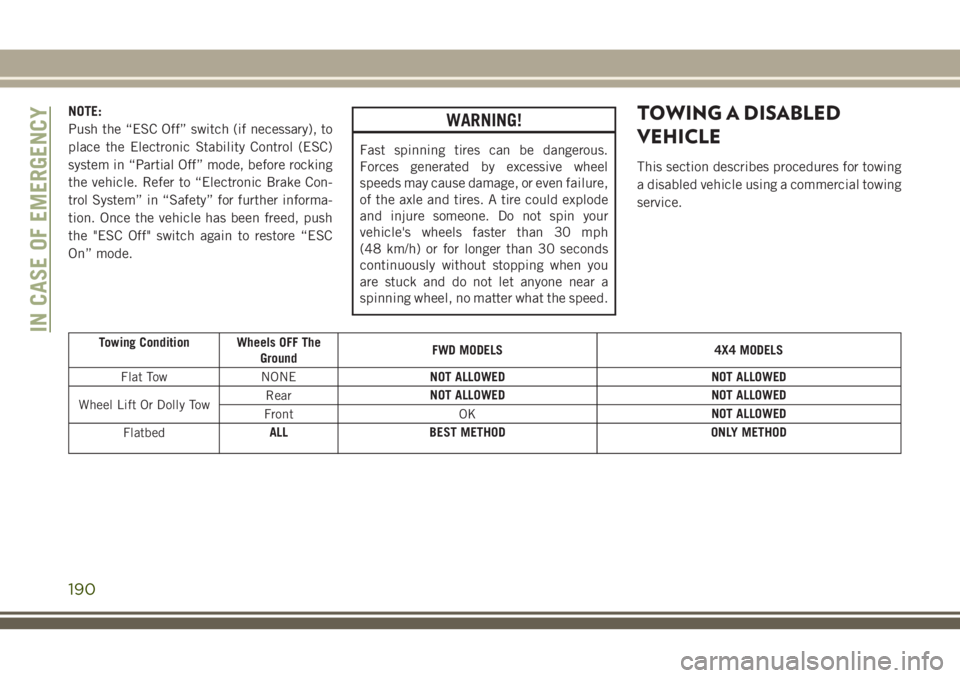
TOWING A DISABLED
VEHICLE
This section describes procedures for towing
a disabled vehicle using a commercial towing
service.
Towing Condition Wheels OFF TheGround FWD MODELS 4X4 MODELS
Flat Tow NONE NOT ALLOWED NOT ALLOWED
Wheel Lift Or Dolly Tow Rear
NOT ALLOWED NOT ALLOWED
Front OK NOT ALLOWED
Flatbed ALL BEST METHOD ONLY METHODIN CASE OF EMERGENCY
190
Page 193 of 312
Proper towing or lifting equipment is required
to prevent damage to your vehicle. Use only
tow bars and other equipment designed for
this purpose, following equipment manufac-
turer’s instructions. Use of safety chains is
mandatory. Attach a tow bar or other towing
devices to main structural members of the
vehicle, not to bumpers or associated brack-
ets. State and local laws regarding vehicles
under tow must be observed.
NOTE:
• You must ensure that the Auto Park Brakefeature is disabled before towing this ve-
hicle, to avoid inadvertent Electric Park
Brake engagement. The Auto Park Brake
feature is enabled or disabled via the cus-
tomer programmable features in the
Uconnect Settings.
• Vehicles with a discharged battery or total electrical failure when the electric park
brake (EPB) is engaged, will need a wheel
dolly or jack to raise the rear wheels off the
ground when moving the vehicle onto a
flatbed. If you must use the accessories (wipers, de-
frosters, etc.) while being towed, the ignition
must be in the ON/RUN mode, not the ACC
mode.
Note that the Safehold feature will engage
the Electric Park Brake whenever the driver's
door is opened (if the battery is connected,
ignition is ON, transmission is not in PARK,
and brake pedal is released). If you are towing
this vehicle with the ignition in the ON/RUN
mode, you must manually disable the Elec-
tric Park Brake each time the driver's door is
opened, by pressing the brake pedal and then
releasing the EPB.
If the vehicle’s battery is discharged, refer to
“Gear Selector Override” in this section for
instructions on shifting the automatic trans-
mission out of PARK so that the vehicle can
be moved.
CAUTION!
• Do not use sling-type equipment when
towing. Vehicle damage may occur.
• When securing the vehicle to a flatbed
truck, do not attach to front or rear
CAUTION!
suspension components. Damage to
your vehicle may result from improper
towing.
• Ensure that the Electric Park Brake is
released, and remains released, while
being towed.
Without The Key Fob
Special care must be taken when the vehicle
is towed with the ignition in the LOCK/OFF
mode. The only approved method of towing
without the key fob is with a flatbed truck.
Proper towing equipment is necessary to pre-
vent damage to the vehicle.
Front-Wheel Drive (FWD) Models — With
Key Fob
The manufacturer recommends towing your
vehicle with all four wheels OFFthe ground
using a flatbed.
191
Page 194 of 312
If flatbed equipment is not available, this
vehicle must be towed with the front wheels
OFF the ground (using a towing dolly, or
wheel lift equipment with the front wheels
raised).
Ensure that the Electric Park Brake is re-
leased, and remains released, while being
towed. The Electric Park Brake does not need
to be released, if all four wheels are off the
ground.
CAUTION!
Towing this vehicle in violation of the
above requirements can cause severe en-
gine and/or transmission damage. Damage
from improper towing is not covered under
the New Vehicle Limited Warranty.
4x4 Models
The manufacturer requires towing with all
four wheelsOFFthe ground.
Acceptable methods are to tow the vehicle on
a flatbed, or with one end of vehicle raised
and the opposite end on a towing dolly.
CAUTION!
• Front or rear wheel lifts must not be used (if the remaining wheels are on the
ground). Internal damage to the trans-
mission or power transfer unit will occur
if a front or rear wheel lift is used when
towing.
• Towing this vehicle in violation of the
above requirements can cause severe
transmission and/or power transfer unit
damage. Damage from improper towing
is not covered under the New Vehicle
Limited Warranty.
Recovery Strap — If Equipped
Your vehicle may be included with a recovery
strap. Recovery straps do not act like tradi-
tional tow straps, chains, or winch cables.
WARNING!
Recovery straps should only be used in
emergencies to rescue stranded vehicles.
Only use Recovery straps on vehicles that
fit within the recommended GVW of your
WARNING!
recovery strap. Only attach recovery straps
to OE recommended anchor points or
emergency towing anchor points. Never
attach to tow ball or vehicle tie down point,
these are not designed for this purpose.
Never attach to vehicle steering, drive
train, or any other suspension compo-
nents. NEVER pull a strap over sharp
edges or abrasive surfaces that can dam-
age the recovery strap. NEVER use a dam-
aged strap, it has reduced strength. DO
NOT attempt to repair straps. ONLY per-
sons involved in the recovery should be in
either vehicle. No passengers. Anyone in-
side the vehicles can be struck by strap
recoil, causing serious injury. MOVE by-
standers at least 40 ft (12.2 m) from the
recovery area when using the recovery
strap.
Using Recovery Strap
1. Review all warnings and instructions first.
2. Position the recovery vehicle.
3. Connect the recovery strap.
4. Add a recovery damper or blanket.
IN CASE OF EMERGENCY
192
Page 195 of 312
5. Clear the danger zone.
6. Safely and slowly start pulling.
7. Disconnect the recovery strap after bothvehicles are secure and parked.
ENHANCED ACCIDENT
RESPONSE SYSTEM (EARS)
This vehicle is equipped with an Enhanced
Accident Response System.
Please refer to “Occupant Restraint Sys-
tems” in “Safety” for further information on
the Enhanced Accident Response System
(EARS) function.
EVENT DATA RECORDER
(EDR)
This vehicle is equipped with an Event Data
Recorder (EDR). The main purpose of an EDR
is to record data that will assist in under-
standing how a vehicle’s systems performed
under certain crash or near crash-like situa-
tions, such as an air bag deployment or hit-
ting a road obstacle.
Please refer to “Occupant Restraint Sys-
tems” in “Safety” for further information on
the Event Data Recorder (EDR).
193
Page 196 of 312
194
Page 197 of 312
SERVICING AND MAINTENANCE
SCHEDULED SERVICING......196
Scheduled Servicing —
Gasoline Engine..............196
Scheduled Servicing —
Diesel Engine ................200
ENGINE COMPARTMENT .....204
2.4L Engine.................204
3.2L Engine .................205
2.0L Diesel Engine .............206
2.2L Diesel Engine .............207
Checking Oil Level .............208
Cooling System ...............208
Adding Washer Fluid ............209 Brake System
................209
Manual Transmission — If Equipped . .210
Automatic Transmission ..........210
Maintenance-Free Battery ........211
DEALER SERVICE...........211
Windshield Wiper Blades .........211
RAISING THE VEHICLE ........216
TIRES ....................216
Tires — General Information .......216
Tire Types ...................220
Spare Tires — If Equipped ........221
Wheel And Wheel Trim Care .......222Tire Chains (Traction Devices)
.......223
Tire Rotation Recommendations .....224
STORING THE VEHICLE.......225
BODYWORK...............226
Preserving The Bodywork .........226
INTERIORS................227
Seats And Fabric Parts ...........227
Plastic And Coated Parts ..........227
Leather Parts .................228
Glass Surfaces ...............228
SERVICING AND MAINTENANCE
195
Page 198 of 312
SCHEDULED SERVICING
Scheduled Servicing — Gasoline Engine
The scheduled services listed in this manual
must be done at the times or mileages speci-
fied to protect your vehicle warranty and
ensure the best vehicle performance and re-
liability. More frequent maintenance may be
needed for vehicles in severe operating con-
ditions, such as dusty areas and very short
trip driving. Inspection and service should
also be done anytime a malfunction is sus-
pected.
The oil change indicator system will remind
you that it is time to take your vehicle in for
scheduled maintenance.
An “Oil Change Required” will be displayed
in the instrument cluster and a single chime
will sound, indicating that an oil change is
necessary.
The oil change indicator message will illumi-
nate approximately 7,000 miles (11,200 km)
after the most recent oil change was per-
formed. Have your vehicle serviced as soon as
possible, within 500 miles (800 km).
NOTE:
• The oil change indicator message will notmonitor the time since the last oil change.
Change your vehicle’s oil if it has been
12 months since your last oil change even
if the oil change indicator message is NOT
illuminated.
• Change your engine oil more often if you drive your vehicle off-road for an extended
period of time.
• Under no circumstances should oil change intervals exceed 7,500 miles (12,000 km)
or 12 months, whichever comes first.
Your authorized dealer will reset the oil
change indicator message after completing
the scheduled oil change. If this scheduled
oil change is performed by someone other
than your authorized dealer the message can
be reset by referring to the steps described
under ”Instrument Cluster Display” in “Get-
ting To Know Your Instrument Panel” for
further information. Once A Month Or Before A Long Trip
• Check engine oil level.
• Check windshield washer fluid level.
• Check tire pressure and look for unusual
wear or damage. Rotate tires at the first
sign of irregular wear, even if it occurs
before the oil indicator system turns on.
• Check the fluid levels of the coolant reser- voir and brake master cylinder, fill as
needed.
• Check function of all interior and exterior lights.
SERVICING AND MAINTENANCE
196
Page 199 of 312
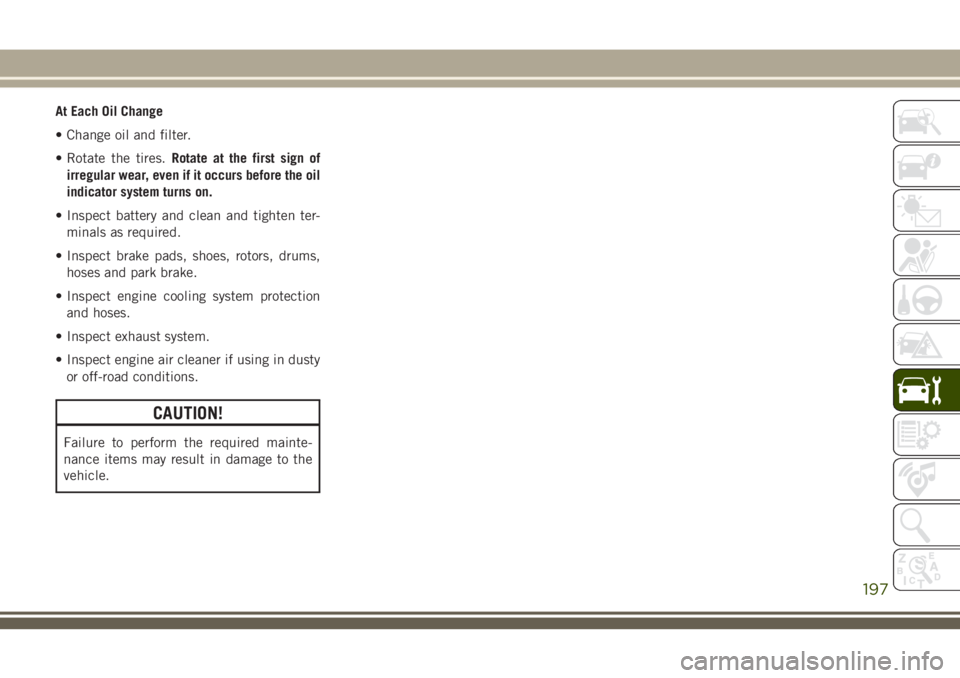
At Each Oil Change
• Change oil and filter.
• Rotate the tires.Rotate at the first sign of
irregular wear, even if it occurs before the oil
indicator system turns on.
• Inspect battery and clean and tighten ter- minals as required.
• Inspect brake pads, shoes, rotors, drums, hoses and park brake.
• Inspect engine cooling system protection and hoses.
• Inspect exhaust system.
• Inspect engine air cleaner if using in dusty or off-road conditions.
CAUTION!
Failure to perform the required mainte-
nance items may result in damage to the
vehicle.
197
Page 200 of 312
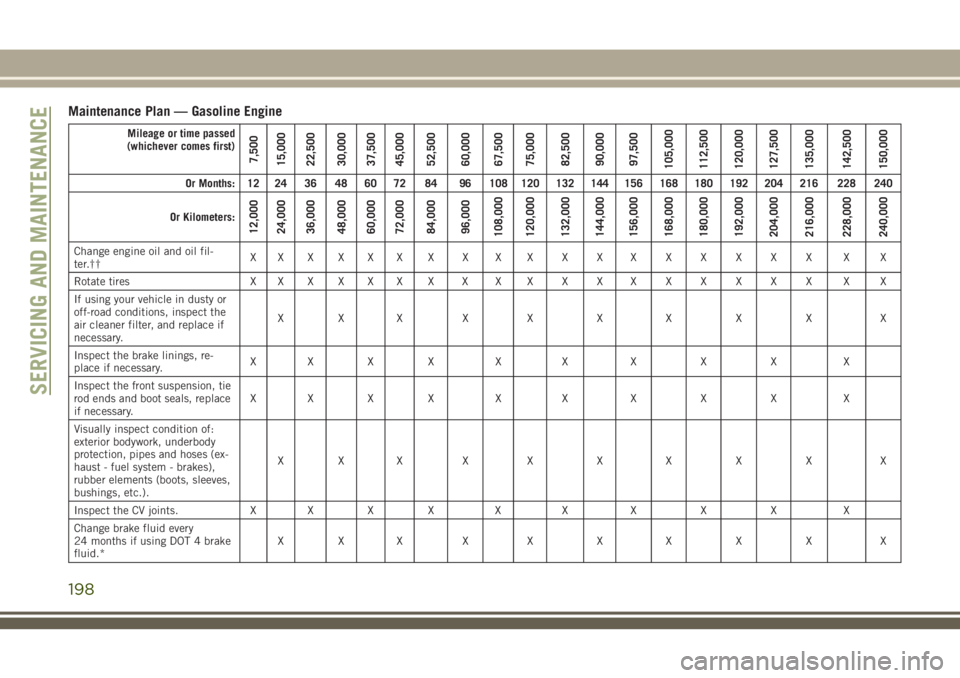
Maintenance Plan — Gasoline Engine
Mileage or time passed
(whichever comes first)
7,500
15,000
22,500
30,000
37,500
45,000
52,500
60,000
67,500
75,000
82,500
90,000
97,500
105,000
112,500
120,000
127,500
135,000
142,500
150,000
Or Months: 12 24 36 48 60 72 84 96 108 120 132 144 156 168 180 192 204 216 228 240
Or Kilometers:
12,000
24,000
36,000
48,000
60,000
72,000
84,000
96,000
108,000
120,000
132,000
144,000
156,000
168,000
180,000
192,000
204,000
216,000
228,000
240,000
Change engine oil and oil fil-
ter.†† XX X X X X X X X X X X X X X X X X X X
Rotate tires X X X X X X X X X X X X X X X X X X X X
If using your vehicle in dusty or
off-road conditions, inspect the
air cleaner filter, and replace if
necessary. XXX X X X X X X X
Inspect the brake linings, re-
place if necessary. XX X X X X X X X X
Inspect the front suspension, tie
rod ends and boot seals, replace
if necessary. XX X X X X X X X X
Visually inspect condition of:
exterior bodywork, underbody
protection, pipes and hoses (ex-
haust - fuel system - brakes),
rubber elements (boots, sleeves,
bushings, etc.). XXX X X X X X X X
Inspect the CV joints. X X X X X X X X X X
Change brake fluid every
24 months if using DOT 4 brake
fluid.* XXX X X X X X X X
SERVICING AND MAINTENANCE
198