tow JEEP CHEROKEE 2023 Owner's Guide
[x] Cancel search | Manufacturer: JEEP, Model Year: 2023, Model line: CHEROKEE, Model: JEEP CHEROKEE 2023Pages: 276, PDF Size: 12.55 MB
Page 118 of 276
116STARTING AND OPERATING
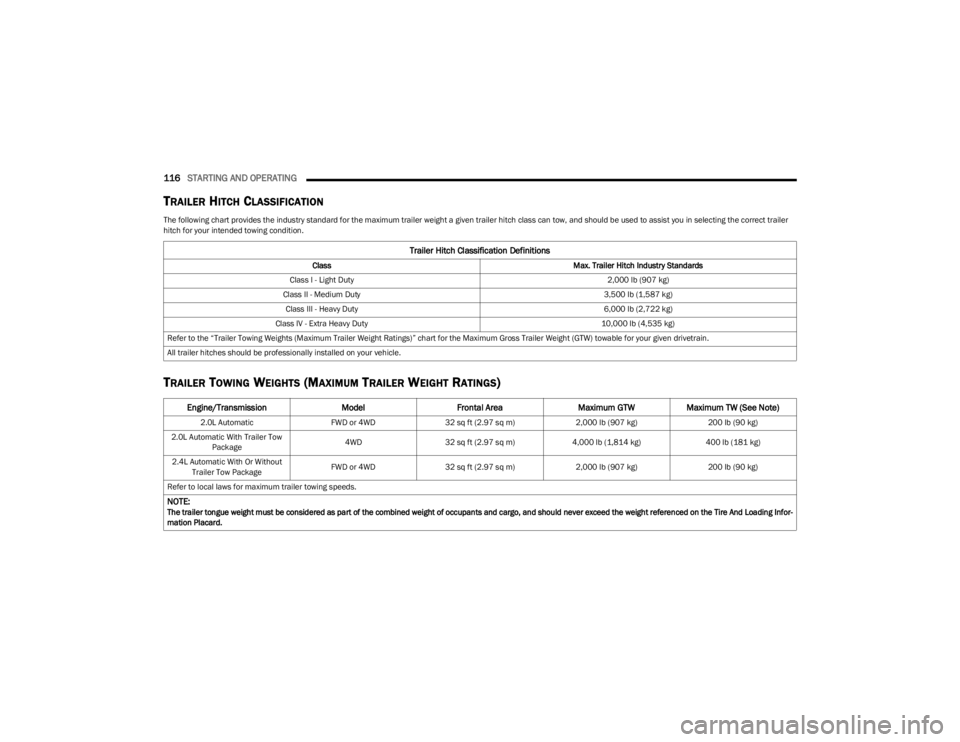
TRAILER HITCH CLASSIFICATION
The following chart provides the industry standard for the maximum trailer weight a given trailer hitch class can tow, and should be used to assist you in selecting the correct trailer
hitch for your intended towing condition.
TRAILER TOWING WEIGHTS (MAXIMUM TRAILER WEIGHT RATINGS)
Trailer Hitch Classification Definitions
Class Max. Trailer Hitch Industry Standards
Class I - Light Duty 2,000 lb (907 kg)
Class II - Medium Duty 3,500 lb (1,587 kg)
Class III - Heavy Duty 6,000 lb (2,722 kg)
Class IV - Extra Heavy Duty 10,000 lb (4,535 kg)
Refer to the “Trailer Towing Weights (Maximum Trailer Weight Ratings)” chart for the Maximum Gross Trailer Weight (GTW) towable for your given drivetrain.
All trailer hitches should be professionally installed on your vehicle.
Engine/Transmission ModelFrontal Area Maximum GTWMaximum TW (See Note)
2.0L Automatic FWD or 4WD32 sq ft (2.97 sq m) 2,000 lb (907 kg) 200 lb (90 kg)
2.0L Automatic With Trailer Tow Package 4WD
32 sq ft (2.97 sq m) 4,000 lb (1,814 kg) 400 lb (181 kg)
2.4L Automatic With Or Without Trailer Tow Package FWD or 4WD
32 sq ft (2.97 sq m) 2,000 lb (907 kg) 200 lb (90 kg)
Refer to local laws for maximum trailer towing speeds.
NOTE:The trailer tongue weight must be considered as part of the combined weight of occupants and cargo, and should never exceed the weight referenced on the Tire And Loading Infor -
mation Placard.
23_KL_OM_EN_USC_t.book Page 116
Page 119 of 276
STARTING AND OPERATING117
(Continued)
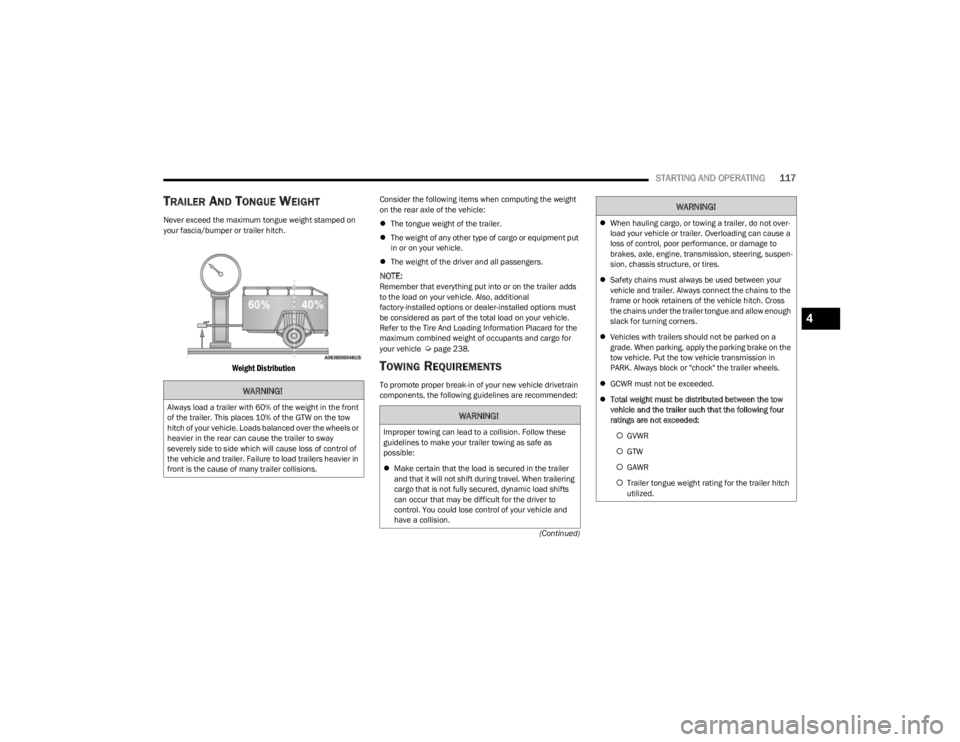
TRAILER AND TONGUE WEIGHT
Never exceed the maximum tongue weight stamped on
your fascia/bumper or trailer hitch.
Weight Distribution
Consider the following items when computing the weight
on the rear axle of the vehicle:
The tongue weight of the trailer.
The weight of any other type of cargo or equipment put
in or on your vehicle.
The weight of the driver and all passengers.
NOTE:Remember that everything put into or on the trailer adds
to the load on your vehicle. Also, additional
factory-installed options or dealer-installed options must
be considered as part of the total load on your vehicle.
Refer to the Tire And Loading Information Placard for the
maximum combined weight of occupants and cargo for
your vehicle
Úpage 238.
TOWING REQUIREMENTS
To promote proper break-in of your new vehicle drivetrain
components, the following guidelines are recommended:WARNING!
Always load a trailer with 60% of the weight in the front
of the trailer. This places 10% of the GTW on the tow
hitch of your vehicle. Loads balanced over the wheels or
heavier in the rear can cause the trailer to sway
severely side to side which will cause loss of control of
the vehicle and trailer. Failure to load trailers heavier in
front is the cause of many trailer collisions.WARNING!
Improper towing can lead to a collision. Follow these
guidelines to make your trailer towing as safe as
possible:
Make certain that the load is secured in the trailer
and that it will not shift during travel. When trailering
cargo that is not fully secured, dynamic load shifts
can occur that may be difficult for the driver to
control. You could lose control of your vehicle and
have a collision.
When hauling cargo, or towing a trailer, do not over -
load your vehicle or trailer. Overloading can cause a
loss of control, poor performance, or damage to
brakes, axle, engine, transmission, steering, suspen -
sion, chassis structure, or tires.
Safety chains must always be used between your
vehicle and trailer. Always connect the chains to the
frame or hook retainers of the vehicle hitch. Cross
the chains under the trailer tongue and allow enough
slack for turning corners.
Vehicles with trailers should not be parked on a
grade. When parking, apply the parking brake on the
tow vehicle. Put the tow vehicle transmission in
PARK. Always block or "chock" the trailer wheels.
GCWR must not be exceeded.
Total weight must be distributed between the tow
vehicle and the trailer such that the following four
ratings are not exceeded:
GVWR
GTW
GAWR
Trailer tongue weight rating for the trailer hitch
utilized.
WARNING!
4
23_KL_OM_EN_USC_t.book Page 117
Page 120 of 276
118STARTING AND OPERATING
Towing Requirements — Tires
Do not attempt to tow a trailer while using a compact
spare tire.
Do not drive more than 50 mph (80 km/h) when towing
while using a full size spare tire.
Proper tire inflation pressures are essential to the safe
and satisfactory operation of your vehicle.
Check the trailer tires for proper tire inflation pressures
before trailer use.
Check for signs of tire wear or visible tire damage
before towing a trailer.
Replacing tires with a higher load carrying capacity will
not increase the vehicle's GVWR and GAWR limits.
Refer to Tires for further information
Úpage 235.
Towing Requirements — Trailer Brakes
Do not interconnect the hydraulic brake system or
vacuum system of your vehicle with that of the trailer.
This could cause inadequate braking and possible
personal injury.
An electronically actuated trailer brake controller is
required when towing a trailer with electronically actu -
ated brakes. When towing a trailer equipped with a
hydraulic surge actuated brake system, an electronic
brake controller is not required.
Trailer brakes are recommended for trailers over
1,000 lb (453 kg) and required for trailers in excess of
2,000 lb (907 kg).
Towing Requirements — Trailer Lights And
Wiring
Whenever you pull a trailer, regardless of the trailer size,
stop lights and turn signals on the trailer are required for
motoring safety.
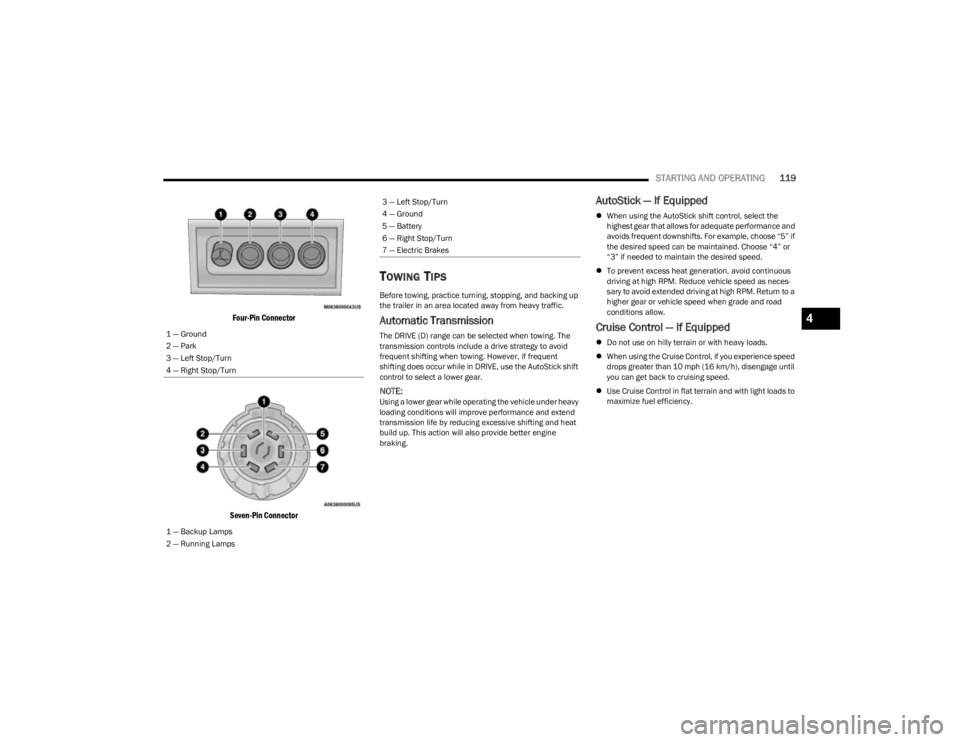
The Trailer Tow Package may include a four- and seven-pin
wiring harness. Use a factory approved trailer harness and
connector.
NOTE:Do not cut or splice wiring into the vehicle’s wiring
harness.
The electrical connections are all complete to the vehicle
but you must mate the harness to a trailer connector.
Refer to the following illustrations.
NOTE:
Disconnect the trailer wiring connector from the vehicle
(or any other device plugged into vehicle’s electrical
connectors) before launching a boat into water.
Be sure to reconnect once clear from water area.
CAUTION!
Do not tow a trailer at all during the first 500 miles
(805 km) the new vehicle is driven. The engine, axle
or other parts could be damaged.
Then, during the first 500 miles (805 km) that a
trailer is towed, do not drive over 50 mph (80 km/h)
and do not make starts at full throttle. This helps the
engine and other parts of the vehicle wear in at the
heavier loads.
WARNING!
Do not connect trailer brakes to your vehicle's
hydraulic brake lines. It can overload your brake
system and cause it to fail. You might not have
brakes when you need them and could have an acci -
dent.
Towing any trailer will increase your stopping
distance. When towing, you should allow for addi -
tional space between your vehicle and the vehicle in
front of you. Failure to do so could result in an acci -
dent.
CAUTION!
If the trailer weighs more than 1,000 lb (453 kg)
loaded, it should have its own brakes and they should
be of adequate capacity. Failure to do this could lead to
accelerated brake lining wear, higher brake pedal
effort, and longer stopping distances.
23_KL_OM_EN_USC_t.book Page 118
Page 121 of 276
STARTING AND OPERATING119
Four-Pin Connector
Seven-Pin Connector
TOWING TIPS
Before towing, practice turning, stopping, and backing up
the trailer in an area located away from heavy traffic.
Automatic Transmission
The DRIVE (D) range can be selected when towing. The
transmission controls include a drive strategy to avoid
frequent shifting when towing. However, if frequent
shifting does occur while in DRIVE, use the AutoStick shift
control to select a lower gear.
NOTE:Using a lower gear while operating the vehicle under heavy
loading conditions will improve performance and extend
transmission life by reducing excessive shifting and heat
build up. This action will also provide better engine
braking.
AutoStick — If Equipped
When using the AutoStick shift control, select the
highest gear that allows for adequate performance and
avoids frequent downshifts. For example, choose “5” if
the desired speed can be maintained. Choose “4” or
“3” if needed to maintain the desired speed.
To prevent excess heat generation, avoid continuous
driving at high RPM. Reduce vehicle speed as neces -
sary to avoid extended driving at high RPM. Return to a
higher gear or vehicle speed when grade and road
conditions allow.
Cruise Control — If Equipped
Do not use on hilly terrain or with heavy loads.
When using the Cruise Control, if you experience speed
drops greater than 10 mph (16 km/h), disengage until
you can get back to cruising speed.
Use Cruise Control in flat terrain and with light loads to
maximize fuel efficiency.
1 — Ground
2 — Park
3 — Left Stop/Turn
4 — Right Stop/Turn
1 — Backup Lamps
2 — Running Lamps
3 — Left Stop/Turn
4 — Ground
5 — Battery
6 — Right Stop/Turn
7 — Electric Brakes
4
23_KL_OM_EN_USC_t.book Page 119
Page 122 of 276
120STARTING AND OPERATING
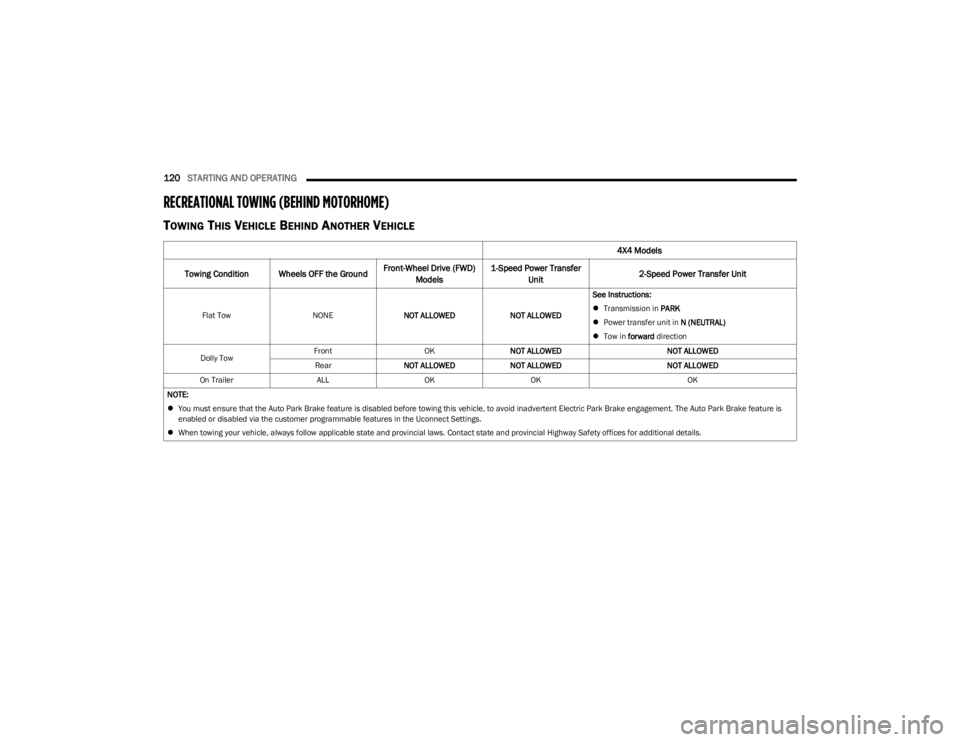
RECREATIONAL TOWING (BEHIND MOTORHOME)
TOWING THIS VEHICLE BEHIND ANOTHER VEHICLE
4X4 Models
Towing Condition Wheels OFF the Ground Front-Wheel Drive (FWD)
Models 1-Speed Power Transfer
Unit 2-Speed Power Transfer Unit
Flat Tow
NONENOT ALLOWED NOT ALLOWEDSee Instructions:
Transmission in PARK
Power transfer unit in N (NEUTRAL)
Tow in forward direction
Dolly Tow Front
OKNOT ALLOWED NOT ALLOWED
Rear NOT ALLOWED NOT ALLOWED NOT ALLOWED
On Trailer ALLOKOK OK
NOTE:
You must ensure that the Auto Park Brake feature is disabled before towing this vehicle, to avoid inadvertent Electric Park Brake engagement. The Auto Park Brake feature is
enabled or disabled via the customer programmable features in the Uconnect Settings.
When towing your vehicle, always follow applicable state and provincial laws. Contact state and provincial Highway Safety offices for additional details.
23_KL_OM_EN_USC_t.book Page 120
Page 123 of 276
STARTING AND OPERATING121
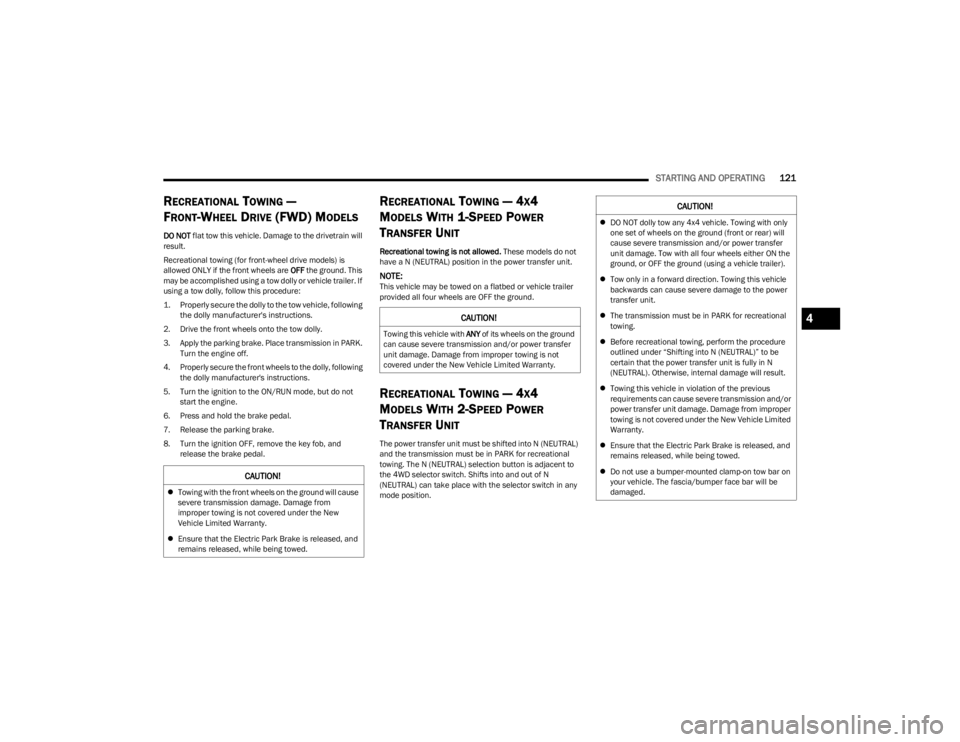
RECREATIONAL TOWING —
F
RONT-WHEEL DRIVE (FWD) MODELS
DO NOT flat tow this vehicle. Damage to the drivetrain will
result.
Recreational towing (for front-wheel drive models) is
allowed ONLY if the front wheels are OFF the ground. This
may be accomplished using a tow dolly or vehicle trailer. If
using a tow dolly, follow this procedure:
1. Properly secure the dolly to the tow vehicle, following the dolly manufacturer's instructions.
2. Drive the front wheels onto the tow dolly.
3. Apply the parking brake. Place transmission in PARK. Turn the engine off.
4. Properly secure the front wheels to the dolly, following the dolly manufacturer's instructions.
5. Turn the ignition to the ON/RUN mode, but do not start the engine.
6. Press and hold the brake pedal.
7. Release the parking brake.
8. Turn the ignition OFF, remove the key fob, and release the brake pedal.
RECREATIONAL TOWING — 4X4
M
ODELS WITH 1-SPEED POWER
T
RANSFER UNIT
Recreational towing is not allowed. These models do not
have a N (NEUTRAL) position in the power transfer unit.
NOTE:This vehicle may be towed on a flatbed or vehicle trailer
provided all four wheels are OFF the ground.
RECREATIONAL TOWING — 4X4
M
ODELS WITH 2-SPEED POWER
T
RANSFER UNIT
The power transfer unit must be shifted into N (NEUTRAL)
and the transmission must be in PARK for recreational
towing. The N (NEUTRAL) selection button is adjacent to
the 4WD selector switch. Shifts into and out of N
(NEUTRAL) can take place with the selector switch in any
mode position.
CAUTION!
Towing with the front wheels on the ground will cause
severe transmission damage. Damage from
improper towing is not covered under the New
Vehicle Limited Warranty.
Ensure that the Electric Park Brake is released, and
remains released, while being towed.
CAUTION!
Towing this vehicle with ANY of its wheels on the ground
can cause severe transmission and/or power transfer
unit damage. Damage from improper towing is not
covered under the New Vehicle Limited Warranty.
CAUTION!
DO NOT dolly tow any 4x4 vehicle. Towing with only
one set of wheels on the ground (front or rear) will
cause severe transmission and/or power transfer
unit damage. Tow with all four wheels either ON the
ground, or OFF the ground (using a vehicle trailer).
Tow only in a forward direction. Towing this vehicle
backwards can cause severe damage to the power
transfer unit.
The transmission must be in PARK for recreational
towing.
Before recreational towing, perform the procedure
outlined under “Shifting into N (NEUTRAL)” to be
certain that the power transfer unit is fully in N
(NEUTRAL). Otherwise, internal damage will result.
Towing this vehicle in violation of the previous
requirements can cause severe transmission and/or
power transfer unit damage. Damage from improper
towing is not covered under the New Vehicle Limited
Warranty.
Ensure that the Electric Park Brake is released, and
remains released, while being towed.
Do not use a bumper-mounted clamp-on tow bar on
your vehicle. The fascia/bumper face bar will be
damaged.
4
23_KL_OM_EN_USC_t.book Page 121
Page 124 of 276
122STARTING AND OPERATING
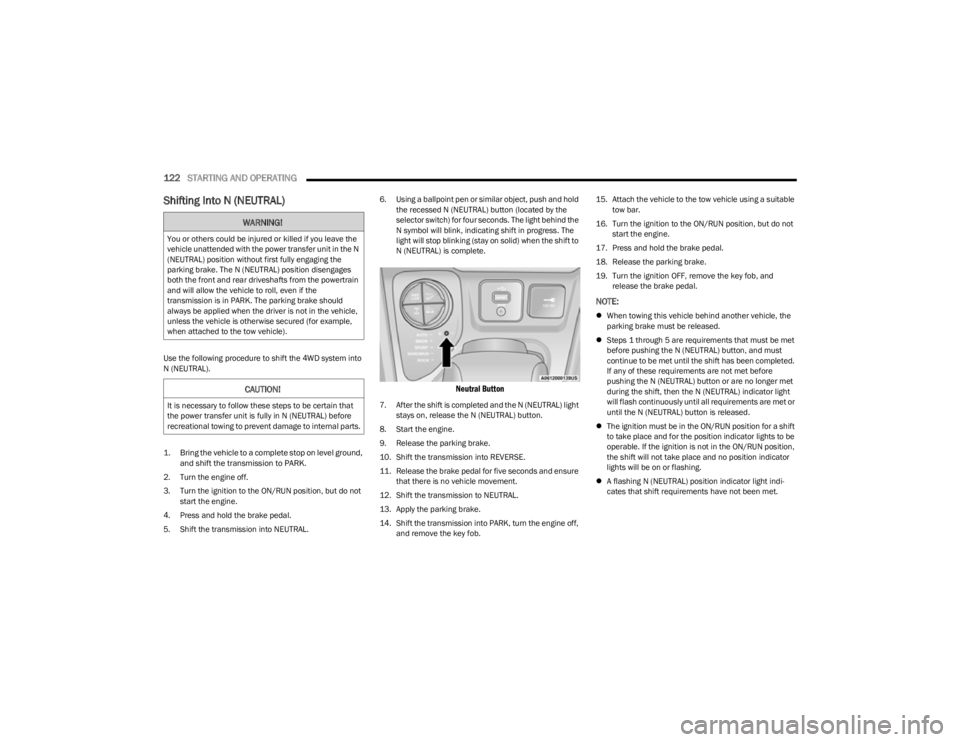
Shifting Into N (NEUTRAL)
Use the following procedure to shift the 4WD system into
N (NEUTRAL).
1. Bring the vehicle to a complete stop on level ground,
and shift the transmission to PARK.
2. Turn the engine off.
3. Turn the ignition to the ON/RUN position, but do not start the engine.
4. Press and hold the brake pedal.
5. Shift the transmission into NEUTRAL. 6. Using a ballpoint pen or similar object, push and hold
the recessed N (NEUTRAL) button (located by the
selector switch) for four seconds. The light behind the
N symbol will blink, indicating shift in progress. The
light will stop blinking (stay on solid) when the shift to
N (NEUTRAL) is complete.
Neutral Button
7. After the shift is completed and the N (NEUTRAL) light stays on, release the N (NEUTRAL) button.
8. Start the engine.
9. Release the parking brake.
10. Shift the transmission into REVERSE.
11. Release the brake pedal for five seconds and ensure that there is no vehicle movement.
12. Shift the transmission to NEUTRAL.
13. Apply the parking brake.
14. Shift the transmission into PARK, turn the engine off, and remove the key fob. 15. Attach the vehicle to the tow vehicle using a suitable
tow bar.
16. Turn the ignition to the ON/RUN position, but do not start the engine.
17. Press and hold the brake pedal.
18. Release the parking brake.
19. Turn the ignition OFF, remove the key fob, and release the brake pedal.
NOTE:
When towing this vehicle behind another vehicle, the
parking brake must be released.
Steps 1 through 5 are requirements that must be met
before pushing the N (NEUTRAL) button, and must
continue to be met until the shift has been completed.
If any of these requirements are not met before
pushing the N (NEUTRAL) button or are no longer met
during the shift, then the N (NEUTRAL) indicator light
will flash continuously until all requirements are met or
until the N (NEUTRAL) button is released.
The ignition must be in the ON/RUN position for a shift
to take place and for the position indicator lights to be
operable. If the ignition is not in the ON/RUN position,
the shift will not take place and no position indicator
lights will be on or flashing.
A flashing N (NEUTRAL) position indicator light indi -
cates that shift requirements have not been met.
WARNING!
You or others could be injured or killed if you leave the
vehicle unattended with the power transfer unit in the N
(NEUTRAL) position without first fully engaging the
parking brake. The N (NEUTRAL) position disengages
both the front and rear driveshafts from the powertrain
and will allow the vehicle to roll, even if the
transmission is in PARK. The parking brake should
always be applied when the driver is not in the vehicle,
unless the vehicle is otherwise secured (for example,
when attached to the tow vehicle).
CAUTION!
It is necessary to follow these steps to be certain that
the power transfer unit is fully in N (NEUTRAL) before
recreational towing to prevent damage to internal parts.
23_KL_OM_EN_USC_t.book Page 122
Page 125 of 276
STARTING AND OPERATING123
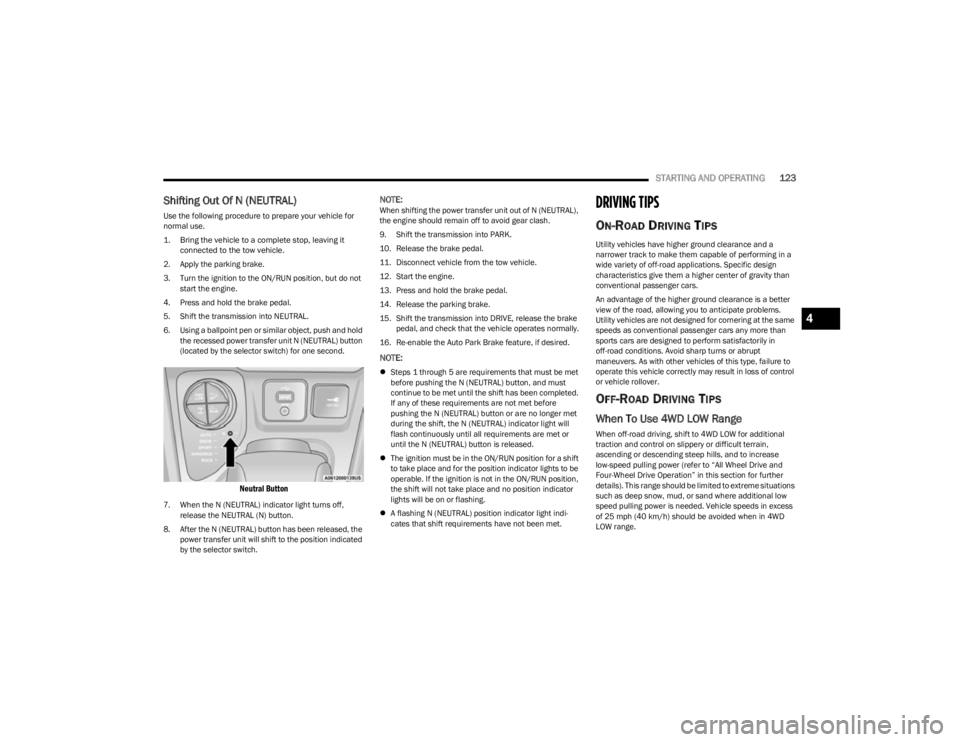
Shifting Out Of N (NEUTRAL)
Use the following procedure to prepare your vehicle for
normal use.
1. Bring the vehicle to a complete stop, leaving it
connected to the tow vehicle.
2. Apply the parking brake.
3. Turn the ignition to the ON/RUN position, but do not start the engine.
4. Press and hold the brake pedal.
5. Shift the transmission into NEUTRAL.
6. Using a ballpoint pen or similar object, push and hold the recessed power transfer unit N (NEUTRAL) button
(located by the selector switch) for one second.
Neutral Button
7. When the N (NEUTRAL) indicator light turns off, release the NEUTRAL (N) button.
8. After the N (NEUTRAL) button has been released, the power transfer unit will shift to the position indicated
by the selector switch.
NOTE:When shifting the power transfer unit out of N (NEUTRAL),
the engine should remain off to avoid gear clash.
9. Shift the transmission into PARK.
10. Release the brake pedal.
11. Disconnect vehicle from the tow vehicle.
12. Start the engine.
13. Press and hold the brake pedal.
14. Release the parking brake.
15. Shift the transmission into DRIVE, release the brake pedal, and check that the vehicle operates normally.
16. Re-enable the Auto Park Brake feature, if desired.
NOTE:
Steps 1 through 5 are requirements that must be met
before pushing the N (NEUTRAL) button, and must
continue to be met until the shift has been completed.
If any of these requirements are not met before
pushing the N (NEUTRAL) button or are no longer met
during the shift, the N (NEUTRAL) indicator light will
flash continuously until all requirements are met or
until the N (NEUTRAL) button is released.
The ignition must be in the ON/RUN position for a shift
to take place and for the position indicator lights to be
operable. If the ignition is not in the ON/RUN position,
the shift will not take place and no position indicator
lights will be on or flashing.
A flashing N (NEUTRAL) position indicator light indi -
cates that shift requirements have not been met.
DRIVING TIPS
ON-ROAD DRIVING TIPS
Utility vehicles have higher ground clearance and a
narrower track to make them capable of performing in a
wide variety of off-road applications. Specific design
characteristics give them a higher center of gravity than
conventional passenger cars.
An advantage of the higher ground clearance is a better
view of the road, allowing you to anticipate problems.
Utility vehicles are not designed for cornering at the same
speeds as conventional passenger cars any more than
sports cars are designed to perform satisfactorily in
off-road conditions. Avoid sharp turns or abrupt
maneuvers. As with other vehicles of this type, failure to
operate this vehicle correctly may result in loss of control
or vehicle rollover.
OFF-ROAD DRIVING TIPS
When To Use 4WD LOW Range
When off-road driving, shift to 4WD LOW for additional
traction and control on slippery or difficult terrain,
ascending or descending steep hills, and to increase
low-speed pulling power (refer to “All Wheel Drive and
Four-Wheel Drive Operation” in this section for further
details). This range should be limited to extreme situations
such as deep snow, mud, or sand where additional low
speed pulling power is needed. Vehicle speeds in excess
of 25 mph (40 km/h) should be avoided when in 4WD LOW range.
4
23_KL_OM_EN_USC_t.book Page 123
Page 150 of 276
148SAFETY
Hill Start Assist (HSA)
HSA is designed to mitigate roll back from a complete stop
while on an incline. If the driver releases the brake while
stopped on an incline, HSA will continue to hold the brake
pressure for a short period. If the driver does not apply the
throttle before this time expires, the system will release
brake pressure and the vehicle will roll down the hill as
normal.
The following conditions must be met in order for HSA to
activate:
The feature must be enabled.
The vehicle must be stopped.
The parking brake must be off.
The driver door must be closed.
The vehicle must be on a sufficient grade.
The gear selection must match vehicle uphill direction
(i.e., vehicle facing uphill is in forward gear; vehicle
backing uphill is in REVERSE gear).
HSA will work in REVERSE gear and all forward gears.
The system will not activate if the transmission is in
PARK or NEUTRAL.
Disabling And Enabling HSA
This feature can be turned on or turned off. To change the
current setting, proceed as follows:
If disabling HSA using your instrument cluster display
Úpage 63
If disabling HSA using Uconnect Settings
Úpage 126
Towing With HSA
HSA will also provide assistance to mitigate roll back while
towing a trailer.
Rain Brake Support (RBS)
RBS may improve braking performance in wet conditions.
It will periodically apply a small amount of brake pressure
to remove any water buildup on the front brake rotors. It
functions when the windshield wipers are in LO or HI
speed. When RBS is active, there is no notification to the
driver and no driver interaction is required.
WARNING!
There may be situations where the Hill Start Assist
(HSA) will not activate and slight rolling may occur, such
as on minor hills or with a loaded vehicle, or while pull -
ing a trailer. HSA is not a substitute for active driving
involvement. It is always the driver’s responsibility to be
attentive to distance to other vehicles, people, and
objects, and most importantly brake operation to
ensure safe operation of the vehicle under all road con -
ditions. Your complete attention is always required
while driving to maintain safe control of your vehicle.
Failure to follow these warnings can result in a collision
or serious personal injury.
WARNING!
If you use a trailer brake controller with your trailer,
the trailer brakes may be activated and deactivated
with the brake switch. If so, there may not be enough
brake pressure to hold both the vehicle and the
trailer on a hill when the brake pedal is released. In
order to avoid rolling down an incline while resuming
acceleration, manually activate the trailer brake or
apply more vehicle brake pressure prior to releasing
the brake pedal.
HSA is not a parking brake. Always apply the parking
brake fully when exiting your vehicle. Also, be certain
to place the transmission in PARK (P).
Failure to follow these warnings can result in a colli -
sion or serious personal injury.
23_KL_OM_EN_USC_t.book Page 148
Page 152 of 276
150SAFETY
Disabling SSC
SSC will deactivate and be disabled if any of the following
conditions occur:
The driver pushes the SSC button.
The driveline is shifted out of 4WD Low.
The parking brake is applied.
The driver door opens.
The vehicle is driven greater than 20 mph (32 km/h)
for greater than 70 seconds.
The vehicle is driven greater than 40 mph (64 km/h)
(SSC exits immediately).
Feedback To The Driver:
The instrument cluster has an SSC icon and the SSC
button has an LED which offers feedback to the driver
about the state SSC is in.
The cluster icon and button lamp will illuminate and
remain on solid when SSC is enabled or activated. This
is the normal operating condition for SSC.
The cluster icon and button lamp will flash for several
seconds then extinguish when the driver pushes the
SSC button but enable conditions are not met.
The cluster icon and button lamp will flash for several
seconds then extinguish when SSC disables due to
excess speed.
The cluster icon and button lamp will flash then extin -
guish when SSC deactivates due to overheated brakes.
Traction Control System (TCS)
The TCS monitors the amount of wheel spin of each of the
driven wheels. If wheel spin is detected, the TCS may apply
brake pressure to the spinning wheel(s) and/or reduce
engine power to provide enhanced acceleration and
stability. A feature of the TCS, Brake Limited Differential
(BLD) functions similarly to a limited slip differential and
controls the wheel spin across a driven axle. If one wheel
on a driven axle is spinning faster than the other, the
system will apply the brake of the spinning wheel. This will
allow more engine torque to be applied to the wheel that
is not spinning. BLD may remain enabled even if TCS and
Electronic Stability Control (ESC) are in reduced modes.
Trailer Sway Control (TSC)
TSC uses sensors in the vehicle to recognize an
excessively swaying trailer and will take the appropriate
actions to attempt to stop the sway.
NOTE:
TSC cannot stop all trailers from swaying. Always use
caution when towing a trailer and follow the trailer tongue
weight recommendations
Úpage 114.
When TSC is functioning, the ESC Activation/Malfunction
Indicator Light will flash, the engine power may be reduced
and you may feel the brakes being applied to individual wheels to attempt to stop the trailer from swaying. TSC is
disabled when the ESC system is in the “Partial Off” or
“Full Off” modes.
AUXILIARY DRIVING SYSTEMS
BLIND SPOT MONITORING (BSM) —
I
F EQUIPPED
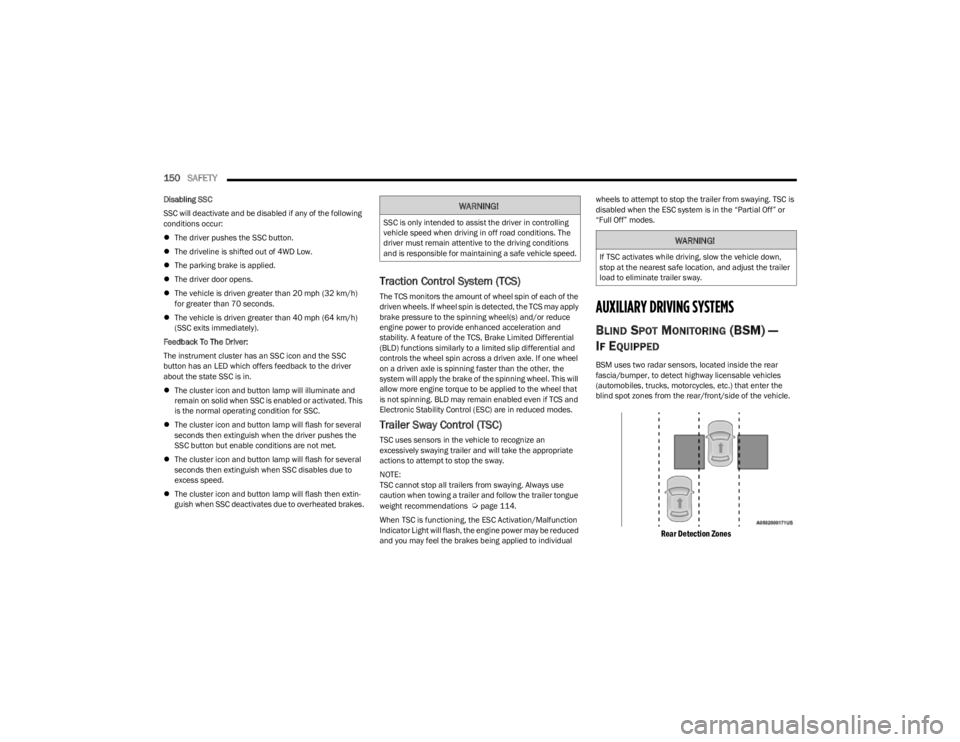
BSM uses two radar sensors, located inside the rear
fascia/bumper, to detect highway licensable vehicles
(automobiles, trucks, motorcycles, etc.) that enter the
blind spot zones from the rear/front/side of the vehicle.
Rear Detection Zones
WARNING!
SSC is only intended to assist the driver in controlling
vehicle speed when driving in off road conditions. The
driver must remain attentive to the driving conditions
and is responsible for maintaining a safe vehicle speed.
WARNING!
If TSC activates while driving, slow the vehicle down,
stop at the nearest safe location, and adjust the trailer
load to eliminate trailer sway.
23_KL_OM_EN_USC_t.book Page 150