ESP JEEP CJ 1953 User Guide
[x] Cancel search | Manufacturer: JEEP, Model Year: 1953, Model line: CJ, Model: JEEP CJ 1953Pages: 376, PDF Size: 19.96 MB
Page 90 of 376
DAUNTLESS
V-6
ENGINE
Note:
The rib on
edge
of cap and the conical
boss
on web of connecting rod must be toward
rear
of
engine
in all connecting rod assemblies of left
cyl
inder
bank and toward front of
engine
in all connecting rod assemblies of right cylinder bank.
Dl-50.
Oil
Pump Intake
and
Screen Cleaning
a.
Pry screen from housing and examine for clog
ging due to deposit of sludge or other foreign
material.
b.
Clean
the screen and housing thoroughly in sol
vent; dry with compressed air.
c.
Install
screen in housing.
Dl-51.
Oil Pan Cleaning and Inspection
Inspect
the oil pan for corrosion, dents, leaks, and
other damage. Inspect its mounting flange carefully
for damage or distortion to be certain that it
will
give
a
good
seal.
Dl-52.
Flywheel Cleaning
and
Inspection
Clean
the flywheel with suitable cleaning solvent;
dry
with compressed air. Inspect clutch face for
burned
or scuffed condition and for rivet grooves.
Inspection
for run out or improper mounting is de
scribed
in installation procedure.
Inspect
teeth
of the flywheel
ring
gear for
burrs,
nicks,
and minor distortion. If necessary and pos
sible, use a small emery wheel to remove
burrs
and
reshape teeth. If gear
teeth
are broken,
cracked,
seriously
burred
or deformed, the
ring
gear must be replaced.
Dl-53.
Ring Gear Replacement
a.
Drill
a
hole
between
two
ring
gear teeth; then
split
the gear with a cold chisel. Be careful not to
damage
ring
gear shoulder or seat surfaces of fly
wheel.
b.
Polish several
spots
on the new
ring
gear to be
installed.
With
a hot plate or slowly moving torch,
heat the new
ring
gear until polished
spots
become
blue, about
600°F.
[312°C.].
Caution:
Do not heat the
ring
gear to a temperature
greater than
800°F.
[424°C.].
Excessive heat
will
destroy heat treatment given to
ring
gear during
manufacture.
c.
Quickly
install
ring
gear on flywheel. Chamfered
edge
of
ring
gear must be toward
ring
gear shoulder
of flywheel. Be certain that
ring
gear is seated prop
erly.
Allow
ring
gear to cool slowly, so that it
will
be held tightly in place.
Dl-54.
Flywheel Housing Cleaning and Inspection
Both
flywheel and clutch are enclosed by a fly
wheel housing. Its front surface is bolted to the
engine
cylinder block, and its
rear
surface acts as
front
support to the transmission.
Clean
the fly wheel housing with a suitable cleaning solvent; dry
with
compressed air. Inspect front and
rear
surfaces
for distortion and improper alignment with each
other;
these
planes must be
parallel
to assure
proper
alignment
between
engine
and transmission.
Dl-55.
Camshaft Cleaning
and
Inspection
Clean
both camshaft and camshaft bearing surfaces
with
a suitable cleaning solvent; dry with com
pressed air.
Note:
The steel-backed babbitt-lined camshaft
bearings are pressed into the crankcase.
From
front
to
rear,
each bearing is .030" [0,76 mm.] smaller
in
diameter than the preceding bearing.
From
front
to
rear,
each camshaft
journal
is correspondingly
smaller
in diameter.
The
camshaft bearings must be line reamed to
proper
diameter after being pressed into crankcase.
Since
this operation requires special reaming equip
ment, the original bearings should be retained un
less
they are severly damaged. Slightly scored cam
shaft bearings are satisfactory if the surfaces of camshaft journals are polished, bearings are
polished to remove
burrs,
and
radial
clearance
between
camshaft and bearings is within .0015"
to .004" [0,038 a 0,102 mm.].
Dl-56.
Valve Lifter
and
Push
Rod
Cleaning and Inspection
a.
Examine the cam contact surface at lower end of each valve lifter body. If surface is excessively
worn,
galled, or otherwise damaged, discard the
valve lifter. Also examine the mating camshaft
lobe
for excessive wear or damage.
b.
Disassemble one or two valve lifters, as de
scribed
below, and inspect them for
dirt
or
varnish.
If
they are dirty or have a varnish deposit, clean
and
inspect all twelve valve lifters. Otherwise,
service
only
those
valve lifters which do not operate
properly.
c.
To disassemble each valve lifter, depress the
push
rod seat with a push rod, and remove the
plunger retainer from the valve lifter body with
a
retainer remover. Remove push rod seat and
plunger from valve lifter body. If plunger sticks
in
valve lifter body, place body in large end of
a
plunger remover tool, with plunger downward.
While
holding lifter with thumb, rap the open end
of remover against a block of wood with just enough force to jar the plunger from body. Refer to
Figs.
Dl-20, Dl-22 and Dl-23.
d.
Drain
oil from valve lifter and remove the check
valve retainer,
ball,
valve spring, and plunger
spring.
e. Keep all parts of each valve lifter separated
during
part cleaning and inspection. The valve
lifter
body and plunger are selectively fitted to each other and must not be interchanged with parts
of other valve lifters.
f. Rinse all valve lifter parts in kerosene to remove as much oil as possible.
This
will
reduce contamina
tion of the cleaning solvent. Immerse all parts in cleaning solvent for approximately one hour. The
time required
will
depend on varnish
deposits
and
effectiveness
of the solvent. After the varnish has
dissolved or has
softened
sufficiently to permit re
moval
by wiping, allow parts to
drain.
Varnish
can
then be cleaned from the valve lifter body
with
a
brush.
Rinse the parts in kerosene to dissolve 90
Page 91 of 376
'Jeep'
UNIVERSAL
SERIES SERVICE
MANUAL
Dl
12712
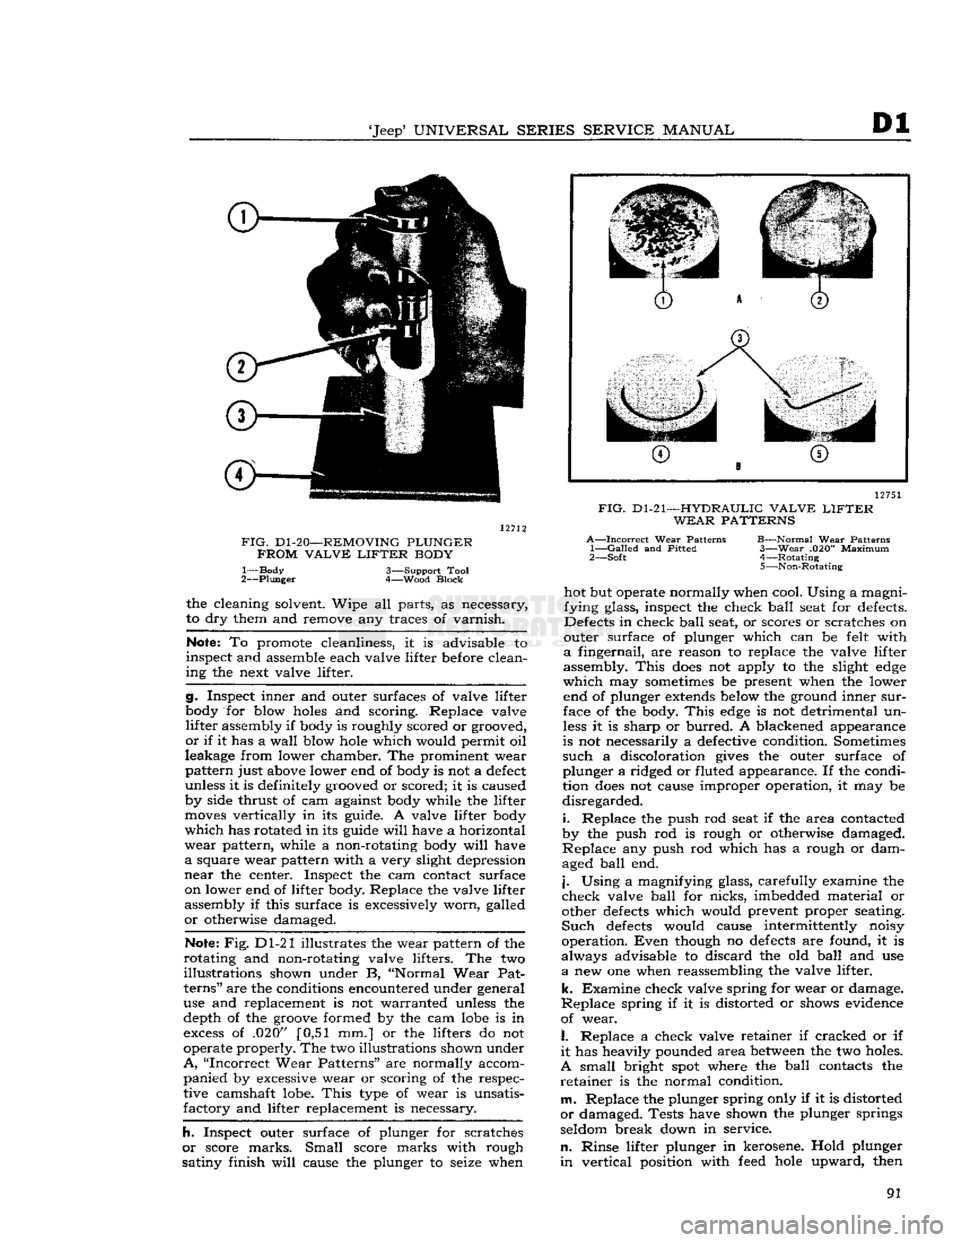
FIG.
D1-20—REMOVING
PLUNGER
FROM
VALVE
LIFTER
BODY
1— Body 3—Support Tool
2—
Plunger
4—Wood Block the cleaning solvent. Wipe all parts, as necessary,
to dry them and remove any traces of varnish.
Note:
To promote cleanliness, it is advisable to
inspect and assemble each valve lifter before clean
ing the next valve lifter.
g. Inspect inner and outer surfaces of valve lifter
body for blow
holes
and scoring. Replace valve lifter assembly if body is roughly scored or grooved,
or
if it has a wall blow
hole
which would permit oil
leakage from lower chamber. The prominent wear
pattern just above lower end of body is not a
defect
unless it is definitely grooved or scored; it is caused
by side thrust of cam against body while the lifter
moves
vertically in its guide. A valve lifter body
which
has rotated in its guide
will
have a horizontal
wear
pattern, while a non-rotating body
will
have
a
square wear pattern with a very slight depression
near
the center. Inspect the cam contact surface on lower end of lifter body. Replace the valve lifter
assembly if this surface is excessively worn, galled
or
otherwise damaged.
Note:
Fig. Dl-21 illustrates the wear pattern of the
rotating and non-rotating valve lifters. The two
illustrations shown under B, "Normal Wear Pat
terns"
are the conditions encountered under general
use and replacement is not warranted unless the depth of the
groove
formed by the cam
lobe
is in
excess
of .020" [0,51 mm.] or the lifters do not
operate properly. The two illustrations shown under
A,
"Incorrect Wear Patterns" are normally accom panied by excessive wear or scoring of the respec
tive camshaft lobe.
This
type of wear is unsatis
factory and lifter replacement is necessary.
h.
Inspect outer surface of plunger for scratches
or
score marks.
Small
score marks with rough
satiny finish
will
cause the plunger to seize when 12751
FIG.
D1-21—HYDRAULIC
VALVE
LIFTER
WEAR PATTERNS
A—Incorrect
Wear Patterns B—Normal Wear Patterns
1—
Galled
and Pitted 3—Wear .020" Maximum
2— Soft 4—Rotating
5—Non-Rotating
hot but operate normally when cool. Using a magni
fying glass, inspect the check ball seat for defects.
Defects in check ball seat, or scores or scratches on
outer surface of plunger which can be felt with
a
fingernail, are reason to replace the valve lifter
assembly.
This
does
not apply to the slight
edge
which
may
sometimes
be present when the lower end of plunger
extends
below the ground inner
sur
face of the body.
This
edge
is not detrimental un
less
it is sharp or burred. A blackened appearance
is not necessarily a defective condition. Sometimes
such
a discoloration
gives
the outer surface of
plunger a ridged or fluted appearance. If the condi
tion
does
not cause improper operation, it may be
disregarded.
i.
Replace the push rod seat if the area contacted
by the push rod is rough or otherwise damaged.
Replace
any push rod which has a rough or dam
aged ball end.
j.
Using a magnifying glass, carefully examine the
check valve ball for nicks, imbedded material or
other
defects
which would prevent proper seating.
Such
defects
would cause intermittently noisy
operation.
Even
though no
defects
are found, it is
always advisable to discard the old ball and use
a
new one when reassembling the valve lifter,
k.
Examine check valve spring for wear or damage.
Replace
spring if it is distorted or shows evidence
of wear.
I.
Replace a check valve retainer if cracked or if
it
has heavily pounded area
between
the two holes.
A
small bright
spot
where the ball contacts the
retainer
is the normal condition.
m.
Replace the plunger spring only if it is distorted
or
damaged. Tests have shown the plunger springs
seldom break down in service.
n.
Rinse lifter plunger in kerosene. Hold plunger
in
vertical position with
feed
hole
upward, then 91
Page 94 of 376
Dl
DAUNTLESS
V-6
ENGINE
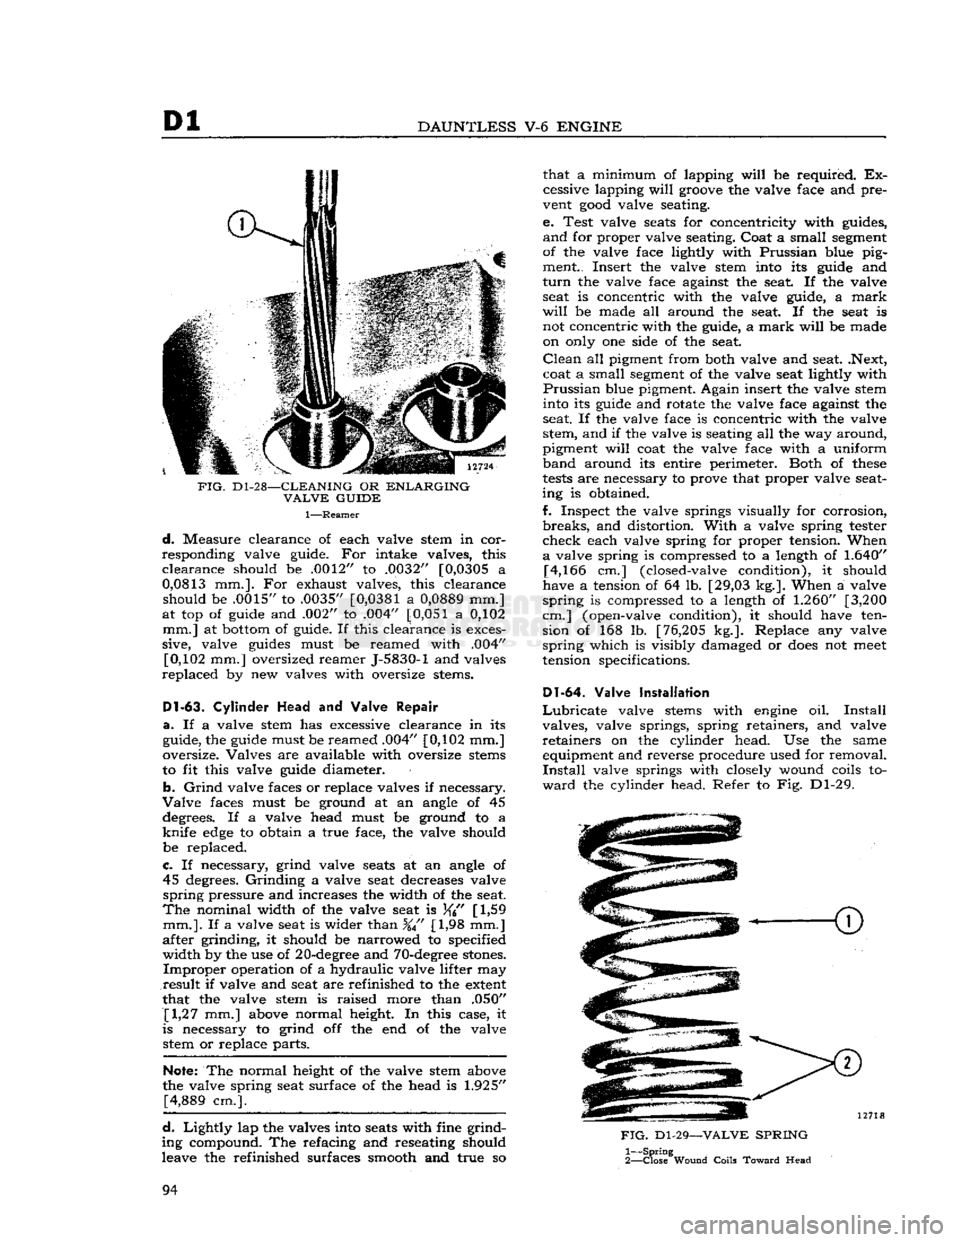
FIG.
D1-28—CLEANING
OR
ENLARGING
VALVE
GUIDE
1—Reamer
d.
Measure clearance of each valve stem in cor
responding valve guide. For intake valves, this
clearance
should be .0012" to .0032" [0,0305 a
0,0813
mm.]. For exhaust valves, this clearance should be .0015" to .0035"
[0,0381
a
0,0889
mm.]
at top of guide and .002" to .004"
[0,051
a 0,102 mm.] at bottom of guide. If this clearance is exces
sive, valve guides must be reamed with .004" [0,102 mm.] oversized reamer J-5830-1 and valves
replaced
by new valves with oversize stems.
Dl-63.
Cylinder
Head
and Valve
Repair
a.
If a valve stem has excessive clearance in its
guide, the guide must be reamed .004" [0,102 mm.]
oversize. Valves are available with oversize stems
to fit this valve guide diameter.
b.
Grind
valve faces or replace valves if necessary.
Valve
faces must be ground at an angle of 45 degrees. If a valve head must be ground to a
knife
edge
to obtain a true face, the valve should
be replaced.
c.
If necessary, grind valve seats at an angle of 45 degrees.
Grinding
a valve seat decreases valve
spring
pressure and increases the width of the seat.
The
nominal width of the valve seat is
[
1,59
mm.].
If a valve seat is wider than %" [1,98 mm.]
after grinding, it should be narrowed to specified
width
by the use of 20-degree and 70-degree stones.
Improper
operation of a hydraulic valve lifter may
result
if valve and seat are refinished to the extent
that the valve stem is raised more than .050" [1,27 mm.] above normal height. In this case, it
is necessary to grind off the end of the valve stetti or replace parts.
Note:
The normal height of the valve stem above
the valve spring seat surface of the head is
1.925"
[4,889 cm.].
d.
Lightly
lap the valves into seats with fine grind
ing compound. The refacing and reseating should
leave the refinished surfaces smooth and true so that a minimum of lapping
will
be required. Ex
cessive lapping
will
groove the valve face and pre
vent
good
valve seating.
e. Test valve seats for concentricity with guides,
and
for proper valve seating. Coat a small segment
of the valve face lightly with Prussian blue pig ment.. Insert the valve stem into its guide and
turn
the valve face against the seat. If the valve seat is concentric with the valve guide, a
mark
will
be made all around the seat. If the seat is not concentric with the guide, a
mark
will
be made
on only one side of the seat.
Clean
all pigment from both valve and seat. .Next,
coat a small segment of the valve seat lightly with
Prussian
blue pigment. Again insert the valve stem into its guide and rotate the valve face against the
seat. If the valve face is concentric with the valve
stem, and if the valve is seating all the way around,
pigment
will
coat the valve face with a uniform
band
around its entire perimeter. Both of
these
tests
are necessary to prove that proper valve seat
ing is obtained.
f. Inspect the valve springs visually for corrosion,
breaks,
and distortion.
With
a valve spring tester
check
each valve spring for proper tension. When
a
valve spring is compressed to a length of
1.640"
[4,166 cm.] (closed-valve condition), it should
have a tension of 64 lb. [29,03 kg.]. When a valve
spring
is compressed to a length of
1.260"
[3,200
cm.] (open-valve condition), it should have ten sion of 168 lb. [76,205 kg.]. Replace any valve
spring
which is visibly damaged or
does
not
meet
tension specifications.
Dl-64.
Valve Installation
Lubricate
valve stems with engine oil.
Install
valves, valve springs, spring retainers, and valve
retainers
on the cylinder head. Use the same equipment and reverse procedure used for removal.
Install
valve springs with closely wound coils to
ward
the cylinder head. Refer to Fig. Dl-29.
FIG.
Dl-29—VALVE
SPRING
1—
Spring
2—
Close
Wound
Coils
Toward
Head
94
Page 96 of 376
Dl
DAUNTLESS
V-6
ENGINE
Note:
During
engine
reassembly, use Perfect Seal
Aerosol
Spray Sealer
Part
No.
994757
on all en
gine
gaskets to ensure against vacuum, oil, gasoline
and
water leaks. Apply to head gaskets, valve covers, water pumps, oil pan gaskets, radiator and
heater
hose
connections, felt gaskets, gasoline and
oil
line connections, stud bolts, spark plug threads,
and
grease retainer washers. Refer to manufac
turer's
instructions on container for proper appli
cation procedure.
Dl-72.
Cylinder
Block
and Crankshaft
Rear
Oil Seals
Braided
fabric seals are pressed into
grooves
of
cylinder
block and
rear
main bearing cap, to
rear
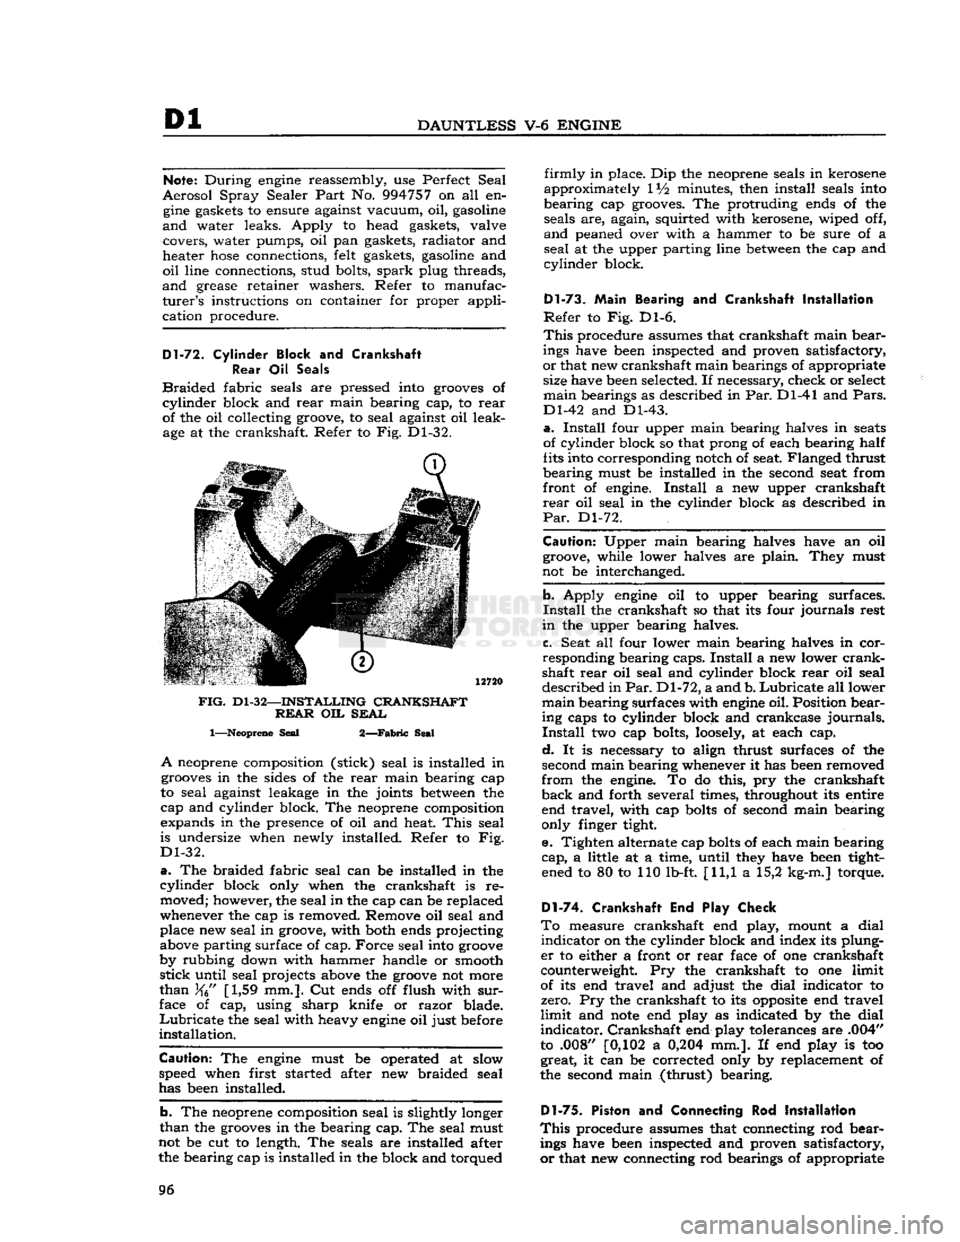
of the oil collecting groove, to seal against oil leak age at the crankshaft. Refer to Fig. Dl-32.
FIG.
Dl-32—INSTALLING
CRANKSHAFT REAR
OIL
SEAL
1—Neoprene
Seal
2—Fabric
Seal
A
neoprene composition (stick) seal is installed in
grooves
in the sides of the
rear
main bearing cap
to seal against leakage in the joints
between
the
cap and cylinder block. The neoprene composition
expands in the presence of oil and heat.
This
seal
is undersize when newly installed. Refer to Fig.
Dl-32.
a.
The braided fabric seal can be installed in the
cylinder
block only when the crankshaft is re moved; however, the seal in the cap can be replaced
whenever the cap is removed. Remove oil seal and place new seal in groove, with both ends projecting
above parting surface of cap. Force seal into
groove
by rubbing down with hammer handle or smooth
stick
until seal projects above the
groove
not more
than
[1,59 mm.]. Cut ends off flush with
sur
face of cap, using sharp knife or razor blade.
Lubricate
the seal with heavy
engine
oil just before
installation.
Caution:
The
engine
must be operated at slow
speed when first started after new braided seal
has been installed.
b. The neoprene composition seal is slightly longer
than
the
grooves
in the bearing cap. The seal must
not be cut to length. The seals are installed after the bearing cap is installed in the block and torqued
firmly
in place. Dip the neoprene seals in kerosene
approximately IV2 minutes, then install seals into
bearing cap grooves. The protruding ends of the seals are, again, squirted with kerosene, wiped off,
and
peaned over with a hammer to be sure of a
seal
at the upper parting line
between
the cap and
cylinder
block.
Dl-73.
Main
Bearing and Crankshaft
Installation
Refer
to Fig. Dl-6.
This
procedure assumes that crankshaft main bear
ings have been inspected and proven satisfactory,
or
that new crankshaft main bearings of appropriate size have been selected. If necessary, check or select
main
bearings as described in Par. Dl-41 and
Pars.
Dl-42 and Dl-43.
a.
Install
four upper main bearing halves in
seats
of cylinder block so that prong of each bearing half
fits into corresponding notch of seat. Flanged thrust
bearing must be installed in the second seat from
front of engine.
Install
a new upper crankshaft
rear
oil seal in the cylinder block as described in
Par.
Dl-72.
Caution:
Upper main bearing halves have an oil groove, while lower halves are plain. They must
not be interchanged.
b. Apply
engine
oil to upper bearing surfaces.
Install
the crankshaft so that its four journals rest
in
the upper bearing halves.
c. Seat all four lower main bearing halves in cor
responding bearing caps.
Install
a new lower
crank
shaft
rear
oil seal and cylinder block
rear
oil seal
described in
Par.
Dl-72, a and b.
Lubricate
all lower
main
bearing surfaces with
engine
oil. Position bear ing caps to cylinder block and crankcase journals.
Install
two cap bolts,
loosely,
at each cap.
d.
It is necessary to align thrust surfaces of the
second main bearing whenever it has been removed
from
the engine. To do this, pry the crankshaft
back
and forth several times, throughout its entire end travel, with cap
bolts
of second main bearing
only finger tight.
e. Tighten alternate cap
bolts
of each main bearing
cap,
a little at a time, until they have been tight ened to 80 to 110 lb-ft. [11,1 a 15,2 kg-m.] torque.
D1-74. Crankshaft End Play Check
To
measure crankshaft end play, mount a dial
indicator
on the cylinder block and index its plung
er
to either a front or
rear
face of one crankshaft
counterweight. Pry the crankshaft to one limit
of its end travel and adjust the dial indicator to
zero. Pry the crankshaft to its
opposite
end travel
limit
and
note
end play as indicated by the dial
indicator.
Crankshaft end play tolerances are .004"
to .008" [0,102 a
0,204
mm.]. If end play is too great, it can be corrected only by replacement of
the second main (thrust) bearing.
Dl-75.
Piston and Connecting Rod
Installation
This
procedure assumes that connecting rod bear ings have been inspected and proven satisfactory,
or
that new connecting rod bearings of appropriate 96
Page 97 of 376
'Jeep'
UNIVERSAL
SERIES SERVICE
MANUAL
Dl
size have
been
selected. If necessary, check or
select
connecting rod bearings as described in Par. Dl-49.
Note:
When a piston and connecting rod assembly
is properly installed, the oil spurt
hole
in the con necting rod
will
face the camshaft. The rib on the
edge
of the bearing cap
will
be on the same side
as the conical
boss
on the connecting rod web;
these
marks (rib and boss)
will
be toward the other
connecting rod on the same crankpin. The notch
on the piston
will
face the front of the
engine.
a.
Be certain that cylinder bores, pistons, connect
ing rod bearings and crankshaft journals are absolutely clean. Coat all bearing surfaces with
engine
oil.
b. Before installing a piston and connecting rod as
sembly into its bore, rotate the crankshaft so that
the corresponding crankpin is moved downward, away from the cylinder bore.
c. Remove bearing cap from connecting rod. With
upper bearing half seated in connecting rod, install connecting rod guides. These
guides
hold the upper
bearing half in place and prevent damage to the
crankshaft
crankpin during installation of the con
necting rod and piston assembly.
d.
Be certain that the gap in the oil ring rails faces
upward,
toward center of
engine.
Gaps of the com
pression rings shall not be aligned with each other
or
with the oil ring
rails.
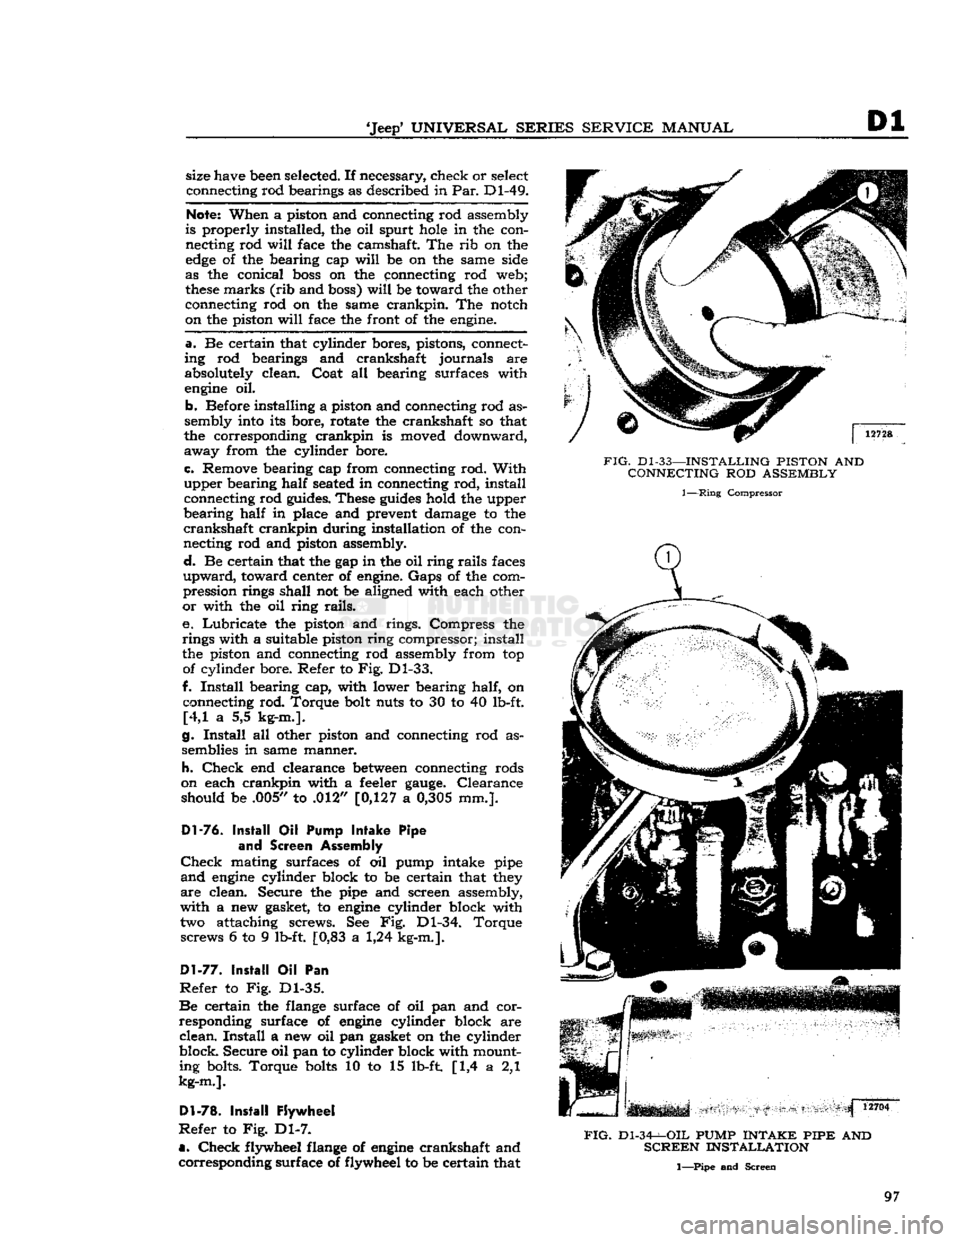
e. Lubricate the piston and rings. Compress the
rings with a suitable piston ring compressor; install
the piston and connecting rod assembly from top of cylinder bore. Refer to Fig. Dl-33.
f.
Install
bearing cap, with lower bearing half, on connecting rod. Torque bolt nuts to 30 to 40 lb-ft. [4,1 a 5,5 kg-m.].
g.
Install
all other piston and connecting rod as
semblies in same manner.
h.
Check
end clearance
between
connecting rods
on each crankpin with a feeler
gauge.
Clearance should be .005,/ to .012" [0,127 a
0,305
mm.].
Dl-76.
Install
Oil
Pump
Intake
Pipe
and
Screen Assembly
Check
mating surfaces of oil pump intake pipe
and
engine
cylinder block to be certain that they
are
clean. Secure the pipe and screen assembly,
with a new gasket, to
engine
cylinder block with two attaching screws. See Fig. Dl-34. Torque screws 6 to 9 lb-ft. [0,83 a 1,24 kg-m.].
Dl-77.
Install
Oil Pan
Refer
to Fig. Dl-35.
Be
certain the flange surface of oil pan and cor
responding surface of
engine
cylinder block are
clean.
Install
a new oil pan gasket on the cylinder
block.
Secure
oil pan to cylinder block with mount ing bolts. Torque
bolts
10 to 15 lb-ft [1,4 a 2,1
kg-m.].
Dl-78.
Install
Flywheel
Refer
to Fig. Dl-7.
a.
Check
flywheel flange of
engine
crankshaft and corresponding surface of flywheel to
be
certain that
FIG.
Dl-33—INSTALLING
PISTON
AND
CONNECTING
ROD
ASSEMBLY
1—Ring
Compressor
FIG.
Dl-34-^-OIL
PUMP
INTAKE PIPE
AND
SCREEN
INSTALLATION
1—Pipe and Screen
97
Page 99 of 376
'Jeep'
UNIVERSAL SERIES SERVICE
MANUAL
Dl
both are clean. Any foreign material on either of
these
surfaces
will
cause flywheel run out and en
gine
vibration. Position flywheel to crankshaft and
secure with six mounting bolts. Torque mounting
bolts
50 to 65 lb-ft. [6,91 a 8,98 kg-m.].
Note:
Flywheel mounting
bolts
are unevenly
spaced so that flywheel can be installed in only
one position.
This
assures correct balance of fly
wheel and crankshaft.
b.
Mount a
dial
indicator on flywheel housing
flange of cylinder block and index its plunger to
the flywheel surface. Measure flywheel run out.
Maximum
allowable run out is .015"
[0,381
mm.].
Dl-82.
Install
Cylinder
Head Assembly
Refer
to Fig. Dl-9.
a.
Wipe cylinder head face of
engine
cylinder
block, and be certain no foreign material has fallen
into the cylinder bores, bolt holes, or in the valve
lifter
area.
It is
good
practice to clean out bolt
holes
with compressed air.
b.
Install
a new cylinder head gasket on the
cylin
der
block. Dowels in the block
will
hold the gasket
in
position. Always handle gaskets carefully to
avoid
kinking or damage to the surface treatment
of the gasket. Apply Perfect Seal Aerosol
Spray
Sealer
Part
No.
994757
on cylinder head gaskets.
Dl-79.
Install
Clutch
and Flywheel Housing
a.
Note
marks made on clutch assembly and fly
wheel during
engine
disassembly. Position clutch
assembly to flywheel, according to
marks,
and
fasten
loosely
with six attaching bolts. Torque
bolts
in rotation, one
turn
at a time, to 30 to 40 lb-ft. [4,1 a 5,5 kg-m.].
b.
Engage fork of clutch linkage to clutch and
position flywheel housing to
engine
cylinder block.
Secure
housing to block with six mounting bolts.
Torque
bolts
30 to 40 lb-ft. [4,1 a 5,5 kg-m.].
D1-80.
Install
Camshaft
Insert
camshaft into camshaft bearings of
engine
cylinder
block carefully to avoid damage to bear
ing surfaces. Make certain camshaft journals are
properly
seated in bearings.
12695
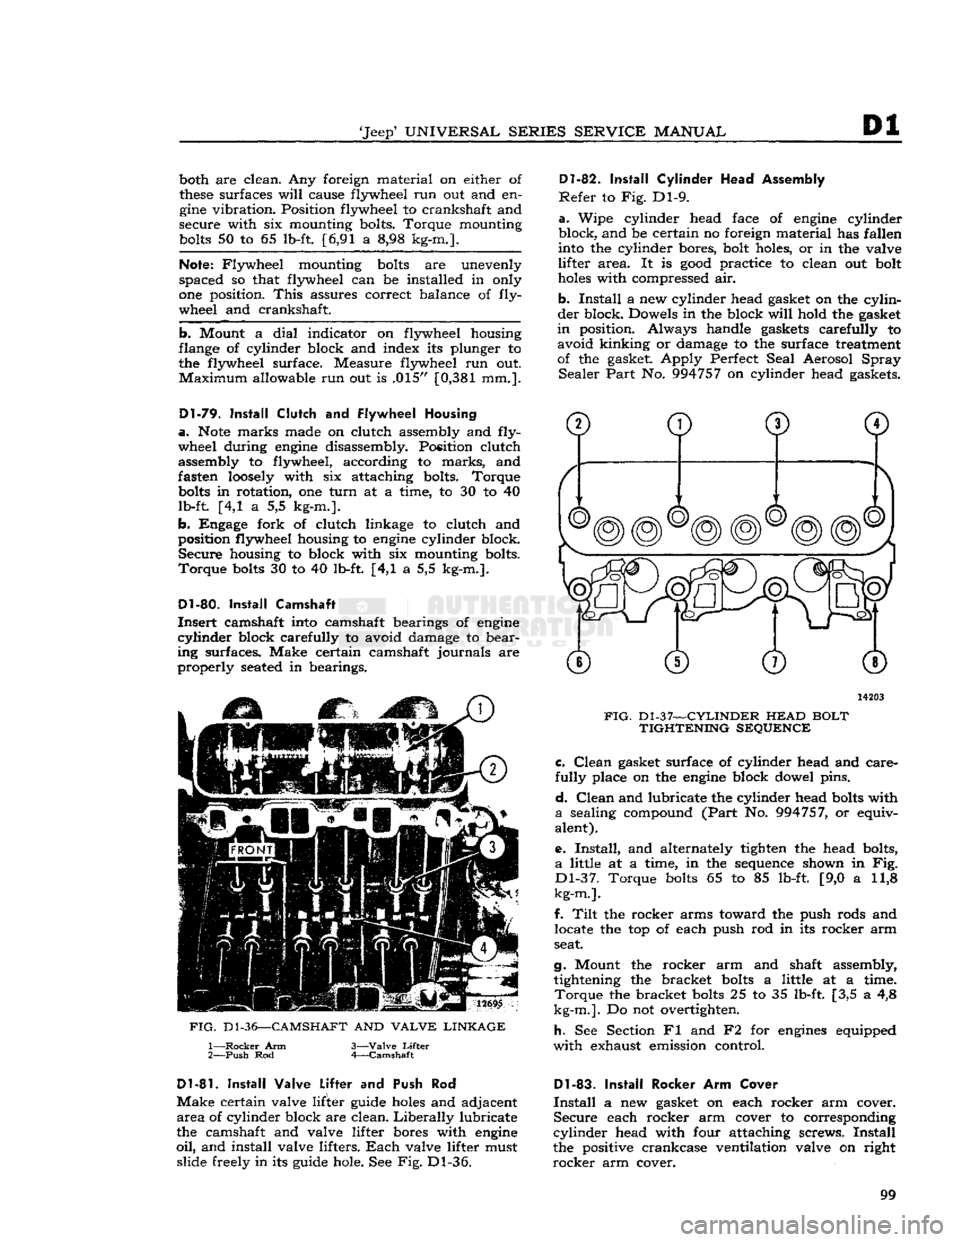
FIG.
D1-36—CAMSHAFT
AND
VALVE LINKAGE
1—
Rocker
Arm
2—
Push
Rod 3—
Valve
Lifter
4—
Camshaft
14203
FIG.
Dl-37—CYLINDER
HEAD
BOLT TIGHTENING SEQUENCE c.
Clean
gasket surface of cylinder head and care
fully
place on the
engine
block dowel pins.
d.
Clean
and lubricate the cylinder head
bolts
with
a
sealing compound
(Part
No. 994757, or equiv
alent).
e.
Install,
and alternately tighten the head bolts,
a
little at a time, in the sequence shown in Fig.
Dl-37.
Torque
bolts
65 to 85 lb-ft. [9,0 a 11,8
kg-m.].
f.
Tilt
the rocker arms toward the push rods and locate the top of each push rod in its rocker arm
seat.
g.
Mount the rocker arm and shaft assembly, tightening the bracket
bolts
a little at a time.
Torque
the bracket
bolts
25 to 35 lb-ft. [3,5 a 4,8
kg-m.].
Do not overtighten.
h.
See Section Fl and F2 for
engines
equipped
with
exhaust emission control.
D1-81.
Install
Valve Lifter
and Push Rod
Make
certain valve lifter guide
holes
and adjacent
area
of cylinder block are clean.
Liberally
lubricate
the camshaft and valve lifter bores with
engine
oil,
and install valve lifters.
Each
valve lifter must slide freely in its guide hole. See Fig. Dl-36.
Dl-83.
Install
Rocker Arm Cover
Install
a new gasket on each rocker arm cover.
Secure
each rocker arm cover to corresponding
cylinder
head with four attaching screws.
Install
the positive crankcase ventilation valve on right
rocker
arm cover. 99
Page 103 of 376
'Jeep1
UNIVERSAL
SERIES
SERVICE
MANUAL
Dl
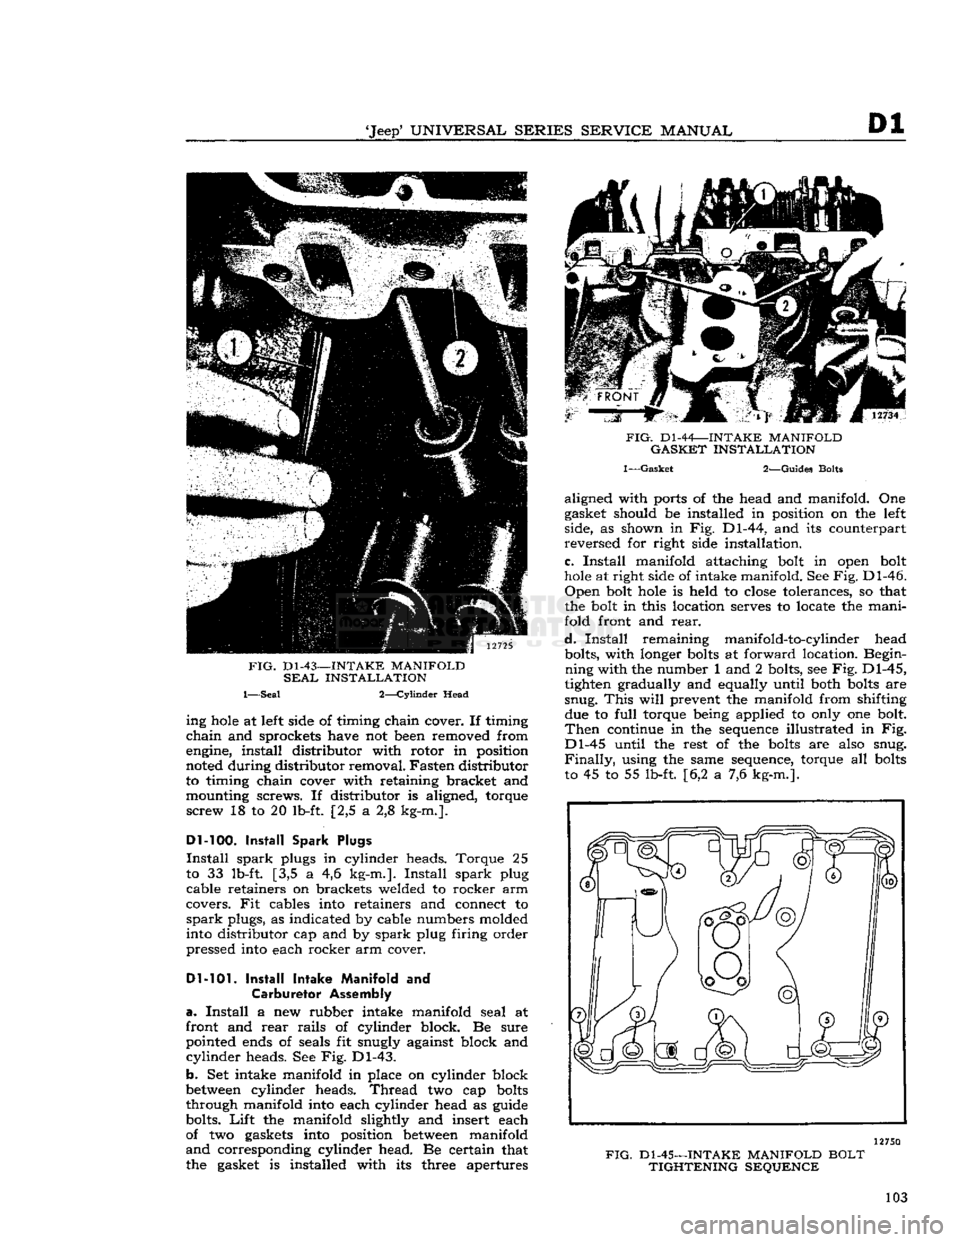
FIG.
D1-43—INTAKE
MANIFOLD
SEAL
INSTALLATION
1—Seal 2—Cylinder Head ing
hole
at left side of timing chain cover. If timing
chain
and sprockets have not been removed from
engine, install distributor with rotor in position
noted during distributor removal. Fasten distributor
to timing chain cover with retaining bracket and
mounting screws. If distributor is aligned, torque
screw
18 to 20 lb-ft. [2,5 a 2,8 kg-m.].
Dl-100.
Install Spark Plugs
Install
spark
plugs in cylinder heads. Torque 25
to 33 lb-ft. [3,5 a 4,6 kg-m.].
Install
spark
plug cable retainers on brackets welded to rocker arm
covers. Fit cables into retainers and connect to
spark
plugs, as indicated by cable numbers molded
into distributor cap and by
spark
plug firing order
pressed into each rocker arm cover.
Dl-101.
Install Intake Manifold
and
Carburetor
Assembly
a.
Install
a new rubber intake manifold seal at
front and
rear
rails
of cylinder block. Be sure
pointed ends of seals fit snugly against block and
cylinder
heads. See Fig. Dl-43.
b.
Set intake manifold in place on cylinder block
between
cylinder heads.
Thread
two cap
bolts
through manifold into each cylinder head as guide
bolts.
Lift
the manifold slightly and insert each
of two gaskets into position
between
manifold
and
corresponding cylinder head. Be certain that
the gasket is installed with its three apertures
FIG.
Dl-44—INTAKE
MANIFOLD
GASKET
INSTALLATION
1—Gasket
2—Guides Bolts aligned with ports of the head and manifold. One
gasket should be installed in position on the left
side, as shown in Fig. Dl-44, and its counterpart
reversed
for right side installation.
c.
Install
manifold attaching bolt in open bolt
hole
at right side of intake manifold. See
Fig.
Dl-46.
Open
bolt
hole
is held to
close
tolerances, so that
the bolt in this location serves to locate the mani
fold front and
rear.
d.
Install
remaining manifold-to-cylinder head bolts, with longer
bolts
at forward location. Begin
ning
with the number 1 and 2 bolts, see
Fig.
Dl-45,
tighten gradually and equally until both
bolts
are
snug.
This
will
prevent the manifold from shifting due to
full
torque being applied to only one bolt.
Then
continue in the sequence illustrated in Fig.
Dl-45
until the rest of the
bolts
are also snug.
Finally,
using the same sequence, torque all
bolts
to 45 to 55 lb-ft. [6,2 a 7,6 kg-m.].
12750
FIG.
Dl-45—INTAKE
MANIFOLD
BOLT
TIGHTENING
SEQUENCE
103
Page 123 of 376
'Jeep9
UNIVERSAL
SERIES
SERVICE
MANUAL
E
exterior moving parts of a carburetor are
often
responsible for unsatisfactory performance.
For
this
reason,
efficient carburetion depends upon careful cleaning and inspection while servicing.
a.
Thoroughly clean carburetor castings and metal
parts
in carburetor cleaning solvent.
Caution:
Accelerator pump plunger and any fiber
or
rubber parts should never be immersed in
car
buretor
cleaner. Wash pump plunger in cleaning
solvent.
b.
Blow out all passages in the castings with com
pressed air. Dry all parts with compressed air.
Make
sure all jets and passages are clean. Do
not use wire to clean fuel passages or air bleeds.
c.
Check
inlet valve
needle
and seat for wear. If
wear
is noted, the assembly must be replaced.
d.
Check
float hinge pin for wear and check float
for damage.
e.
Check
throttle and choke shaft bores for wear
and
out-of-round.
f. Inspect idle mixture adjustment
needles
for
burrs
or
grooves; replace if damaged.
g. Inspect cup of accelerator pump plunger; re
place if damaged, worn, or hardened. Inspect pump
well
in bowl for wear or scoring.
h.
Check
filter screens for
dirt
or lint.
Clean,
and
if
they remain
clogged,
replace.
i.
If for any reason parts have
become
loose
or
damaged in the cluster assembly, the assembly
must be replaced.
Note:
Use ijew gaskets whenever the carburetor
is disassembled.
E-37.
Throttle Body Assembly
a.
Install
idle mixture adjustment
needles
and
springs in throttle body. Tighten finger-tight, then
unthread
one
turn
as a preliminary adjustment
setting.
Caution:
Do not force idle mixture adjustment
needles
against
seats
or damage may result.
b.
Invert
fuel bowl body and place new throttle
body gasket on bowl. Fasten throttle body to bowl
body with three screws and lockwashers; tighten
securely.
E-38.
Fuel
Bowl Body Assembly
a.
Drop steel discharge check
tall
of accelerator
pump into discharge hole.
Install
pump discharge
spring
and T-shaped retainer. Stake retainer in
place.
Note:
Top of retainer must be flush with flat
surface
of fuel bowl body.
b.
Install
two inserts in main well. Align surface
on lip of insert with flat surface in recess on top
of main well.
Install
venturi cluster with gasket,
and
tighten mounting screws evenly and securely.
Be
certain that center screw is fitted with fiber gasket, and that a special smooth shank screw is
used.
c.
Install
two main metering jets, power valve
gasket and power valve.
d.
Install
small aluminum inlet check
ball
in ac
celerator
pump inlet at
bottom
of pump well. In
sert
pump return spring into well, and center by
pressing spring downward with finger.
e.
Install
pump inlet screen in
bottom
of fuel
bowl.
E-39.
Air
Horn Body
Assembly
a.
Install
choke lever and collar on choke shaft.
Prong
on choke lever must face away from air
horn
body and be on top of choke trip lever.
b.
Install
choke shaft and lever assembly into the
air
horn. Choke rod
hole
in the choke lever must
face fuel inlet side of carburetor.
c.
Install
choke valve plate in choke shaft so that
letters RP
will
face upward in finished carburetor.
Install
two new valve plate attaching screws, but
do not tighten securely until valve plate is centered.
To
center choke valve plate on choke shaft, hold
choke valve tightly closed, then slide choke shaft
inward
to obtain approximately .020" [0,508 mm.]
clearance
between
choke trip lever and choke lever
and
collar assembly. Tighten choke valve screws
securely,
and stake lightly in place. Choke valve
will
be perfectly free in all positions when installed
correctly.
d.
Insert
outer accelerator pump lever and shaft as sembly into air horn body, with lever pointing to
ward
choke shaft.
Install
inner pump arm, with plunger
hole
inward,
and tighten set screw securely.
Position pump plunger assembly on inner pump
arm,
with pump shaft pointing
inward,
and install
retainer.
e.
Install
needle
seat screen on inlet valve seat. In
stall
seat and gasket in air horn body. Tighten seat
securely with a wide-blade screwdriver.
f.
Install
power piston into vacuum cavity.
Lightly
stake piston retainer washer in place. Piston should
travel
freely in cavity.
g.
Install
air horn gasket on air horn body, fitting
gasket over guide pin.
h.
Attach inlet valve
needle
to float.
Carefully
position float and insert float hinge pin. Drop tang
at
rear
of float arm downward toward air horn.
i.
Install
fuel inlet fitting, if removed.
j.
With
air horn assembly inverted, measure the distance from the air horn gasket to top of float
at toe \%£f [27,78 mm.] for standard carburetors
and
\%i [29,36 mm.] for exhaust emission control
equipped carburetors, as shown in Fig. E-23. Use
float level
gauge
J-5127-2. Bend float arm as re
quired
to adjust float level.
k.
With
air horn body held upright, measure dis
tance from gasket to
bottom
of float
pontoon
at outer end. Use a l7/s" [47,625 mm.] float drop
gauge.
Bend float tang, as required, to adjust float
drop.
See Fig. E-24.
I.
Carefully
place air horn body on fuel bowl
body, making certain that the accelerator pump
plunger is properly positioned in the pump well.
Lower
the cover gently, straight down; install air 123
Page 130 of 376
E
FUEL
SYSTEM
taching screws and valve housing from the fuel
pump body.
c.
Remove the two screws in the valve housing
and
separate the filter cover and air
dome
dia
phragm.
d.
Remove the cam lever return spring, plug,
cam
lever pin, and cam lever from the pump body.
Tap
the cam lever pin out of body, using a drift
inserted through the small
hole
in the pump body.
e. Remove diaphragm from pump body.
f. Under normal service, the pump may be cleaned without further disassembly.
Note:
The oil seal (at top of spring in diaphragm
assembly) seals the spring side of the fuel
dia
phragm
from the crankcase. Any deposit, in
excess
of a few drops, of oil on the diaphragm indicates leakage past the oil seal. Be sure the seat for the
seal
in the pump body is clean and smooth.
E-63.
Fuel
Pump Cleaning and Inspection
Caution:
Do not immerse valves or diaphragm
in
cleaning solvent; wipe clean.
Clean
all metal parts of the fuel pump in solvent.
Brush
with a stiff-bristled
brush.
Dry with com
pressed
air.
Check
all parts to see that they are not
cracked
or broken and that the screw threads are
not damaged.
E-64.
Fuel
Pump Reassembly
•
Refer to Fig. E-32.
a.
Assemble the valve housing and filter cover, using a new air
dome
diaphragm. The opening
in
the air
dome
diaphragm is located over the
intake
valve. The filter cover is positioned cor
rectly
when the inlet passage in the cover aligns
with
the inlet valve. Tighten the attaching screws
alternately and securely.
b.
Lubricate
diaphragm assembly shaft, around
oil
seal, with
engine
oil. Position diaphragm as sembly on valve housing and thread all the attach ing screws through diaphragm.
(This
helps avoid
damage to the screw
holes
in diaphragm.)
c.
Place diaphragm assembly and valve housing
in
position on pump body (align marks made
before disassembly).
First
start all screws one
or
two threads; then tighten the screws alternately
and
securely.
d.
Lubricate
forked end of cam lever, pin bore
of body, and corresponding
hole
in lever, and the
pin
itself with
engine
oil.
Note:
Forked
end of lever
goes
around diaphragm
shaft. Be sure
loose
bumper washer on diaphragm shaft is on top of lever and
between
lever and fixed
washer
on shaft.
e.
Install
lever and pin. To install pin, use a drift
and
tap pin into the
hole
in the body until it hits
the
stop
on the
bottom
of the hole;
move
the lever while tapping, to align
hole
in lever with the pin;
then install plug.
Install
lever return spring.
f.
Install
a new filter bowl gasket in filter cover.
Place
bail
assembly in ears on cover and swing
to one side.
Install
spring and new filter element in
bowl and install bowl on pump. Position
bail
as
sembly under bowl; tighten retainer screw.
Caution:
Do not overtighten screw.
E-65.
Fuel
Pump Installation
a.
Make certain mating surfaces of fuel pump and
engine
cylinder case are clean. Cement a new gasket to mounting flange of fuel pump.
b.
Position fuel pump on cylinder block, so that
cam
lever of pump rests on fuel pump cam of cam
shaft. Secure pump to block with two cap screws
and
lock washers. Torque
bolts
13 to 17 lb-ft. [1,8
a
2,3 kg-m.].
c.
Connect intake and
outlet
fuel lines to fuel
pump.
E-66.
Fuel
Pump Testing
Whenever
the fuel pump is to be checked for pres
sure
or volume, follow the procedure outline in
Par.
C-23 of this manual.
Fuel
pump pressure is
important
for low pressure
will
seriously affect en
gine
operation and high pressure can cause exces
sive fuel consumption and flooding of the carbure
tor.
Should there be any doubt of normal opera
tion, check the procedure as outlined in Par. C-23.
In
addition to proper fuel pressure, volume of the
pump is also important. When testing for proper
pump pressure, be certain to also
test
for volume
as the pump may build up sufficient pressure, but
fail
to produce sufficient volume.
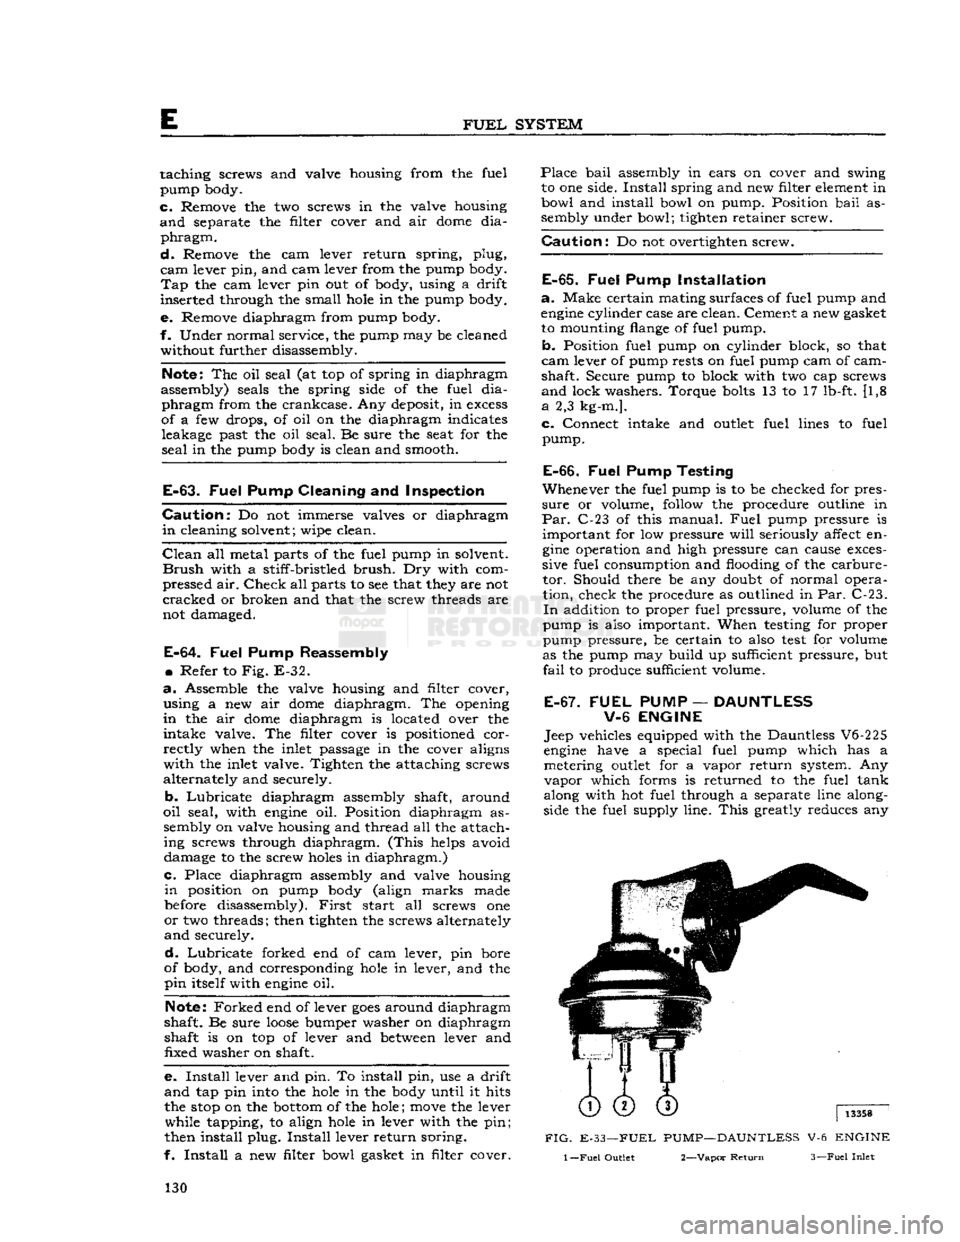
E-67. FUEL
PUMP
—
DAUNTLESS
V-6
ENGINE
Jeep vehicles equipped with the Dauntless V6-225
engine
have a special fuel pump which has a metering
outlet
for a vapor return system. Any
vapor
which forms is returned to the fuel tank
along with hot fuel through a separate line along
side the fuel supply line.
This
greatly reduces any
FIG.
E-33—FUEL PUMP—DAUNTLESS V-6 ENGINE
1
—Fuel
Outlet 2—Vapor
Return
3—Fuel
Inlet
130
Page 133 of 376
'Jeep'
UNIVERSAL
SERIES
SERVICE
MANUAL
E
portant that
these
lines are not accidentally re
versed.
When
installing the fuel tank on late model vehicles, position the tank
between
the frame
rail
to allow space to connect the fuel line(s), vent
hose
and
sending unit wire. After connecting
these
items, align and secure tank to frame brackets.
Position filler
hose
on tank filler neck and tighten
hose
clamp.
Fill
tank with fuel and check for leaks.
When
installing the fuel tank on early model vehicles, reverse the order of removal as given in
Par.
E-73.
E-75.
Fuel
Tank
Cap
A
surge pressure type fuel tank filler cap is used on
all
models.
This
is necessary to prevent fuel leakage
from
the cap vent opening when the vehicle is on a
side slope. Two spring loaded relief valves which
open when venting is required are built into the
cap.
Should the pressure valve
fail
to open, pressure
in
the tank may force fuel by the carburetor inlet
valve causing flooding.
Failure
of the vacuum valve may prevent flow of fuel to the carburetor. Should
the valves
fail
to vent install a new cap.
Note:
Vehicles having a
Fuel
Evaporative
Emis
sion System are equipped with a non-vent sealed gas cap. The sealed cap is designed to allow no
vapors to discharge to the atmosphere. No other type of cap is to be used on vehicles having this
type system.
E-76.
Fuel
Gauge Float Unit
The
fuel tank
gauge
float unit is mounted in the top
of the fuel tank and consists of a housing enclosing
a
rheostat that is actuated by the float arm, and a
float
which
moves
with the fuel level in the tank.
On
V-6 and current production F4
engine
equipped vehicles, the fuel
outlet
pipe is integral with the
float
unit.
The fuel
outlet
pipe has a mesh filter on the inner end.
Note:
Under no circumstances should a fuel tank
gauge
be installed without a mesh filter element.
The
filter,
outlet
pipe, and float unit are locked as
an
assembly to the top of the fuel tank. To remove,
turn
the lock plate that secures the float unit
assembly.
E-77.
Fuel
Lines
Check
lines and connections occasionally for leaks,
and
for severe kinks that might restrict the flow of
fuel. If an excessive amount of
dirt
is found in the
carburetor
or fuel pump, the fuel tank should be
drained
and the fuel lines blown out with com
pressed air.
All
rubber fuel lines and their respective clamps should be checked occasionally to be certain they
are
correctly positioned and not leaking. 133