JEEP CJ 1953 Service Manual
Manufacturer: JEEP, Model Year: 1953, Model line: CJ, Model: JEEP CJ 1953Pages: 376, PDF Size: 19.96 MB
Page 201 of 376
'Jeep*
UNIVERSAL
SERIES
SERVICE
MANUAL
H
Resistance
should be approximately 0.1 ohm.
An
extremely accurate instrument would be neces
sary
to ascertain shorted turns.
Only
an open condi
tion can be detected with a commercial ohmmeter.
If
the alternator has been disassembled because of
an
electrical malfunction, replace stator only after
all
components have been checked and found to
be satisfactory.
H-85.
Out-Of-Circuit
Rectifier Diode Test
With
the rectifier diode heat sinks disconnected
from
the stator assembly (Par. H-80), the diodes
can
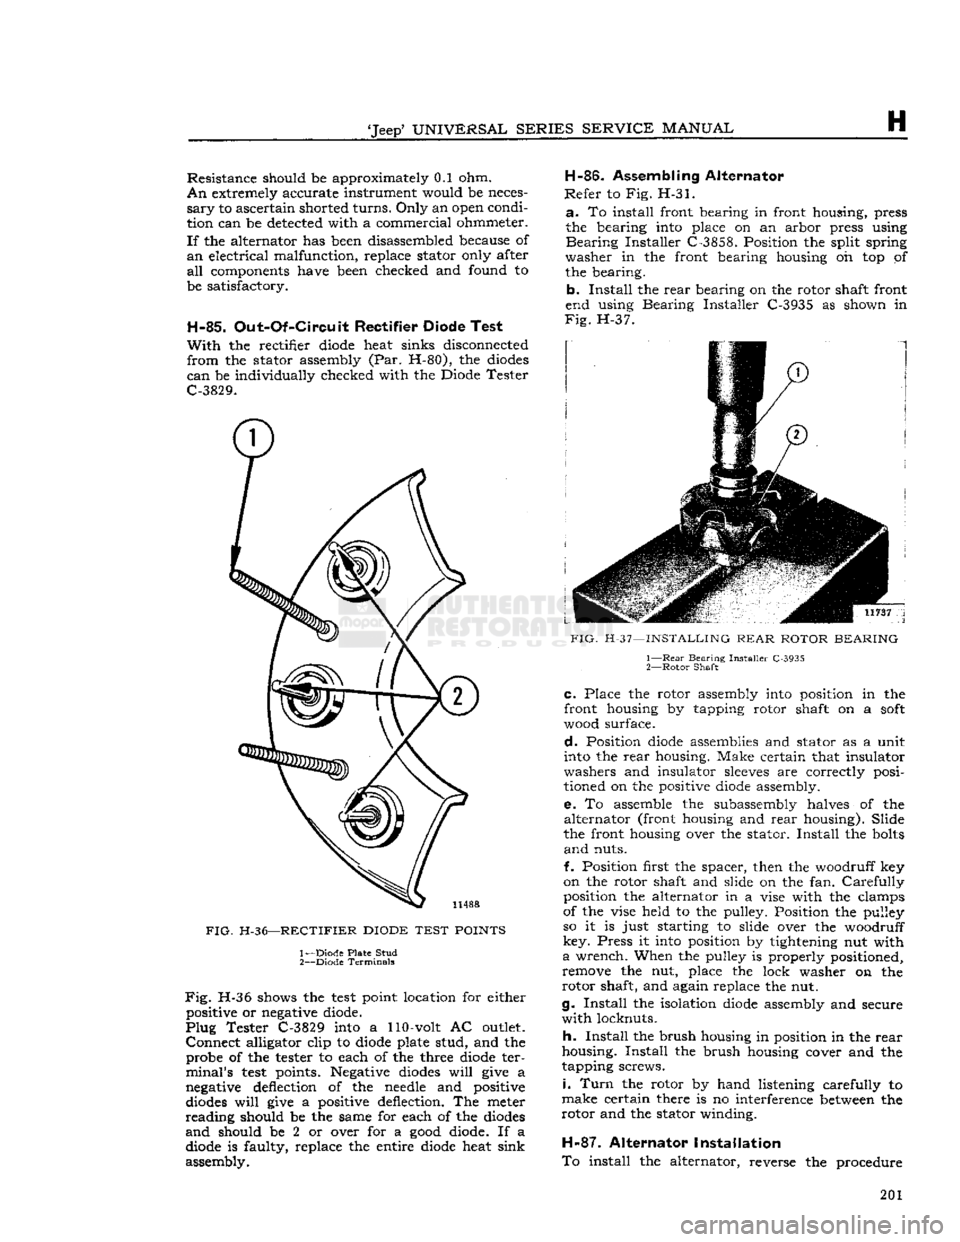
be individually checked with the Diode Tester
C-3829.
FIG.
H-36—RECTIFIER
DIODE
TEST
POINTS
1— Diode Plate Stud
2—
Diode Terminals
Fig.
H-36 shows the
test
point location for either positive or negative diode.
Plug
Tester C-3829 into a 110-volt AC outlet.
Connect
alligator clip to diode plate stud, and the probe of the tester to each of the three diode ter
minal's
test
points. Negative diodes
will
give a
negative deflection of the needle and positive
diodes
will
give a positive deflection. The meter
reading
should be the same for each of the diodes
and
should be 2 or over for a
good
diode. If a diode is faulty, replace the entire diode heat sink
assembly. H-86.
Assembling Alternator
Refer
to Fig. H-31.
a.
To install front bearing in front housing, press
the bearing into place on an arbor press using
Bearing
Installer C-3858. Position the split spring
washer
in the front bearing housing oh top of the bearing.
b.
Install
the
rear
bearing on the rotor shaft front
end using Bearing Installer C-3935 as shown in
Fig.
H-37.
FIG.
H-37—INSTALLING
REAR
ROTOR
BEARING
1—
Rear
Bearing Installer C-3935
2—
Rotor
Shaft
C.
Place the rotor assembly
into
position in the
front housing by tapping rotor shaft on a
soft
wood surface.
d.
Position diode assemblies and stator as a unit
into the
rear
housing. Make certain that insulator
washers and insulator
sleeves
are correctly posi
tioned on the positive diode assembly.
e.
To assemble the subassembly halves of the
alternator
(front
housing and
rear
housing). Slide
the front housing over the stator.
Install
the bolts
and
nuts.
f. Position first the spacer, then the woodruff key
on the rotor shaft and slide on the fan.
Carefully
position the alternator in a vise with the clamps
of the vise held to the pulley. Position the pulley
so it is just starting to slide over the woodruff
key.
Press it into position by tightening nut with
a
wrench. When the pulley is properly positioned,
remove the nut, place the lock washer on the
rotor
shaft, and again replace the nut.
g.
Install
the isolation diode assembly and secure
with
locknuts.
h.
Install
the brush housing in position in the
rear
housing.
Install
the brush housing cover and the
tapping screws.
i.
Turn
the rotor by hand listening carefully to
make
certain there is no interference between the
rotor
and the stator winding.
H-87.
Alternator Installation
To
install the alternator, reverse the procedure 201
Page 202 of 376
H
ELECTRICAL
SYSTEM
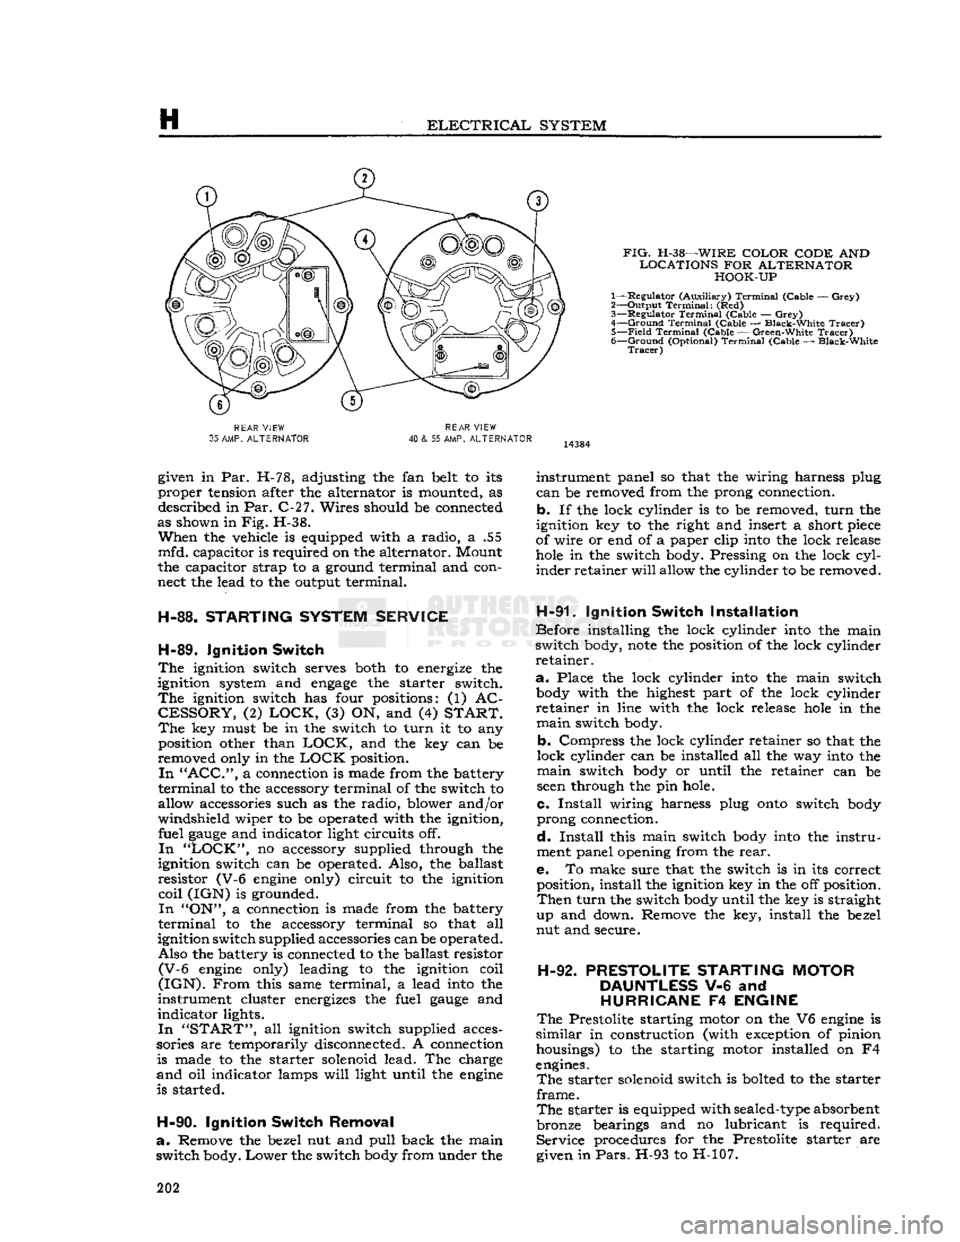
FIG.
H-38—WIRE
COLOR CODE
AND
LOCATIONS
FOR
ALTERNATOR HOOK-UP
1— Regulator (Auxiliary)
Terminal
(Cable —
Grey)
2— Output
Terminal:
(Red)
3—
Regulator
Terminal
(Cable —
Grey)
4—
Ground
Terminal
(Cable — Black-White
Tracer)
5—
Field
Terminal
(Cable — Green-White
Tracer)
6—
Ground
(Optional)
Terminal
(Cable — Black-White
Tracer)
REAR
VIEW
35
AMP.
ALTERNATOR
REAR
VIEW
40
& 55 AMP.
ALTERNATOR
given in Par. H-78, adjusting the fan belt to its
proper tension after the alternator is mounted, as described in Par. C-27. Wires should be connected
as shown in Fig. H-38.
When
the vehicle is equipped with a radio, a .55
mfd. capacitor is required on the alternator. Mount
the capacitor strap to a ground terminal and con
nect the lead to the output terminal.
H-88.
STARTING
SYSTEM
SERVICE
H-89.
Ignition
Switch
The
ignition switch serves both to energize the
ignition system and
engage
the starter switch.
The
ignition switch has four positions: (1) AC
CESSORY,
(2)
LOCK,
(3) ON, and (4)
START. The
key must be in the switch to turn it to any position other than
LOCK,
and the key can be
removed only in the
LOCK
position.
In "ACC",
a connection is made from the battery
terminal
to the accessory terminal of the switch to
allow accessories such as the radio, blower and/or
windshield wiper to be operated with the ignition, fuel
gauge
and indicator light circuits off.
In "LOCK",
no accessory supplied through the
ignition switch can be operated. Also, the ballast
resistor (V-6
engine
only) circuit to the ignition
coil
(IGN) is grounded.
In
"ON", a connection is made from the battery
terminal
to the accessory terminal so that all
ignition switch supplied accessories can be operated. Also the battery is connected to the ballast resistor
(V-6
engine
only) leading to the ignition coil
(IGN).
From
this same terminal, a lead
into
the
instrument cluster energizes the fuel
gauge
and
indicator lights.
In "START",
all ignition switch supplied acces
sories are temporarily disconnected. A connection is made to the starter solenoid lead. The charge
and
oil indicator lamps
will
light until the
engine
is started.
H-90.
Ignition
Switch
Removal
a.
Remove the bezel nut and pull back the main
switch body.
Lower
the switch
body
from under the instrument panel so that the wiring harness plug
can
be removed from the prong connection,
b. If the lock cylinder is to be removed, turn the
ignition key to the right and insert a short
piece
of wire or end of a paper clip
into
the lock release
hole
in the switch body. Pressing on the lock
cyl
inder retainer
will
allow the cylinder to be removed.
H-91.
Ignition
Switch
Installation
Before installing the lock cylinder
into
the main
switch body,
note
the position of the lock cylinder
retainer.
a.
Place the lock cylinder
into
the main switch
body
with the highest part of the lock cylinder
retainer in line with the lock release
hole
in the
main
switch body.
b. Compress the lock cylinder retainer so that the
lock cylinder can be installed all the way
into
the
main
switch
body
or until the retainer can be
seen
through the pin hole.
c.
Install
wiring harness plug
onto
switch
body
prong connection.
d.
Install
this main switch
body
into
the instru
ment panel opening from the
rear.
e. To make sure that the switch is in its correct position, install the ignition key in the off position.
Then
turn the switch
body
until the key is straight
up and down. Remove the key, install the bezel
nut and secure.
H-92.
PRESTOLITE
STARTING
MOTOR
DAUNTLESS
V-6 and
HURRICANE
F4
ENGINE
The
Prestolite starting motor on the V6
engine
is
similar
in construction (with exception of pinion housings) to the starting motor installed on F4
engines.
The
starter solenoid switch is bolted to the starter
frame.
The
starter is equipped with
sealed-type
absorbent
bronze bearings and no lubricant is required. Service procedures for the Prestolite starter are
given in
Pars.
H-93 to H-107. 202
Page 203 of 376
'Jeep*
UNIVERSAL
SERIES SERVICE
MANUAL
H
13406
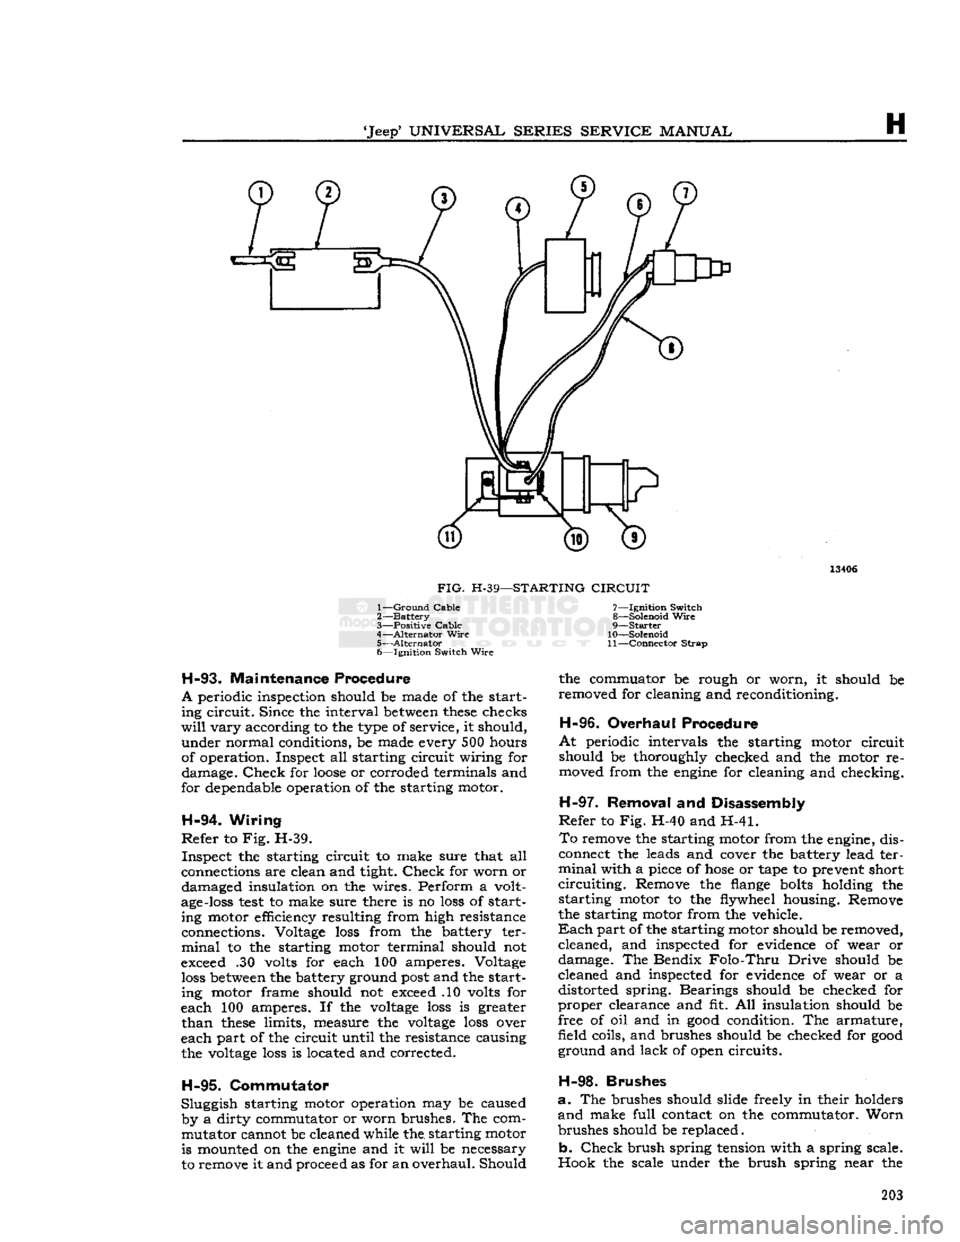
FIG.
H-39—STARTING
CIRCUIT
1—
Ground
Cable
2—
Battery
3—
Positive Cable
4—
Alternator
Wire
5—
Alternator
6— Ignition Switch
Wire
H-93.
Maintenance Procedure
A
periodic inspection should be made of the start ing circuit. Since the interval
between
these
checks
will
vary according to the type of service, it should, under normal conditions, be made every 500 hours
of operation. Inspect all starting circuit wiring for damage.
Check
for
loose
or corroded terminals and
for dependable operation of the starting motor.
H-94.
Wiring
Refer
to Fig. H-39. Inspect the starting circuit to make sure that all
connections are clean and tight.
Check
for worn or damaged insulation on the wires. Perform a volt
age-loss
test
to make sure there is no
loss
of start ing motor efficiency resulting from high resistance
connections. Voltage
loss
from the battery ter
minal
to the starting motor terminal should not
exceed .30 volts for each 100 amperes. Voltage
loss
between
the battery ground
post
and the starting motor frame should not exceed .10 volts for
each 100 amperes. If the
voltage
loss
is greater
than
these
limits, measure the
voltage
loss
over
each part of the circuit until the resistance causing the
voltage
loss
is located and corrected.
H-95.
Commutator
Sluggish starting motor operation may be caused by a dirty commutator or worn brushes. The commutator cannot be cleaned while the. starting motor is mounted on the
engine
and it
will
be necessary
to remove it and proceed as for an overhaul. Should 7— Ignition Switch
8— Solenoid
Wire
9—
Starter
10— Solenoid
11—
Connector
Strap
the commuator be rough or worn, it should be
removed for cleaning and reconditioning.
H-96.
Overhaul Procedure
At
periodic intervals the starting motor circuit
should be thoroughly checked and the motor re moved from the
engine
for cleaning and checking.
H-97.
Removal and Disassembly
Refer
to Fig. H-40 and H-41.
To
remove the starting motor from the engine, dis
connect the leads and cover the battery lead ter
minal
with a piece of
hose
or tape to prevent short
circuiting.
Remove the flange
bolts
holding the starting motor to the flywheel housing. Remove
the starting motor from the vehicle.
Each
part of the starting motor should be removed, cleaned, and inspected for evidence of wear or
damage. The Bendix
Folo-Thru
Drive should be
cleaned and inspected for evidence of wear or a distorted spring. Bearings should be checked for
proper clearance and fit. All insulation should be
free of oil and in
good
condition. The armature,
field coils, and brushes should be checked for
good
ground and lack of open circuits.
H-98.
Brushes
a.
The brushes should slide freely in their holders
and
make full contact on the commutator. Worn
brushes should be replaced.
b.
Check
brush spring tension with a spring scale.
Hook the scale under the brush spring near the 203
Page 204 of 376
H
ELECTRICAL
SYSTEM
11035
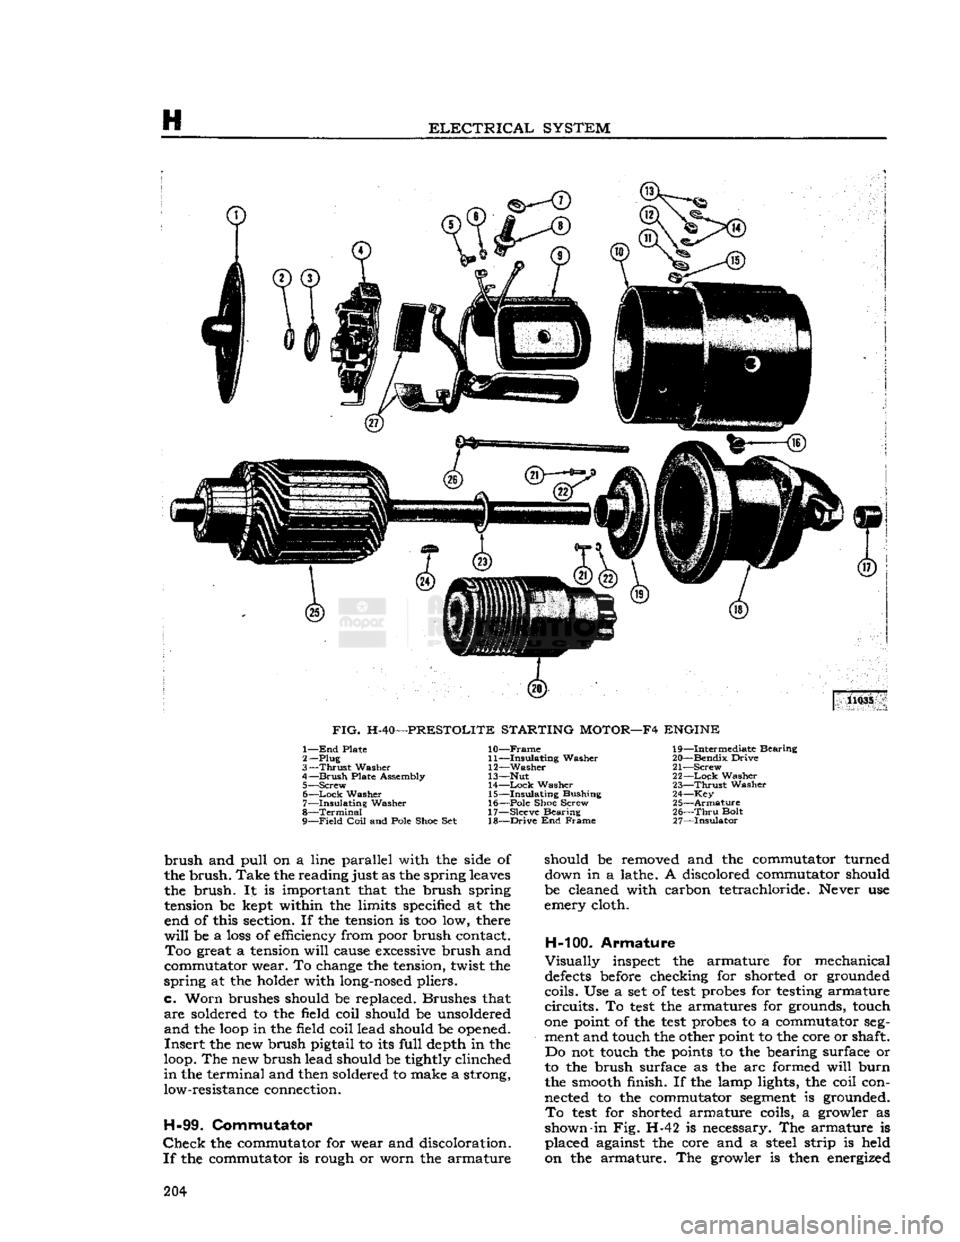
FIG.
H-40—PRESTOLITE STARTING MOTOR—F4 ENGINE 1— End
Plate
2—
Plug
3—
Thrust
Washer
4—
Brush
Plate Assembly 5— Screw
6—
—Lock
Washer
7—
Insulating
Washer
8—
Terminal
9—
Field
Coil
and Pole
Shoe
Set
10—
Frame
11—
Insulating
Washer
12—
Washer
13— Nut 14—
Lock
Washer
15—
Insulating
Bushing
16—
Pole
Shoe
Screw
17— Sleeve Bearing
18—
Drive
End Frame
19—
Intermediate Bearing
20—
Bendix
Drive
21—
Screw
22—
Lock
Washer
23—
Thrust
Washer
24— Key
25—
Armature
26—
Thru
Bolt
27—
Insulator
brush
and
pull
On
a line parallel with the side of
the
brush.
Take
the
reading
just as the spring leaves the
brush.
It is important that the brush spring
tension be kept within the limits specified at the end of this section. If the tension is too low, there
will
be a loss of efficiency from poor brush contact.
Too
great a tension
will
cause excessive brush and
commutator wear. To change the tension, twist the
spring
at the holder with long-nosed pliers,
c.
Worn
brushes should be replaced. Brushes that
are
soldered to the field coil should be unsoldered
and
the
loop
in the field coil lead should be opened.
Insert
the new brush pigtail to its
full
depth in the
loop. The new brush lead should be tightly clinched
in
the terminal and then soldered to make a strong, low-resistance connection.
H-99.
Commutator
Check
the commutator for wear and discoloration.
If
the commutator is rough or worn the armature should be removed and the commutator turned
down in a lathe. A discolored commutator should
be cleaned with carbon tetrachloride. Never use
emery cloth.
H-100.
Armature
Visually
inspect the armature for mechanical
defects
before checking for shorted or grounded
coils. Use a set of
test
probes for testing armature
circuits.
To
test
the armatures for grounds, touch
one point of the
test
probes to a commutator seg
ment and touch the other point to the core or shaft. Do not touch the points to the bearing surface or
to the brush surface as the arc formed
will
burn
the smooth finish. If the lamp lights, the coil con nected to the commutator segment is grounded.
To
test
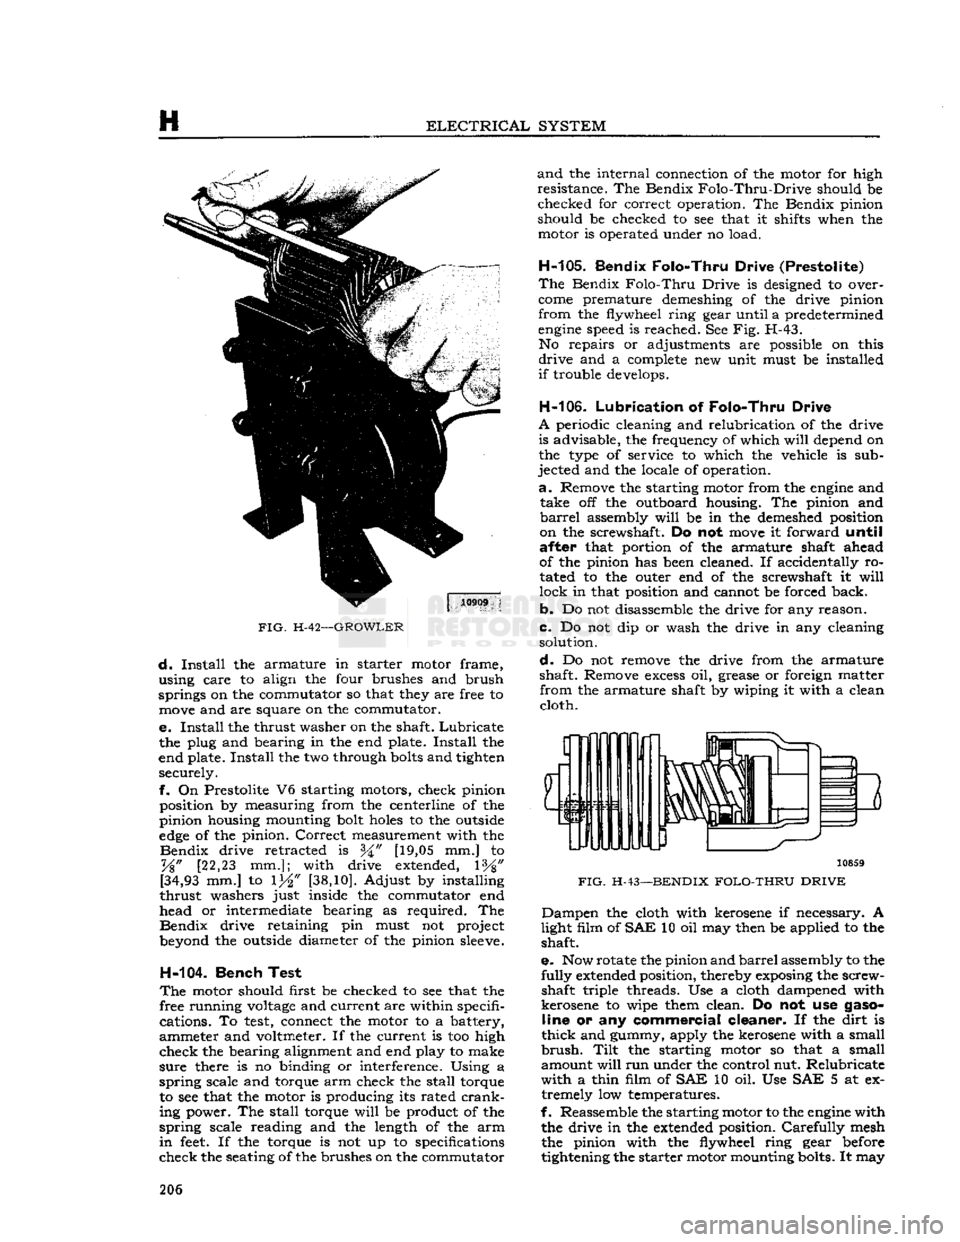
for shorted armature coils, a growler as
shown-in Fig. H-42 is necessary. The armature is placed against the core and a steel strip is held
on the armature. The growler is then energized 204
Page 205 of 376
SERIES
SERVICE
MANUAL
H
t
^
12956
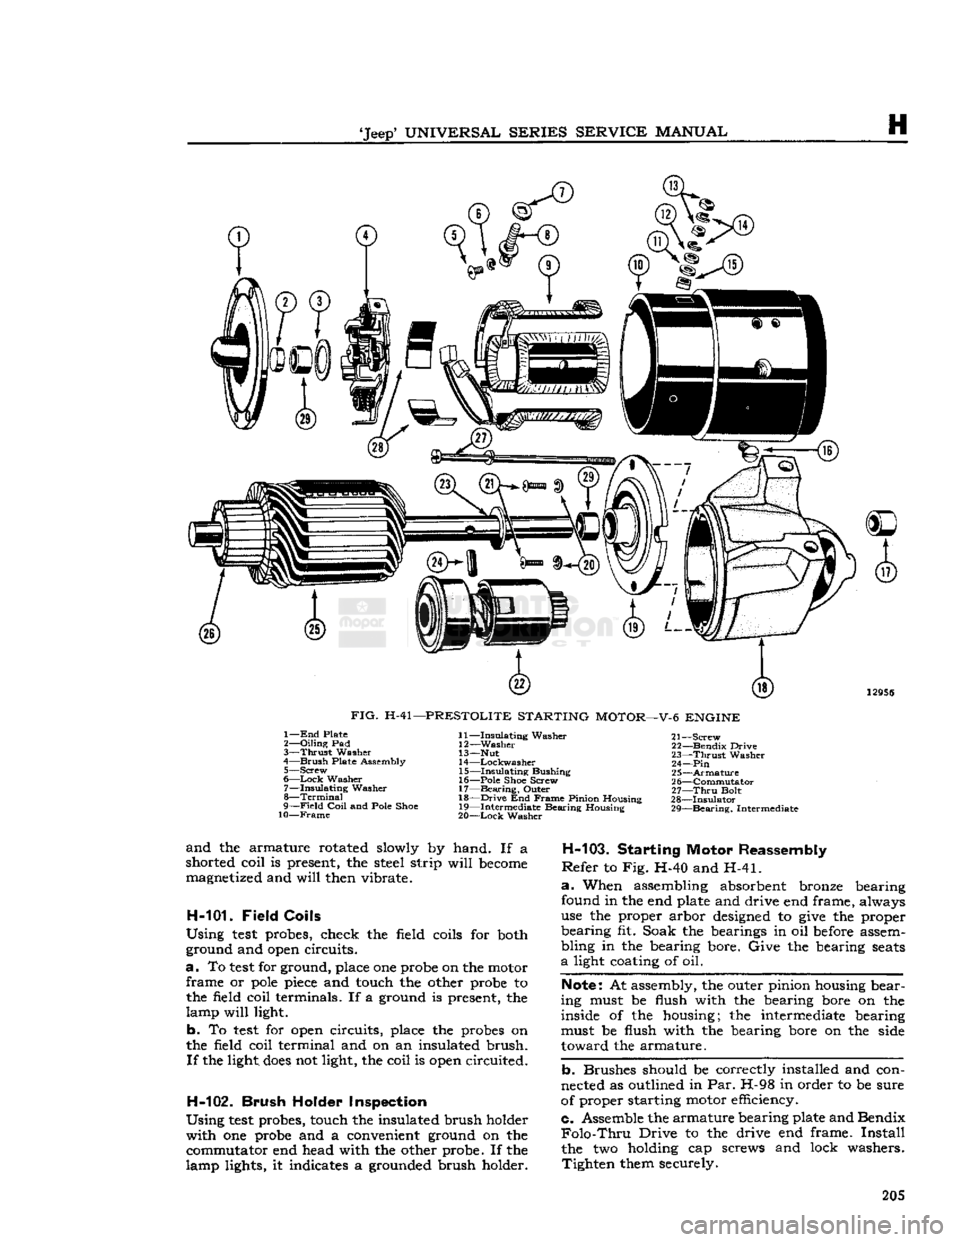
FIG.
H-41—PRESTOLITE
STARTING
MOTOR—V-6
ENGINE
1—
End
Plate
2—
Oiling
Pad
3—
Thrust
Washer
4—
Brush
Plate Assembly 5—
Screw
6—
Lock
Washer 7—
Insulating
Washer
8—
Terminal
9—
Field
Coil
and Pole Shoe
10—Frame
11—
Insulating
Washer
12—
Washer
13— Nut
14
—Lockwasher
15—
Insulating
Bushing
16— Pole Shoe Screw
17—
Bearing,
Outer
18—
Drive
End
Frame
Pinion Housing
19— Intermediate Bearing Housing
20—
Lock
Washer 21—
Screw
22— Bendix Drive
23—
Thrust
Washer
24—Pin
25—
Armature
2 6—Commutator
27—
Thru
Bolt
28—
Insulator
29—
Bearing,
Intermediate
and
the armature rotated slowly by hand. If a
shorted coil is present, the steel strip
will
become
magnetized and
will
then vibrate.
H-101-
Field
Coils
Using
test
probes, check the field coils for both
ground and
open
circuits.
a.
To
test
for ground, place one probe on the motor frame or
pole
piece
and touch the other probe to the field coil terminals. If a ground is present, the
lamp
will
light.
b.
To
test
for
open
circuits, place the probes on
the field coil terminal and on an insulated brush.
If
the light,
does
not light, the coil is
open
circuited.
H-102.
Brush
Holder Inspection
Using
test
probes, touch the insulated brush holder with one probe and a convenient ground on the commutator end head with the other probe. If the
lamp lights, it indicates a grounded brush holder.
H-103.
Starting Motor Reassembly
Refer
to Fig. H-40 and H-41.
a.
When assembling absorbent bronze bearing
found in the end plate and drive end frame, always
use the proper arbor
designed
to
give
the proper
bearing fit. Soak the bearings in oil
before
assem
bling in the bearing bore. Give the bearing
seats
a
light coating of oil.
Note:
At assembly, the outer pinion housing bear
ing must be flush with the bearing bore on the inside of the housing; the intermediate bearing
must be flush with the bearing bore on the side
toward the armature.
b.
Brushes should be correctly installed and con
nected as outlined in Par. H-98 in order to be sure
of proper starting motor efficiency.
c. Assemble the armature bearing plate and Bendix
Folo-Thru
Drive to the drive end frame.
Install
the two holding cap screws and lock washers. Tighten them securely. 205
Page 206 of 376
H
ELECTRICAL
SYSTEM
FIG.
H-42—GROWLER
d.
Install
the armature in starter motor frame,
using care to align the four brushes and brush
springs on the commutator so that they are free to
move
and are square on the commutator.
e.
Install
the thrust washer on the shaft.
Lubricate
the plug and bearing in the end plate.
Install
the
end plate.
Install
the two through
bolts
and tighten securely.
f.
On Prestolite V6 starting motors, check pinion position by measuring from the centerline of the
pinion housing mounting bolt
holes
to the outside
edge
of the pinion.
Correct
measurement with the
Bendix
drive retracted is [19,05 mm.] to
%"
[22,23 mm.]; with drive extended, 1%"
[34,93
mm.] to 1^" [38,10]. Adjust by installing
thrust
washers just inside the commutator end
head or intermediate bearing as required. The
Bendix
drive retaining pin must not project
beyond the outside diameter of the pinion
sleeve.
H-104.
Bench Test
The
motor should first be checked to see that the
free running
voltage
and current are within specifi cations. To
test,
connect the motor to a battery,
ammeter and voltmeter. If the current is too high
check
the bearing alignment and end play to make
sure
there is no binding or interference. Using a
spring
scale and torque arm check the stall torque to see that the motor is producing its rated
crank
ing power. The stall torque
will
be product of the
spring
scale reading and the length of the arm
in
feet.
If the torque is not up to specifications
check
the seating of the brushes on the commutator
and
the internal connection of the motor for high
resistance. The Bendix
Folo-Thru-Drive
should be checked for correct operation. The Bendix pinion
should be checked to see that it shifts when the motor is operated under no load.
H-105.
Bendix Folo-Thru Drive (Prestolite)
The
Bendix
Folo-Thru
Drive is designed to over
come
premature demeshing of the drive pinion
from
the flywheel ring gear until a predetermined
engine
speed is reached. See Fig. H-43. No repairs or adjustments are possible on this
drive
and a
complete
new unit must be installed
if
trouble develops.
H-106.
Lubrication
of
Folo-Thru Drive
A
periodic cleaning and relubrication of the drive is advisable, the frequency of which
will
depend on
the type of service to which the vehicle is sub
jected and the locale of operation.
a.
Remove the starting motor from the
engine
and take off the outboard housing. The pinion and
barrel
assembly
will
be in the demeshed position
on the screwshaft. Do not
move
it forward
until
after
that portion of the armature shaft ahead
of the pinion has been cleaned. If accidentally ro
tated to the outer end of the screwshaft it
will
lock
in that position and cannot be forced back.
b.
Do not disassemble the drive for any reason.
c.
Do not dip or wash the drive in any cleaning solution.
d.
Do not remove the drive from the armature
shaft. Remove
excess
oil, grease or foreign matter
from
the armature shaft by wiping it with a clean cloth.
3
10859
FIG.
H-43—BENDIX
FOLO-THRU DRIVE
Dampen
the cloth with kerosene if necessary. A
light film of
SAE
10 oil may then be applied to the shaft.
e.
Now rotate the pinion and
barrel
assembly to the
fully
extended position, thereby exposing the screw shaft triple threads. Use a cloth dampened with
kerosene to wipe them clean. Do not use
gaso
line
or any
commercial cleaner.
If the dirt is
thick
and gummy, apply the kerosene with a small
brush.
Tilt
the starting motor so that a small
amount
will
run under the control nut. Relubricate
with
a thin film of
SAE
10 oil. Use SAE 5 at ex tremely low temperatures.
f.
Reassemble the starting motor to the
engine
with the drive in the extended position.
Carefully
mesh the pinion with the flywheel ring gear before
tightening the starter motor mounting bolts. It may 206
Page 207 of 376
'Jeep'
UNIVERSAL
SERIES
SERVICE
MANUAL
H
require
a slight rotation of the pinion to index it
into the ring gear. When the
engine
starts the drive
pinion
will
automatically demesh from the ring
gear and return to its normal position.
H-107. Starter Solenoid Switch (Prestolite)
•
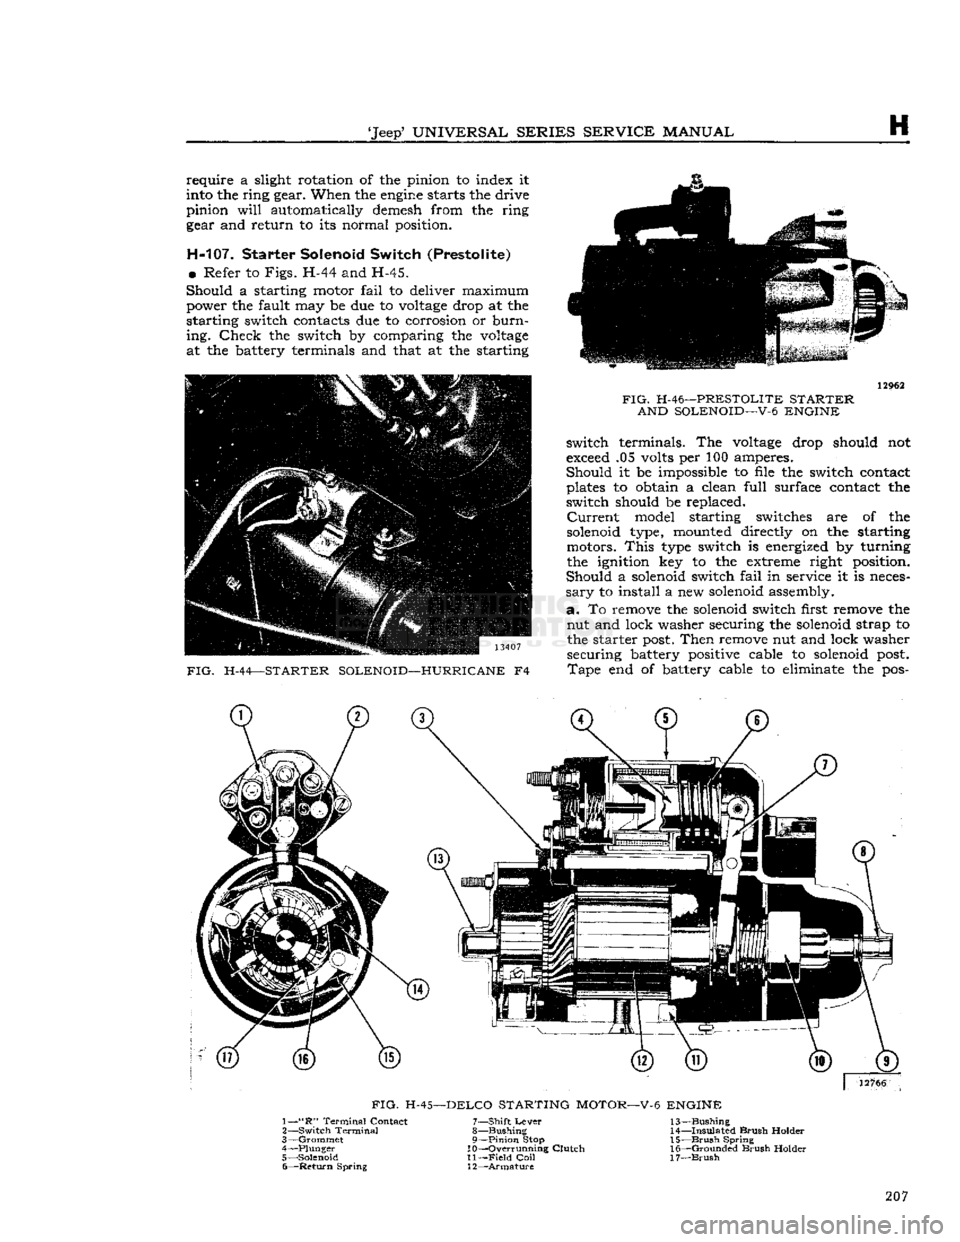
Refer to
Figs.
H-44 and H-45.
Should
a starting motor
fail
to deliver maximum power the fault may be due to
voltage
drop at the
starting switch contacts due to corrosion or
burn
ing.
Check
the switch by comparing the
voltage
at the battery terminals and that at the starting 13407
FIG.
H-44—STARTER SOLENOID—HURRICANE
F4
FIG.
H-46—PRESTOLITE STARTER
AND SOLENOID—V-6 ENGINE
switch terminals. The
voltage
drop should not
exceed .05 volts per 100 amperes.
Should
it be impossible to file the switch contact
plates to obtain a clean
full
surface contact the
switch should be replaced.
Current
model starting switches are of the
solenoid type, mounted directly on the starting
motors.
This
type switch is energized by turning
the ignition key to the extreme right position.
Should
a solenoid switch
fail
in service it is neces
sary
to install a new solenoid assembly,
a.
To remove the solenoid switch first remove the nut and lock washer securing the solenoid strap to the starter
post.
Then
remove nut and lock washer securing battery positive cable to solenoid
post.
Tape
end of battery cable to eliminate the pos- 207
Page 208 of 376
H
ELECTRICAL
SYSTEM
sibility
of the cable shorting at the
engine
or frame.
Remove nut and lock washer securing the ignition
wire
to the solenoid
post
and remove the two screws and lock washers securing the solenoid to
the starter frame. Remove the switch,
b.
To install the solenoid switch reverse the re
moval
procedure given above.
H-10S.
STARTING MOTOR
—
DELCO
DAUNTLESS
V-6
ENGINE
Refer
to Fig. H-45.
The
starting motor used on the Dauntless V-6 en
gine
has an integral solenoid switch and enclosed
shift lever which first shifts the overrunning clutch
pinion into
engagement
with the ring gear on the
flywheel of the
engine
and then
closes
the electrical
circuit
to cause
engine
cranking. When the
engine
starts,
the overrunning clutch
disengages
to pre vent transfer of
engine
speed to the starting motor.
Note:
Should a service replacement starter motor
be required the factory recommends replacement
with
original equipment parts; however, should the need arise an existing starter motor (Delco or
Prestolite) could be replaced with the current
Delco-Remy
starter, model 1108375, with the
following modifications to the wiring harness. If
the existing starter motor wiring harness
does
not
provide a 12 ga. purple conduit wire, (connects the ignition switch to the starter motor) then a 12 ga.
purple
conduit wire 70 inches long, must be in
stalled.
Should the existing starter motor wiring
harness
contain a 16 ga. light blue conduit wire, (connects the ignition switch and starter motor)
bend this wire back and tape out of the way.
H-109.
Starting Motor Disassembly
a.
Before removing the starting motor from the
engine, disconnect leads and cover battery lead
terminal
with piece of
hose
or tape to prevent
short circuiting.
Note
locations of wiring connec
tions to assure proper reconnection. Remove the cap screw that secures the starting motor to the
angle bracket on the side of the engine. Remove
the two cap screws that secure the drive end of
the starting motor to the cylinder block; remove
the starting motor.
b.
Remove terminal nut and disconnect field lead,
which
passes through grommet at top of motor,
from
motor terminal of solenoid. Remove two
thru
bolts
from motor. Remove commutator end frame
and
field frame assembly from solenoid and drive assembly.
e.
Pull
out pivot pins of brush holders and remove each of two brush holder and spring assemblies
from
field housing. Remove screws which attach
brushes and leads to holders.
d.
Remove armature and drive assembly from
drive
housing. Remove thrust collar from pinion
end of armature shaft. Remove leather thrust
washer
from
opposite
end of shaft.
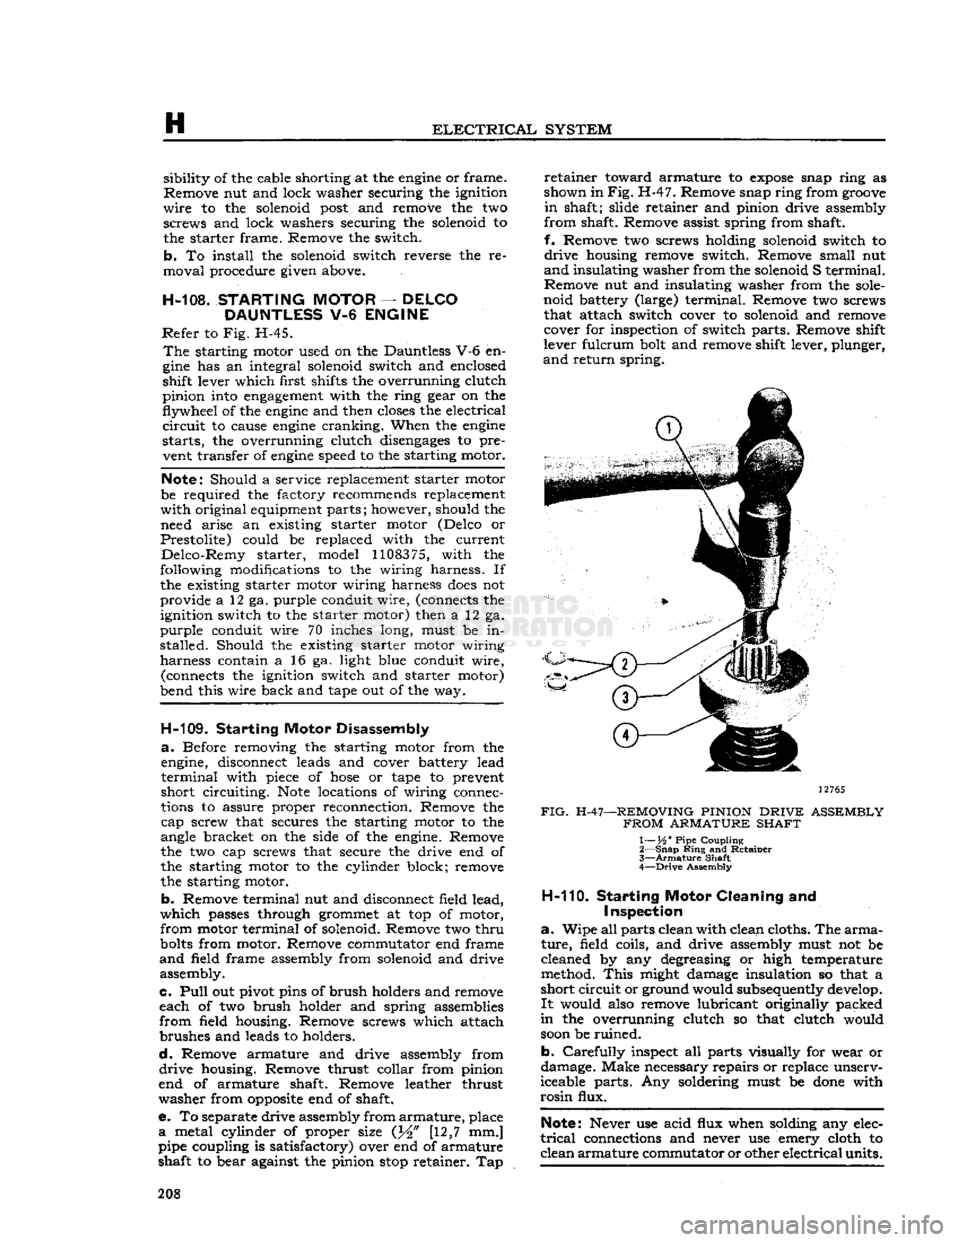
e. To separate drive assembly from
armature,
place
a
metal cylinder of proper size (J^" [12,7 mm.]
pipe coupling is satisfactory) over end of armature
shaft to bear against the pinion
stop
retainer. Tap
retainer
toward armature to
expose
snap ring as
shown in
Fig.
H-47. Remove snap ring from
groove
in
shaft; slide retainer and pinion drive assembly
from
shaft. Remove assist spring from shaft,
f.
Remove two screws holding solenoid switch to
drive
housing remove switch. Remove small nut
and
insulating washer from the solenoid S terminal.
Remove nut and insulating washer from the
sole
noid battery (large) terminal. Remove two screws that attach switch cover to solenoid and remove cover for inspection of switch parts. Remove shift
lever fulcrum bolt and remove shift lever, plunger,
and
return spring.
12765
FIG.
H-47—REMOVING PINION
DRIVE
ASSEMBLY
FROM
ARMATURE SHAFT
1— XA ' Pipe Coupling
2—
Snap
Ring
and Retainer
3—
Armature
Shaft
4—
Drive
Assembly
H-110.
Starting
Motor
Cleaning and
Inspection
a.
Wipe all parts clean with clean cloths. The
arma
ture,
field coils, and drive assembly must not be
cleaned by any degreasing or high temperature
method.
This
might damage insulation so that a
short
circuit
or ground would subsequently develop.
It
would also remove lubricant originally packed
in
the overrunning clutch so that clutch would
soon
be ruined.
b.
Carefully
inspect all parts visually for wear or
damage. Make necessary repairs or replace unserv
iceable parts. Any soldering must be
done
with
rosin
flux.
Note:
Never use acid flux when solding any elec
trical
connections and never use emery cloth to
clean
armature
commutator or other
electrical
units. 208
Page 209 of 376
'Jeep'
UNIVERSAL
SERIES SERVICE
MANUAL
H
H-111.
Brushes
Check
brush length. If brushes are worn to one-
half
their original length, replace them. Also check
for
cracks,
chips, damaged mounting holes, oil
saturation,
or other damage; replace brushes.
H-112.
Commutator
Check
the commutator for wear and discoloration.
If
the commutator is rough or worn the armature
should be removed and the commutator turned
down in a lathe. A discolored commutator should
be cleaned with carbon tetrachloride and inspected.
Scratches
on the commutator may be removed
with
sand paper. Use compressed air to remove
sand
particles after cleaning.
H-113.
Armature
Visually
inspect the armature for mechanical
defects
before checking for shorted or grounded
coils. Use a set of
test
probes for testing armature
circuits.
To
test
the armature for grounds, touch
one point of the
test
probes to a commutator
seg
ment and touch the other point to the core or shaft.
Do not touch the points to the bearing surface or
to the brush surface as the arc formed
will
burn
the smooth finish. If the lamp lights, the coil con
nected to the commutator
segment
is grounded.
H-114.
Field
Coils
Using
test
probes, check the field coils for both ground and open circuits. To
test
for ground, place
one probe on the motor frame or
pole
piece and
touch the other probe to the field coil terminals.
If
a ground is present, the lamp
will
light.
To
test
for open circuits, place the probes on the
field coil terminal and on an insulated
brush.
If
the light
does
not light, the coil is open circuited.
H-115.
Brush
Holder Inspection
Inspect
brush
holders for distortion, wear, and other
damage.
Check
that brush holders pivot freely on
their
pivot pins.
Check
brush spring tension with
a
spring scale. Hook the spring scale under the
brush
holder at the brush and
pull
on a line
paral
lel
to the side of the
brush.
Note
scale reading just
as brush leaves commutator. Tension must be 35 oz. [9,925 kg.] minimum. Replace brush springs
if
tension is insufficient.
H-116.
Solenoid
Coils
Check
solenoid coil as follows:
a.
Remove screw from motor terminal of solenoid
and
bend field coil leads away from terminal.
Con
nect terminal to ground with a heavy jumper wire.
See
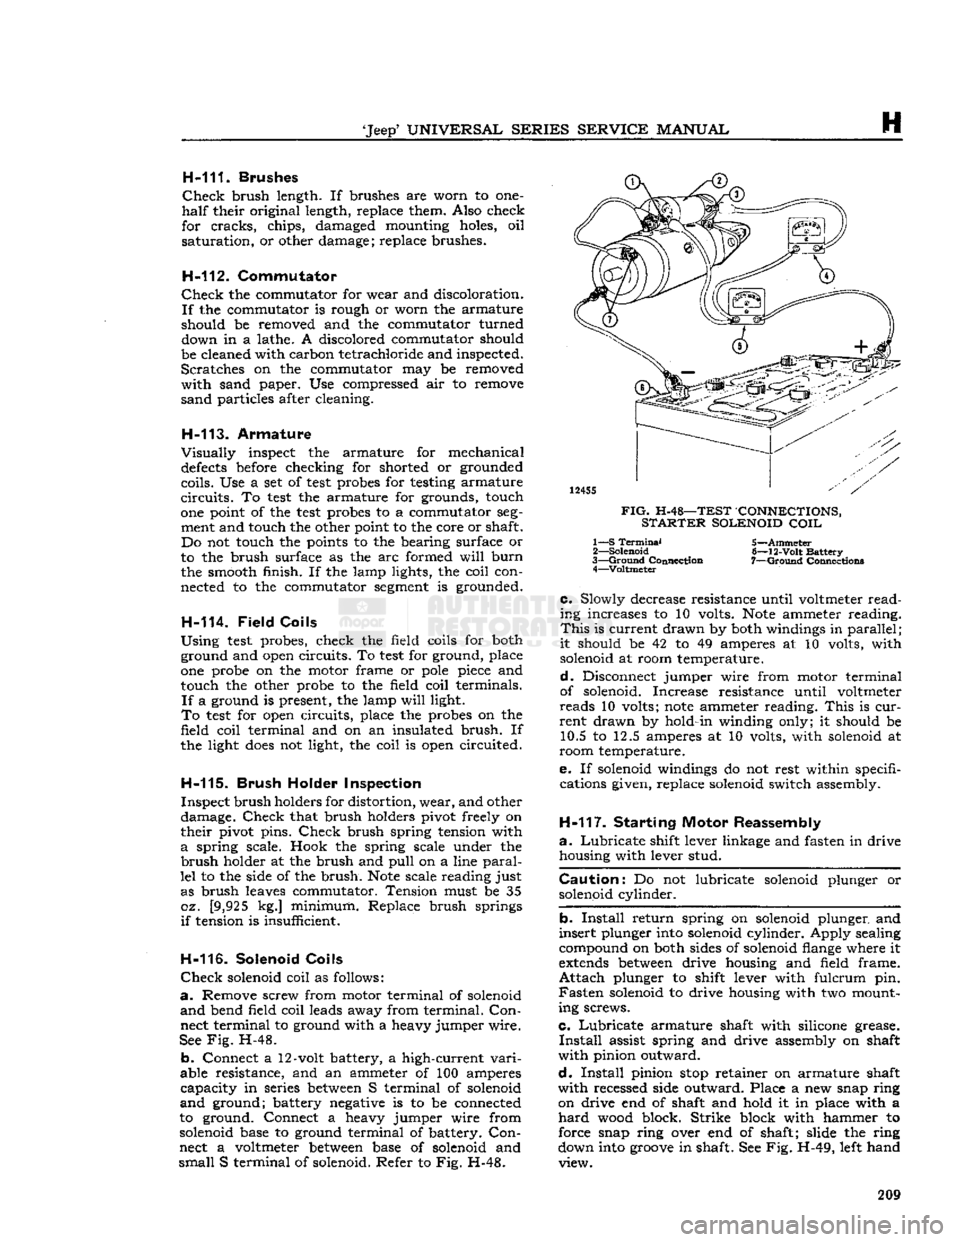
Fig.
H-48.
b.
Connect a 12-volt battery, a high-current
vari
able resistance, and an ammeter of 100 amperes
capacity
in series
between
S terminal of solenoid
and
ground; battery negative is to be connected
to ground. Connect a heavy jumper wire from
solenoid base to ground terminal of battery.
Con
nect a voltmeter
between
base of solenoid and
small
S terminal of solenoid. Refer to Fig. H-48.
12455
FIG.
H-48—TEST CONNECTIONS,
STARTER
SOLENOID
COIL
1— S
Terminal
2—
Solenoid
3—
Ground
Connection 4—Voltmeter 5—Ammeter
6—
12-Volt
Battery
7—
Ground
Connection*
c.
Slowly decrease resistance until voltmeter
read
ing increases to 10 volts.
Note
ammeter reading.
This
is current drawn by both windings in
parallel
;
it
should be 42 to 49 amperes at 10 volts, with solenoid at room temperature.
d.
Disconnect jumper wire from motor terminal
of solenoid. Increase resistance until voltmeter
reads
10 volts;
note
ammeter reading.
This
is
cur
rent
drawn by hold-in winding only; it should be 10.5 to 12.5 amperes at 10 volts, with solenoid at
room temperature.
e. If solenoid windings do not rest within specifi cations given, replace solenoid switch assembly.
H-117.
Starting Motor Reassembly
a.
Lubricate
shift lever linkage and fasten in drive housing with lever stud.
Caution:
Do not lubricate solenoid plunger or solenoid cylinder.
b.
Install
return spring on solenoid plunger and
insert
plunger into solenoid cylinder. Apply sealing
compound on both sides of solenoid flange where it
extends
between
drive housing and field frame.
Attach
plunger to shift lever with fulcrum pin.
Fasten
solenoid to drive housing with two mount
ing screws.
c.
Lubricate
armature shaft with silicone grease.
Install
assist spring and drive assembly on shaft
with
pinion outward.
d.
Install
pinion
stop
retainer on armature shaft
with
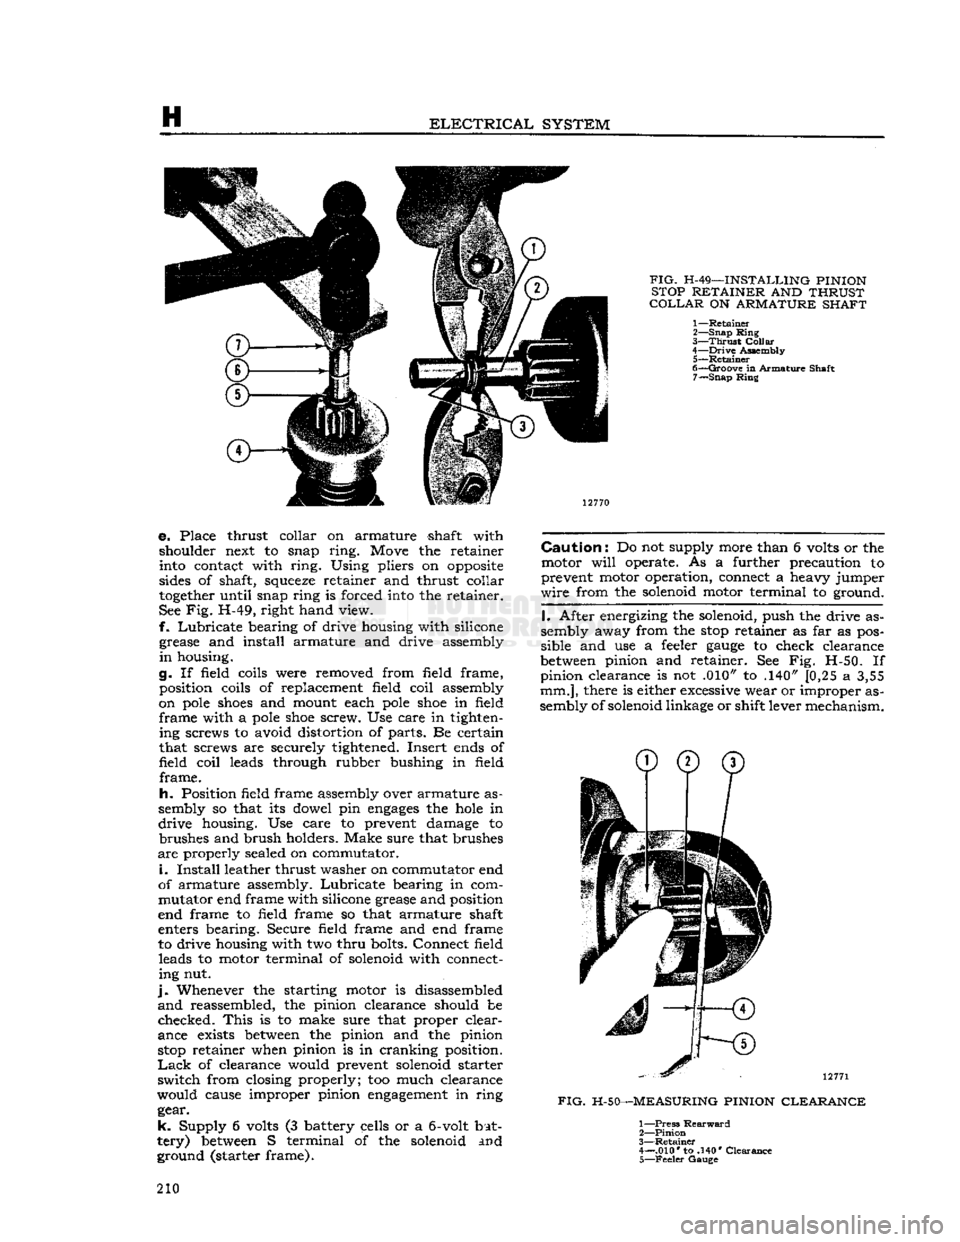
recessed side outward. Place a new snap ring on drive end of shaft and hold it in place with a
hard
wood block. Strike block with hammer to
force snap ring over end of shaft; slide the ring
down into
groove
in shaft. See Fig. H-49, left hand view. 209
Page 210 of 376
H
ELECTRICAL
SYSTEM
FIG.
H-49—INSTALLING PINION
STOP RETAINER AND THRUST
COLLAR
ON ARMATURE SHAFT
1—
Retainer
2—
Snap
Ring
3—
Thrust
Collar
4—
Drive
Assembly 5—
Retainer
6—
Groove
in Armature Shaft 7—
Snap
Ring
e. Place thrust collar on armature shaft with shoulder next to snap
ring.
Move the retainer
into contact with
ring.
Using pliers on
opposite
sides of shaft,
squeeze
retainer and thrust collar
together
until snap ring is forced into the retainer.
See Fig. H-49, right hand view.
f.
Lubricate
bearing of drive housing with silicone grease and install armature and drive assembly
in
housing.
g. If field coils were removed from field frame, position coils of replacement field coil assembly
on
pole
shoes
and mount each
pole
shoe
in field
frame
with a
pole
shoe
screw. Use care in tighten ing screws to avoid distortion of parts. Be certain
that screws are securely tightened. Insert ends of
field
coil
leads through rubber bushing in field
frame.
h.
Position field frame assembly over armature as
sembly so that its dowel pin
engages
the
hole
in
drive
housing. Use care to prevent damage to brushes and brush holders. Make sure that brushes
are
properly sealed on commutator.
i.
Install
leather thrust washer on commutator end
of armature assembly.
Lubricate
bearing in com
mutator end frame with silicone grease and position
end frame to field frame so that armature shaft
enters bearing. Secure field frame and end frame
to drive housing with two
thru
bolts. Connect field leads to motor terminal of solenoid with connecting nut.
j.
Whenever the starting motor is disassembled
and
reassembled, the pinion clearance should be
checked.
This
is to make sure that proper clear
ance exists
between
the pinion and the pinion
stop
retainer when pinion is in cranking position.
Lack
of clearance would prevent solenoid starter
switch
from closing properly; too much clearance
would cause improper pinion
engagement
in ring gear.
k.
Supply 6 volts (3 battery cells or a
6-volt
bat
tery)
between
S terminal of the solenoid and ground (starter frame).
Caution:
Do not supply more than 6 volts or the
motor
will
operate. As a further precaution to
prevent motor operation, connect a heavy jumper
wire
from the solenoid motor terminal to ground.
I.
After energizing the solenoid, push the drive as
sembly away from the
stop
retainer as far as pos
sible and use a feeler
gauge
to check clearance
between
pinion and retainer. See Fig. H-50. If pinion clearance is not .010" to .140" [0,25 a 3,55
mm.],
there is either excessive wear or improper as
sembly of solenoid linkage or shift lever mechanism.
12771
FIG.
H-50—MEASURING PINION CLEARANCE
1—
Press
Rearward
2—
Pinion
3—
Retainer
4— .010* to .140* Clearance 5—
Feeler
Gauge
210