engine JEEP CJ 1953 Workshop Manual
[x] Cancel search | Manufacturer: JEEP, Model Year: 1953, Model line: CJ, Model: JEEP CJ 1953Pages: 376, PDF Size: 19.96 MB
Page 42 of 376
D
HURRICANE
F4
ENGINE
D-7.
Remove Water Pump
Remove the
bolts
and lockwashers that attach the
water pump to the cylinder block. Remove the water pump.
D-8.
Remove
Exhaust
Manifold
Remove the five nuts from the manifold studs.
Pull
the manifold off the mounting studs. Remove the center and two end gaskets from the cylinder
block. See Section Fl for exhaust emission con trolled engines.
D-9.
Remove Oil
Filler
Tube
Loop
a piece of wire several times around the tube
below the top and make a
loop
through which a
pry
bar may be used to pry over the top of the
engine
water
outlet
fitting.
Pull
on the tube, tapping it just above where it enters the crankcase.
D-10.
Remove Water Outlet Fitting
Remove the nuts and lockwashers that attach the
water
outlet
fitting to the cylinder head.
Lift
the
outlet
fitting from the cylinder head.
D-11.
Remove Thermostat
With
the water
outlet
fitting removed, the thermo
stat can be lifted from the water
outlet
elbow on the cylinder head.
D-12.
Remove
Crankshaft
Pulley
Remove the crankshaft nut.
Install
a puller and
pull
the pulley from the crankshaft.
D-13.
Remove Distributor
a.
Remove
spark
plug cables from the distributor
cap,
noting the order in which they are assembled to ensure correct reassembly. No. 1
spark
plug
terminal
is in the 5 o'clock position. Starting with this tower the cables are installed in a counterclockwise direction in
1-3-4-2
firing order.
b.
Remove the
primary
lead from the terminal
post
at the side of the distributor.
c. Remove the screw holding the distributor to the crankcase and lift the assembly from the engine.
D-14. Remove Oil Pump
The
oil pump is located externally on the left side
of the engine. If only the oil pump is being removed
with
the
engine
in the vehicle, set No. 1 piston at
TDC
for reference for reinstalling the oil pump
without greatly disturbing the ignition timing.
First
remove the distributor cover and
note
the
position of the distributor rotor.
If
the distributor is already removed, sight through
the distributor
hole
before removing the oil pump.
The
slot should be near vertical. Remove the capscrews and lockwashers attaching the oil pump
to the cylinder block.
Carefully
slide the oil pump
and
its drive shaft out of the cylinder block.
D-1S.
Remove
Crankcase
Ventilation Valve
To
remove the crankcase ventilation valve from
the elbow fitting screwed into the inlet manifold of the cylinder head, first remove the
hose
and
clamp from the valve (Fig. D-32), then using a
wrench
carefully unscrew the valve from the
elbow.
D-l6.
Remove Rooker Arm Assemblies
The
rocker arm cover was previously removed as
a
step
of the
engine
removal (Par. D-5).
Remove the nuts from the rocker arm shaft support
studs, and lift the rocker arm assembly off the studs.
Lift
the intake valve push rods out of the
cylinder
block.
D-17.
Remove
Cylinder
Head
a.
Removal.
Disconnect the oil line from the flared tube con
nector and remove the rocker arm attaching stud nuts, and rocker arm shaft assembly if not pre
viously removed. Two end head
bolts
cannot be removed until the rocker arm shaft is removed.
Remove the cylinder head bolts.
There
is one
cylinder
head bolt located below the carburetor
mounting, inside the intake manifold, that must
not be overlooked.
Carefully
lift the cylinder head off the block.
Remove the valve push rods and the valve lifters.
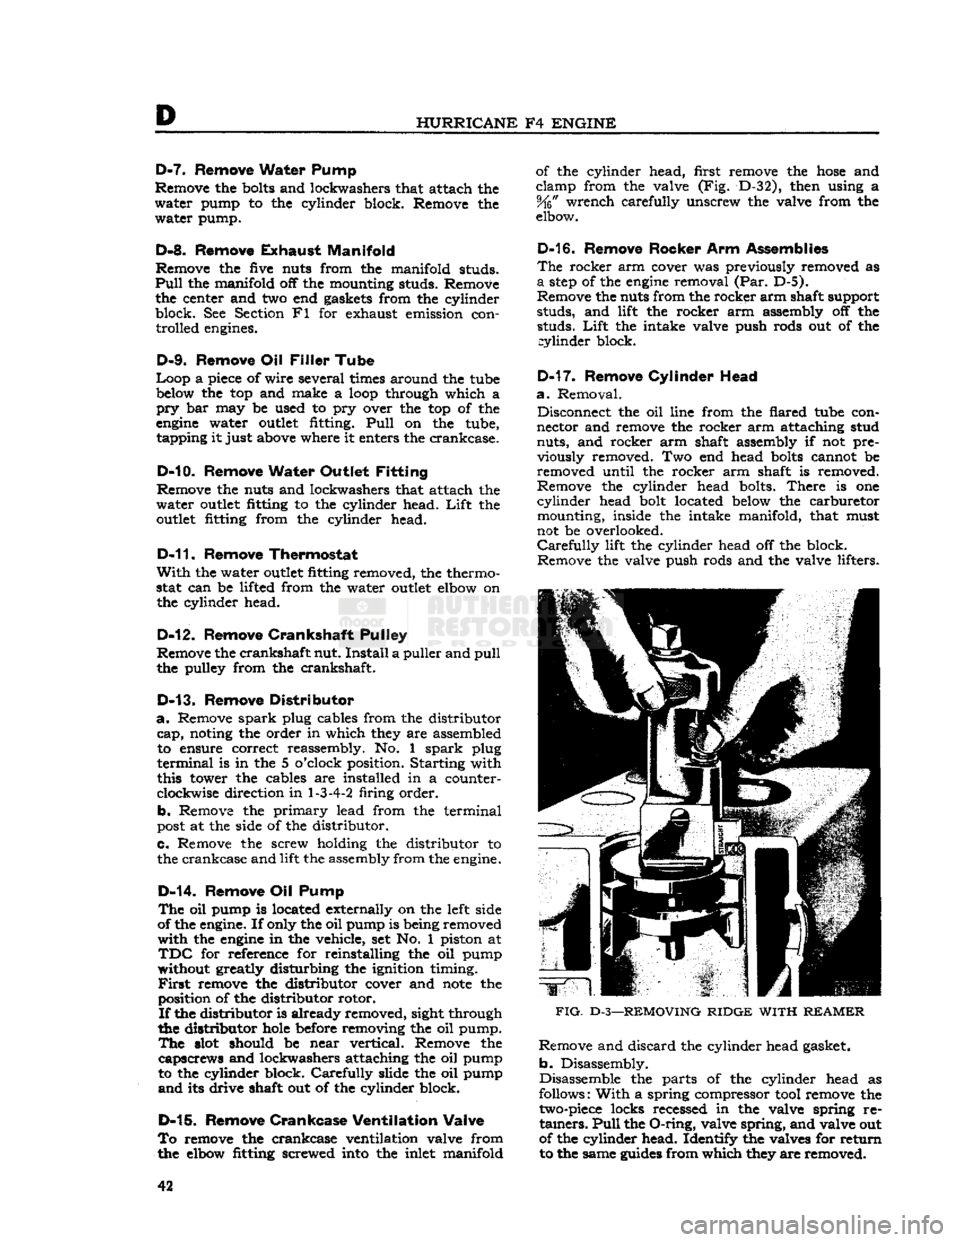
FIG.
D-3—REMOVING
RIDGE
WITH
REAMER
Remove and discard the cylinder head gasket,
b. Disassembly.
Disassemble the parts of the cylinder head as
follows:
With
a spring compressor tool remove the
two-piece
locks recessed in the valve spring re
tainers.
Pull
the
O-ring,
valve spring, and valve out
of the cylinder head. Identify the valves for return to the same
guides
from which they are removed.
42
Page 43 of 376
'Jeep*
UNIVERSAL SERIES SERVICE
MANUAL
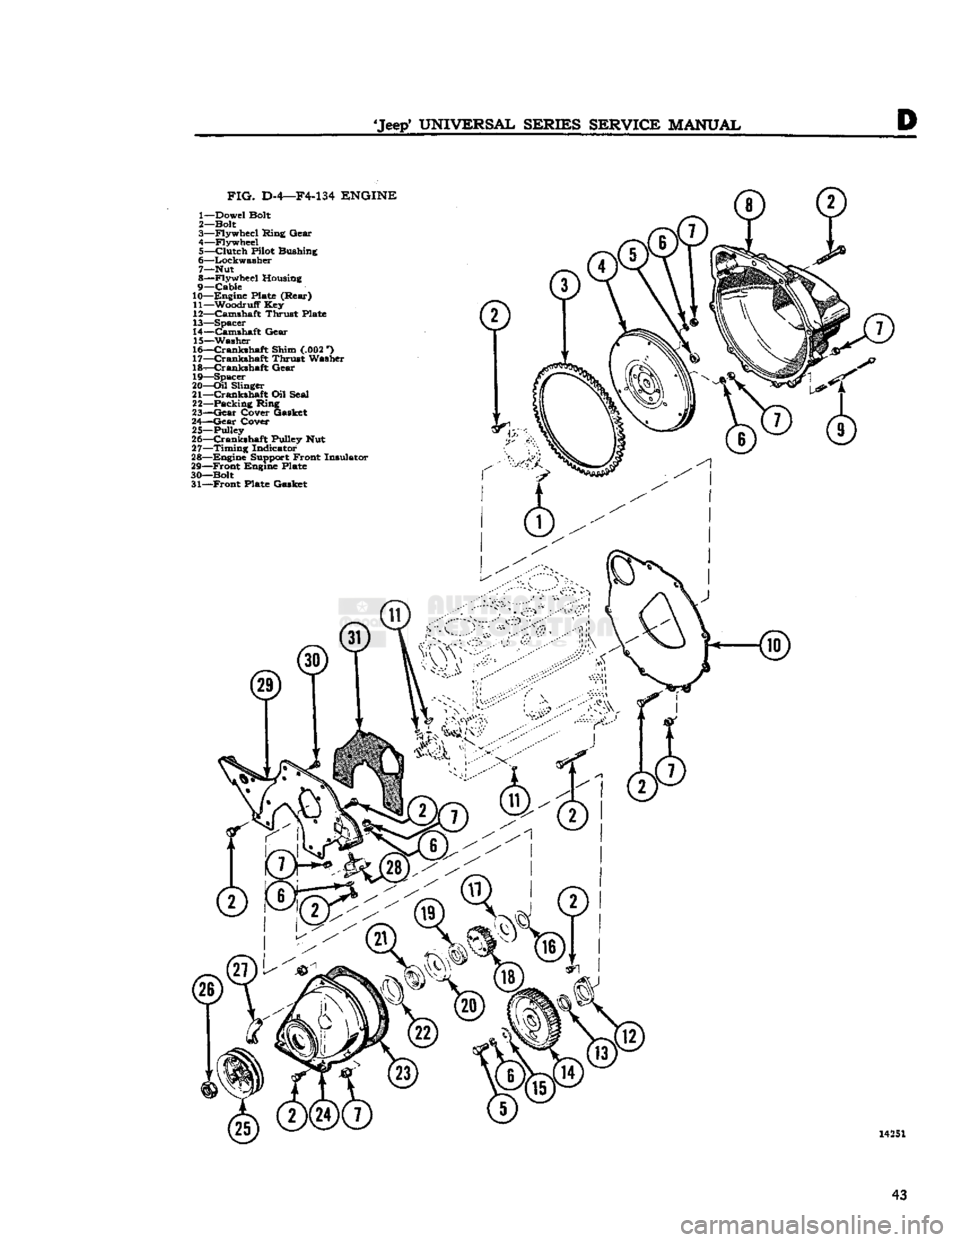
FIG.
D-4—F4-134
ENGINE
1— Dowel Bolt
2— Bolt
3— Flywheel Ring Gear
4— Flywheel 5—
Clutch
Pilot Bushing
6— Lockwasher
7— Nut
8— Flywheel Housing
9—
Cable
10— Engine Plate (Rear)
11— Woodruff Key
12— Camshaft Thrust Plate
13— Spacer
14— Camshaft Gear
15— Washer
16—
Crankshaft
Shim (.002 *)
17—
Crankshaft
Thrust Washer
18—
Crankshaft
Gear
19— Spacer
20—
Oil
Slinger
21—
Crankshaft
Oil Seal
22— Packing Ring
23—
Gear
Cover Gasket
24—
Gear
Cover
25—Pulley
26—
Crankshaft
Pulley Nut
27—
Timing
Indicator
28— Engine Support Front Insulator
29—
Front
Engine Plate
30— Bolt 31—
Front
Plate Gasket 14251
43
Page 44 of 376
D
HURRICANE
F4
ENGINE
Note:
Check
the condition of the rubber O-rings.
Defective O-rings could be the major cause of oil
leakage into cylinders. Always discard and replace
all
O-rings removed as only new O-rings should be installed at reassembly.
D-18.
Ream
Cylinder
Bore Ridges
To
prevent breaking the piston lands, the ridge
at the top of each cylinder bore must be removed
first.
To remove this ridge, use a cylinder ridge
reamer,
as shown in Fig. D-3 following the instruc
tions furnished by the reamer manufacturer. Use
care
not to cut below the top of the upper ring
travel
in the bore. Keep each piston top covered
with
an oil-soaked cloth to prevent cuttings from
falling
into the cylinder.
Note:
This
operation should be performed at this
time before the
engine
is rotated for the sequence
steps
following.
D-19.
Remove Oil Pan
Rotate the
engine
to the upside down position.
Remove the screws and lockwashers that attach
the oil pan to the cylinder block. Remove the oil
pan
and gasket.
Discard
the gasket.
D-20.
Remove Piston and Connecting
Rod
Assemblies
Remove the stamped locking nuts from the lower
end of each connecting rod bearing bolt. Remove
the connecting rod nuts. Remove the bearing cap evenly. Push the connecting rod and piston as
sembly out of the cylinder block with the handle end of a hammer until the piston rings are free from
the cylinder bore. Remove the piston and connecting rod assembly
from
the top of the cylinder block. Reassemble the
connecting rod bearing cap with the bearings in
place in the rod from which it was removed. Rotate
the crankshaft and follow the same procedure until
all
the piston and connecting rod assemblies are
removed.
Pistons and connecting rod assemblies may be removed for repair with the
engine
in the vehicle after draining the cooling system, removing the
oil
pan and the cylinder head, and reaming the ridges as previously described.
D-21.
Remove
Timing
Gear
Cover
Remove the bolts, nuts, and lockwashers, that at
tach
the timing gear cover to the engine. Remove
the cover, timing pointer, and cover gasket.
Dis
card
the gasket. Remove the crankshaft oil seal
from
the timing gear cover and discard the seal. Remove the oil slinger and spacer from the
crank
shaft.
D-22.
Remove
Timing
Gears
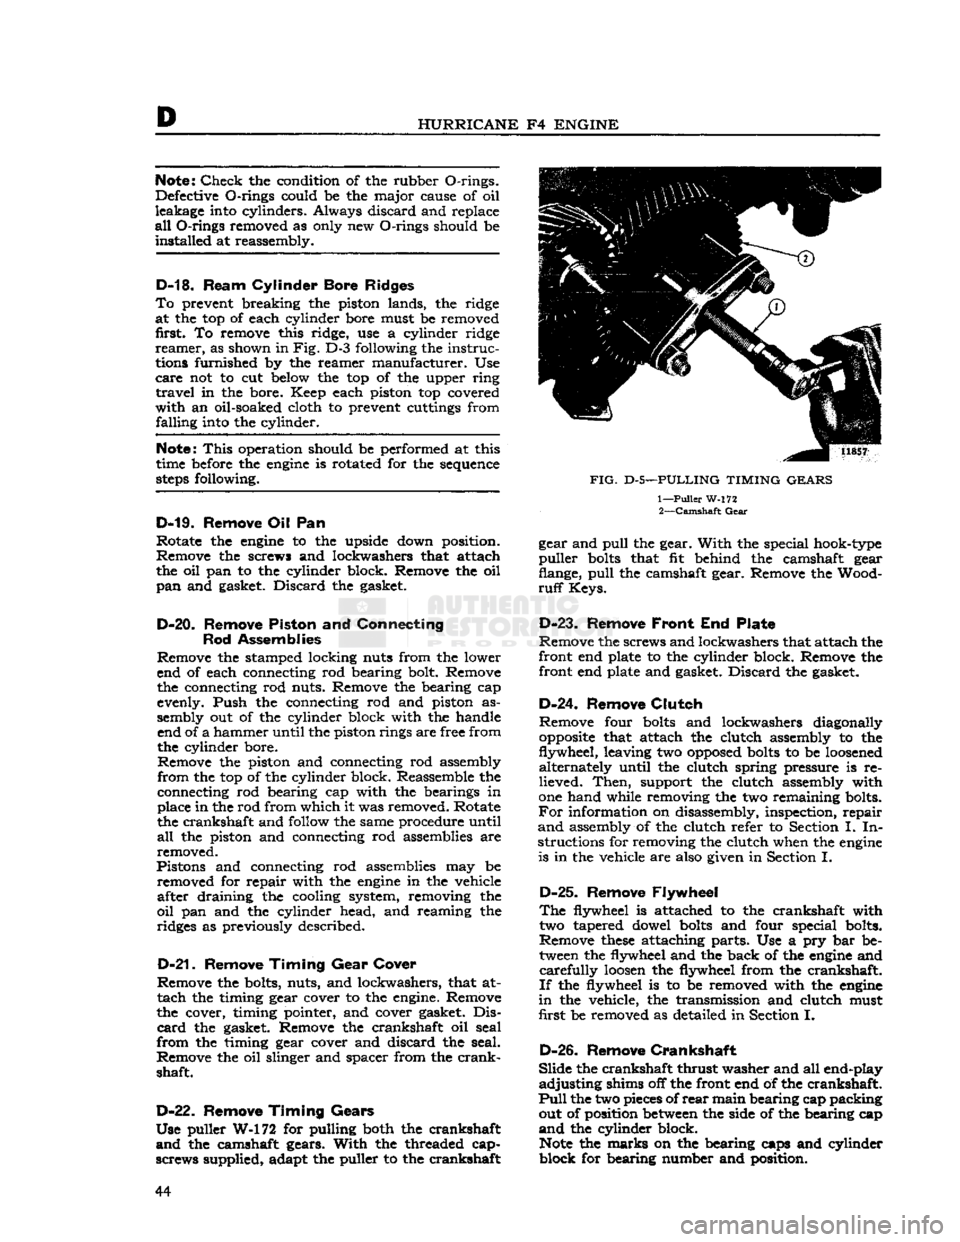
Use puller W-172 for pulling both the crankshaft
and
the camshaft gears.
With
the threaded cap-
screws supplied, adapt the puller to the crankshaft
FIG.
D-5—PULLING TIMING GEARS
1—
Puller
W-172 2—
Camshaft
Gear
gear and
pull
the gear.
With
the special hook-type
puller
bolts
that fit behind the camshaft gear
flange,
pull
the camshaft gear. Remove the Wood
ruff
Keys.
D-23.
Remove
Front
End Plate
Remove the screws and lockwashers that attach the
front end plate to the cylinder block. Remove the
front end plate and gasket.
Discard
the gasket.
D-24. Remove
Clutch
Remove four
bolts
and lockwashers diagonally
opposite
that attach the clutch assembly to the
flywheel, leaving two
opposed
bolts
to be
loosened
alternately until the clutch spring pressure is re
lieved.
Then,
support the clutch assembly with
one hand while removing the two remaining bolts.
For
information on disassembly, inspection, repair
and
assembly of the clutch refer to Section I. In
structions for removing the clutch when the
engine
is in the vehicle are also given in Section I.
D-25.
Remove Flywheel
The
flywheel is attached to the crankshaft with two tapered dowel
bolts
and four special bolts.
Remove
these
attaching parts. Use a pry bar be tween the flywheel and the back of the
engine
and
carefully
loosen
the flywheel from the crankshaft.
If
the flywheel is to be removed with the
engine
in
the vehicle, the transmission and clutch must
first be removed as detailed in Section I.
D-26.
Remove
Crankshaft
Slide
the crankshaft thrust washer and all end-play
adjusting
shims off the front end of the crankshaft.
Pull
the two pieces of
rear
main bearing cap packing out of position
between
the side of the bearing cap
and
the cylinder block.
Note
the marks on the bearing caps and cylinder
block for bearing number and position. 44
Page 45 of 376
'Jeep'
UNIVERSAL SERIES SERVICE
MANUAL
D
Remove the screws and lockwashers that attach
the main bearing caps to the cylinder block. Use
a
lifting bar beneath the ends of each bearing cap.
Be
careful not to exert too much pressure to cause
damage to the cap or
dowels
and pry the caps free.
CAUTION:
If main bearing caps are not removed
carefully
by raising both sides of each cap evenly
until
free of the dowels, the
dowels
may be bent.
A
bent main bearing cap dowel can cause misalign ment of the cap and resultant
rapid
bearing wear
necessitating replacement. Therefore, remove each
main
bearing cap carefully. If there is reason to
believe any of the
dowels
have been bent during
the bearing cap removal, remove them and install
new
dowels
as detailed in Par. D-34c.
Remove the upper
half
of the
rear
main bearing
oil
seal from the cylinder block and the lower
half
from
the oil seal
groove
in the
rear
main bearing
cap.
Install
the main bearing caps and bearings on
the cylinder block in their original positions.
Note;
Removal of the crankshaft may be ac
complished only with the
engine
out of the vehicle.
D-27.
Remove
Exhaust
Valves and Springs
Access to the valve chamber is obtained by re moving the attaching parts and the valve spring
cover and gasket from the cylinder block. Use cloths
to block off the three
holes
in the exhaust valve
chamber to prevent the valve retaining locks falling
into the crankcase, should they be accidentally dropped.
With
a valve
/
spring compressor, compress the valve springs on
those
valves which are in the
closed position (valve seated against cylinder
block).
Remove the exhaust valve spring retainer
locks,
the exhaust valve spring retainer, and the exhaust valve spring. Close the other valves by
rotating the camshaft and repeat the above opera
tion for the other valves in the same manner.
Lift
out all the exhaust valves and tag or place them in
a
rack
to indicate the location where each was removed from the cylinder block. If a valve sticks in
the guide and cannot be easily lifted out,
pull
the valve upward as far as possible and remove the
spring.
Lower
the valve and remove any carbon
deposits
from the valve stem.
This
will
permit re moval of the valve.
For
intake valve and spring removal, see
Par.
D-l7.
D-28.
Remove Camshaft
a.
Push the intake and exhaust valve tappets into the cylinder block as far as possible so the ends of
the tappets are not in contact with the camshaft. b. Secure each tappet in the raised position by in
stalling a common clip-type clothes pin on the
shank
of each tappet or tie them up in the valve
chamber.
c. Remove the camshaft thrust plate attaching
screws.
Remove the camshaft thrust plate and
spacer.
d.
Pull
the camshaft forward out of the cylinder
block using care to prevent damage to the cam
shaft bearing surfaces.
D-29.
Remove Valve Tappets
Remove the intake and exhaust valve tappets from
the
bottom
or crankshaft side of the cylinder block
after the camshaft has been removed. Tag each
tappet or place them in a marked
rack
so they may be reassembled in their original positions.
D-30.
Remove Oil
Gallery
Plugs
Remove the plug at each end of the oil gallery in the cylinder block.
This
operation is only applicable
when the
engine
is out of the vehicle and
will
allow access to the oil gallery so it may be cleaned.
D-31. ENGINE INSPECTION
AND
REPAIR
The
inspection and repair procedures detailed here
in
are recommended to be followed when a com
plete
engine
overhaul is to be made with the
engine
out of the vehicle. These instructions can generally be applied individually with the
engine
in the
vehicle. Wherever the procedure differs due to
the
engine
being in the vehicle, the necessary
special
instructions are provided. Inspection and
repair
instructions are included to cover the
cylinder
block, cylinder head, crankshaft and bearings, connecting rods and bearings, oil pump, valves and tappets, pistons and rings, flywheel,
timing gears, and the camshaft and bearings. In addition, fitting operations for
these
engine
com
ponents
are included.
Important:
Before the inspection and repair pro
cedures listed below are begun, the
engine
serial
number must be checked for the presence of
code
letters denoting undersize bearings or oversize
pistons. Refer to Par. D-2.
D-32.
Cylinder
Block
The
cylinder block must be thoroughly cleaned, inspected and repaired as detailed in the following
paragraphs.
D-33.
Cleaning
The
cylinder block may be steam cleaned or cleaned
with
a suitable solvent. A scraper is recommended
to remove
hard
deposits, except on highly finished surfaces. Special attention must be directed to the
cleaning of the oil passages, valve chamber,
crank
case, and cylinder walls to remove all sludge,
dirt
and
carbon deposits. After cleaning, use air pressure to dry the block thoroughly.
D-34. Inspection
Examine
the cylinder block for minute cracks and
fractures.
Rusted valve springs or evidence of rust
in
the valve chamber or the cylinder walls is a
good
indication of a possible
crack
in the block,
a.
Examine all machined surfaces of the cylinder block for
burrs
and scores.
Check
for cylinder block
distortion by placing a straight
edge
along the
length of the cylinder head surface of the block.
With
a feeler
gauge,
check for clearance
between
the straight
edge
and the block, particularly be
tween adjacent cylinders. Maximum permissible
out of line for service is .010"
[0,254
mm.] over the
full
length of the block. 45
Page 46 of 376
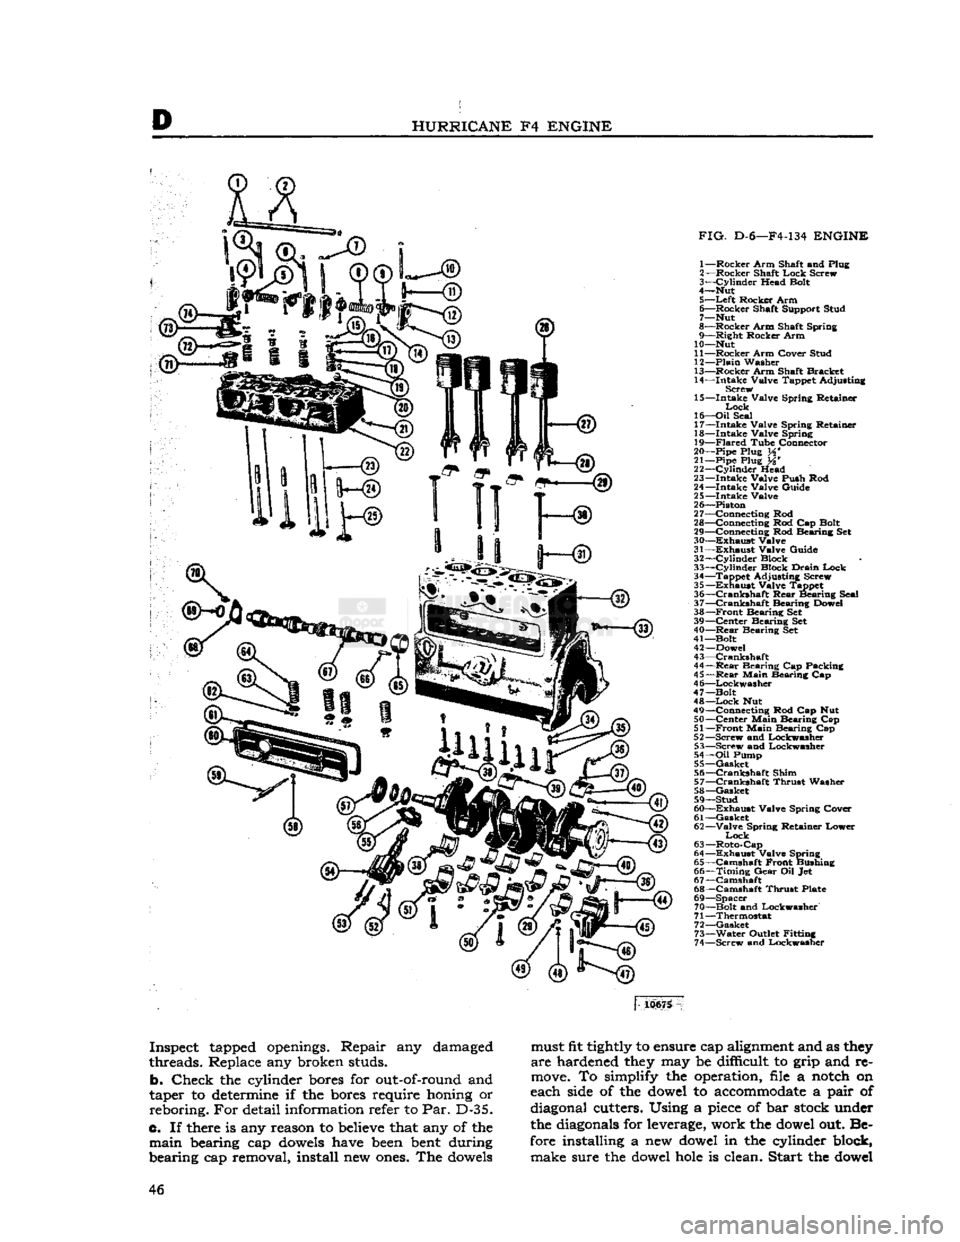
HURRICANE
F4
ENGINE
FIG.
D-6—F4-134
ENGINE
1— Rocker Arm Shaft and Plug
2— Rocker Shaft
Lock
Screw
3—
Cylinder
Head Bolt
4— Nut
5—
Left
Rocker Arm
6— Rocker Shaft Support Stud
7— Nut
8— Rocker Arm Shaft Spring
9— Right Rocker Arm
10— Nut
11— Rocker Arm Cover Stud
12—
Plain
Washer
13— Rocker Arm Shaft Bracket
14— Intake Valve Tappet Adjusting Screw
15— Intake Valve Spring Retainer
Lock
16—
Oil
Seal
17— Intake Valve Spring Retainer
18— Intake Valve Spring
19—
Flared
Tube Connector
20— Pipe Plug H'
21—
Pipe Plug W
22—
Cylinder
Head
23— Intake Valve Push Rod
24— Intake Valve Guide
25— Intake Valve 26— Piston
27— Connecting Rod
28— Connecting Rod Cap Bolt
29— Connecting Rod Bearing Set
30—
Exhaust
Valve
31—
Exhaust
Valve Guide 32—
Cylinder
Block
33—
Cylinder
Block
Drain
Lock
34— Tappet Adjusting Screw
35—
Exhaust
Valve Tappet
36—
Crankshaft
Rear
Bearing Seal
37—
Crankshaft
Bearing Dowel
38—
Front
Bearing Set
39— Center Bearing Set
40—
Rear
Bearing Set
41—Bolt 42— Dowel
43—
Crankshaft
44—
Rear
Bearing Cap Packing
45—
Rear
Main Bearing Cap
4 6—Lockwasher
47— Bolt
48—
Lock
Nut
49— Connecting Rod Cap Nut
50— Center Main Bearing Cap
51—
Front
Main Bearing Cap
52— Screw and Lockwasher 53— Screw and Lockwasher
54—
Oil
Pump
55— Gasket
56—
Crankshaft
Shim
57—
Crankshaft
Thrust Washer
58— Gasket
59— Stud
60—
Exhaust
Valve Spring Cover 61— Gasket
62— Valve Spring Retainer Lower
Lock
63— Roto-Cap 64—
Exhaust
Valve Spring
65— Camshaft Front Bushing
66—
Timing
Gear
Oil Jet
67— Camshaft
68— Camshaft Thrust Plate
69— Spacer 70— Bolt and Lockwasher
71— Thermostat
72— Gasket 73— Water Outlet Fitting
74— Screw and Lockwasher
10675
Inspect
tapped
openings.
Repair any
damaged
threads. Replace any broken
studs.
b.
Check the cylinder
bores
for
out-of-round
and
taper to
determine
if the
bores
require
honing
or reboring. For detail information refer to Par. D-35.
c. If
there
is any reason to
believe
that
any of the main bearing cap
dowels
have
been
bent
during
bearing cap removal, install new
ones.
The
dowels
must
fit
tightly
to ensure cap
alignment
and as
they
are hardened
they
may be difficult to grip and re
move.
To simplify the operation,
file
a
notch
on
each
side
of the
dowel
to
accommodate
a pair of
diagonal cutters. Using a
piece
of bar
stock
under the
diagonals
for
leverage,
work the
dowel
out. Be
fore
installing a new
dowel
in the cylinder block, make sure the
dowel
hole
is clean. Start the
dowel
46
Page 47 of 376
'Jeep*
UNIVERSAL
SERIES SERVICE
MANUAL
D
straight
in the hole, then tap the dowel lightly
with
a hammer until it
bottoms.
d.
When installing bearing eaps, be sure to tighten
the
bolts
evenly in each cap to
pull
it into place
without bending the
dowels
or distorting the
bearing
cap.
e. Other parts of the block which require inspec tion
and
possible
repair,
but which are directly
related
to other
engine
components (such as tappets, pistons, camshaft, valves, crankshaft, and
oil
pump) are covered later in this section.
D-35.
Cylinder
Bores
The
cylinder bores may be reconditioned by honing
or
reboring. Use oil-soaked rags to protect
crank
shaft
journals
and other
engine
parts from abrasive
dust during all reconditioning operations.
Both
honing and reboring of the cylinders must be
done
carefully to fit the pistons and to obtain
specified clearances. If reboring of the cylinder bores is not required but the walls are glazed, use
a
finishing
hone
to remove the glaze. Reboring the cylinders must not be attempted unless ade
quate facilities and experienced service technicians
are
available. The amount of material to be removed is determined from the original diameter
of the cylinder bores (3.125" to 3.127") [79,375 a
79,426
mm.] plus the amount of oversize in diameter
of the oversize pistons to be fitted. Pistons are
available
in the following oversizes.
.010"
[0,254
mm.] .030" [0,762 mm.] .020" [0,508 mm.] .040" [1,016 mm.}
The
largest cylinder bore
will
determine the over
size to which all cylinders must be rebored, since the size and weight of all pistons must be uniform
to maintain proper
engine
balance. The maximum rebore should not exceed .040" [1,016 mm.] from
standard.
Measure
the cylinder diameters by making mea
surements both parallel to and at right angles to
crankshaft
over entire piston travel and at
bottom
of cylinder. Proceed as follows:
a.
If bores are scored; if out-of-round
exceeds
.005
"
[0,127 mm.]; if diameters differ more than .005";
or
if taper
exceeds
.005
"
on diameter, it is generally
recommended that cylinders be reconditioned by
reboring
and honing to the next oversize using new
pistons of the proper size.
Note:
If reboring is performed, allow .0015"
[0,0381
mm.] for final honing.
All
cylinder bore diameters must be within .002
"
[0,0508
mm.] after reconditioning.
b.
If bore measurements are within the above
limits,
but indicate hollows or waviness, cylinders should be honed with 250 grit
stone
hone. Pump
hone
up and down in cylinder while it is rotating
to produce a satin-finish, diamond cross-hatched
pattern
approximately 30° with horizontal. Hone
only enough to correct waviness.
c. If cylinder bore correction is unnecessary, break the glaze on cylinder walls with a 250 grit
stone
hone
or with a suitable deglazing tool. Operate the
hone
or deglazer to obtain diamond cross-hatched
pattern
previously mentioned.
d.
Regardless of type of correction on cylinder
walls,
wash out bores thoroughly afterwards and
apply
a light coat of
engine
oil. If cylinders have
been rebored or honed heavily, measure cylinder
diameters again to assure proper selection of piston
size.
D-36.
Pistons, Rings, and Connecting Rods
Pistons are each fitted with three rings, two com pression rings and one oil control
ring.
The pistons have an extra
groove
above the top ring which acts as a heat dam or insulating
groove
to protect
against sealing of the top ring in the ring
groove
with
hard
carbon. The piston pin is secured by the lock screw.
The
pistons and connecting rods were removed from
the
engine
as assemblies. If cylinders were rebored,
new oversized pistons and rings
will
have to be in
stalled.
Disassemble the pistons and rods. Remove the
two compression rings, the oil control
ring,
and the oil control ring expander from each piston. Do not remove the
bolts
from the lower end of the
connecting rods unless the
bolts
are damaged.
Clamp
each connecting rod and piston assembly
in
a padded bench vise and remove the piston pin
lock
screw and lockwasher. Press the piston pin
out of the piston and connecting rod.
Clean
all
carbon,
gum, and lacquer
deposits
from both the
inner
and outer surfaces of each piston, connecting
rod,
and piston pin. Use a ring
groove
cleaner or a
broken
ring filed to a sharp square
edge
to clean
the carbon from the piston ring
grooves
and the
insulator
groove. Use care not to scrape metal from
the sides of the
grooves
or make
burrs
on ring
groove
surfaces. Run a length of wire through the
oil
spray
hole
near the lower end of the connecting
rod
to clear the
hole
of hardened oil
deposits
or
foreign matter.
Carefully
inspect the pistons and
replace
any that are broken or cracked. Replace
pistons if any of the ring lands are chipped, broken,
or
rounded on the
edges;
or if the piston is scored,
scratched,
or burned so seriously that the imperfec
tions cannot be removed with a hand honing
stone
or
crocus cloth.
Replace
the pistons as follows:
a.
After cylinder bores have been carefully checked for out-of-round and taper (Par. D-35), check fit
of each piston to cylinder bore with block and
pistons clean and dry and at approximately 70
°F.
[21°C]
by using Piston Fitting Gauge And Scale
Tool
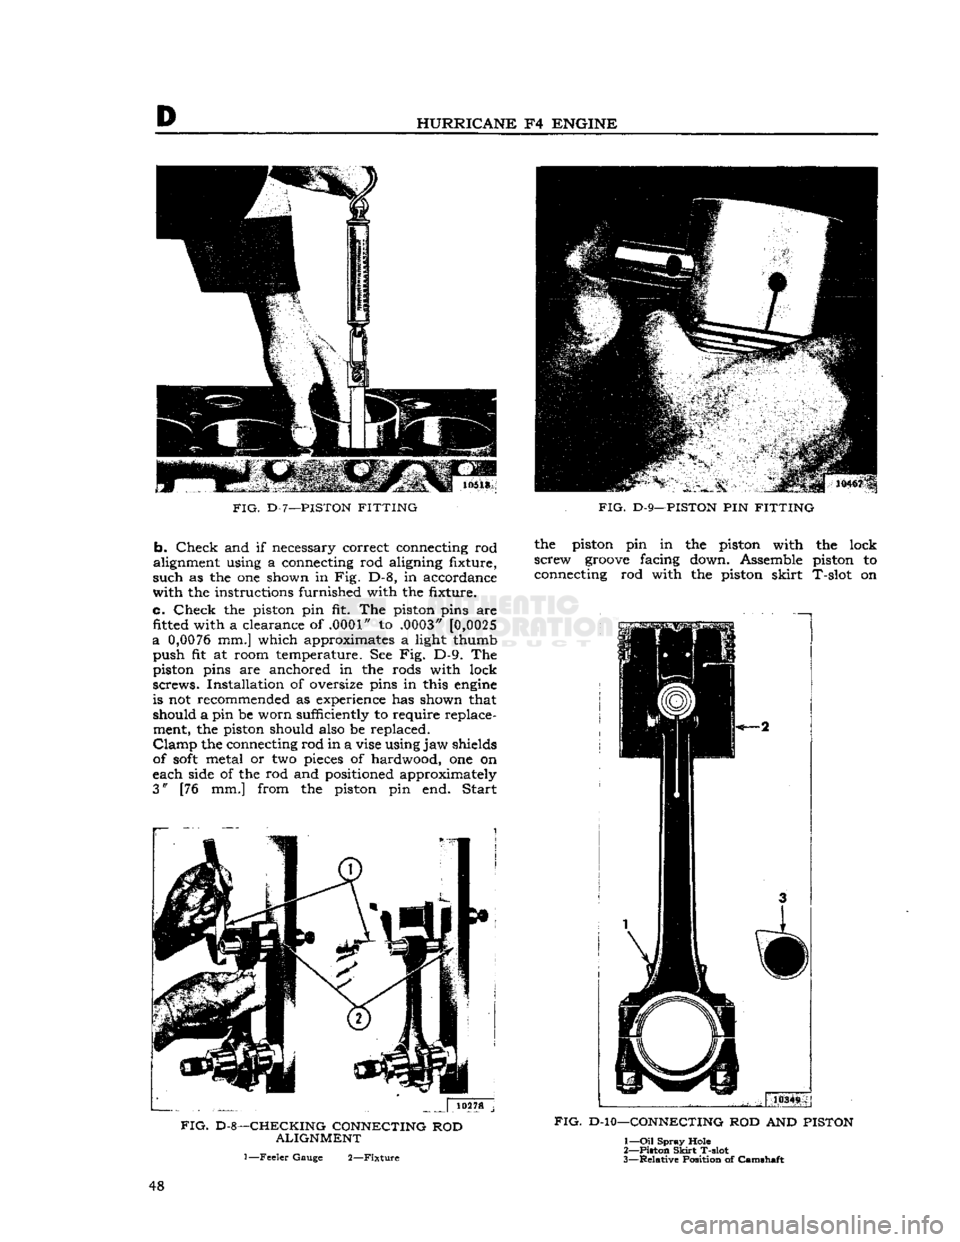
No. C-690 as shown in Fig. D-7. Use a .003"
[0,0762
mm.] thickness
gauge
%" [19 mm.] wide.
The
piston is fitted upside down in the block to
facilitate the operation. The
gauge
must extend the
full
length of the piston on the thrust side
(opposite
side from slot in piston
skirt).
Scale should register
5
to 10 pounds [2,3 a 4,5 kg.]
pull
to remove the
thickness
gauge
from
between
cylinder
wall
and piston. Excessive
pull
indicates need for a slightly
smaller
piston or additional honing of cylinder. In sufficient
pull
indicates need for fitting a larger piston. 47
Page 48 of 376
D
HURRICANE
F4
ENGINE
FIG.
D-7—PISTON
FITTING
b.
Check
and if necessary correct connecting rod
alignment using a connecting rod aligning fixture,
such
as the one shown in Fig. D-8, in accordance
with
the instructions furnished with the fixture.
c.
Check
the piston pin fit. The piston pins are fitted
with
a clearance of .0001" to .0003" [0,0025
a
0,0076
mm.] which approximates a light thumb
push
fit at room temperature. See Fig. D-9. The piston pins are anchored in the rods with lock
screws.
Installation of oversize pins in this
engine
is not recommended as experience has shown that
should a pin be worn sufficiently to require replace ment, the piston should also be replaced.
Clamp
the connecting rod in a vise using
jaw
shields
of
soft
metal or two pieces of hardwood, one on
each side of the rod and positioned approximately
3" [76 mm.] from the piston pin end.
Start
,
.. . | 10278 j
FIG.
D-8—CHECKING
CONNECTING
ROD
ALIGNMENT
1
—Feeler
Gauge
2—Fixture
FIG.
D-9—PISTON PIN
FITTING
the piston pin in the piston with the lock
screw
groove
facing down. Assemble piston to connecting rod with the piston
skirt
T-slot on
FIG.
D-10—CONNECTING ROD AND
PISTON
1—
Oil
Spray
Hole
2—
Piston
Skirt
T-slot
3—
Relative
Position
of
Camshaft
48
Page 50 of 376
D
HURRICANE
F4
ENGINE
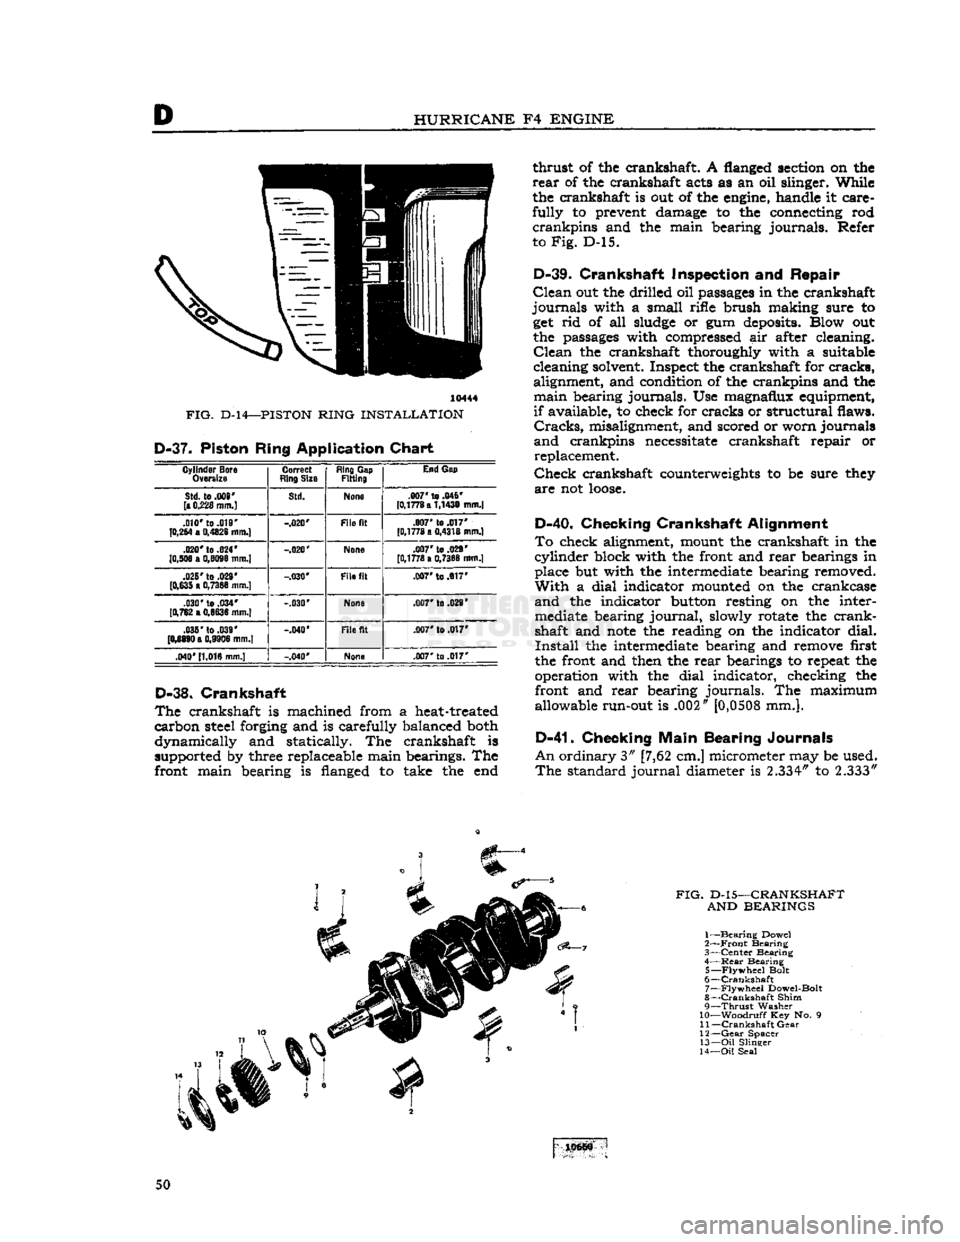
10444
FIG.
D-14—PISTON
RING INSTALLATION D-37.
Piston Ring Application Chart
Cylinder
Bora
Ovtrsiie
Correct
Ring
Size
Ring
Gap
Fitting
End
Gap
Std.
te .009'
[•0,228
mm.]
Std.
None
.007' to
.045'
[0,1778 a
1.1430
mm.]
.010*
to .019'
[0,254
a
0,4826
mm.)
-.020'
File
fit .007'
to
.017'
[0,1778 a 0,4318 mm.]
.020'
to
.024'
[0,508 a
0,6096
mm.] -.020'
None
.007' to .029*
[0,1778 a
0,7366
mm.]
.025'
to
.029'
[0,635 a
0,7366
mm.] -.030'
File
fit
.007'
to .017*
.030' to .034*
[0,762 a
0,8636
mm.] -.030'
None
.007'to
.029'
.038'to
.039'
[0,8890
a
0,9908
mm.] -.040*
File
fit
.007'
to .017'
.040' [1,016 mm.]
-.040*
None
.007'
to .017'
D-38.
Crankshaft
The
crankshaft is machined from a heat-treated
carbon
steel forging and is carefully balanced both
dynamically
and statically. The crankshaft is
supported by three replaceable main bearings. The
front main bearing is flanged to take the end
thrust
of the crankshaft. A flanged section on the
rear
of the crankshaft acts as an oil slinger. While the crankshaft is out of the engine, handle it care
fully
to prevent damage to the connecting rod
crankpins
and the main bearing journals. Refer
to
Fig.
D-l5.
D-39.
Crankshaft Inspection
and
Repair
Clean
out the drilled oil passages in the crankshaft
journals
with a small rifle brush making sure to get rid of all sludge or gum deposits. Blow out the passages with compressed air after cleaning.
Clean
the crankshaft thoroughly with a suitable
cleaning solvent. Inspect the crankshaft for
cracks,
alignment, and condition of the crankpins and the
main
bearing journals. Use magnafuix equipment,
if
available, to check for cracks or structural flaws.
Cracks,
misalignment, and scored or worn journals
and
crankpins necessitate crankshaft repair or replacement.
Check
crankshaft counterweights to be sure they
are
not
loose.
D-40.
Checking Crankshaft Alignment
To
check alignment, mount the crankshaft in the
cylinder
block with the front and
rear
bearings in
place but with the intermediate bearing removed.
With
a dial indicator mounted on the crankcase
and
the indicator button resting on the intermediate bearing
journal,
slowly rotate the
crank
shaft and
note
the reading on the indicator
dial.
Install
the intermediate bearing and remove first
the front and then the
rear
bearings to repeat the operation with the dial indicator, checking the
front and
rear
bearing journals. The maximum allowable run-out is .002"
[0,0508
mm.].
D-41.
Checking Main Bearing Journals
An
ordinary 3" [7,62 cm.] micrometer may be used.
The
standard
journal
diameter is
2.334"
to 2.333" 50
Page 51 of 376
![JEEP CJ 1953 Workshop Manual
-Jeep*
UNIVERSAL
SERIES SERVICE
MANUAL
E>
[5,928 a
5,926
cm.] for all main bearings. Allowable
taper or out-of-round of the journals is .001"
[0,0254
mm.].
D-42.
Checking Connecting Ro JEEP CJ 1953 Workshop Manual
-Jeep*
UNIVERSAL
SERIES SERVICE
MANUAL
E>
[5,928 a
5,926
cm.] for all main bearings. Allowable
taper or out-of-round of the journals is .001"
[0,0254
mm.].
D-42.
Checking Connecting Ro](/img/16/57040/w960_57040-50.png)
-Jeep*
UNIVERSAL
SERIES SERVICE
MANUAL
E>
[5,928 a
5,926
cm.] for all main bearings. Allowable
taper or out-of-round of the journals is .001"
[0,0254
mm.].
D-42.
Checking Connecting Rod
Crankpins
Check
the crankpin diameters with a micrometer
to ensure that they are not out-of-round or tapered more than .001"
[0,0254
mm.] The standard
crank-
pin
diameter is
1.9383*
to
1.9375"
[4,9233
a
4,9213
cm.].
D-43.
Crankshaft
Main
Bearings
The
crankshaft rotates on three main bearings
with
a running clearance of .0003" to .0029"
[0,0076
a
0,0736
mm.].
These
bearings are positioned and prevented from
rotating in their supports in the cylinder block by
dowel pins. Dowel pins are used in both the center
and
the
rear
bearing caps. No dowel pins are used
in
the front bearing cap because the bearing has
a
flange. The front main bearing takes the end
thrust
of the crankshaft. The main bearings are of premium type which provides long bearing life.
They
are replaceable and when correctly installed, provide proper clearance without filing, boring,
scraping,
or shimming. Crankshaft bearings can
be removed from this
engine
only with the
engine
out of the vehicle. Crankshaft bearings must be replaced as a complete set of three bearings, each
bearing consisting of two halves.
Main
bearings
are
available in the standard size and the following
undersizes:
.001" [0,025mm.] .012" [0,305 mm.] .002" [0,051mm.] .020" [0,508 mm.] .010" [0,254mm.] .030" [0,762 mm.]
The
.001" and .002" undersize main bearings are
for use with standard size crankshafts having
slightly worn
journals.
The .010", .020", and .030" undersize bearings are for use with undersize
crankshafts
in
those
sizes. The .012" undersize
bearings are for use with .010" undersize
crank
shafts having slightly worn journals. Bearing sizes
are
rubber stamped on the reverse side of each
bearing half.
D-44. Crankshaft
Main
Bearing Inspection
The
crankshaft
journals
must be carefully inspected
as detailed previously in Par. D-41. Worn journals
will
require undersize bearings. Scored, flaked, or
worn
bearings must be replaced. Measure the main
bearing bores in the cylinder block using a
telescope
gauge
and micrometer. Measure the bores at right
angles to the split line and at 45° to the split line.
The
bores should not be over .001"
[0,0254
mm.]
out-of-round or .001" in taper from end to end.
Also,
the bores should not be more then .001"
oversize, considering the average diameter of the
bore.
D-45.
Fitting Crankshaft
Main
Bearings
Using
Plastigage
After
wiping and carefully inspecting the bearing bore, install the proper bearing. See that the oil
hole
in the bearing upper half registers properly
with
the oil
hole
in the block, and that the bearing
lock fits properly in the notch in the block.
Install
the crankshaft if replacing bearings with the
engine
out of the vehicle. The desired running fit (dif
ference
between
the diameter of the crankshaft
journal
and the inside diameter of the fitted bear ing) for a main bearing is .0003" to .0029"
[0,0076
a
0,0736
mm.]. With a dimension in
excess
of this
standard
running fit, a satisfactory bearing replacement cannot be made and it
will
be necessary to
regrind
the crankshaft.
Install
the bearing lower
half
and the bearing cap and draw the nuts down
equally and only slightly tight. Rotate the
crank
shaft by hand to be sure it turns freely without
drag.
Pull
the nuts tighter, first one then the other,
a
little at a time, intermittently rotating the
crank
shaft by hand until the recommended torque of
35 to 45 lb-ft. [4,8 a 6,2 kg-m.] is reached. If the
bearings are of the correct size, and lubricated with
light oil before installation, the crankshaft should
turn
freely in the bearings. If the crankshaft cannot
be turned, a larger bearing is
required.
If there is no binding or tightness, it is still necessary to check
clearance to guard against too
loose
a fit. Never file
either the bearing cap or the bearing to compensate
for too much clearance. Do not use shims under a
bearing cap or behind a bearing shell. Do not run a
new bearing half with a worn bearing half. The use
of "Plastigage" of the proper size to measure .001" [0,025 mm.] clearance is recommended for check
ing crankshaft main bearing clearance. The method
of checking clearance is as follows:
a.
Remove the bearing cap and carefully wipe
all
oil from the bearing and the
journal.
b.
Lay a piece of "Plastigage" y%" [3 mm.]
shorter than the width of the bearing across the
journal
(lengthwise of the crankshaft).
c.
Install
the bearing and cap and tighten first
one nut, then the other, a little at a time to the specified torque. As the bearing
tightens
down
around
the
journal,
the "Plastigage" flattens to a
width that indicates the bearing clearance.
d.
Remove the cap and measure the width of
the flattened "Plastigage," using the scale printed
on the
edge
of the envelope. The proper size "Plasti
gage"
will
accurately measure clearance down to .001".
e. If the flattened "Plastigage" tapers toward the middle, or toward the end, or both ends, there
is a difference in clearance, indicating a taper, a
low
spot,
or other irregularity of the bearing or
journal.
D-46.
Fitting Crankshaft
Main
Bearings
Using
Shim Stock
Thin
feeler or shim stock may be used instead of "Plastigage" to check bearing clearances. The
method is simple, but care must be taken to protect
the bearing metal surface from
injury
by too much pressure against the feeler stock,
a.
Cut a piece of .001" [0,025 mm.] thick, by Yl [12,7 mm.] wide, feeler stock }4" [3 mm.]
shorter than the width of the bearing. Coat this 51
Page 52 of 376
D
HURRICANE
F4
ENGINE
10442
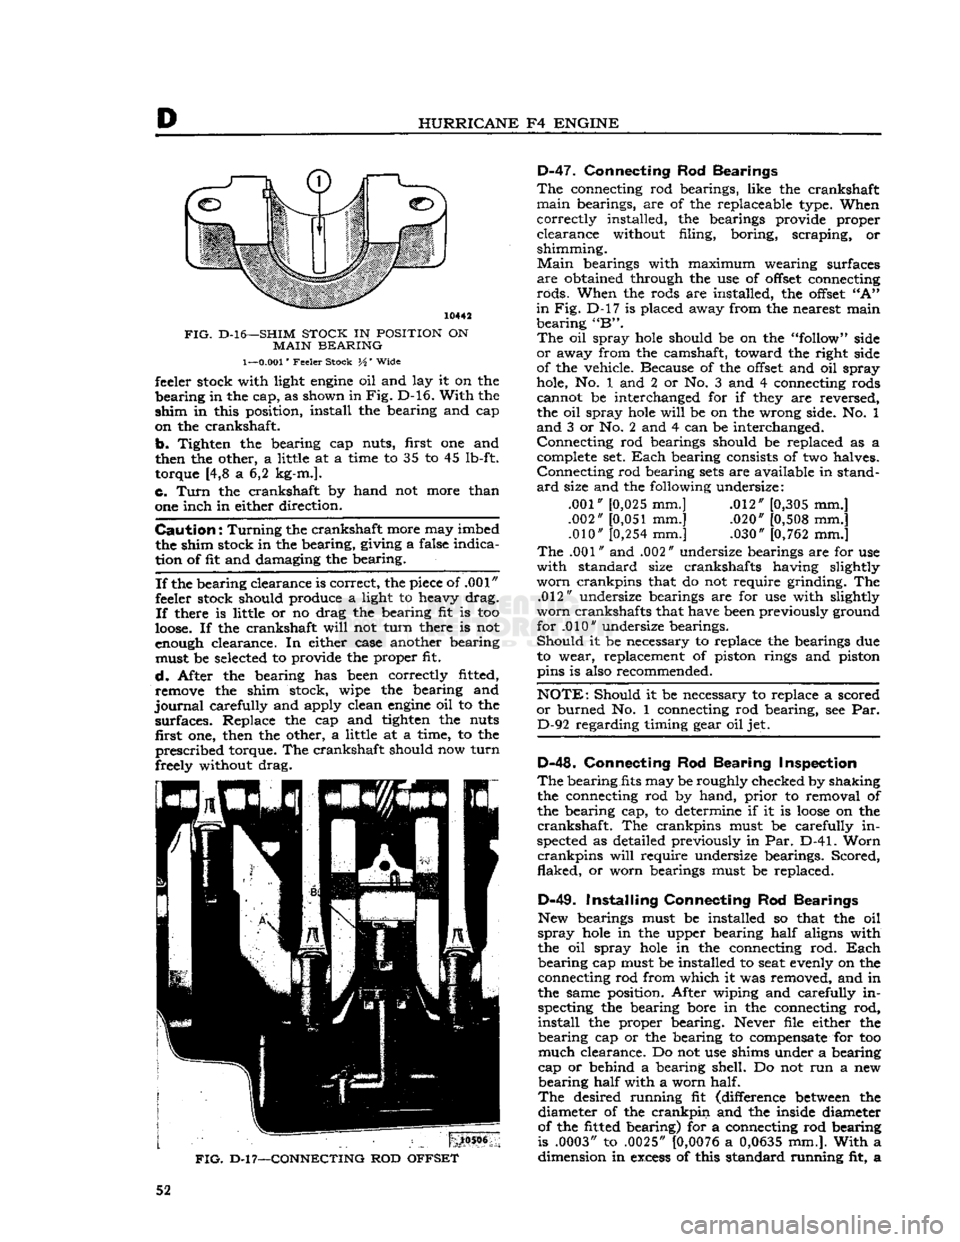
FIG.
D-l6—SHIM
STOCK
IN
POSITION
ON
MAIN
BEARING
1—0.001"
Feeler Stock H' Wide feeler stock with light
engine
oil and lay it on the
bearing
in the cap, as shown in
Fig.
D-16.
With
the
shim
in this position, install the bearing and cap
on the crankshaft.
b.
Tighten the bearing cap nuts, first one and
then the other, a little at a time to 35 to 45 lb-ft. torque [4,8 a 6,2 kg-m.].
c.
Turn
the crankshaft by hand not more than
one inch in either direction.
Caution:
Turning
the crankshaft more may imbed the shim stock in the bearing, giving a false indica
tion of fit and damaging the bearing.
If
the bearing clearance is correct, the piece of .001"
feeler stock should produce a light to heavy drag.
If
there is little or no drag the bearing fit is too
loose.
If the crankshaft
will
not
turn
there is not
enough clearance. In either case another bearing must be selected to provide the proper fit.
d.
After the bearing has been correctly fitted, remove the shim stock, wipe the bearing and
journal
carefully and apply clean
engine
oil to the
surfaces.
Replace the cap and tighten the nuts first one, then the other, a little at a time, to the
prescribed
torque. The crankshaft should now
turn
freely without drag.
FIG.
D-l
7—CONNECTING
ROD
OFFSET
D-47.
Connecting Rod Bearings
The
connecting rod bearings, like the crankshaft
main
bearings, are of the replaceable type. When
correctly
installed, the bearings provide proper
clearance
without filing, boring, scraping, or
shimming.
Main
bearings with maximum wearing surfaces
are
obtained through the use of
offset
connecting
rods.
When the rods are installed, the
offset
"A"
in
Fig. D-l7 is placed away from the nearest main
bearing
"B".
The
oil spray
hole
should be on the "follow" side
or
away from the camshaft, toward the right side
of the vehicle. Because of the
offset
and oil spray
hole, No. 1 and 2 or No. 3 and 4 connecting rods cannot be interchanged for if they are reversed,
the oil spray
hole
will
be on the wrong side. No. 1
and
3 or No. 2 and 4 can be interchanged.
Connecting
rod bearings should be replaced as a complete set.
Each
bearing consists of two halves.
Connecting
rod bearing
sets
are available in stand
ard
size and the following undersize:
.001" [0,025 mm.] .012" [0,305 mm.]
.002"
[0,051
mm.] .020" [0,508 mm.] .010"
[0,254
mm.] .030" [0,762 mm.]
The
.001" and .002" undersize bearings are for use
with
standard size crankshafts having slightly
worn
crankpins that do not require grinding. The .012" undersize bearings are for use with slightly
worn
crankshafts that have been previously ground for .010" undersize bearings.
Should
it be necessary to replace the bearings due to wear, replacement of piston rings and piston
pins is also recommended.
NOTE:
Should it be necessary to replace a scored
or
burned No. 1 connecting rod bearing, see Par. D-92 regarding timing gear oil jet.
D-48.
Connecting Rod Bearing Inspection
The
bearing fits may be roughly checked by shaking the connecting rod by hand,
prior
to removal of
the bearing cap, to determine if it is
loose
on the
crankshaft.
The crankpins must be carefully in
spected as detailed previously in Par. D-41.
Worn
crankpins
will
require undersize bearings. Scored,
flaked,
or
worn bearings must be replaced.
D-49.
Installing Connecting Rod Bearings
New bearings must be installed so that the oil
spray
hole
in the upper bearing
half
aligns with
the oil spray
hole
in the connecting rod.
Each
bearing
cap must be installed to seat evenly on the connecting rod from which it was removed, and in
the same position. After wiping and carefully in specting the bearing bore in the connecting rod,
install
the proper bearing. Never file either the
bearing
cap or the bearing to compensate for too
much
clearance. Do not use shims under a bearing
cap or behind a bearing shell. Do not run a new
bearing
half
with a worn half.
The
desired running fit (difference
between
the diameter of the
crankpin
and the inside diameter
of the fitted bearing) for a connecting rod bearing
is .0003" to .0025"
[0,0076
a
0,0635
mm.].
With
a dimension in
excess
of this standard running fit, a 52