check engine JEEP CJ 1953 Manual PDF
[x] Cancel search | Manufacturer: JEEP, Model Year: 1953, Model line: CJ, Model: JEEP CJ 1953Pages: 376, PDF Size: 19.96 MB
Page 127 of 376
'Jeep'
UNIVERSAL
SERIES
SERVICE
MANUAL
E
E-47.
Reassembly
•
Refer to Fig. E-29.
Install
the valve gaskets, valves, valve retainer and
secure them with the valve retainer screws. Make
sure that the inlet and
outlet
valves are in their proper positions. Place the diaphragm spring re
tainer in position on the diaphragm
pull
rod
and
install diaphragm spring. Position the
dia
phragm assembly in pump
body
and attach the
cover to pump body, with file marks aligned, with
the six attaching screws. Do not draw the screws
up tight.
Install
rocker arm spring, rocker arm
pin
washers, rocker arm and rocker arm pin.
With
rocker
arm positioned on the diaphragm rod, draw
the six pump
body
screws up evenly and securely.
Install
the filter screen, cork gasket and sediment
bowl and secure them firmly with the thumb screw
on the bowl clamp.
E-48.
Vacuum
Pump
The
double-action fuel pump resembles two single-
action pumps placed one
above
the other. A single
fuel pump rocker arm actuates the two separate diaphragms. One diaphragm is part of the fuel
delivery pump and operates as described in Par.
E-45.
The other diaphragm is part of the vacuum
pump and operates as described here.
As
the actuating lever forces the diaphragm upward against spring pressure, air is forced through the
outlet
port
into
the
engine's
intake manifold. On
the return stroke, spring pressure forces the
dia
phragm downward, creating a
partial
vacuum and
opening the inlet valve. In this manner, air is pumped out of the windshield wiper motor and
into
the intake manifold. When the wiper motor is shut off, manifold vacuum holds the diaphragm against its spring so that the
full
motion of the actuating
lever is not accompanied by a
complete
up-and-
down motion of the diaphragm.
When
the windshield wiper motor is turned on, but manifold vacuum is greater than the vacuum
created by the
booster
pump, air
flows
from the
wiper motor through both valves of the vacuum
booster.
As manifold vacuum drops off as a result
of the
engine
operating under low
speed
and high load, the vacuum created by the vacuum
booster
will
be greater than
engine
intake manifold vacuum
and
the pump
will
operate the wiper motor when the wiper control switch is turned on.
•
Refer to Fig. E-29. Remove the
eight
cover attaching screws and
lockwashers, and remove the cover, diaphragm
spring
and spring seat. Detach the diaphragm rod
from the rocker arm and remove the diaphragm.
The
valve assemblies are pressed
into
the cover
and
body
and lightly staked. They may be removed
with the point of a knife blade. If installing new valves be sure the inlet and
outlet
valves are
correctly positioned and stake them lightly with
a
small punch.
Assemble the vacuum pump in the reverse order
of disassembly, drawing the cover attaching screws up evenly and tightly.
E-49.
Fuel
Pump
Testing
Four
tests
are presented in following paragraphs to
test
for proper operation of the fuel pump. In addi
tion, check the following:
a.
Check
for secure mounting of the fuel pump.
The
rocker arm may be working the entire pump
up and down, rather than just the pump
dia
phragms.
b. Remove and clean the fuel sediment bowl.
c.
Check
all fuel lines.
E-50.
Volume
Check
To
measure fuel pump capacity (amount of fuel
delivered in a given time) disconnect the pump-to-
carburetor
line at the carburetor end. Place the
open
end of the line in a suitable container.
Start
the
engine
and operate at normal idle speed.
Delivery
should be one quart U.S. [1 ltr.] within
one minute.
E-51.
Pressure
Check
To
measure fuel pump pressure (force of fuel de
livery)
disconnect the pump-to-carburetor line
at the carburetor end. Plug a pressure
gauge
and T-fitting
into
the
open
end of this line and
into
the
carburetor.
Start
the
engine
and operate at normal
idle speed. Pressure should be 2J4 to 3% psi.
[0,716
a
0,264
kg-cm2] at 1800 rpm. and at 16"
[406 mm.]
above
the
outlet.
E-52.
Vacuum
Check
To
measure fuel pump vacuum (pull of. the pump
at the inlet side) disconnect the pump-to-fuel-tank
line at the fuel pump. Attach a vacuum
gauge
to the fuel pump inlet.
Start
the
engine,
accelerate to
specified speed, and hold this
engine
speed
while
taking a
gauge
reading. Permissible
gauge
reading
is 8* [203 mm.] of mercury [Hg] at 1200 rpm. and
10j^'
[267 mm.] at 1800 rpm.
E-53.
Vacuum
Booster
Check
To
test
the condition of the vacuum
booster
pump,
disconnect both inlet and
outlet
lines at the pump.
Attach
a vacuum
gauge
to the windshield wiper
connection at the pump.
Start
the
engine,
accelerate
to
2000
rpm., and hold this
engine
speed
while taking a
gauge
reading. Permissible
gauge
reading
is 10* to 14" [254 a 356 cm.] of mercury [Hg].
E-54.'
FUEL
PUMP
(SINGLE-ACTION)
—
HURRICANE
F4
ENGINE
•
Early
Models.
Vehicles with electric windshield wiper motors are
equipped with a single-action fuel pump (Fig.
E-30).
The fuel pump cam lever is activated by an eccentric on the
engine
camshaft. When the
car
buretor float
needle
valve closes, accumulation of
fuel in the pump
extends
the diaphragm spring.
This
action causes the rocker arm linkage to be
come
inoperative until the pressure on the
dia
phragm and spring is reduced. The fuel pump dis
charge pressure is thus controlled by the diaphragm
spring.
This
provides a steady supply of fuel to the
carburetor
at a fairly constant pressure. 127
Page 128 of 376
E
FUEL
SYSTEM
E-55.
Fuel
Pump
Removal
To
remove the fuel pump from the engine, dis
connect the inlet and
outlet
fuel lines. Remove the two fuel pump body attaching nuts, lock
washers,
and washers, and pull the fuel pump and gasket free of the engine.
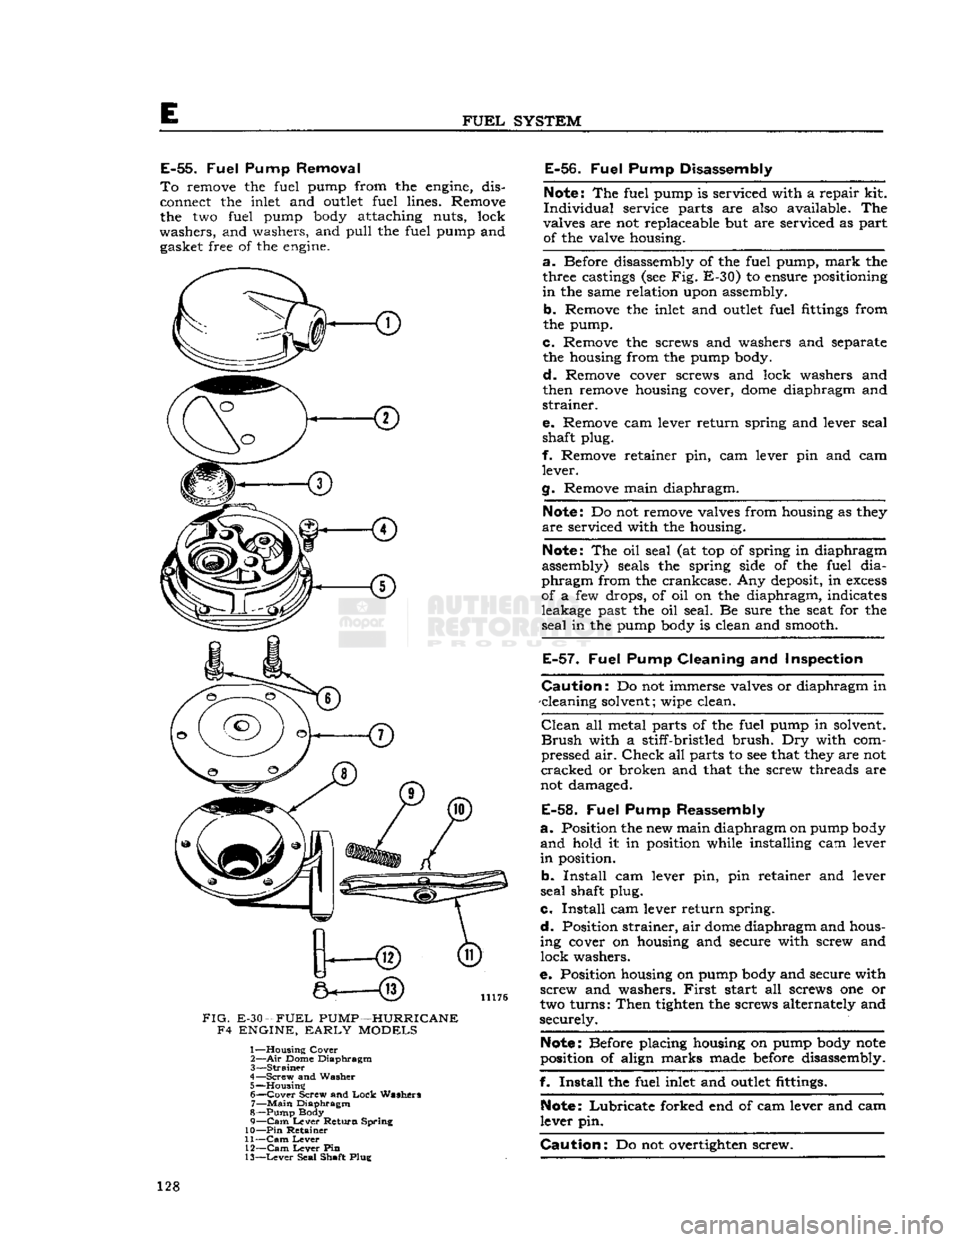
FIG.
E-30
—
FUEL
PUMP—HURRICANE
F4 ENGINE,
EARLY
MODELS
1—
Housing
Cover
2— Air
Dome
Diaphragm
3—
Strainer
4—
Screw
and
Washer
5—
Housing
6—
Cover
Screw
and
Lock
Washers
7—
Main
Diaphragm
8—
Pump
Body
9— Cam
Lever
Return
Spring
10— Pin
Retainer
11— Cam
Lever
12— Cam
Lever
Pin
13—
Lever
Seal
Shaft
Plug
E-56.
Fuel
Pump
Disassembly
Note:
The fuel pump is serviced with a repair kit.
Individual
service parts are also available. The
valves are not replaceable but are serviced as part of the valve housing.
a.
Before disassembly of the fuel pump,
mark
the
three castings (see Fig. E-30) to ensure positioning
in
the same relation upon assembly. b. Remove the inlet and
outlet
fuel fittings from
the pump.
c. Remove the screws and washers and separate the housing from the pump body.
d.
Remove cover screws and lock washers and
then remove housing cover,
dome
diaphragm and
strainer.
e.
Remove cam lever return spring and lever seal
shaft plug.
f. Remove retainer pin, cam lever pin and cam
lever.
g. Remove main diaphragm.
Note:
Do not remove valves from housing as they
are
serviced with the housing.
Note:
The oil seal (at top of spring in diaphragm
assembly) seals the spring side of the fuel
dia
phragm
from the crankcase. Any deposit, in
excess
of a few drops, of oil on the diaphragm, indicates
leakage past the oil seal. Be sure the seat for the
seal
in the pump body is clean and smooth.
E-57.
Fuel
Pump
Cleaning
and
Inspection
Caution:
Do not immerse valves or diaphragm in
-cleaning solvent; wipe clean.
Clean
all metal parts of the fuel pump in solvent.
Brush
with a stiff-bristled brush. Dry with com
pressed air.
Check
all parts to see that they are not
cracked
or broken and that the screw threads are
not damaged.
E-58.
Fuel
Pump
Reassembly
a.
Position the new main diaphragm on pump body
and
hold it in position while installing cam lever
in
position.
b.
Install
cam lever pin, pin retainer and lever
seal
shaft plug.
c.
Install
cam lever return spring.
d.
Position strainer, air
dome
diaphragm and hous
ing cover on housing and secure with screw and
lock
washers.
e.
Position housing on pump body and secure with screw and washers.
First
start all screws one or
two turns:
Then
tighten the screws alternately and
securely.
Note:
Before placing housing on pump body
note
position of align marks made before disassembly.
f.
Install
the fuel inlet and
outlet
fittings.
Note:
Lubricate
forked end of cam lever and cam
lever pin.
Caution:
Do not overtighten screw. 128
Page 130 of 376
E
FUEL
SYSTEM
taching screws and valve housing from the fuel
pump body.
c.
Remove the two screws in the valve housing
and
separate the filter cover and air
dome
dia
phragm.
d.
Remove the cam lever return spring, plug,
cam
lever pin, and cam lever from the pump body.
Tap
the cam lever pin out of body, using a drift
inserted through the small
hole
in the pump body.
e. Remove diaphragm from pump body.
f. Under normal service, the pump may be cleaned without further disassembly.
Note:
The oil seal (at top of spring in diaphragm
assembly) seals the spring side of the fuel
dia
phragm
from the crankcase. Any deposit, in
excess
of a few drops, of oil on the diaphragm indicates leakage past the oil seal. Be sure the seat for the
seal
in the pump body is clean and smooth.
E-63.
Fuel
Pump Cleaning and Inspection
Caution:
Do not immerse valves or diaphragm
in
cleaning solvent; wipe clean.
Clean
all metal parts of the fuel pump in solvent.
Brush
with a stiff-bristled
brush.
Dry with com
pressed
air.
Check
all parts to see that they are not
cracked
or broken and that the screw threads are
not damaged.
E-64.
Fuel
Pump Reassembly
•
Refer to Fig. E-32.
a.
Assemble the valve housing and filter cover, using a new air
dome
diaphragm. The opening
in
the air
dome
diaphragm is located over the
intake
valve. The filter cover is positioned cor
rectly
when the inlet passage in the cover aligns
with
the inlet valve. Tighten the attaching screws
alternately and securely.
b.
Lubricate
diaphragm assembly shaft, around
oil
seal, with
engine
oil. Position diaphragm as sembly on valve housing and thread all the attach ing screws through diaphragm.
(This
helps avoid
damage to the screw
holes
in diaphragm.)
c.
Place diaphragm assembly and valve housing
in
position on pump body (align marks made
before disassembly).
First
start all screws one
or
two threads; then tighten the screws alternately
and
securely.
d.
Lubricate
forked end of cam lever, pin bore
of body, and corresponding
hole
in lever, and the
pin
itself with
engine
oil.
Note:
Forked
end of lever
goes
around diaphragm
shaft. Be sure
loose
bumper washer on diaphragm shaft is on top of lever and
between
lever and fixed
washer
on shaft.
e.
Install
lever and pin. To install pin, use a drift
and
tap pin into the
hole
in the body until it hits
the
stop
on the
bottom
of the hole;
move
the lever while tapping, to align
hole
in lever with the pin;
then install plug.
Install
lever return spring.
f.
Install
a new filter bowl gasket in filter cover.
Place
bail
assembly in ears on cover and swing
to one side.
Install
spring and new filter element in
bowl and install bowl on pump. Position
bail
as
sembly under bowl; tighten retainer screw.
Caution:
Do not overtighten screw.
E-65.
Fuel
Pump Installation
a.
Make certain mating surfaces of fuel pump and
engine
cylinder case are clean. Cement a new gasket to mounting flange of fuel pump.
b.
Position fuel pump on cylinder block, so that
cam
lever of pump rests on fuel pump cam of cam
shaft. Secure pump to block with two cap screws
and
lock washers. Torque
bolts
13 to 17 lb-ft. [1,8
a
2,3 kg-m.].
c.
Connect intake and
outlet
fuel lines to fuel
pump.
E-66.
Fuel
Pump Testing
Whenever
the fuel pump is to be checked for pres
sure
or volume, follow the procedure outline in
Par.
C-23 of this manual.
Fuel
pump pressure is
important
for low pressure
will
seriously affect en
gine
operation and high pressure can cause exces
sive fuel consumption and flooding of the carbure
tor.
Should there be any doubt of normal opera
tion, check the procedure as outlined in Par. C-23.
In
addition to proper fuel pressure, volume of the
pump is also important. When testing for proper
pump pressure, be certain to also
test
for volume
as the pump may build up sufficient pressure, but
fail
to produce sufficient volume.
E-67. FUEL
PUMP
—
DAUNTLESS
V-6
ENGINE
Jeep vehicles equipped with the Dauntless V6-225
engine
have a special fuel pump which has a metering
outlet
for a vapor return system. Any
vapor
which forms is returned to the fuel tank
along with hot fuel through a separate line along
side the fuel supply line.
This
greatly reduces any
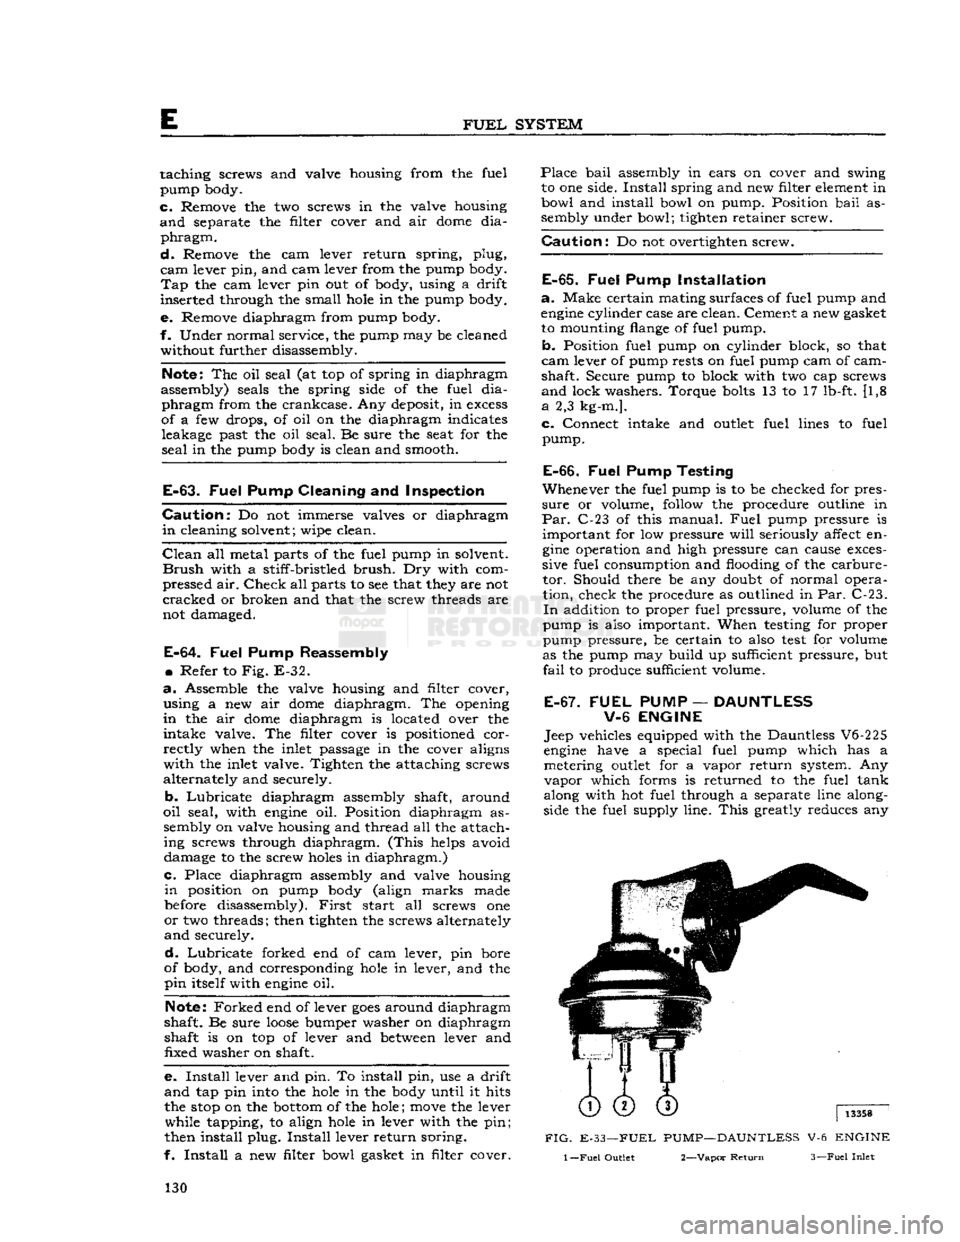
FIG.
E-33—FUEL PUMP—DAUNTLESS V-6 ENGINE
1
—Fuel
Outlet 2—Vapor
Return
3—Fuel
Inlet
130
Page 133 of 376
'Jeep'
UNIVERSAL
SERIES
SERVICE
MANUAL
E
portant that
these
lines are not accidentally re
versed.
When
installing the fuel tank on late model vehicles, position the tank
between
the frame
rail
to allow space to connect the fuel line(s), vent
hose
and
sending unit wire. After connecting
these
items, align and secure tank to frame brackets.
Position filler
hose
on tank filler neck and tighten
hose
clamp.
Fill
tank with fuel and check for leaks.
When
installing the fuel tank on early model vehicles, reverse the order of removal as given in
Par.
E-73.
E-75.
Fuel
Tank
Cap
A
surge pressure type fuel tank filler cap is used on
all
models.
This
is necessary to prevent fuel leakage
from
the cap vent opening when the vehicle is on a
side slope. Two spring loaded relief valves which
open when venting is required are built into the
cap.
Should the pressure valve
fail
to open, pressure
in
the tank may force fuel by the carburetor inlet
valve causing flooding.
Failure
of the vacuum valve may prevent flow of fuel to the carburetor. Should
the valves
fail
to vent install a new cap.
Note:
Vehicles having a
Fuel
Evaporative
Emis
sion System are equipped with a non-vent sealed gas cap. The sealed cap is designed to allow no
vapors to discharge to the atmosphere. No other type of cap is to be used on vehicles having this
type system.
E-76.
Fuel
Gauge Float Unit
The
fuel tank
gauge
float unit is mounted in the top
of the fuel tank and consists of a housing enclosing
a
rheostat that is actuated by the float arm, and a
float
which
moves
with the fuel level in the tank.
On
V-6 and current production F4
engine
equipped vehicles, the fuel
outlet
pipe is integral with the
float
unit.
The fuel
outlet
pipe has a mesh filter on the inner end.
Note:
Under no circumstances should a fuel tank
gauge
be installed without a mesh filter element.
The
filter,
outlet
pipe, and float unit are locked as
an
assembly to the top of the fuel tank. To remove,
turn
the lock plate that secures the float unit
assembly.
E-77.
Fuel
Lines
Check
lines and connections occasionally for leaks,
and
for severe kinks that might restrict the flow of
fuel. If an excessive amount of
dirt
is found in the
carburetor
or fuel pump, the fuel tank should be
drained
and the fuel lines blown out with com
pressed air.
All
rubber fuel lines and their respective clamps should be checked occasionally to be certain they
are
correctly positioned and not leaking. 133
Page 134 of 376
E
FUEL
SYSTEM
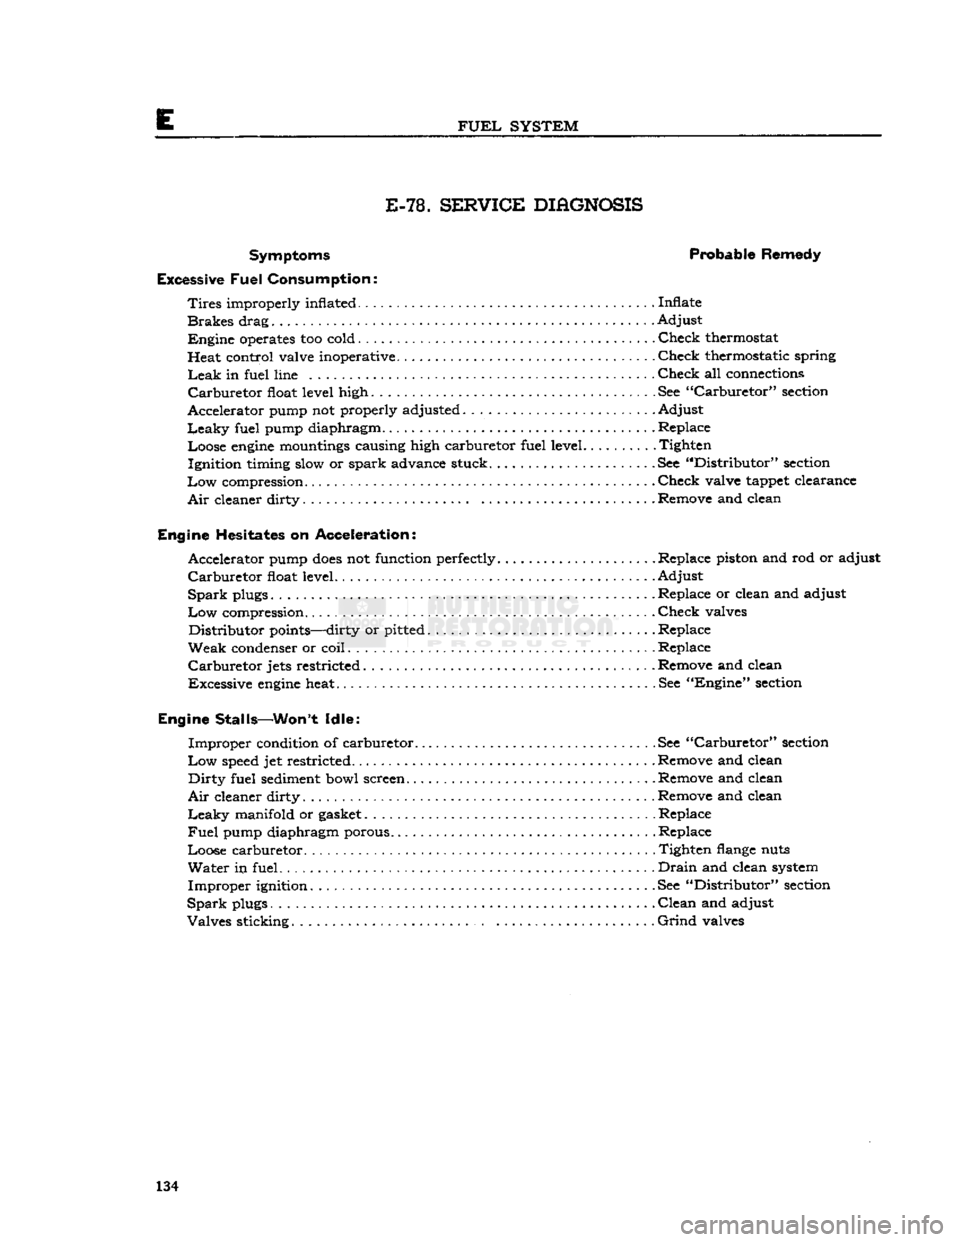
E-78. SERVICE DIHGNOSIS
Symptoms Probable Remedy
Excessive
Fuel
Consumption:
Tires
improperly inflated Inflate
Brakes
drag Adjust
Engine
operates too cold Check thermostat
Heat control valve inoperative Check thermostatic spring
Leak
in fuel line Check all connections
Carburetor
float level high. See
"Carburetor"
section
Accelerator pump not properly adjusted Adjust
Leaky
fuel pump diaphragm Replace
Loose
engine
mountings causing high carburetor fuel level Tighten Ignition timing slow or spark advance stuck See "Distributor" section
Low
compression. Check valve tappet clearance
Air
cleaner dirty
.
Remove and clean
Engine
Hesitates on Acceleration: Accelerator pump
does
not function perfectly.
...................
.Replace piston and rod or adjust
Carburetor
float level. ... .Adjust
Spark
plugs Replace or clean and adjust
Low
compression Check valves
Distributor
points—dirty or pitted Replace
Weak
condenser or coil Replace
Carburetor
jets restricted Remove and clean
Excessive
engine
heat See "Engine" section
Engine
Stalls—Won't Idle:
Improper
condition of carburetor See
"Carburetor"
section
Low
speed
jet restricted Remove and clean
Dirty
fuel sediment bowl screen Remove and clean
Air
cleaner dirty Remove and clean
Leaky
manifold or gasket Replace
Fuel
pump diaphragm porous. Replace
Loose carburetor. Tighten
flange
nuts
Water
in fuel
Drain
and clean system
Improper
ignition. .See "Distributor" section
Spark
plugs Clean and adjust
Valves
sticking.
Grind
valves 134
Page 139 of 376
'Jeep'
UNIVERSAL
SERIES
SERVICE
MANUAL
©
1
1
©-
IT
T"
I
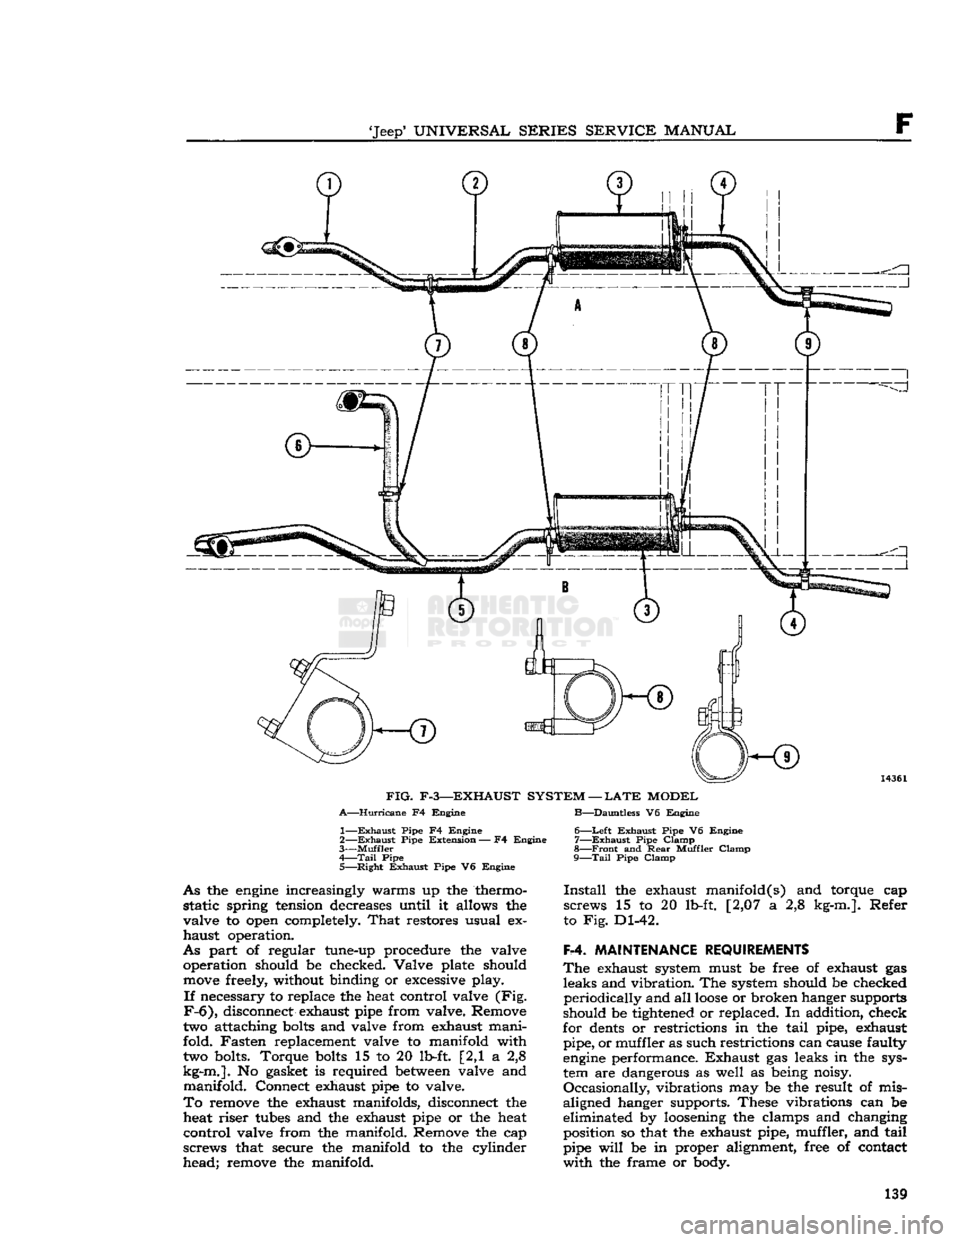
FIG.
F-3—EXHAUST SYSTEM —
LATE
MODEL
A—Hurricane
F4 Engine B—Dauntless V6 Engine
1—
Exhaust
Pipe F4 Engine
2—
Exhaust
Pipe
Extension
— F4 Engine
3—
Muffler
4—
Tail
Pipe
5—
Right
Exhaust
Pipe V6 Engine
As
the
engine
increasingly warms up the thermo static spring tension decreases until it allows the
valve to open completely.
That
restores usual ex haust operation.
As
part of regular tune-up procedure the valve operation should be checked. Valve plate should
move
freely, without binding or excessive play.
If
necessary to replace the heat control valve (Fig.
F-6),
disconnect exhaust pipe from valve. Remove
two attaching
bolts
and valve from exhaust mani
fold. Fasten replacement valve to manifold with two bolts. Torque
bolts
15 to 20 lb-ft [2,1 a 2,8
kg-m.].
No gasket is required
between
valve and manifold. Connect exhaust pipe to valve.
To
remove the exhaust manifolds, disconnect the heat riser
tubes
and the exhaust pipe or the heat
control valve from the manifold. Remove the cap screws that secure the manifold to the cylinder
head; remove the manifold. 6—
Left
Exhaust
Pipe V6 Engine
7—
Exhaust
Pipe
Clamp
8—
Front
and
Rear
Muffler
Clamp
9—
Tail
Pipe
Clamp
Install
the exhaust manifold(s) and torque cap
screws 15 to 20 lb-ft. [2,07 a 2,8 kg-m.]. Refer
to Fig. Dl-42.
F-4.
MAINTENANCE REQUIREMENTS
The
exhaust system must be free of exhaust gas leaks and vibration. The system should be checked periodically and all
loose
or broken hanger supports
should be tightened or replaced. In addition, check
for
dents
or restrictions in the tail pipe, exhaust pipe, or muffler as such restrictions can cause faulty
engine
performance. Exhaust gas leaks in the sys
tem are dangerous as well as being noisy.
Occasionally,
vibrations may be the result of mis
aligned hanger supports. These vibrations can be
eliminated by loosening the clamps and changing position so that the exhaust pipe, muffler, and tail
pipe
will
be in proper alignment, free of contact
with
the frame or body. 139
Page 141 of 376

'Jeep'
UNIVERSAL
SERIES
SERVICE
MANUAL
F F-8.
Exhaust
Pipe Replacement
When
replacing the exhaust pipe(s) refer to
Figs.
Fl,
F2 and
F-3.
Remove the nuts securing the ex
haust pipe(s) to the exhaust manifold(s), loosen
and
disconnect mounting
clamp
(s)
as necessary, loosen clamp securing exhaust pipe to muffler and
remove exhaust pipe(s).
Note: Always use new gasket(s) between exhaust
pipe(s) and exhaust manifold(s). After installation
of exhaust pipe(s), check the exhaust system for
alignment and leaks.
F-9.
Muffler Removal and Replacement
Disconnect the support bracket and clamps on each
side of the muffler. Loosen the
tail
pipe support
clamp
bolt and
pull
the
tail
pipe to the
rear
until
it
is free of the muffler. Remove the muffler. To
install
the muffler, reverse the above
steps
and
properly
align the complete system, then tighten
connecting support brackets securely. Operate the engine and check for possible leaks.
F-10.
Tail
Pipe Removal and Replacement
Refer
to
Figs.
F-l,
F-2 and
F-3.
Disconnect the support bracket and clamps both at the
rear
of the muffler and also at outlet end of
the
tail
pipe.
Free
the
tail
pipe from the muffler. To
assemble, position
tail
pipe to the muffler and secure clamps, being careful to align the exhaust
system so it doesn't contact body or frame.
Check
system for exhaust gas leaks.
F-ll.
EXHAUST SYSTEM SPECIFICATIONS
EARLY
MODEL
HURRICANE
F4
ENGINE
EARLY
MODEL
DAUNTLESS
V-6
ENGINE
TYPE:
Muffler:
Type
Exhaust
Pipe:
Wall
Thickness
Tail
Pipe:
Crossover
Pipe
Diameter
Single
Reverse
Flow
1.625*
[4,13 cm.] .065* [1,6 ram.]
1.625*
[4,13 cm.] Single
With
Cross-Over
Reverse
Flow
2.00* [5,08 cm.] .065* [1,6 mm.]
2.00* [5,08 cm.]
2.00* [5,08 cm.] .065* [1,6 mm.]
Wall
Thickness Single
With
Cross-Over
Reverse
Flow
2.00* [5,08 cm.] .065* [1,6 mm.]
2.00* [5,08 cm.]
2.00* [5,08 cm.] .065* [1,6 mm.]
LATE
MODEL
HURRICANE
F4
ENGINE
LATE
MODEL
DAUNTLESS
V6
ENGINE
TYPE:
Muffler:
Exhaust
Pipe:
Wall
Thickness
Exhaust
Pipe Extension:
Wall
Thickness
Crossover
Pipe: Single
Reverse
Flow
2.005* [5,09 cm.]
1.755*
[4,46 cm.]
1.625*
[4,13 cm.]
.065* [1,6 mm.]
1.629*
[4,14 cm.] 2.00* [5,08 cm.] .065* [1,6 mm.] Single with
Cross-Over
Reverse
Flow
2.005* [5,09 cm.]
1.755*
[4,46 cm.]
2.00* [5,08 cm.] .065* [1,6 mm.]
2.00* [5,08 cm.] .065* [1,6 mm.]
1.753*
[4,45 cm 1
Wall
Thickness
Tail
Pipe
1.753*
[4,45 cm.] Single with
Cross-Over
Reverse
Flow
2.005* [5,09 cm.]
1.755*
[4,46 cm.]
2.00* [5,08 cm.] .065* [1,6 mm.]
2.00* [5,08 cm.] .065* [1,6 mm.]
1.753*
[4,45 cm 1 141
Page 143 of 376
'Jeep'
UNIVERSAL SERIES SERVICE
MANUAL
Fl
EXHHUST
EMISSION
CONTROL
SYSTEM
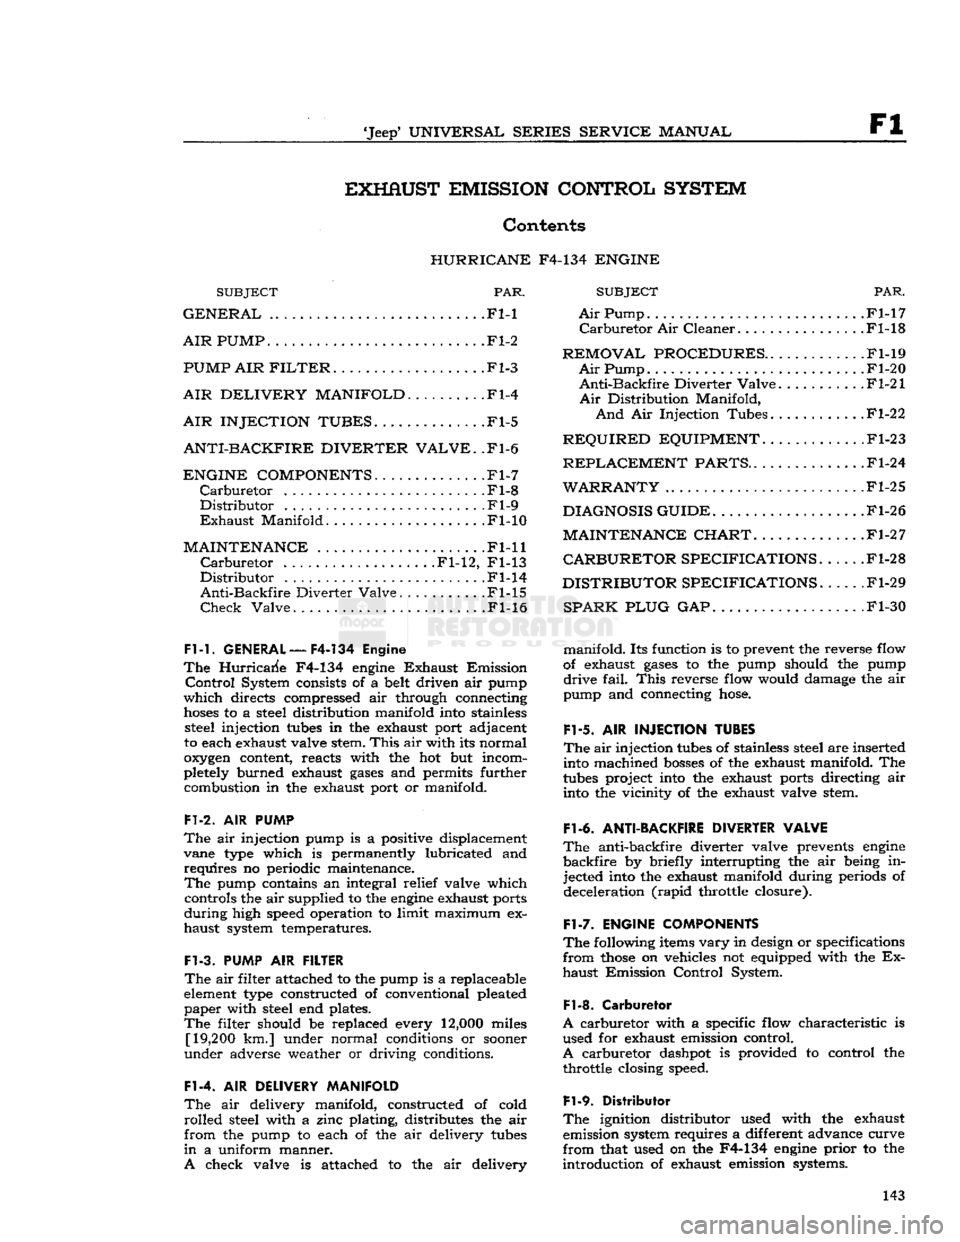
Contents
HURRICANE
F4-134
ENGINE
SUBJECT
PAR.
GENERAL
Fl-1
AIR
PUMP
Fl-2
PUMP
AIR
FILTER
Fl-3
AIR
DELIVERY
MANIFOLD
Fl-4
AIR INJECTION TUBES.
Fl-5
ANTI-BACKFIRE
DIVERTER
VALVE.
.Fl-6
ENGINE
COMPONENTS
. .Fl-7
Carburetor
. .Fl-8
Distributor
........
.Fl-9
Exhaust
Manifold Fl-10
MAINTENANCE
Fl-11
Carburetor
Fl-12,
Fl-13
Distributor
Fl-14
Anti-Backfire
Diverter
Valve.
.........
.Fl-15
Check
Valve Fl-16
Fl-1. GENERAL—F4-134
Engine
The
Hurricane
F4-134
engine
Exhaust
Emission
Control
System consists of a belt driven air pump
which
directs compressed air through connecting
hoses
to a steel distribution manifold into stainless steel injection
tubes
in the exhaust port adjacent
to each exhaust valve stem.
This
air with its normal
oxygen
content, reacts with the hot but incom
pletely burned exhaust
gases
and permits further combustion in the exhaust port or manifold.
Fl-2. AIR
PUMP
The
air injection pump is a positive displacement
vane type which is permanently lubricated and
requires
no periodic maintenance.
The
pump contains an integral relief valve which controls the air supplied to the
engine
exhaust ports
during
high speed operation to limit maximum ex
haust system temperatures.
Fl-3. PUMP
AIR
FILTER
The
air filter attached to the pump is a replaceable
element type constructed of conventional pleated
paper
with steel end plates.
The
filter should be replaced every
12,000
miles
[19,200
km.] under normal conditions or sooner
under
adverse weather or driving conditions.
Fl-4.
AIR
DELIVERY
MANIFOLD
The
air delivery manifold, constructed of cold
rolled
steel with a zinc plating, distributes the air
from
the pump to each of the air delivery
tubes
in
a uniform manner.
A
check valve is attached to the air delivery
SUBJECT
PAR.
Air
Pump Fl-17
Carburetor
Air Cleaner Fl-18
REMOVAL PROCEDURES
.Fl-19
Air
Pump
Fl-20
Anti-Backfire
Diverter Valve Fl-21
Air
Distribution Manifold,
And
Air Injection Tubes
Fl-22
REQUIRED
EQUIPMENT
.Fl-23
REPLACEMENT
PARTS
Fl-24
WARRANTY
Fl-25
DIAGNOSIS
GUIDE
Fl-26
MAINTENANCE CHART
Fl-27
CARBURETOR SPECIFICATIONS
Fl-28
DISTRIBUTOR SPECIFICATIONS
Fl-29
SPARK PLUG
GAP
.Fl-30
manifold.
Its function is to prevent the reverse flow
of exhaust
gases
to the pump should the pump
drive
fail.
This
reverse flow would damage the air
pump and connecting
hose.
Fl-5.
AIR
INJECTION
TUBES
The
air injection
tubes
of stainless steel are inserted
into machined
bosses
of the exhaust manifold. The
tubes
project into the exhaust ports directing air
into the vicinity of the exhaust valve stem.
Fl-6.
ANTI-BACKFIRE DIVERTER VALVE
The
anti-backfire diverter valve prevents
engine
backfire
by briefly interrupting the air being in
jected into the exhaust manifold during periods of deceleration (rapid throttle closure).
Fl-7.
ENGINE
COMPONENTS
The
following items
vary
in design or specifications
from
those
on vehicles not equipped with the Ex
haust Emission
Control
System.
Fl-8.
Carburetor
A
carburetor with a specific flow characteristic is used for exhaust emission control.
A
carburetor dashpot is provided to control the throttle closing speed.
Fl-t.
Distributor
The
ignition distributor used with the exhaust emission system requires a different advance curve
from
that used on the F4-134
engine
prior
to the
introduction of exhaust emission systems. 143
Page 144 of 376
Fl
EXHAUST EMISSION CONTROL SYSTEMS
12793
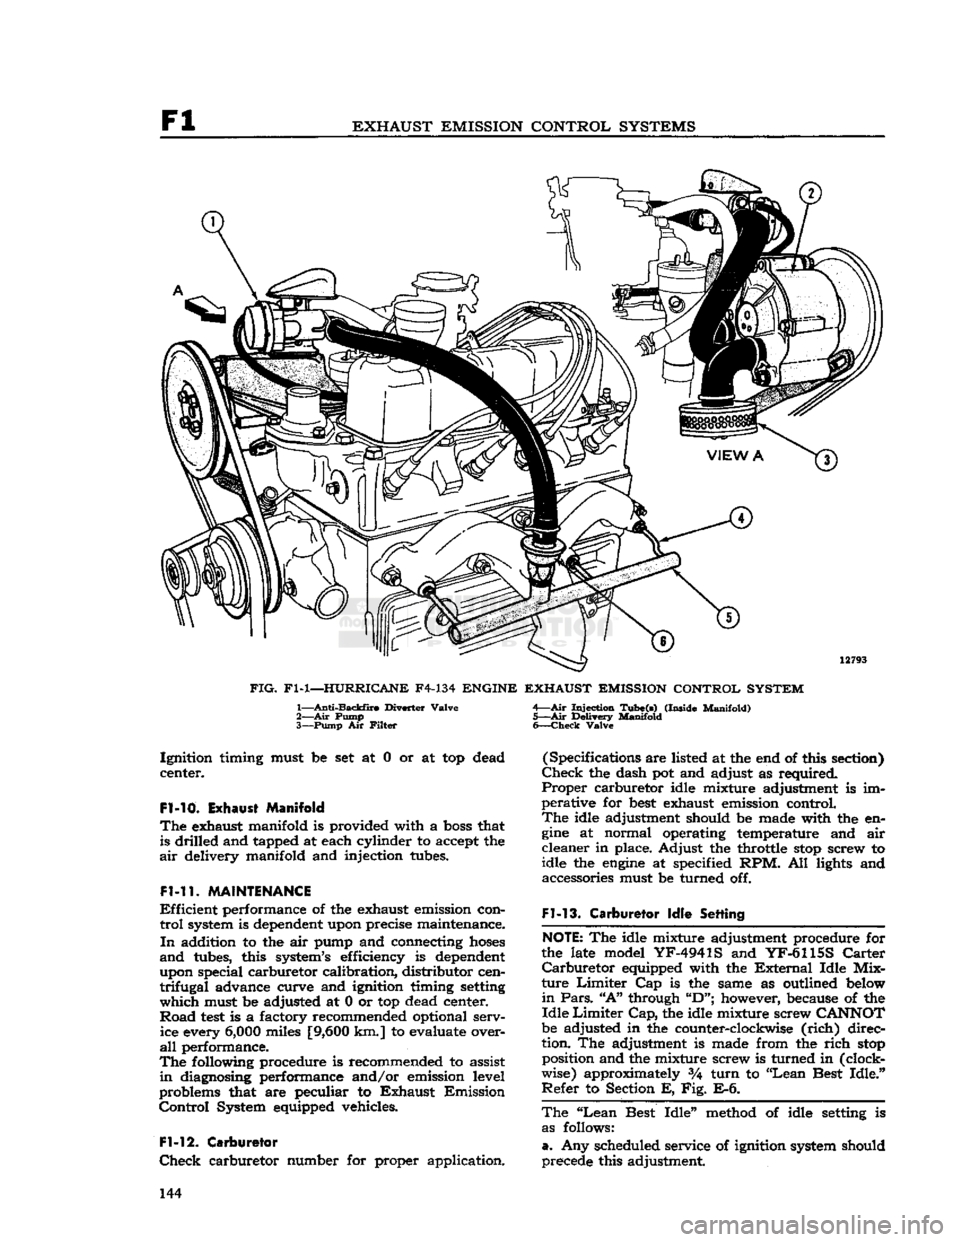
FIG.
Fl-1—HURRICANE
F4-134
ENGINE EXHAUST EMISSION CONTROL SYSTEM
1—
Anti-Backfire
Diverter
Valve
2— Air
Pump
3—
Pump
Air
Filter
Injection
Tube(s)
(Inside
Manifold)
5—Air
Delivery
Manifold
6—
Check
Valve
Ignition
timing must be set at 0 or at top dead
center.
Fl-10.
Exhaust Manifold
The
exhaust manifold is provided with a
boss
that is drilled and tapped at each cylinder to accept the
air
delivery manifold and injection tubes.
Fl-11.
MAINTENANCE
Efficient
performance of the exhaust emission con
trol
system is dependent upon precise maintenance.
In
addition to the air pump and connecting
hoses
and
tubes, this system's efficiency is dependent
upon special carburetor calibration, distributor cen
trifugal
advance curve and ignition timing setting
which
must be adjusted at 0 or top dead center.
Road
test
is a factory recommended optional serv ice every
6,000
miles
[9,600
km.] to evaluate over
all
performance.
The
following procedure is recommended to assist
in
diagnosing performance and/or emission level
problems that are peculiar to
Exhaust
Emission
Control
System equipped vehicles.
Fl-12.
Carburetor
Check
carburetor number for proper application. (Specifications are listed at the end of this section)
Check
the dash pot and adjust as required.
Proper
carburetor idle mixture adjustment is im
perative for
best
exhaust emission control.
The
idle adjustment should be made with the en
gine
at normal operating temperature and air
cleaner
in place. Adjust the throttle
stop
screw to
idle the
engine
at specified RPM. All lights and accessories must be turned off.
Fl-13.
Carburetor
Idle
Setting
NOTE:
The idle mixture adjustment procedure for
the late model
YF-4941S
and
YF-6115S
Carter
Carburetor
equipped with the
External
Idle
Mix
ture
Limiter
Cap is the same as outlined below
in
Pars.
"A"
through
"D";
however, because of the
Idle
Limiter
Cap,
the idle mixture screw
CANNOT
be adjusted in the counter-clockwise
(rich)
direc
tion. The adjustment is made from the
rich
stop
position and the mixture screw is turned in (clock
wise) approximately %
turn
to "Lean Best
Idle."
Refer
to Section E, Fig. E-6.
The
"Lean
Best
Idle"
method of idle setting is as follows:
a.
Any scheduled service of ignition system should
precede this adjustment. 144
Page 145 of 376
'Jeep'
UNIVERSAL
SERIES SERVICE
MANUAL
Fl
b. Connect tachometer to
engine.
c.
Warm
up
engine
and stabilize temperatures.
d.
Adjust
engine
idle to
speed
desired, using throt
tle idle
speed
adjusting screw.
e.
Carburetors without Idle
Limiter
Cap turn idle mixture screws out (counterclockwise) until a
loss
of
engine
speed
is indicated; then, slowly turn mix
ture screw in (clockwise-leaner) until maximum
speed
(RPM) is reached. Continue turning in (clockwise) until
speed
begins
to drop; turn mixture
adjustment back out (counterclockwise-richer) un
til
maximum
speed
is just regained at a "lean as
possible" mixture adjustment.
Fl-14.
Distributor
Check
the distributor number for proper appli
cation.
Check
the distributor cam dwell angle and
point condition and adjust to specifications or re place as required. (Specifications listed at the end
of this section)
Check
ignition timing and set at
0°
or
TDC.
Fl-15.
Anti-iackfire
Diverter Valve
The
anti-backfire valve remains closed
except
when
the throttle is closed rapidly from an
open
position.
To
check the valve for proper operation, accelerate
the
engine
in neutral, allowing the throttle to
close
rapidly.
The valve is operating satisfactorily when
no exhaust system backfire occurs. A further check
to determine whether the valve is functioning can be made by removing from the anti-backfire valve
the large
hose
Which
connects to the check valve.
Accelerate the
engine
to allow the throttle to
close
rapidly.
The valve is operating satisfactorily if a
momentary interruption of rushing air is audible.
Fl-16.
Check Valve
The
check valve prevents the reverse flow of ex
haust
gases
to the pump in the
event
the pump
should, for any reason,
become
inoperative or should exhaust pressure ever
exceed
pump pressure.
To
check this valve for proper operation, remove the air supply
hose
from the pump at the
distri
bution manifold.
With
the
engine
running, listen for exhaust leakage at the check valve which is
connected to the distribution manifold.
Fl-17.
Air
Pump
Check
for proper drive belt tension with belt tension
gauge
W-283. The belt strand tension should be
50-60
pounds on a belt with previous service, meas
ured
on the
longest
accessible span
between
two pulleys. When installing a new belt, adjust the
tension to
60-80
pounds tension. DO NOT PRY
ON
THE DIE
CAST
PUMP
HOUSING.
To
check the pump for proper operation, remove the air
outlet
hose
at the pump.
With
the
engine
running,
air discharge should be
felt
at the pump
outlet
opening. The pump
outlet
air pressure, as determined by the relief valve, is preset and is not
adjustable.
The
air pump
rear
cover assembly, housing the pressed in inlet and discharge tubes, and the pres
sure relief valve are the only pump
components
recommended for service replacement. These parts
are
to be replaced only when damaged as a result
of handling or in the
event
the relief valve was
tampered with.
Fl-18.
Carburetor
Air
Cleaner
Every
6000
miles
[9,600
km.] clean the inside
sur
face at the sump and
refill
to indicated oil level with
SAE
40 or 50
engine
oil
above
32 F; SAE 20
below
32 F. Wash filter
element
in kerosene and
drain.
Reassemble the air cleaner.
More
frequent cleaning and replacement is advis able when the car is operated in dusty areas or on
unpaved roads. Accumulated dirt restricts air flow,
reducing fuel
economy
and performance.
Fl-19.
REMOVAL
PROCEDURES
The
following paragraphs
give
the procedures for removing the major units of the Exhaust Emission
Control
System and the required equipment
needed.
Fl-20.
Air
Pump
Loosen
the air pump adjusting strap to facilitate
drive
belt removal. Remove the air pump air dis
charge hose(s) and air filter attachment. Separate
the air pump from its mounting bracket. At time of installation, torque tighten the air pump mounting
bolts
to
30-40
lbs-ft. [4,15 a 5,53 kg-m.]. Adjust
the belt strand tension to
50-60
pounds on a belt
with previous service and
60-80
pounds on a new
belt.
Fl-21.
Anti-Backfire
Diverter Valve
The
anti-backfire diverter valve removal requires disconnecting the
hoses
and bracket to
engine
at
taching screws.
Fl-22.
Air
Distribution
Manifold
and
Injection Tubes
In
order to remove the air distribution manifold
without bending the tubing, which could result in
fractures
or leakage, it is necessary to remove the
exhaust manifold as an assembly from the
engine.
After
the exhaust manifold assembly is removed
from
the
engine,
place the manifold in a vise and
loosen
the air distribution manifold
tube
retaining nuts at each cylinder exhaust port. Tap the injec
tion
tubes
lightly to allow the air distribution mani
fold to be pulled away partially from the exhaust manifold. The stainless steel injection
tubes
in the
exhaust manifold may have
become
partially fused
to the air distribution manifold and, therefore, may
require
application of heat to the joint in order to
separate. While applying heat to the joint, rotate
the injection
tubes
with pliers being careful not to
damage the
tubes
by applying excessive force.
At
time of installation, the air injection
tubes
must
be positioned into the exhaust manifold prior to
placing the exhaust manifold assembly on the en gine.
Note:
Two different length injection
tubes
are used.
The
shorter length injection
tubes
must be inserted into cylinders 1 and 4. 145