uconnect system JEEP COMPASS 2020 Owner handbook (in English)
[x] Cancel search | Manufacturer: JEEP, Model Year: 2020, Model line: COMPASS, Model: JEEP COMPASS 2020Pages: 328, PDF Size: 8.85 MB
Page 12 of 328
10
DEALER SERVICE ................................ 227
Air Conditioner Maintenance.......... 227
Wiper Blades ............................... 228
Exhaust System ........................... 228
Cooling System ............................ 229
Brake System .............................. 230
Manual Transmission — If
Equipped ..................................... 231 Automatic Transmission ................ 231
RAISING THE VEHICLE .......................... 232TIRES ................................................. 232
Tires — General Information ......... 232
Tire Types .................................... 236
Spare Tires — If Equipped ............ 237
Tire Chains (Traction Devices) ....... 239
Tire Rotation Recommendations .... 239
STORING THE VEHICLE ......................... 240
BODYWORK ......................................... 241
Preserving The Bodywork ............... 241
INTERIORS ......................................... 242
Seats And Fabric Parts .................. 242
Plastic And Coated Parts ............... 243
Leather Parts ............................... 243
Glass Surfaces ............................ 243
TECHNICAL SPECIFICATIONS
IDENTIFICATION DATA .......................... 244
Vehicle Identification Number ....... 244
WHEEL AND TIRE TORQUE
SPECIFICATIONS ..................................244
Torque Specifications ................... 244
DIMENSIONS .......................................245
WHEELS ..............................................247
WEIGHTS ............................................249
FUEL REQUIREMENTS — GASOLINE
ENGINE ...............................................250
1.4L Turbo Gasoline Engine .......... 250
Ethanol ....................................... 250
Materials Added To Fuel ............... 250
Gasoline/Oxygenate Blends............ 250
Fuel Icon Identification Compliant To
EN16942 .................................... 251 Fuel System Cautions ................... 252
Carbon Monoxide Warnings ........... 252
FUEL REQUIREMENTS — DIESEL
ENGINE ..............................................252
Diesel Engine .............................. 252
Fuel Icon Identification Compliant To
EN16942 .................................... 253
FLUID CAPACITIES ..............................254 FLUIDS AND LUBRICANTS .....................255
Engine ........................................ 255
Chassis ...................................... 259
FUEL CONSUMPTION AND CO2
EMISSIONS ........................................260 MOPAR ACCESSORIES .........................260
Authentic Accessories By Mopar .... 260
MULTIMEDIA
UCONNECT SYSTEMS ...........................262
CYBERSECURITY .................................262
UCONNECT 3 WITH 5–INCH DISPLAY — IF
EQUIPPED............................................263
Uconnect 3 With 5–inch Display At A
Glance .........................................263 Clock Setting ...............................263
Audio Setting ...............................263
Radio Operation ...........................264
USB/Audio Jack (AUX)/Bluetooth®
Operation .....................................265 Voice Text Reply (Not Compatible With
iPhone®) ....................................266 Apps — If Equipped......................267
UCONNECT 4 WITH 7-INCH DISPLAY ....267
Uconnect 4 At A Glance ...............267
Drag & Drop Menu Bar .................268
Radio ..........................................269
Media Hub — USB/Audio Jack (AUX) —
If Equipped ..................................270 Android Auto™ — If Equipped .......271
Apple CarPlay® Integration — If
Equipped .....................................272 Apps — If Equipped......................273
2020_JEEP_M6_UG_UK.book Page 10
Page 13 of 328
11
UCONNECT 4C/4C NAV WITH 8.4–INCH
DISPLAY ............................................. 274
Uconnect 4C/4C NAV At A
Glance ........................................ 274 Drag & Drop Menu Bar .................. 275
Radio .......................................... 275
Media Hub — USB/Audio Jack (AUX) —
If Equipped.................................. 276 Android Auto™ — If Equipped ...... 278
Apple CarPlay® Integration — If
Equipped ..................................... 282 Apps — If Equipped ..................... 284
UCONNECT SETTINGS .......................... 284STEERING WHEEL AUDIO CONTROLS ..... 285
Radio Operation ........................... 285
Media Mode ................................. 285
NAVIGATION — IF EQUIPPED ................ 285
Changing The Navigation Voice Prompt
Volume ........................................ 285 Finding Points Of Interest.............. 286
Finding A Place By Spelling The
Name .......................................... 286 One-Step Voice Destination Entry ... 286
Setting Your Home Location .......... 286
Home .......................................... 287
Adding A Stop .............................. 287
Taking A Detour ........................... 287
Map Update ................................. 287
UCONNECT PHONE ...............................288
Uconnect Phone (Bluetooth Hands Free
Calling) ....................................... 288 Pairing (Wirelessly Connecting) Your
Mobile Phone To The Uconnect
System ........................................ 289 Common Phone Commands
(Examples) ................................. 292 Mute (Or Unmute) Microphone During
Call............................................. 293 Transfer Ongoing Call Between Handset
And Vehicle ................................. 293 Phonebook ................................. 293
Voice Command Tips .................... 293
Changing The Volume ................... 293
Using Do Not Disturb ................... 293
Incoming Text Messages .............. 294
Helpful Tips And Common Questions To
Improve Bluetooth® Performance With
Your Uconnect System.................. 295
UCONNECT VOICE RECOGNITION QUICK
TIPS ...................................................296
Introducing Uconnect ................... 296
Get Started .................................. 297
Basic Voice Commands ................. 297
Radio .......................................... 297
Media ......................................... 298
Phone ......................................... 299 Voice Text Reply — If Equipped .....300
Climate ........................................301
Navigation (4C NAV) — If
Equipped .....................................301 Siri® Eyes Free — If Equipped .....302
Using Do Not Disturb ...................302
Android Auto™ — If Equipped ......302
Apple CarPlay® — If Equipped .....303
Additional Information...................304
CUSTOMER ASSISTANCE
IF YOU NEED ASSISTANCE ...................305
ARGENTINA .................................305
AUSTRALIA .................................305
AUSTRIA .....................................305
BALANCE OF THE CARIBBEAN .....306
BELGIUM ....................................306
BOLIVIA.......................................306
BRAZIL ........................................306
BULGARIA ...................................306
CHILE .........................................306
CHINA .........................................307
COLOMBIA...................................307
COSTA RICA ................................307
CROATIA .....................................307
CZECH REPUBLIC ........................307
2020_JEEP_M6_UG_UK.book Page 11
Page 16 of 328
GETTING TO KNOW YOUR VEHICLE
14
The emergency key allows for entry into the
vehicle should the battery in the vehicle or
the key fob become depleted. The emer-
gency key is also for locking the glove
compartment. You can keep the emergency
key with you when valet parking.
To remove the emergency key from the
keyless ignition key fob, slide the mechan -
ical latch at the top of the key fob sideways
with your thumb and then pull the key out
with your other hand.
To Unlock The Doors And Liftgate
Push and release the unlock button on the
key fob once to unlock the driver's door or
twice within five seconds to unlock all doors
and the liftgate.
All doors can be programmed to unlock on
the first push of the unlock button. Refer to
“Uconnect Settings” in “Multimedia” in the
Owner’s Manual for further information.
To Lock The Doors And Liftgate
Push and release the lock button on the key
fob to lock all doors and liftgate.
Request For Additional Key Fobs
NOTE:
Only key fobs that are programmed to the
vehicle electronics can be used to start and
operate the vehicle. Once a key fob is
programmed to a vehicle, it cannot be
programmed to any other vehicle.
NOTE:
Used batteries may be harmful to the envi -
ronment if not disposed of correctly. Always
dispose of used batteries by specialized
battery disposal container, or by taking used
batteries to an authorized dealer. Duplication of key fobs may be performed at
an authorized dealer. This procedure
consists of programming a blank key fob to
the vehicle electronics. A blank key fob is
one that has never been programmed.
NOTE:
When having the Sentry Key Immobilizer
System serviced, bring all vehicle keys with
you to an authorized dealer.
IGNITION SWITCH
Keyless Enter-N-Go — Ignition (If
Equipped)
This feature allows the driver to operate the
ignition with the push of a button as long as
the key fob is in the passenger compartment.
The START/STOP push button ignition has
three operating modes. The three modes are
OFF, ON/RUN, and START.
NOTE:
If the ignition state/mode does not change
with the push of a button, the key fob may
have a low or depleted battery. In this situa
-
tion, a back up method can be used to
operate the ignition switch. Put the nose side
WARNING!
Push the Mechanical Key Release Button
only with the key fob facing away from
your body, especially your eyes and objects
that may be damaged, such as clothing. WARNING!
Always remove the key fobs from the
vehicle and lock all doors when leaving
the vehicle unattended.
For vehicles equipped with Keyless
Enter-N-Go — Ignition, always
remember to place the ignition in the
OFF mode.
2020_JEEP_M6_UG_UK.book Page 14
Page 23 of 328
21
DOORS
Keyless Enter-N-Go — Passive Entry
The Passive Entry system is an enhancement
to the vehicle’s Remote Keyless Entry system
and a feature of Keyless Enter-N-Go —
Passive Entry. This feature allows you to lock
and unlock the vehicle’s door(s) and fuel
door without having to push the key fob lock
or unlock buttons.
NOTE:
Passive Entry may be programmed ON/
OFF. Refer to “Uconnect Settings” in
“Multimedia” in the Owner’s Manual for
further information.
The key fob may not be detected by the
vehicle passive entry system if it is located
next to a mobile phone, laptop, or other
electronic device; these devices may inter-
fere with the key fob’s wireless signal and
prevent the passive entry system from
locking/unlocking the vehicle.
Passive Entry Unlock initiates illuminated
approach (Low Beams, License Plate Lamp,
Position Lamps) for whichever time duration
is set between 0, 30 (default), 60 or 90
seconds. Passive Entry Unlock also initiates
two flashes of the turn signal lamps.
If wearing gloves on your hands, or if it has
been raining/snowing on the Passive Entry
door handle, the unlock sensitivity can be
affected, resulting in a slower response
time.
If the vehicle is unlocked by Passive Entry
and no door is opened within 60 seconds,
the vehicle will re-lock and if equipped
will arm the security alarm.
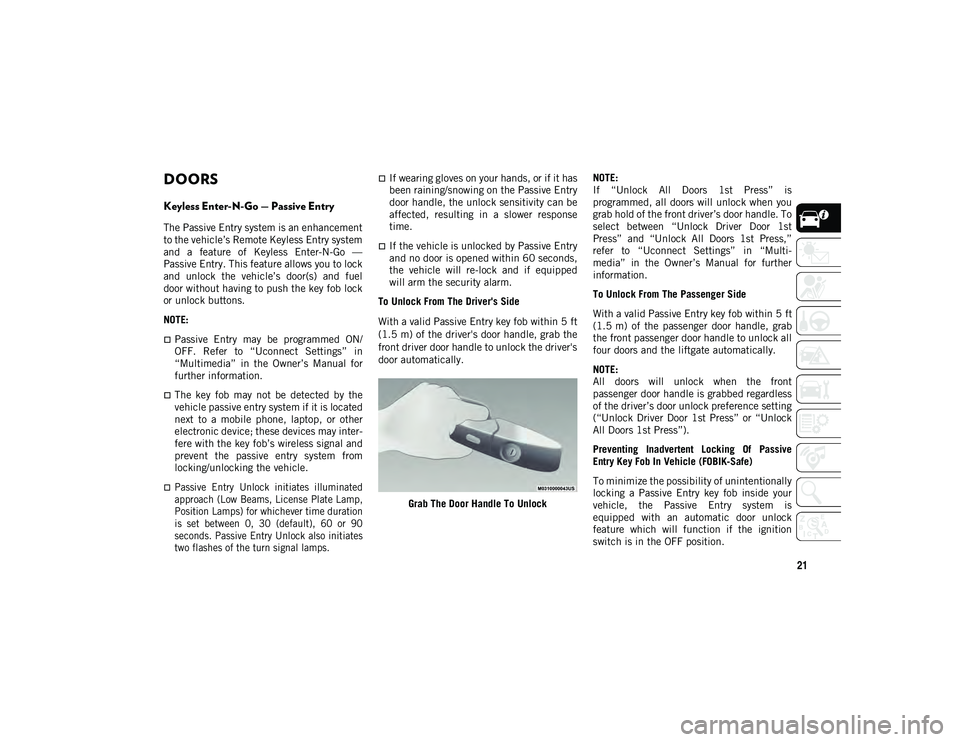
To Unlock From The Driver's Side
With a valid Passive Entry key fob within 5 ft
(1.5 m) of the driver's door handle, grab the
front driver door handle to unlock the driver's
door automatically.
Grab The Door Handle To Unlock NOTE:
If “Unlock All Doors 1st Press” is
programmed, all doors will unlock when you
grab hold of the front driver’s door handle. To
select between “Unlock Driver Door 1st
Press” and “Unlock All Doors 1st Press,”
refer to “Uconnect Settings” in “Multi
-
media” in the Owner’s Manual for further
information.
To Unlock From The Passenger Side
With a valid Passive Entry key fob within 5 ft
(1.5 m) of the passenger door handle, grab
the front passenger door handle to unlock all
four doors and the liftgate automatically.
NOTE:
All doors will unlock when the front
passenger door handle is grabbed regardless
of the driver’s door unlock preference setting
(“Unlock Driver Door 1st Press” or “Unlock
All Doors 1st Press”).
Preventing Inadvertent Locking Of Passive
Entry Key Fob In Vehicle (FOBIK-Safe)
To minimize the possibility of unintentionally
locking a Passive Entry key fob inside your
vehicle, the Passive Entry system is
equipped with an automatic door unlock
feature which will function if the ignition
switch is in the OFF position.
2020_JEEP_M6_UG_UK.book Page 21
Page 25 of 328
23
NOTE:
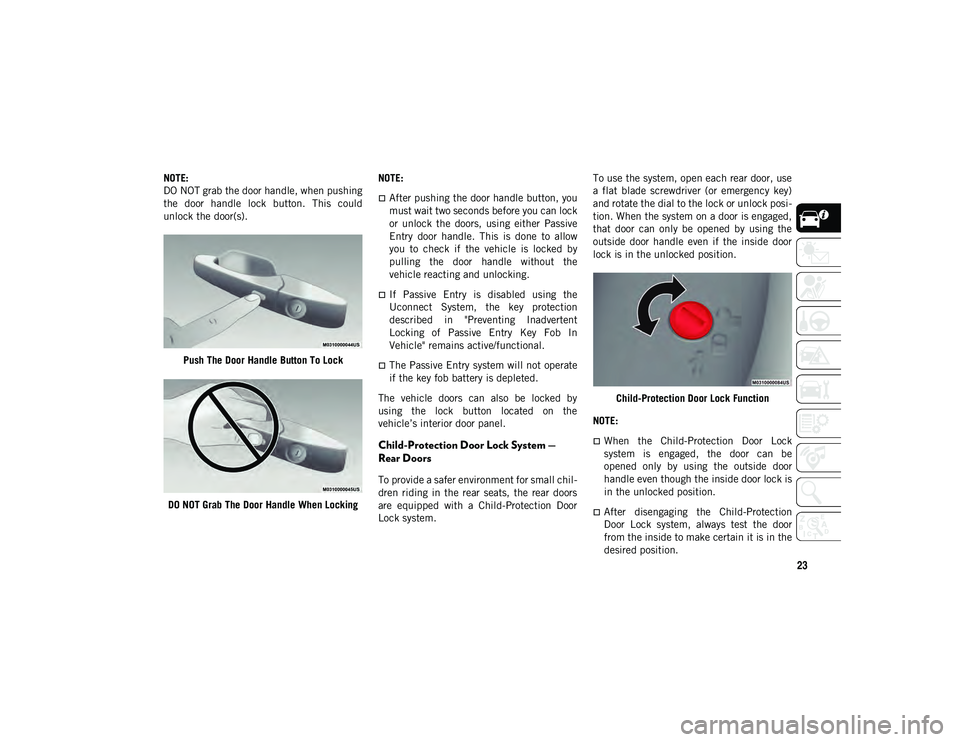
DO NOT grab the door handle, when pushing
the door handle lock button. This could
unlock the door(s).Push The Door Handle Button To Lock
DO NOT Grab The Door Handle When Locking NOTE:
After pushing the door handle button, you
must wait two seconds before you can lock
or unlock the doors, using either Passive
Entry door handle. This is done to allow
you to check if the vehicle is locked by
pulling the door handle without the
vehicle reacting and unlocking.
If Passive Entry is disabled using the
Uconnect System, the key protection
described in "Preventing Inadvertent
Locking of Passive Entry Key Fob In
Vehicle" remains active/functional.
The Passive Entry system will not operate
if the key fob battery is depleted.
The vehicle doors can also be locked by
using the lock button located on the
vehicle’s interior door panel.
Child-Protection Door Lock System —
Rear Doors
To provide a safer environment for small chil -
dren riding in the rear seats, the rear doors
are equipped with a Child-Protection Door
Lock system. To use the system, open each rear door, use
a flat blade screwdriver (or emergency key)
and rotate the dial to the lock or unlock posi
-
tion. When the system on a door is engaged,
that door can only be opened by using the
outside door handle even if the inside door
lock is in the unlocked position.
Child-Protection Door Lock Function
NOTE:
When the Child-Protection Door Lock
system is engaged, the door can be
opened only by using the outside door
handle even though the inside door lock is
in the unlocked position.
After disengaging the Child-Protection
Door Lock system, always test the door
from the inside to make certain it is in the
desired position.
2020_JEEP_M6_UG_UK.book Page 23
Page 28 of 328
GETTING TO KNOW YOUR VEHICLE
26
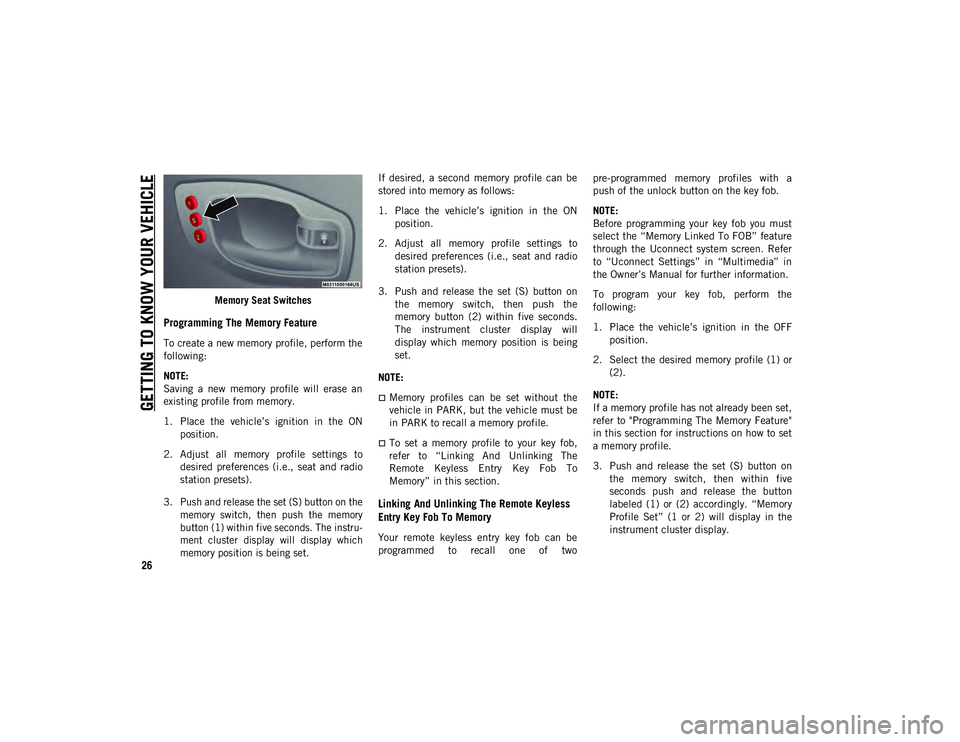
Memory Seat Switches
Programming The Memory Feature
To create a new memory profile, perform the
following:
NOTE:
Saving a new memory profile will erase an
existing profile from memory.
1. Place the vehicle’s ignition in the ONposition.
2. Adjust all memory profile settings to desired preferences (i.e., seat and radio
station presets).
3. Push and release the set (S) button on the memory switch, then push the memory
button (1) within five seconds. The instru -
ment cluster display will display which
memory position is being set.
If desired, a second memory profile can be
stored into memory as follows:
1. Place the vehicle’s ignition in the ON
position.
2. Adjust all memory profile settings to desired preferences (i.e., seat and radio
station presets).
3. Push and release the set (S) button on the memory switch, then push the
memory button (2) within five seconds.
The instrument cluster display will
display which memory position is being
set.
NOTE:
Memory profiles can be set without the
vehicle in PARK, but the vehicle must be
in PARK to recall a memory profile.
To set a memory profile to your key fob,
refer to “Linking And Unlinking The
Remote Keyless Entry Key Fob To
Memory” in this section.
Linking And Unlinking The Remote Keyless
Entry Key Fob To Memory
Your remote keyless entry key fob can be
programmed to recall one of two pre-programmed memory profiles with a
push of the unlock button on the key fob.
NOTE:
Before programming your key fob you must
select the “Memory Linked To FOB” feature
through the Uconnect system screen. Refer
to “Uconnect Settings” in “Multimedia” in
the Owner’s Manual for further information.
To program your key fob, perform the
following:
1. Place the vehicle’s ignition in the OFF
position.
2. Select the desired memory profile (1) or (2).
NOTE:
If a memory profile has not already been set,
refer to "Programming The Memory Feature"
in this section for instructions on how to set
a memory profile.
3. Push and release the set (S) button on the memory switch, then within five
seconds push and release the button
labeled (1) or (2) accordingly. “Memory
Profile Set” (1 or 2) will display in the
instrument cluster display.
2020_JEEP_M6_UG_UK.book Page 26
Page 29 of 328
27
4. Push and release the lock button on thekey fob within 10 seconds.
NOTE:
Your key fob can be unlinked to your memory
settings by pushing the set (S) button,
followed by pushing the unlock button on the
key fob within 10 seconds.
Memory Position Recall
NOTE:
The vehicle must be in PARK to recall
memory positions. If a recall is attempted
when the vehicle is not in PARK, a message
will display in the instrument cluster display.
To recall the memory settings for driver
one, push memory button (1) or the unlock
button on the key fob linked to memory
position 1.
To recall the memory settings for driver
two, push memory button (2) or the unlock
button on the key fob linked to memory
position 2.
A recall can be canceled by pushing any of
the memory buttons (S, 1, or 2) during a
recall. When a recall is canceled, the driver
seat will stop moving. A delay of one second
will occur before another recall can be
selected.
Front Heated Seats — If Equipped
The front heated seats control buttons are
located within the Uconnect system. You can
gain access to the control buttons through
the climate screen or the controls screen.
Press the heated seat button once to
turn the HI setting on.
Press the heated seat button a second
time to turn the LO setting on.
Press the heated seat button a third
time to turn the heating elements off.
If your vehicle is equipped with automatic
temperature controls with an integrated
center stack, or manual temperature
controls, you’ll find the heated seat switches
on the switch bank below the radio screen.
If the HI level setting is selected, the system
will automatically switch to LO level after
approximately 60 minutes of continuous
operation. At that time, the display will
change from HI to LO, indicating the change.
The LO level setting will turn off automati -
cally after approximately 45 minutes.
NOTE:
The engine must be running for the heated
seats to operate. Vehicles With Remote Start — If Equipped
On models that are equipped with remote
start, the heated seats can be programmed to
come on during a remote start.
This feature can be programmed through the
Uconnect system. Refer to “Uconnect
Settings” in “Multimedia” in the Owner’s
Manual for further information.
WARNING!
Persons who are unable to feel pain to
the skin because of advanced age,
chronic illness, diabetes, spinal cord
injury, medication, alcohol use, exhaus-
tion or other physical condition must
exercise care when using the seat heater.
It may cause burns even at low tempera-
tures, especially if used for long periods
of time.
Do not place anything on the seat or
seatback that insulates against heat,
such as a blanket or cushion. This may
cause the seat heater to overheat. Sitting
in a seat that has been overheated could
cause serious burns due to the increased
surface temperature of the seat.
2020_JEEP_M6_UG_UK.book Page 27
Page 30 of 328
GETTING TO KNOW YOUR VEHICLE
28
Front Ventilated Seats — If Equipped
If your vehicle is equipped with ventilated
seats, the seat cushion and seat back will
have fans that draw the air from the
passenger compartment and move air
through fine perforations in the seat cover to
help keep the driver and front passenger
cooler in higher ambient temperatures. The
fans operate at two speeds, HI and LO.
The front ventilated seats control buttons are
located within the Uconnect system. You can
gain access to the control buttons through
the climate screen or the controls screen.
Press the ventilated seat button once to
choose HI.
Press the ventilated seat button a
second time to choose LO.
Press the ventilated seat button a third
time to turn the ventilated seat off.
NOTE:
The engine must be running for the venti -
lated seats to operate.
Vehicles With Remote Start — If Equipped
On models that are equipped with remote start,
the ventilated seats can be programmed to
come on during a remote start.
This feature can be programmed through the
Uconnect system. Refer to “Uconnect
Settings” in “Multimedia” in the Owner's
Manual for further details.
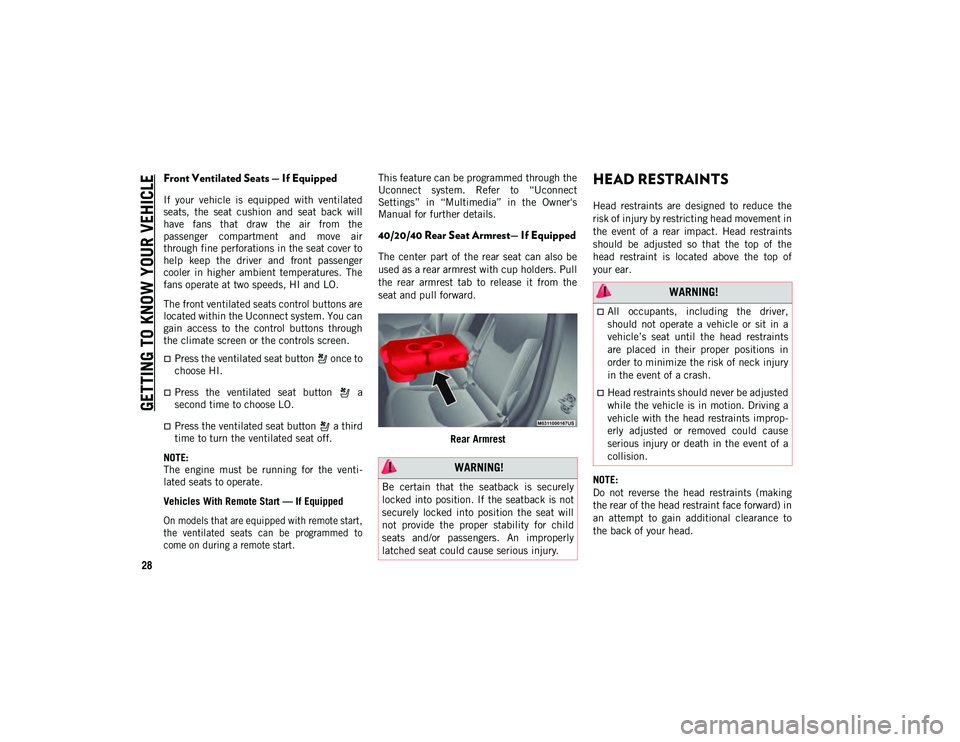
40/20/40 Rear Seat Armrest— If Equipped
The center part of the rear seat can also be
used as a rear armrest with cup holders. Pull
the rear armrest tab to release it from the
seat and pull forward.
Rear Armrest
HEAD RESTRAINTS
Head restraints are designed to reduce the
risk of injury by restricting head movement in
the event of a rear impact. Head restraints
should be adjusted so that the top of the
head restraint is located above the top of
your ear.
NOTE:
Do not reverse the head restraints (making
the rear of the head restraint face forward) in
an attempt to gain additional clearance to
the back of your head.
WARNING!
Be certain that the seatback is securely
locked into position. If the seatback is not
securely locked into position the seat will
not provide the proper stability for child
seats and/or passengers. An improperly
latched seat could cause serious injury.
WARNING!
All occupants, including the driver,
should not operate a vehicle or sit in a
vehicle’s seat until the head restraints
are placed in their proper positions in
order to minimize the risk of neck injury
in the event of a crash.
Head restraints should never be adjusted
while the vehicle is in motion. Driving a
vehicle with the head restraints improp -
erly adjusted or removed could cause
serious injury or death in the event of a
collision.
2020_JEEP_M6_UG_UK.book Page 28
Page 32 of 328
GETTING TO KNOW YOUR VEHICLE
30
NOTE:
The head restraints should only be removed
by qualified technicians, for service
purposes only. If either of the head restraints
require removal, see an authorized dealer.
STEERING WHEEL
Tilt/Telescoping Steering Column
This feature allows you to tilt the steering
column upward or downward. It also allows
you to lengthen or shorten the steering
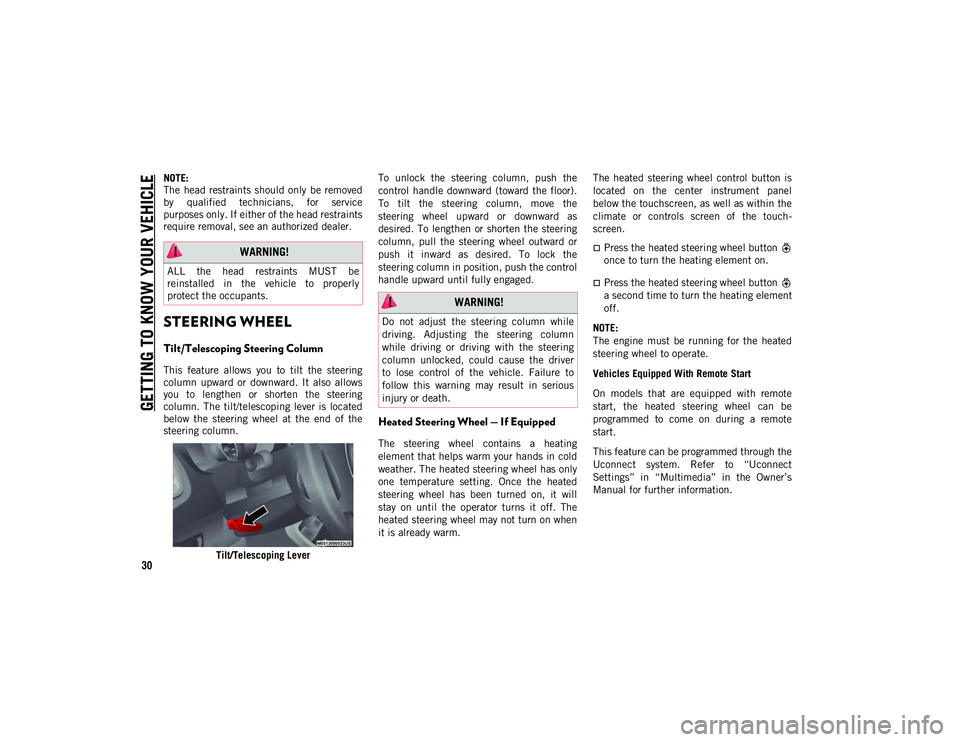
column. The tilt/telescoping lever is located
below the steering wheel at the end of the
steering column.Tilt/Telescoping Lever To unlock the steering column, push the
control handle downward (toward the floor).
To tilt the steering column, move the
steering wheel upward or downward as
desired. To lengthen or shorten the steering
column, pull the steering wheel outward or
push it inward as desired. To lock the
steering column in position, push the control
handle upward until fully engaged.
Heated Steering Wheel — If Equipped
The steering wheel contains a heating
element that helps warm your hands in cold
weather. The heated steering wheel has only
one temperature setting. Once the heated
steering wheel has been turned on, it will
stay on until the operator turns it off. The
heated steering wheel may not turn on when
it is already warm.
The heated steering wheel control button is
located on the center instrument panel
below the touchscreen, as well as within the
climate or controls screen of the touch
-
screen.
Press the heated steering wheel button
once to turn the heating element on.
Press the heated steering wheel button
a second time to turn the heating element
off.
NOTE:
The engine must be running for the heated
steering wheel to operate.
Vehicles Equipped With Remote Start
On models that are equipped with remote
start, the heated steering wheel can be
programmed to come on during a remote
start.
This feature can be programmed through the
Uconnect system. Refer to “Uconnect
Settings” in “Multimedia” in the Owner’s
Manual for further information.
WARNING!
ALL the head restraints MUST be
reinstalled in the vehicle to properly
protect the occupants.
WARNING!
Do not adjust the steering column while
driving. Adjusting the steering column
while driving or driving with the steering
column unlocked, could cause the driver
to lose control of the vehicle. Failure to
follow this warning may result in serious
injury or death.
2020_JEEP_M6_UG_UK.book Page 30
Page 34 of 328
GETTING TO KNOW YOUR VEHICLE
32
Daytime Running Lights (DRL) — If
Equipped
The Daytime Running Lights will turn on
when the engine is started and remain on
unless the headlamps are turned on or the
ignition is in the OFF position.
NOTE:
If allowed by law in the country in which the
vehicle was purchased the Daytime Running
Lights can be turned on and off using the
Uconnect System. Refer to “Uconnect
Settings” in “Multimedia” in the Owner’s
Manual for further details.
High/Low Beam Switch
Push the multifunction lever toward the
instrument panel to switch the headlights to
high beams. Pulling the multifunction lever
back toward the steering wheel will return
the lights to low beams.
Automatic High Beam Headlamp Control
— If Equipped
The Automatic High Beam Headlamp Control
system provides increased forward lighting at
night by automating high beam control
through the use of a digital camera mounted
on the inside rearview mirror. This cameradetects vehicle specific light and automati
-
cally switches from high beams to low beams
until the approaching vehicle is out of view.
NOTE:
The Automatic High Beam Headlamp
Control can be turned on or off using the
Uconnect System. Refer to “Uconnect
Settings” in “Multimedia” in the Owner’s
Manual for further information.
Broken, muddy, or obstructed headlights
and taillights of vehicles in the field of
view will cause headlights to remain on
longer (closer to the vehicle). Also, dirt,
film, and other obstructions on the wind -
shield or camera lens will cause the
system to function improperly.
Flash-To-Pass
You can signal another vehicle with your
headlights by lightly pulling the multifunc -
tion lever toward you. This will cause the
high beam headlights to turn on, and remain
on, until the lever is released.
Automatic Headlights — If Equipped
This system automatically turns the head -
lights on or off according to ambient light
levels. To turn the system on, rotate the headlight switch clockwise to the last detent
for automatic headlight operation. When the
system is on, the headlight time delay
feature is also on. This means the headlights
will stay on for up to 90 seconds after you
place the ignition into the OFF position. To
turn the automatic system off, move the
headlight switch out of the AUTO position.
NOTE:
The engine must be running before the head
-
lights will come on in the automatic mode.
Headlight Time Delay
This feature provides the safety of headlight
illumination for up to 90 seconds (program -
mable) when leaving your vehicle in an unlit
area.
To activate the delay feature, place the igni -
tion in the OFF position while the headlights
are still on. Then, turn off the headlights
within 45 seconds. The delay interval begins
when the headlight switch is turned off.
If you turn the headlights or parking lights
on, or place the ignition in ACC or RUN, the
system will cancel the delay.
If you turn the headlights off before the igni -
tion, they will turn off in the normal manner.
2020_JEEP_M6_UG_UK.book Page 32