uconnect system JEEP COMPASS 2020 Owner handbook (in English)
[x] Cancel search | Manufacturer: JEEP, Model Year: 2020, Model line: COMPASS, Model: JEEP COMPASS 2020Pages: 328, PDF Size: 8.85 MB
Page 159 of 328
157
NOTE:
For further information on Active Park Assist,
refer to “ParkSense Active Park Assist
System” in this chapter.
The six ParkSense sensors, located in the
front fascia/bumper, monitor the area in
front of the vehicle that is within the sensors’
field of view. The sensors can detect obsta-
cles from approximately 12 inches (30 cm)
up to 47 inches (120 cm) from the front
fascia/bumper in the horizontal direction,
depending on the location, type and orienta -
tion of the obstacle.
Enabling And Disabling ParkSense
ParkSense can be enabled and
disabled with the ParkSense switch,
located on the switch panel below
the Uconnect display.
When the ParkSense switch is pushed to
disable the system, the instrument cluster
display will show the “PARKSENSE OFF”
message for approximately five seconds.
Refer to “Instrument Cluster Display” in
“Getting To Know Your Instrument Panel” in
your Owner’s Manual for further details.
When the gear selector is moved to
REVERSE and the system is disabled, the instrument cluster display will show the
“PARKSENSE OFF” message for as long as
the vehicle is in REVERSE.
The ParkSense switch LED will be on when
ParkSense is disabled or requires service.
The ParkSense switch LED will be off when
the system is enabled. If the ParkSense
switch is pushed, and requires service, the
ParkSense switch LED will blink momen
-
tarily, and then the LED will be on.
Side Distance Warning System
The Side Distance Warning system has the
function of detecting the presence of side
obstacles near the vehicle using the parking
sensors located in the front and rear
bumpers.
Side Distance Warning Display
The Side Distance Warning screen will only
be displayed if “Sound and Display” is
selected from the Customer - Programmable
Features section of the Uconnect System.
Refer to “Uconnect Settings” in “Multi -
media” in the Owner’s Manual for further
information. The system warns the driver with an acoustic
signal and where provided, with visual indi
-
cations on the instrument panel display.
NOTE:
Parksense will reduce the volume of the
radio if on when the system is sounding an
audible tone.
Activation And Deactivation
The system can operate only after driving a
short distance and if the vehicle speed is
between 0 and 7 mph (0 and 11 km/h). The
system can be activated/deactivated via the
"Settings" menu of the Uconnect system. If
the ParkSense System is deactivated via the
ParkSense hard switch then the side
distance warning system will automatically
be deactivated.
Message on the display for Side Distance
Warning feature:
“Wipe Sensors” — This message is
displayed in the case of a failure of the Side
Distance Warning system sensors. Free the
bumpers of any obstacles, ensure that the
front and rear bumper are free of snow, ice,
mud, dirt and debris to keep the ParkSense
system operating properly.
2020_JEEP_M6_UG_UK.book Page 157
Page 161 of 328
159
PARKSENSE ACTIVE PARK
ASSIST SYSTEM — IF
EQUIPPED
The ParkSense Active Park Assist system is
intended to assist the driver during Parallel,
Perpendicular, and Parallel Park Exit maneu-
vers by identifying a proper parking space,
providing audible/visual instructions, and
controlling the steering wheel. The Park -
Sense Active Park Assist system is defined
as “semi-automatic” since the driver main -
tains control of the accelerator, gear selector and brakes. Depending on the driver's
parking maneuver selection, the ParkSense
Active Park Assist system is capable of
maneuvering a vehicle into a parallel or a
perpendicular parking space on either side
(i.e., driver side or passenger side), as well as
exiting a parallel parking space.
NOTE:
The driver is always responsible for
controlling the vehicle, responsible for any
surrounding objects, and must intervene
as required.
The system is provided to assist the driver
and not to substitute the driver.
During a semi-automatic maneuver, if the
driver touches the steering wheel after
being instructed to remove their hands
from the steering wheel, the system will
cancel, and the driver will be required to
manually complete the parking maneuver.
The system may not work in all conditions
(e.g. environmental conditions such as
heavy rain, snow, etc., or if searching for a
parking space that has surfaces that will
absorb the ultrasonic sensor waves).
New vehicles from the dealer must have at
least 30 miles (48 km) accumulated
before the ParkSense Active Park Assist
system is fully calibrated and performs
accurately. This is due to the system’s
dynamic vehicle calibration to improve the
performance of the feature. The system
will also continuously perform the
dynamic vehicle calibration to account for
differences such as over or under inflated
tires and new tires.
Enabling And Disabling The ParkSense
Active Park Assist System
The ParkSense Active Park Assist system can
be enabled and disabled with the ParkSense
Active Park Assist switch, located on the
switch panel below the Uconnect display.
To enable the ParkSense Active Park
Assist system, push the ParkSense
Active Park Assist switch once (LED
turns on).
To disable the ParkSense Active Park Assist
system, push the ParkSense Active Park
Assist switch again (LED turns off).
CAUTION!
ParkSense is only a parking aid and it is
unable to recognize every obstacle,
including small obstacles. Parking curbs
might be temporarily detected or not
detected at all. Obstacles located above
or below the sensors will not be detected
when they are in close proximity.
The vehicle must be driven slowly when
using ParkSense in order to be able to
stop in time when an obstacle is
detected. It is recommended that the
driver looks over his/her shoulder when
using ParkSense.
2020_JEEP_M6_UG_UK.book Page 159
Page 164 of 328
STARTING AND OPERATING
162
Take great care to ensure that conditions
do not change during the parking
maneuver (e.g. if there are persons and/or
animals in the parking place, moving vehi-
cles, etc.) and intervene immediately if
necessary.
During parking maneuvers, pay attention
to vehicles approaching from the opposite
direction. Always abide by the law and
road regulations.
NOTE:
Correct system operation is not guaranteed
if snow chains or the space-saver wheel
are fitted.
The function only informs the driver about
the last appropriate parking place (parallel
or perpendicular) detected by the parking
sensors.
Some messages displayed are accompa-
nied by acoustic warnings.
LANESENSE — IF EQUIPPED
LaneSense Operation
The LaneSense system is operational at
speeds above 37 mph (60 km/h) and below
112 mph (180 km/h). The LaneSense system uses a forward looking camera to
detect lane markings and measure vehicle
position within the lane boundaries.
When both lane markings are detected and
the driver unintentionally drifts out of the
lane (no turn signal applied), the LaneSense
system provides a haptic warning in the form
of torque applied to the steering wheel, as
well as a visual warning in the instrument
cluster display, to prompt the driver to
remain within the lane boundaries.
The driver may manually override the haptic
warning by applying torque into the steering
wheel at any time.
When only a single lane marking is detected
and the driver unintentionally drifts across
the lane marking (no turn signal applied), the
LaneSense system provides a visual warning
through the instrument cluster display to
prompt the driver to remain within the lane.
When only a single lane marking is detected,
a haptic (torque) warning will not be
provided.
NOTE:
When operating conditions have been met,
the LaneSense system will monitor if the
driver’s hands are on the steering wheel and
provide an audible and visual warning to the
driver when the driver’s hands are not
detected on the steering wheel. The system
will cancel if the driver does not return their
hands to the wheel.
Turning LaneSense On Or Off
The default status of LaneSense is
“Off”.
The LaneSense button is located on the
switch panel below the Uconnect display.
To turn the LaneSense system on, push the
LaneSense button (LED turns off). A “Lane
Sense On” message is shown in the instru -
ment cluster display.
To turn the LaneSense system off, push the
LaneSense button again (LED turns on).
NOTE:
The LaneSense system will retain the last
system state on or off from the last ignition
cycle when the ignition is changed to the ON/
RUN position.
LaneSense Warning Message
The LaneSense system will indicate the
current lane drift condition through the
instrument cluster display.
2020_JEEP_M6_UG_UK.book Page 162
Page 166 of 328
STARTING AND OPERATING
164
When the LaneSense system senses the
lane has been approached and is in a lane
departure situation, the left thick lane line
flashes yellow, the left thin line remains
solid yellow and the LaneSense telltale
changes from solid white to flashing
yellow.
NOTE:
The LaneSense system operates with the
similar behavior for a right lane departure
when only the right lane marking has been
detected.
Left Lane Departure — Both Lanes Detected
When the LaneSense system is on, the
lane lines turn from grey to white to indi-
cate that both of the lane markings have
been detected. The LaneSense telltale
is solid green when both lane markings
have been detected and the system is
“armed” to provide visual warnings in the
instrument cluster display and a torque
warning in the steering wheel if an unin -
tentional lane departure occurs.
When the LaneSense system senses a lane
drift situation, the left thick lane line and
left thin line turn solid yellow. The Lane-
Sense telltale changes from solid green to solid yellow. At this time torque is
applied to the steering wheel in the oppo-
site direction of the lane boundary.
For example: if approaching the left side
of the lane the steering wheel will turn to
the right.
When the LaneSense system senses the
lane has been approached and is in a lane
departure situation, the left thick lane line
flashes yellow and the left thin line
remains solid yellow. The LaneSense tell
-
tale stays solid yellow. At this time
torque is applied to the steering wheel in
the opposite direction of the lane
boundary.
For example: if approaching the left side
of the lane the steering wheel will turn to
the right.
NOTE:
The LaneSense system operates with the
similar behavior for a right lane departure.
Changing LaneSense Status
The LaneSense system has settings to adjust
the intensity of the torque warning (Low/
Medium/High) and the warning zone sensi -
tivity (Early/Medium/Late) that you can
configure through the Uconnect system screen. Refer to “Uconnect Settings” in
“Multimedia” in the Owner’s Manual for
further details.
NOTE:
The system will not apply torque to the
steering wheel whenever a safety system
engages (Anti-Lock Brakes, Traction
Control System, Electronic Stability
Control, Forward Collision Warning, etc.).
Use of the turn signals and Hazard
Warning flashers also suppresses the
warnings.
PARKVIEW REAR BACK UP
CAMERA — IF EQUIPPED
You can see an on-screen image of the rear
of your vehicle whenever the transmission is
shifted into REVERSE. The ParkView Rear
Back Up Camera image will be displayed on
the Uconnect Display, located on the center
stack of the instrument panel.
If the Uconnect Display appears foggy, clean
the camera lens located on the rear of the
vehicle above the rear license plate
Refer to “ParkView Back Up Camera” in
“Starting And Operating” in your Owner's
Manual for further information.
2020_JEEP_M6_UG_UK.book Page 164
Page 264 of 328
262
MULTIMEDIA
UCONNECT SYSTEMS
For detailed information about your Ucon-
nect system or pairing a phone to your Ucon -
nect system, refer to your Uconnect Owner’s
Manual Supplement.
NOTE:
Uconnect screen images are for illustration
purposes only and may not reflect exact soft -
ware for your vehicle.
CYBERSECURITY
Your vehicle may be a connected vehicle and
may be equipped with both wired and wire -
less networks. These networks allow your
vehicle to send and receive information. This
information allows systems and features in
your vehicle to function properly.
Your vehicle may be equipped with certain
security features to reduce the risk of unau -
thorized and unlawful access to vehicle
systems and wireless communications.
Vehicle software technology continues to
evolve over time and FCA, working with its
suppliers, evaluates and takes appropriate
steps as needed. Similar to a computer or
other devices, your vehicle may require soft -
ware updates to improve the usability and performance of your systems or to reduce the
potential risk of unauthorized and unlawful
access to your vehicle systems.
The risk of unauthorized and unlawful access
to your vehicle systems may still exist, even
if the most recent version of vehicle software
(such as Uconnect software) is installed.
NOTE:
FCA or your dealer may contact you
directly regarding software updates.
To help further improve vehicle security
and minimize the potential risk of a secu
-
rity breach, vehicle owners should:
Only connect and use trusted media devices (e.g. personal mobile phones,
USBs, CDs).
Privacy of any wireless and wired communi -
cations cannot be assured. Third parties may
unlawfully intercept information and private
communications without your consent. For
further information, refer to “Onboard Diag -
nostic System (OBD II) Cybersecurity” in
“Getting To Know Your Instrument Panel” in
your Owner’s Manual. WARNING!
It is not possible to know or to predict all
of the possible outcomes if your vehicle’s
systems are breached. It may be possible
that vehicle systems, including safety
related systems, could be impaired or a
loss of vehicle control could occur that
may result in an accident involving
serious injury or death.
ONLY insert media (e.g., USB, SD card,
or CD) into your vehicle if it came from a
trusted source. Media of unknown origin
could possibly contain malicious soft -
ware, and if installed in your vehicle, it
may increase the possibility for vehicle
systems to be breached.
As always, if you experience unusual
vehicle behavior, take your vehicle to
your nearest authorized dealer immedi -
ately.
2020_JEEP_M6_UG_UK.book Page 262
Page 265 of 328
263
UCONNECT 3 WITH 5–INCH
DISPLAY — IF EQUIPPED
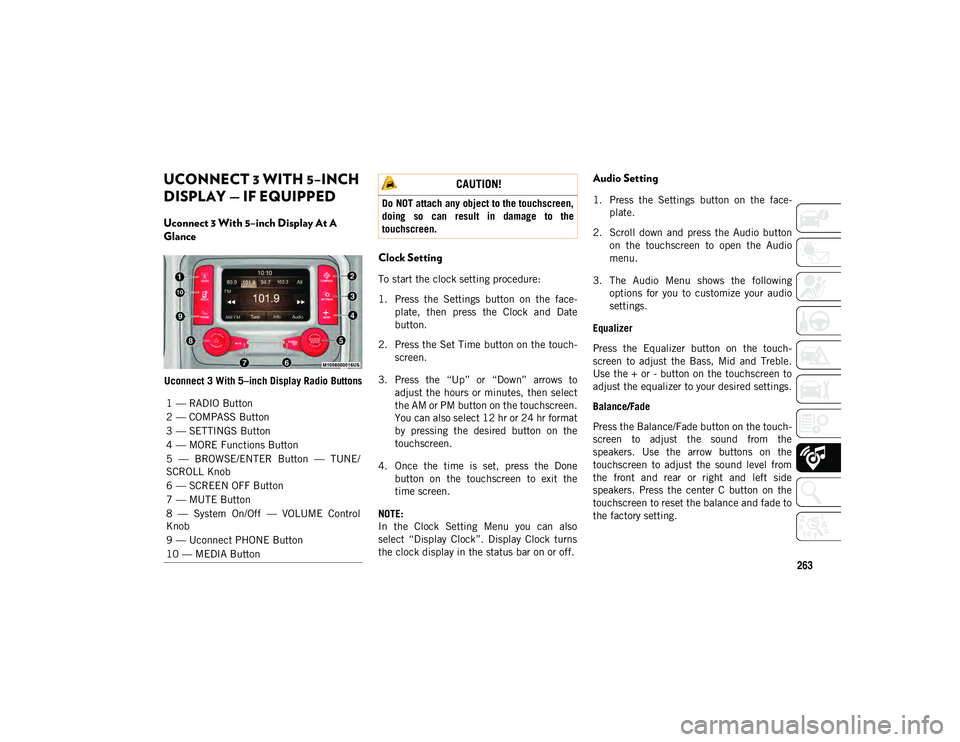
Uconnect 3 With 5–inch Display At A
Glance
Uconnect 3 With 5–inch Display Radio Buttons
Clock Setting
To start the clock setting procedure:
1. Press the Settings button on the face-
plate, then press the Clock and Date
button.
2. Press the Set Time button on the touch -
screen.
3. Press the “Up” or “Down” arrows to adjust the hours or minutes, then select
the AM or PM button on the touchscreen.
You can also select 12 hr or 24 hr format
by pressing the desired button on the
touchscreen.
4. Once the time is set, press the Done button on the touchscreen to exit the
time screen.
NOTE:
In the Clock Setting Menu you can also
select “Display Clock”. Display Clock turns
the clock display in the status bar on or off.
Audio Setting
1. Press the Settings button on the face -
plate.
2. Scroll down and press the Audio button on the touchscreen to open the Audio
menu.
3. The Audio Menu shows the following options for you to customize your audio
settings.
Equalizer
Press the Equalizer button on the touch -
screen to adjust the Bass, Mid and Treble.
Use the + or - button on the touchscreen to
adjust the equalizer to your desired settings.
Balance/Fade
Press the Balance/Fade button on the touch -
screen to adjust the sound from the
speakers. Use the arrow buttons on the
touchscreen to adjust the sound level from
the front and rear or right and left side
speakers. Press the center C button on the
touchscreen to reset the balance and fade to
the factory setting.
1 — RADIO Button
2 — COMPASS Button
3 — SETTINGS Button
4 — MORE Functions Button
5 — BROWSE/ENTER Button — TUNE/
SCROLL Knob
6 — SCREEN OFF Button
7 — MUTE Button
8 — System On/Off — VOLUME Control
Knob
9 — Uconnect PHONE Button
10 — MEDIA Button
CAUTION!
Do NOT attach any object to the touchscreen,
doing so can result in damage to the
touchscreen.
2020_JEEP_M6_UG_UK.book Page 263
Page 267 of 328
265
USB/Audio Jack (AUX)/Bluetooth®
Operation
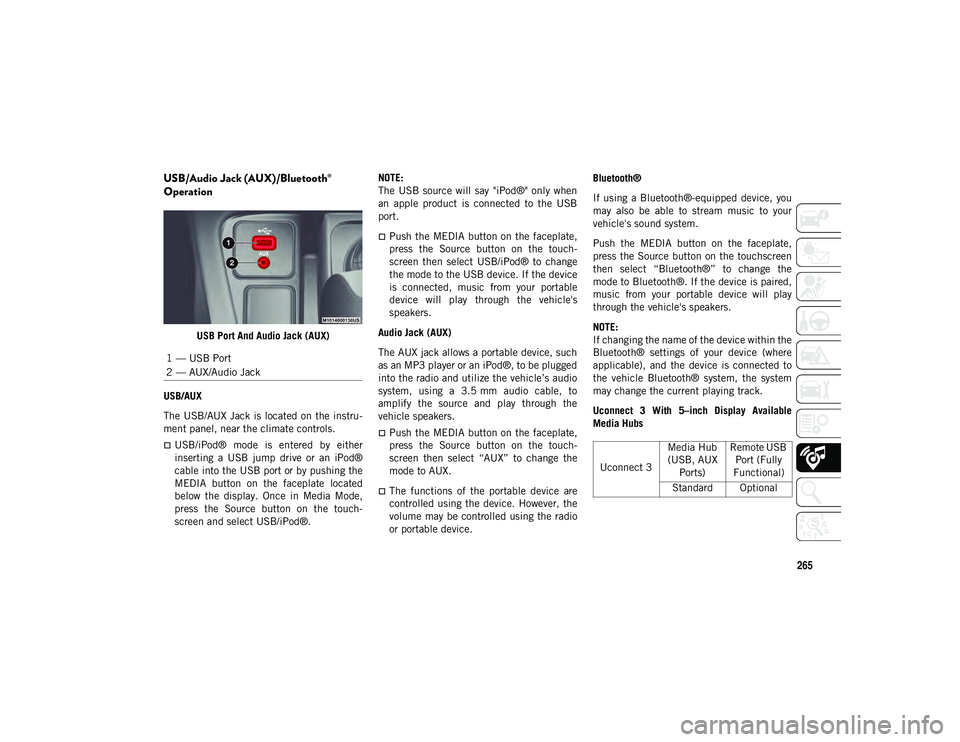
USB Port And Audio Jack (AUX)
USB/AUX
The USB/AUX Jack is located on the instru -
ment panel, near the climate controls.
USB/iPod® mode is entered by either
inserting a USB jump drive or an iPod®
cable into the USB port or by pushing the
MEDIA button on the faceplate located
below the display. Once in Media Mode,
press the Source button on the touch -
screen and select USB/iPod®. NOTE:
The USB source will say "iPod®" only when
an apple product is connected to the USB
port.
Push the MEDIA button on the faceplate,
press the Source button on the touch
-
screen then select USB/iPod® to change
the mode to the USB device. If the device
is connected, music from your portable
device will play through the vehicle's
speakers.
Audio Jack (AUX)
The AUX jack allows a portable device, such
as an MP3 player or an iPod®, to be plugged
into the radio and utilize the vehicle’s audio
system, using a 3.5 mm audio cable, to
amplify the source and play through the
vehicle speakers.
Push the MEDIA button on the faceplate,
press the Source button on the touch -
screen then select “AUX” to change the
mode to AUX.
The functions of the portable device are
controlled using the device. However, the
volume may be controlled using the radio
or portable device. Bluetooth®
If using a Bluetooth®-equipped device, you
may also be able to stream music to your
vehicle's sound system.
Push the MEDIA button on the faceplate,
press the Source button on the touchscreen
then select “Bluetooth®” to change the
mode to Bluetooth®. If the device is paired,
music from your portable device will play
through the vehicle's speakers.
NOTE:
If changing the name of the device within the
Bluetooth® settings of your device (where
applicable), and the device is connected to
the vehicle Bluetooth® system, the system
may change the current playing track.
Uconnect 3 With 5–inch Display Available
Media Hubs
1 — USB Port
2 — AUX/Audio Jack
Uconnect 3
Media Hub
(USB, AUX Ports) Remote USB
Port (Fully
Functional)
Standard Optional
2020_JEEP_M6_UG_UK.book Page 265
Page 268 of 328
MULTIMEDIA
266
Voice Text Reply (Not Compatible With
iPhone®)
Once your Uconnect system is paired with a
compatible mobile device, the system can
announce a new incoming text message, and
read it to you over the vehicle audio system.
You can reply to the message using Voice
Recognition by selecting, or saying, one of
the 18 pre-defined messages.
Here’s How:
1. Push the Voice Recognition (VR) or the Phone button and wait for the beep,
then say “reply.” Uconnect gives the
following prompt: “Please say the
message you would like to send.”
2. Wait for the beep and say one of the pre-defined messages. (If you are not
sure, you can say “help”). Uconnect will
then read the pre-defined messages
allowed.
3. As soon as you hear the message you would like to send, you can interrupt the
list of prompts by pushing the Uconnect
phone button and saying the phrase.
Uconnect will confirm the message by
reading it back to you. 4. Push the Phone button and say “Send.”
*Use only the numbering listed or the system
may not transcribe the message properly.
NOTE:
Voice Text Reply and Voice Texting features
require a compatible mobile device enabled
with Bluetooth® Message Access Profile
(MAP). iPhone® and some other smart
-
phones do not currently support Bluetooth®
MAP. Visit driveuconnect.eu or an authorized
dealer for device compatibility.
Siri® Eyes Free — If Equipped
Siri lets you use your voice to send text
messages, select media, place phone calls
and much more. Siri uses natural language
to understand what you mean and responds
back to confirm your requests. The system is
designed to keep your eyes on the road and
your hands on the wheel by letting Siri help
you perform useful tasks.
To enable Siri, push and hold, then release
the Uconnect Voice Recognition (VR) button
on the steering wheel. After you hear a
double beep you can ask Siri to play
podcasts and music, get directions, read text
messages and many other useful requests.PRE-DEFINED VOICE TEXT REPLY RESPONSES
Yes. Stuck in
traffic. See you
later.
No. Start without
me. I’ll be late.
Okay. Where are
you? I will be <5,
10, 15, 20,
25, 30, 45, 60>*
minutes late.
Call me.
Are you
there yet?
I’ll call you later. I need
directions. See you in
<5, 10, 15,
20, 25, 30, 45, 60>* minutes.
I’m on my
way. Can’t talk
right now.
I’m lost. Thanks.
2020_JEEP_M6_UG_UK.book Page 266
Page 272 of 328
MULTIMEDIA
270
Media Hub — USB/Audio Jack (AUX) — If
Equipped
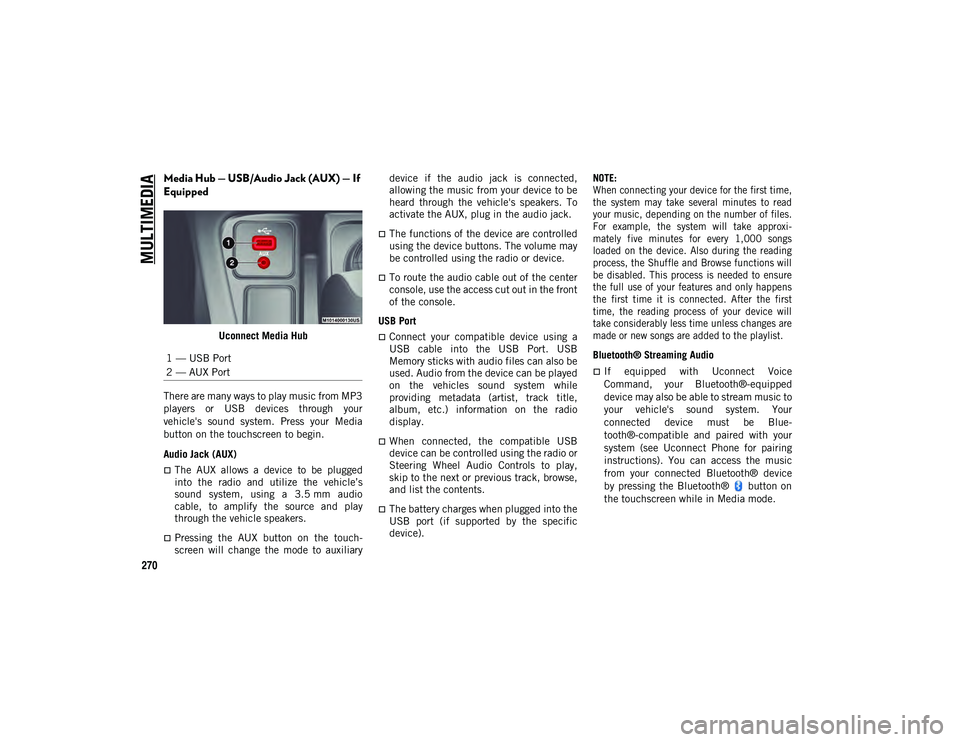
Uconnect Media Hub
There are many ways to play music from MP3
players or USB devices through your
vehicle's sound system. Press your Media
button on the touchscreen to begin.
Audio Jack (AUX)
The AUX allows a device to be plugged
into the radio and utilize the vehicle’s
sound system, using a 3.5 mm audio
cable, to amplify the source and play
through the vehicle speakers.
Pressing the AUX button on the touch -
screen will change the mode to auxiliary device if the audio jack is connected,
allowing the music from your device to be
heard through the vehicle's speakers. To
activate the AUX, plug in the audio jack.
The functions of the device are controlled
using the device buttons. The volume may
be controlled using the radio or device.
To route the audio cable out of the center
console, use the access cut out in the front
of the console.
USB Port
Connect your compatible device using a
USB cable into the USB Port. USB
Memory sticks with audio files can also be
used. Audio from the device can be played
on the vehicles sound system while
providing metadata (artist, track title,
album, etc.) information on the radio
display.
When connected, the compatible USB
device can be controlled using the radio or
Steering Wheel Audio Controls to play,
skip to the next or previous track, browse,
and list the contents.
The battery charges when plugged into the
USB port (if supported by the specific
device).
NOTE:
When connecting your device for the first time,
the system may take several minutes to read
your music, depending on the number of files.
For example, the system will take approxi
-
mately five minutes for every 1,000 songs
loaded on the device. Also during the reading
process, the Shuffle and Browse functions will
be disabled. This process is needed to ensure
the full use of your features and only happens
the first time it is connected. After the first
time, the reading process of your device will
take considerably less time unless changes are
made or new songs are added to the playlist.
Bluetooth® Streaming Audio
If equipped with Uconnect Voice
Command, your Bluetooth®-equipped
device may also be able to stream music to
your vehicle's sound system. Your
connected device must be Blue-
tooth®-compatible and paired with your
system (see Uconnect Phone for pairing
instructions). You can access the music
from your connected Bluetooth® device
by pressing the Bluetooth® button on
the touchscreen while in Media mode.
1 — USB Port
2 — AUX Port
2020_JEEP_M6_UG_UK.book Page 270
Page 273 of 328
271
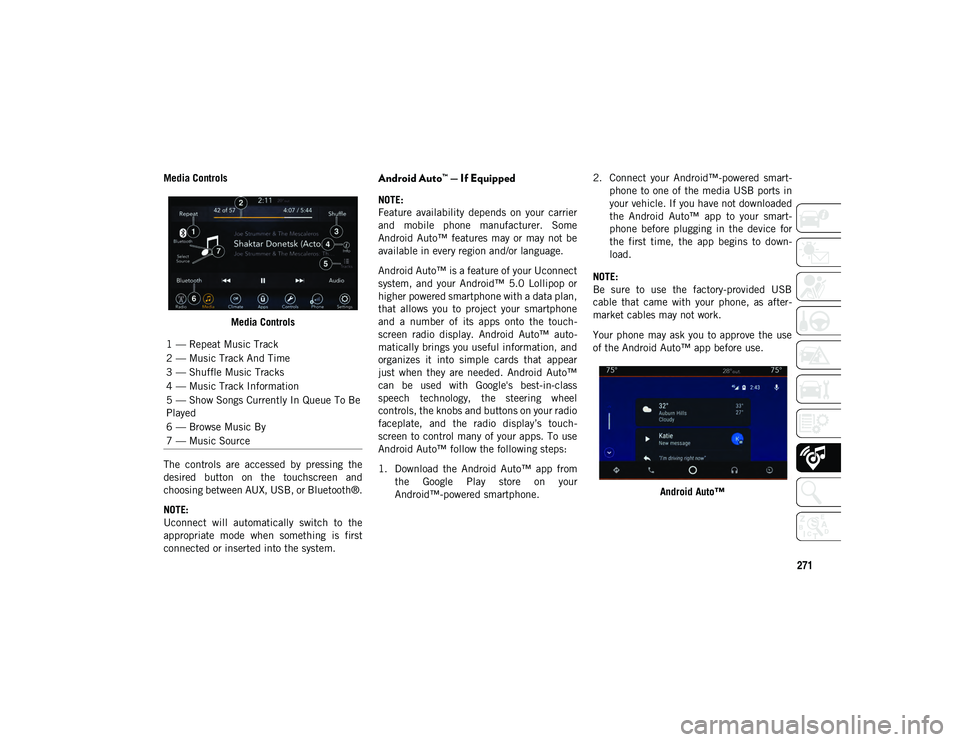
Media ControlsMedia Controls
The controls are accessed by pressing the
desired button on the touchscreen and
choosing between AUX, USB, or Bluetooth®.
NOTE:
Uconnect will automatically switch to the
appropriate mode when something is first
connected or inserted into the system.Android Auto™ — If Equipped
NOTE:
Feature availability depends on your carrier
and mobile phone manufacturer. Some
Android Auto™ features may or may not be
available in every region and/or language.
Android Auto™ is a feature of your Uconnect
system, and your Android™ 5.0 Lollipop or
higher powered smartphone with a data plan,
that allows you to project your smartphone
and a number of its apps onto the touch -
screen radio display. Android Auto™ auto -
matically brings you useful information, and
organizes it into simple cards that appear
just when they are needed. Android Auto™
can be used with Google's best-in-class
speech technology, the steering wheel
controls, the knobs and buttons on your radio
faceplate, and the radio display’s touch -
screen to control many of your apps. To use
Android Auto™ follow the following steps:
1. Download the Android Auto™ app from the Google Play store on your
Android™-powered smartphone. 2. Connect your Android™-powered smart
-
phone to one of the media USB ports in
your vehicle. If you have not downloaded
the Android Auto™ app to your smart -
phone before plugging in the device for
the first time, the app begins to down -
load.
NOTE:
Be sure to use the factory-provided USB
cable that came with your phone, as after -
market cables may not work.
Your phone may ask you to approve the use
of the Android Auto™ app before use.
Android Auto™
1 — Repeat Music Track
2 — Music Track And Time
3 — Shuffle Music Tracks
4 — Music Track Information
5 — Show Songs Currently In Queue To Be
Played
6 — Browse Music By
7 — Music Source
2020_JEEP_M6_UG_UK.book Page 271