AUX JEEP COMPASS 2020 Owner handbook (in English)
[x] Cancel search | Manufacturer: JEEP, Model Year: 2020, Model line: COMPASS, Model: JEEP COMPASS 2020Pages: 328, PDF Size: 8.85 MB
Page 9 of 328
7
WINDSHIELD WIPERS AND WASHERS ..... 34
Windshield Wiper Operation............. 35
Rain Sensing Wipers — If
Equipped ...................................... 35 Rear Window Wiper/Washer ............ 36
CLIMATE CONTROLS............................... 36
Automatic Climate Controls
Overview ........................................ 37 Automatic Temperature Control
(ATC) ........................................... 43 Operating Tips ............................... 44
WINDOWS ............................................ 45
Power Window Controls ................... 45
Auto-Down Feature ........................ 45
Auto-Up Feature With Anti-Pinch
Protection ..................................... 45 Window Lockout Switch .................. 46
Wind Buffeting .............................. 46
POWER SUNROOF WITH POWER SHADE — IF
EQUIPPED ............................................ 46
Opening Sunroof ............................ 47
Opening Sunroof — Vent ................. 47
Closing Sunroof .............................. 47
Opening Power Shade ..................... 47
Closing Power Shade....................... 48
Pinch Protect Feature ..................... 48
Sunroof Maintenance ...................... 48
Ignition Off Operation ..................... 48
HOOD ....................................................49
Opening The Hood ......................... 49
Closing The Hood ........................... 49
LIFTGATE...............................................50
Opening ........................................ 50
Closing .......................................... 50
Power Liftgate — If Equipped ......... 50
INTERNAL EQUIPMENT ........................... 52
Power Outlets ................................ 52
Power Inverter — If Equipped ......... 53
ROOF LUGGAGE RACK — IF EQUIPPED ....54
GETTING TO KNOW YOUR INSTRUMENT
PANEL
INSTRUMENT CLUSTER DISPLAY ............ 55
Instrument Cluster Display Location And
Controls ....................................... 55 Oil Change Indicator System — If
Equipped ...................................... 56 Gear Shift Indicator (GSI) — If
Equipped ...................................... 56 Instrument Cluster Display Menu
Items ........................................... 56 Diesel Displays .............................. 57
Fuel System Messages .................... 57
TRIP COMPUTER ...................................59 WARNING LIGHTS AND MESSAGES ..........59
Red Warning Lights .........................59
Yellow Warning Lights .....................62
Yellow Indicator Lights ....................66
Green Indicator Lights .....................68
White Indicator Lights .....................69
Blue Indicator Lights .......................70
Gray Indicator Lights .......................71
ONBOARD DIAGNOSTIC SYSTEM —
OBD II ...................................................71
Onboard Diagnostic System (OBD II)
Cybersecurity..................................71
SAFETY
SAFETY FEATURES .................................72
Anti-Lock Brake System (ABS) ........72
Electronic Brake Control System ......73
AUXILIARY DRIVING SYSTEMS ................80
Blind Spot Monitoring (BSM) — If
Equipped .......................................80 Forward Collision Warning (FCW) With
Mitigation — If Equipped ................84 Tire Pressure Monitoring System
(TPMS) .........................................86
2020_JEEP_M6_UG_UK.book Page 7
Page 11 of 328
9
LANESENSE — IF EQUIPPED ................ 162
LaneSense Operation .................... 162
Turning LaneSense On Or Off ........ 162
LaneSense Warning Message ......... 162
Changing LaneSense Status........... 164
PARKVIEW REAR BACK UP CAMERA — IF
EQUIPPED ........................................... 164
REFUELING THE VEHICLE ...................... 165
Emergency Fuel Filler Door
Release ....................................... 166
REFUELING THE VEHICLE — DIESEL
ENGINE ............................................... 167
Adblue (UREA) — If Equipped....... 169
VEHICLE LOADING ............................... 171
Certification Label ........................ 171
TRAILER TOWING ................................. 171
Common Towing Definitions .......... 171
Trailer Towing Weights (Maximum Trailer
Weight Ratings) ........................... 173 Towing Requirements ................... 173
RECREATIONAL TOWING (BEHIND
MOTORHOME, ETC.) ............................ 175
Towing This Vehicle Behind Another
Vehicle ........................................ 175 Recreational Towing — Front-Wheel
Drive (FWD) Models ...................... 175 Recreational Towing — 4X4
Models ........................................ 176
IN CASE OF EMERGENCY
HAZARD WARNING FLASHERS...............177
BULB REPLACEMENT............................177
Replacement Bulbs ...................... 177
High Intensity Discharge (HID)
Headlamps — If Equipped ............ 179 Replacing Exterior Bulbs ............... 179
FUSES.................................................182
General Information...................... 182
Fuse Location .............................. 182
Engine Compartment Fuses/Distribution
Unit ............................................ 182 Engine Compartment Fuses/Auxiliary
Unit ............................................ 185 Interior Fuses............................... 186
Rear Cargo Fuse/Relay Distribution
Unit ............................................ 187
JACKING AND TIRE CHANGING ..............189
Jack Location/Spare Tire Stowage .. 189
Preparations For Jacking .............. 190
Jacking Instructions .................... 190
Road Tire Installation ................... 193
EC Declaration Of Conformance ..... 194
Jack Usage Precautions ................ 195
TIRE SERVICE KIT — IF EQUIPPED ........196
JUMP STARTING .................................202
Preparations For Jump Start .......... 202
Jump Starting Procedure............... 203
REFUELING IN EMERGENCY — IF
EQUIPPED............................................204 IF YOUR ENGINE OVERHEATS ...............204
GEAR SELECTOR OVERRIDE ...................205
FREEING A STUCK VEHICLE...................206
TOWING A DISABLED VEHICLE ..............207
Without The Key Fob .....................208
Front-Wheel Drive (FWD) Models — With
Key Fob .......................................208 4x4 Models ..................................208
Emergency Tow Hooks ..................209
Tow Eye Usage — If Equipped ......209
ENHANCED ACCIDENT RESPONSE SYSTEM
(EARS) ...............................................211 EVENT DATA RECORDER (EDR) ..............211
SERVICING AND MAINTENANCE
SCHEDULED SERVICING ........................212
1.4L Gasoline Engine ...................212
Diesel Engines ..............................217
ENGINE COMPARTMENT .......................222
1.4L Engine .................................222
2.0L Diesel Engine .......................223
1.6L Diesel Engine .......................224
Checking Oil Level ........................225
Adding Washer Fluid ....................225
Maintenance-Free Battery .............226
Pressure Washing..........................227
2020_JEEP_M6_UG_UK.book Page 9
Page 12 of 328
10
DEALER SERVICE ................................ 227
Air Conditioner Maintenance.......... 227
Wiper Blades ............................... 228
Exhaust System ........................... 228
Cooling System ............................ 229
Brake System .............................. 230
Manual Transmission — If
Equipped ..................................... 231 Automatic Transmission ................ 231
RAISING THE VEHICLE .......................... 232TIRES ................................................. 232
Tires — General Information ......... 232
Tire Types .................................... 236
Spare Tires — If Equipped ............ 237
Tire Chains (Traction Devices) ....... 239
Tire Rotation Recommendations .... 239
STORING THE VEHICLE ......................... 240
BODYWORK ......................................... 241
Preserving The Bodywork ............... 241
INTERIORS ......................................... 242
Seats And Fabric Parts .................. 242
Plastic And Coated Parts ............... 243
Leather Parts ............................... 243
Glass Surfaces ............................ 243
TECHNICAL SPECIFICATIONS
IDENTIFICATION DATA .......................... 244
Vehicle Identification Number ....... 244
WHEEL AND TIRE TORQUE
SPECIFICATIONS ..................................244
Torque Specifications ................... 244
DIMENSIONS .......................................245
WHEELS ..............................................247
WEIGHTS ............................................249
FUEL REQUIREMENTS — GASOLINE
ENGINE ...............................................250
1.4L Turbo Gasoline Engine .......... 250
Ethanol ....................................... 250
Materials Added To Fuel ............... 250
Gasoline/Oxygenate Blends............ 250
Fuel Icon Identification Compliant To
EN16942 .................................... 251 Fuel System Cautions ................... 252
Carbon Monoxide Warnings ........... 252
FUEL REQUIREMENTS — DIESEL
ENGINE ..............................................252
Diesel Engine .............................. 252
Fuel Icon Identification Compliant To
EN16942 .................................... 253
FLUID CAPACITIES ..............................254 FLUIDS AND LUBRICANTS .....................255
Engine ........................................ 255
Chassis ...................................... 259
FUEL CONSUMPTION AND CO2
EMISSIONS ........................................260 MOPAR ACCESSORIES .........................260
Authentic Accessories By Mopar .... 260
MULTIMEDIA
UCONNECT SYSTEMS ...........................262
CYBERSECURITY .................................262
UCONNECT 3 WITH 5–INCH DISPLAY — IF
EQUIPPED............................................263
Uconnect 3 With 5–inch Display At A
Glance .........................................263 Clock Setting ...............................263
Audio Setting ...............................263
Radio Operation ...........................264
USB/Audio Jack (AUX)/Bluetooth®
Operation .....................................265 Voice Text Reply (Not Compatible With
iPhone®) ....................................266 Apps — If Equipped......................267
UCONNECT 4 WITH 7-INCH DISPLAY ....267
Uconnect 4 At A Glance ...............267
Drag & Drop Menu Bar .................268
Radio ..........................................269
Media Hub — USB/Audio Jack (AUX) —
If Equipped ..................................270 Android Auto™ — If Equipped .......271
Apple CarPlay® Integration — If
Equipped .....................................272 Apps — If Equipped......................273
2020_JEEP_M6_UG_UK.book Page 10
Page 13 of 328
11
UCONNECT 4C/4C NAV WITH 8.4–INCH
DISPLAY ............................................. 274
Uconnect 4C/4C NAV At A
Glance ........................................ 274 Drag & Drop Menu Bar .................. 275
Radio .......................................... 275
Media Hub — USB/Audio Jack (AUX) —
If Equipped.................................. 276 Android Auto™ — If Equipped ...... 278
Apple CarPlay® Integration — If
Equipped ..................................... 282 Apps — If Equipped ..................... 284
UCONNECT SETTINGS .......................... 284STEERING WHEEL AUDIO CONTROLS ..... 285
Radio Operation ........................... 285
Media Mode ................................. 285
NAVIGATION — IF EQUIPPED ................ 285
Changing The Navigation Voice Prompt
Volume ........................................ 285 Finding Points Of Interest.............. 286
Finding A Place By Spelling The
Name .......................................... 286 One-Step Voice Destination Entry ... 286
Setting Your Home Location .......... 286
Home .......................................... 287
Adding A Stop .............................. 287
Taking A Detour ........................... 287
Map Update ................................. 287
UCONNECT PHONE ...............................288
Uconnect Phone (Bluetooth Hands Free
Calling) ....................................... 288 Pairing (Wirelessly Connecting) Your
Mobile Phone To The Uconnect
System ........................................ 289 Common Phone Commands
(Examples) ................................. 292 Mute (Or Unmute) Microphone During
Call............................................. 293 Transfer Ongoing Call Between Handset
And Vehicle ................................. 293 Phonebook ................................. 293
Voice Command Tips .................... 293
Changing The Volume ................... 293
Using Do Not Disturb ................... 293
Incoming Text Messages .............. 294
Helpful Tips And Common Questions To
Improve Bluetooth® Performance With
Your Uconnect System.................. 295
UCONNECT VOICE RECOGNITION QUICK
TIPS ...................................................296
Introducing Uconnect ................... 296
Get Started .................................. 297
Basic Voice Commands ................. 297
Radio .......................................... 297
Media ......................................... 298
Phone ......................................... 299 Voice Text Reply — If Equipped .....300
Climate ........................................301
Navigation (4C NAV) — If
Equipped .....................................301 Siri® Eyes Free — If Equipped .....302
Using Do Not Disturb ...................302
Android Auto™ — If Equipped ......302
Apple CarPlay® — If Equipped .....303
Additional Information...................304
CUSTOMER ASSISTANCE
IF YOU NEED ASSISTANCE ...................305
ARGENTINA .................................305
AUSTRALIA .................................305
AUSTRIA .....................................305
BALANCE OF THE CARIBBEAN .....306
BELGIUM ....................................306
BOLIVIA.......................................306
BRAZIL ........................................306
BULGARIA ...................................306
CHILE .........................................306
CHINA .........................................307
COLOMBIA...................................307
COSTA RICA ................................307
CROATIA .....................................307
CZECH REPUBLIC ........................307
2020_JEEP_M6_UG_UK.book Page 11
Page 82 of 328
SAFETY
80
Traction Control System (TCS)
The Traction Control System (TCS) monitors
the amount of wheel spin of each of the
driven wheels. If wheel spin is detected, the
TCS may apply brake pressure to the spin-
ning wheel(s) and/or reduce vehicle power to
provide enhanced acceleration and stability.
A feature of the TCS, Brake Limited Differen -
tial (BLD), functions similar to a limited slip
differential and controls the wheel spin
across a driven axle. If one wheel on a driven
axle is spinning faster than the other, the
system will apply the brake of the spinning
wheel. This will allow more vehicle torque to
be applied to the wheel that is not spinning.
BLD may remain enabled even if TCS and
ESC are in a reduced mode.
Trailer Sway Control (TSC)
Trailer Sway Control (TSC) uses sensors in
the vehicle to recognize an excessively
swaying trailer and will take the appropriate
actions to attempt to stop the sway. TSC will
become active automatically once an exces -
sively swaying trailer is recognized.
NOTE:
TSC cannot stop all trailers from swaying.
Always use caution when towing a trailer and
follow the trailer tongue weight recommen -dations. Refer to “Trailer Towing” in
“Starting And Operating” for further informa
-
tion.
When TSC is functioning, the “ESC Activa -
tion/Malfunction Indicator Light” will flash,
the engine power may be reduced and you
may feel the brakes being applied to indi -
vidual wheels to attempt to stop the trailer
from swaying. TSC is disabled when the ESC
system is in the “Partial Off” or “Full Off”
modes.
AUXILIARY DRIVING
SYSTEMS
Blind Spot Monitoring (BSM) — If
Equipped
The Blind Spot Monitoring (BSM) system
uses two radar-based sensors, located inside
the rear bumper fascia, to detect highway
licensable vehicles (automobiles, trucks,
motorcycles, etc.) that enter the blind spot
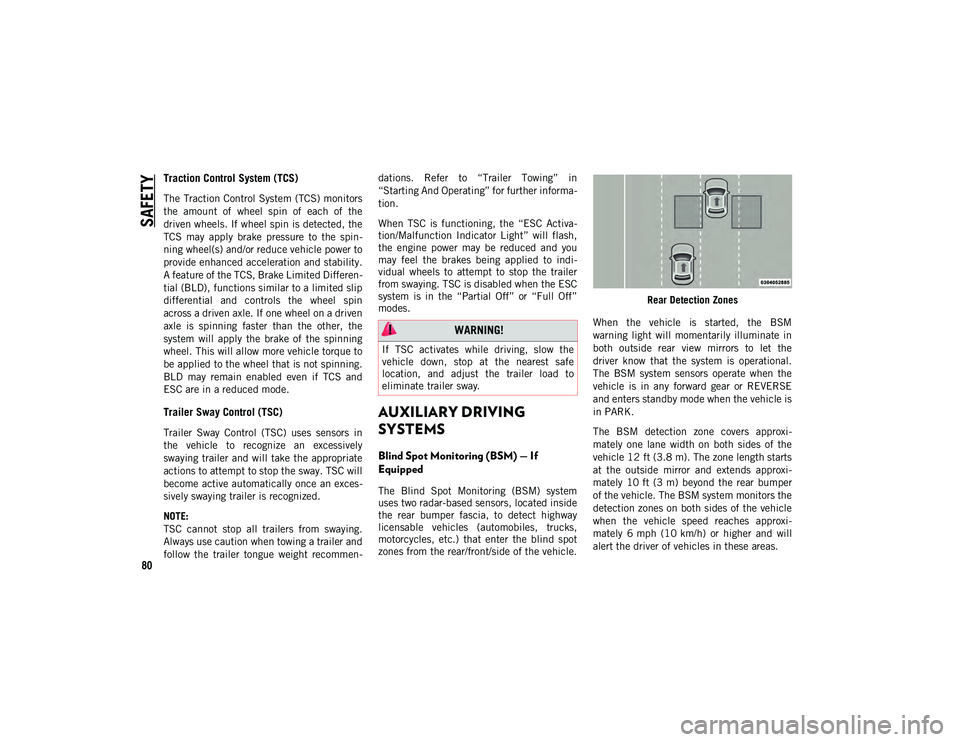
zones from the rear/front/side of the vehicle. Rear Detection Zones
When the vehicle is started, the BSM
warning light will momentarily illuminate in
both outside rear view mirrors to let the
driver know that the system is operational.
The BSM system sensors operate when the
vehicle is in any forward gear or REVERSE
and enters standby mode when the vehicle is
in PARK.
The BSM detection zone covers approxi -
mately one lane width on both sides of the
vehicle 12 ft (3.8 m). The zone length starts
at the outside mirror and extends approxi -
mately 10 ft (3 m) beyond the rear bumper
of the vehicle. The BSM system monitors the
detection zones on both sides of the vehicle
when the vehicle speed reaches approxi -
mately 6 mph (10 km/h) or higher and will
alert the driver of vehicles in these areas.
WARNING!
If TSC activates while driving, slow the
vehicle down, stop at the nearest safe
location, and adjust the trailer load to
eliminate trailer sway.
2020_JEEP_M6_UG_UK.book Page 80
Page 187 of 328
185
The Fuse Box has additional ATO fuse holders installed on the bottom of the box.
Engine Compartment Fuses/Auxiliary Unit
The auxiliary fuse panel is located in front of the battery on the left side of the engine compartment.Fxx
– –10 Amp Red Dual Battery Control Relay With NON DDCT
Trans (*)
7.5 Amp Brown Dual Battery Control Relay With DDCT Trans (*)
Cavity ATO / UNIVAL Fuse Description
F15 Amp Biege Drivetrain Control Module (4x4/AWD (*)
F2 10 Amp Red ECM — Start Diagnostic Sense (*)
F3 2 Amp Grey Mod Steering Control (*)
CavityMaxi Fuse Cartridge Fuse Mini Fuse Description
F01––20 Amp Yellow NOX Sensor Feed
F02 ––10 Amp Red PM Sensor Feed
F03 ––15 Amp Blue SCR Module Feed
F05 –30 Amp Pink – ATS Relay Feed
F06 –40 Amp Tan – SCR Module Feed
CavityHC Micro ISO Description
R130 AmpATS Relay
R2 30 AmpSCR Relay
CavityMaxi Fuse Cartridge Fuse Mini Fuse Description
2020_JEEP_M6_UG_UK.book Page 185
Page 267 of 328
265
USB/Audio Jack (AUX)/Bluetooth®
Operation
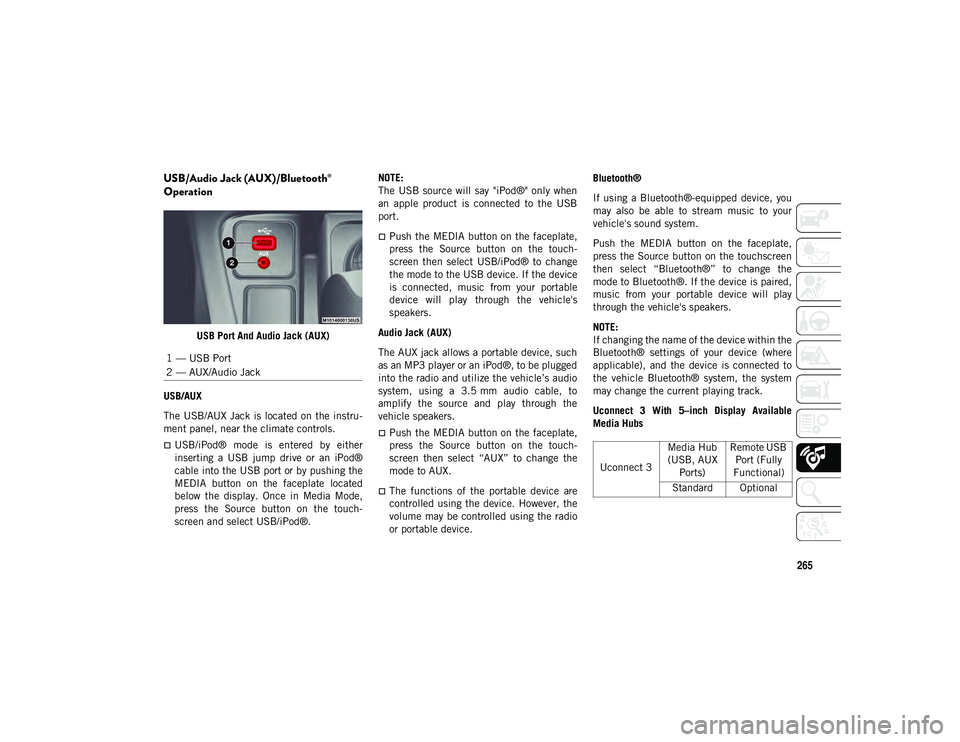
USB Port And Audio Jack (AUX)
USB/AUX
The USB/AUX Jack is located on the instru -
ment panel, near the climate controls.
USB/iPod® mode is entered by either
inserting a USB jump drive or an iPod®
cable into the USB port or by pushing the
MEDIA button on the faceplate located
below the display. Once in Media Mode,
press the Source button on the touch -
screen and select USB/iPod®. NOTE:
The USB source will say "iPod®" only when
an apple product is connected to the USB
port.
Push the MEDIA button on the faceplate,
press the Source button on the touch
-
screen then select USB/iPod® to change
the mode to the USB device. If the device
is connected, music from your portable
device will play through the vehicle's
speakers.
Audio Jack (AUX)
The AUX jack allows a portable device, such
as an MP3 player or an iPod®, to be plugged
into the radio and utilize the vehicle’s audio
system, using a 3.5 mm audio cable, to
amplify the source and play through the
vehicle speakers.
Push the MEDIA button on the faceplate,
press the Source button on the touch -
screen then select “AUX” to change the
mode to AUX.
The functions of the portable device are
controlled using the device. However, the
volume may be controlled using the radio
or portable device. Bluetooth®
If using a Bluetooth®-equipped device, you
may also be able to stream music to your
vehicle's sound system.
Push the MEDIA button on the faceplate,
press the Source button on the touchscreen
then select “Bluetooth®” to change the
mode to Bluetooth®. If the device is paired,
music from your portable device will play
through the vehicle's speakers.
NOTE:
If changing the name of the device within the
Bluetooth® settings of your device (where
applicable), and the device is connected to
the vehicle Bluetooth® system, the system
may change the current playing track.
Uconnect 3 With 5–inch Display Available
Media Hubs
1 — USB Port
2 — AUX/Audio Jack
Uconnect 3
Media Hub
(USB, AUX Ports) Remote USB
Port (Fully
Functional)
Standard Optional
2020_JEEP_M6_UG_UK.book Page 265
Page 269 of 328
267
Apps — If Equipped
To access the Apps, Press the More button,
and the press the Apps button to browse the
list of applications:
EcoDrive
MyCar
TuneIn
Deezer
Reuters
Twitter
Facebook Check-In, and many more.
UCONNECT 4 WITH 7-INCH
DISPLAY
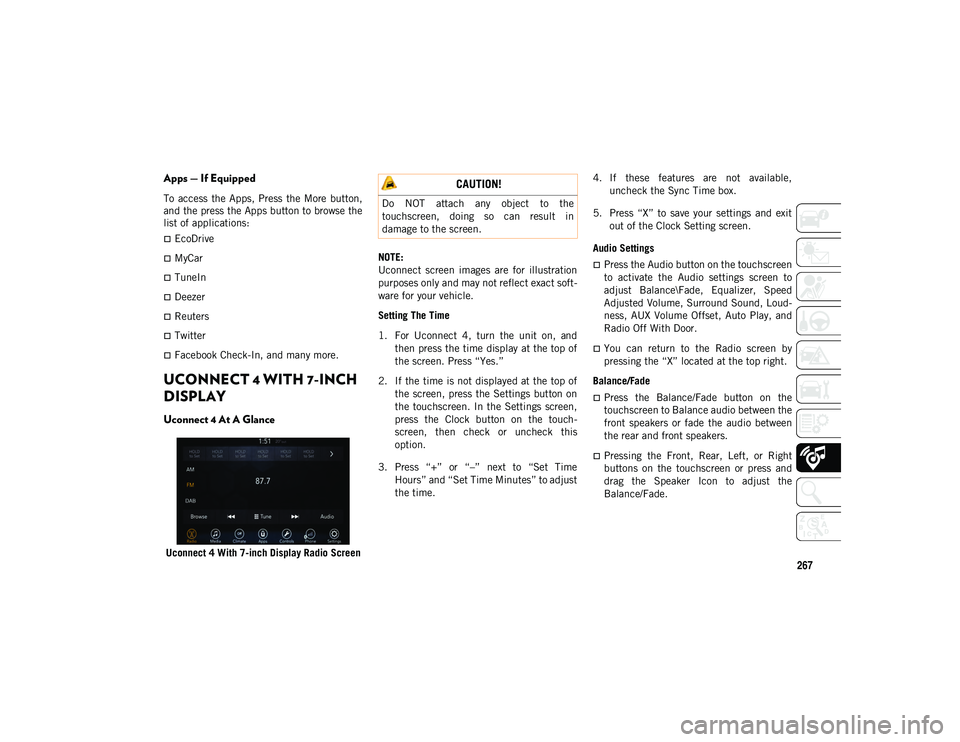
Uconnect 4 At A Glance
Uconnect 4 With 7-inch Display Radio ScreenNOTE:
Uconnect screen images are for illustration
purposes only and may not reflect exact soft
-
ware for your vehicle.
Setting The Time
1. For Uconnect 4, turn the unit on, and then press the time display at the top of
the screen. Press “Yes.”
2. If the time is not displayed at the top of the screen, press the Settings button on
the touchscreen. In the Settings screen,
press the Clock button on the touch -
screen, then check or uncheck this
option.
3. Press “+” or “–” next to “Set Time Hours” and “Set Time Minutes” to adjust
the time. 4. If these features are not available,
uncheck the Sync Time box.
5. Press “X” to save your settings and exit out of the Clock Setting screen.
Audio Settings
Press the Audio button on the touchscreen
to activate the Audio settings screen to
adjust Balance\Fade, Equalizer, Speed
Adjusted Volume, Surround Sound, Loud -
ness, AUX Volume Offset, Auto Play, and
Radio Off With Door.
You can return to the Radio screen by
pressing the “X” located at the top right.
Balance/Fade
Press the Balance/Fade button on the
touchscreen to Balance audio between the
front speakers or fade the audio between
the rear and front speakers.
Pressing the Front, Rear, Left, or Right
buttons on the touchscreen or press and
drag the Speaker Icon to adjust the
Balance/Fade.
CAUTION!
Do NOT attach any object to the
touchscreen, doing so can result in
damage to the screen.
2020_JEEP_M6_UG_UK.book Page 267
Page 270 of 328
MULTIMEDIA
268
Equalizer
Press the Equalizer button on the touch-
screen to activate the Equalizer screen.
Press the + or – buttons on the touch -
screen, or press and drag over the level bar
for each of the equalizer bands. The level
value, which spans between plus or minus
nine, is displayed at the bottom of each of
the bands.
Speed Adjusted Volume
Press the Speed Adjusted Volume button
on the touchscreen to activate the Speed
Adjusted Volume screen. The Speed
Adjusted Volume is adjusted by pressing
the volume level indicator. This alters the
automatic adjustment of the audio volume
with variation to vehicle speed.
Loudness — If Equipped
Press the On button on the touchscreen to
activate Loudness. Press “Off” to deacti -
vate this feature. When Loudness is On,
the sound quality at lower volumes
improves.
AUX Volume Offset
Press the AUX Volume Offset button on
the touchscreen to activate the AUX
Volume Offset screen. The AUX Volume Offset is adjusted by pressing of the + and
– buttons. This alters the AUX input audio
volume. The level value, which spans
between plus or minus three, is displayed
above the adjustment bar.
Auto Play — If Equipped
Press the Auto Play button on the touch -
screen to activate the Auto Play screen.
The Auto Play feature has two settings
“On” and “Off.” With Auto Play on, music
begins playing from a connected device,
immediately after it is connected to the
radio.
Auto On Radio — If Equipped
The Radio automatically turns on when
vehicle is in run or will recall whether it
was on or off at last ignition off.
Radio Off With Door — If Equipped
Press the Radio Off With Door button on
the touchscreen to activate the Radio Off
With Door screen. The Radio Off With Door
feature, when activated, keeps the radio
on until the driver or passenger door is
opened, or when the Radio Off Delay
selected time has expired.
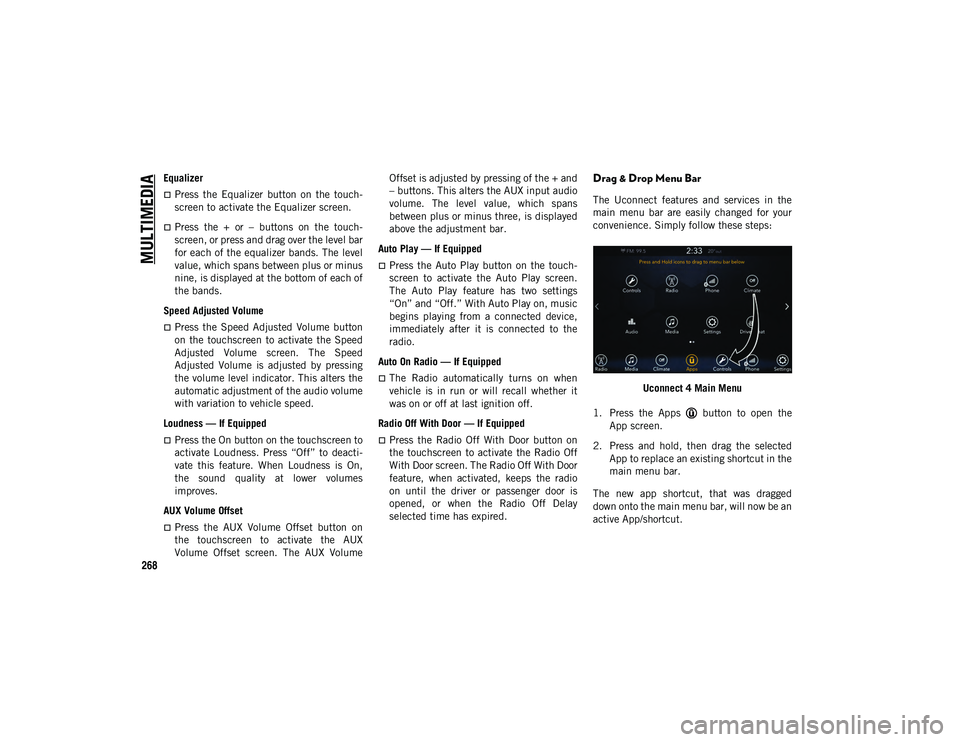
Drag & Drop Menu Bar
The Uconnect features and services in the
main menu bar are easily changed for your
convenience. Simply follow these steps:
Uconnect 4 Main Menu
1. Press the Apps button to open the App screen.
2. Press and hold, then drag the selected App to replace an existing shortcut in the
main menu bar.
The new app shortcut, that was dragged
down onto the main menu bar, will now be an
active App/shortcut.
2020_JEEP_M6_UG_UK.book Page 268
Page 272 of 328
MULTIMEDIA
270
Media Hub — USB/Audio Jack (AUX) — If
Equipped
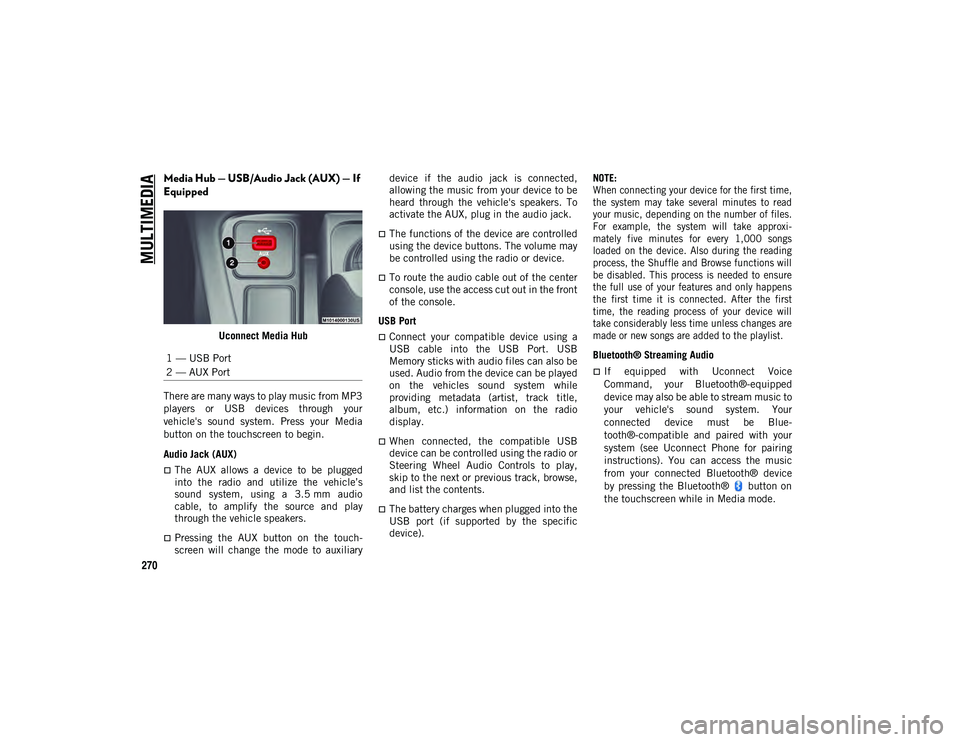
Uconnect Media Hub
There are many ways to play music from MP3
players or USB devices through your
vehicle's sound system. Press your Media
button on the touchscreen to begin.
Audio Jack (AUX)
The AUX allows a device to be plugged
into the radio and utilize the vehicle’s
sound system, using a 3.5 mm audio
cable, to amplify the source and play
through the vehicle speakers.
Pressing the AUX button on the touch -
screen will change the mode to auxiliary device if the audio jack is connected,
allowing the music from your device to be
heard through the vehicle's speakers. To
activate the AUX, plug in the audio jack.
The functions of the device are controlled
using the device buttons. The volume may
be controlled using the radio or device.
To route the audio cable out of the center
console, use the access cut out in the front
of the console.
USB Port
Connect your compatible device using a
USB cable into the USB Port. USB
Memory sticks with audio files can also be
used. Audio from the device can be played
on the vehicles sound system while
providing metadata (artist, track title,
album, etc.) information on the radio
display.
When connected, the compatible USB
device can be controlled using the radio or
Steering Wheel Audio Controls to play,
skip to the next or previous track, browse,
and list the contents.
The battery charges when plugged into the
USB port (if supported by the specific
device).
NOTE:
When connecting your device for the first time,
the system may take several minutes to read
your music, depending on the number of files.
For example, the system will take approxi
-
mately five minutes for every 1,000 songs
loaded on the device. Also during the reading
process, the Shuffle and Browse functions will
be disabled. This process is needed to ensure
the full use of your features and only happens
the first time it is connected. After the first
time, the reading process of your device will
take considerably less time unless changes are
made or new songs are added to the playlist.
Bluetooth® Streaming Audio
If equipped with Uconnect Voice
Command, your Bluetooth®-equipped
device may also be able to stream music to
your vehicle's sound system. Your
connected device must be Blue-
tooth®-compatible and paired with your
system (see Uconnect Phone for pairing
instructions). You can access the music
from your connected Bluetooth® device
by pressing the Bluetooth® button on
the touchscreen while in Media mode.
1 — USB Port
2 — AUX Port
2020_JEEP_M6_UG_UK.book Page 270