tailgate JEEP GLADIATOR 2023 Owners Manual
[x] Cancel search | Manufacturer: JEEP, Model Year: 2023, Model line: GLADIATOR, Model: JEEP GLADIATOR 2023Pages: 448, PDF Size: 17.37 MB
Page 5 of 448

3
EXTERIOR LIGHTS.................................................. 56 Headlight Switch...............................................56
Daytime Running Lights (DRLs) —
If Equipped .......................................................57
High/Low Beam Switch....................................57
Automatic High Beam Headlamp Control —
If Equipped .......................................................58
Flash-To-Pass....................................................58
Automatic Headlights — If Equipped ..............58
Lights-On Reminder..........................................58
Front Fog Lights — If Equipped .......................58
Turn Signals ......................................................59
Lane Change Assist — If Equipped ..................59
Bed Lights — If Equipped ................................59
INTERIOR LIGHTS ................................................. 59
Interior Courtesy Lights ....................................59
Dimmer Control ................................................60
WINDSHIELD WIPERS AND WASHERS .............. 60
Windshield Wiper Operation ............................60
CLIMATE CONTROLS ............................................. 61
Automatic Climate Control Descriptions And
Functions ..........................................................62
Manual Climate Control Descriptions And
Functions ..........................................................64
Automatic Temperature Control (ATC) —
If Equipped........................................................67
Climate Voice Commands................................67
Operating Tips .................................................67 INTERIOR STORAGE AND EQUIPMENT ............... 68
Storage..............................................................68
Lighted Cupholders — If Equipped ..................71
AUX/USB Control ..............................................71
Jeep® Wireless Speaker —
If Equipped........................................................72
Power Outlets ..................................................77
Power Inverters — If Equipped ........................78
Auxiliary Switches — If Equipped ....................79
POWER WINDOWS — IF EQUIPPED .....................81
Auto-Down Feature .........................................81
Manual Sliding Rear Window —
If Equipped........................................................81
Window Lockout Switch ...................................82
Wind Buffeting .................................................82
GLADIATOR TOPS .................................................82
Provided Tools ..................................................82
Lowering The Soft Top
S
..............................83
Raising The Soft Top
S
.................................89
Removing The Soft Top
S
.............................92
Installing The Soft Top .....................................93
Hard Top Front Panel(s) Removal
S
............95
Hard Top Front Panel(s) Installation ..............98
Removing The Hard Top
S
...........................98
Installing The Hard Top ................................. 100
Sunrider® For Hard Top —
If Equipped..................................................... 101 DOOR FRAME — IF EQUIPPED WITH A
SOFT TOP ............................................................. 104
Door Frame Removal .................................... 104
Door Frame Installation ................................ 105
FOLDING WINDSHIELD ...................................... 106
Lowering The Windshield.............................. 106
Raising The Windshield ................................ 108
HOOD .................................................................... 109
Opening The Hood ........................................ 109
Closing The Hood .......................................... 109
TAILGATE .............................................................. 110
Opening.......................................................... 110Three-Position Tailgate ................................. 110
Closing ........................................................... 111
BED RAIL TIE DOWN SYSTEM —
IF EQUIPPED ........................................................ 111
TONNEAU COVER — IF EQUIPPED ..................... 112
Tonneau Cover Installation .......................... 112
Tonneau Cover Removal .............................. 114
ROOF LUGGAGE RACK — IF EQUIPPED ............ 115
GETTING TO KNOW YOUR
INSTRUMENT PANEL
GASOLINE INSTRUMENT CLUSTERS ................ 116
Instrument Cluster Descriptions
S
........... 118
DIESEL INSTRUMENT CLUSTERS ...................... 119
Instrument Cluster Descriptions .................. 121
23_JT_OM_EN_USC_t.book Page 3
Page 17 of 448
15
GETTING TO KNOW YOUR VEHICLE
KEYS
KEY FOB
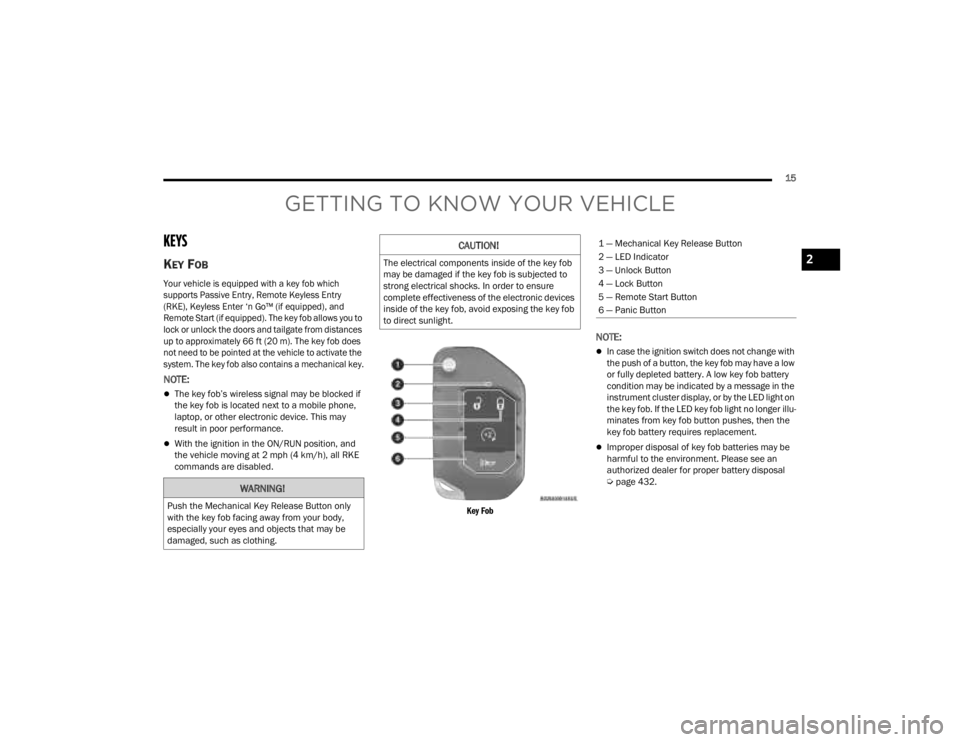
Your vehicle is equipped with a key fob which
supports Passive Entry, Remote Keyless Entry
(RKE), Keyless Enter ‘n Go™ (if equipped), and
Remote Start (if equipped). The key fob allows you to
lock or unlock the doors and tailgate from distances
up to approximately 66 ft (20 m). The key fob does
not need to be pointed at the vehicle to activate the
system. The key fob also contains a mechanical key.
NOTE:
The key fob’s wireless signal may be blocked if
the key fob is located next to a mobile phone,
laptop, or other electronic device. This may
result in poor performance.
With the ignition in the ON/RUN position, and
the vehicle moving at 2 mph (4 km/h), all RKE commands are disabled.
Key Fob
NOTE:
In case the ignition switch does not change with
the push of a button, the key fob may have a low
or fully depleted battery. A low key fob battery
condition may be indicated by a message in the
instrument cluster display, or by the LED light on
the key fob. If the LED key fob light no longer illu-
minates from key fob button pushes, then the
key fob battery requires replacement.
Improper disposal of key fob batteries may be
harmful to the environment. Please see an
authorized dealer for proper battery disposal
Ú page 432.
WARNING!
Push the Mechanical Key Release Button only
with the key fob facing away from your body,
especially your eyes and objects that may be
damaged, such as clothing.
CAUTION!
The electrical components inside of the key fob
may be damaged if the key fob is subjected to
strong electrical shocks. In order to ensure
complete effectiveness of the electronic devices
inside of the key fob, avoid exposing the key fob
to direct sunlight.
1 — Mechanical Key Release Button
2 — LED Indicator
3 — Unlock Button
4 — Lock Button
5 — Remote Start Button
6 — Panic Button
2
23_JT_OM_EN_USC_t.book Page 15
Page 18 of 448
16GETTING TO KNOW YOUR VEHICLE
To Lock/Unlock The Doors And Tailgate
Push and release the unlock button on the key fob
once to unlock the driver’s door, or twice to unlock
all the doors. To lock all the doors, push the lock
button once.
When the doors are unlocked, the turn signals will
flash and the illuminated entry system will be
activated. When the doors are locked, the turn
signals will flash and the horn will chirp.
NOTE:
All doors can be programmed to unlock on the
first push of the unlock button through
Uconnect Settings Úpage 215.
The mechanical flip key can be used to lock or
unlock the doors, tailgate, glove compartment,
storage compartments (if equipped), and rear
seatbacks.
Key Left Vehicle Feature
If a valid key fob is no longer detected inside the
vehicle while the vehicle’s ignition system is in the
ON/RUN or START position, the message “Key Fob
Has Left The Vehicle” will be shown in the
instrument cluster display along with an interior
chime. An exterior audible and visual alert will also
be activated to warn the driver. The vehicle’s horn will rapidly chirp three times
along with a single flash of the vehicle’s exterior
lights.
NOTE:
The doors have to be open and then closed in
order for the vehicle to check for the presence of
a key fob; the Key Left Vehicle feature will not
activate until all of the doors are closed.
These alerts will not be activated in situations
where the vehicle’s engine is left running with
the key fob inside.
Replacing The Battery In The Key Fob
The recommended replacement battery is
CR2450.
NOTE:
Customers are recommended to use a battery
obtained from Mopar®. Aftermarket coin
battery dimensions may not meet the original
OEM coin battery dimensions.
Perchlorate material — special handling may
apply. See www.dtsc.ca.gov/hazardouswaste/
perchlorate for further information.
Do not touch the battery terminals that are on
the back housing or the printed circuit board.
When a key fob battery is low, a warning will be
indicated on the vehicle’s instrument cluster,
and the fob LED will no longer illuminate with a
button push.
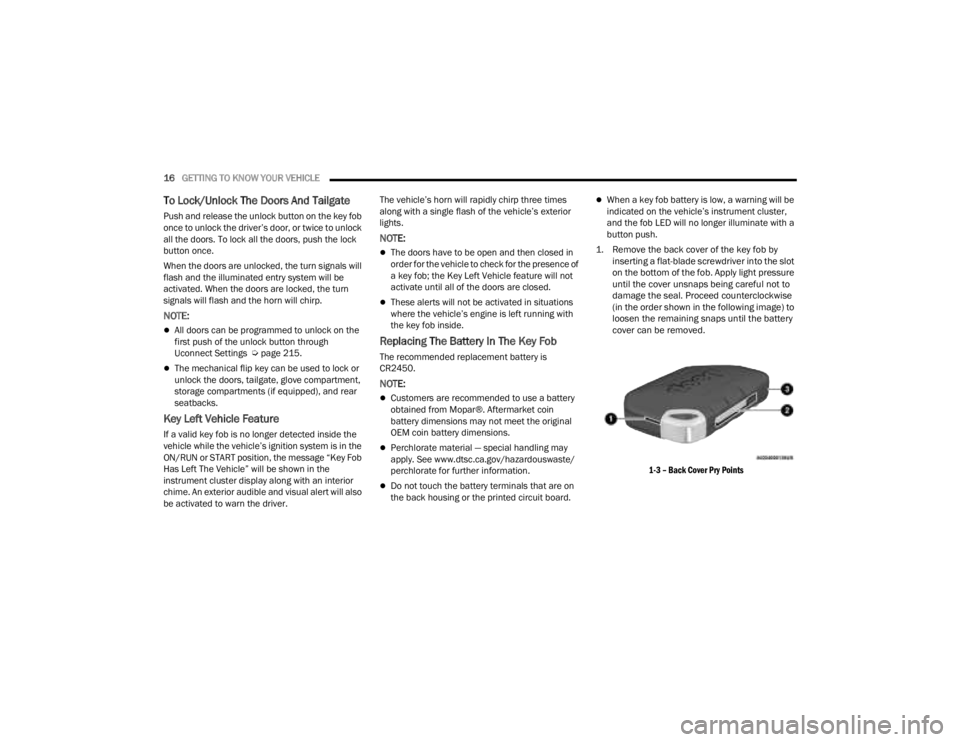
1. Remove the back cover of the key fob by inserting a flat-blade screwdriver into the slot
on the bottom of the fob. Apply light pressure
until the cover unsnaps being careful not to
damage the seal. Proceed counterclockwise
(in the order shown in the following image) to
loosen the remaining snaps until the battery
cover can be removed.
1-3 – Back Cover Pry Points
23_JT_OM_EN_USC_t.book Page 16
Page 22 of 448
20GETTING TO KNOW YOUR VEHICLE
NOTE:When opening the driver's door with the ignition in
the ON/RUN (engine not running) position, a chime
will sound to remind you to place the ignition in the
OFF position. In addition to the chime, the
message will display “Ignition Or Accessory On” in
the cluster.
REMOTE START — IF EQUIPPED
(GASOLINE)
This system uses the key fob to start the
engine conveniently from outside the
vehicle while still maintaining security.
The system has a range of 328 ft (100 m).
Remote Start is used to defrost windows in cold
weather, and to reach a comfortable climate in all
ambient conditions before the driver enters the
vehicle.
NOTE:
The vehicle must be equipped with an auto -
matic transmission to be equipped with Remote
Start.
Obstructions between the vehicle and key fob
may reduce this range Ú page 432.
HOW TO USE REMOTE START
Push and release the Remote Start button on the
key fob twice within five seconds. The vehicle
doors and tailgate will lock, the turn signals will
flash twice, and the horn will chirp twice (if
equipped). Pushing the Remote Start button again
will shut the engine off.
NOTE:
With Remote Start, the engine will only run for
15 minutes.
Remote Start can only be used twice.
If an engine fault is present or fuel level is low,
the vehicle will start and then shut down in
10 seconds.
The parking lights will turn on and remain on
during Remote Start mode.
For security, power window operation is
disabled when the vehicle is in the Remote Start
mode.
The ignition must be placed in the ON/RUN posi -
tion before the Remote Start sequence can be
repeated for a third cycle.
All of the following conditions must be met before
the engine will remote start:
Gear selector in PARK
Doors closed
Hood closed
Hazard switch off
Brake switch inactive (brake pedal not pressed)
Battery at an acceptable charge level
Panic button not pushed
System not disabled from previous Remote
Start event
CAUTION!
An unlocked vehicle is an invitation for thieves.
Always remove key fob from the vehicle and lock
all doors when leaving the vehicle unattended.
WARNING!
Do not start or run an engine in a closed
garage or confined area. Exhaust gas contains
carbon monoxide (CO) which is odorless and
colorless. Carbon monoxide is poisonous and
can cause serious injury or death when
inhaled.
Keep key fobs away from children. Operation
of the Remote Start system, windows, door
locks or other controls could cause serious
injury or death.
23_JT_OM_EN_USC_t.book Page 20
Page 24 of 448
22GETTING TO KNOW YOUR VEHICLE
For more information on ATC, MTC, and climate
control settings, see Ú page 61.
NOTE:These features will stay on through the duration of
Remote Start, or until the ignition is placed in the
ON/RUN position. The climate control settings will
change if manually adjusted by the driver while the
vehicle is in remote start mode. This includes
turning the climate controls off using the OFF
button.
REMOTE START WINDSHIELD WIPER
D
E-ICER ACTIVATION — IF EQUIPPED
When Remote Start is active and the outside
ambient temperature is less than 33°F (0.6°C),
the Windshield Wiper De-Icer will activate. Exiting
Remote Start will resume previous operation. If the
Windshield Wiper De-Icer was active, the
Windshield Wiper De-Icer timer and operation will
continue.
REMOTE START CANCEL MESSAGE
The following messages will display in the
instrument cluster if the vehicle fails to remote
start or exits Remote Start prematurely:
Remote Start Canceled — Door Open
Remote Start Canceled — Hood Open
Remote Start Canceled — Fuel Low
Remote Start Canceled — Tailgate Open
Remote Start Canceled — Time Expired
Remote Start Disabled — Start Vehicle To Reset
The message will stay active until the ignition is
placed in the ON/RUN position.
REMOTE START — IF EQUIPPED (DIESEL)
This system uses the key fob to start the
engine conveniently from outside the
vehicle while still maintaining security.
The system has a range of approximately
328 ft (100 m).
Remote Start is used to defrost windows in cold
weather, and to reach a comfortable climate in all
ambient conditions before the driver enters the
vehicle.
NOTE:
The vehicle must be equipped with an auto -
matic transmission to be equipped with Remote
Start.
Obstructions between the vehicle and the key
fob may reduce this range.
The Remote Start system will wait for the Wait
To Start yellow telltale to extinguish before
cranking the engine Ú page 132. This allows
time for the engine preheat cycle to heat the
cylinder air, and is normal in cold weather.
HOW TO USE REMOTE START
Push and release the Remote Start button on the
key fob twice within five seconds. The vehicle
doors and tailgate will lock, the turn signals will
flash twice, and the horn will chirp twice. Pushing
the Remote Start button again will shut the engine
off.
NOTE:
With Remote Start, the engine will only run for
15 minutes.
Remote Start can only be used twice.
If an engine fault is present or fuel level is low,
the vehicle will start and then shut down in 10
seconds.
WARNING!
Do not start or run an engine in a closed
garage or confined area. Exhaust gas contains
carbon monoxide (CO) which is odorless and
colorless. Carbon monoxide is poisonous and
can cause serious injury or death when
inhaled.
Keep key fobs away from children. Operation
of the Remote Start system, windows, door
locks or other controls could cause serious
injury or death.
23_JT_OM_EN_USC_t.book Page 22
Page 26 of 448
24GETTING TO KNOW YOUR VEHICLE
occurred, the Vehicle Security system will arm
regardless of whether you are in the vehicle or not.
If you remain in the vehicle and open a door, the
alarm will sound. If this occurs, disarm the Vehicle
Security system.
If the Vehicle Security system is armed and the
battery becomes disconnected, the Vehicle
Security system will remain armed when the
battery is reconnected; the exterior lights will flash,
and the horn will sound. If this occurs, disarm the
Vehicle Security system.
REARMING OF THE SYSTEM
If something triggers the alarm and no action is
taken to disarm it, the Vehicle Security system will
turn the horn off after a 29 second cycle (with five
seconds between cycles and up to eight cycles if
the trigger remains active) and then rearm itself.
DOORS
MANUAL DOOR LOCKS
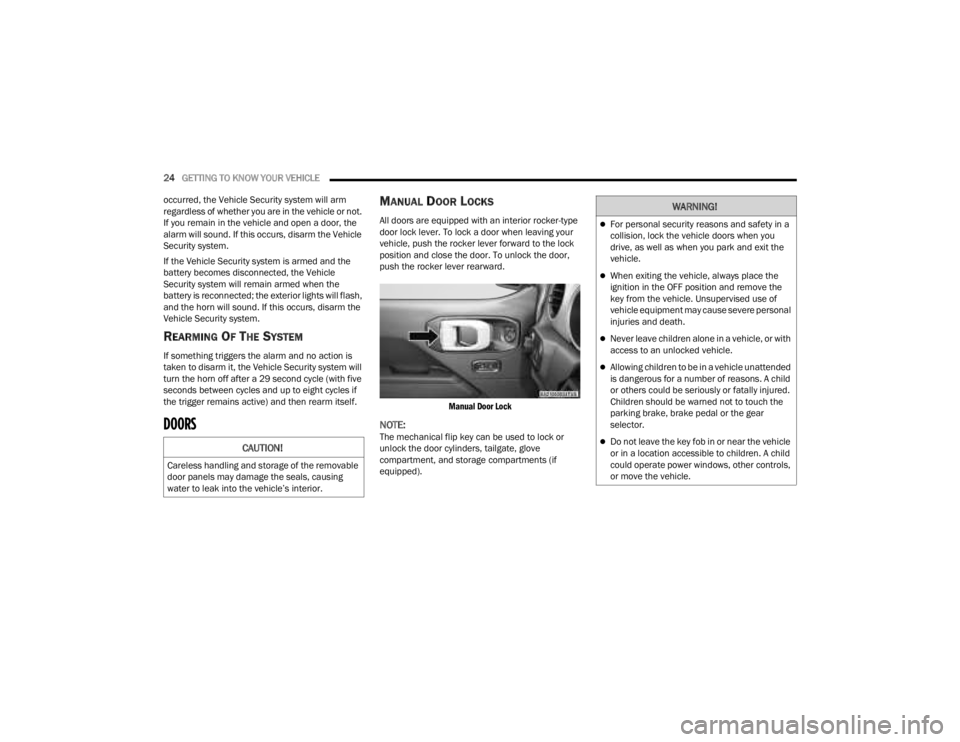
All doors are equipped with an interior rocker-type
door lock lever. To lock a door when leaving your
vehicle, push the rocker lever forward to the lock
position and close the door. To unlock the door,
push the rocker lever rearward.
Manual Door Lock
NOTE:The mechanical flip key can be used to lock or
unlock the door cylinders, tailgate, glove
compartment, and storage compartments (if
equipped).CAUTION!
Careless handling and storage of the removable
door panels may damage the seals, causing
water to leak into the vehicle’s interior.
WARNING!
For personal security reasons and safety in a
collision, lock the vehicle doors when you
drive, as well as when you park and exit the
vehicle.
When exiting the vehicle, always place the
ignition in the OFF position and remove the
key from the vehicle. Unsupervised use of
vehicle equipment may cause severe personal
injuries and death.
Never leave children alone in a vehicle, or with
access to an unlocked vehicle.
Allowing children to be in a vehicle unattended
is dangerous for a number of reasons. A child
or others could be seriously or fatally injured.
Children should be warned not to touch the
parking brake, brake pedal or the gear
selector.
Do not leave the key fob in or near the vehicle
or in a location accessible to children. A child
could operate power windows, other controls,
or move the vehicle.
23_JT_OM_EN_USC_t.book Page 24
Page 27 of 448
GETTING TO KNOW YOUR VEHICLE25
(Continued)
POWER DOOR LOCKS — IF EQUIPPED
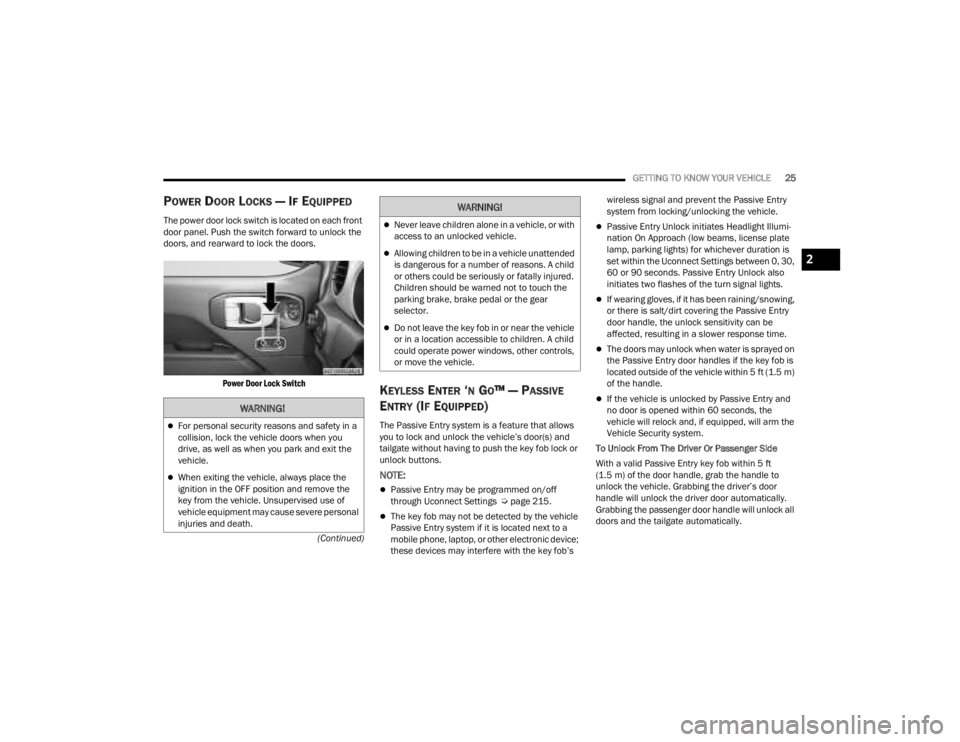
The power door lock switch is located on each front
door panel. Push the switch forward to unlock the
doors, and rearward to lock the doors.
Power Door Lock Switch
KEYLESS ENTER ‘N GO™ — PASSIVE
E
NTRY (IF EQUIPPED)
The Passive Entry system is a feature that allows
you to lock and unlock the vehicle’s door(s) and
tailgate without having to push the key fob lock or
unlock buttons.
NOTE:
Passive Entry may be programmed on/off
through Uconnect Settings Ú page 215.
The key fob may not be detected by the vehicle
Passive Entry system if it is located next to a
mobile phone, laptop, or other electronic device;
these devices may interfere with the key fob’s wireless signal and prevent the Passive Entry
system from locking/unlocking the vehicle.
Passive Entry Unlock initiates Headlight Illumi
-
nation On Approach (low beams, license plate
lamp, parking lights) for whichever duration is
set within the Uconnect Settings between 0, 30,
60 or 90 seconds. Passive Entry Unlock also
initiates two flashes of the turn signal lights.
If wearing gloves, if it has been raining/snowing,
or there is salt/dirt covering the Passive Entry
door handle, the unlock sensitivity can be
affected, resulting in a slower response time.
The doors may unlock when water is sprayed on
the Passive Entry door handles if the key fob is
located outside of the vehicle within 5 ft (1.5 m)
of the handle.
If the vehicle is unlocked by Passive Entry and
no door is opened within 60 seconds, the
vehicle will relock and, if equipped, will arm the
Vehicle Security system.
To Unlock From The Driver Or Passenger Side
With a valid Passive Entry key fob within 5 ft
(1.5 m) of the door handle, grab the handle to
unlock the vehicle. Grabbing the driver’s door
handle will unlock the driver door automatically.
Grabbing the passenger door handle will unlock all
doors and the tailgate automatically.WARNING!
For personal security reasons and safety in a
collision, lock the vehicle doors when you
drive, as well as when you park and exit the
vehicle.
When exiting the vehicle, always place the
ignition in the OFF position and remove the
key from the vehicle. Unsupervised use of
vehicle equipment may cause severe personal
injuries and death.
Never leave children alone in a vehicle, or with
access to an unlocked vehicle.
Allowing children to be in a vehicle unattended
is dangerous for a number of reasons. A child
or others could be seriously or fatally injured.
Children should be warned not to touch the
parking brake, brake pedal or the gear
selector.
Do not leave the key fob in or near the vehicle
or in a location accessible to children. A child
could operate power windows, other controls,
or move the vehicle.
WARNING!
2
23_JT_OM_EN_USC_t.book Page 25
Page 80 of 448
78GETTING TO KNOW YOUR VEHICLE
(Continued)
POWER INVERTERS — IF EQUIPPED
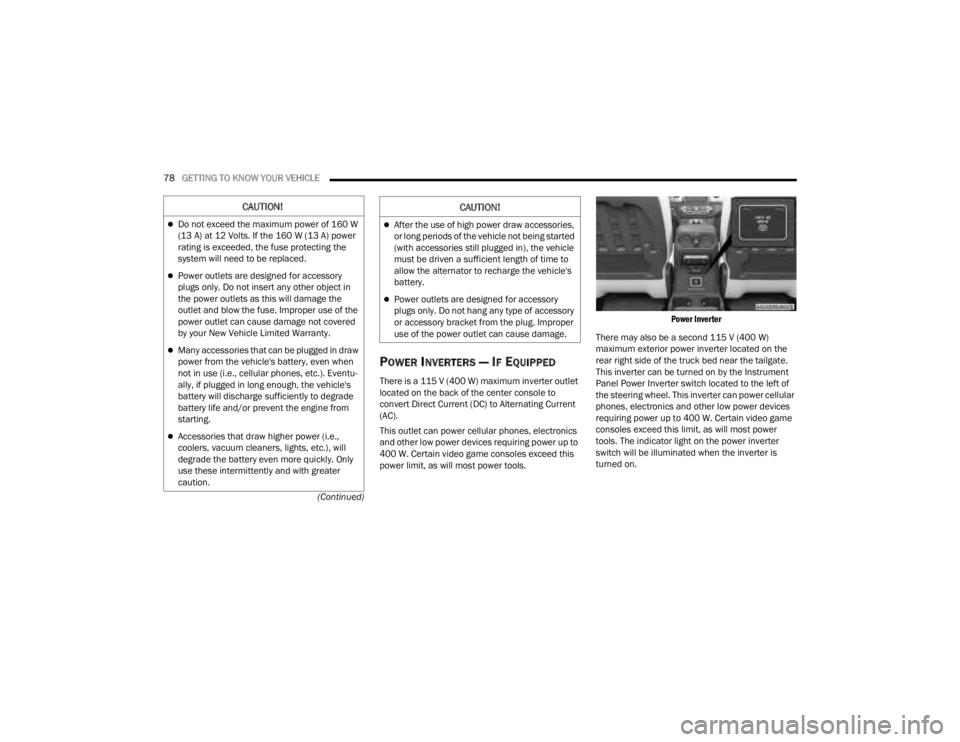
There is a 115 V (400 W) maximum inverter outlet
located on the back of the center console to
convert Direct Current (DC) to Alternating Current
(AC).
This outlet can power cellular phones, electronics
and other low power devices requiring power up to
400 W. Certain video game consoles exceed this
power limit, as will most power tools.
Power Inverter
There may also be a second 115 V (400 W)
maximum exterior power inverter located on the
rear right side of the truck bed near the tailgate.
This inverter can be turned on by the Instrument
Panel Power Inverter switch located to the left of
the steering wheel. This inverter can power cellular
phones, electronics and other low power devices
requiring power up to 400 W. Certain video game
consoles exceed this limit, as will most power
tools. The indicator light on the power inverter
switch will be illuminated when the inverter is
turned on.
CAUTION!
Do not exceed the maximum power of 160 W
(13 A) at 12 Volts. If the 160 W (13 A) power
rating is exceeded, the fuse protecting the
system will need to be replaced.
Power outlets are designed for accessory
plugs only. Do not insert any other object in
the power outlets as this will damage the
outlet and blow the fuse. Improper use of the
power outlet can cause damage not covered
by your New Vehicle Limited Warranty.
Many accessories that can be plugged in draw
power from the vehicle's battery, even when
not in use (i.e., cellular phones, etc.). Eventu -
ally, if plugged in long enough, the vehicle's
battery will discharge sufficiently to degrade
battery life and/or prevent the engine from
starting.
Accessories that draw higher power (i.e.,
coolers, vacuum cleaners, lights, etc.), will
degrade the battery even more quickly. Only
use these intermittently and with greater
caution.
After the use of high power draw accessories,
or long periods of the vehicle not being started
(with accessories still plugged in), the vehicle
must be driven a sufficient length of time to
allow the alternator to recharge the vehicle's
battery.
Power outlets are designed for accessory
plugs only. Do not hang any type of accessory
or accessory bracket from the plug. Improper
use of the power outlet can cause damage.
CAUTION!
23_JT_OM_EN_USC_t.book Page 78
Page 112 of 448
110GETTING TO KNOW YOUR VEHICLE
TAILGATE
OPENING
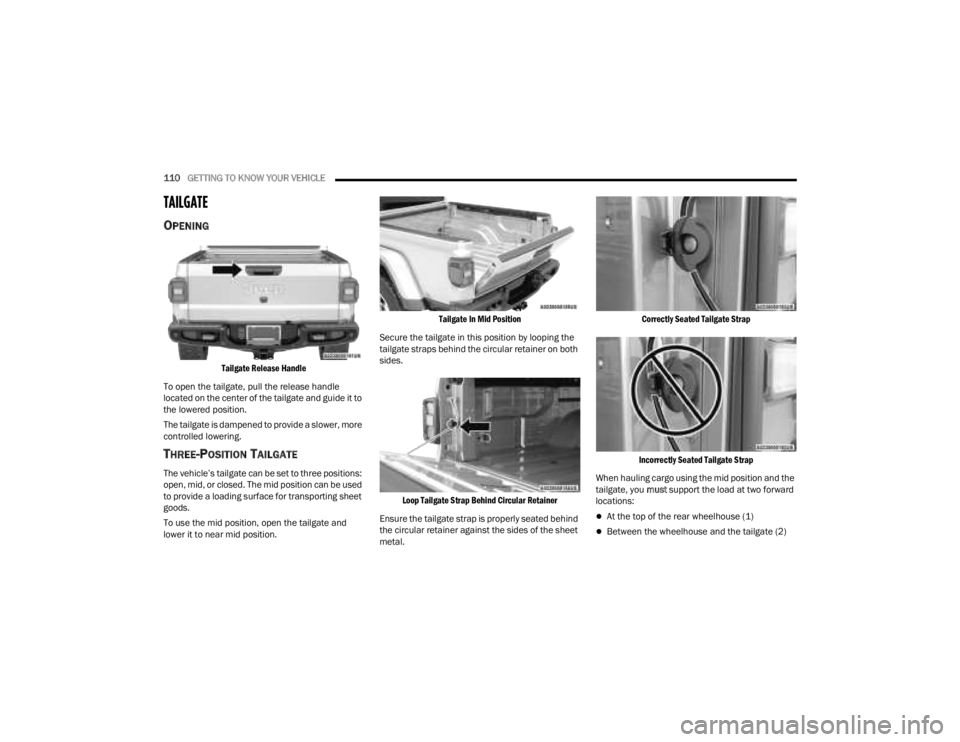
Tailgate Release Handle
To open the tailgate, pull the release handle
located on the center of the tailgate and guide it to
the lowered position.
The tailgate is dampened to provide a slower, more
controlled lowering.
THREE-POSITION TAILGATE
The vehicle’s tailgate can be set to three positions:
open, mid, or closed. The mid position can be used
to provide a loading surface for transporting sheet
goods.
To use the mid position, open the tailgate and
lower it to near mid position.
Tailgate In Mid Position
Secure the tailgate in this position by looping the
tailgate straps behind the circular retainer on both
sides.
Loop Tailgate Strap Behind Circular Retainer
Ensure the tailgate strap is properly seated behind
the circular retainer against the sides of the sheet
metal.
Correctly Seated Tailgate Strap
Incorrectly Seated Tailgate Strap
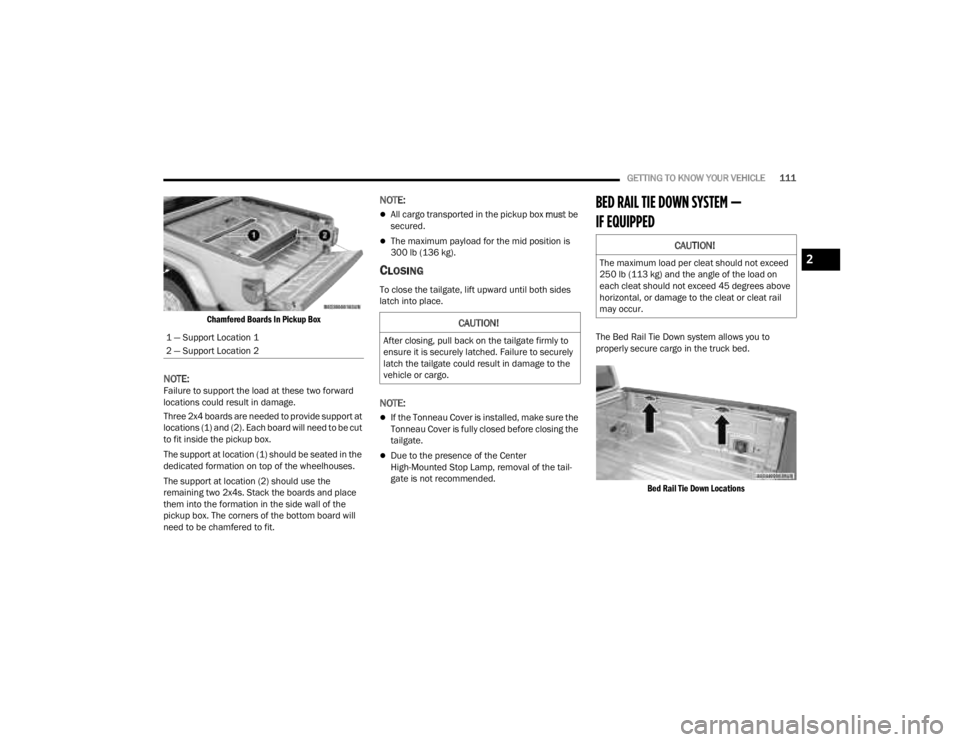
When hauling cargo using the mid position and the
tailgate, you must support the load at two forward
locations:
At the top of the rear wheelhouse (1)
Between the wheelhouse and the tailgate (2)
23_JT_OM_EN_USC_t.book Page 110
Page 113 of 448
GETTING TO KNOW YOUR VEHICLE111
Chamfered Boards In Pickup Box
NOTE:Failure to support the load at these two forward
locations could result in damage.
Three 2x4 boards are needed to provide support at
locations (1) and (2). Each board will need to be cut
to fit inside the pickup box.
The support at location (1) should be seated in the
dedicated formation on top of the wheelhouses.
The support at location (2) should use the
remaining two 2x4s. Stack the boards and place
them into the formation in the side wall of the
pickup box. The corners of the bottom board will
need to be chamfered to fit.
NOTE:
All cargo transported in the pickup box must be
secured.
The maximum payload for the mid position is
300 lb (136 kg).
CLOSING
To close the tailgate, lift upward until both sides
latch into place.
NOTE:
If the Tonneau Cover is installed, make sure the
Tonneau Cover is fully closed before closing the
tailgate.
Due to the presence of the Center
High-Mounted Stop Lamp, removal of the tail -
gate is not recommended.
BED RAIL TIE DOWN SYSTEM —
IF EQUIPPED
The Bed Rail Tie Down system allows you to
properly secure cargo in the truck bed.
Bed Rail Tie Down Locations
1 — Support Location 1
2 — Support Location 2
CAUTION!
After closing, pull back on the tailgate firmly to
ensure it is securely latched. Failure to securely
latch the tailgate could result in damage to the
vehicle or cargo.
CAUTION!
The maximum load per cleat should not exceed
250 lb (113 kg) and the angle of the load on
each cleat should not exceed 45 degrees above
horizontal, or damage to the cleat or cleat rail
may occur.2
23_JT_OM_EN_USC_t.book Page 111