JEEP GRAND CHEROKEE 2012 WK2 / 4.G Service Manual
Manufacturer: JEEP, Model Year: 2012, Model line: GRAND CHEROKEE, Model: JEEP GRAND CHEROKEE 2012 WK2 / 4.GPages: 148, PDF Size: 5.91 MB
Page 41 of 148
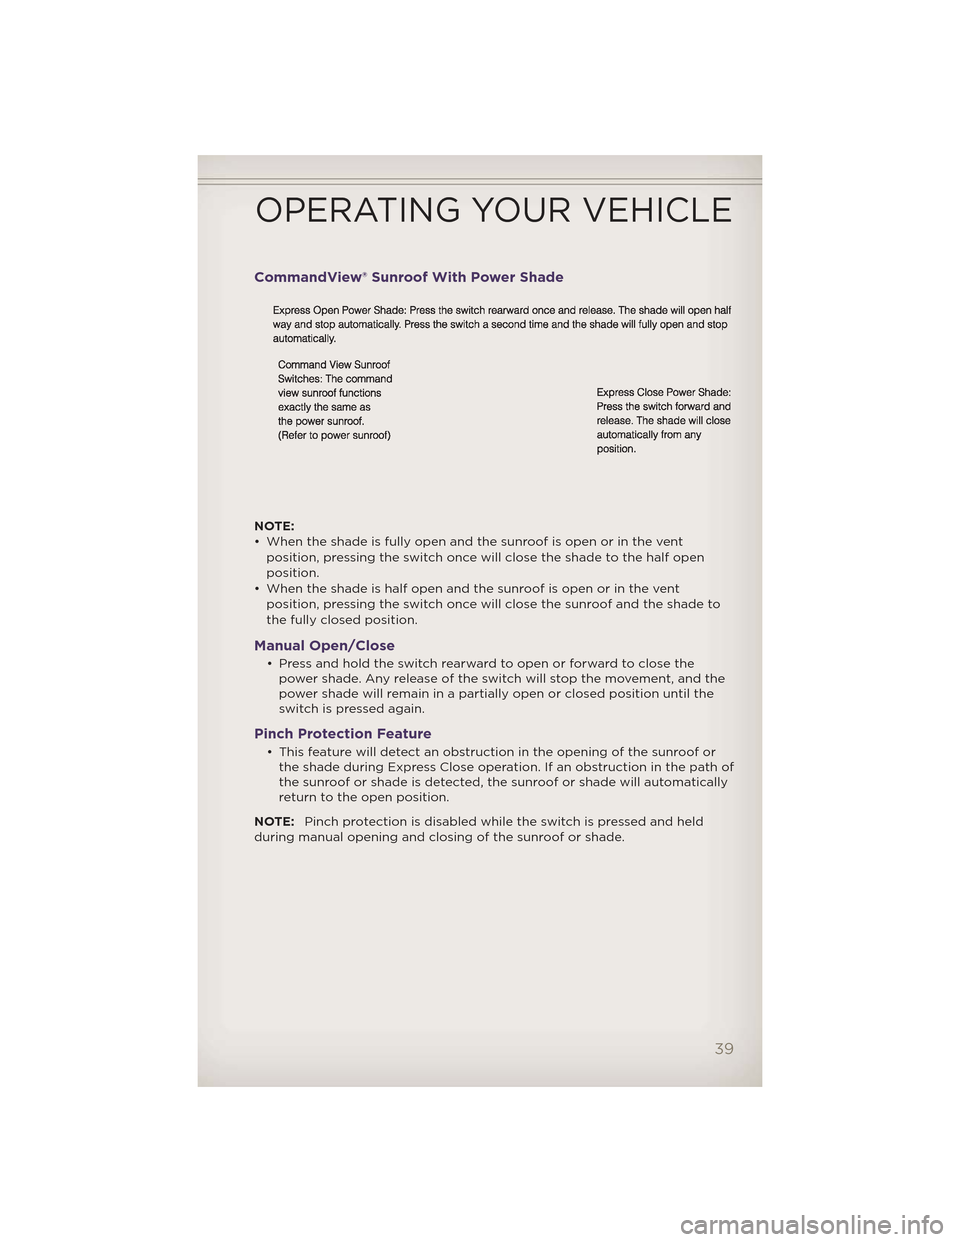
CommandView® Sunroof With Power Shade
NOTE:
• When the shade is fully open and the sunroof is open or in the ventposition, pressing the switch once will close the shade to the half open
position.
• When the shade is half open and the sunroof is open or in the vent position, pressing the switch once will close the sunroof and the shade to
the fully closed position.
Manual Open/Close
• Press and hold the switch rearward to open or forward to close thepower shade. Any release of the switch will stop the movement, and the
power shade will remain in a partially open or closed position until the
switch is pressed again.
Pinch Protection Feature
• This feature will detect an obstruction in the opening of the sunroof orthe shade during Express Close operation. If an obstruction in the path of
the sunroof or shade is detected, the sunroof or shade will automatically
return to the open position.
NOTE: Pinch protection is disabled while the switch is pressed and held
during manual opening and closing of the sunroof or shade.
OPERATING YOUR VEHICLE
39
Page 42 of 148
WARNING!
• Never leave children in a vehicle with the key in the ignition switch.Occupants, particularly unattended children, can become entrapped
by the power sunroof while operating the power sunroof switch.
Such entrapment may result in serious injury or death.
• In a collision, there is a greater risk of being thrown from a vehicle with an open sunroof. You could also be severely injured or killed.
Always fasten your seat belt properly and make sure all passengers
are properly secured.
• Do not allow small children to operate the sunroof. Never allow your fingers, other body parts, or any object to project through the
sunroof opening. Injury may result.
OPERATING YOUR VEHICLE
40
Page 43 of 148
WIND BUFFETING
• Wind buffeting can be described as a helicopter-type percussion sound.If buffeting occurs with the rear windows open, adjust the front and rear
windows together.
• If buffeting occurs with the sunroof open, adjust the sunroof opening, or adjust any window. This will minimize buffeting.
OPERATING YOUR VEHICLE
41
Page 44 of 148
YOUR VEHICLE'S SOUND SYSTEM
ELECTRONICS
42
Page 45 of 148
ELECTRONICS
43
Page 46 of 148
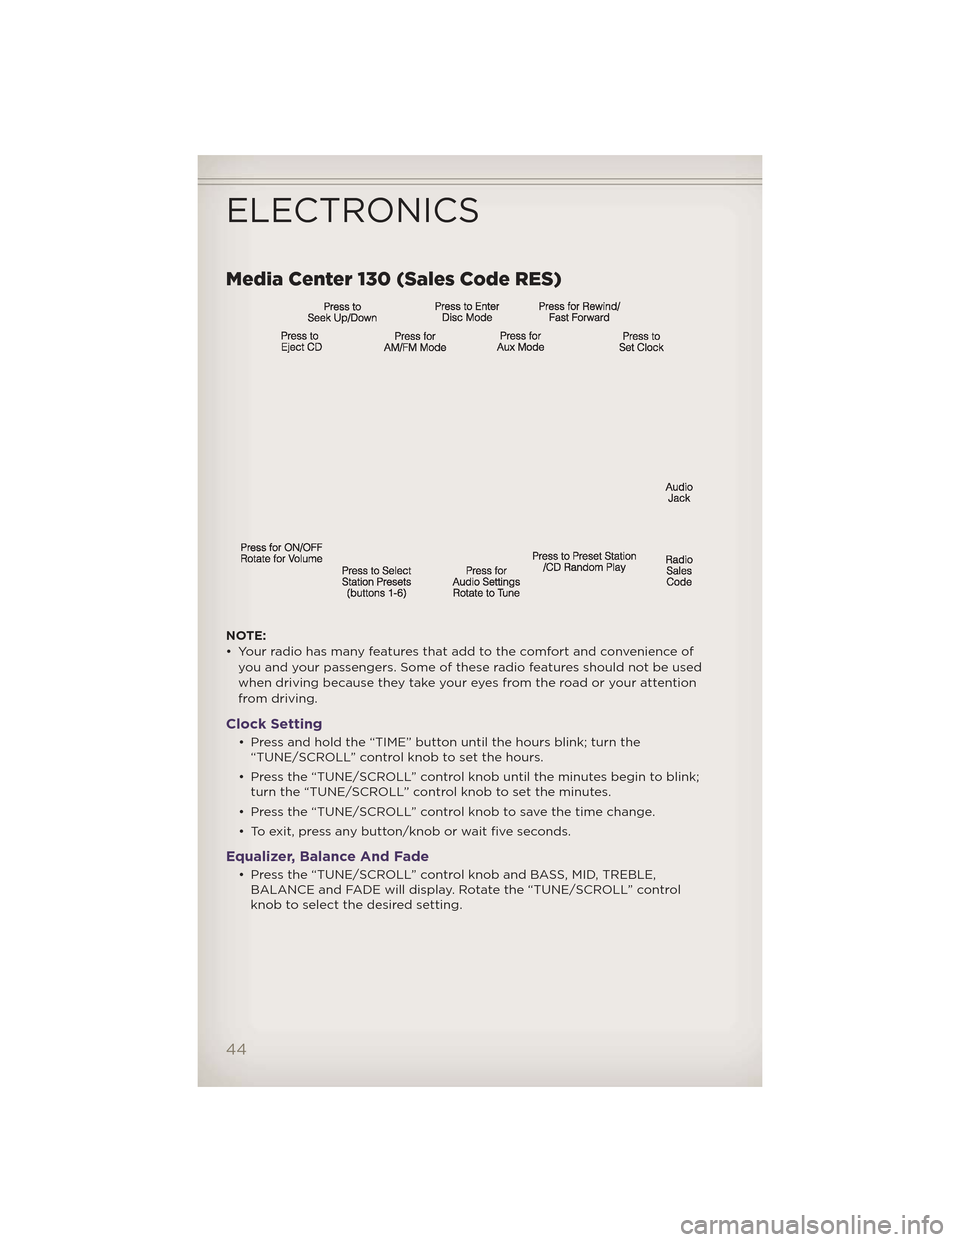
Media Center 130 (Sales Code RES)
NOTE:
• Your radio has many features that add to the comfort and convenience ofyou and your passengers. Some of these radio features should not be used
when driving because they take your eyes from the road or your attention
from driving.
Clock Setting
• Press and hold the “TIME” button until the hours blink; turn the“TUNE/SCROLL” control knob to set the hours.
• Press the “TUNE/SCROLL” control knob until the minutes begin to blink; turn the “TUNE/SCROLL” control knob to set the minutes.
• Press the “TUNE/SCROLL” control knob to save the time change.
• To exit, press any button/knob or wait five seconds.
Equalizer, Balance And Fade
• Press the “TUNE/SCROLL” control knob and BASS, MID, TREBLE, BALANCE and FADE will display. Rotate the “TUNE/SCROLL” control
knob to select the desired setting.
ELECTRONICS
44
Page 47 of 148
Radio Operation
Seek Up/Down Buttons• Press to seek through radio stations in AM, FM, or SAT bands.
• Hold either button to bypass stations without stopping.
Store Radio Presets • Press the “SET/RND” button once and SET 1 will show in the display. Then select button (1–6).
• A second station may be added to each push button. Press the “SET/RND” button twice and SET 2 will show in the display. Then select
button (1–6).
CD/DISC Operation
Seek Up/Down Buttons
• Press to seek through CD tracks.
• Hold either button to bypass tracks without stopping.
SET/RND Button (Random Play) • Press this button while the CD is playing to activate Random Play.
• This feature plays the selections on the CD in random order to provide an interesting change of pace.
Audio Jack Operation
• The Audio Jack allows a portable device, such as an MP3 player or acassette player, to be plugged into the radio and utilize the vehicle’s
audio system, using a 3.5 mm audio cable, to amplify the source and play
through the vehicle speakers.
• Pressing the “AUX” button will change the mode to auxiliary device if the Audio Jack is connected, allowing the music from your portable device
to play through the vehicle's speakers.
• The functions of the portable device are controlled using the device buttons. The volume may be controlled using the radio or portable
device.
ELECTRONICS
45
Page 48 of 148
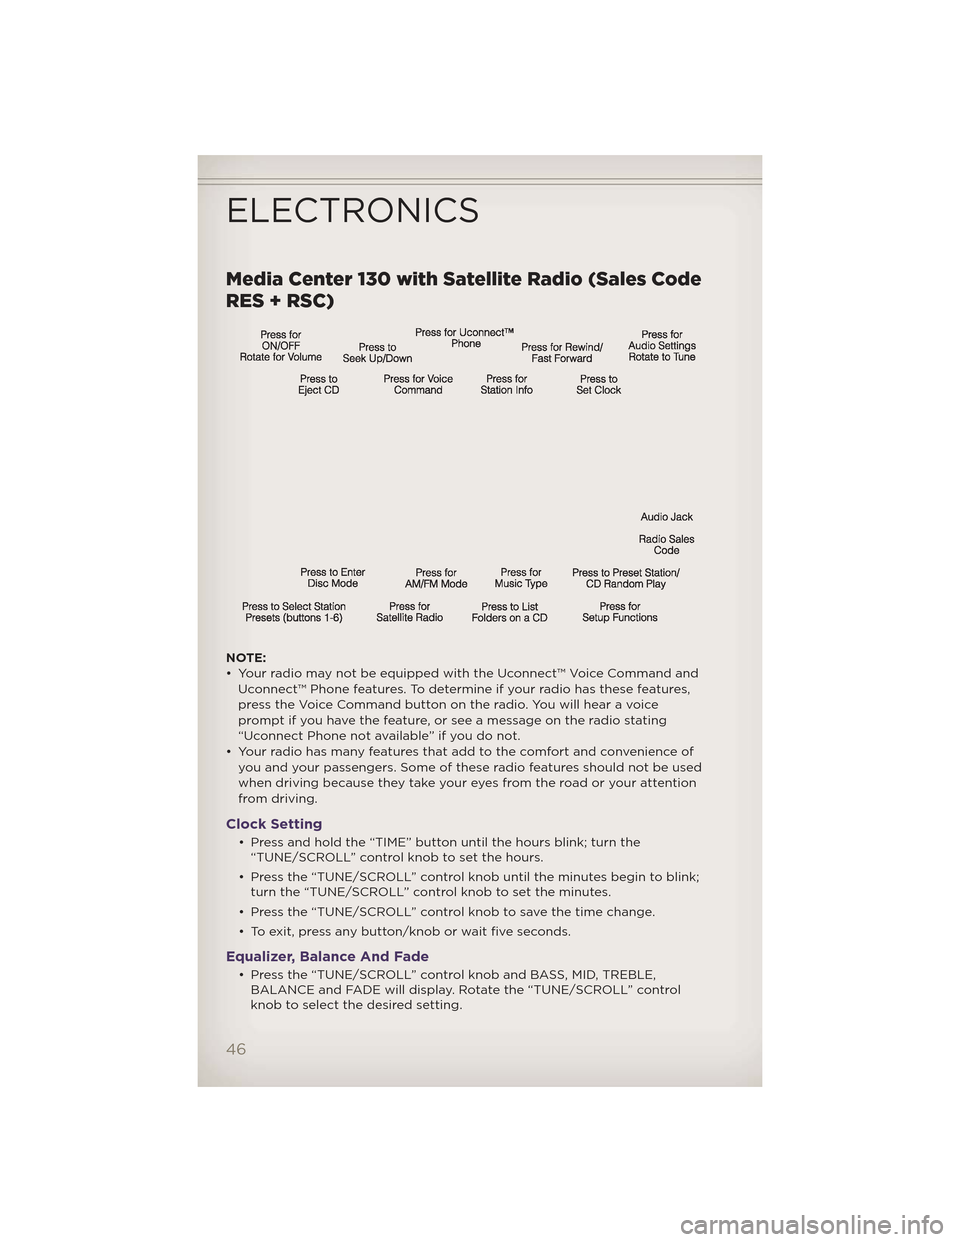
Media Center 130 with Satellite Radio (Sales Code
RES + RSC)
NOTE:
• Your radio may not be equipped with the Uconnect™ Voice Command andUconnect™ Phone features. To determine if your radio has these features,
press the Voice Command button on the radio. You will hear a voice
prompt if you have the feature, or see a message on the radio stating
“Uconnect Phone not available” if you do not.
• Your radio has many features that add to the comfort and convenience of you and your passengers. Some of these radio features should not be used
when driving because they take your eyes from the road or your attention
from driving.
Clock Setting
• Press and hold the “TIME” button until the hours blink; turn the“TUNE/SCROLL” control knob to set the hours.
• Press the “TUNE/SCROLL” control knob until the minutes begin to blink; turn the “TUNE/SCROLL” control knob to set the minutes.
• Press the “TUNE/SCROLL” control knob to save the time change.
• To exit, press any button/knob or wait five seconds.
Equalizer, Balance And Fade
• Press the “TUNE/SCROLL” control knob and BASS, MID, TREBLE, BALANCE and FADE will display. Rotate the “TUNE/SCROLL” control
knob to select the desired setting.
ELECTRONICS
46
Page 49 of 148
Radio Operation
Seek Up/Down Buttons• Press to seek through radio stations in AM, FM, or SAT bands.
• Hold either button to bypass stations without stopping.
Store Radio Presets • Press the “SET/RND” button once and SET 1 will show in the display. Then select button (1–6).
• A second station may be added to each push button. Press the “SET/RND” button twice and SET 2 will show in the display. Then select
button (1–6).
Music Type • Press the “MUSIC TYPE” button to activate this mode. Press the “MUSIC TYPE” button again or turn the “TUNE/SCROLL” control knob to select
the desired music type (Adult Hits, Country, Jazz, Oldies, Rock, etc.).
• Once a music type is chosen and the icon is displayed, press either “SEEK” button and the radio will only search for stations with the
selected music type.
NOTE: The Music Type function only operates when in FM mode.
SETUP Button • Pressing the “SETUP” button allows you to select between items that are available in that particular mode.
• Turn the “TUNE/SCROLL” control knob to scroll through the entries. Push the “AUDIO/SELECT” button to select an entry and make changes.
Sirius XM™ Satellite Radio
• Sirius XM™ Satellite Radio gives you over 130 channels, including 100%commercial-free music from nearly every genre, plus all your favorite
sports, news, talk and entertainment channels–all with crystal clear,
coast-to-coast coverage, all in one place and all at your fingertips.
• To access Sirius XM™ Satellite Radio, press the “SAT” hard-key.
CD/DISC Operation
Seek Up/Down Buttons
• Press to seek through CD tracks.
• Hold either button to bypass tracks without stopping.
SET/RND Button (Random Play) • Press this button while the CD is playing to activate Random Play.
• This feature plays the selections on the CD in random order to provide an interesting change of pace.
ELECTRONICS
47
Page 50 of 148
LIST Button• Press the “LIST” button to bring up a list of all folders on the CD. Scroll up or down the list by turning the “TUNE/SCROLL” control knob.
• To select a folder from the list, press the “TUNE/SCROLL” control knob and the radio will begin playing the files contained in that folder.
Audio Jack Operation
• The Audio Jack allows a portable device, such as an MP3 player or acassette player, to be plugged into the radio and utilize the vehicle’s
audio system, using a 3.5 mm audio cable, to amplify the source and play
through the vehicle speakers.
• Pressing the “AUX” button will change the mode to auxiliary device if the Audio Jack is connected, allowing the music from your portable device
to play through the vehicle's speakers.
• The functions of the portable device are controlled using the device buttons. The volume may be controlled using the radio or portable
device.
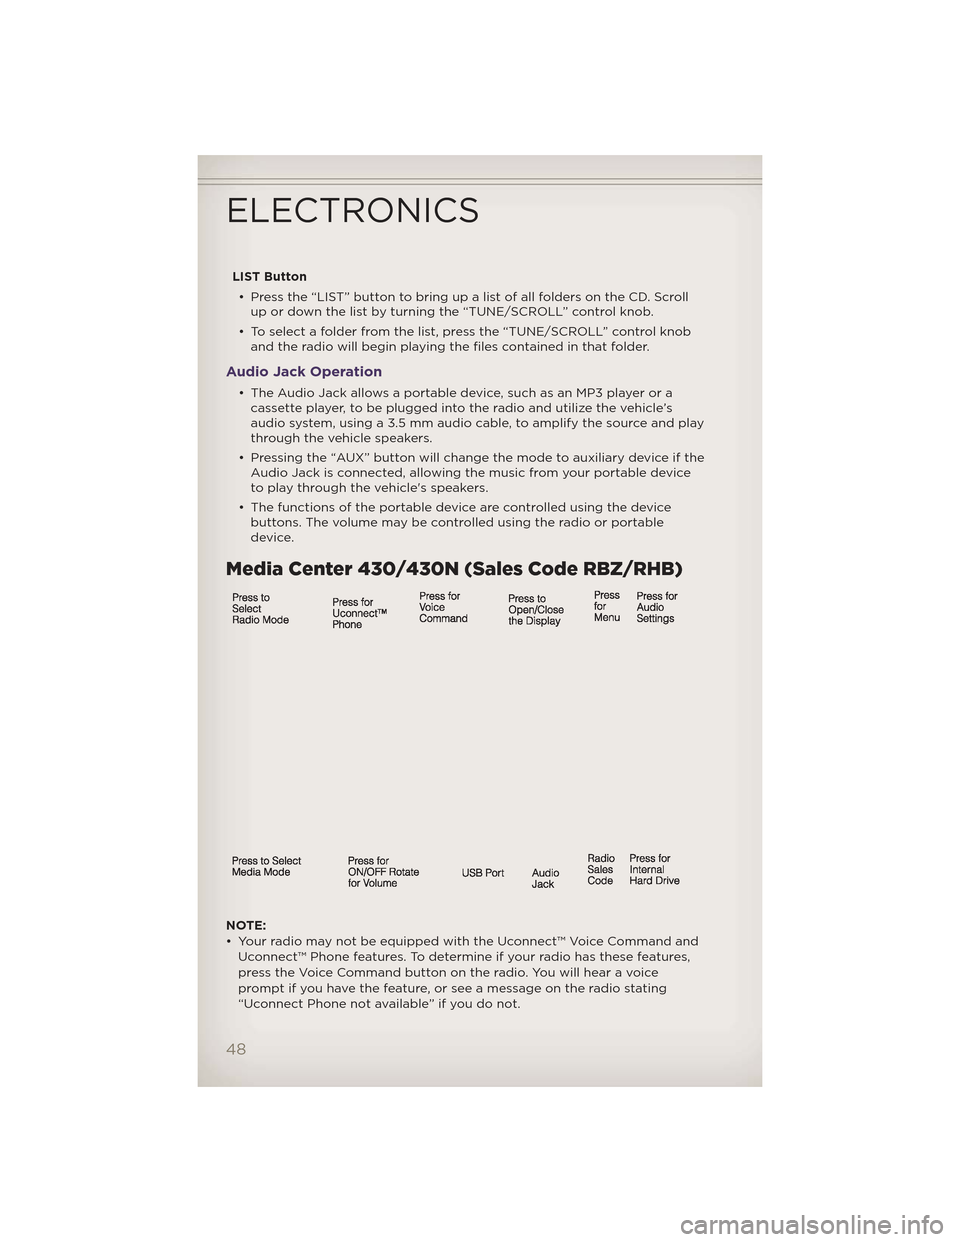
Media Center 430/430N (Sales Code RBZ/RHB)
NOTE:
• Your radio may not be equipped with the Uconnect™ Voice Command and
Uconnect™ Phone features. To determine if your radio has these features,
press the Voice Command button on the radio. You will hear a voice
prompt if you have the feature, or see a message on the radio stating
“Uconnect Phone not available” if you do not.
ELECTRONICS
48