remote start JEEP GRAND CHEROKEE 2017 WK2 / 4.G User Guide
[x] Cancel search | Manufacturer: JEEP, Model Year: 2017, Model line: GRAND CHEROKEE, Model: JEEP GRAND CHEROKEE 2017 WK2 / 4.GPages: 372
Page 13 of 372
GETTING TO KNOW YOUR VEHICLE
KEYS .....................13
KeyFob.....................13
IGNITIONSWITCH............14
Models With Keyless Enter-N-Go — Passive
Entry.......................14
Vehicle On Message.............15
REMOTE STARTING SYSTEM — IF
EQUIPPED .................16
General Information.............16
SENTRYKEY................17
Irregular Operation..............17
VEHICLE SECURITY ALARM — IF
EQUIPPED .................17
To Arm The System .............18
To Disarm The System ............18
DOORS....................19
Manual Door Locks ..............19
Power Door Locks ..............20
Keyless Enter-N-Go — Passive Entry . . .20
Locking The Doors With One Or More Door
Open ......................23 Auto Relocking
................23
Child-Protection Door Lock System — Rear
Doors ......................23
SEATS.....................24
Manual Seat Adjustment ..........24
Power Adjustment Front ...........25
Manual Adjustment Rear ..........25
Memory Seat ..................27
Heated/Ventilated Seats ...........27
HEADRESTRAINTS...........29
Front Adjustment...............30
Front Removal .................31
Rear Adjustment ...............32
STEERING WHEEL ............32
Adjustment...................32
Heated Steering Wheel ............33
MIRRORS..................34
Interior Mirror .................34
Exterior Mirrors ................35
EXTERIORLIGHTS............37
Headlight Switch ...............37 Headlights
...................37
Daytime Running Lights ...........38
High Beams ..................38
Flash-To-Pass .................38
Automatic Lighting ..............38
Parking Lights And Panel Lights .....39
Headlight Delay ................39
Fog Lights ...................39
Turn Signals ..................39
Lane Change Assist .............40
INTERIORLIGHTS............40
Courtesy Interior Lights ...........40
WIPER/WASHER............40
Front Wipers..................40
Rain Sensor ..................41
Rear Wiper ...................42
HEADLIGHT WASHERS — IF
EQUIPPED .................42
CLIMATECONTROLS..........43
Overview....................43
GETTING TO KNOW YOUR VEHICLE
11
Page 15 of 372
KEYS
Your vehicle uses keyless ignition system.
The ignition system consists of a key fob with
a Remote Keyless Entry (RKE) and an igni-
tion switch. The keyless ignition system con-
sists of a key fob and Keyless Enter-N-Go
button.
Key Fob
The key fob allows you to lock or unlock the
doors and liftgate from distances up to ap-
proximately 66 ft (20 m) using a handheld
key fob. The key fob does not need to be
pointed at the vehicle to activate the system.
NOTE:
In the ON/RUN position, the lock button is
disabled. Only the unlock button is enabled.
To Unlock The Doors And Liftgate
Push and release the unlock button on the
key fob once to unlock the driver's door or
twice within five seconds to unlock all doors
and the liftgate.All doors can be programmed to unlock on the
first push of the unlock button. Refer to
“Programmable Features” in the “Uconnect
Settings” in “Multimedia” section of this
guide.
To Lock The Doors And Liftgate
Push and release the lock button on the key
fob to lock all doors and liftgate.
Vehicles Equipped With Keyless Enter-N-Go —
Passive Entry
If one or more doors are open, or the liftgate is
open, the doors will lock. The doors will
unlock again automatically if the key is left
inside the passenger compartment, otherwise
the doors will stay locked.
Request For Additional Key Fobs
NOTE:
Only key fobs that are programmed to the
vehicle electronics can be used to start and
operate the vehicle. Once a key fob is pro-
grammed to a vehicle, it cannot be pro-
grammed to any other vehicle.
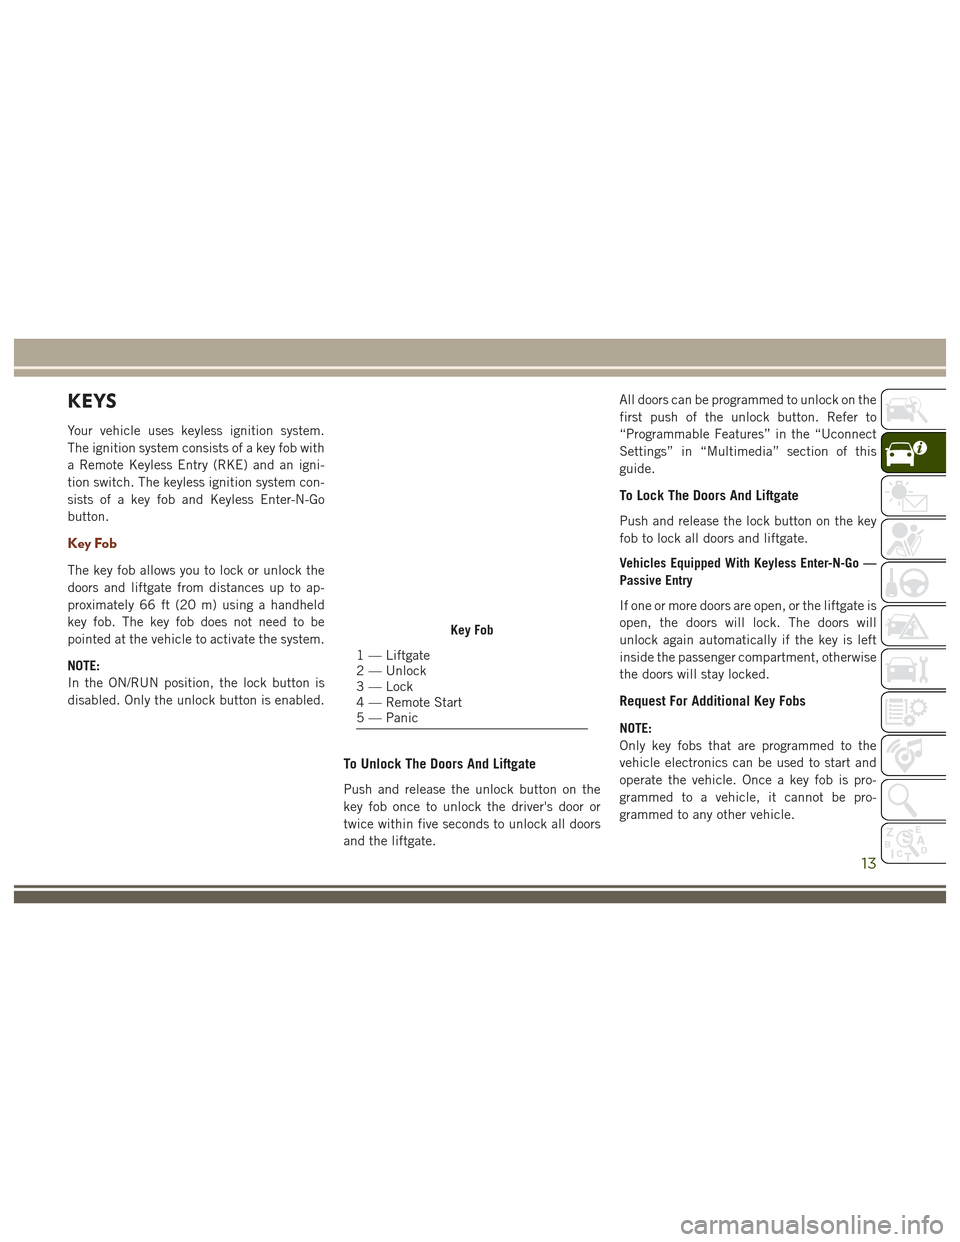
Key Fob
1 — Liftgate
2 — Unlock
3 — Lock
4 — Remote Start
5 — Panic
13
Page 18 of 372
WARNING!
• Do not leave the key fob in or near thevehicle, or in a location accessible to
children, and do not leave the ignition of
a vehicle equipped with Keyless Enter-
N-Go in the ON/RUN mode. A child
could operate power windows, other con-
trols, or move the vehicle.
• Do not leave children or animals inside
parked vehicles in hot weather. Interior
heat build-up may cause serious injury
or death.
CAUTION!
An unlocked vehicle is an invitation for
thieves. Always remove key fob from the
vehicle and lock all doors when leaving the
vehicle unattended.
REMOTE STARTING
SYSTEM — IF EQUIPPED
• Push the remote start button on the key
fob twice within five seconds. Pushing the
remote start button a third time shuts the
engine off.
• To drive the vehicle, push unlock button, insert the key in the ignition and turn to
the ON/RUN position.
• With remote start, the engine will only run for 15 minutes (timeout) unless the igni-
tion key is placed in the ON/RUN position.
• The vehicle must be started with the key after two consecutive timeouts.
WARNING!
• Do not start or run an engine in a closed
garage or confined area. Exhaust gas
contains Carbon Monoxide (CO) which is
odorless and colorless. Carbon Monox-
ide is poisonous and can cause you or
others to be severely injured or killed
when inhaled.
WARNING!
• Keep key fobs away from children. Op-eration of the Remote Start System, win-
dows, door locks or other controls could
cause you and others to be severely
injured or killed.
General Information
The following regulatory statement applies to
all Radio Frequency (RF) devices equipped in
this vehicle:
This device complies with Part 15 of the FCC
Rules and with Industry Canada licence-
exempt RSS standard(s). Operation is sub-
ject to the following two conditions:
1. This device may not cause harmful inter-
ference, and
2. This device must accept any interference received, including interference that may
cause undesired operation.
GETTING TO KNOW YOUR VEHICLE
16
Page 29 of 372
Memory Seat
This feature allows the driver to store up to
two different memory profiles for easy recall
through a memory switch. Each memory pro-
file contains desired position settings for the
driver seat, side mirrors, and power tilt and
telescopic steering column (if equipped) and
a set of desired radio station presets. Your
remote keyless entry key fob can also be
programmed to recall the same positions
when the UNLOCK button is pushed.NOTE:
Your vehicle is equipped with two key fobs,
one key fob can be linked to memory position
1 and the other key fob can be linked to
memory position 2.
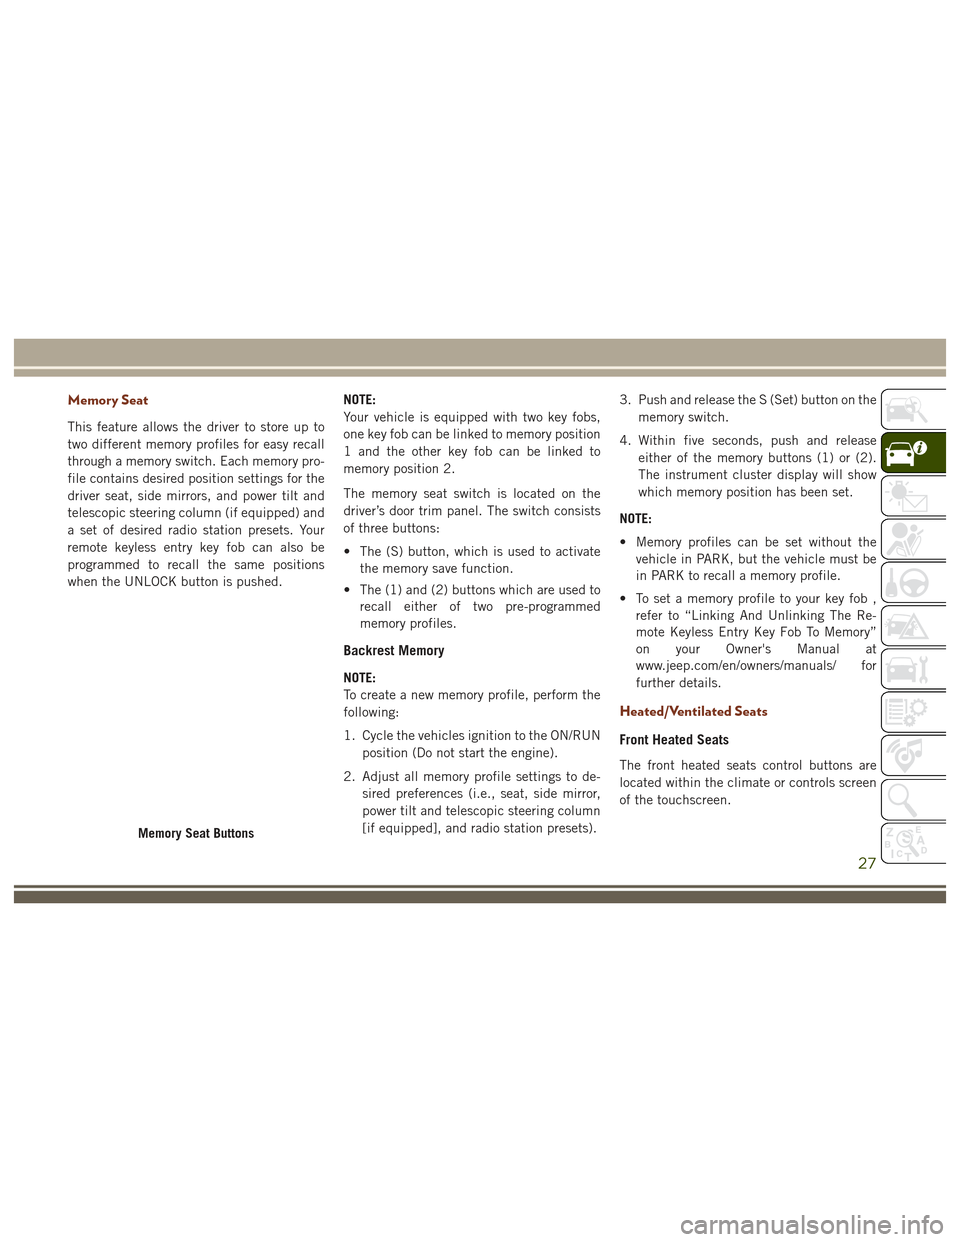
The memory seat switch is located on the
driver’s door trim panel. The switch consists
of three buttons:
• The (S) button, which is used to activate
the memory save function.
• The (1) and (2) buttons which are used to recall either of two pre-programmed
memory profiles.
Backrest Memory
NOTE:
To create a new memory profile, perform the
following:
1. Cycle the vehicles ignition to the ON/RUN
position (Do not start the engine).
2. Adjust all memory profile settings to de- sired preferences (i.e., seat, side mirror,
power tilt and telescopic steering column
[if equipped], and radio station presets). 3. Push and release the S (Set) button on the
memory switch.
4. Within five seconds, push and release either of the memory buttons (1) or (2).
The instrument cluster display will show
which memory position has been set.
NOTE:
• Memory profiles can be set without the vehicle in PARK, but the vehicle must be
in PARK to recall a memory profile.
• To set a memory profile to your key fob , refer to “Linking And Unlinking The Re-
mote Keyless Entry Key Fob To Memory”
on your Owner's Manual at
www.jeep.com/en/owners/manuals/ for
further details.
Heated/Ventilated Seats
Front Heated Seats
The front heated seats control buttons are
located within the climate or controls screen
of the touchscreen.
Memory Seat Buttons
27
Page 30 of 372
You can choose from HI, LO or OFF heat
settings. The indicator arrows in touchscreen
buttons indicate the level of heat in use. Two
indicator arrows will illuminate for HI, one for
LO and none for OFF.
• Press the heated seat button
once to
turn the HI setting ON.
• Press the heated seat button
a second
time to turn the LO setting ON.
• Press the heated seat button
a third
time to turn the heating elements OFF.
If the HI-level setting is selected, the system
will automatically switch to LO-level after
approximately 60 minutes of continuous op-
eration. At that time, the display will change
from HI to LO, indicating the change. The
LO-level setting will turn OFF automatically
after approximately 45 minutes.
NOTE:
• Once a heat setting is selected, heat will be felt within two to five minutes.
• The engine must be running for the heated seats to operate. Vehicles Equipped With Remote Start
On models that are equipped with remote
start, the heated seats can be programmed to
come on during a remote start.
This feature can be programmed through the
Uconnect system. Refer to your Owner's
Manual
at
www.jeep.com/en/owners/manuals/ for fur-
ther details.
WARNING!
• Persons who are unable to feel pain to the skin because of advanced age,
chronic illness, diabetes, spinal cord in-
jury, medication, alcohol use, exhaus-
tion or other physical condition must
exercise care when using the seat
heater. It may cause burns even at low
temperatures, especially if used for long
periods of time.
• Do not place anything on the seat or
seatback that insulates against heat,
such as a blanket or cushion. This may
cause the seat heater to overheat. Sit-
ting in a seat that has been overheated
WARNING!
could cause serious burns due to the
increased surface temperature of the
seat.
Rear Heated Seats
On some models, the two outboard seats are
equipped with heated seats. The heated seat
switches for these seats are located on the
rear of the center console. There are two
heated seat switches
that allow the rear
passengers to operate the seats indepen-
dently.
You can choose from HI, LO or OFF heat
settings. The indicator lights in each switch
indicate the level of heat in use. Two indica-
tor lights will illuminate for HI, one for LO
and none for OFF.
• Push the heated seat button
once to
select HI-level heating.
• Push the heated seat button
a second
time to select LO-level heating.
• Push the heated seat button
a third
time to turn the heating elements OFF.
GETTING TO KNOW YOUR VEHICLE
28
Page 31 of 372
NOTE:
• Once a heat setting is selected, heat willbe felt within two to five minutes.
• The engine must be running for the heated seats to operate.
If the HI-level setting is selected, the system
will automatically switch to LO-level after
approximately 60 minutes of continuous op-
eration. At that time, the number of illumi-
nated LEDs changes from two to one, indicat-
ing the change. The LO-level setting will turn
OFF automatically after approximately
45 minutes.
Front Ventilated Seats
If your vehicle is equipped with ventilated
seats, the seat cushion and seat back will
have fans that draw the air from the passen-
ger compartment and move air through fine
perforations in the seat cover to help keep the
driver and front passenger cooler in higher
ambient temperatures. The fans operate at
two speeds, HI and LO. The front ventilated seats control buttons are
located within the Uconnect system. You can
gain access to the control buttons through
the climate screen or the controls screen.
• Press the ventilated seat button
once
to choose HI.
• Press the ventilated seat button
a
second time to choose LO.
• Press the ventilated seat button
a
third time to turn the ventilated seat OFF.
NOTE:
The engine must be running for the ventilated
seats to operate.
Vehicles Equipped With Remote Start
On models that are equipped with remote
start, the ventilated seats can be pro-
grammed to come on during a remote start.
This feature can be programmed through the
Uconnect system. Refer to your Owner's
Manual at
www.jeep.com/en/owners/manuals/ for fur-
ther details.
HEAD RESTRAINTS
Head restraints are designed to reduce the
risk of injury by restricting head movement in
the event of a rear impact. Head restraints
should be adjusted so that the top of the head
restraint is located above the top of your ear.
WARNING!
• All occupants, including the driver, should not operate a vehicle or sit in a
vehicle’s seat until the head restraints
are placed in their proper positions in
order to minimize the risk of neck injury
in the event of a crash.
• Head restraints should never be ad-
justed while the vehicle is in motion.
Driving a vehicle with the head restraints
improperly adjusted or removed could
cause serious injury or death in the event
of a collision.
29
Page 36 of 372
based on environmental temperatures. The
heated steering wheel can shut off early or
may not turn on when the steering wheel is
already warm.
The heated steering wheel control button is
located within the Uconnect system. You can
gain access to the control button through the
climate screen or the controls screen.
• Press the heated steering wheel button
once to turn the heating element ON.
• Press the heated steering wheel button
a second time to turn the heating
element OFF.
NOTE:
The engine must be running for the heated
steering wheel to operate.
Vehicles Equipped With Remote Start
On models that are equipped with remote
start, the heated steering wheel can be pro-
grammed to come on during a remote start
through the Uconnect system. Refer to
“Uconnect Settings” in “Multimedia” in the
Owner’s Manualat
www.jeep.com/en/owners/manuals/ for fur-
ther information.
WARNING!
• Persons who are unable to feel pain to the skin because of advanced age,
chronic illness, diabetes, spinal cord in-
jury, medication, alcohol use, exhaus-
tion, or other physical conditions must
exercise care when using the steering
wheel heater. It may cause burns even at
low temperatures, especially if used for
long periods.
• Do not place anything on the steering
wheel that insulates against heat, such
as a blanket or steering wheel covers of
any type and material. This may cause
the steering wheel heater to overheat.
MIRRORS
Interior Mirror
Manual Mirror
The mirror head can be adjusted up, down,
left, and right for various drivers. The mirror
should be adjusted to center on the view
through the rear window. Headlight glare from vehicles behind you can
be reduced by moving the small control under
the mirror to the night position (toward the
rear of the vehicle). The mirror should be
adjusted while set in the day position (toward
the windshield).
Electrochromatic Mirror
The mirror head can be adjusted up, down,
left, and right for various drivers. The mirror
should be adjusted to center on the view
through the rear window.
This mirror automatically adjusts for head-
light glare from vehicles behind you.
Adjusting Rearview Mirror
GETTING TO KNOW YOUR VEHICLE
34
Page 43 of 372
CAUTION!
Always remove any buildup of snow that
prevents the windshield wiper blades from
returning to the PARK position. If the
windshield wiper switch is turned off, and
the blades cannot return to the PARK
position, damage to the wiper motor may
occur.
Rain Sensor
This feature senses moisture on the wind-
shield and automatically activates the wipers
for the driver. The feature is especially useful
for road splash or overspray from the wind-
shield washers of the vehicle ahead. Rotate
the end of the multifunction lever to one of
four settings to activate this feature.
Automatic Wiping
The sensitivity of the system can be adjusted
with the multifunction lever. Wiper delay po-
sition one is the least sensitive, and wiper
delay position four is the most sensitive.
Setting three should be used for normal rain
conditions. Settings one and two can be used
if the driver desires less wiper sensitivity.Setting four can be used if the driver desires
more sensitivity. Place the wiper switch in the
OFF position when not using the system.
NOTE:
• The Rain Sensing feature will not operate
when the wiper switch is in the low or
high-speed position.
• The Rain Sensing feature may not function properly when ice, or dried salt water is
present on the windshield.
• Use of Rain-X or products containing wax or silicone may reduce Rain Sensing per-
formance.
• The Rain Sensing feature can be turned on and off using the Uconnect System, refer
to “Uconnect Settings” in “Multimedia”
in the Owners Manual at
www.jeep.com/en/owners/manuals/ for
further information.
The Rain Sensing system has protection fea-
tures for the wiper blades and arms, and will
not operate under the following conditions: •
Low Ambient Temperature — When the ig-
nition is first turned ON, the Rain Sensing
system will not operate until the wiper
switch is moved, vehicle speed is greater
than 0 mph (0 km/h), or the outside tem-
perature is greater than 32°F (0°C).
• Transmission In NEUTRAL Position — When
the ignition is ON, and the automatic
transmission is in the NEUTRAL position,
the Rain Sensing system will not operate
until the wiper switch is moved, vehicle
speed is greater than 3 mph (5 km/h), or
the gear selector is moved out of the NEU-
TRAL position.
Remote Start Mode Inhibit — On vehicles
equipped with Remote Starting system, Rain
Sensing wipers are not operational when the
vehicle is in the remote start mode. Once the
operator is in the vehicle and has placed the
ignition switch in the RUN position, rain
sensing wiper operation can resume, if it has
been selected, and no other inhibit condi-
tions (mentioned previously) exist.
41
Page 223 of 372
WARNING!
A loose tire or jack thrown forward in a
collision or hard stop could endanger the
occupants of the vehicle. Always stow the
jack parts and the spare tire in the places
provided. Have the deflated (flat) tire re-
paired or replaced immediately.
Changing Procedure
1. Mount the road tire on the axle.
2. Install the remaining lug nuts with thecone shaped end of the nut toward the
wheel. Lightly tighten the lug nuts.
WARNING!
To avoid the risk of forcing the vehicle off
the jack, do not tighten the lug nuts fully
until the vehicle has been lowered. Failure
to follow this warning may result in per-
sonal injury.
3. Lower the vehicle to the ground by turning the jack handle counterclockwise.
4. Finish tightening the lug nuts. Push down on the wrench while at the end of the handle for increased leverage. Tighten the
lug nuts in a star pattern until each nut
has been tightened twice. The correct
tightness of each lug nut is 130 ft-lbs
(176 N·m). If in doubt about the correct
tightness, have them checked with a
torque wrench by your authorized dealer
or service station.
NOTE:
For the SRT model the correct wheel nut
tightness is 110 ft lbs (149 N·m).
5. After 25 miles (40 km) check the lug nut torque with a torque wrench to ensure that
all lug nuts are properly seated against the
wheel.JUMP-STARTING
If your vehicle has a discharged battery it can
be jump-started using a set of jumper cables
and a battery in another vehicle or by using a
portable battery booster pack. Jump-starting
can be dangerous if done improperly so
please follow the procedures in this section
carefully.
WARNING!
Do not attempt jump-starting if the battery
is frozen. It could rupture or explode and
cause personal injury.
CAUTION!
Do not use a portable battery booster pack
or any other booster source with a system
voltage greater than 12 Volts or damage to
the battery, starter motor, alternator or
electrical system may occur.
NOTE:
When using a portable battery booster pack
follow the manufacturer's operating instruc-
tions and precautions.
Preparations For Jump-Starting
The battery in your vehicle is located under
the passenger's front seat. There are remote
locations located under the hood to assist in
jump-starting.
221
Page 224 of 372
WARNING!
• Take care to avoid the radiator coolingfan whenever the hood is raised. It can
start anytime the ignition switch is ON.
You can be injured by moving fan
blades.
WARNING!
• Remove any metal jewelry such as rings,watch bands and bracelets that could
make an inadvertent electrical contact.
You could be seriously injured.
• Batteries contain sulfuric acid that can
burn your skin or eyes and generate
hydrogen gas which is flammable and
explosive. Keep open flames or sparks
away from the battery.
NOTE:
Be sure that the disconnected ends of the
cables do not touch while still connected to
the either vehicle.
1. Set the parking brake, shift the automatic transmission into PARK and turn the igni-
tion to LOCK.
2. Turn off the heater, radio, and all unnec- essary electrical accessories.
3. Remove the protective cover over the re- mote positive (+)battery post. Pull up-
ward on the cover to remove it. 4. If using another vehicle to jump-start the
battery, park the vehicle within the
jumper cables reach, set the parking
brake and make sure the ignition is OFF.
WARNING!
Do not allow vehicles to touch each other
as this could establish a ground connec-
tion and personal injury could result.
Jump-Starting Procedure
WARNING!
Failure to follow this jump-starting proce-
dure could result in personal injury or
property damage due to battery explosion.
CAUTION!
Failure to follow these procedures could
result in damage to the charging system of
the booster vehicle or the discharged ve-
hicle.
Remote Battery Posts
1 — Remote Positive (+)Post
2 — Remote Negative (–)Post
IN CASE OF EMERGENCY
222