stop start JEEP RENEGADE 2018 Owner handbook (in English)
[x] Cancel search | Manufacturer: JEEP, Model Year: 2018, Model line: RENEGADE, Model: JEEP RENEGADE 2018Pages: 356, PDF Size: 6.11 MB
Page 154 of 356

The gear engaged is shown on the
display.
The lever has a button A fig. 106, which
must be pressed to move the lever to P or
R.
If the transmission is used in "sequential"
mode, which is activated moving the
lever from D (Drive) to the left, the
various positions can be reached towards
+ or –. These positions are unstable.
To exit from the P (Park) position, or to
pass from the N (Neutral) position to the
D (Drive) or R (Reverse) position when
the car is stopped or is moving at a low
speed, the brake pedal must also be
pressed (see "Gear engagement disabling
system with brake engaged" in this
chapter).
IMPORTANT DO NOT accelerate while
shifting from position P (or N) to
another position.
IMPORTANT After selecting a gear,
wait a few seconds before accelerating.
This precaution is particularly
important with a cold engine.
AutoStick - Sequential shifting mode
In the case of frequent gearshiftings (e.g.
when the vehicle is driven with a heavy
load, on slopes, with strong headwind or
when towing heavy trailers), it is
recommended to use the AutoStick
(sequential shifting) mode to select and
keep a lower fixed ratio.
It is possible to shift from position D
(Drive) to the sequential mode regardless
of car speed.
Activation
With gear lever in position D (Drive), to
activate the sequential drive mode, move
the lever to the left (– and + indication of
the panel). The gear engaged will be
shown on the display. Gearshifting is
made by moving the gear lever forwards,
towards symbol – or backwards, towards
symbol +.
Deactivation
Bring the gear lever back in position D
(Drive) ("automatic" driving mode).
TRANSMISSION EMERGENCY
FUNCTION
(where provided)
Transmission operation is constantly
monitored to detect any fault. If a
condition that might damage the
transmission is detected, the
"transmission emergency" function is
activated.
In this condition, the transmission stays
in 4th gear, regardless of the selected
gear.
Positions P (Parking), R (Reverse) e N
(Neutral) still work. Icon
might light
up in the display
In the event of a "transmission
emergency" immediately contact the
nearest Jeep Dealership.
Temporary failure
In the event of a temporary failure, the
transmission correct operation can be
restored for all the forwards gears by
proceeding as follows:
stop the vehicle;bring the transmission lever to P
(Park).
bring the ignition device to STOP;wait for about 10 seconds, then restart
the engine;
select the desired gear: if the problem
is not detected anymore the transmission
correct operation is restored.
106J0A0924C
152
STARTING AND DRIVING
Page 157 of 356
available and restart the engine, using
the gear lever as described previously.
MOVING THE CAR
To move the car, from P press the brake
pedal and, using the button on the gear
lever, move the lever to the desired
position (D, R or "Sequential mode"). The
display will show the gear engaged.
When the brake pedal is released, the car
starts moving forwards or backwards, as
soon as the manoeuvre is activated
("creeping" effect). The accelerator
should not be pressed in this case.
IMPORTANT The inconsistency
between the speed actually engaged
(shown on the display) and the
position of the gear lever is indicated
by the letter corresponding to the
position of the lever flashing on the
trim (also accompanied by an acoustic
signal).
This condition should not be interpreted
as an operational fault, but simply as a
request by the system to repeat the
manoeuvre.
IMPORTANT With engine running and
car stationary, in "Sequential mode",
the request for engaging 2
ndgear is
not accepted by the system (whether
the brake pedal is pressed or not).
If, with 1stgear or reverse (R) engaged,
the following conditions occur:
road slope over 5%;clutch overheated;engine torque constant for a given
period (e.g. if the car hits the pavement
or is parked downhill/uphill);
car movement is achieved by pressing
the accelerator pedal.
IMPORTANT With the electric parking
brake released and brake pedal
released, engine at idling speed and
gear lever in position D, R or
sequential, pay the utmost care
because the car can move even
without the operation of the
accelerator pedal. This condition can
be used with the car on a level surface
during tight parking manoeuvres using
the brake pedal only.
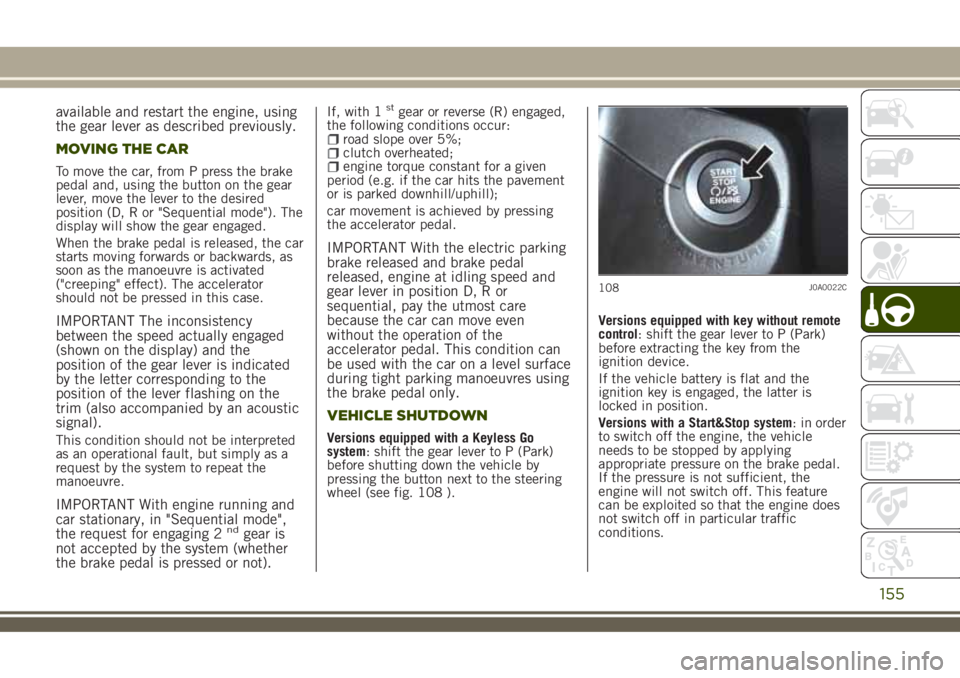
VEHICLE SHUTDOWN
Versions equipped with a Keyless Go
system: shift the gear lever to P (Park)
before shutting down the vehicle by
pressing the button next to the steering
wheel (see fig. 108 ).Versions equipped with key without remote
control: shift the gear lever to P (Park)
before extracting the key from the
ignition device.
If the vehicle battery is flat and the
ignition key is engaged, the latter is
locked in position.
Versions with a Start&Stop system: in order
to switch off the engine, the vehicle
needs to be stopped by applying
appropriate pressure on the brake pedal.
If the pressure is not sufficient, the
engine will not switch off. This feature
can be exploited so that the engine does
not switch off in particular traffic
conditions.
108J0A0022C
155
Page 158 of 356
Ignition key removal
The ignition key can be removed only if
the gear lever is in position P:
if the engine is switched off with the
gear lever in position P: the ignition key
can be removed within 30 seconds;
if the engine is switched off with the
gear lever in position other than P:move
the lever to P within 5 seconds. Once
this operation is completed, it will be
possible, for about 30 seconds, to extract
the ignition key.
In both cases, if the described conditions
and times are not respected, the ignition
key will be automatically locked.
To remove the key, turn it to MAR and
then to STOP, repeating the procedure
described above.
"RECOVERY" FUNCTIONS
In case of a gear lever failure, the
instrument panel display could show a
dedicated message recommending that
the driver continues driving without
shifting the lever to the P position.
In this case, the transmission will
maintain the forward gear (with reduced
performance) even if the lever is
positioned at R or N.
Once the lever is positioned at P, or after
shutting down the vehicle, selecting R or
any other forward gear will no longer be
possible. In this case, contact a Jeep
Dealership.WARNING
128)Never leave children unattended in
the car. Always remove the ignition key
when leaving the car and take the key with
you.
IMPORTANT
49)If the car is on a gradient, always
engage the electric parking brake BEFORE
placing the gear lever in P.
50)Engage reverse only with the car
stationary, engine at idling speed and
accelerator pedal fully released.
156
STARTING AND DRIVING
Page 161 of 356
solid. The other LEDs switch on
sequentially, depending on the positions
set on the knob, so that the driver can
understand which is the new required
mode.
Once the required mode is set (LED close
to the wording switched on), just keep
the knob in that position so that the
Selec-Terrain™system actuates to
engage the wished mode.STOP/START SYSTEM
The Stop/Start system automatically
stops the engine each time the vehicle is
stationary and starts it again when the
driver wants to move off.
In this way, the vehicle efficiency is
increased, by reducing consumption,
dangerous gas emissions and noise
pollution.
129) 130)53)
OPERATING MODES
Engine stopping mode
Versions with manual gearbox
With the vehicle stopped, the engine
stops with gearbox in neutral and clutch
pedal released.
Versions with automatic transmission
With vehicle at a standstill and brake
pedal pressed, the engine switches off if
the gear lever is in a position other than
R.
In the event of stops uphill, the engine
switching off is disabled to activate the
"Hill Start Assist" function (works only
with running engine).
The
warning light on the instrumentpanel switches on to signal that the
engine was stopped.
Engine restarting mode
Versions with manual gearbox
To restart the engine, press the clutch
pedal.
If the vehicle does not start pressing the
clutch, place the gear lever in neutral
and repeat the procedure. If the problem
persists, contact a Jeep Dealership.
Versions with automatic transmission
To restart the engine, release the brake
pedal.
With brake pressed, if the gear lever is in
automatic mode - D (Drive) - the engine
can be restarted moving the lever to R
(Reverse) or N (Neutral) or "AutoStick".
With brake pressed, if the gear lever is in
"AutoStick" mode, the engine can be
restarted moving the lever to "+" or "–", or
R (Reverse) or N (Neutral).
When the engine has been stopped
automatically, keeping the brake pedal
pressed, the brake can be released
keeping the engine off by quickly shifting
the gear lever to P (Park).
To restart the engine, just move the lever
out of position P.
159
Page 162 of 356
SYSTEM MANUAL ACTIVATION/
DEACTIVATION
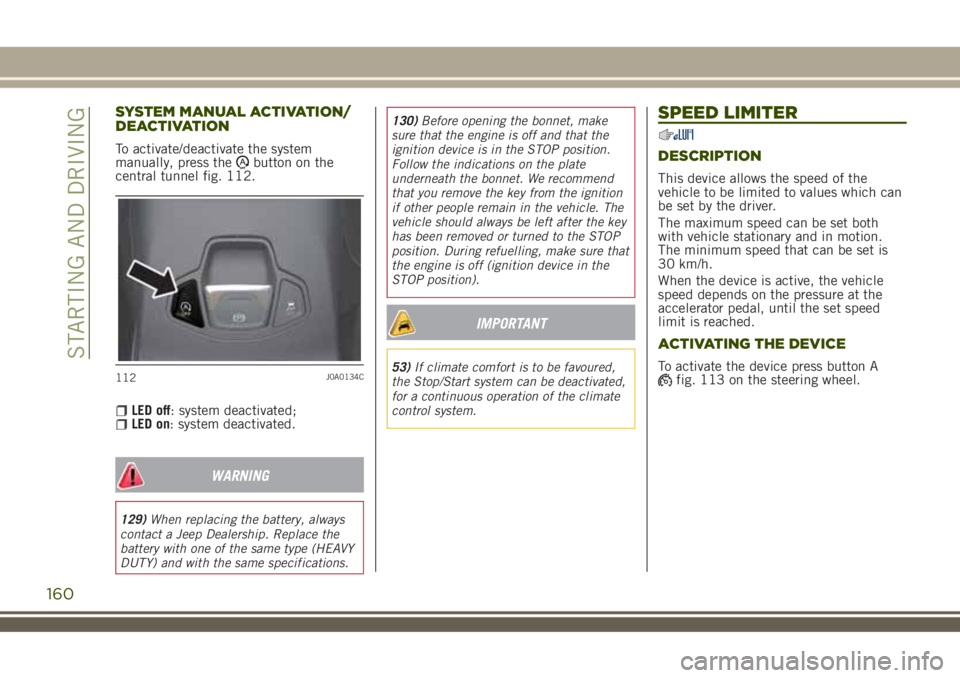
To activate/deactivate the system
manually, press thebutton on the
central tunnel fig. 112.
LED off: system deactivated;LED on: system deactivated.
WARNING
129)When replacing the battery, always
contact a Jeep Dealership. Replace the
battery with one of the same type (HEAVY
DUTY) and with the same specifications.130)Before opening the bonnet, make
sure that the engine is off and that the
ignition device is in the STOP position.
Follow the indications on the plate
underneath the bonnet. We recommend
that you remove the key from the ignition
if other people remain in the vehicle. The
vehicle should always be left after the key
has been removed or turned to the STOP
position. During refuelling, make sure that
the engine is off (ignition device in the
STOP position).
IMPORTANT
53)If climate comfort is to be favoured,
the Stop/Start system can be deactivated,
for a continuous operation of the climate
control system.
SPEED LIMITER
DESCRIPTION
This device allows the speed of the
vehicle to be limited to values which can
be set by the driver.
The maximum speed can be set both
with vehicle stationary and in motion.
The minimum speed that can be set is
30 km/h.
When the device is active, the vehicle
speed depends on the pressure at the
accelerator pedal, until the set speed
limit is reached.
ACTIVATING THE DEVICE
To activate the device press button Afig. 113 on the steering wheel.112J0A0134C
160
STARTING AND DRIVING
Page 164 of 356
SETTING THE DESIRED SPEED
Activate the device and then, when the
vehicle has reached the desired speed,
press button SET + (or SET –) and
release it to activate the device. When
the accelerator is released, the vehicle
will proceed at the selected speed.
If needed (when overtaking for instance),
you can accelerate simply by pressing the
accelerator; when you release the pedal,
the vehicle goes back to the speed stored
previously.
When travelling downhills with the device
active, the vehicle speed may slightly
exceed the stored one.
IMPORTANT Before pressing buttons
SET + (or SET –) the vehicle must be
travelling at a constant speed on a flat
surface.
INCREASING/DECREASING
SPEED
Once the electronic Cruise Control has
been activated, the speed can be
increased by pressing button SET + or
decreased by pressing button SET – .
ACCELERATING WHEN
OVERTAKING
Depress the accelerator pedal: when this
is released the vehicle will gradually go
back to the stored speed.
IMPORTANT The device keeps the
speed stored even uphill and downhill.
A slight variation in the speed on slight
rises is completely normal.
RECALLING THE SPEED
Versions with automatic
transmission(operating in Drive mode -
automatic): press and release the RES
button.
Versions with manual gearbox or
automatic transmission in Autostick
(sequential) mode: before recalling the
previously set speed you should
accelerate until getting close to it, then
press and release the RES button.
DEACTIVATING THE DEVICE
Pressing the CANC button or pressing the
brake pedal as the vehicle is slowing
down deactivates the electronic Cruise
Control without deleting the stored
speed.
The Cruise Control can also be
deactivated if the electric parking brake(EPB) is activated or if the braking
system intervenes (e.g. the ESC system).
DEACTIVATING THE DEVICE
The device is deactivated by pressing
buttonor bringing the ignition device
to STOP.
WARNING
131)When travelling with the device
active, never move the gear lever to
neutral.
132)In case of a malfunction or failure of
the device, contact a Jeep Dealership.
133)The electronic Cruise Control can be
dangerous if the system cannot keep a
constant speed. In specific conditions
speed may be excessive, resulting in the
risk of losing control of the vehicle and
causing accidents. Do not use the device
in heavy traffic or on winding, icy, snowy
or slippery roads.
162
STARTING AND DRIVING
Page 168 of 356
The setting is 4 (maximum) the first time
the device is used. After the distance has
been modified by the driver, the new
distance will be stored also after the
system is deactivated and reactivated.
To decrease the distance
Press and release the
button to
decrease the distance setting.
The distance setting decreases by one
bar (shorter) every time the button is
pressed.
The set speed is held if there are no
vehicles ahead. Once the shortest
distance has been reached, a further
press of the button will set the longest
distance.
The vehicle holds the set distance until:
the vehicle ahead accelerates to a
speed higher than the set speed;
the vehicle ahead leaves the lane or
the detection field of the Adaptive Cruise
Control device sensor;
the distance setting is changed;the Adaptive Cruise Control device is
deactivated/cancelled.
IMPORTANT The maximum breaking
applied by the device is limited. The
driver may apply the brakes in all
cases, if needed.IMPORTANT If the device predicts that
the braking level is not sufficient to
hold the set distance, the warning
message “BRAKE!” will blink on the
display while approaching the vehicle
ahead. An acoustic signal is also
emitted. In this case, it is advisable to
brake immediately as necessary to hold
a safe distance from the vehicle ahead.
IMPORTANT The driver is responsible
for ensuring that there are no
pedestrians, other vehicles or
objectives along the direction of the
vehicle. Failure to comply with these
precautions may cause serious
accidents and injuries.
IMPORTANT The driver is fully
responsible for holding a safe distance
from the vehicle ahead respecting the
highway code in force in the respective
country.
DEACTIVATION
The device is deactivated and the set
speed is cancelled if:
thebutton is pressed on the
Adaptive Cruise Control;
thebutton is pressed on the
electronic Cruise Control;
the Speed Limiter button is pressed;
the ignition device is in the STOP
position;
4WD LOW mode is activated.
The device is cancelled (the set speed
and distance are stored):
when the CANC button is pressed;when the conditions shown in the
“Setting the desired speed” paragraph
occur;
when the vehicle speed drops under
the minimum set speed (e.g. in presence
of slow vehicles).
If these conditions occur while the
system is decelerating with respect to a
vehicle ahead, the system could continue
the deceleration, if necessary, also after
it is cancelled or deactivated within the
minimum speed settable on the system.
ELECTRONIC CRUISE CONTROL
MODE
Electronic Cruise Control mode is
available for travelling at constant speed
in addition to the Adaptive Cruise Control
(ACC) mode.
If the Adaptive Cruise Control (ACC)
function is implemented on the vehicle,
the electronic Cruise Control works in the
same manner as the ACC (by pressing
the
button of the Cruise Control) with
the difference that:
it does not hold the distance from the
vehicle ahead;
166
STARTING AND DRIVING
Page 170 of 356
PARKSENSE SYSTEM
(where provided)
VERSIONS WITH 4 SENSORS
140)61) 62)
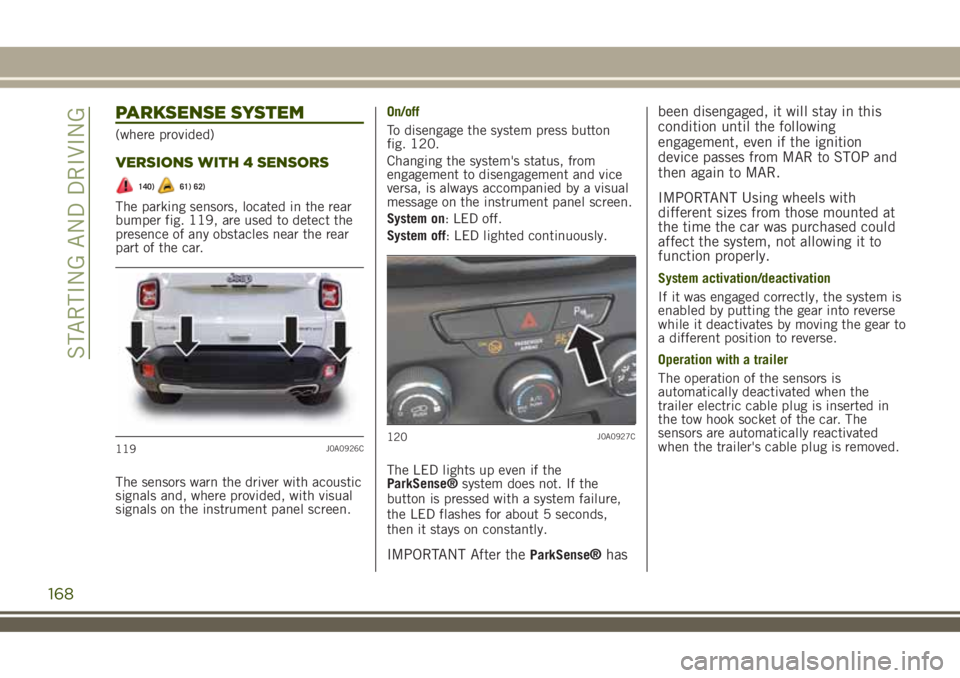
The parking sensors, located in the rear
bumper fig. 119, are used to detect the
presence of any obstacles near the rear
part of the car.
The sensors warn the driver with acoustic
signals and, where provided, with visual
signals on the instrument panel screen.On/off
To disengage the system press button
fig. 120.
Changing the system's status, from
engagement to disengagement and vice
versa, is always accompanied by a visual
message on the instrument panel screen.
System on: LED off.
System off: LED lighted continuously.
The LED lights up even if the
ParkSense®system does not. If the
button is pressed with a system failure,
the LED flashes for about 5 seconds,
then it stays on constantly.
IMPORTANT After theParkSense®hasbeen disengaged, it will stay in this
condition until the following
engagement, even if the ignition
device passes from MAR to STOP and
then again to MAR.
IMPORTANT Using wheels with
different sizes from those mounted at
the time the car was purchased could
affect the system, not allowing it to
function properly.
System activation/deactivation
If it was engaged correctly, the system is
enabled by putting the gear into reverse
while it deactivates by moving the gear to
a different position to reverse.
Operation with a trailer
The operation of the sensors is
automatically deactivated when the
trailer electric cable plug is inserted in
the tow hook socket of the car. The
sensors are automatically reactivated
when the trailer's cable plug is removed.
119J0A0926C120J0A0927C
168
STARTING AND DRIVING
Page 175 of 356
PARALLEL AND
PERPENDICULAR PARKING
DESCRIPTION
Activation
The system is activated pressing the
button on the dashboard (see "On/off"
paragraph): after being selected, the
system activates in search mode.
Considering that the system recognises
parking places even when it has not been
selected, it can be activated even
immediately after passing close to a
parking place suitable for the type of car.
The system will inform the driver,
through the instrument panel display,
about the operations to be performed for
a correct manoeuvre.
Selecting the type of parking
During the search and until the reverse
gear is engaged, the preferred type can
be selected for parking:
"Parallel": the car will search a parking
place parallel to the driving direction;
"Perpendicular": the vehicle will
search a parking place perpendicular to
the driving direction.
Selection of the search side
To select the search side and perform the
correct manoeuvre, act as follows:
Select the search for the parking
place and the manoeuvre on thepassenger side placing the direction
indicator in centre position (deactivated)
or pushed upwards.
Select the search for the parking
area and manoeuvre on the driver side
pushing the direction indicator
downwards.
Search for a parking place
Through the side sensors, the system
continuously searches for a free parking
place, suitable for the car’s dimensions.
While searching the vehicle should
continue following its route at a speed of
below 30 km/h and at a distance of
around 50 cm to 1.5 m from parked
vehicles.
A parking place is considered suitable if
it is about 80 cm longer than the
dimensions of the vehicle for parking
placesparallelto the driving direction
and about 1 m per parking places
perpendicularto the driving direction,
compared to the vehicle's dimensions.
IMPORTANT While searching, vehicle
speed should not exceed 30 km/h;
when 25 km/h have been reached, the
driver is asked to decrease the speed;
if the speed of 30 km/h is exceeded, it
is deactivated (in this case, the system
can be restarted by pressing the button
on the instrument panel).
Manoeuvre
During manoeuvre, the vehicle's
movements can be controlled by
operating the accelerator, brake and
clutch pedals (versions with manual
gearbox), or the accelerator and brake
pedals (versions with automatic
transmission). Once a parking place has
been found, you will be asked to engage
reverse, leave the steering wheel and use
the pedals, while the system handles the
steering automatically to perform the
parking operation in the dedicated area.
During the manoeuvre it will be possible
to take advantage of the information
coming from the parking sensors (when
driving in reverse it is advisable to reach
the area where the rear sensors sound
continuously), but it is always advisable
to keep an eye on the surrounding area.
The car can be stopped during the
manoeuvre and, whilst remaining
stationary, reverse gear can temporarily
be released (for example, to allow a
pedestrian to go by in the area of the
manoeuvre).
The parking manoeuvre will be
interrupted in the following cases:
vehicle's speed is above 7 km/h;the steering is (voluntarily or
unintentionally) moved (by grabbing it or
preventing it from moving);
173
Page 190 of 356
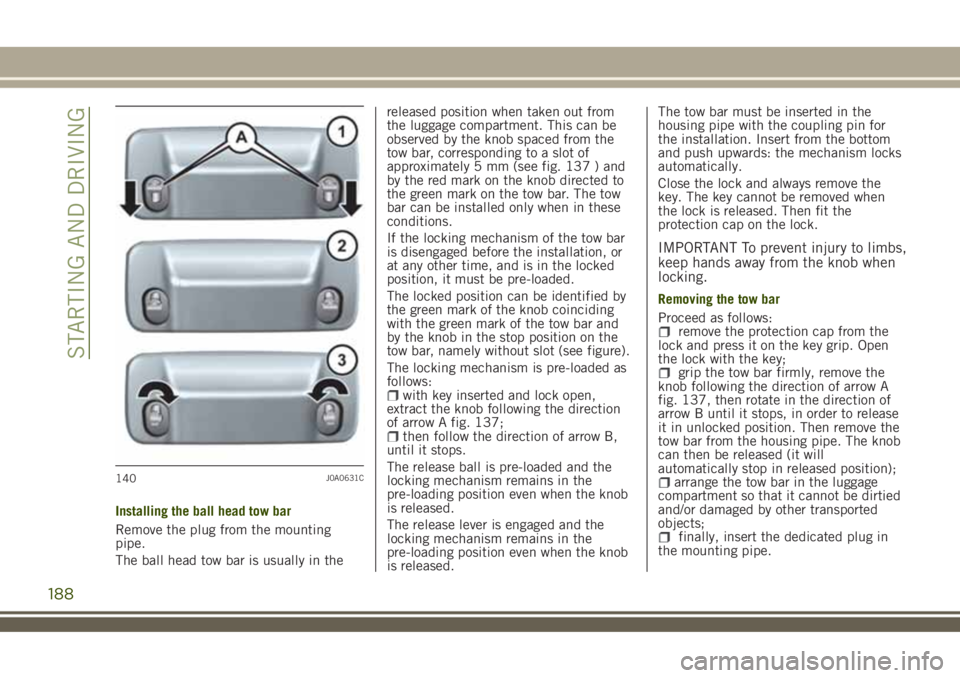
Installing the ball head tow bar
Remove the plug from the mounting
pipe.
The ball head tow bar is usually in thereleased position when taken out from
the luggage compartment. This can be
observed by the knob spaced from the
tow bar, corresponding to a slot of
approximately 5 mm (see fig. 137 ) and
by the red mark on the knob directed to
the green mark on the tow bar. The tow
bar can be installed only when in these
conditions.
If the locking mechanism of the tow bar
is disengaged before the installation, or
at any other time, and is in the locked
position, it must be pre-loaded.
The locked position can be identified by
the green mark of the knob coinciding
with the green mark of the tow bar and
by the knob in the stop position on the
tow bar, namely without slot (see figure).
The locking mechanism is pre-loaded as
follows:
with key inserted and lock open,
extract the knob following the direction
of arrow A fig. 137;
then follow the direction of arrow B,
until it stops.
The release ball is pre-loaded and the
locking mechanism remains in the
pre-loading position even when the knob
is released.
The release lever is engaged and the
locking mechanism remains in the
pre-loading position even when the knob
is released.The tow bar must be inserted in the
housing pipe with the coupling pin for
the installation. Insert from the bottom
and push upwards: the mechanism locks
automatically.
Close the lock and always remove the
key. The key cannot be removed when
the lock is released. Then fit the
protection cap on the lock.
IMPORTANT To prevent injury to limbs,
keep hands away from the knob when
locking.
Removing the tow bar
Proceed as follows:
remove the protection cap from the
lock and press it on the key grip. Open
the lock with the key;
grip the tow bar firmly, remove the
knob following the direction of arrow A
fig. 137, then rotate in the direction of
arrow B until it stops, in order to release
it in unlocked position. Then remove the
tow bar from the housing pipe. The knob
can then be released (it will
automatically stop in released position);
arrange the tow bar in the luggage
compartment so that it cannot be dirtied
and/or damaged by other transported
objects;
finally, insert the dedicated plug in
the mounting pipe.
140J0A0631C
188
STARTING AND DRIVING