display JEEP WAGONEER 2023 Service Manual
[x] Cancel search | Manufacturer: JEEP, Model Year: 2023, Model line: WAGONEER, Model: JEEP WAGONEER 2023Pages: 396, PDF Size: 15.17 MB
Page 117 of 396
GETTING TO KNOW YOUR INSTRUMENT PANEL115
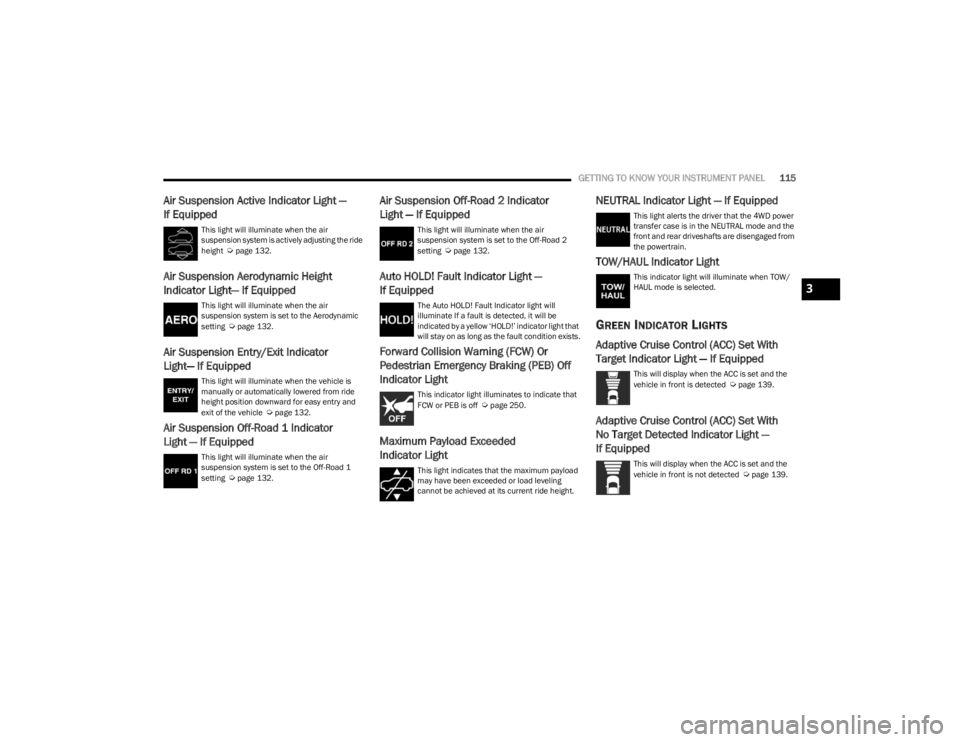
Air Suspension Active Indicator Light —
If Equipped
This light will illuminate when the air
suspension system is actively adjusting the ride
height
Úpage 132.
Air Suspension Aerodynamic Height
Indicator Light— If Equipped
This light will illuminate when the air
suspension system is set to the Aerodynamic
setting
Úpage 132.
Air Suspension Entry/Exit Indicator
Light— If Equipped
This light will illuminate when the vehicle is
manually or automatically lowered from ride
height position downward for easy entry and
exit of the vehicle
Úpage 132.
Air Suspension Off-Road 1 Indicator
Light — If Equipped
This light will illuminate when the air
suspension system is set to the Off-Road 1
setting
Úpage 132.
Air Suspension Off-Road 2 Indicator
Light — If Equipped
This light will illuminate when the air
suspension system is set to the Off-Road 2
setting
Úpage 132.
Auto HOLD! Fault Indicator Light —
If Equipped
The Auto HOLD! Fault Indicator light will
illuminate If a fault is detected, it will be
indicated by a yellow ‘HOLD!’ indicator light that
will stay on as long as the fault condition exists.
Forward Collision Warning (FCW) Or
Pedestrian Emergency Braking (PEB) Off
Indicator Light
This indicator light illuminates to indicate that
FCW or PEB is off Úpage 250.
Maximum Payload Exceeded
Indicator Light
This light indicates that the maximum payload
may have been exceeded or load leveling
cannot be achieved at its current ride height.
NEUTRAL Indicator Light — If Equipped
This light alerts the driver that the 4WD power
transfer case is in the NEUTRAL mode and the
front and rear driveshafts are disengaged from
the powertrain.
TOW/HAUL Indicator Light
This indicator light will illuminate when TOW/
HAUL mode is selected.
GREEN INDICATOR LIGHTS
Adaptive Cruise Control (ACC) Set With
Target Indicator Light — If Equipped
This will display when the ACC is set and the
vehicle in front is detected Úpage 139.
Adaptive Cruise Control (ACC) Set With
No Target Detected Indicator Light —
If Equipped
This will display when the ACC is set and the
vehicle in front is not detected Úpage 139.
3
23_WS_OM_EN_USC_t.book Page 115
Page 118 of 396
116GETTING TO KNOW YOUR INSTRUMENT PANEL
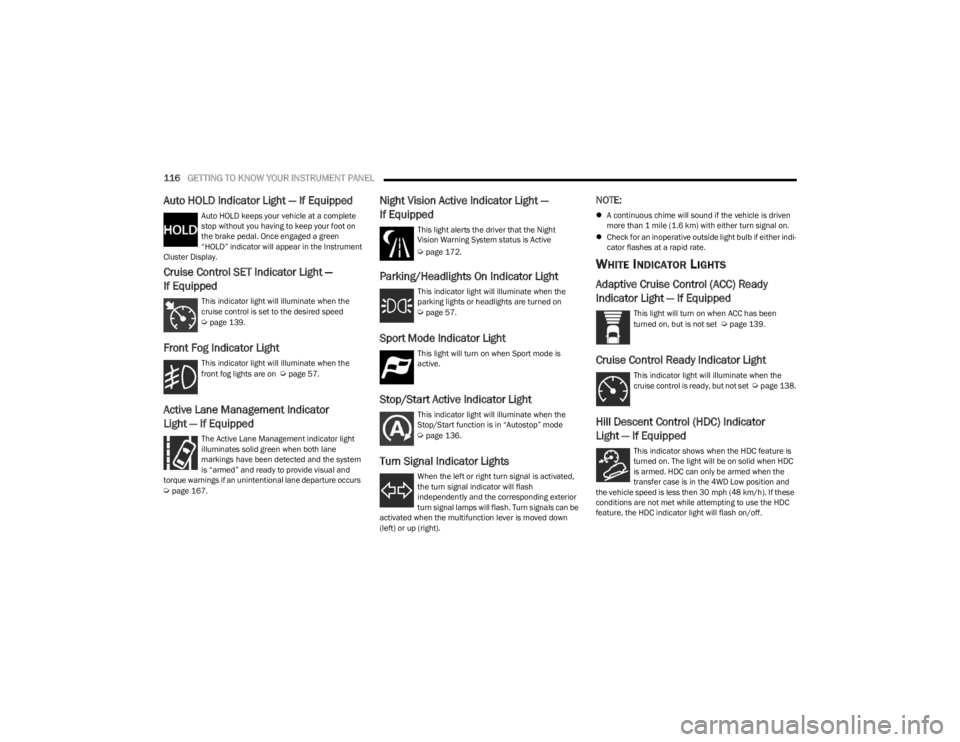
Auto HOLD Indicator Light — If Equipped
Auto HOLD keeps your vehicle at a complete
stop without you having to keep your foot on
the brake pedal. Once engaged a green
“HOLD” indicator will appear in the Instrument
Cluster Display.
Cruise Control SET Indicator Light —
If Equipped
This indicator light will illuminate when the
cruise control is set to the desired speed
Úpage 139.
Front Fog Indicator Light
This indicator light will illuminate when the
front fog lights are on Úpage 57.
Active Lane Management Indicator
Light — If Equipped
The Active Lane Management indicator light
illuminates solid green when both lane
markings have been detected and the system
is “armed” and ready to provide visual and
torque warnings if an unintentional lane departure occurs
Úpage 167.
Night Vision Active Indicator Light —
If Equipped This light alerts the driver that the Night
Vision Warning System status is Active
Ú page 172.
Parking/Headlights On Indicator Light
This indicator light will illuminate when the
parking lights or headlights are turned on
Úpage 57.
Sport Mode Indicator Light
This light will turn on when Sport mode is
active.
Stop/Start Active Indicator Light
This indicator light will illuminate when the
Stop/Start function is in “Autostop” mode
Úpage 136.
Turn Signal Indicator Lights
When the left or right turn signal is activated,
the turn signal indicator will flash
independently and the corresponding exterior
turn signal lamps will flash. Turn signals can be
activated when the multifunction lever is moved down
(left) or up (right).
NOTE:
A continuous chime will sound if the vehicle is driven
more than 1 mile (1.6 km) with either turn signal on.
Check for an inoperative outside light bulb if either indi -
cator flashes at a rapid rate.
WHITE INDICATOR LIGHTS
Adaptive Cruise Control (ACC) Ready
Indicator Light — If Equipped
This light will turn on when ACC has been
turned on, but is not set Úpage 139.
Cruise Control Ready Indicator Light
This indicator light will illuminate when the
cruise control is ready, but not set Úpage 138.
Hill Descent Control (HDC) Indicator
Light — If Equipped
This indicator shows when the HDC feature is
turned on. The light will be on solid when HDC
is armed. HDC can only be armed when the
transfer case is in the 4WD Low position and
the vehicle speed is less then 30 mph (48 km/h). If these
conditions are not met while attempting to use the HDC
feature, the HDC indicator light will flash on/off.
23_WS_OM_EN_USC_t.book Page 116
Page 119 of 396
GETTING TO KNOW YOUR INSTRUMENT PANEL117
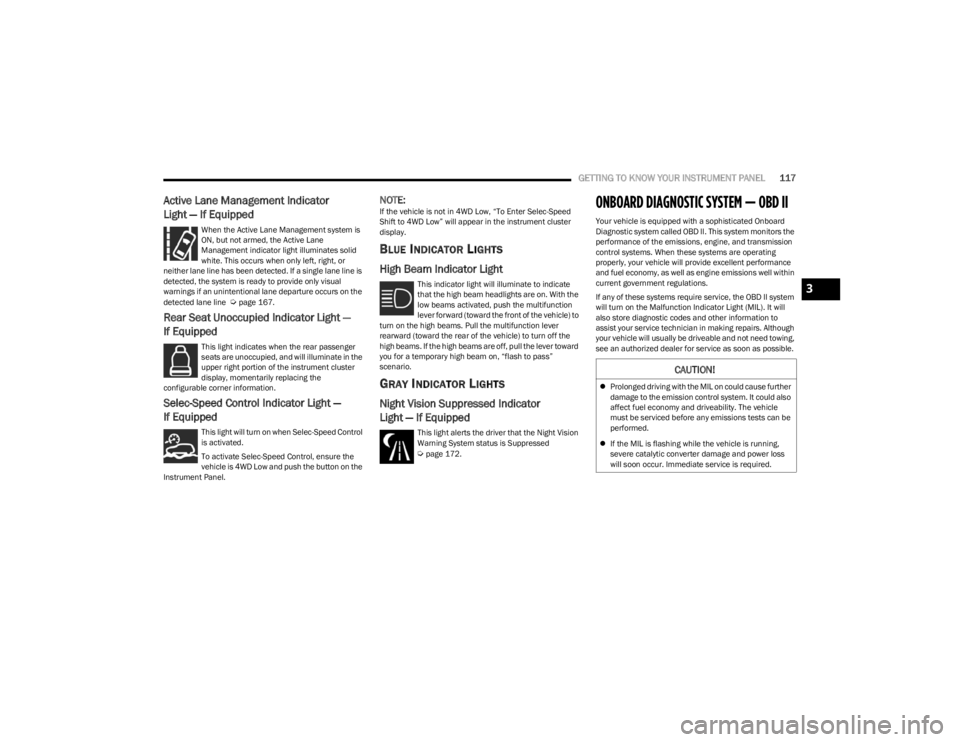
Active Lane Management Indicator
Light — If Equipped
When the Active Lane Management system is
ON, but not armed, the Active Lane
Management indicator light illuminates solid
white. This occurs when only left, right, or
neither lane line has been detected. If a single lane line is
detected, the system is ready to provide only visual
warnings if an unintentional lane departure occurs on the
detected lane line
Úpage 167.
Rear Seat Unoccupied Indicator Light —
If Equipped
This light indicates when the rear passenger
seats are unoccupied, and will illuminate in the
upper right portion of the instrument cluster
display, momentarily replacing the
configurable corner information.
Selec-Speed Control Indicator Light —
If Equipped
This light will turn on when Selec-Speed Control
is activated.
To activate Selec-Speed Control, ensure the
vehicle is 4WD Low and push the button on the
Instrument Panel.
NOTE:If the vehicle is not in 4WD Low, “To Enter Selec-Speed
Shift to 4WD Low” will appear in the instrument cluster
display.
BLUE INDICATOR LIGHTS
High Beam Indicator Light
This indicator light will illuminate to indicate
that the high beam headlights are on. With the
low beams activated, push the multifunction
lever forward (toward the front of the vehicle) to
turn on the high beams. Pull the multifunction lever
rearward (toward the rear of the vehicle) to turn off the
high beams. If the high beams are off, pull the lever toward
you for a temporary high beam on, “flash to pass”
scenario.
GRAY INDICATOR LIGHTS
Night Vision Suppressed Indicator
Light — If Equipped
This light alerts the driver that the Night Vision
Warning System status is Suppressed
Úpage 172.
ONBOARD DIAGNOSTIC SYSTEM — OBD II
Your vehicle is equipped with a sophisticated Onboard
Diagnostic system called OBD II. This system monitors the
performance of the emissions, engine, and transmission
control systems. When these systems are operating
properly, your vehicle will provide excellent performance
and fuel economy, as well as engine emissions well within
current government regulations.
If any of these systems require service, the OBD II system
will turn on the Malfunction Indicator Light (MIL). It will
also store diagnostic codes and other information to
assist your service technician in making repairs. Although
your vehicle will usually be driveable and not need towing,
see an authorized dealer for service as soon as possible.
CAUTION!
Prolonged driving with the MIL on could cause further
damage to the emission control system. It could also
affect fuel economy and driveability. The vehicle
must be serviced before any emissions tests can be
performed.
If the MIL is flashing while the vehicle is running,
severe catalytic converter damage and power loss
will soon occur. Immediate service is required.
3
23_WS_OM_EN_USC_t.book Page 117
Page 122 of 396
120STARTING AND OPERATING
4. If the gear selector is not in PARK and the ENGINE
START/STOP button is pushed once with the vehicle
speed above 5 mph (8 km/h), the instrument cluster will display a “ Vehicle Not In Park ” message and the
engine will remain running. Never leave a vehicle out
of the PARK position, or it could roll.
NOTE:If the gear selector is not in PARK, and the ENGINE START/
STOP button is pushed once with the vehicle speed below
5 mph (8 km/h), the engine will shut off and the ignition
will remain in the ON/RUN position. If vehicle speed drops
below 1.2 mph (1.9 km/h), the vehicle may AutoPark
Úpage 120.
ENGINE START/STOP Button Functions — With Driver’s
Foot Off The Brake Pedal (In PARK Or NEUTRAL Position)
The ENGINE START/STOP button operates similar to an
ignition switch. It has two positions: OFF, and RUN. To
change the ignition positions without starting the vehicle
and use the accessories, follow these directions:
1. Start with the ignition in the OFF position.
2. Push the ENGINE START/STOP button once to place the ignition in the ON/RUN position.
3. Push the ENGINE START/STOP button a second time to return the ignition to the OFF position.
NOTE:Only press one pedal at a time while driving the vehicle.
Torque performance of the vehicle could be reduced if
both pedals are pressed at the same time. If pressure is
detected on both pedals simultaneously, a warning
message will display in the instrument cluster
Úpage 96.
AUTOPARK
AutoPark is a supplemental feature to assist in placing the
vehicle in PARK (P) should the situations on the following
pages occur. It is a back-up system and should not be
relied upon as the primary method by which the driver
shifts the vehicle into PARK.
The conditions under which AutoPark will engage are
outlined on the following pages.
If the vehicle is not in PARK and the driver turns off the
engine, the vehicle may AutoPark.
AutoPark will engage when all of these conditions are met:
Vehicle is equipped with an 8-speed transmission
Vehicle is not in PARK
Vehicle speed is 1.2 mph (1.9 km/h) or less
Ignition is switched from RUN to OFF
NOTE:For Keyless Enter ‘n Go™ equipped vehicles, the engine
will turn off and the ignition switch will change to ON/RUN
position. After 30 minutes the ignition switches to OFF
automatically, unless the driver turns the ignition
switch OFF.
If the vehicle is not in PARK and the driver exits the vehicle
with the engine running, the vehicle may AutoPark.
AutoPark will engage when all of these conditions are met:
Vehicle is equipped with an 8-speed transmission
Vehicle is not in PARK
Vehicle speed is 1.2 mph (1.9 km/h) or less
Driver’s seat belt is unbuckled
Driver’s door is ajar
Brake pedal is not pressed
The message “ AutoPark Engaged Shift To P Then Shift To
Gear ” will display in the instrument cluster.
NOTE:In some cases the ParkSense graphic will be displayed in
the instrument cluster. In these cases, the gear selector
must be returned to “P” to select desired gear.
If the driver shifts into PARK while moving, the vehicle may
AutoPark.
AutoPark will engage ONLY when vehicle speed is 1.2 mph
(1.9 km/h) or less.
The message “ Vehicle Speed Is Too High To Shift To P ” will
be displayed in the instrument cluster if vehicle speed is
above 1.2 mph (1.9 km/h).
WARNING!
Driver inattention could lead to failure to place the
vehicle in PARK. ALWAYS DO A VISUAL CHECK that
your vehicle is in PARK by verifying that a solid (not
blinking) “P” is indicated in the instrument cluster
display and on the gear selector. If the "P" indicator is
blinking, your vehicle is not in PARK. As an added
precaution, always apply the parking brake when
exiting the vehicle.
AutoPark is a supplemental feature. It is not
designed to replace the need to shift your vehicle
into PARK. It is a back up system and should not be
relied upon as the primary method by which the
driver shifts the vehicle into PARK.
23_WS_OM_EN_USC_t.book Page 120
Page 123 of 396
STARTING AND OPERATING121
4WD LOW — If Equipped
AutoPark will be disabled when operating the vehicle in
4WD LOW.
The message “AutoPark Disabled ” will be displayed in the
instrument cluster.
Additional customer warnings will be given when both of
these conditions are met:
Vehicle is not in PARK
Driver’s door is ajar
The message “ AutoPark Not Engaged ” will be displayed in
the instrument cluster. A warning chime will continue until
you shift the vehicle into PARK or the driver’s door is
closed.
ALWAYS DO A VISUAL CHECK
that your vehicle is in PARK
by looking for the "P" in the instrument cluster display and
on the gear selector. As an added precaution, always apply
the parking brake when exiting the vehicle.
EXTENDED PARK STARTING
NOTE:Extended Park condition occurs when the vehicle has not
been started or driven for at least 30 days.
1. Install a battery charger or jumper cables to the battery to ensure a full battery charge during the
crank cycle.
2. Press and hold the brake pedal while pushing the ENGINE START/STOP button once.
3. If the engine fails to start within 10 seconds, wait 10 to 15 seconds to allow the starter to cool, then
repeat the Extended Park Starting procedure.
4. If the engine fails to start after eight attempts, allow the starter to cool for at least 10 minutes, then repeat
the Extended Park Starting procedure.
IF ENGINE FAILS TO START
If the engine fails to start after you have followed the
“Normal Starting” procedure and has not experienced an
extended park condition as defined previously, it may be
flooded. Push the accelerator pedal all the way to the floor
and hold it there while the engine is cranking. This should
clear any excess fuel in case the engine is flooded.
The starter motor will engage automatically, run for
10 seconds, and then disengage. Once this occurs, release the accelerator pedal and the
brake pedal, wait 10 to 15 seconds, then repeat the
“Normal Starting” procedure.
WARNING!
If vehicle speed is above 1.2 mph (1.9 km/h), the
transmission will default to NEUTRAL until the vehicle
speed drops below 1.2 mph (1.9 km/h). A vehicle left in
the NEUTRAL position can roll. As an added precaution,
always apply the parking brake when exiting the vehicle.
CAUTION!
To prevent damage to the starter, do not crank
continuously for more than 10 seconds at a time.
Wait 10 to 15 seconds before trying again.
WARNING!
Never pour fuel or other flammable liquid into the
throttle body air inlet opening in an attempt to start
the vehicle. This could result in flash fire causing
serious personal injury.
Do not attempt to push or tow your vehicle to get it
started. Vehicles equipped with an automatic trans -
mission cannot be started this way. Unburned fuel
could enter the catalytic converter and once the
engine has started, ignite and damage the converter
and vehicle.
If the vehicle has a discharged battery, booster
cables may be used to obtain a start from a booster
battery or the battery in another vehicle. This type of
start can be dangerous if done improperly
Úpage 301.
CAUTION!
To prevent damage to the starter, do not continuously
crank the engine for more than 10 seconds at a time.
Wait 10 to 15 seconds before trying again.
4
23_WS_OM_EN_USC_t.book Page 121
Page 128 of 396

126STARTING AND OPERATING
IGNITION PARK INTERLOCK
This vehicle is equipped with an Ignition Park Interlock
which requires the transmission to be in PARK (P) before
the ignition can be turned to the OFF position. This helps
the driver avoid inadvertently leaving the vehicle without
placing the transmission in PARK. This system also locks
the transmission in PARK whenever the ignition is in the
OFF position.
NOTE:The transmission is NOT locked in PARK when the ignition
is in the ON/RUN position (even though the engine will be
off). Ensure that the transmission is in PARK, and the
ignition is OFF (not in ON/RUN position) before exiting the
vehicle.
BRAKE/TRANSMISSION SHIFT
I
NTERLOCK (BTSI) SYSTEM
This vehicle is equipped with a BTSI system that holds the
transmission gear selector in PARK unless the brakes are
applied. To shift the transmission out of PARK, the engine
must be running and the brake pedal must be pressed.
The brake pedal must also be pressed to shift from
NEUTRAL into DRIVE or REVERSE when the vehicle is
stopped or moving at low speeds.
8-SPEED AUTOMATIC TRANSMISSION
The transmission is controlled using a rotary electronic
gear selector located on the center console. The
transmission gear range (PRND) is displayed both above
the gear selector and in the instrument cluster. To select
a gear range, simply rotate the gear selector. You must
press the brake pedal to shift the transmission out of
PARK (or NEUTRAL, when the vehicle is stopped or moving
at low speeds). To shift past multiple gear ranges at once
(such as PARK to DRIVE), simply rotate the gear selector
to the appropriate detent. Select the DRIVE range for
normal driving.
NOTE:In the event of a mismatch between the gear selector
position and the actual transmission gear (for example,
driver selects PARK while driving), the position indicator
will blink continuously until the selector is returned to the
proper position, or the requested shift can be completed.
Unintended movement of a vehicle could injure
those in or near the vehicle. As with all vehicles, you
should never exit a vehicle while the engine is
running. Before exiting a vehicle, always come to a
complete stop, then apply the parking brake, shift
the transmission into PARK, and turn the ignition
OFF. When the ignition is in the OFF position, the
transmission is locked in PARK, securing the vehicle
against unwanted movement.
When exiting the vehicle, always make sure the igni -
tion is in the OFF position, remove the key fob from
the vehicle, and lock the vehicle.
Never leave children alone in a vehicle, or with
access to an unlocked vehicle. Allowing children to
be in a vehicle unattended is dangerous for a
number of reasons. A child or others could be seri -
ously or fatally injured. Children should be warned
not to touch the parking brake, brake pedal or the
transmission gear selector.
Do not leave the key fob in or near the vehicle (or in
a location accessible to children), and do not leave
the ignition in the ON/RUN position. A child could
operate power windows, other controls, or move the
vehicle.
WARNING!CAUTION!
Damage to the transmission may occur if the following
precautions are not observed:
Shift into or out of PARK or REVERSE (R) only after
the vehicle has come to a complete stop.
Do not shift between PARK, REVERSE, NEUTRAL, or
DRIVE (D) when the engine is above idle speed.
Before shifting into any gear, make sure your foot is
firmly pressing the brake pedal.
23_WS_OM_EN_USC_t.book Page 126
Page 129 of 396
STARTING AND OPERATING127
The electronically controlled transmission adapts its shift
schedule based on driver inputs, along with environmental
and road conditions. The transmission electronics are
self-calibrating; therefore, the first few shifts on a new
vehicle may be somewhat abrupt. This is a normal
condition, and precision shifts will develop within a few
hundred miles (kilometers).
Only shift from DRIVE to PARK or REVERSE when the
accelerator pedal is released and the vehicle is stopped.
Be sure to keep your foot on the brake pedal when shifting
between these gears.
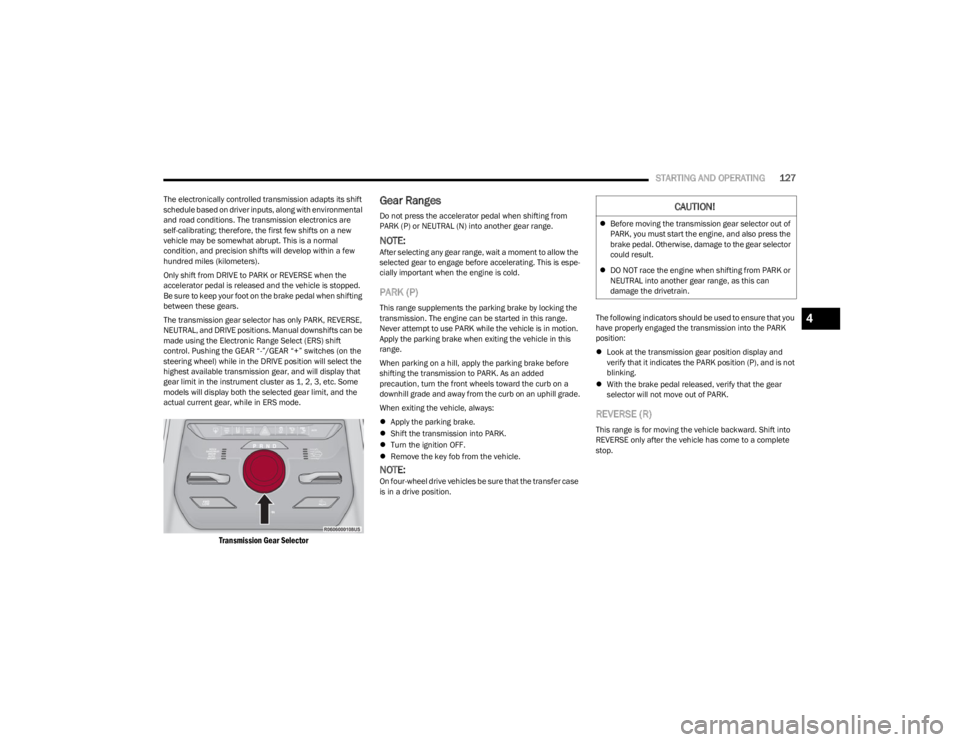
The transmission gear selector has only PARK, REVERSE,
NEUTRAL, and DRIVE positions. Manual downshifts can be
made using the Electronic Range Select (ERS) shift
control. Pushing the GEAR “-”/GEAR “+” switches (on the
steering wheel) while in the DRIVE position will select the
highest available transmission gear, and will display that
gear limit in the instrument cluster as 1, 2, 3, etc. Some
models will display both the selected gear limit, and the
actual current gear, while in ERS mode.
Transmission Gear Selector
Gear Ranges
Do not press the accelerator pedal when shifting from
PARK (P) or NEUTRAL (N) into another gear range.
NOTE:After selecting any gear range, wait a moment to allow the
selected gear to engage before accelerating. This is espe -
cially important when the engine is cold.
PARK (P)
This range supplements the parking brake by locking the
transmission. The engine can be started in this range.
Never attempt to use PARK while the vehicle is in motion.
Apply the parking brake when exiting the vehicle in this
range.
When parking on a hill, apply the parking brake before
shifting the transmission to PARK. As an added
precaution, turn the front wheels toward the curb on a
downhill grade and away from the curb on an uphill grade.
When exiting the vehicle, always:
Apply the parking brake.
Shift the transmission into PARK.
Turn the ignition OFF.
Remove the key fob from the vehicle.
NOTE:On four-wheel drive vehicles be sure that the transfer case
is in a drive position. The following indicators should be used to ensure that you
have properly engaged the transmission into the PARK
position:
Look at the transmission gear position display and
verify that it indicates the PARK position (P), and is not
blinking.
With the brake pedal released, verify that the gear
selector will not move out of PARK.
REVERSE (R)
This range is for moving the vehicle backward. Shift into
REVERSE only after the vehicle has come to a complete
stop.
CAUTION!
Before moving the transmission gear selector out of
PARK, you must start the engine, and also press the
brake pedal. Otherwise, damage to the gear selector
could result.
DO NOT race the engine when shifting from PARK or
NEUTRAL into another gear range, as this can
damage the drivetrain.
4
23_WS_OM_EN_USC_t.book Page 127
Page 131 of 396
STARTING AND OPERATING129
Electronic Range Select (ERS) Operation
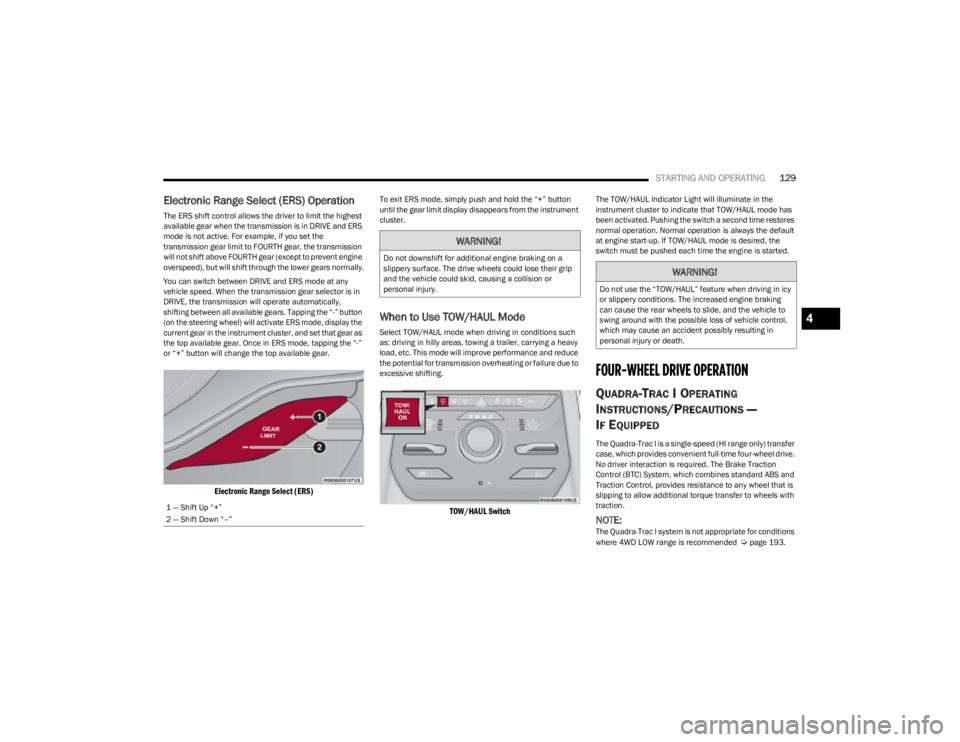
The ERS shift control allows the driver to limit the highest
available gear when the transmission is in DRIVE and ERS
mode is not active. For example, if you set the
transmission gear limit to FOURTH gear, the transmission
will not shift above FOURTH gear (except to prevent engine
overspeed), but will shift through the lower gears normally.
You can switch between DRIVE and ERS mode at any
vehicle speed. When the transmission gear selector is in
DRIVE, the transmission will operate automatically,
shifting between all available gears. Tapping the “-” button
(on the steering wheel) will activate ERS mode, display the
current gear in the instrument cluster, and set that gear as
the top available gear. Once in ERS mode, tapping the “-”
or “+” button will change the top available gear.
Electronic Range Select (ERS)
To exit ERS mode, simply push and hold the “+” button
until the gear limit display disappears from the instrument
cluster.
When to Use TOW/HAUL Mode
Select TOW/HAUL mode when driving in conditions such
as: driving in hilly areas, towing a trailer, carrying a heavy
load, etc. This mode will improve performance and reduce
the potential for transmission overheating or failure due to
excessive shifting.
TOW/HAUL Switch
The TOW/HAUL Indicator Light will illuminate in the
instrument cluster to indicate that TOW/HAUL mode has
been activated. Pushing the switch a second time restores
normal operation. Normal operation is always the default
at engine start-up. If TOW/HAUL mode is desired, the
switch must be pushed each time the engine is started.
FOUR-WHEEL DRIVE OPERATION
QUADRA-TRAC I OPERATING
I
NSTRUCTIONS/PRECAUTIONS —
I
F EQUIPPED
The Quadra-Trac I is a single-speed (HI range only) transfer
case, which provides convenient full-time four-wheel drive.
No driver interaction is required. The Brake Traction
Control (BTC) System, which combines standard ABS and
Traction Control, provides resistance to any wheel that is
slipping to allow additional torque transfer to wheels with
traction.
NOTE:The Quadra-Trac I system is not appropriate for conditions
where 4WD LOW range is recommended Úpage 193.
1 — Shift Up “+”
2 — Shift Down “–”
WARNING!
Do not downshift for additional engine braking on a
slippery surface. The drive wheels could lose their grip
and the vehicle could skid, causing a collision or
personal injury.
WARNING!
Do not use the “TOW/HAUL” feature when driving in icy
or slippery conditions. The increased engine braking
can cause the rear wheels to slide, and the vehicle to
swing around with the possible loss of vehicle control,
which may cause an accident possibly resulting in
personal injury or death.
4
23_WS_OM_EN_USC_t.book Page 129
Page 133 of 396
STARTING AND OPERATING131
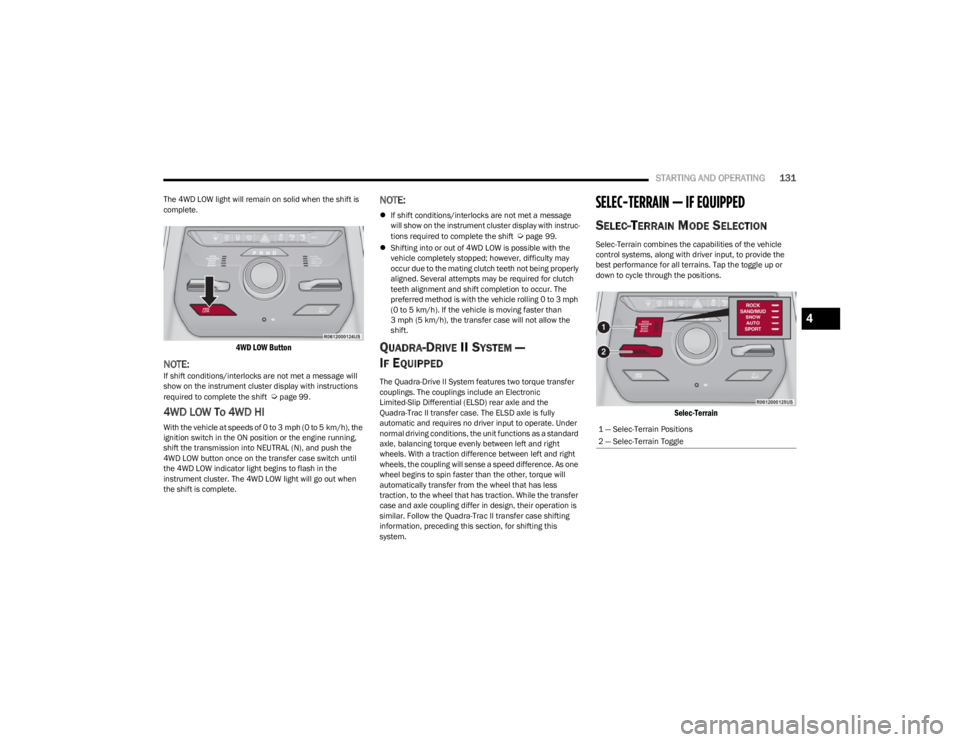
The 4WD LOW light will remain on solid when the shift is
complete.
4WD LOW Button
NOTE:If shift conditions/interlocks are not met a message will
show on the instrument cluster display with instructions
required to complete the shift
Úpage 99.
4WD LOW To 4WD HI
With the vehicle at speeds of 0 to 3 mph (0 to 5 km/h), the
ignition switch in the ON position or the engine running,
shift the transmission into NEUTRAL (N), and push the
4WD LOW button once on the transfer case switch until
the 4WD LOW indicator light begins to flash in the
instrument cluster. The 4WD LOW light will go out when
the shift is complete.
NOTE:
If shift conditions/interlocks are not met a message
will show on the instrument cluster display with instruc -
tions required to complete the shift
Úpage 99.
Shifting into or out of 4WD LOW is possible with the
vehicle completely stopped; however, difficulty may
occur due to the mating clutch teeth not being properly
aligned. Several attempts may be required for clutch
teeth alignment and shift completion to occur. The
preferred method is with the vehicle rolling 0 to 3 mph
(0 to 5 km/h). If the vehicle is moving faster than
3 mph (5 km/h), the transfer case will not allow the
shift.
QUADRA-DRIVE II SYSTEM —
I
F EQUIPPED
The Quadra-Drive II System features two torque transfer
couplings. The couplings include an Electronic
Limited-Slip Differential (ELSD) rear axle and the
Quadra-Trac II transfer case. The ELSD axle is fully
automatic and requires no driver input to operate. Under
normal driving conditions, the unit functions as a standard
axle, balancing torque evenly between left and right
wheels. With a traction difference between left and right
wheels, the coupling will sense a speed difference. As one
wheel begins to spin faster than the other, torque will
automatically transfer from the wheel that has less
traction, to the wheel that has traction. While the transfer
case and axle coupling differ in design, their operation is
similar. Follow the Quadra-Trac II transfer case shifting
information, preceding this section, for shifting this
system.
SELEC-TERRAIN — IF EQUIPPED
SELEC-TERRAIN MODE SELECTION
Selec-Terrain combines the capabilities of the vehicle
control systems, along with driver input, to provide the
best performance for all terrains. Tap the toggle up or
down to cycle through the positions.
Selec-Terrain
1 — Selec-Terrain Positions
2 — Selec-Terrain Toggle
4
23_WS_OM_EN_USC_t.book Page 131
Page 134 of 396
132STARTING AND OPERATING
Selec-Terrain consists of the following positions:
ROCK (if equipped) – Off-road calibration is only avail -
able in 4WD LOW. The vehicle is raised (if equipped
with Air Suspension) for improved ground clearance.
Traction-based tuning with improved steerability for
use on high traction off-road surfaces. Use for low
speed obstacles such as large rocks, deep ruts, etc. If
equipped with air suspension, the vehicle level will
change to Off-Road 2 (OR2). If the Selec-Terrain switch
is in ROCK mode, and the transfer case is switched
from 4WD LOW to 4WD HI, the Selec-Terrain system
will return to AUTO.
SAND (if equipped) – Off-road calibration for use on low
traction surfaces such as sand or wet grass. Driveline
is maximized for traction. Some binding may be felt on
less forgiving surfaces. The electronic brake controls
are set to limit traction control management of throttle
and wheel spin. If equipped with air suspension, the
default ride height for SAND is Normal Ride Height
(NRH).
MUD (if equipped) – Off-road calibration for use on low
traction surfaces such as mud. Driveline is maximized
for traction. Some binding may be felt on less forgiving
surfaces. The electronic brake controls are set to limit
traction control management of throttle and wheel
spin. If equipped with air suspension, the level will
change to Off-Road 1 (OR1).
SNOW – Tuning set for additional stability in inclement
weather. Use on and off road on loose traction surfaces
such as snow. When in SNOW mode (depending on
certain operating conditions), the transmission may
use SECOND gear (rather than FIRST gear) during
launches, to minimize wheel slippage. If equipped with
air suspension, the default ride height for SNOW is
Normal Ride Height (NRH).
AUTO – Fully automatic full-time four-wheel drive oper -
ation can be used on and off road. Balances traction
with seamless steering feel to provide improved
handling and acceleration over two-wheel drive vehi -
cles. If equipped with air suspension, the level will
change to Normal Ride Height (NRH).
SPORT – This mode alters the transmission's auto -
matic shift schedule for sportier driving. Upshift speeds
are increased to make full use of available engine
power. Steering efforts are modified for sporty driving.
If equipped with air suspension, the level will change to
Aero Height.
INSTRUMENT CLUSTER DISPLAY
M
ESSAGES
When the appropriate conditions exist, a message will
appear in the instrument cluster Úpage 99.
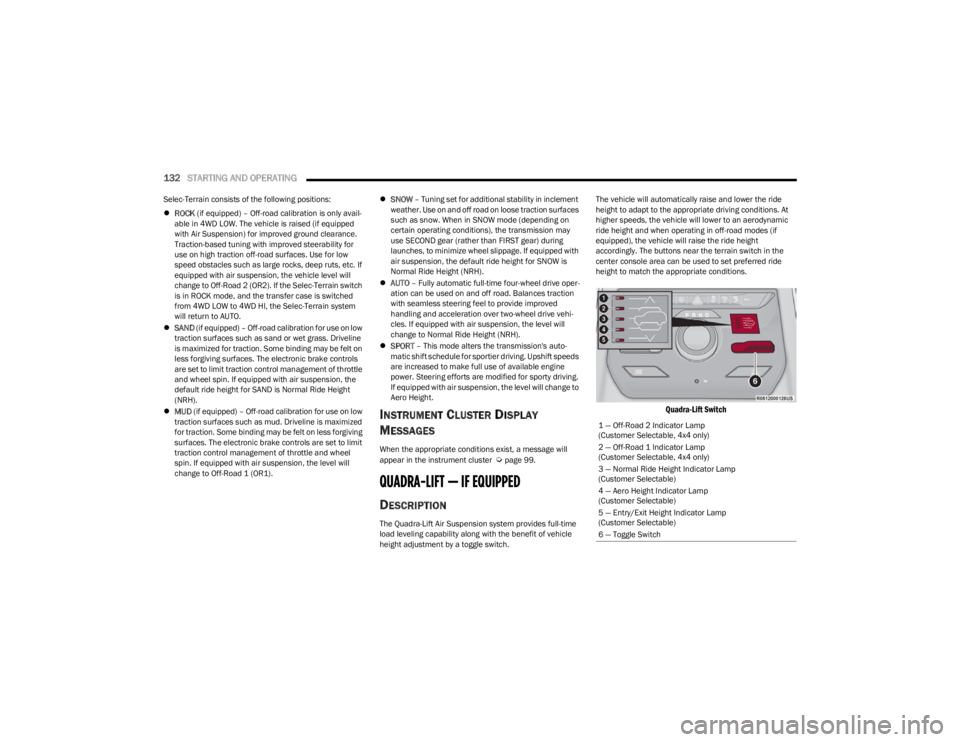
QUADRA-LIFT — IF EQUIPPED
DESCRIPTION
The Quadra-Lift Air Suspension system provides full-time
load leveling capability along with the benefit of vehicle
height adjustment by a toggle switch. The vehicle will automatically raise and lower the ride
height to adapt to the appropriate driving conditions. At
higher speeds, the vehicle will lower to an aerodynamic
ride height and when operating in off-road modes (if
equipped), the vehicle will raise the ride height
accordingly. The buttons near the terrain switch in the
center console area can be used to set preferred ride
height to match the appropriate conditions.
Quadra-Lift Switch
1 — Off-Road 2 Indicator Lamp
(Customer Selectable, 4x4 only)
2 — Off-Road 1 Indicator Lamp
(Customer Selectable, 4x4 only)
3 — Normal Ride Height Indicator Lamp
(Customer Selectable)
4 — Aero Height Indicator Lamp
(Customer Selectable)
5 — Entry/Exit Height Indicator Lamp
(Customer Selectable)
6 — Toggle Switch
23_WS_OM_EN_USC_t.book Page 132