JEEP WRANGLER 2015 JK / 3.G Owners Manual
Manufacturer: JEEP, Model Year: 2015, Model line: WRANGLER, Model: JEEP WRANGLER 2015 JK / 3.GPages: 695, PDF Size: 20.64 MB
Page 631 of 695
CAUTION!
When installing hanging air fresheners in your ve-
hicle, read the installation instructions carefully.
Some air fresheners will damage the finish of
painted or decorated parts if allowed to directly
contact any surface.
Glass Surfaces
All glass surfaces should be cleaned on a regular basis
with MOPAR® Glass Cleaner, or any commercial
household-type glass cleaner. Never use an abrasive type
cleaner. Use caution when cleaning the inside rear win-
dow equipped with electric defrosters or the right rear
quarter window equipped with the radio antenna. Do
not use scrapers or other sharp instrument that may
scratch the elements.
When cleaning the rear view mirror, spray cleaner on the
towel or rag that you are using. Do not spray cleaner
directly on the mirror.
Cleaning Plastic Instrument Cluster Lenses
The lenses in front of the instruments in this vehicle are
molded in clear plastic. When cleaning the lenses, care
must be taken to avoid scratching the plastic.
1. Clean with a wet soft rag. A mild soap solution may be
used, but do not use high alcohol content or abrasive
cleaners. If soap is used, wipe clean with a clean damp
rag.
2. Dry with a soft cloth.
Seat Belt Maintenance
Do not bleach, dye, or clean the belts with chemical
solvents or abrasive cleaners. This will weaken the fabric.
Sun damage can also weaken the fabric.
7
MAINTAINING YOUR VEHICLE 629
Page 632 of 695
If the belts need cleaning, use MOPAR® Total Clean, a
mild soap solution, or lukewarm water. Do not remove
the belts from the vehicle to wash them. Dry with a soft
cloth.
Replace the belts if they appear frayed or worn or if the
buckles do not work properly.
WARNING!
A frayed or torn belt could rip apart in a collision and
leave you with no protection. Inspect the belt system
periodically, checking for cuts, frays, or loose parts.
Damaged parts must be replaced immediately. Do
not disassemble or modify the system. Seat belt
assemblies must be replaced after a collision if they
have been damaged (i.e., bent retractor, torn web-
bing, etc.).
Appearance Care For Fabric Top Models
CAUTION!
To maintain the appearance of your vehicle’s interior
trim and top, follow these precautions:
•Avoid leaving your vehicle unattended with the top
down, as exposure to sun or rain may damage interior
trim.
•Do not use harsh cleaners or bleaching agents on top
material, as damage may result.
•Do not allow any vinyl cleaner to run down and dry
on the paint, leaving a streak.
•After cleaning your vehicle’s fabric top, always make
sure it is completely dry before lowering.
•Be especially careful when washing the windows by
following the directions for “Care of Fabric Top Win-
dows.”
630 MAINTAINING YOUR VEHICLE
Page 633 of 695
Washing –Use MOPAR® Car Wash or equivalent, or
mild soap suds, lukewarm water, and a brush with soft
bristles. If extra cleaning is required, use MOPAR®
Convertible Cloth Top Cleaner or equivalent, or a mild
foaming cleaner on the entire top, but support the top
from underneath.
Rinsing –Be sure to remove all traces of cleaner by
rinsing the top thoroughly with clean water. Remember
to allow the top to dry before lowering it.
CAUTION!
Failure to follow these cautions may cause interior
water damage, stains or mildew on the top material:
•Avoid high-pressure car washes, as they can dam-
age the top material. Also, increased water pressure
may force past the weather strips.
(Continued)
CAUTION!(Continued)
•It is recommended that the top be free of water
prior to opening it. Operating the top, opening a
door or lowering a window while the top is wet
may allow water to drip into the vehicle’s interior.
•Use care when washing the vehicle, water pressure
directed at the weather strip seals may cause water
to leak into the vehicle’s interior.
•Careless handling and storage of the removable
roof panels may damage the seals, causing water to
leak into the vehicle’s interior.
•The front panel(s) must be positioned properly to
ensure sealing. Improper installation can cause
water to leak into the vehicle’s interior.7
MAINTAINING YOUR VEHICLE 631
Page 634 of 695
Care Of Fabric Top Windows
CAUTION!
Your vehicle’s fabric top has pliable plastic windows
which can be scratched unless special care is taken by
following these directions:
1. Never use a dry cloth to remove dust. Instead,use a
microfiber towel or soft cotton cloth moistened with
cold or warm, clean water, and wipe across the
window, not up and down.MOPAR® Jeep Soft Glass
Window Cleaner or equivalent will safely clean all
plastic windows without scratching. It removes fine
scratches to improve visibility and provides UV pro-
tection to help prevent yellowing.
2. When washing,never use hot wateror anything
stronger than a mild soap. Never use solvents such as
alcohol or harsh cleaning agents.
3. Always rinse thoroughly with cold water, then wipe
with a soft and slightly moist, clean cloth.
4. When removing frost, snow or ice,never use a scraper
or de-icing chemicals.Use warm water only if you
must clean the window quickly.
5.Debris (sand, mud/dirt, dust, or salt) from off-road
driving will have a major impact on zipper operation.
Even normal on-road driving and vehicle washing will
eventually impact window zipper operation. To main-
tain ease of use of the window zippers, each window
zipper should be cleaned and lubricated regularly. Use
MOPAR® Soft Top Zipper Cleaner and Lubricant or
equivalent to ease zipper operation. Before applying,
make sure the zipper teeth are clear of sand, mud, and
other materials. Clean both sides of the zipper, not just
one side. Rinse both zipper halves with fresh water and
allow to dry. Aggressively work the MOPAR® Soft Top
Zipper Cleaner and Lubricant or equivalent into the
zipper teeth. If a stuck zipper slide is experienced, work
632 MAINTAINING YOUR VEHICLE
Page 635 of 695
the MOPAR® Soft Top Zipper Cleaner and Lubricant or
equivalent into the zipper slide. Several applications
may be required before the zipper comes free.
6. Never paste stickers, gummed labels or any tape to the
windows. Adhesives are hard to remove and may
damage the windows.
FUSES
WARNING!
•When replacing a blown fuse, always use an appro-
priate replacement fuse with the same amp rating as
the original fuse. Never replace a fuse with another
fuse of higher amp rating. Never replace a blown
fuse with metal wires or any other material. Failure
to use proper fuses may result in serious personal
injury, fire and/or property damage.
(Continued)
WARNING!(Continued)
•Before replacing a fuse, make sure that the ignition
is off and that all the other services are switched off
and/or disengaged.
•If the replaced fuse blows again, contact an autho-
rized dealer.
•If a general protection fuse for safety systems (air
bag system, braking system), power unit systems
(engine system, gearbox system) or steering system
blows, contact an authorized dealer.
7
MAINTAINING YOUR VEHICLE 633
Page 636 of 695
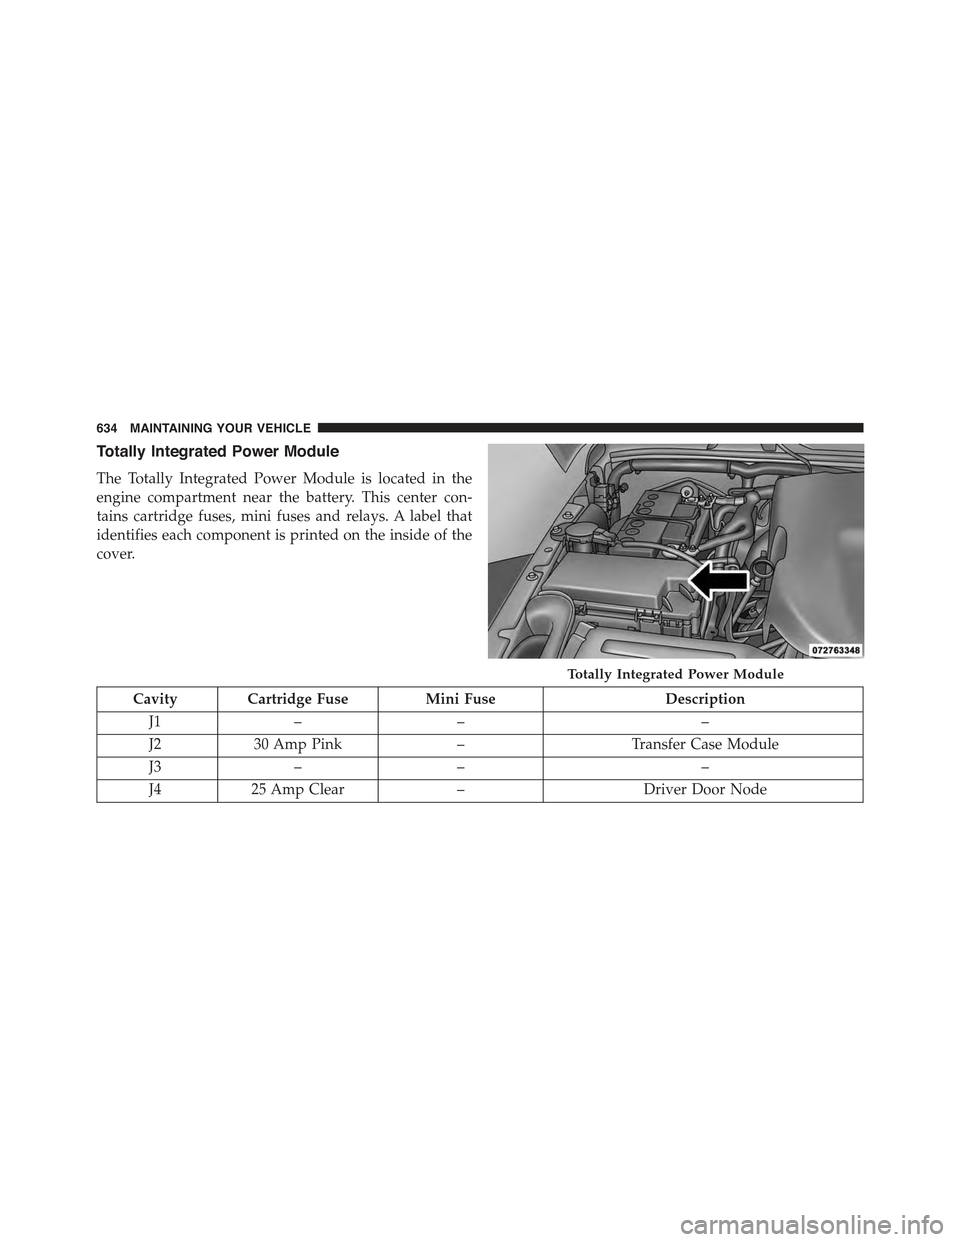
Totally Integrated Power Module
The Totally Integrated Power Module is located in the
engine compartment near the battery. This center con-
tains cartridge fuses, mini fuses and relays. A label that
identifies each component is printed on the inside of the
cover.
Cavity Cartridge FuseMini FuseDescription
J1–––
J230 Amp Pink–Transfer Case Module
J3–––
J425 Amp Clear–Driver Door Node
Totally Integrated Power Module
634 MAINTAINING YOUR VEHICLE
Page 637 of 695
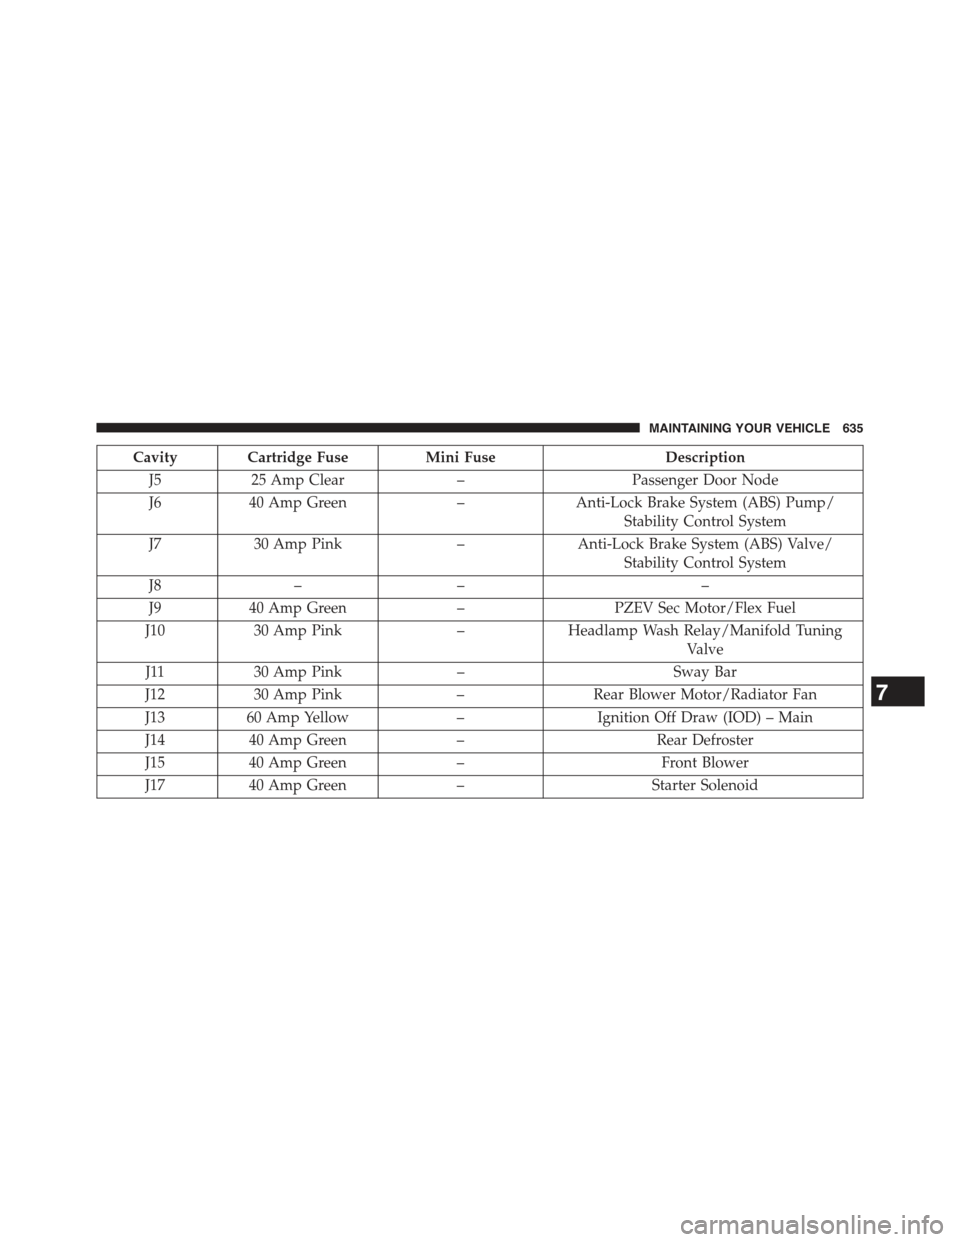
Cavity Cartridge FuseMini FuseDescription
J525 Amp Clear–Passenger Door Node
J640 Amp Green–Anti-Lock Brake System (ABS) Pump/
Stability Control System
J730 Amp Pink–Anti-Lock Brake System (ABS) Valve/
Stability Control System
J8–––
J940 Amp Green–PZEV Sec Motor/Flex Fuel
J1030 Amp Pink–Headlamp Wash Relay/Manifold Tuning
Valve
J1130 Amp Pink–Sway Bar
J1230 Amp Pink–Rear Blower Motor/Radiator Fan
J1360 Amp Yellow–Ignition Off Draw (IOD) – Main
J1440 Amp Green–Rear Defroster
J1540 Amp Green–Front Blower
J1740 Amp Green–Starter Solenoid
7
MAINTAINING YOUR VEHICLE 635
Page 638 of 695
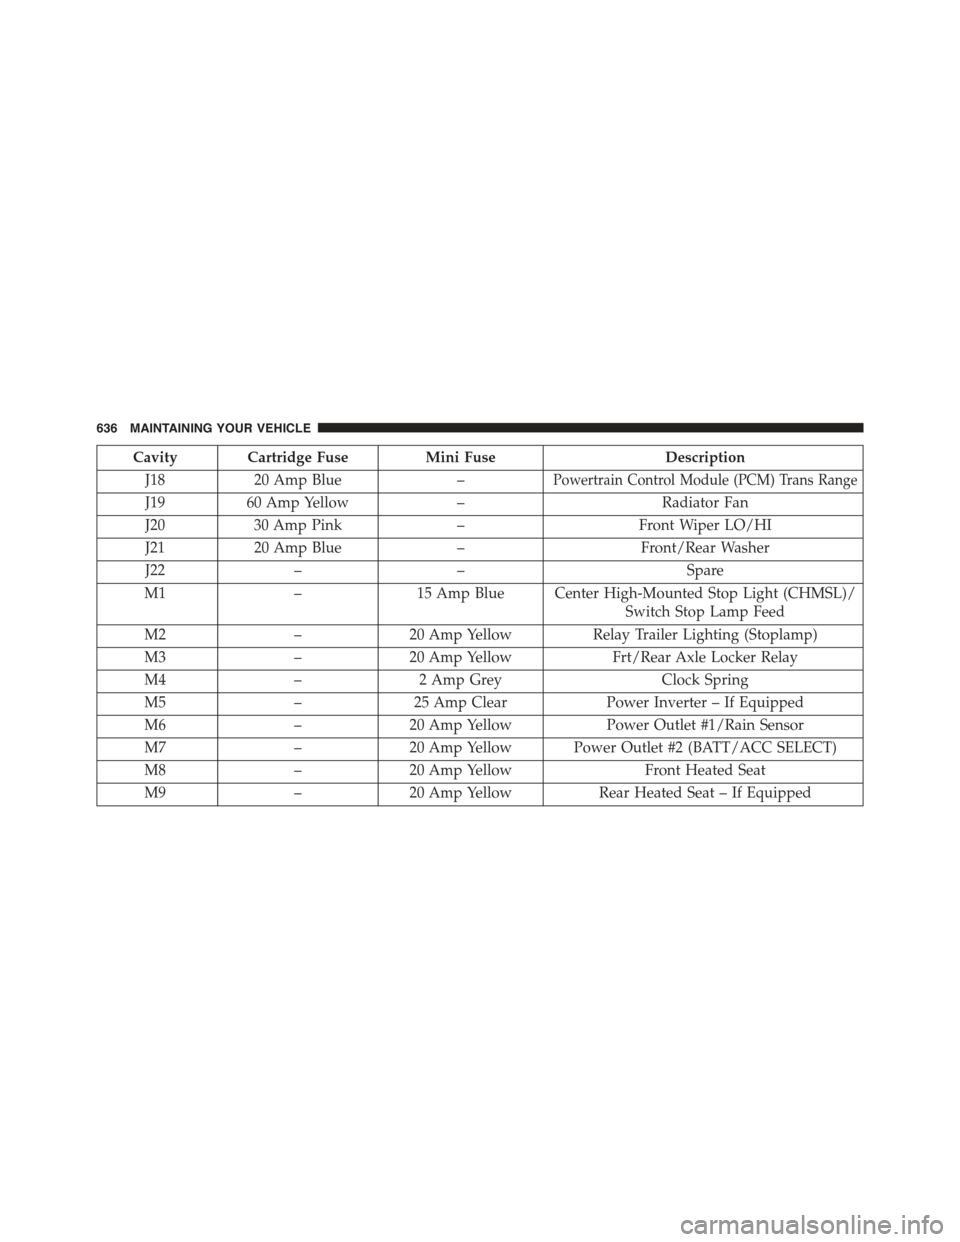
Cavity Cartridge FuseMini FuseDescription
J1820 Amp Blue–Powertrain Control Module (PCM) Trans Range
J1960 Amp Yellow–Radiator Fan
J2030 Amp Pink–Front Wiper LO/HI
J2120 Amp Blue–Front/Rear Washer
J22––Spare
M1–15 Amp Blue Center High-Mounted Stop Light (CHMSL)/
Switch Stop Lamp Feed
M2–20 Amp YellowRelay Trailer Lighting (Stoplamp)
M3–20 Amp YellowFrt/Rear Axle Locker Relay
M4–2 Amp GreyClock Spring
M5–25 Amp ClearPower Inverter – If Equipped
M6–20 Amp YellowPower Outlet #1/Rain Sensor
M7–20 Amp Yellow Power Outlet #2 (BATT/ACC SELECT)
M8–20 Amp YellowFront Heated Seat
M9–20 Amp YellowRear Heated Seat – If Equipped
636 MAINTAINING YOUR VEHICLE
Page 639 of 695

Cavity Cartridge FuseMini FuseDescription
M10–15 Amp BlueIgnition Off Draw – Vehicle Entertainment Sys-
tem, Satellite Digital Audio Receiver (SDARS),
DVD, Hands-Free Module, RADIO, Antenna,
Universal Garage Door Opener, Vanity Lamp
M11–10 Amp Red (Ignition Off Draw) Climate Control System,
Underhood Lamp
M12–30 Amp GreenAmplifier
M13–20 Amp Yellow Ignition Off Draw – Cabin Compartment
Node, Wireless Control Module, SIREN,
Multifunction Control Switch
M14–20 Amp YellowTrailer Tow (Export Only)
M15–20 Amp Yellow Climate Control System, Rear View Mirror,
Cabin Compartment Node, Transfer Case
Switch, Multi-Function Control Switch, Tire
Pressure Monitor, Glow Plug Module –
Export Diesel Only
7
MAINTAINING YOUR VEHICLE 637
Page 640 of 695
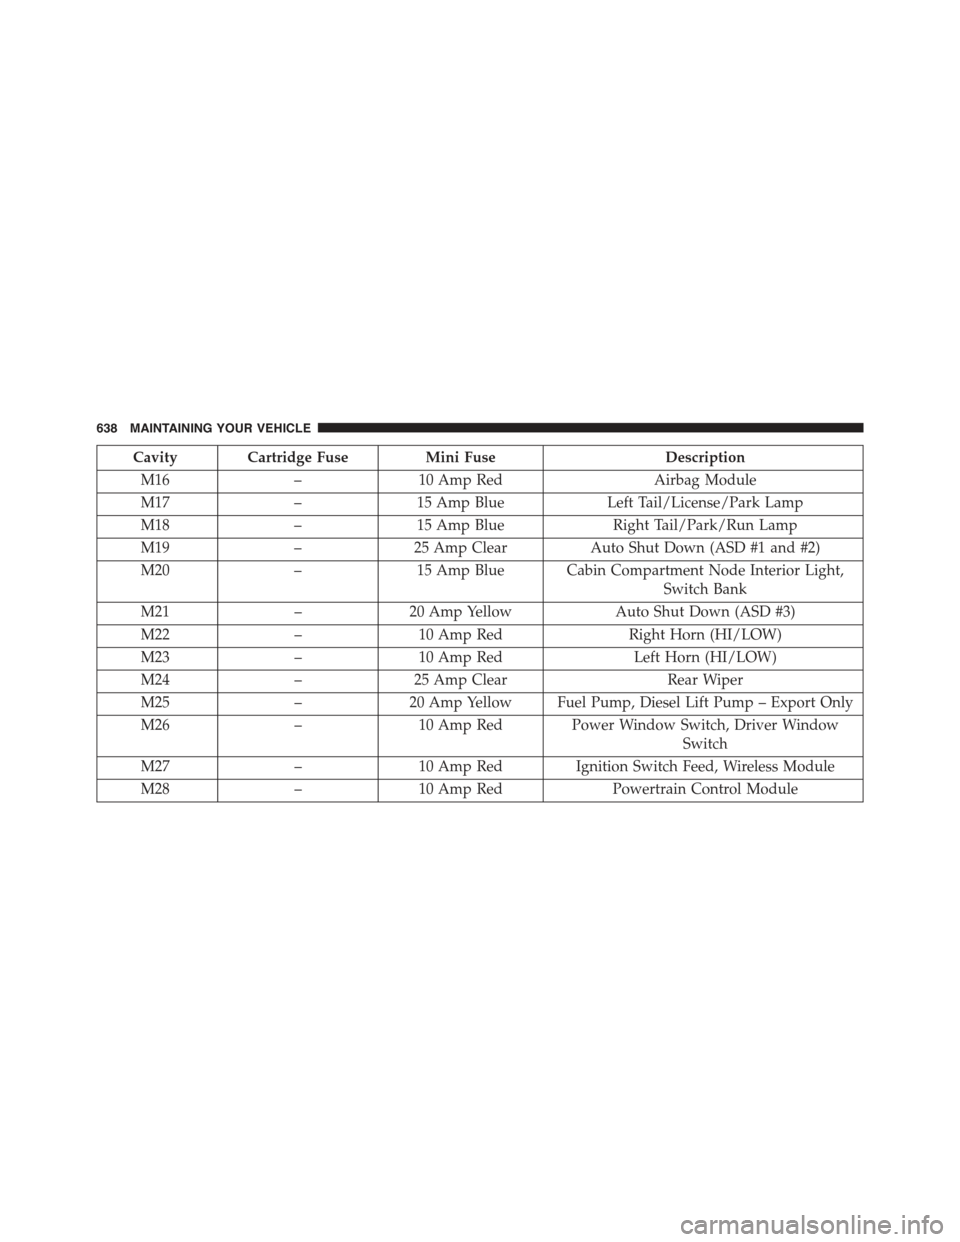
Cavity Cartridge FuseMini FuseDescription
M16–10 Amp RedAirbag Module
M17–15 Amp BlueLeft Tail/License/Park Lamp
M18–15 Amp BlueRight Tail/Park/Run Lamp
M19–25 Amp ClearAuto Shut Down (ASD #1 and #2)
M20–15 Amp Blue Cabin Compartment Node Interior Light,
Switch Bank
M21–20 Amp YellowAuto Shut Down (ASD #3)
M22–10 Amp RedRight Horn (HI/LOW)
M23–10 Amp RedLeft Horn (HI/LOW)
M24–25 Amp ClearRear Wiper
M25–20 Amp Yellow Fuel Pump, Diesel Lift Pump – Export Only
M26–10 Amp Red Power Window Switch, Driver Window
Switch
M27–10 Amp Red Ignition Switch Feed, Wireless Module
M28–10 Amp RedPowertrain Control Module
638 MAINTAINING YOUR VEHICLE