JEEP WRANGLER UNLIMITED 2020 Owner handbook (in English)
Manufacturer: JEEP, Model Year: 2020, Model line: WRANGLER UNLIMITED, Model: JEEP WRANGLER UNLIMITED 2020Pages: 330, PDF Size: 9.16 MB
Page 261 of 330
259
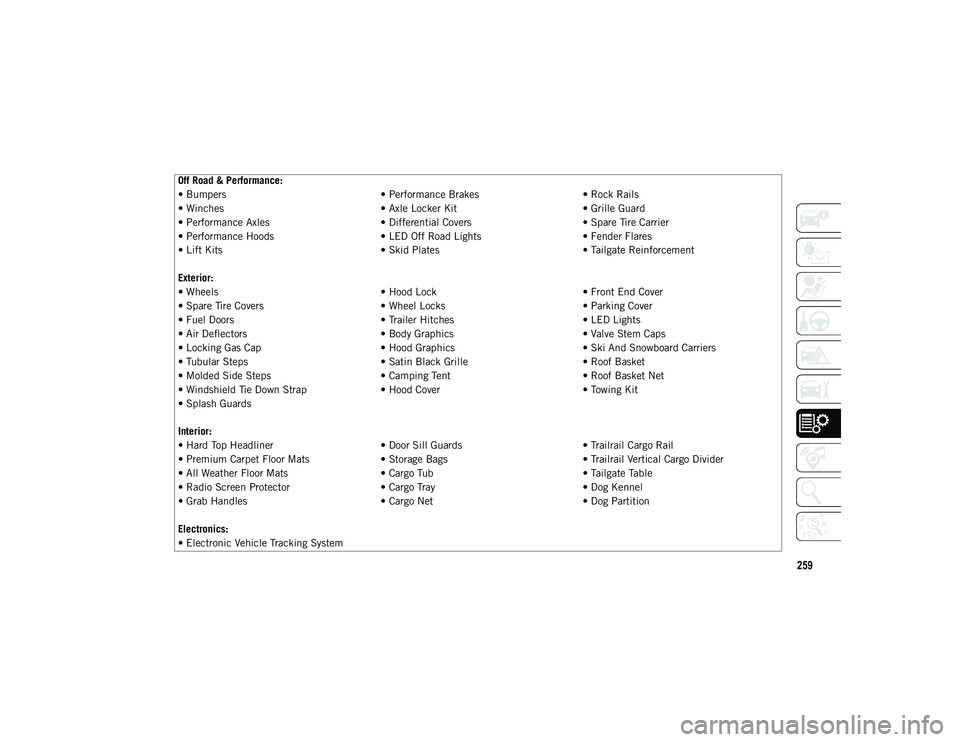
Off Road & Performance:
• Bumpers• Performance Brakes• Rock Rails
• Winches • Axle Locker Kit• Grille Guard
• Performance Axles • Differential Covers• Spare Tire Carrier
• Performance Hoods • LED Off Road Lights• Fender Flares
• Lift Kits • Skid Plates• Tailgate Reinforcement
Exterior:
• Wheels • Hood Lock• Front End Cover
• Spare Tire Covers • Wheel Locks• Parking Cover
• Fuel Doors • Trailer Hitches• LED Lights
• Air Deflectors • Body Graphics• Valve Stem Caps
• Locking Gas Cap • Hood Graphics• Ski And Snowboard Carriers
• Tubular Steps • Satin Black Grille• Roof Basket
• Molded Side Steps • Camping Tent• Roof Basket Net
• Windshield Tie Down Strap • Hood Cover• Towing Kit
• Splash Guards
Interior:
• Hard Top Headliner • Door Sill Guards• Trailrail Cargo Rail
• Premium Carpet Floor Mats • Storage Bags• Trailrail Vertical Cargo Divider
• All Weather Floor Mats • Cargo Tub• Tailgate Table
• Radio Screen Protector • Cargo Tray• Dog Kennel
• Grab Handles • Cargo Net• Dog Partition
Electronics:
• Electronic Vehicle Tracking System
2020_JEEP_JL_WRANGLER_UG_RHD_UK.book Page 259
Page 262 of 330
260
MULTIMEDIA
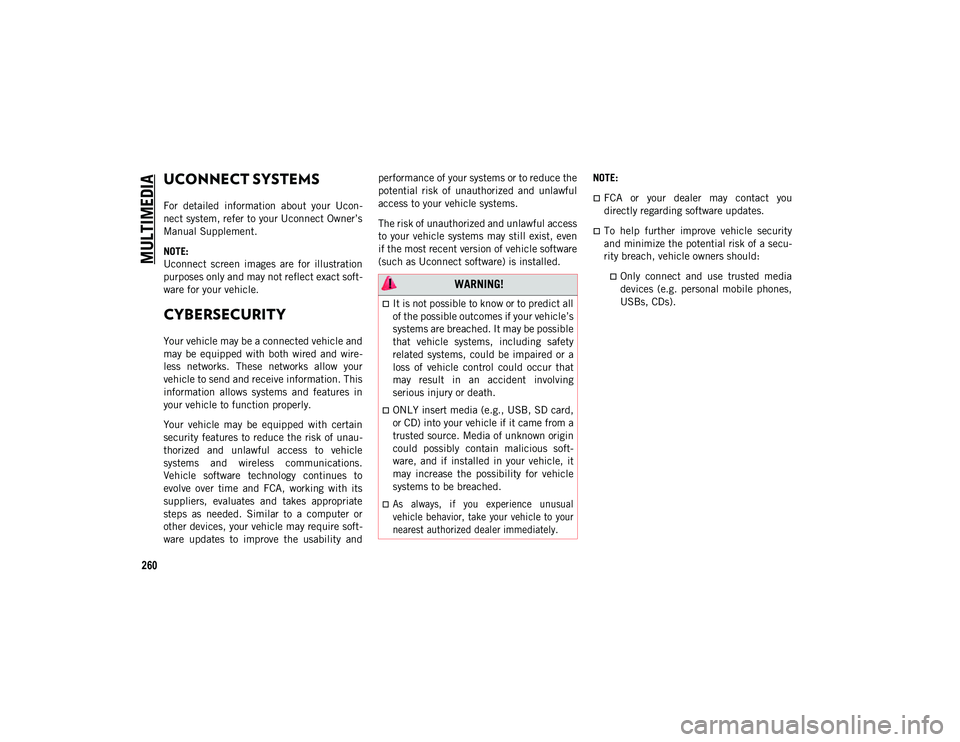
UCONNECT SYSTEMS
For detailed information about your Ucon-
nect system, refer to your Uconnect Owner’s
Manual Supplement.
NOTE:
Uconnect screen images are for illustration
purposes only and may not reflect exact soft -
ware for your vehicle.
CYBERSECURITY
Your vehicle may be a connected vehicle and
may be equipped with both wired and wire -
less networks. These networks allow your
vehicle to send and receive information. This
information allows systems and features in
your vehicle to function properly.
Your vehicle may be equipped with certain
security features to reduce the risk of unau -
thorized and unlawful access to vehicle
systems and wireless communications.
Vehicle software technology continues to
evolve over time and FCA, working with its
suppliers, evaluates and takes appropriate
steps as needed. Similar to a computer or
other devices, your vehicle may require soft -
ware updates to improve the usability and performance of your systems or to reduce the
potential risk of unauthorized and unlawful
access to your vehicle systems.
The risk of unauthorized and unlawful access
to your vehicle systems may still exist, even
if the most recent version of vehicle software
(such as Uconnect software) is installed.
NOTE:
FCA or your dealer may contact you
directly regarding software updates.
To help further improve vehicle security
and minimize the potential risk of a secu
-
rity breach, vehicle owners should:
Only connect and use trusted media devices (e.g. personal mobile phones,
USBs, CDs). WARNING!
It is not possible to know or to predict all
of the possible outcomes if your vehicle’s
systems are breached. It may be possible
that vehicle systems, including safety
related systems, could be impaired or a
loss of vehicle control could occur that
may result in an accident involving
serious injury or death.
ONLY insert media (e.g., USB, SD card,
or CD) into your vehicle if it came from a
trusted source. Media of unknown origin
could possibly contain malicious soft -
ware, and if installed in your vehicle, it
may increase the possibility for vehicle
systems to be breached.
As always, if you experience unusual
vehicle behavior, take your vehicle to your
nearest authorized dealer immediately.
2020_JEEP_JL_WRANGLER_UG_RHD_UK.book Page 260
Page 263 of 330
261
UCONNECT 3 WITH 5-INCH
DISPLAY — IF EQUIPPED
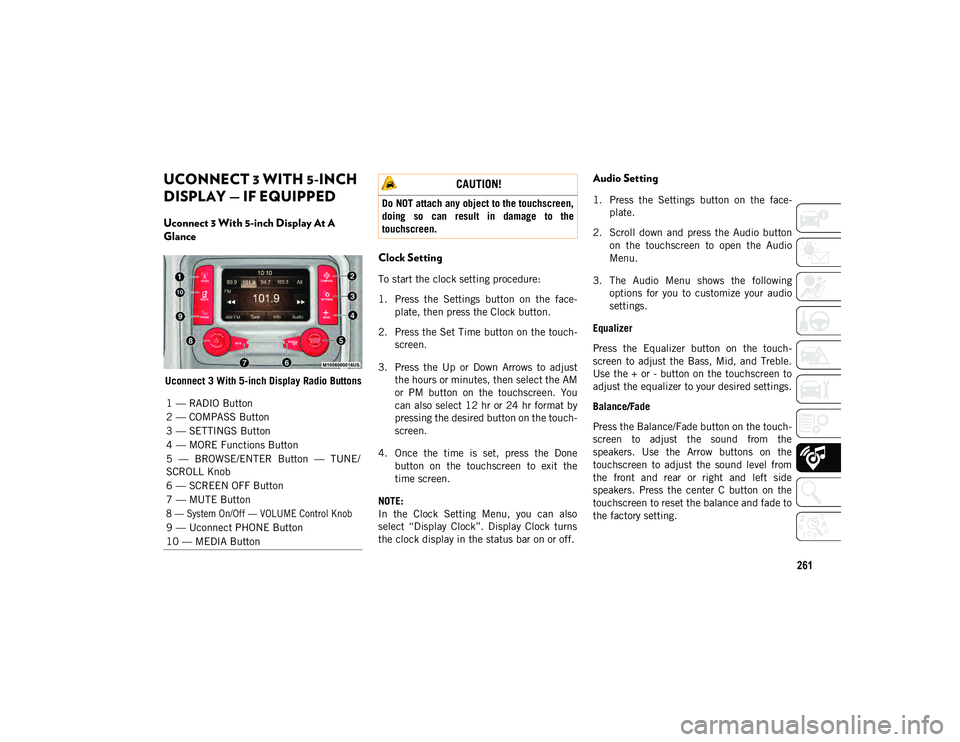
Uconnect 3 With 5-inch Display At A
Glance
Uconnect 3 With 5-inch Display Radio Buttons
Clock Setting
To start the clock setting procedure:
1. Press the Settings button on the face-
plate, then press the Clock button.
2. Press the Set Time button on the touch -
screen.
3. Press the Up or Down Arrows to adjust the hours or minutes, then select the AM
or PM button on the touchscreen. You
can also select 12 hr or 24 hr format by
pressing the desired button on the touch -
screen.
4. Once the time is set, press the Done button on the touchscreen to exit the
time screen.
NOTE:
In the Clock Setting Menu, you can also
select “Display Clock”. Display Clock turns
the clock display in the status bar on or off.
Audio Setting
1. Press the Settings button on the face -
plate.
2. Scroll down and press the Audio button on the touchscreen to open the Audio
Menu.
3. The Audio Menu shows the following options for you to customize your audio
settings.
Equalizer
Press the Equalizer button on the touch -
screen to adjust the Bass, Mid, and Treble.
Use the + or - button on the touchscreen to
adjust the equalizer to your desired settings.
Balance/Fade
Press the Balance/Fade button on the touch -
screen to adjust the sound from the
speakers. Use the Arrow buttons on the
touchscreen to adjust the sound level from
the front and rear or right and left side
speakers. Press the center C button on the
touchscreen to reset the balance and fade to
the factory setting.
1 — RADIO Button
2 — COMPASS Button
3 — SETTINGS Button
4 — MORE Functions Button
5 — BROWSE/ENTER Button — TUNE/
SCROLL Knob
6 — SCREEN OFF Button
7 — MUTE Button
8 — System On/Off — VOLUME Control Knob
9 — Uconnect PHONE Button
10 — MEDIA Button
CAUTION!
Do NOT attach any object to the touchscreen,
doing so can result in damage to the
touchscreen.
2020_JEEP_JL_WRANGLER_UG_RHD_UK.book Page 261
Page 264 of 330
MULTIMEDIA
262
Speed Adjusted Volume — If Equipped
Press the Speed Adjusted Volume button on
the touchscreen to select between OFF, 1, 2,
or 3. This will decrease the radio volume
relative to a decrease in vehicle speed.
Loudness — If Equipped
Press the Loudness button on the touch-
screen to select the Loudness feature. When
this feature is activated it, improves sound
quality at lower volumes.
Surround Sound — If Equipped
Press the Surround Sound button on the
touchscreen, select “On” or “Off” followed
by pressing the Back Arrow button on the
touchscreen. When this feature is activated,
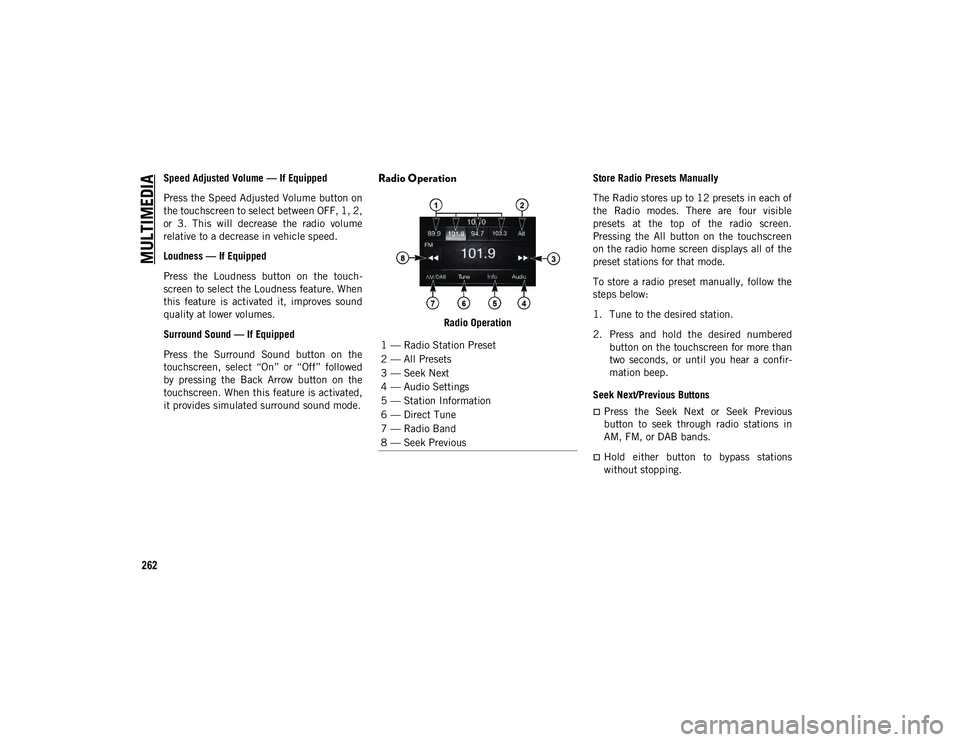
it provides simulated surround sound mode.Radio Operation
Radio Operation Store Radio Presets Manually
The Radio stores up to 12 presets in each of
the Radio modes. There are four visible
presets at the top of the radio screen.
Pressing the All button on the touchscreen
on the radio home screen displays all of the
preset stations for that mode.
To store a radio preset manually, follow the
steps below:
1. Tune to the desired station.
2. Press and hold the desired numbered
button on the touchscreen for more than
two seconds, or until you hear a confir -
mation beep.
Seek Next/Previous Buttons
Press the Seek Next or Seek Previous
button to seek through radio stations in
AM, FM, or DAB bands.
Hold either button to bypass stations
without stopping.
1 — Radio Station Preset
2 — All Presets
3 — Seek Next
4 — Audio Settings
5 — Station Information
6 — Direct Tune
7 — Radio Band
8 — Seek Previous
2020_JEEP_JL_WRANGLER_UG_RHD_UK.book Page 262
Page 265 of 330
263
UCONNECT 4 WITH 7-INCH
DISPLAY
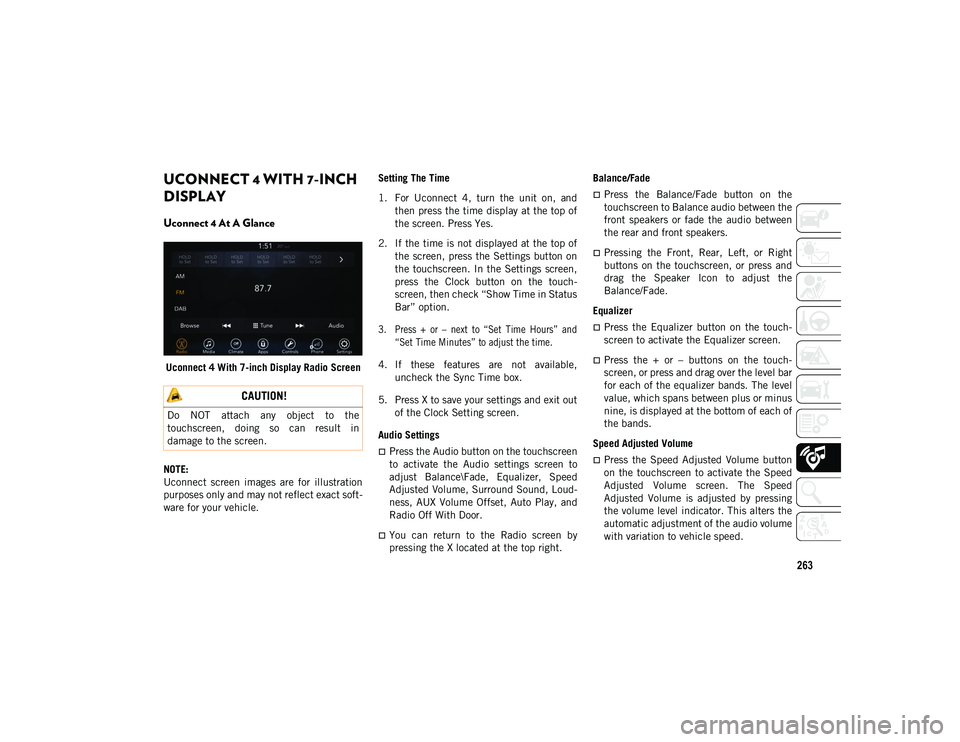
Uconnect 4 At A Glance
Uconnect 4 With 7-inch Display Radio Screen
NOTE:
Uconnect screen images are for illustration
purposes only and may not reflect exact soft -
ware for your vehicle. Setting The Time
1. For Uconnect 4, turn the unit on, and
then press the time display at the top of
the screen. Press Yes.
2. If the time is not displayed at the top of the screen, press the Settings button on
the touchscreen. In the Settings screen,
press the Clock button on the touch -
screen, then check “Show Time in Status
Bar” option.
3. Press + or – next to “Set Time Hours” and “Set Time Minutes” to adjust the time.
4. If these features are not available, uncheck the Sync Time box.
5. Press X to save your settings and exit out of the Clock Setting screen.
Audio Settings
Press the Audio button on the touchscreen
to activate the Audio settings screen to
adjust Balance\Fade, Equalizer, Speed
Adjusted Volume, Surround Sound, Loud -
ness, AUX Volume Offset, Auto Play, and
Radio Off With Door.
You can return to the Radio screen by
pressing the X located at the top right. Balance/Fade
Press the Balance/Fade button on the
touchscreen to Balance audio between the
front speakers or fade the audio between
the rear and front speakers.
Pressing the Front, Rear, Left, or Right
buttons on the touchscreen, or press and
drag the Speaker Icon to adjust the
Balance/Fade.
Equalizer
Press the Equalizer button on the touch -
screen to activate the Equalizer screen.
Press the + or – buttons on the touch -
screen, or press and drag over the level bar
for each of the equalizer bands. The level
value, which spans between plus or minus
nine, is displayed at the bottom of each of
the bands.
Speed Adjusted Volume
Press the Speed Adjusted Volume button
on the touchscreen to activate the Speed
Adjusted Volume screen. The Speed
Adjusted Volume is adjusted by pressing
the volume level indicator. This alters the
automatic adjustment of the audio volume
with variation to vehicle speed.
CAUTION!
Do NOT attach any object to the
touchscreen, doing so can result in
damage to the screen.
2020_JEEP_JL_WRANGLER_UG_RHD_UK.book Page 263
Page 266 of 330
MULTIMEDIA
264
Loudness — If Equipped
Press the On button on the touchscreen to
activate Loudness. Press the Off button to
deactivate this feature. When Loudness is
On, the sound quality at lower volumes
improves.
AUX Volume Offset
Press the AUX Volume Offset button on
the touchscreen to activate the AUX
Volume Offset screen. The AUX Volume
Offset is adjusted by pressing the + and –
buttons. This alters the AUX input audio
volume. The level value, which spans
between plus or minus three, is displayed
above the adjustment bar.
Auto Play
Press the Auto Play button on the touch -
screen to activate the Auto Play screen.
The Auto Play feature has two settings
“On” and “Off”. With Auto Play On, music
begins playing from a connected device,
immediately after it is connected to the
radio. Auto On Radio — If Equipped
The Radio turns on always when the igni
-
tion is ON/RUN regardless if the radio was
turned Off or On in the last ignition Off
state OR will recall whether it was On or
Off at the last ignition state.
Radio Off With Door — If Equipped
Press the Radio Off With Door button on
the touchscreen to activate the Radio Off
With Door screen. The Radio Off With Door
feature, when activated, keeps the radio
on until the driver or passenger door is
opened or when the Radio Off Delay
selected time has expired.
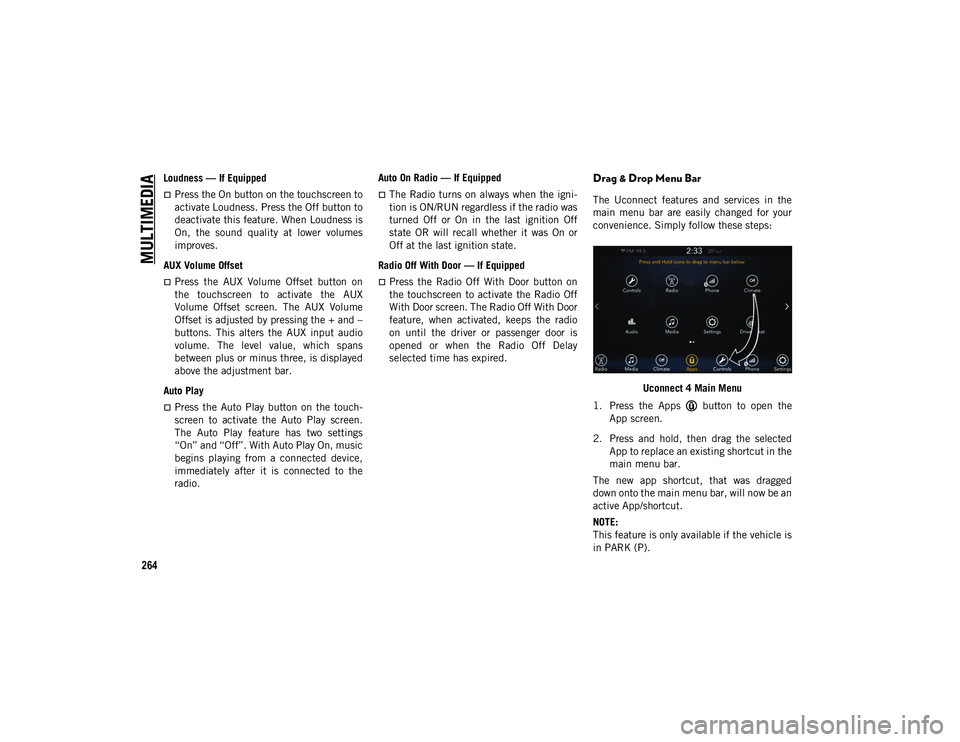
Drag & Drop Menu Bar
The Uconnect features and services in the
main menu bar are easily changed for your
convenience. Simply follow these steps:
Uconnect 4 Main Menu
1. Press the Apps button to open the App screen.
2. Press and hold, then drag the selected App to replace an existing shortcut in the
main menu bar.
The new app shortcut, that was dragged
down onto the main menu bar, will now be an
active App/shortcut.
NOTE:
This feature is only available if the vehicle is
in PARK (P).
2020_JEEP_JL_WRANGLER_UG_RHD_UK.book Page 264
Page 267 of 330
265
Radio
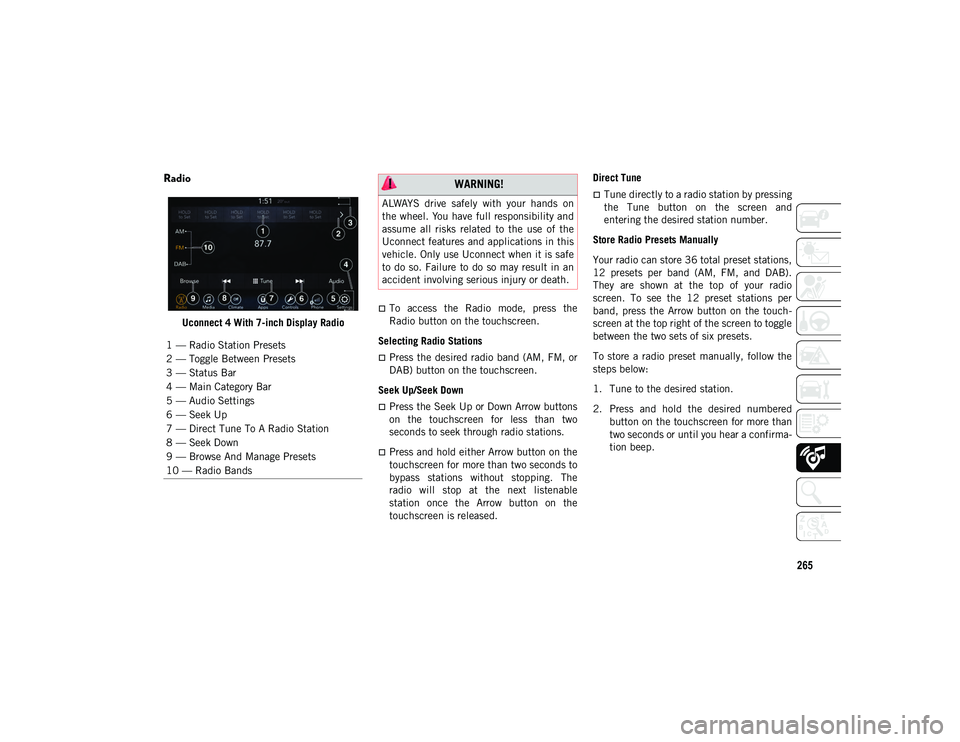
Uconnect 4 With 7-inch Display Radio
To access the Radio mode, press the
Radio button on the touchscreen.
Selecting Radio Stations
Press the desired radio band (AM, FM, or
DAB) button on the touchscreen.
Seek Up/Seek Down
Press the Seek Up or Down Arrow buttons
on the touchscreen for less than two
seconds to seek through radio stations.
Press and hold either Arrow button on the
touchscreen for more than two seconds to
bypass stations without stopping. The
radio will stop at the next listenable
station once the Arrow button on the
touchscreen is released. Direct Tune
Tune directly to a radio station by pressing
the Tune button on the screen and
entering the desired station number.
Store Radio Presets Manually
Your radio can store 36 total preset stations,
12 presets per band (AM, FM, and DAB).
They are shown at the top of your radio
screen. To see the 12 preset stations per
band, press the Arrow button on the touch -
screen at the top right of the screen to toggle
between the two sets of six presets.
To store a radio preset manually, follow the
steps below:
1. Tune to the desired station.
2. Press and hold the desired numbered button on the touchscreen for more than
two seconds or until you hear a confirma -
tion beep.
1 — Radio Station Presets
2 — Toggle Between Presets
3 — Status Bar
4 — Main Category Bar
5 — Audio Settings
6 — Seek Up
7 — Direct Tune To A Radio Station
8 — Seek Down
9 — Browse And Manage Presets
10 — Radio Bands WARNING!
ALWAYS drive safely with your hands on
the wheel. You have full responsibility and
assume all risks related to the use of the
Uconnect features and applications in this
vehicle. Only use Uconnect when it is safe
to do so. Failure to do so may result in an
accident involving serious injury or death.
2020_JEEP_JL_WRANGLER_UG_RHD_UK.book Page 265
Page 268 of 330
MULTIMEDIA
266
Android Auto™
NOTE:
Feature availability depends on your carrier
and mobile phone manufacturer. Some
Android Auto™ features may or may not be
available in every region and/or language.
Android Auto™ is a feature of your Uconnect
system, and your Android™ 5.0 (Lollipop) or
higher powered smartphone with a data plan,
that allows you to project your smartphone
and a number of its apps onto the touch-
screen radio display. Android Auto™ auto -
matically brings you useful information, and
organizes it into simple cards that appear
just when they are needed. Android Auto™
can be used with Google's best-in-class
speech technology, the steering wheel
controls, the knobs and buttons on your radio
faceplate, and the radio display’s touch -
screen to control many of your apps. To use
Android Auto™ follow the following steps:
1. Download the Android Auto™ app from the Google Play store on your
Android™-powered smartphone. 2. Connect your Android™-powered smart
-
phone to one of the media USB ports in
your vehicle. If you have not downloaded
the Android Auto™ app to your smart -
phone before plugging in the device for
the first time, the app begins to down -
load.
NOTE:
Be sure to use the factory-provided USB
cable that came with your phone, as after -
market cables may not work.
Your phone may ask you to approve the use
of the Android Auto™ app before use.
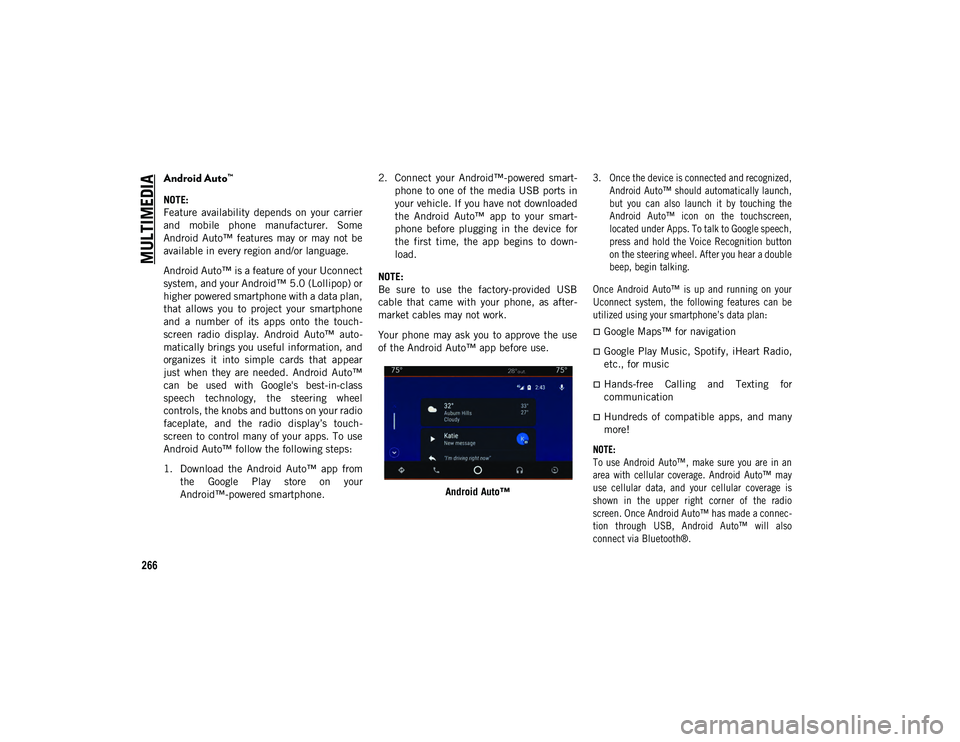
Android Auto™
3. Once the device is connected and recognized,
Android Auto™ should automatically launch,
but you can also launch it by touching the
Android Auto™ icon on the touchscreen,
located under Apps. To talk to Google speech,
press and hold the Voice Recognition button
on the steering wheel. After you hear a double
beep, begin talking.
Once Android Auto™ is up and running on your
Uconnect system, the following features can be
utilized using your smartphone’s data plan:
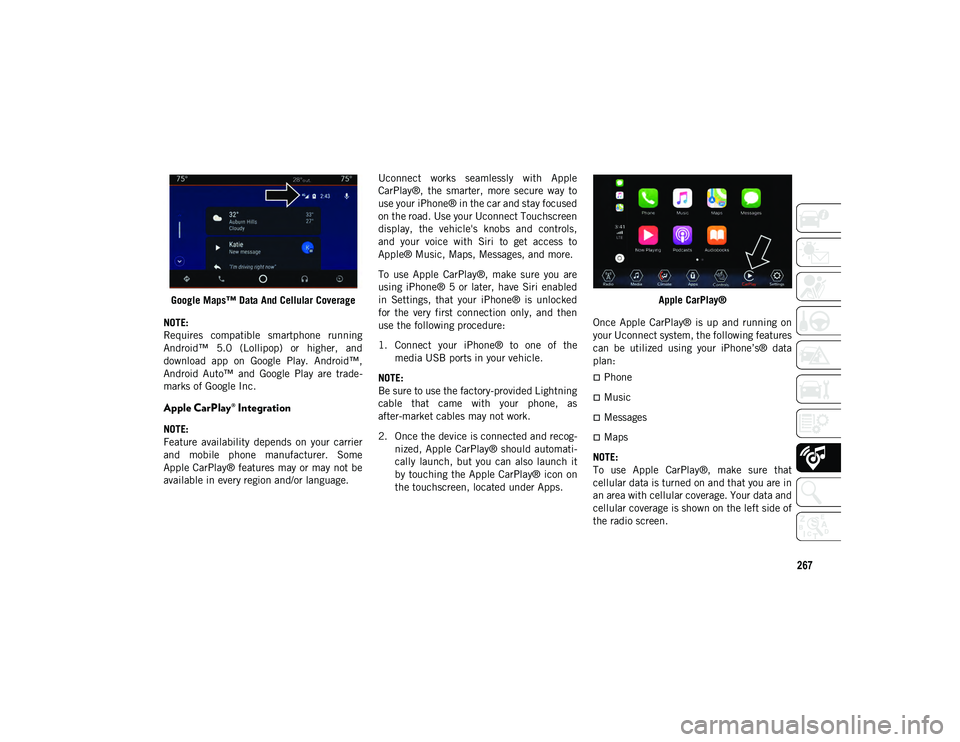
Google Maps™ for navigation
Google Play Music, Spotify, iHeart Radio,
etc., for music
Hands-free Calling and Texting for
communication
Hundreds of compatible apps, and many
more!
NOTE:
To use Android Auto™, make sure you are in an
area with cellular coverage. Android Auto™ may
use cellular data, and your cellular coverage is
shown in the upper right corner of the radio
screen. Once Android Auto™ has made a connec -
tion through USB, Android Auto™ will also
connect via Bluetooth®.
2020_JEEP_JL_WRANGLER_UG_RHD_UK.book Page 266
Page 269 of 330
267
Google Maps™ Data And Cellular Coverage
NOTE:
Requires compatible smartphone running
Android™ 5.0 (Lollipop) or higher, and
download app on Google Play. Android™,
Android Auto™ and Google Play are trade -
marks of Google Inc.
Apple CarPlay® Integration
NOTE:
Feature availability depends on your carrier
and mobile phone manufacturer. Some
Apple CarPlay® features may or may not be
available in every region and/or language. Uconnect works seamlessly with Apple
CarPlay®, the smarter, more secure way to
use your iPhone® in the car and stay focused
on the road. Use your Uconnect Touchscreen
display, the vehicle's knobs and controls,
and your voice with Siri to get access to
Apple® Music, Maps, Messages, and more.
To use Apple CarPlay®, make sure you are
using iPhone® 5 or later, have Siri enabled
in Settings, that your iPhone® is unlocked
for the very first connection only, and then
use the following procedure:
1. Connect your iPhone® to one of the
media USB ports in your vehicle.
NOTE:
Be sure to use the factory-provided Lightning
cable that came with your phone, as
after-market cables may not work.
2. Once the device is connected and recog -
nized, Apple CarPlay® should automati -
cally launch, but you can also launch it
by touching the Apple CarPlay® icon on
the touchscreen, located under Apps. Apple CarPlay®
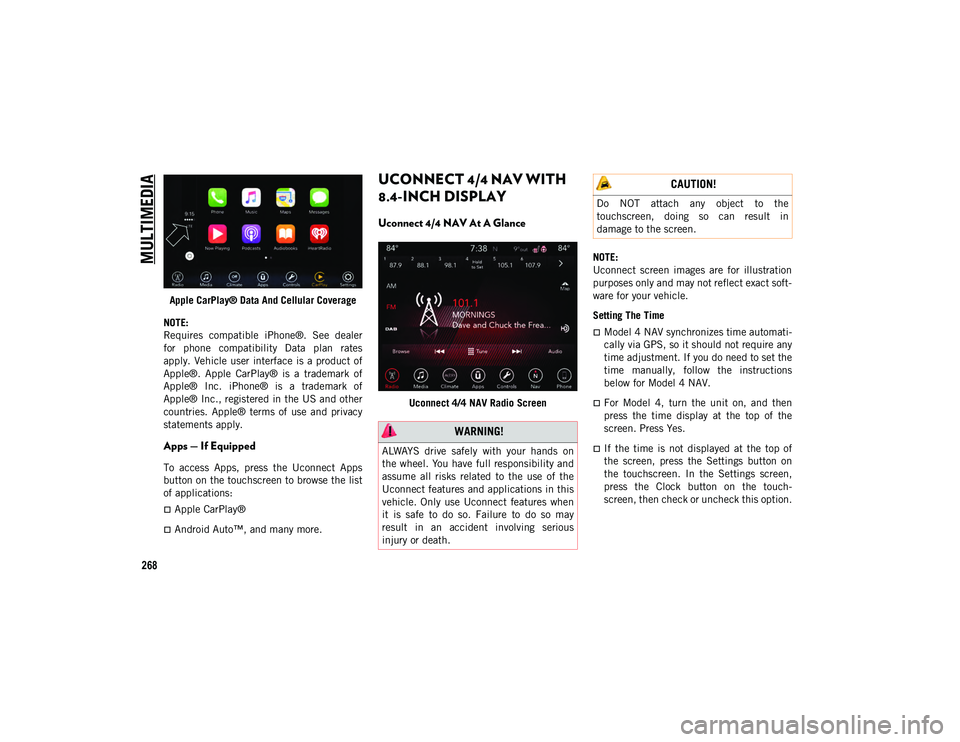
Once Apple CarPlay® is up and running on
your Uconnect system, the following features
can be utilized using your iPhone’s® data
plan:
Phone
Music
Messages
Maps
NOTE:
To use Apple CarPlay®, make sure that
cellular data is turned on and that you are in
an area with cellular coverage. Your data and
cellular coverage is shown on the left side of
the radio screen.
2020_JEEP_JL_WRANGLER_UG_RHD_UK.book Page 267
Page 270 of 330
MULTIMEDIA
268
Apple CarPlay® Data And Cellular Coverage
NOTE:
Requires compatible iPhone®. See dealer
for phone compatibility Data plan rates
apply. Vehicle user interface is a product of
Apple®. Apple CarPlay® is a trademark of
Apple® Inc. iPhone® is a trademark of
Apple® Inc., registered in the US and other
countries. Apple® terms of use and privacy
statements apply.
Apps — If Equipped
To access Apps, press the Uconnect Apps
button on the touchscreen to browse the list
of applications:
Apple CarPlay®
Android Auto™, and many more.
UCONNECT 4/4 NAV WITH
8.4-INCH DISPLAY
Uconnect 4/4 NAV At A Glance
Uconnect 4/4 NAV Radio Screen NOTE:
Uconnect screen images are for illustration
purposes only and may not reflect exact soft
-
ware for your vehicle.
Setting The Time
Model 4 NAV synchronizes time automati -
cally via GPS, so it should not require any
time adjustment. If you do need to set the
time manually, follow the instructions
below for Model 4 NAV.
For Model 4, turn the unit on, and then
press the time display at the top of the
screen. Press Yes.
If the time is not displayed at the top of
the screen, press the Settings button on
the touchscreen. In the Settings screen,
press the Clock button on the touch -
screen, then check or uncheck this option.
WARNING!
ALWAYS drive safely with your hands on
the wheel. You have full responsibility and
assume all risks related to the use of the
Uconnect features and applications in this
vehicle. Only use Uconnect features when
it is safe to do so. Failure to do so may
result in an accident involving serious
injury or death.
CAUTION!
Do NOT attach any object to the
touchscreen, doing so can result in
damage to the screen.
2020_JEEP_JL_WRANGLER_UG_RHD_UK.book Page 268