JEEP XJ 1995 Service And Repair Manual
Manufacturer: JEEP, Model Year: 1995, Model line: XJ, Model: JEEP XJ 1995Pages: 2158, PDF Size: 81.9 MB
Page 1721 of 2158
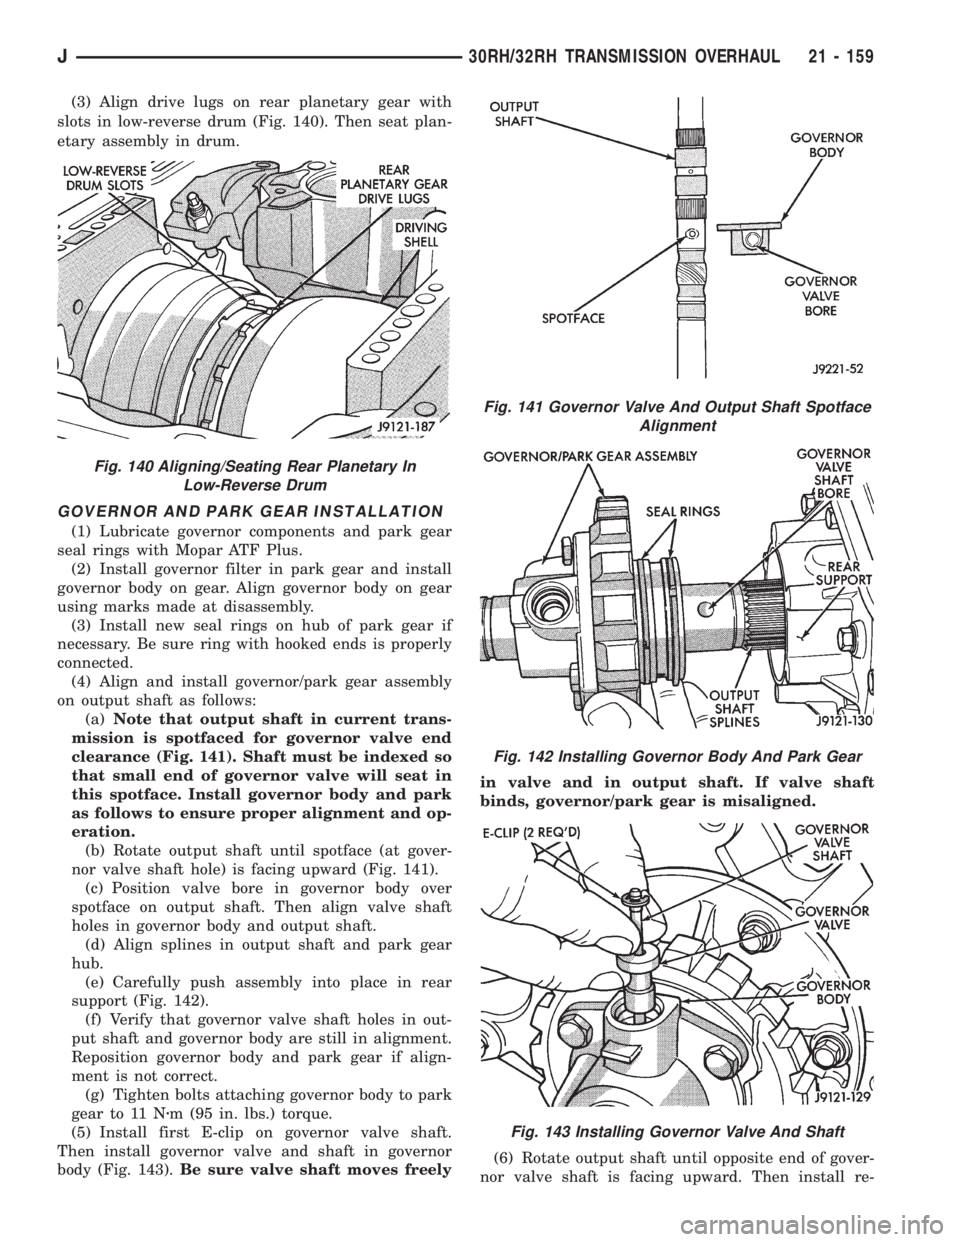
(3) Align drive lugs on rear planetary gear with
slots in low-reverse drum (Fig. 140). Then seat plan-
etary assembly in drum.
GOVERNOR AND PARK GEAR INSTALLATION
(1) Lubricate governor components and park gear
seal rings with Mopar ATF Plus.
(2) Install governor filter in park gear and install
governor body on gear. Align governor body on gear
using marks made at disassembly.
(3) Install new seal rings on hub of park gear if
necessary. Be sure ring with hooked ends is properly
connected.
(4) Align and install governor/park gear assembly
on output shaft as follows:
(a)Note that output shaft in current trans-
mission is spotfaced for governor valve end
clearance (Fig. 141). Shaft must be indexed so
that small end of governor valve will seat in
this spotface. Install governor body and park
as follows to ensure proper alignment and op-
eration.
(b) Rotate output shaft until spotface (at gover-
nor valve shaft hole) is facing upward (Fig. 141).
(c) Position valve bore in governor body over
spotface on output shaft. Then align valve shaft
holes in governor body and output shaft.
(d) Align splines in output shaft and park gear
hub.
(e) Carefully push assembly into place in rear
support (Fig. 142).
(f) Verify that governor valve shaft holes in out-
put shaft and governor body are still in alignment.
Reposition governor body and park gear if align-
ment is not correct.
(g) Tighten bolts attaching governor body to park
gear to 11 Nzm (95 in. lbs.) torque.
(5) Install first E-clip on governor valve shaft.
Then install governor valve and shaft in governor
body (Fig. 143).Be sure valve shaft moves freelyin valve and in output shaft. If valve shaft
binds, governor/park gear is misaligned.
(6) Rotate output shaft until opposite end of gover-
nor valve shaft is facing upward. Then install re-
Fig. 140 Aligning/Seating Rear Planetary In
Low-Reverse Drum
Fig. 141 Governor Valve And Output Shaft Spotface
Alignment
Fig. 142 Installing Governor Body And Park Gear
Fig. 143 Installing Governor Valve And Shaft
J30RH/32RH TRANSMISSION OVERHAUL 21 - 159
Page 1722 of 2158
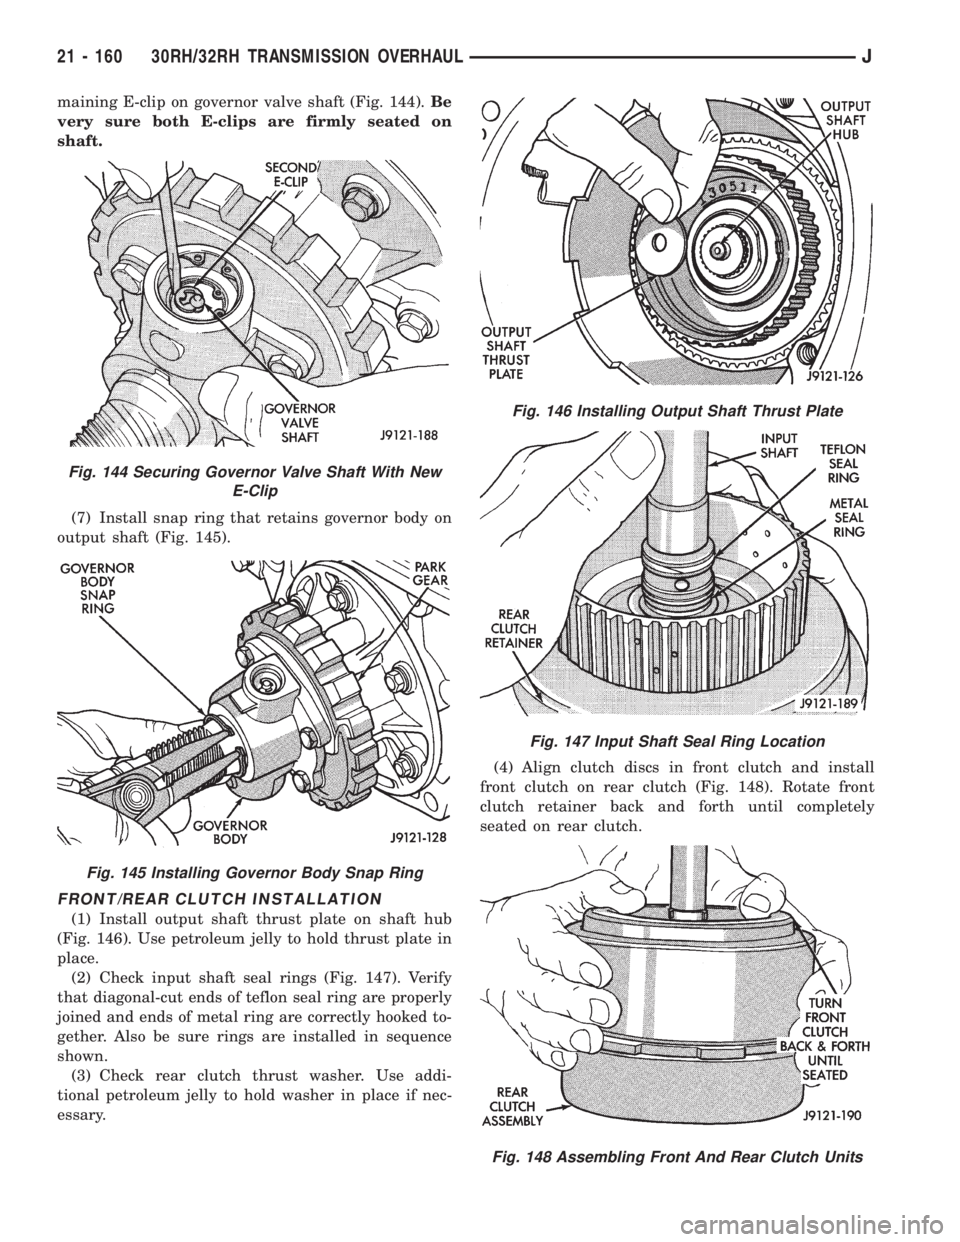
maining E-clip on governor valve shaft (Fig. 144).Be
very sure both E-clips are firmly seated on
shaft.
(7) Install snap ring that retains governor body on
output shaft (Fig. 145).
FRONT/REAR CLUTCH INSTALLATION
(1) Install output shaft thrust plate on shaft hub
(Fig. 146). Use petroleum jelly to hold thrust plate in
place.
(2) Check input shaft seal rings (Fig. 147). Verify
that diagonal-cut ends of teflon seal ring are properly
joined and ends of metal ring are correctly hooked to-
gether. Also be sure rings are installed in sequence
shown.
(3) Check rear clutch thrust washer. Use addi-
tional petroleum jelly to hold washer in place if nec-
essary.(4) Align clutch discs in front clutch and install
front clutch on rear clutch (Fig. 148). Rotate front
clutch retainer back and forth until completely
seated on rear clutch.
Fig. 144 Securing Governor Valve Shaft With New
E-Clip
Fig. 145 Installing Governor Body Snap Ring
Fig. 146 Installing Output Shaft Thrust Plate
Fig. 147 Input Shaft Seal Ring Location
Fig. 148 Assembling Front And Rear Clutch Units
21 - 160 30RH/32RH TRANSMISSION OVERHAULJ
Page 1723 of 2158
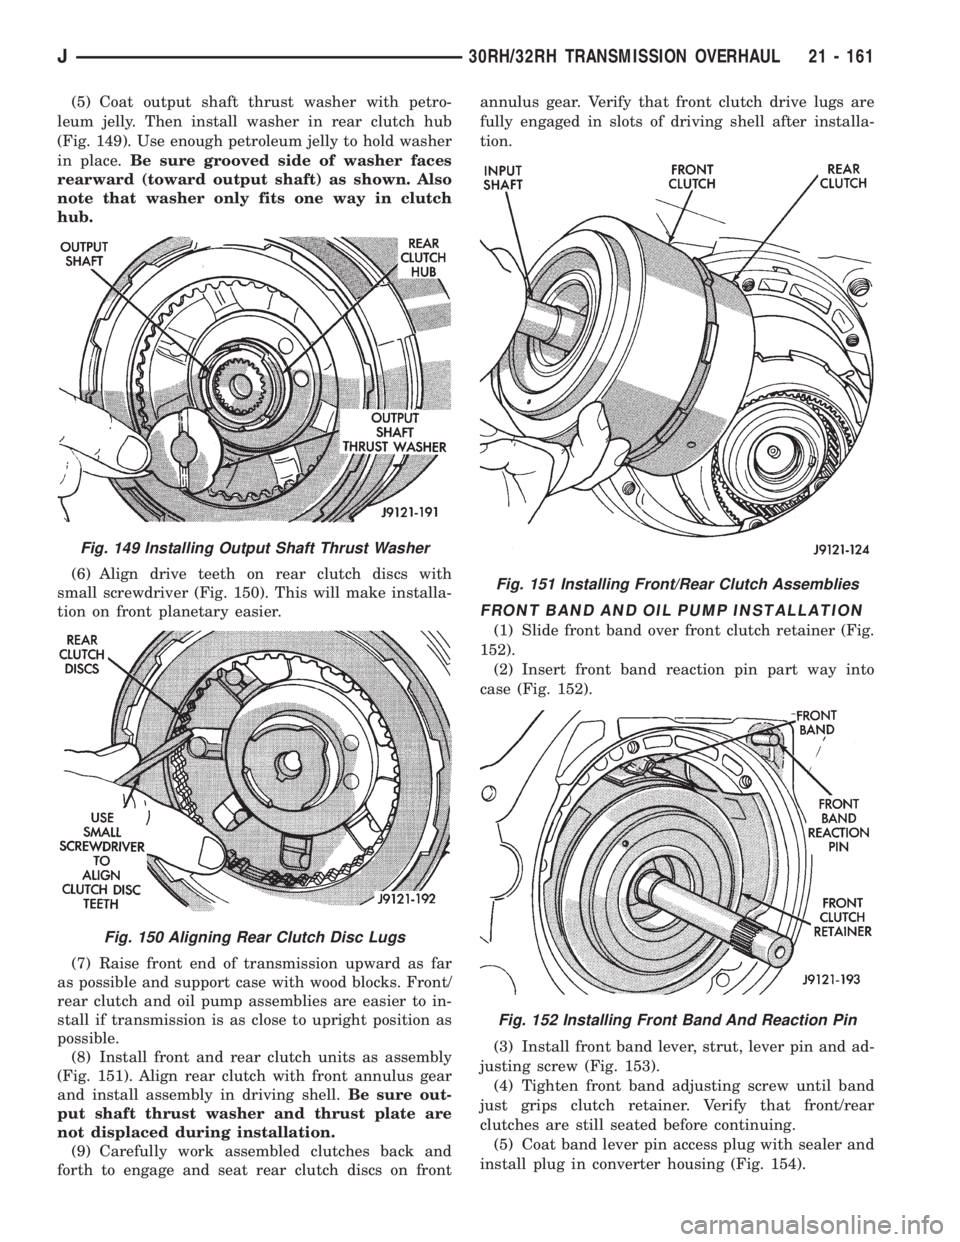
(5) Coat output shaft thrust washer with petro-
leum jelly. Then install washer in rear clutch hub
(Fig. 149). Use enough petroleum jelly to hold washer
in place.Be sure grooved side of washer faces
rearward (toward output shaft) as shown. Also
note that washer only fits one way in clutch
hub.
(6) Align drive teeth on rear clutch discs with
small screwdriver (Fig. 150). This will make installa-
tion on front planetary easier.
(7) Raise front end of transmission upward as far
as possible and support case with wood blocks. Front/
rear clutch and oil pump assemblies are easier to in-
stall if transmission is as close to upright position as
possible.
(8) Install front and rear clutch units as assembly
(Fig. 151). Align rear clutch with front annulus gear
and install assembly in driving shell.Be sure out-
put shaft thrust washer and thrust plate are
not displaced during installation.
(9) Carefully work assembled clutches back and
forth to engage and seat rear clutch discs on frontannulus gear. Verify that front clutch drive lugs are
fully engaged in slots of driving shell after installa-
tion.
FRONT BAND AND OIL PUMP INSTALLATION
(1) Slide front band over front clutch retainer (Fig.
152).
(2) Insert front band reaction pin part way into
case (Fig. 152).
(3) Install front band lever, strut, lever pin and ad-
justing screw (Fig. 153).
(4) Tighten front band adjusting screw until band
just grips clutch retainer. Verify that front/rear
clutches are still seated before continuing.
(5) Coat band lever pin access plug with sealer and
install plug in converter housing (Fig. 154).
Fig. 149 Installing Output Shaft Thrust Washer
Fig. 150 Aligning Rear Clutch Disc Lugs
Fig. 151 Installing Front/Rear Clutch Assemblies
Fig. 152 Installing Front Band And Reaction Pin
J30RH/32RH TRANSMISSION OVERHAUL 21 - 161
Page 1724 of 2158
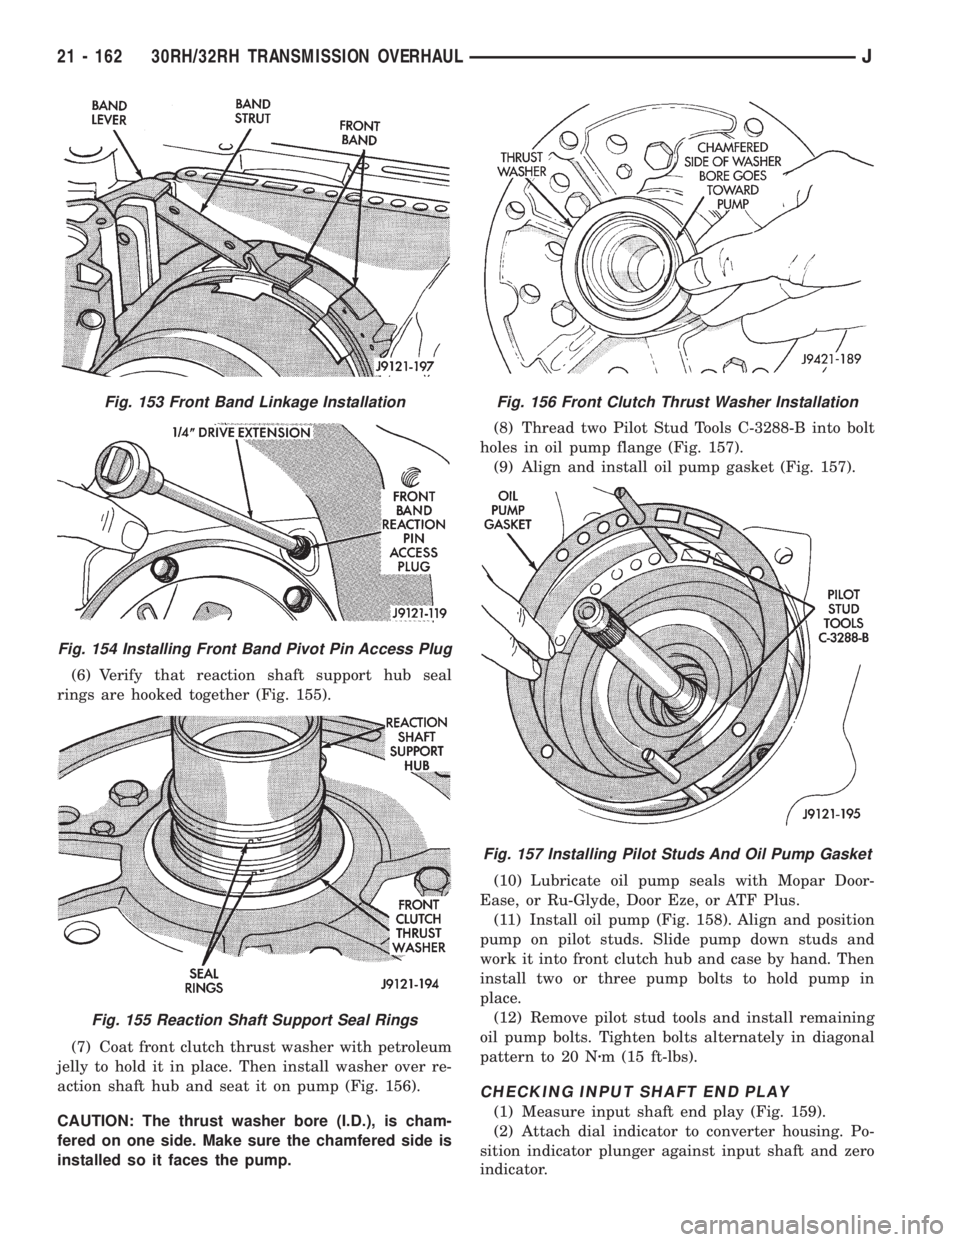
(6) Verify that reaction shaft support hub seal
rings are hooked together (Fig. 155).
(7) Coat front clutch thrust washer with petroleum
jelly to hold it in place. Then install washer over re-
action shaft hub and seat it on pump (Fig. 156).
CAUTION: The thrust washer bore (I.D.), is cham-
fered on one side. Make sure the chamfered side is
installed so it faces the pump.(8) Thread two Pilot Stud Tools C-3288-B into bolt
holes in oil pump flange (Fig. 157).
(9) Align and install oil pump gasket (Fig. 157).
(10) Lubricate oil pump seals with Mopar Door-
Ease, or Ru-Glyde, Door Eze, or ATF Plus.
(11) Install oil pump (Fig. 158). Align and position
pump on pilot studs. Slide pump down studs and
work it into front clutch hub and case by hand. Then
install two or three pump bolts to hold pump in
place.
(12) Remove pilot stud tools and install remaining
oil pump bolts. Tighten bolts alternately in diagonal
pattern to 20 Nzm (15 ft-lbs).
CHECKING INPUT SHAFT END PLAY
(1) Measure input shaft end play (Fig. 159).
(2) Attach dial indicator to converter housing. Po-
sition indicator plunger against input shaft and zero
indicator.
Fig. 153 Front Band Linkage Installation
Fig. 154 Installing Front Band Pivot Pin Access Plug
Fig. 155 Reaction Shaft Support Seal Rings
Fig. 156 Front Clutch Thrust Washer Installation
Fig. 157 Installing Pilot Studs And Oil Pump Gasket
21 - 162 30RH/32RH TRANSMISSION OVERHAULJ
Page 1725 of 2158
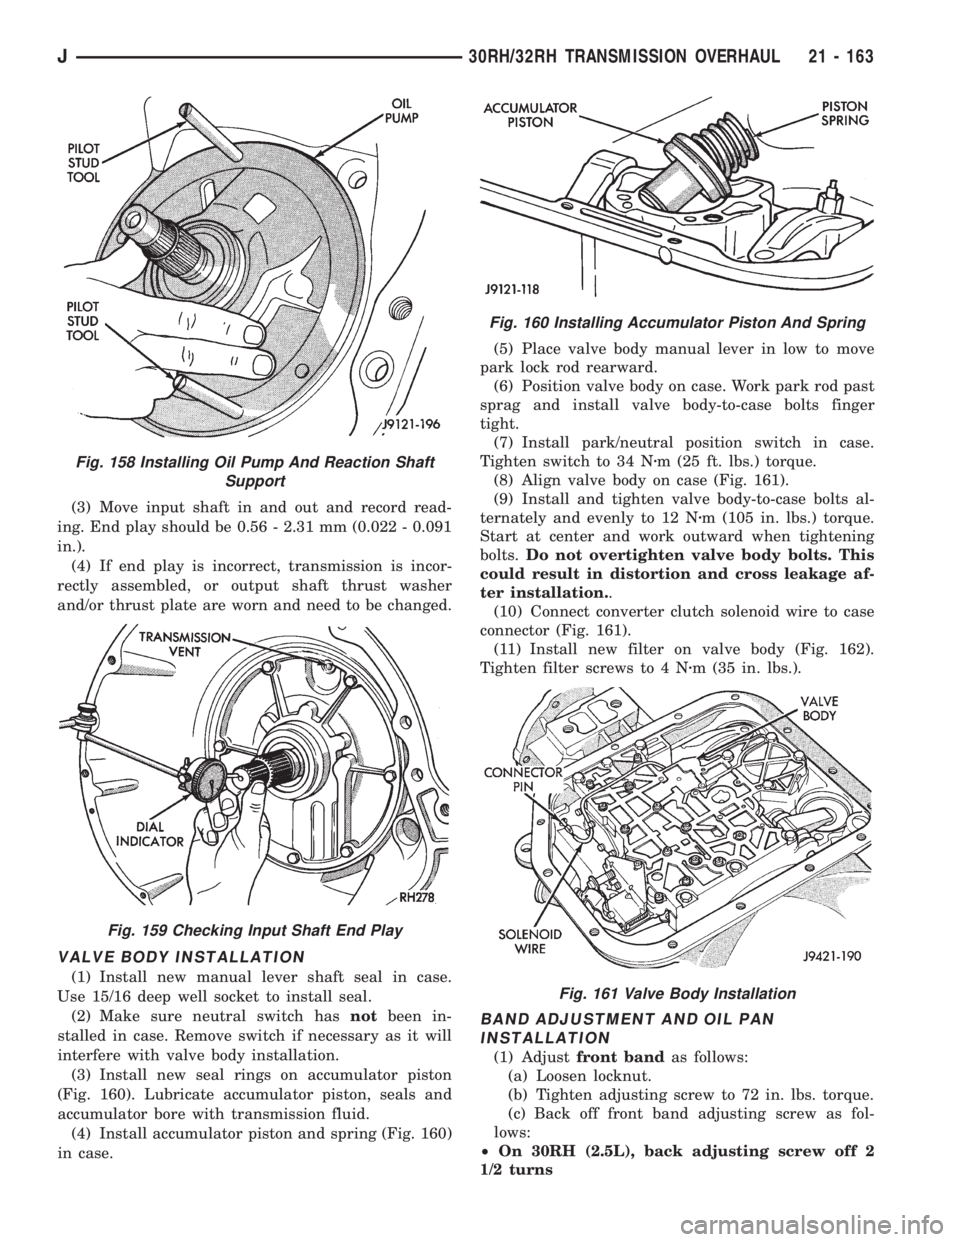
(3) Move input shaft in and out and record read-
ing. End play should be 0.56 - 2.31 mm (0.022 - 0.091
in.).
(4) If end play is incorrect, transmission is incor-
rectly assembled, or output shaft thrust washer
and/or thrust plate are worn and need to be changed.
VALVE BODY INSTALLATION
(1) Install new manual lever shaft seal in case.
Use 15/16 deep well socket to install seal.
(2) Make sure neutral switch hasnotbeen in-
stalled in case. Remove switch if necessary as it will
interfere with valve body installation.
(3) Install new seal rings on accumulator piston
(Fig. 160). Lubricate accumulator piston, seals and
accumulator bore with transmission fluid.
(4) Install accumulator piston and spring (Fig. 160)
in case.(5) Place valve body manual lever in low to move
park lock rod rearward.
(6) Position valve body on case. Work park rod past
sprag and install valve body-to-case bolts finger
tight.
(7) Install park/neutral position switch in case.
Tighten switch to 34 Nzm (25 ft. lbs.) torque.
(8) Align valve body on case (Fig. 161).
(9) Install and tighten valve body-to-case bolts al-
ternately and evenly to 12 Nzm (105 in. lbs.) torque.
Start at center and work outward when tightening
bolts.Do not overtighten valve body bolts. This
could result in distortion and cross leakage af-
ter installation..
(10) Connect converter clutch solenoid wire to case
connector (Fig. 161).
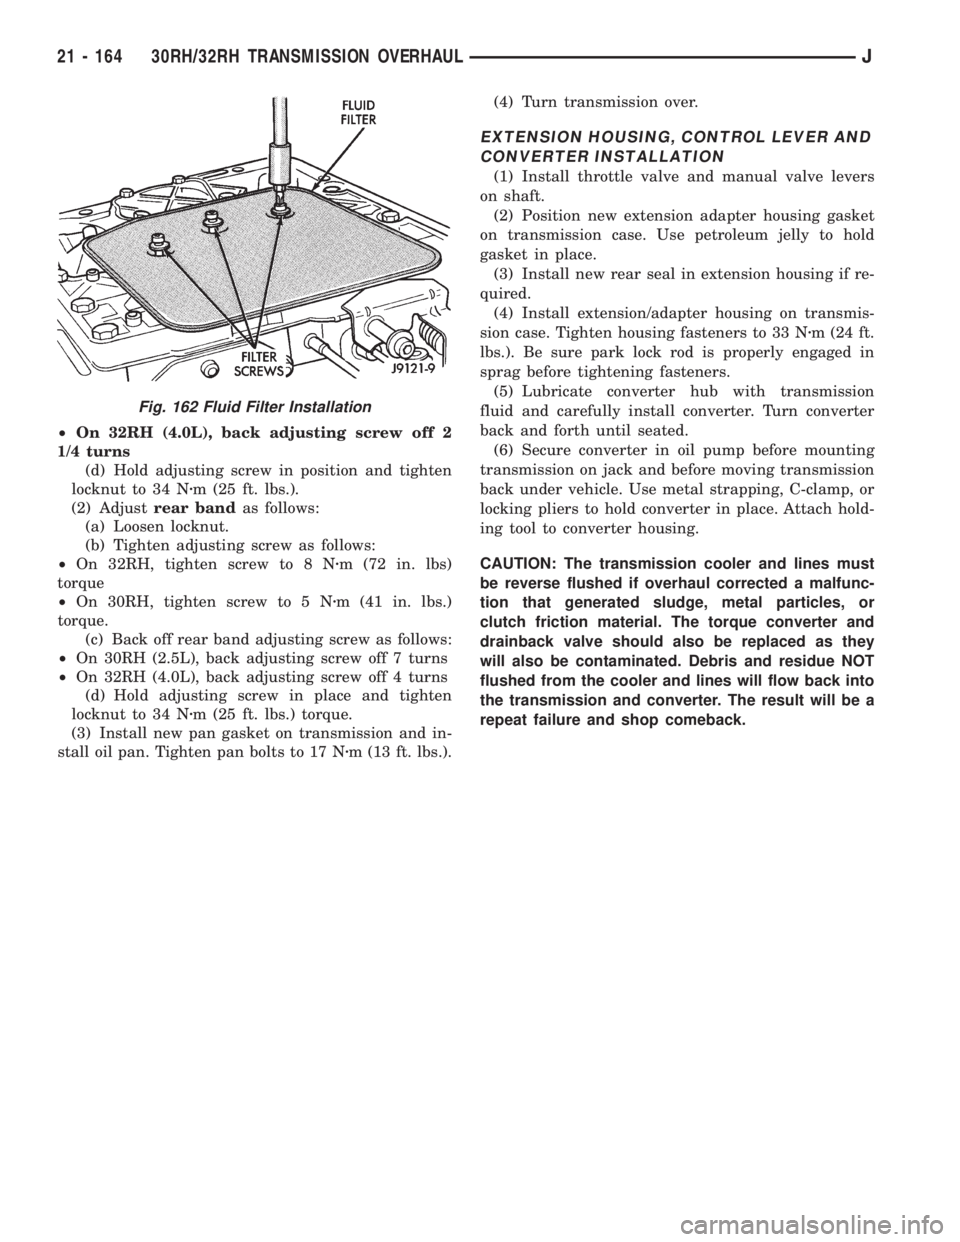
(11) Install new filter on valve body (Fig. 162).
Tighten filter screws to 4 Nzm (35 in. lbs.).
BAND ADJUSTMENT AND OIL PAN
INSTALLATION
(1) Adjustfront bandas follows:
(a) Loosen locknut.
(b) Tighten adjusting screw to 72 in. lbs. torque.
(c) Back off front band adjusting screw as fol-
lows:
²On 30RH (2.5L), back adjusting screw off 2
1/2 turns
Fig. 158 Installing Oil Pump And Reaction Shaft
Support
Fig. 159 Checking Input Shaft End Play
Fig. 160 Installing Accumulator Piston And Spring
Fig. 161 Valve Body Installation
J30RH/32RH TRANSMISSION OVERHAUL 21 - 163
Page 1726 of 2158
²On 32RH (4.0L), back adjusting screw off 2
1/4 turns
(d) Hold adjusting screw in position and tighten
locknut to 34 Nzm (25 ft. lbs.).
(2) Adjustrear bandas follows:
(a) Loosen locknut.
(b) Tighten adjusting screw as follows:
²On 32RH, tighten screw to 8 Nzm (72 in. lbs)
torque
²On 30RH, tighten screw to 5 Nzm (41 in. lbs.)
torque.
(c) Back off rear band adjusting screw as follows:
²On 30RH (2.5L), back adjusting screw off 7 turns
²On 32RH (4.0L), back adjusting screw off 4 turns
(d) Hold adjusting screw in place and tighten
locknut to 34 Nzm (25 ft. lbs.) torque.
(3) Install new pan gasket on transmission and in-
stall oil pan. Tighten pan bolts to 17 Nzm (13 ft. lbs.).(4) Turn transmission over.
EXTENSION HOUSING, CONTROL LEVER AND
CONVERTER INSTALLATION
(1) Install throttle valve and manual valve levers
on shaft.
(2) Position new extension adapter housing gasket
on transmission case. Use petroleum jelly to hold
gasket in place.
(3) Install new rear seal in extension housing if re-
quired.
(4) Install extension/adapter housing on transmis-
sion case. Tighten housing fasteners to 33 Nzm (24 ft.
lbs.). Be sure park lock rod is properly engaged in
sprag before tightening fasteners.
(5) Lubricate converter hub with transmission
fluid and carefully install converter. Turn converter
back and forth until seated.
(6) Secure converter in oil pump before mounting
transmission on jack and before moving transmission
back under vehicle. Use metal strapping, C-clamp, or
locking pliers to hold converter in place. Attach hold-
ing tool to converter housing.
CAUTION: The transmission cooler and lines must
be reverse flushed if overhaul corrected a malfunc-
tion that generated sludge, metal particles, or
clutch friction material. The torque converter and
drainback valve should also be replaced as they
will also be contaminated. Debris and residue NOT
flushed from the cooler and lines will flow back into
the transmission and converter. The result will be a
repeat failure and shop comeback.
Fig. 162 Fluid Filter Installation
21 - 164 30RH/32RH TRANSMISSION OVERHAULJ
Page 1727 of 2158
AW-4 AUTOMATIC TRANSMISSION
CONTENTS
page page
AW-4 AUTOMATIC TRANSMISSION........ 165
AW-4 IN-VEHICLE SERVICE.............. 182
AW-4 TRANSMISSION DIAGNOSIS......... 176
AW-4 TRANSMISSION OVERHAUL......... 201AW-4 TRANSMISSION REMOVAL AND
INSTALLATION....................... 198
GENERAL INFORMATION................ 165
GENERAL INFORMATION
INDEX
page page
Components and Operation................. 166
Description............................. 165
First/Second/Third/Reverse Components....... 168
Fourth Gear Overdrive Components.......... 167
Geartrain Operation and Application Charts..... 169Hydraulic System........................ 169
Recommended Fluid and Capacity........... 166
Torque Converter........................ 167
Transmission Identification.................. 166
Transmission Ranges and Shift Lever Positions . . 166
DESCRIPTION
AW-4 Transmission Overhaul
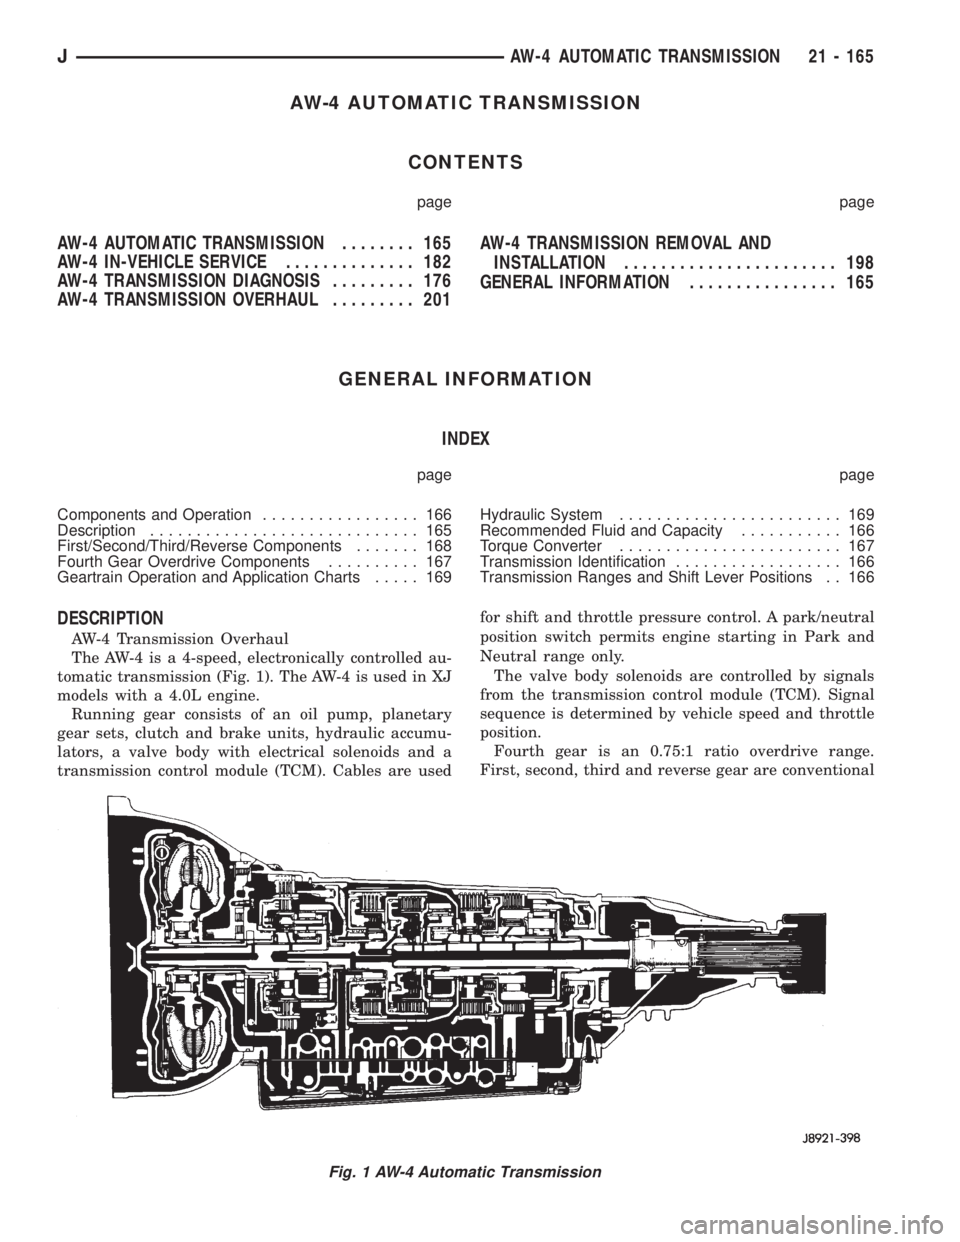
The AW-4 is a 4-speed, electronically controlled au-
tomatic transmission (Fig. 1). The AW-4 is used in XJ
models with a 4.0L engine.
Running gear consists of an oil pump, planetary
gear sets, clutch and brake units, hydraulic accumu-
lators, a valve body with electrical solenoids and a
transmission control module (TCM). Cables are usedfor shift and throttle pressure control. A park/neutral
position switch permits engine starting in Park and
Neutral range only.
The valve body solenoids are controlled by signals
from the transmission control module (TCM). Signal
sequence is determined by vehicle speed and throttle
position.
Fourth gear is an 0.75:1 ratio overdrive range.
First, second, third and reverse gear are conventional
Fig. 1 AW-4 Automatic Transmission
JAW-4 AUTOMATIC TRANSMISSION 21 - 165
Page 1728 of 2158
ranges. Third gear ratio is 1:1. A separate planetary
gear set provides overdrive operation in fourth gear.
TRANSMISSION RANGES AND SHIFT LEVER
POSITIONS
The AW-4 transmission has six ranges and shift le-
ver positions. Park, Reverse and Neutral are conven-
tional and mechanically operated. The 1-2, 3 and D
ranges provide electronically controlled shifting.
The 1-2 position provides first and second gear
only. The 3 position provides first, second and third
gear.
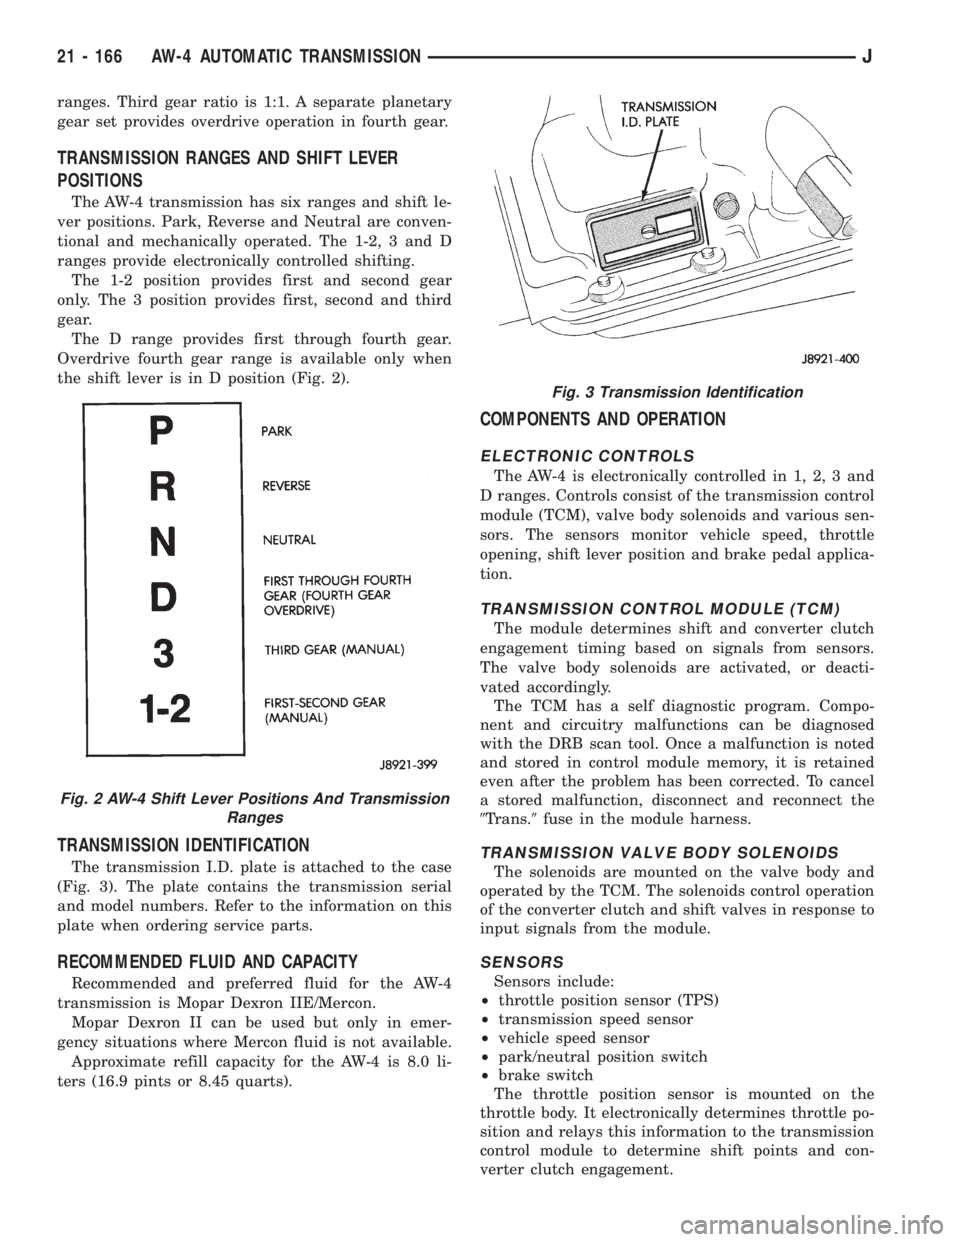
The D range provides first through fourth gear.
Overdrive fourth gear range is available only when
the shift lever is in D position (Fig. 2).
TRANSMISSION IDENTIFICATION
The transmission I.D. plate is attached to the case
(Fig. 3). The plate contains the transmission serial
and model numbers. Refer to the information on this
plate when ordering service parts.
RECOMMENDED FLUID AND CAPACITY
Recommended and preferred fluid for the AW-4
transmission is Mopar Dexron IIE/Mercon.
Mopar Dexron II can be used but only in emer-
gency situations where Mercon fluid is not available.
Approximate refill capacity for the AW-4 is 8.0 li-
ters (16.9 pints or 8.45 quarts).
COMPONENTS AND OPERATION
ELECTRONIC CONTROLS
The AW-4 is electronically controlled in 1, 2, 3 and
D ranges. Controls consist of the transmission control
module (TCM), valve body solenoids and various sen-
sors. The sensors monitor vehicle speed, throttle
opening, shift lever position and brake pedal applica-
tion.
TRANSMISSION CONTROL MODULE (TCM)
The module determines shift and converter clutch
engagement timing based on signals from sensors.
The valve body solenoids are activated, or deacti-
vated accordingly.
The TCM has a self diagnostic program. Compo-
nent and circuitry malfunctions can be diagnosed
with the DRB scan tool. Once a malfunction is noted
and stored in control module memory, it is retained
even after the problem has been corrected. To cancel
a stored malfunction, disconnect and reconnect the
9Trans.9fuse in the module harness.
TRANSMISSION VALVE BODY SOLENOIDS
The solenoids are mounted on the valve body and
operated by the TCM. The solenoids control operation
of the converter clutch and shift valves in response to
input signals from the module.
SENSORS
Sensors include:
²throttle position sensor (TPS)
²transmission speed sensor
²vehicle speed sensor
²park/neutral position switch
²brake switch
The throttle position sensor is mounted on the
throttle body. It electronically determines throttle po-
sition and relays this information to the transmission
control module to determine shift points and con-
verter clutch engagement.
Fig. 2 AW-4 Shift Lever Positions And Transmission
Ranges
Fig. 3 Transmission Identification
21 - 166 AW-4 AUTOMATIC TRANSMISSIONJ
Page 1729 of 2158
The transmission speed sensor consists of a rotor
and magnet on the transmission output shaft and a
switch in the extension housing or adapter. The sen-
sor switch is activated each time the rotor and mag-
net complete one revolution. Sensor signals are sent
to the transmission control module.
The park/neutral position switch is mounted on the
valve body manual shaft. The switch signals shift
linkage and manual valve position to the transmis-
sion control module through an interconnecting har-
ness. The switch prevents engine starting in all gears
other than Park or Neutral.
The brake switch is in circuit with the torque con-
verter clutch solenoid. The switch disengages the
converter clutch whenever the brakes are applied.
The switch is mounted on the brake pedal bracket
and signals the transmission control module when
the pedal is pressed or released.
TORQUE CONVERTER
A three element torque converter is used for all ap-
plications. The converter contains an impeller, stator,
and turbine.
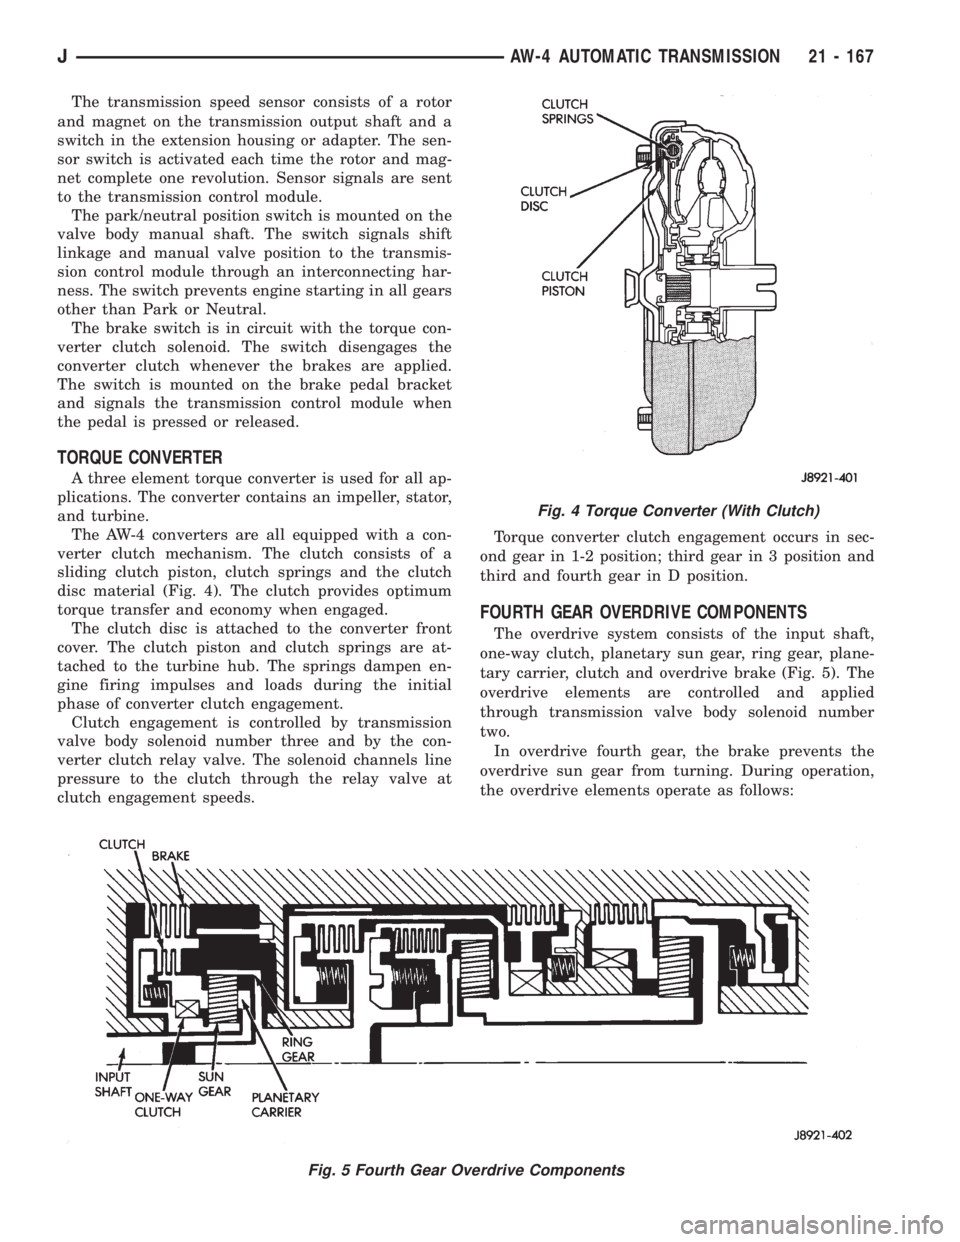
The AW-4 converters are all equipped with a con-
verter clutch mechanism. The clutch consists of a
sliding clutch piston, clutch springs and the clutch
disc material (Fig. 4). The clutch provides optimum
torque transfer and economy when engaged.
The clutch disc is attached to the converter front
cover. The clutch piston and clutch springs are at-
tached to the turbine hub. The springs dampen en-
gine firing impulses and loads during the initial
phase of converter clutch engagement.
Clutch engagement is controlled by transmission
valve body solenoid number three and by the con-
verter clutch relay valve. The solenoid channels line
pressure to the clutch through the relay valve at
clutch engagement speeds.Torque converter clutch engagement occurs in sec-
ond gear in 1-2 position; third gear in 3 position and
third and fourth gear in D position.
FOURTH GEAR OVERDRIVE COMPONENTS
The overdrive system consists of the input shaft,
one-way clutch, planetary sun gear, ring gear, plane-
tary carrier, clutch and overdrive brake (Fig. 5). The
overdrive elements are controlled and applied
through transmission valve body solenoid number
two.
In overdrive fourth gear, the brake prevents the
overdrive sun gear from turning. During operation,
the overdrive elements operate as follows:
Fig. 4 Torque Converter (With Clutch)
Fig. 5 Fourth Gear Overdrive Components
JAW-4 AUTOMATIC TRANSMISSION 21 - 167
Page 1730 of 2158
The overdrive input shaft and planetary carrier ro-
tate as a unit. The sun gear and overdrive direct
clutch drum are in mesh and operate as a single
unit. The direct clutch splines function as the hub for
the overdrive brake. The one-way clutch outer race is
in mesh with the planetary carrier. The inner race is
fixed to the sun gear shaft.
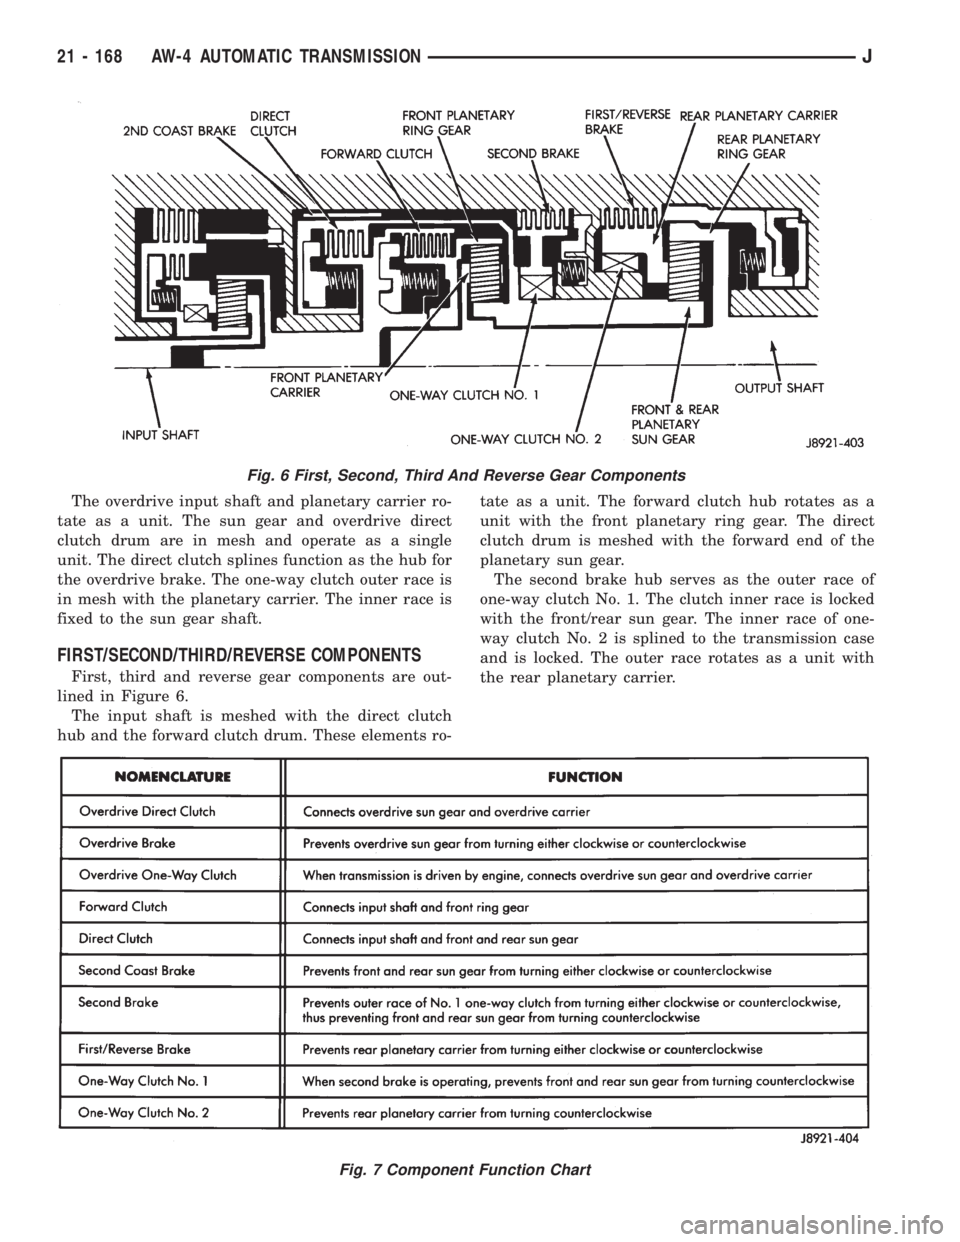
FIRST/SECOND/THIRD/REVERSE COMPONENTS
First, third and reverse gear components are out-
lined in Figure 6.
The input shaft is meshed with the direct clutch
hub and the forward clutch drum. These elements ro-tate as a unit. The forward clutch hub rotates as a
unit with the front planetary ring gear. The direct
clutch drum is meshed with the forward end of the
planetary sun gear.
The second brake hub serves as the outer race of
one-way clutch No. 1. The clutch inner race is locked
with the front/rear sun gear. The inner race of one-
way clutch No. 2 is splined to the transmission case
and is locked. The outer race rotates as a unit with
the rear planetary carrier.
Fig. 6 First, Second, Third And Reverse Gear Components
Fig. 7 Component Function Chart
21 - 168 AW-4 AUTOMATIC TRANSMISSIONJ