instrument cluster KIA CADENZA 2017 Owners Manual
[x] Cancel search | Manufacturer: KIA, Model Year: 2017, Model line: CADENZA, Model: KIA CADENZA 2017Pages: 500, PDF Size: 10.37 MB
Page 15 of 500
25
Your vehicle at a glance
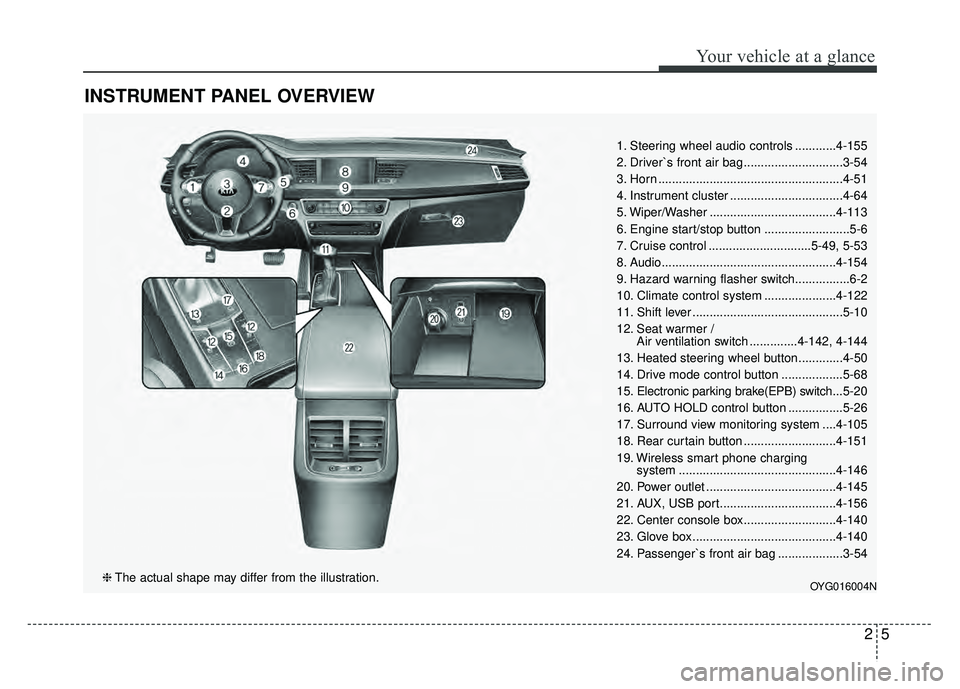
INSTRUMENT PANEL OVERVIEW
1. Steering wheel audio controls ............4-155
2. Driver`s front air bag .............................3-54
3. Horn ......................................................4-51
4. Instrument cluster .................................4-64
5. Wiper/Washer .....................................4-113
6. Engine start/stop button .........................5-6
7. Cruise control ..............................5-49, 5-53
8. Audio...................................................4-154
9. Hazard warning flasher switch................6-2
10. Climate control system .....................4-122
11. Shift lever ............................................5-10
12. Seat warmer /Air ventilation switch ..............4-142, 4-144
13. Heated steering wheel button.............4-50
14. Drive mode control button ..................5-68
15. Electronic parking brake(EPB) switch... 5-20
16. AUTO HOLD control button ................5-26
17. Surround view monitoring system ....4-105
18. Rear curtain button ...........................4-151
19. Wireless smart phone charging system ..............................................4-146
20. Power outlet ......................................4-145
21. AUX, USB port..................................4-156
22. Center console box...........................4-140
23. Glove box ..........................................4-140
24. Passenger`s front air bag ...................3-54
OYG016004N❈ The actual shape may differ from the illustration.
Page 83 of 500
Steering wheel . . . . . . . . . . . . . . . . . . . . . . . . . . . . . 4-47
• Electric power steering (EPS) . . . . . . . . . . . . . . . . . . 4-47
• Tilt and telescopic steering . . . . . . . . . . . . . . . . . . . . 4-48
• Heated steering wheel . . . . . . . . . . . . . . . . . . . . . . . . . 4-50
• Horn . . . . . . . . . . . . . . . . . . . . . . . . . . . . . . . . . . . . \
. . . 4-51
Mirrors . . . . . . . . . . . . . . . . . . . . . . . . . . . . . . . . . . 4-52\
• Inside rearview mirror . . . . . . . . . . . . . . . . . . . . . . . . 4-52
• Automatic-dimming function . . . . . . . . . . . . . . . . . . . 4-54
• Compass function . . . . . . . . . . . . . . . . . . . . . . . . . . . . 4-55
• Programming HomeLink
®. . . . . . . . . . . . . . . . . . . . . 4-57
• Standard programming . . . . . . . . . . . . . . . . . . . . . . . 4-57
• Rolling code programming . . . . . . . . . . . . . . . . . . . . . 4-58
• Gate operator & Canadian programming . . . . . . . . 4-59
• Operating HomeLink
®. . . . . . . . . . . . . . . . . . . . . . . . 4-59
• Reprogramming a single HomeLink
®button. . . . . . 4-60
• Erasing HomeLink
®buttons . . . . . . . . . . . . . . . . . . . 4-60
• Outside rearview mirror. . . . . . . . . . . . . . . . . . . . . . . 4-61
Instrument cluster . . . . . . . . . . . . . . . . . . . . . . . . . 4-64
• Instrument cluster control . . . . . . . . . . . . . . . . . . . . . 4-65
• LCD display control . . . . . . . . . . . . . . . . . . . . . . . . . . 4-65
• Gauges . . . . . . . . . . . . . . . . . . . . . . . . . . . . . . . . . . . . \
. 4-66
• Transaxle shift indicator . . . . . . . . . . . . . . . . . . . . . . . 4-69
LCD windows . . . . . . . . . . . . . . . . . . . . . . . . . . . . . 4-70
• Over view . . . . . . . . . . . . . . . . . . . . . . . . . . . . . . . . . . . 4-\
70
• Trip information (Trip computer) . . . . . . . . . . . . . . . 4-70
• LCD Modes . . . . . . . . . . . . . . . . . . . . . . . . . . . . . . . . . 4-74
Warning and indicator lights . . . . . . . . . . . . . . . . 4-86
• Warning lights . . . . . . . . . . . . . . . . . . . . . . . . . . . . . . . 4-86
• Indicator Lights . . . . . . . . . . . . . . . . . . . . . . . . . . . . . . 4-93
Head up display (HUD) . . . . . . . . . . . . . . . . . . . . . 4-98
• Description . . . . . . . . . . . . . . . . . . . . . . . . . . . . . . . . . . 4-98\
• Head Up Display ON/OFF . . . . . . . . . . . . . . . . . . . . . 4-99
• Head Up Display Information . . . . . . . . . . . . . . . . . . 4-99
• Head Up Display Setting. . . . . . . . . . . . . . . . . . . . . . . 4-99
Rear parking assist system . . . . . . . . . . . . . . . . . 4-100
• Operation of the rear parking assist system . . . . . . 4-100
• Non-operational conditions of rear parking assist system . . . . . . . . . . . . . . . . . . . . . . . . . . . . . . . 4-101
• Rear parking assist system precautions . . . . . . . . . 4-102
• Self-diagnosis . . . . . . . . . . . . . . . . . . . . . . . . . . . . . . . 4-103
Rearview camera . . . . . . . . . . . . . . . . . . . . . . . . . 4-104
Surround view monitoring system (SVM) . . . . . 4-105
4
Page 128 of 500

447
Features of your vehicle
Electric power steering (EPS)
The power steering uses a motor to
assist you in steering the vehicle. If
the engine is off or if the power steer-
ing system becomes inoperative, the
vehicle may still be steered, but it will
require increased steering effort.
The motor driven power steering is
controlled by a power steering con-
trol unit which senses the steering
wheel torque and vehicle speed to
command the motor.
The steering becomes heavier as the
vehicle’s speed increases and
becomes lighter as the vehicle’s
speed decreases for optimum steer-
ing control.
Should you notice any change in the
effort required to steer during normal
vehicle operation, have the power
steering checked by an authorized
Kia dealer. If the Electric Power Steering
System does not operate normally,
the warning light will illuminate on
the instrument cluster. The steering
wheel may require increased
steering effort. Take your vehicle to
an authorized Kia dealer and have
the vehicle checked as soon as
possible.
When you operate the steering wheel in low temperature, noise
may occur. If temperature rises, the
noise will likely disappear. This is a
normal condition.
When the vehicle is stationary, and the steering wheel is turned all the
way to the left or right continuous-
ly, the steering wheel becomes
harder to turn. The power assist is
limited to protect the motor from
overheating.
As time passes, the steering wheel
will return to its normal condition.
✽ ✽ NOTICE
The following symptoms may occur
during normal vehicle operation:
• The EPS warning light does not
illuminate.
• The steering gets heavy immedi- ately after turning the ignition
switch on. This happens as the sys-
tem performs the EPS system
diagnostics. When the diagnostics
are completed, the steering wheel
will return to its normal condition.
• A click noise may be heard from the EPS relay after the Engine
Start/Stop button is turned to the
ON or OFF position.
• A motor noise may be heard when the vehicle is at a stop or at a low
driving speed.
• If the Electric Power Steering System does not operate normally,
the warning light will illuminate on
the instrument cluster. The power
steering system will not operate
and steering effort can highly
increase. Take your vehicle to an
authorized Kia dealer and have the
vehicle checked as soon as possible. (Continued)
STEERING WHEEL
Page 145 of 500
Features of your vehicle
64
4
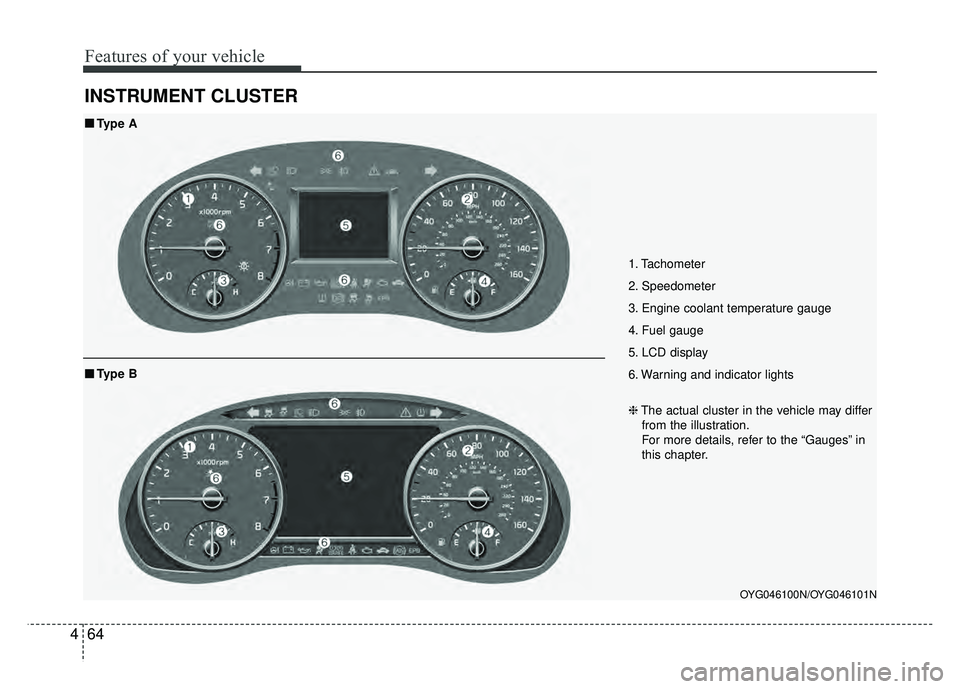
INSTRUMENT CLUSTER
1. Tachometer
2. Speedometer
3. Engine coolant temperature gauge
4. Fuel gauge
5. LCD display
6. Warning and indicator lights
OYG046100N/OYG046101N
■
■
Type A
❈The actual cluster in the vehicle may differ
from the illustration.
For more details, refer to the “Gauges” in
this chapter.
■
■ Type B
Page 146 of 500

465
Features of your vehicle
Instrument Cluster Control
Adjusting Instrument ClusterIllumination
The brightness of the instrument
panel illumination is changed by
pressing the illumination control button
(“+” or “-”) when the Engine Start/Stop
button is ON, or the taillights are
turned on. If you hold the illumination control
button (“+” or “-”), the brightness
will be changed continuously.
If the brightness reaches to the maximum or minimum level, an
alarm will sound.
LCD Display Control
The LCD display modes can be
changed by using the control buttons
on the steering wheel.
OYG046102
OYG046157LOYG046103L
OYG046104L
■Type A
■Type B
Page 162 of 500
481
Features of your vehicle
Fuel Economy Auto Reset
- Off : The average fuel economy
will not reset automatically when-
ever refueling.
- After Ignition : The average fuel economy will reset automatically
whenever it has passed 4 hours
after turning OFF the engine.
- After Refueling : The average fuel economy will reset automatically
when refueling.
❈ For more details, refer to “Trip
Computer” in this chapter.
Fuel Economy Unit : Choose the
fuel economy unit. (US gallon, UK
gallon)
Temperature Unit : Choose the tem-
perature unit. (°C,°F)
Tire Pressure Unit (if equipped) :
Choose the tire pressure unit. (psi,
kPa, Bar)
Language : Choose the language.Warning messages
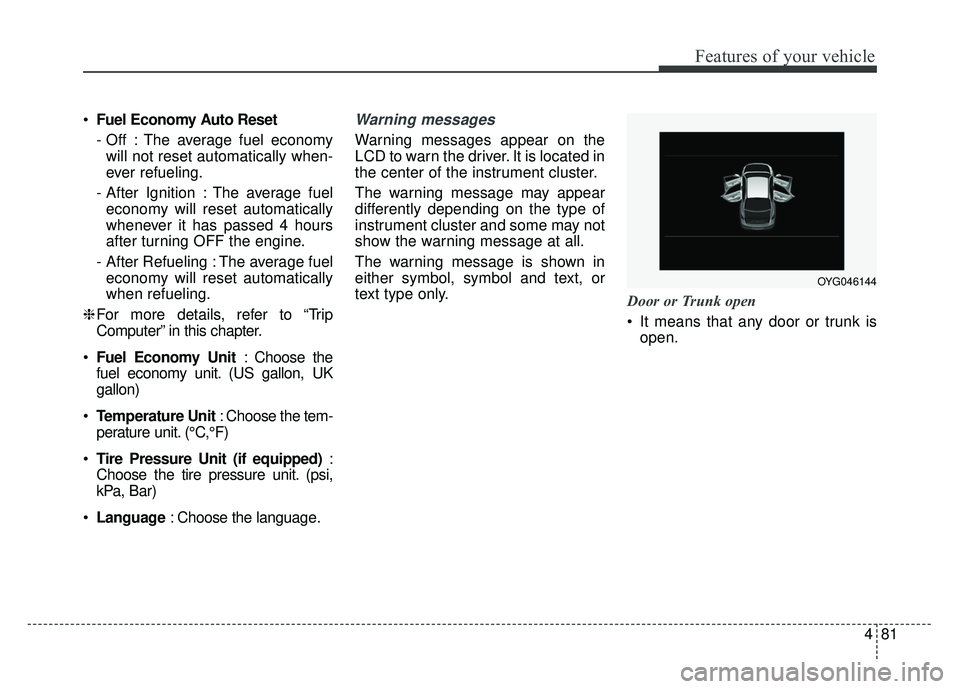
Warning messages appear on the
LCD to warn the driver. It is located in
the center of the instrument cluster.
The warning message may appear
differently depending on the type of
instrument cluster and some may not
show the warning message at all.
The warning message is shown in
either symbol, symbol and text, or
text type only.
Door or Trunk open
It means that any door or trunk is
open.
OYG046144
Page 179 of 500

Features of your vehicle
98
4
Description
The head up display is a transparent
display which projects a shadow of
some information of the instrument
cluster and navigation on the wind-
shield glass. The head up display image on the
windshield glass may be invisible
when:
- Sitting posture is bad.
- Wearing a polarized sunglasses.
- There is an object on the cover ofthe head up display.
- Driving on a wet road.
- An inadequate lighting is turned on inside the vehicle.
- Any light comes from the outside.
- Wearing an inadequate glasses to your eyesight.
If the head up display image is not shown well, adjust the height, rota-
tion or illumination of the head up
display in the LCD window.
❈ For more details, refer to “LCD
window” in this chapter.
When the head up display needs inspection or repair, we recom-
mend that you consult an author-
ized Kia dealer.
Do not place any accessories on the clash pad or attach any objects
on the windshield glass.
✽ ✽ NOTICE
Installing window tint or any other
type of metallic coating on the wind-
shield can prevent the driver from
seeing the Head Up Display images.
✽ ✽NOTICE
When replacing the front wind-
shield glass of the vehicles equipped
with the head up display, replace it
with a windshield glass designed for
the head up display operation.
Otherwise, duplicated images may
be displayed on the windshield glass.
HEAD UP DISPLAY (HUD) (IF EQUIPPED)
OYG046430N
WARNING - Head up
display
The Head up display is a supple-
mental system. Do not solely
rely on the system, always drive
safely, and pay attention to the
driving conditions on the road.
Page 228 of 500

4147
Features of your vehicle
Wireless smart phone charging
1. Remove any object on the smartphone charging pad including the
smart key. If there is any foreign
object on the pad other than a
smart phone, the wireless charging
function may not operate properly.
2. Place the smart phone on the cen- ter of the wireless charging pad.
3. The indicator light will change to orange once the wireless charging
begins. After the charging is com-
plete, the orange light will change
to green.
4. You can choose to turn the wireless charging function to either ON or
OFF by selecting the USM on the
instrument cluster. (Please refer to
“Instrument Cluster” for details).
If the wireless charging does not
work, gently move your smart phone
around the pad until the charging indi-
cator light turns yellow. Depending on
the smart phone, the charging indica-
tor light may not turn green even after
the charging is complete. If the wireless charging is not func-
tioning properly, the orange light will
blink and flash for ten seconds then
turn off. In such cases, remove the
smart phone from the pad and
replace it on the pad again, or double
check the charging status.
If you leave the smart phone on the
charging pad when the vehicle igni-
tion is in OFF, the vehicle will alert
you through warning messages and
sound (applicable for vehicles with
voice guidance function) after the
‘Good bye’ function on the instru-
ment cluster ends.WARNING - Distracted
driving
Driving while distracted can
result in a loss of vehicle con-
trol that may lead to an acci-
dent, severe personal injury,
and death. The driver’s primary
responsibility is in the safe and
legal operation of a vehicle, and
use of any handheld devices,
other equipment, or vehicle sys-
tems which take the driver’s
eyes, attention and focus away
from the safe operation of a
vehicle or which are not permis-
sible by law should never be
used during operation of the
vehicle.
Page 271 of 500
Driving your vehicle
34
5
ESC OFF usage
When driving
ESC should be turned on for daily
driving whenever possible.
To turn ESC off while driving, press the ESC OFF button while driving
on a flat road surface.
✽ ✽ NOTICE
• When operating the vehicle on a
dynamometer, ensure that the
ESC is turned off (ESC OFF light
illuminated). If the ESC is left on,
it may prevent the vehicle speed
from increasing, and result in false
diagnosis.
• Turning the ESC off does not affect ABS or brake system operation.
Vehicle stability management
(VSM)
This system provides further
enhancements to vehicle stability
and steering responses when a vehi-
cle is driving on a slippery road or a
vehicle detects changes in coeffi-
cient of friction between right wheels
and left wheels when braking.
VSM operation
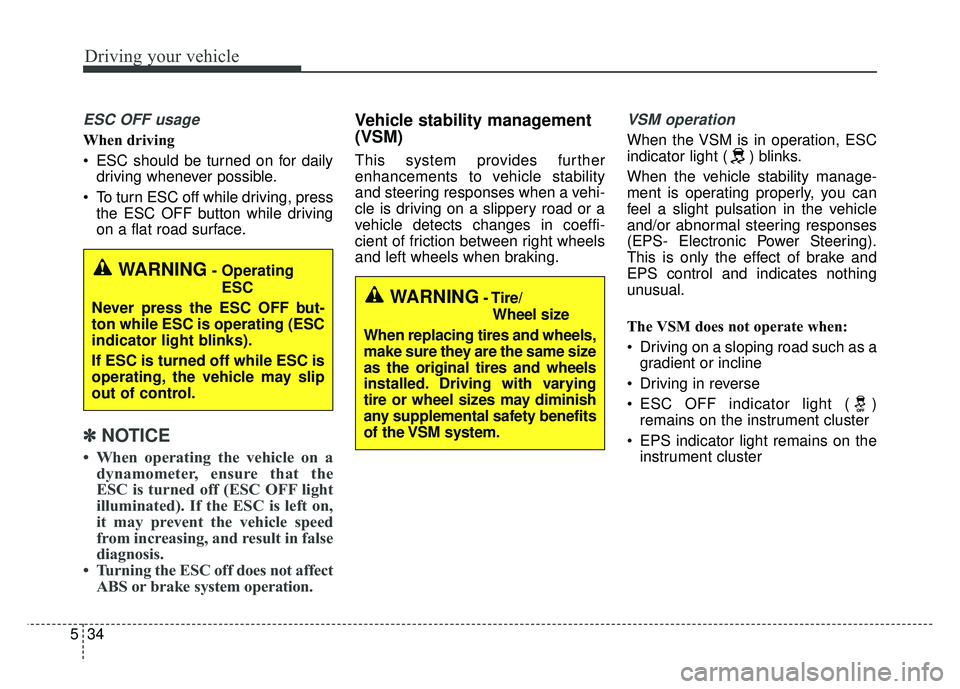
When the VSM is in operation, ESC
indicator light ( ) blinks.
When the vehicle stability manage-
ment is operating properly, you can
feel a slight pulsation in the vehicle
and/or abnormal steering responses
(EPS- Electronic Power Steering).
This is only the effect of brake and
EPS control and indicates nothing
unusual.
The VSM does not operate when:
Driving on a sloping road such as a
gradient or incline
Driving in reverse
ESC OFF indicator light ( ) remains on the instrument cluster
EPS indicator light remains on the instrument cluster
WARNING- Operating
ESC
Never press the ESC OFF but-
ton while ESC is operating (ESC
indicator light blinks).
If ESC is turned off while ESC is
operating, the vehicle may slip
out of control.
WARNING- Tire/ Wheel size
When replacing tires and wheels,
make sure they are the same size
as the original tires and wheels
installed. Driving with varying
tire or wheel sizes may diminish
any supplemental safety benefits
of the VSM system.
Page 276 of 500
539
Driving your vehicle
The warning light illumi-
nates on the LCD display,
when you cancel the AEB
system. The driver can
monitor the AEB ON/OFF status on
the LCD display. When the warning
light remains ON with the AEB acti-
vated, we recommend you to have
the system checked by an authorized
Kia dealer.
The driver can select the initial warn-
ing activation time in the User
Settings in the instrument cluster
LCD display. The options for the ini-
tial Forward Collision Warning
include the following:
selected, the initial
Forward Collision Warning
is activated earlier than
normal. This setting maxi-
mizes the amount of dis-
tance between the vehicle
or pedestrian ahead before
the initial warning occurs.
selected, the initial
Forward Collision
Warning is activated nor-
mally. This setting allows
for a nominal amount of
distance between the
vehicle or pedestrian
ahead before the initial
warning occurs.
selected, the initial Forward
Collision Warning is activat-
ed later than normal. This
setting reduces the amount
of distance between the
vehicle or pedestrian ahead
before the initial warning
occurs.