KIA K900 2015 1.G Owner's Guide
Manufacturer: KIA, Model Year: 2015, Model line: K900, Model: KIA K900 2015 1.GPages: 522, PDF Size: 7.92 MB
Page 31 of 522
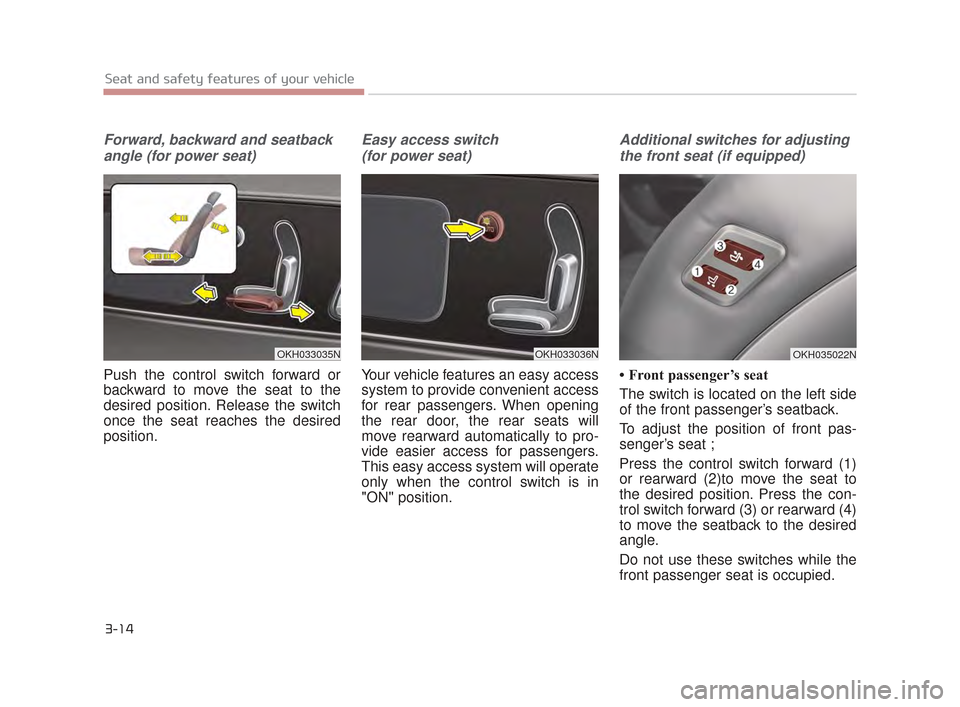
Forward, backward and seatbackangle (for power seat)
Push the control switch forward or
backward to move the seat to the
desired position. Release the switch
once the seat reaches the desired
position.
Easy access switch (for power seat)
Your vehicle features an easy access
system to provide convenient access
for rear passengers. When opening
the rear door, the rear seats will
move rearward automatically to pro-
vide easier access for passengers.
This easy access system will operate
only when the control switch is in
"ON" position.
Additional switches for adjustingthe front seat (if equipped)
• Front passenger’s seat
The switch is located on the left side
of the front passenger’s seatback.
To adjust the position of front pas-
senger’s seat ;
Press the control switch forward (1)
or rearward (2)to move the seat to
the desired position. Press the con-
trol switch forward (3) or rearward (4)
to move the seatback to the desired
angle.
Do not use these switches while the
front passenger seat is occupied.
3-14
Seat and safety features of your vehicle
OKH033035NOKH033036NOKH035022N
KH CAN (ENG) 3:2015 3/26/2015 6:07 AM Page 14
Page 32 of 522
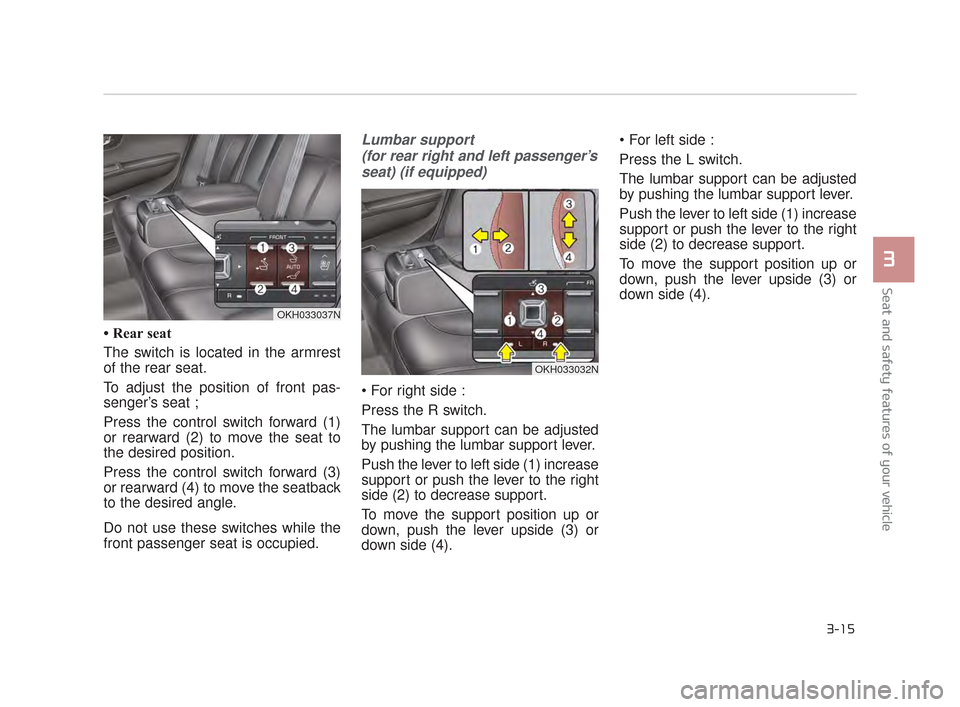
• Rear seat
The switch is located in the armrest
of the rear seat.
To adjust the position of front pas-
senger’s seat ;
Press the control switch forward (1)
or rearward (2) to move the seat to
the desired position.
Press the control switch forward (3)
or rearward (4) to move the seatback
to the desired angle.
Do not use these switches while the
front passenger seat is occupied.
Lumbar support (for rear right and left passenger’sseat) (if equipped)
Press the R switch.
The lumbar support can be adjusted
by pushing the lumbar support lever.
Push the lever to left side (1) increase
support or push the lever to the right
side (2) to decrease support.
To move the support position up or
down, push the lever upside (3) or
down side (4).
Press the L switch.
The lumbar support can be adjusted
by pushing the lumbar support lever.
Push the lever to left side (1) increase
support or push the lever to the right
side (2) to decrease support.
To move the support position up or
down, push the lever upside (3) or
down side (4).
Seat and safety features of your vehicle
3
3-15
OKH033037N
OKH033032N
KH CAN (ENG) 3:2015 3/26/2015 6:07 AM Page 15
Page 33 of 522

3-16
Seat and safety features of your vehicle
Rear switches operating limitation
You can activate or deactivate the
rear seat control, rear audio control
and climate control by using the
REAR LOCK button on the rear arm-
rest or “System Settings” in the AVN
(Audio, Video, and Navigation).
Detailed information for the “System
Settings” is described in a separately
supplied manual.
If the rear control button has deacti-
vated through AVN, you can reacti-
vate the rear control button only
through AVN.
Headrest (for rear seat)
The rear seat is equipped with head-
rests in all the seating positions for
the occupant's safety and comfort.
The headrest not only provides com-
fort for passengers, but also helps
protect the head and neck in the
event of a collision. For maximum effectiveness in case
of an accident, the headrest should
be adjusted so the middle of the
headrest is at the same height of the
center of gravity of an occupant's
head. Generally, the center of gravity
of most people's head is similar with
the height as the top of their eyes.
Also adjust the headrest as close to
your head as possible. For this rea-
son, the use of a cushion that holds
the body away from the seatback is
not recommended.
OKH033040NOKH033111N
KH CAN (ENG) 3:2015 3/26/2015 6:07 AM Page 16
Page 34 of 522
Seat and safety features of your vehicle
3
3-17
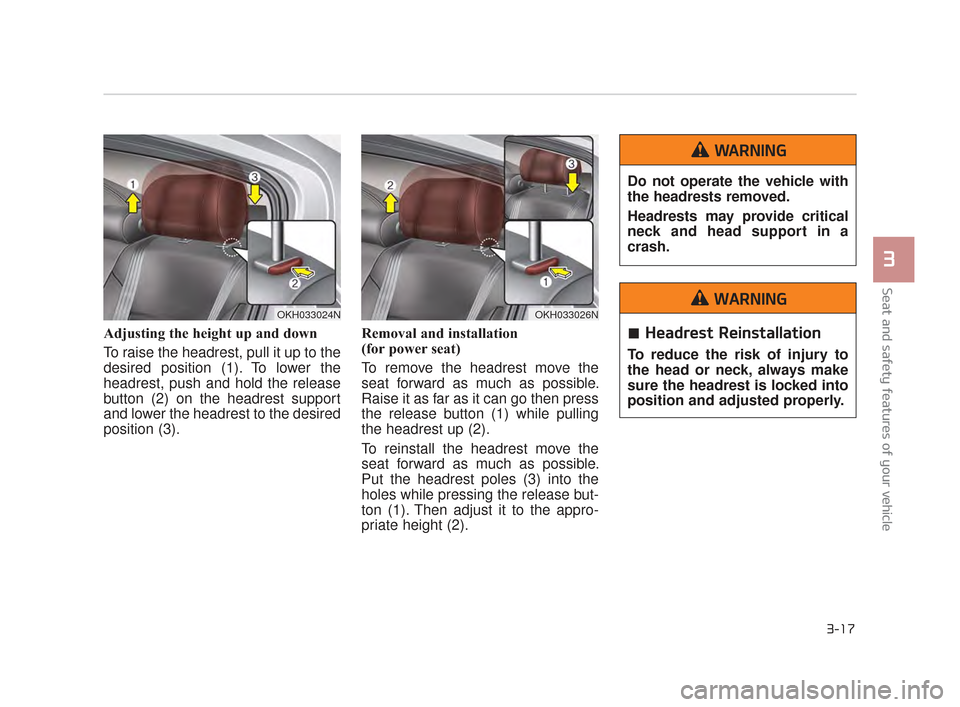
Adjusting the height up and down
To raise the headrest, pull it up to the
desired position (1). To lower the
headrest, push and hold the release
button (2) on the headrest support
and lower the headrest to the desired
position (3).Removal and installation
(for power seat)
To remove the headrest move the
seat forward as much as possible.
Raise it as far as it can go then press
the release button (1) while pulling
the headrest up (2).
To reinstall the headrest move the
seat forward as much as possible.
Put the headrest poles (3) into the
holes while pressing the release but-
ton (1). Then adjust it to the appro-
priate height (2).
OKH033024NOKH033026N
Do not operate the vehicle with
the headrests removed.
Headrests may provide critical
neck and head support in a
crash.
WARNING
Headrest Reinstallation
To reduce the risk of injury to
the head or neck, always make
sure the headrest is locked into
position and adjusted properly.
WARNING
KH CAN (ENG) 3:2015 3/26/2015 6:07 AM Page 17
Page 35 of 522
3-18
Seat and safety features of your vehicle
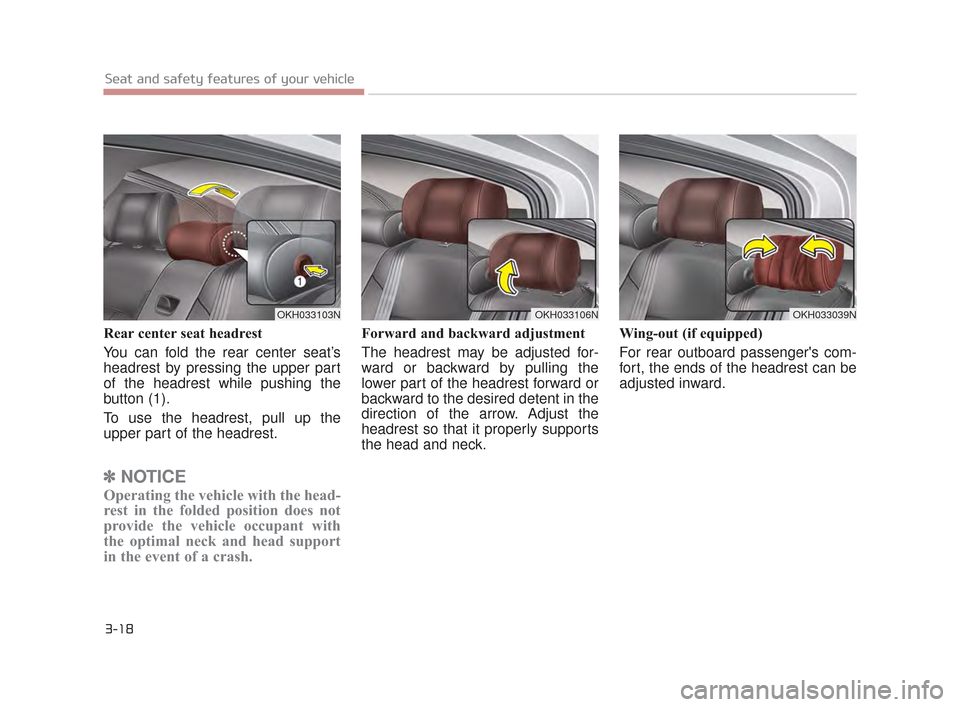
Rear center seat headrest
You can fold the rear center seat’s
headrest by pressing the upper part
of the headrest while pushing the
button (1).
To use the headrest, pull up the
upper part of the headrest.
✽NOTICE
Operating the vehicle with the head-
rest in the folded position does not
provide the vehicle occupant with
the optimal neck and head support
in the event of a crash.
Forward and backward adjustment
The headrest may be adjusted for-
ward or backward by pulling the
lower part of the headrest forward or
backward to the desired detent in the
direction of the arrow. Adjust the
headrest so that it properly supports
the head and neck. Wing-out (if equipped)
For rear outboard passenger's com-
fort, the ends of the headrest can be
adjusted inward.
OKH033103NOKH033039NOKH033106N
KH CAN (ENG) 3:2015 3/26/2015 6:07 AM Page 18
Page 36 of 522

Seat and safety features of your vehicle
3
3-19
Armrest
To use the armrest, pull it forward
from the seatback.
Carrying long / narrow cargo (for fixed seat, if equipped)
Additional cargo space is provided to
accommodate long/narrow cargo
(skis, poles, etc.) not able to fit prop-
erly in the trunk when closed.
1.Pull the armrest down.
2.Pull the cover down while pushing the release lever down.
OKH033027N
OKH033076N
Be careful when loadingcargo through the rear passen-
ger seats to prevent damage to
the vehicle interior.
When cargo is loaded through the rear passenger seats,
ensure the cargo is properly
secured to prevent it from mov-
ing while driving. Unsecured
cargo in the passenger com-
partment can cause damage to
the vehicle.
CAUTION
Cargo
Cargo should always be
secured to prevent it from being
thrown about the vehicle in a
collision and causing injury to
the vehicle occupants. Do not
place objects on the rear seats,
since they cannot be properly
secured and may hit the front
seat occupants in a collision.
WARNING
KH CAN (ENG) 3:2015 3/26/2015 6:07 AM Page 19
Page 37 of 522
3-20
Seat and safety features of your vehicle
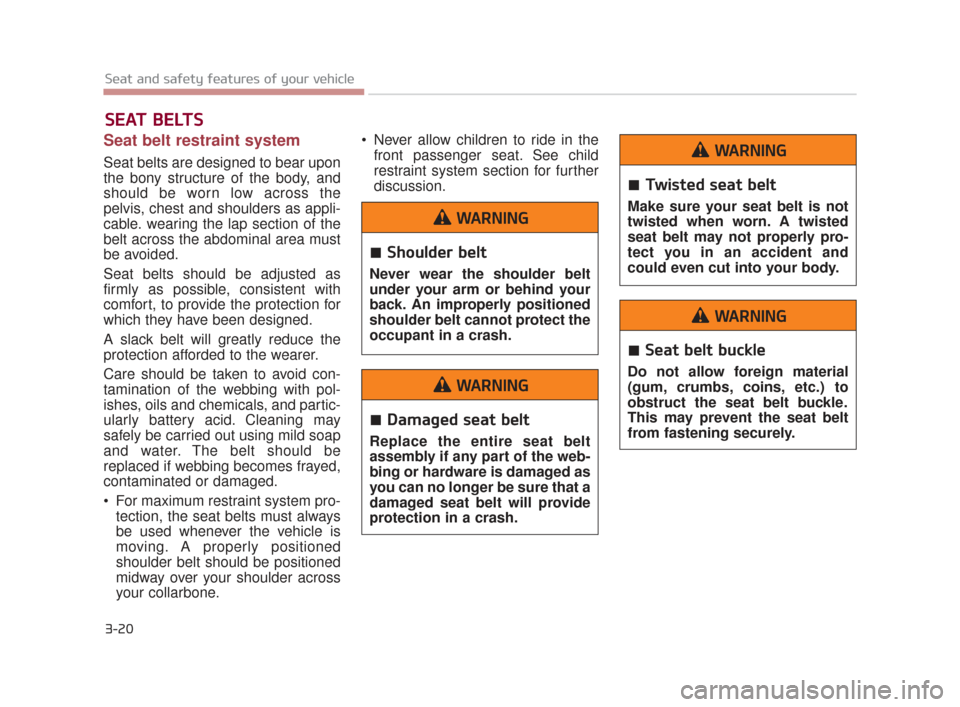
Seat belt restraint system
Seat belts are designed to bear upon
the bony structure of the body, and
should be worn low across the
pelvis, chest and shoulders as appli-
cable. wearing the lap section of the
belt across the abdominal area must
be avoided.
Seat belts should be adjusted as
firmly as possible, consistent with
comfort, to provide the protection for
which they have been designed.
A slack belt will greatly reduce the
protection afforded to the wearer.
Care should be taken to avoid con-
tamination of the webbing with pol-
ishes, oils and chemicals, and partic-
ularly battery acid. Cleaning may
safely be carried out using mild soap
and water. The belt should be
replaced if webbing becomes frayed,
contaminated or damaged.
For maximum restraint system pro-tection, the seat belts must always
be used whenever the vehicle is
moving. A properly positioned
shoulder belt should be positioned
midway over your shoulder across
your collarbone. Never allow children to ride in the
front passenger seat. See child
restraint system section for further
discussion.
SEAT BELTS
Shoulder belt
Never wear the shoulder belt
under your arm or behind your
back. An improperly positioned
shoulder belt cannot protect the
occupant in a crash.
WARNING
Damaged seat belt
Replace the entire seat belt
assembly if any part of the web-
bing or hardware is damaged as
you can no longer be sure that a
damaged seat belt will provide
protection in a crash.
WARNING
Twisted seat belt
Make sure your seat belt is not
twisted when worn. A twisted
seat belt may not properly pro-
tect you in an accident and
could even cut into your body.
WARNING
Seat belt buckle
Do not allow foreign material
(gum, crumbs, coins, etc.) to
obstruct the seat belt buckle.
This may prevent the seat belt
from fastening securely.
WARNING
KH CAN (ENG) 3:2015 3/26/2015 6:07 AM Page 20
Page 38 of 522
Seat and safety features of your vehicle
3
3-21
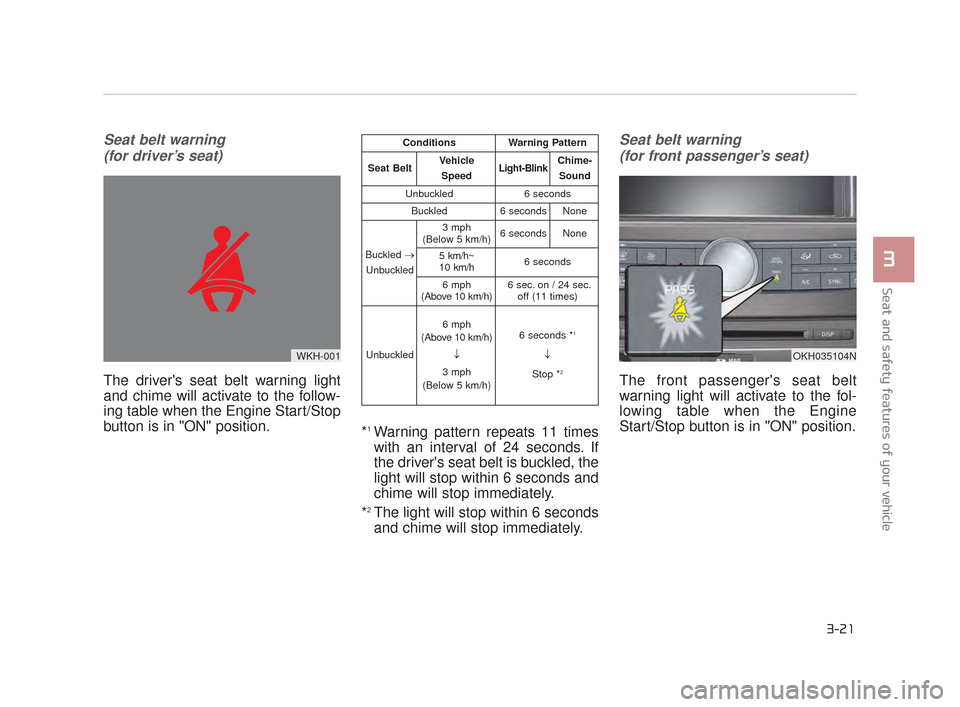
Seat belt warning (for driver’s seat)
The driver's seat belt warning light
and chime will activate to the follow-
ing table when the Engine Start/Stop
button is in "ON" position. *
1Warning pattern repeats 11 times
with an interval of 24 seconds. If
the driver's seat belt is buckled, the
light will stop within 6 seconds and
chime will stop immediately.
*
2The light will stop within 6 seconds
and chime will stop immediately.
Seat belt warning (for front passenger’s seat)
The front passenger's seat belt
warning light will activate to the fol-
lowing table when the Engine
Start/Stop button is in "ON" position.
WKH-001
ConditionsWarning Pattern
Seat BeltVehicle
SpeedLight-BlinkChime-Sound
Unbuckled6 seconds
Buckled6 secondsNone
Buckled →
Unbuckled
3 mph
(Below 5 km/h)6 secondsNone
5 km/h~
10 km/h6 seconds
6 mph
(Above 10 km/h)6 sec. on / 24 sec. off (11 times)
Unbuckled
6 mph
(Above 10 km/h)
↓
3 mph
(Below 5 km/h)6 seconds *1
↓
Stop *
2OKH035104N
KH CAN (ENG) 3:2015 3/26/2015 6:07 AM Page 21
Page 39 of 522
3-22
Seat and safety features of your vehicle
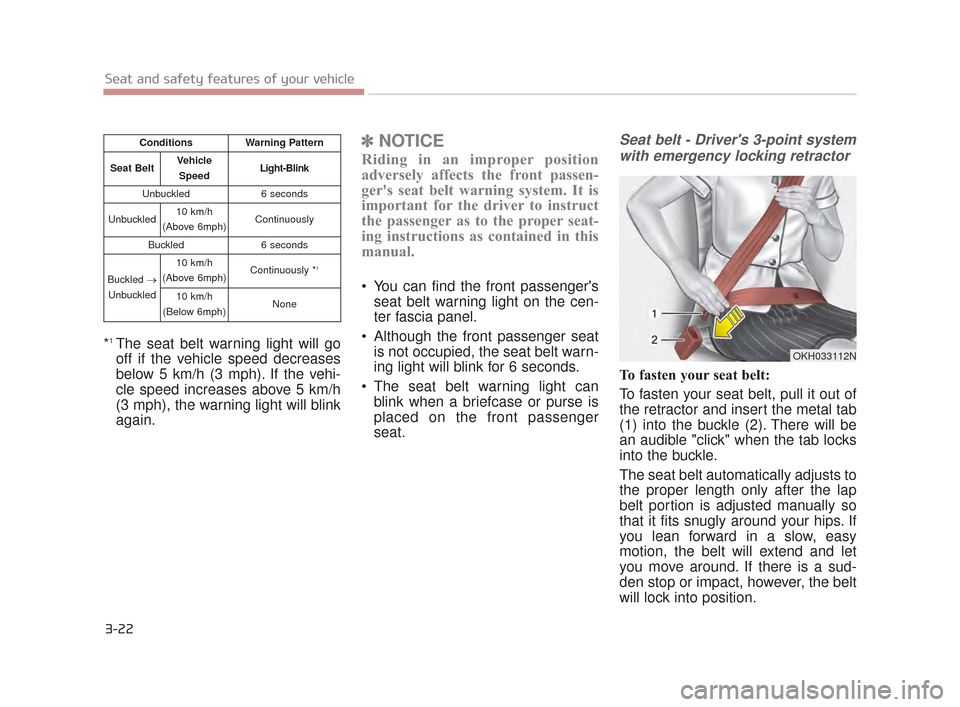
*1The seat belt warning light will go
off if the vehicle speed decreases
below 5 km/h (3 mph). If the vehi-
cle speed increases above 5 km/h
(3 mph), the warning light will blink
again.
✽NOTICE
Riding in an improper position
adversely affects the front passen-
ger's seat belt warning system. It is
important for the driver to instruct
the passenger as to the proper seat-
ing instructions as contained in this
manual.
You can find the front passenger's
seat belt warning light on the cen-
ter fascia panel.
Although the front passenger seat is not occupied, the seat belt warn-
ing light will blink for 6 seconds.
The seat belt warning light can blink when a briefcase or purse is
placed on the front passenger
seat.
Seat belt - Driver's 3-point system
with emergency locking retractor
To fasten your seat belt:
To fasten your seat belt, pull it out of
the retractor and insert the metal tab
(1) into the buckle (2). There will be
an audible "click" when the tab locks
into the buckle.
The seat belt automatically adjusts to
the proper length only after the lap
belt portion is adjusted manually so
that it fits snugly around your hips. If
you lean forward in a slow, easy
motion, the belt will extend and let
you move around. If there is a sud-
den stop or impact, however, the belt
will lock into position.
ConditionsWarning Pattern
Seat BeltVehicle
SpeedLight-Blink
Unbuckled6 seconds
Unbuckled10 km/h
(Above 6mph)Continuously
Buckled6 seconds
Buckled →
Unbuckled
10 km/h
(Above 6mph)Continuously *1
10 km/h
(Below 6mph)None
OKH033112N
r
KH CAN (ENG) 3:2015 3/26/2015 6:07 AM Page 22
Page 40 of 522
Seat and safety features of your vehicle
3
3-23
It will also lock if you try to lean for-
ward too quickly.
✽NOTICE
If you are unable to pull out the seat
belt from the retractor, firmly pull
the belt out and release it. Then you
will be able to pull the belt out
smoothly.
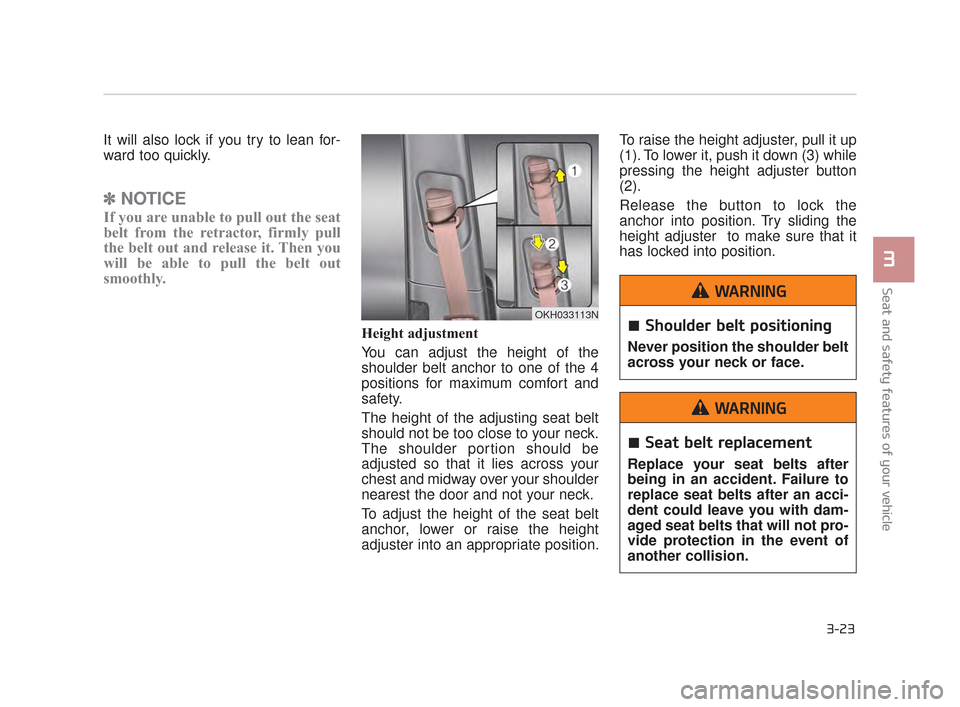
Height adjustment
You can adjust the height of the
shoulder belt anchor to one of the 4
positions for maximum comfort and
safety.
The height of the adjusting seat belt
should not be too close to your neck.
The shoulder portion should be
adjusted so that it lies across your
chest and midway over your shoulder
nearest the door and not your neck.
To adjust the height of the seat belt
anchor, lower or raise the height
adjuster into an appropriate position. To raise the height adjuster, pull it up
(1). To lower it, push it down (3) while
pressing the height adjuster button
(2).
Release the button to lock the
anchor into position. Try sliding the
height adjuster to make sure that it
has locked into position.
OKH033113NShoulder belt positioning
Never position the shoulder belt
across your neck or face.
WARNING
Seat belt replacement
Replace your seat belts after
being in an accident. Failure to
replace seat belts after an acci-
dent could leave you with dam-
aged seat belts that will not pro-
vide protection in the event of
another collision.
WARNING
KH CAN (ENG) 3:2015 3/26/2015 6:08 AM Page 23