KIA Rio 2005 2.G Owner's Manual
Manufacturer: KIA, Model Year: 2005, Model line: Rio, Model: KIA Rio 2005 2.GPages: 238, PDF Size: 2.6 MB
Page 161 of 238
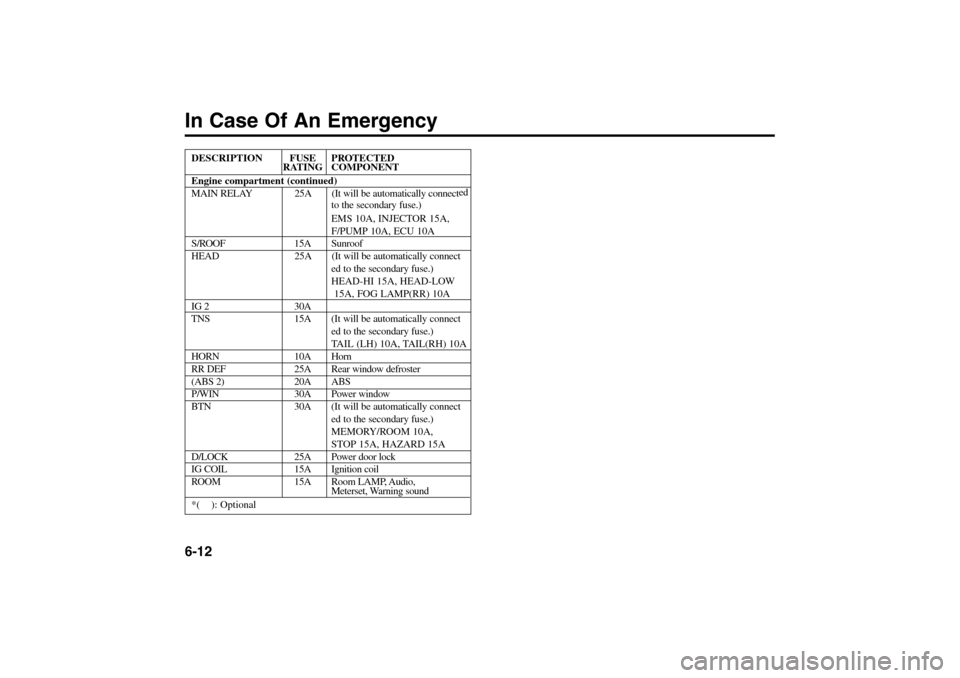
In Case Of An Emergency6-12DESCRIPTION FUSE PROTECTED
RATING COMPONENT
Engine compartment (continued)
MAIN RELAY 25A (It will be automatically connected
to the secondary fuse.)
EMS 10A, INJECTOR 15A,
F/PUMP 10A, ECU 10A
S/ROOF 15A Sunroof
HEAD 25A (It will be automatically connect
ed to the secondary fuse.)
HEAD-HI 15A, HEAD-LOW
15A, FOG LAMP(RR) 10A
IG 2 30A
TNS 15A (It will be automatically connect
ed to the secondary fuse.)
TAIL (LH) 10A, TAIL(RH) 10A
HORN 10A Horn
RR DEF 25A Rear window defroster
(ABS 2) 20A ABS
P/WIN 30A Power window
BTN 30A (It will be automatically connect
ed to the secondary fuse.)
MEMORY/ROOM 10A,
STOP 15A, HAZARD 15A
D/LOCK 25A Power door lock
IG COIL 15A Ignition coil
ROOM 15A Room LAMP, Audio,
Meterset, Warning sound
*( ): Optional
RIO ENG CNA 6.qxd 7/29/05 5:15 PM Page 12
Page 162 of 238
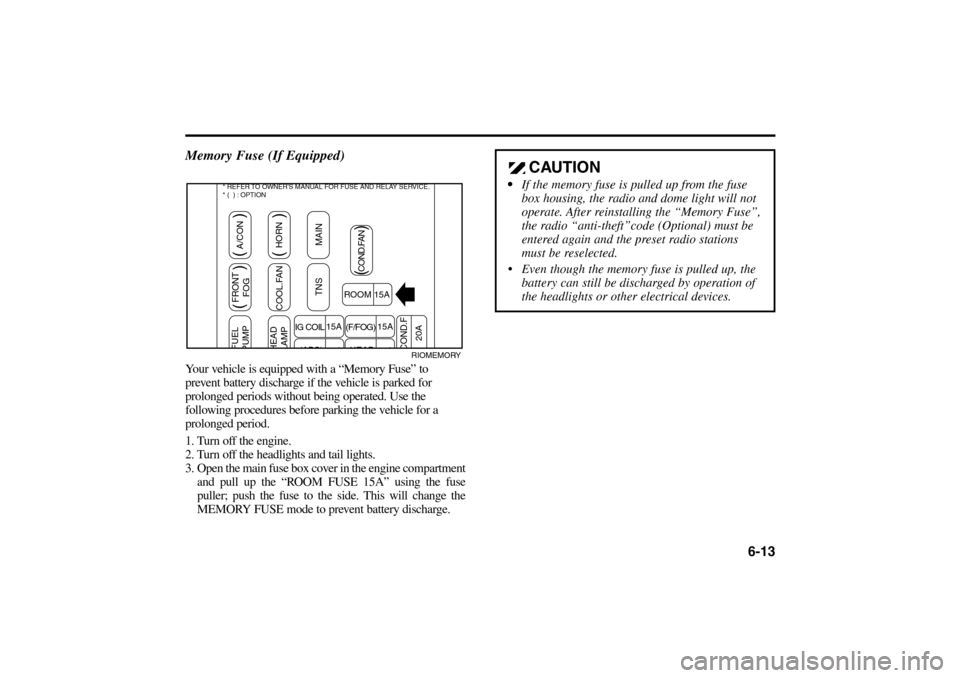
6-13 Memory Fuse (If Equipped)
Your vehicle is equipped with a “Memory Fuse” to
prevent battery discharge if the vehicle is parked for
prolonged periods without being operated. Use the
following procedures before parking the vehicle for a
prolonged period.
1. Turn off the engine.
2. Turn off the headlights and tail lights.
3. Open the main fuse box cover in the engine compartment
and pull up the “ROOM FUSE 15A” using the fuse
puller; push the fuse to the side. This will change the
MEMORY FUSE mode to prevent battery discharge.
FUEL
PUMPFRONT
FOGA/CON
HEAD
LAMPCOOL.FANHORN
TNS MAIN
COND.F( ) ( )
( )
( )
COND.FAN
ROOM 15A
IG COIL
(ABS)(F/FOG)
HEAD 15A
15A15A
25A
20A
* REFER TO OWNER'S MANUAL FOR FUSE AND RELAY SERVICE.
* ( ) : OPTION
RIOMEMORY
CAUTION
•If the memory fuse is pulled up from the fuse
box housing, the radio and dome light will not
operate. After reinstalling the “Memory Fuse”,
the radio “anti-theft”code (Optional) must be
entered again and the preset radio stations
must be reselected.
Even though the memory fuse is pulled up, the
battery can still be discharged by operation of
the headlights or other electrical devices.
RIO ENG CNA 6.qxd 7/29/05 5:15 PM Page 13
Page 163 of 238
In Case Of An Emergency6-14TowingIf emergency towing is necessary, we recommend
having it done by an Authorized Kia Dealer or a
competent tow-truck service. Proper lifting and towing
procedures are necessary to prevent damage to the
vehicle. Provincial and local laws applicable to towing
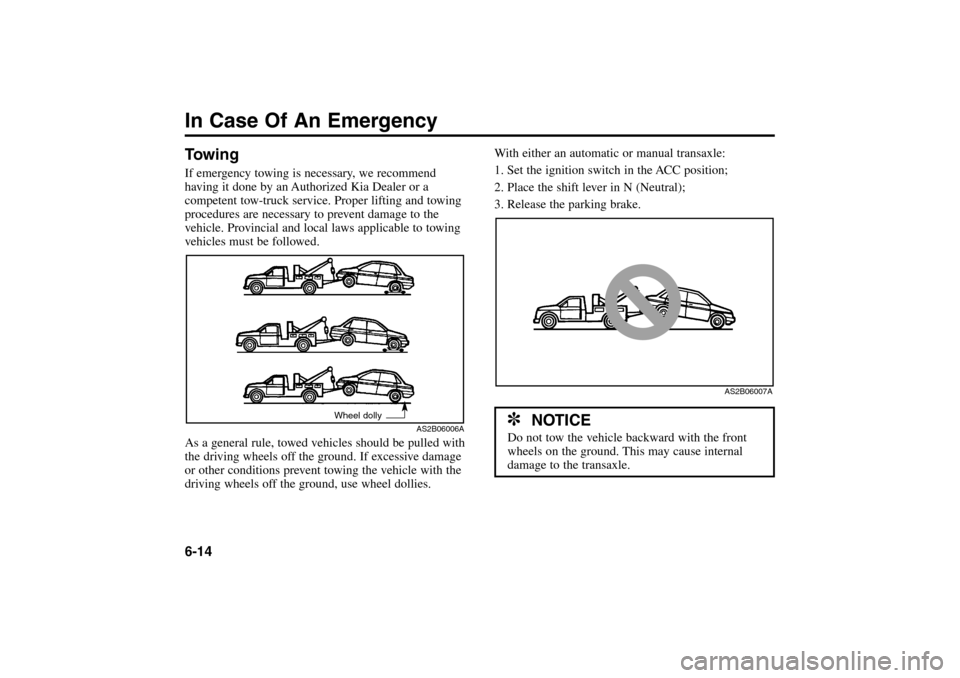
vehicles must be followed.
As a general rule, towed vehicles should be pulled with
the driving wheels off the ground. If excessive damage
or other conditions prevent towing the vehicle with the
driving wheels off the ground, use wheel dollies.
With either an automatic or manual transaxle:
1. Set the ignition switch in the ACC position;
2. Place the shift lever in N (Neutral);
3. Release the parking brake.
✽
NOTICE
Do not tow the vehicle backward with the front
wheels on the ground. This may cause internal
damage to the transaxle.
AS2B06006AAS2B06007A
Wheel dolly
RIO ENG CNA 6.qxd 7/29/05 5:15 PM Page 14
Page 164 of 238
6-15
✽
NOTICE
Do not tow with sling-type equipment. Use wheel
lift or flatbed equipment.
CAUTION
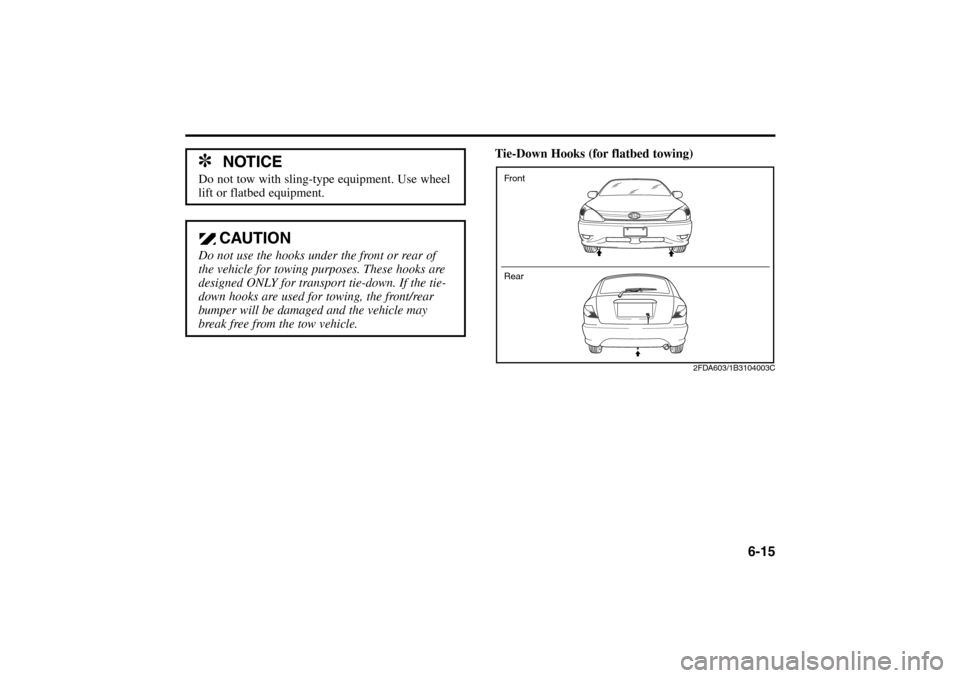
Do not use the hooks under the front or rear of
the vehicle for towing purposes. These hooks are
designed ONLY for transport tie-down. If the tie-
down hooks are used for towing, the front/rear
bumper will be damaged and the vehicle may
break free from the tow vehicle.
Tie-Down Hooks (for flatbed towing)
2FDA603/1B3104003C
Front
Rear
RIO ENG CNA 6.qxd 7/29/05 5:15 PM Page 15
Page 165 of 238
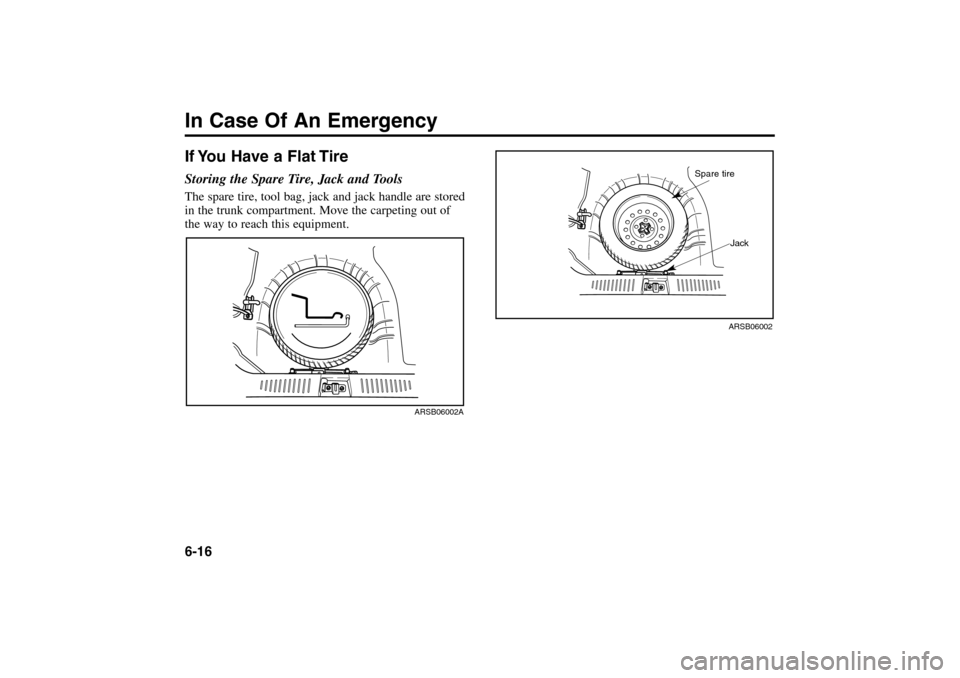
In Case Of An Emergency6-16If You Have a Flat TireStoring the Spare Tire, Jack and ToolsThe spare tire, tool bag, jack and jack handle are stored
in the trunk compartment. Move the carpeting out of
the way to reach this equipment.
ARSB06002A
ARSB06002
Spare tire
Jack
RIO ENG CNA 6.qxd 7/29/05 5:15 PM Page 16
Page 166 of 238
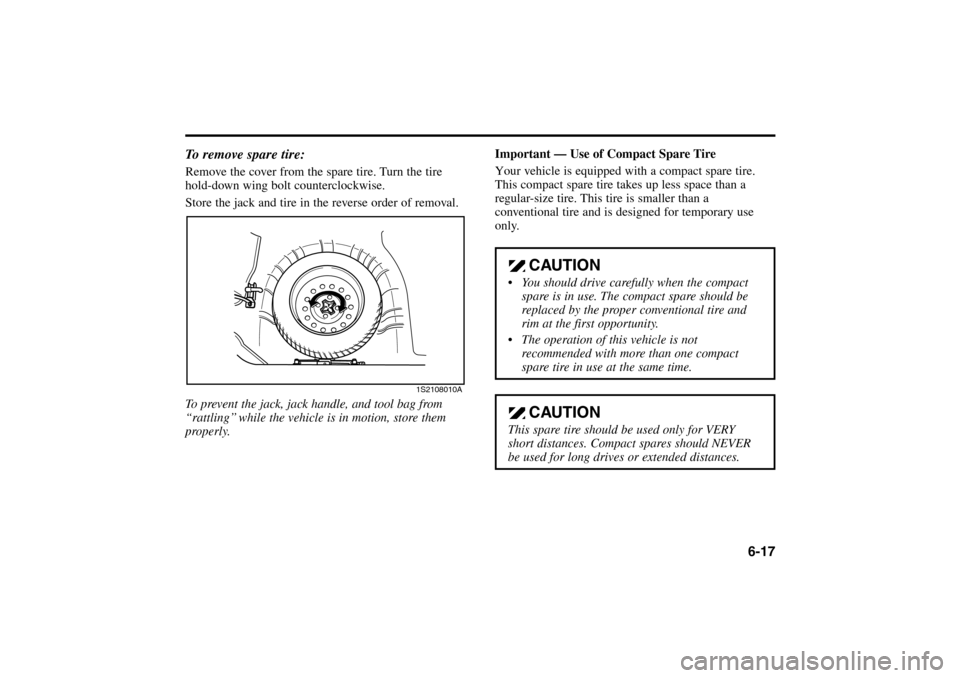
6-17 To remove spare tire:
Remove the cover from the spare tire. Turn the tire
hold-down wing bolt counterclockwise.
Store the jack and tire in the reverse order of removal.
To prevent the jack, jack handle, and tool bag from
“rattling’’ while the vehicle is in motion, store them
properly.
Important — Use of Compact Spare Tire
Your vehicle is equipped with a compact spare tire.
This compact spare tire takes up less space than a
regular-size tire. This tire is smaller than a
conventional tire and is designed for temporary use
only.
CAUTION
You should drive carefully when the compact
spare is in use. The compact spare should be
replaced by the proper conventional tire and
rim at the first opportunity.
The operation of this vehicle is not
recommended with more than one compact
spare tire in use at the same time.
CAUTION
This spare tire should be used only for VERY
short distances. Compact spares should NEVER
be used for long drives or extended distances.
1S2108010A
RIO ENG CNA 6.qxd 7/29/05 5:15 PM Page 17
Page 167 of 238
In Case Of An Emergency6-18The compact spare should be inflated to 60 psi
(415 kPa).
When using a compact spare tire, observe the
following precautions:
Under no circumstances should you exceed 80 km/h
(50 mph); a higher speed could damage the tire.
Ensure that you drive slowly enough for the road
conditions to avoid all hazards. Any road hazard,
such as a pothole or debris, could seriously damage
the compact spare.
Any continuous road use of this tire could result in
tire failure, loss of vehicle control, and possible
personal injury.
Do not exceed the vehicle’s maximum load rating or
the load-carrying capacity shown on the sidewall of
the compact spare tire. Avoid driving over obstacles. The compact spare tire
diameter is smaller than the diameter of a
conventional tire and reduces the ground clearance
approximately 25 mm (1 in.), which could result in
damage to the vehicle.
Do not take this vehicle through an automatic car
wash.
Do not use tire chains on this tire. Because of the
smaller size, a tire chain will not fit properly. This
could damage the vehicle and result in loss of the
chain.
This tire should not be installed on the front axle if
the vehicle must be driven in snow or on ice.
Do not use the compact spare tire on any other
vehicle because this tire has been designed
especially for your vehicle.
The compact spare’s tread life is shorter than a
regular tire. Inspect your compact spare tire
regularly and replace worn compact spare tires with
the same size and design, mounted on the same
wheel.
✽
NOTICE
Check the inflation pressure after installing the
spare tire. Adjust it to the specified pressure, as
necessary.
RIO ENG CNA 6.qxd 7/29/05 5:15 PM Page 18
Page 168 of 238
6-19 Changing Tires
Jacking Instructions
The jack is provided for emergency tire changing only.
Follow jacking instructions to reduce the possibility of
personal injury.Tire Replacement
1. Park on a level surface and set the parking brake
firmly.
2. Set the automatic transaxle in P (Park), or shift the
manual transaxle into R (Reverse).
3. Activate the hazard warning flasher.
4. Remove the wheel lug nut wrench, jack, jack
handle, and spare tire from the vehicle.
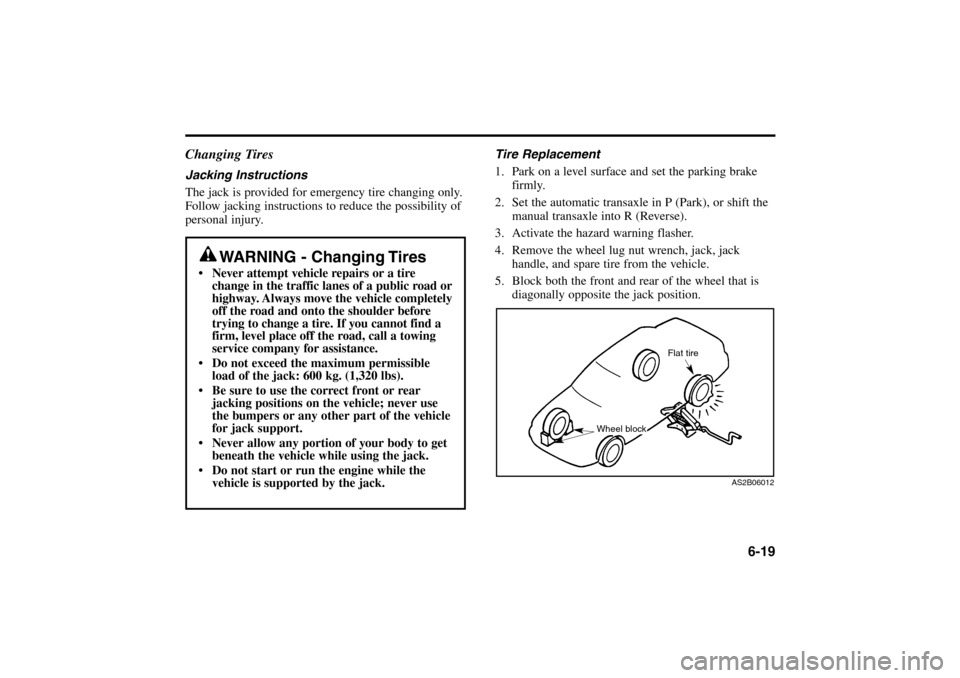
5. Block both the front and rear of the wheel that is
diagonally opposite the jack position.
WARNING - Changing Tires
Never attempt vehicle repairs or a tire
change in the traffic lanes of a public road or
highway. Always move the vehicle completely
off the road and onto the shoulder before
trying to change a tire. If you cannot find a
firm, level place off the road, call a towing
service company for assistance.
Do not exceed the maximum permissible
load of the jack: 600 kg. (1,320 lbs).
Be sure to use the correct front or rear
jacking positions on the vehicle; never use
the bumpers or any other part of the vehicle
for jack support.
Never allow any portion of your body to get
beneath the vehicle while using the jack.
Do not start or run the engine while the
vehicle is supported by the jack.
AS2B06012
Flat tire
Wheel block
RIO ENG CNA 6.qxd 7/29/05 5:15 PM Page 19
Page 169 of 238
In Case Of An Emergency6-206. For models with alloy wheels, remove the center
cap.
WARNING - Changing a Front
Tire
When one front wheel is lifted off the ground,
neither the automatic transaxle P (Park)
position nor the manual transaxle R (Reverse)
position will prevent the vehicle from moving
and possibly slipping off the jack, even if these
positions are properly engaged. To prevent
vehicle movements while changing a tire,
always set the parking brake fully, and always
block the wheel diagonally opposite the wheel
being changed.
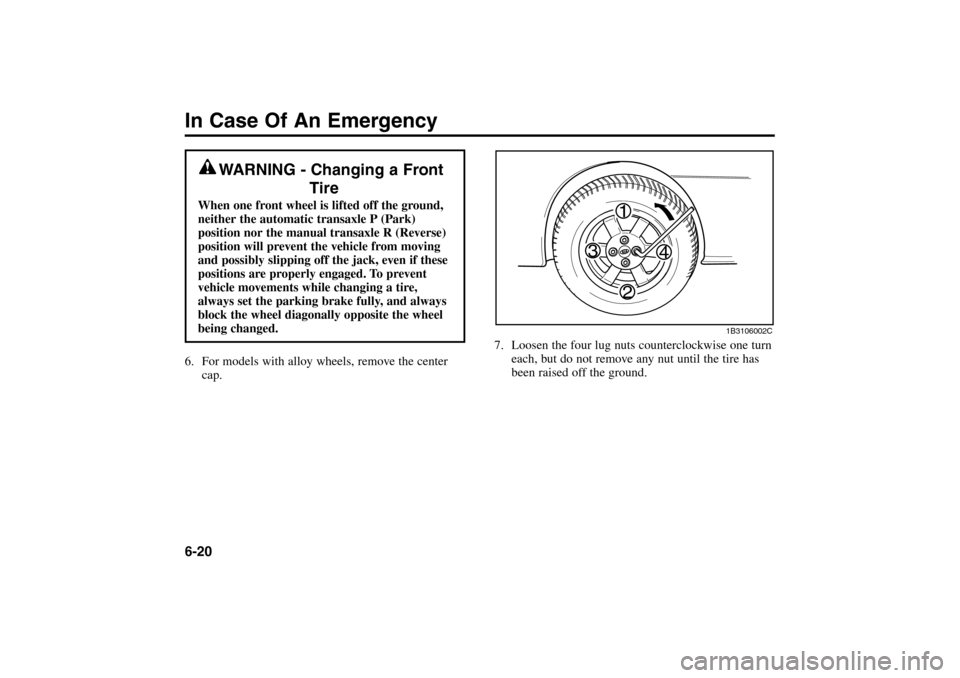
7. Loosen the four lug nuts counterclockwise one turn
each, but do not remove any nut until the tire has
been raised off the ground.
3
2
4
1
1B3106002C
RIO ENG CNA 6.qxd 7/29/05 5:15 PM Page 20
Page 170 of 238
6-21
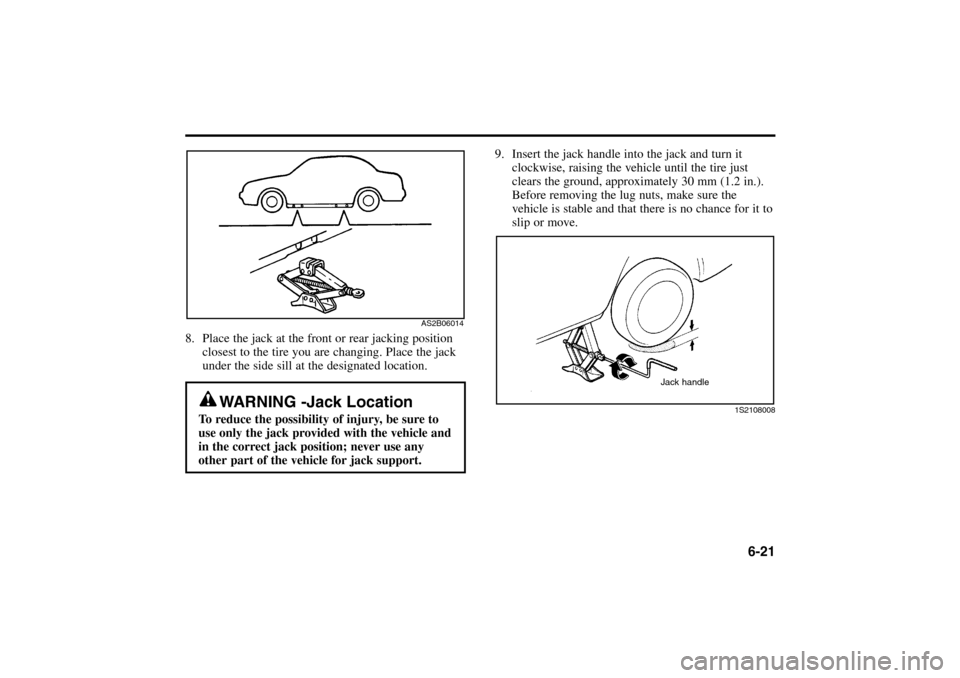
8. Place the jack at the front or rear jacking position
closest to the tire you are changing. Place the jack
under the side sill at the designated location.
9. Insert the jack handle into the jack and turn it
clockwise, raising the vehicle until the tire just
clears the ground, approximately 30 mm (1.2 in.).
Before removing the lug nuts, make sure the
vehicle is stable and that there is no chance for it to
slip or move.
WARNING -Jack Location
To reduce the possibility of injury, be sure to
use only the jack provided with the vehicle and
in the correct jack position; never use any
other part of the vehicle for jack support.
1S2108008 AS2B06014
Jack handle
RIO ENG CNA 6.qxd 7/29/05 5:15 PM Page 21