Sound system KIA SPORTAGE 2020 Owners Manual
[x] Cancel search | Manufacturer: KIA, Model Year: 2020, Model line: SPORTAGE, Model: KIA SPORTAGE 2020Pages: 624, PDF Size: 15.41 MB
Page 40 of 624
Safety features of your vehicle
22
3
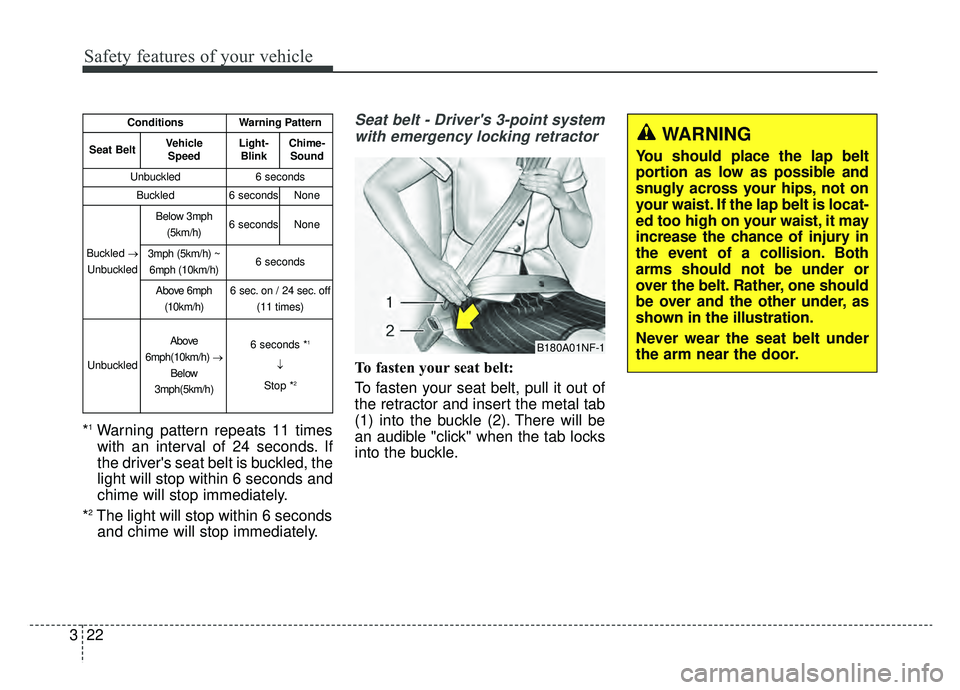
*1Warning pattern repeats 11 times
with an interval of 24 seconds. If
the driver's seat belt is buckled, the
light will stop within 6 seconds and
chime will stop immediately.
*
2The light will stop within 6 seconds and chime will stop immediately.
Seat belt - Driver's 3-point system
with emergency locking retractor
To fasten your seat belt:
To fasten your seat belt, pull it out of
the retractor and insert the metal tab
(1) into the buckle (2). There will be
an audible "click" when the tab locks
into the buckle.
ConditionsWarning Pattern
Seat BeltVehicle
SpeedLight-BlinkChime-Sound
Unbuckled6 seconds
Buckled6 secondsNone
Buckled →
Unbuckled
Below 3mph (5km/h)6 secondsNone
3mph (5km/h) ~6mph (10km/h)6 seconds
Above 6mph (10km/h)6 sec. on / 24 sec. off (11 times)
Unbuckled
Above
6mph(10km/h) →
Below
3mph(5km/h)6 seconds *1
↓
Stop *
2
B180A01NF-1
WARNING
You should place the lap belt
portion as low as possible and
snugly across your hips, not on
your waist. If the lap belt is locat-
ed too high on your waist, it may
increase the chance of injury in
the event of a collision. Both
arms should not be under or
over the belt. Rather, one should
be over and the other under, as
shown in the illustration.
Never wear the seat belt under
the arm near the door.
Page 61 of 624
343
Safety features of your vehicle
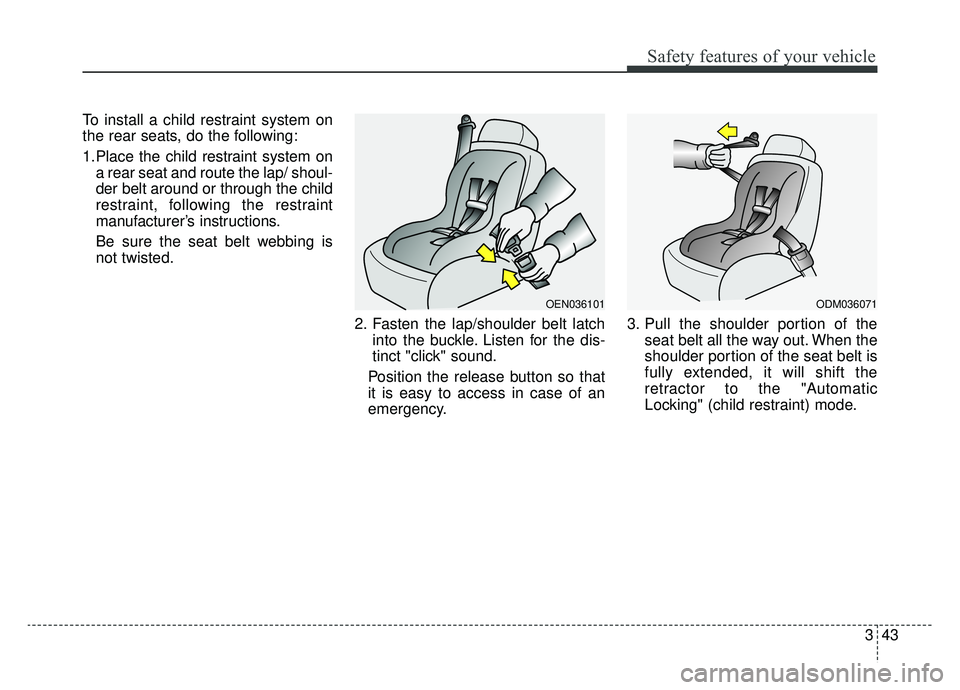
To install a child restraint system on
the rear seats, do the following:
1.Place the child restraint system ona rear seat and route the lap/ shoul-
der belt around or through the child
restraint, following the restraint
manufacturer’s instructions.
Be sure the seat belt webbing is
not twisted.
2. Fasten the lap/shoulder belt latchinto the buckle. Listen for the dis-
tinct "click" sound.
Position the release button so that
it is easy to access in case of an
emergency. 3. Pull the shoulder portion of the
seat belt all the way out. When the
shoulder portion of the seat belt is
fully extended, it will shift the
retractor to the "Automatic
Locking" (child restraint) mode.
OEN036101ODM036071
Page 62 of 624
Safety features of your vehicle
44
3
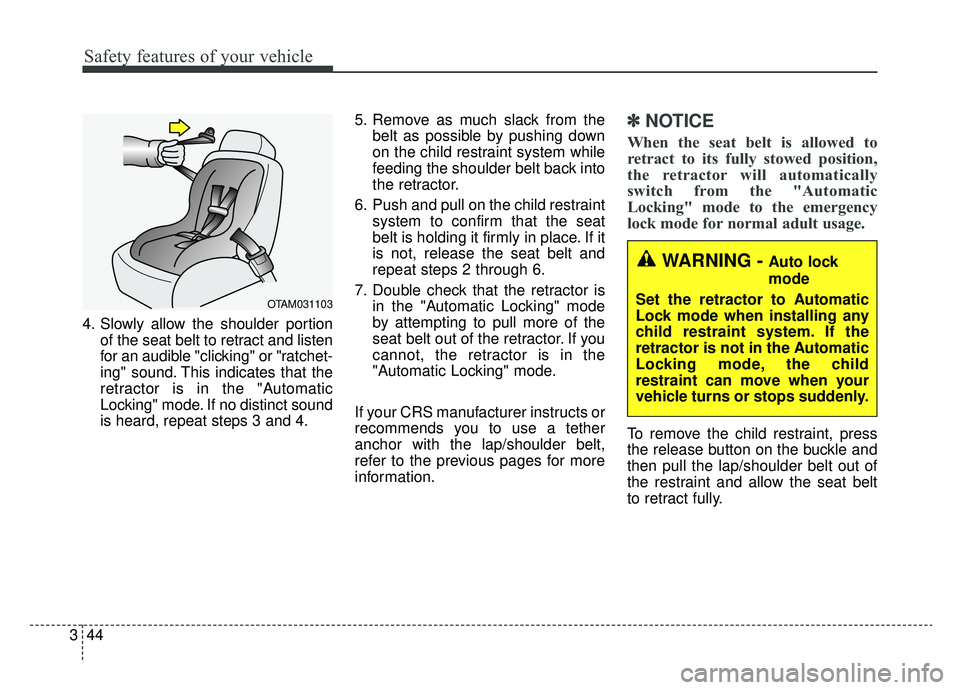
4. Slowly allow the shoulder portion
of the seat belt to retract and listen
for an audible "clicking" or "ratchet-
ing" sound. This indicates that the
retractor is in the "Automatic
Locking" mode. If no distinct sound
is heard, repeat steps 3 and 4. 5. Remove as much slack from the
belt as possible by pushing down
on the child restraint system while
feeding the shoulder belt back into
the retractor.
6. Push and pull on the child restraint system to confirm that the seat
belt is holding it firmly in place. If it
is not, release the seat belt and
repeat steps 2 through 6.
7. Double check that the retractor is in the "Automatic Locking" mode
by attempting to pull more of the
seat belt out of the retractor. If you
cannot, the retractor is in the
"Automatic Locking" mode.
If your CRS manufacturer instructs or
recommends you to use a tether
anchor with the lap/shoulder belt,
refer to the previous pages for more
information.
✽ ✽ NOTICE
When the seat belt is allowed to
retract to its fully stowed position,
the retractor will automatically
switch from the "Automatic
Locking" mode to the emergency
lock mode for normal adult usage.
To remove the child restraint, press
the release button on the buckle and
then pull the lap/shoulder belt out of
the restraint and allow the seat belt
to retract fully.
OTAM031103
WARNING - Auto lock
mode
Set the retractor to Automatic
Lock mode when installing any
child restraint system. If the
retractor is not in the Automatic
Locking mode, the child
restraint can move when your
vehicle turns or stops suddenly.
Page 110 of 624
Features of your vehicle
20
4
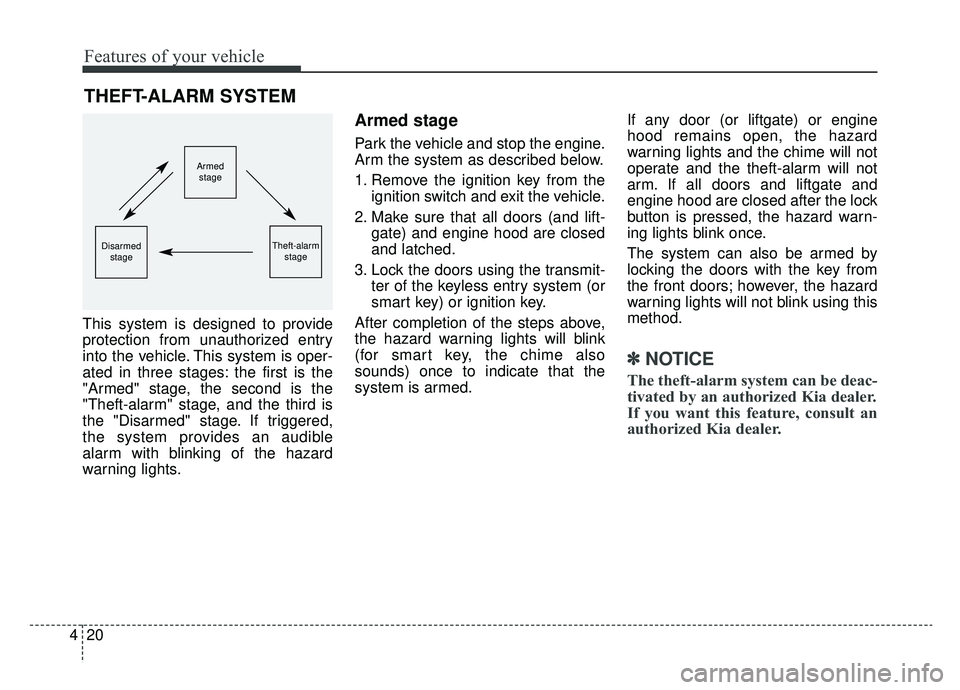
This system is designed to provide
protection from unauthorized entry
into the vehicle. This system is oper-
ated in three stages: the first is the
"Armed" stage, the second is the
"Theft-alarm" stage, and the third is
the "Disarmed" stage. If triggered,
the system provides an audible
alarm with blinking of the hazard
warning lights.
Armed stage
Park the vehicle and stop the engine.
Arm the system as described below.
1. Remove the ignition key from the
ignition switch and exit the vehicle.
2. Make sure that all doors (and lift- gate) and engine hood are closed
and latched.
3. Lock the doors using the transmit- ter of the keyless entry system (or
smart key) or ignition key.
After completion of the steps above,
the hazard warning lights will blink
(for smart key, the chime also
sounds) once to indicate that the
system is armed. If any door (or liftgate) or engine
hood remains open, the hazard
warning lights and the chime will not
operate and the theft-alarm will not
arm. If all doors and liftgate and
engine hood are closed after the lock
button is pressed, the hazard warn-
ing lights blink once.
The system can also be armed by
locking the doors with the key from
the front doors; however, the hazard
warning lights will not blink using this
method.
✽ ✽
NOTICE
The theft-alarm system can be deac-
tivated by an authorized Kia dealer.
If you want this feature, consult an
authorized Kia dealer.
THEFT-ALARM SYSTEM
Armed
stage
Theft-alarm stageDisarmedstage
Page 111 of 624
421
Features of your vehicle
Do not arm the system until all
passengers have left the vehicle. If
the system is armed while a pas-
senger(s) remains in the vehicle,
the alarm may be activated when
the remaining passenger(s) leave
the vehicle. If any door (or liftgate
) or engine hood is opened within
30 seconds after the system
enters the armed stage, the sys-
tem is disarmed to prevent an
unnecessary alarm.Theft-alarm stage
The alarm will be activated if any of
the following occurs while the system
is armed.
A front or rear door is opened with-out using the ignition key or trans-
mitter (or smart key).
The liftgate is opened without using the transmitter (or smart key).
The engine hood is opened.
The horn will sound and the hazard
warning lights will blink continuously
for approximately 27 seconds, and
repeat the horn 3 times unless the
system is disarmed. To turn off the
system, unlock the doors with the igni-
tion key or transmitter (or smart key).
Disarmed stage
The system will be disarmed when
The doors (and liftgate) are unlocked with the transmitter (or
smart key) or the ignition key.
After depressing the unlock button,
the hazard warning lights will blink
and the chime will sound twice (in
smart key) to indicate that the sys-
tem is disarmed.
After depressing the unlock button, if
any door (or liftgate) is not opened
within 30 seconds, the system will be
rearmed.
Page 124 of 624
Features of your vehicle
34
4
✽ ✽
NOTICE
• The power liftgate can be operated
when the engine is not running.
However the power liftgate opera-
tion consumes large amounts of
vehicle electric power. To prevent
the battery from being discharged,
do not operate it excessively.
• To prevent the battery from being discharged, do not leave the power
liftgate in the open position for a
long time.
• Do not modify or repair any part of the power liftgate by yourself.
This must be done by an author-
ized Kia dealer.
• When jacking up the vehicle to change a tire or repair the vehicle,
do not operate the power liftgate.
This could cause the power liftgate
to operate improperly. (Continued)(Continued)
• In cold and wet climates, the
power liftgate may not work prop-
erly due to freezing conditions.
• It is recommended to wait until the power liftgate is fully closed
before starting the vehicle. The
power liftgate may not close fully
if the vehicle is started during
automatic closing.
CAUTION
Do not operate the power lift-
gate more than 5 times continu-ously.
It may damage the power liftgatesystem. If you operate the powerliftgate more than 5 times con-tinuously, the chime will sound 3times and the power liftgate willnot operate. At this time, stopoperating the liftgate and leave itfor more than 1 minute.
WARNING
Make sure there are no people
or objects around the liftgate
before opening or closing the
power liftgate. Wait until the lift-
gate is open fully and stopped
before loading or unloading
cargo from the vehicle.
Page 126 of 624
Features of your vehicle
36
4
How to reset the power liftgate
If the battery has been discharged or
disconnected, or if the related fuse has
been replaced or disconnected, for the
power liftgate to operate normally,
reset the power liftgate as follows:
1. Put the automatic shift lever in P
(Park).
2. While pressing the liftgate close button, press the liftgate handle
switch for more than 3 seconds.
(the chime will sound)
3. Close the liftgate manually.
If the power liftgate does not work
properly after the above procedure,
have the system checked by an
authorized Kia dealer.
✽ ✽ NOTICE
If the power liftgate does not operate
normally, first check the following
condition before using the power
liftgate.
Make sure the automatic shift lever
is in P (Park).
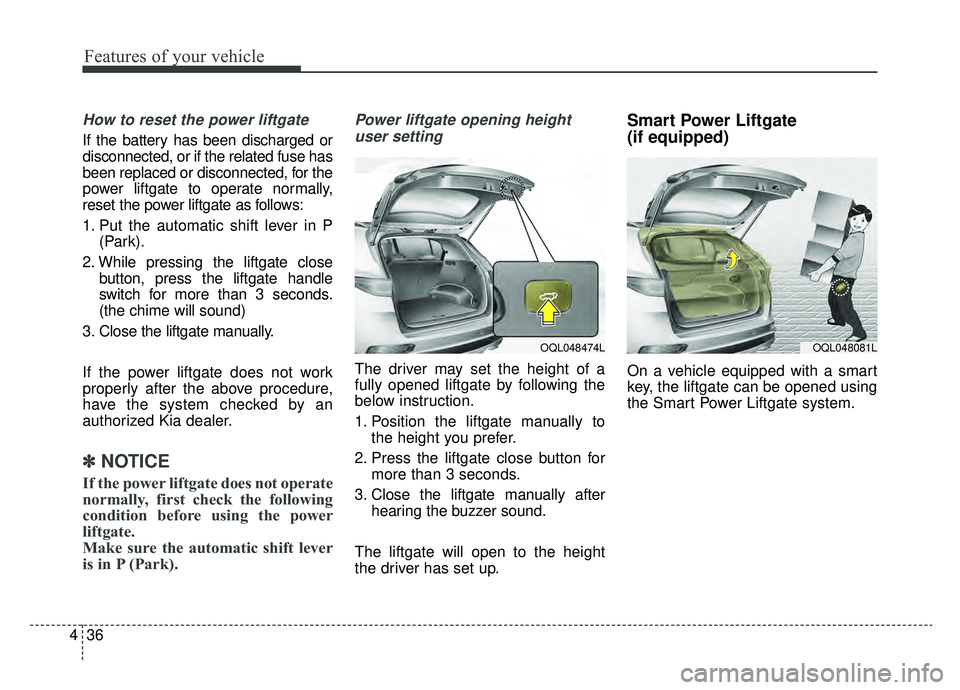
Power liftgate opening height
user setting
The driver may set the height of a
fully opened liftgate by following the
below instruction.
1. Position the liftgate manually to the height you prefer.
2. Press the liftgate close button for more than 3 seconds.
3. Close the liftgate manually after hearing the buzzer sound.
The liftgate will open to the height
the driver has set up.
Smart Power Liftgate
(if equipped)
On a vehicle equipped with a smart
key, the liftgate can be opened using
the Smart Power Liftgate system.
OQL048474LOQL048081L
Page 139 of 624
449
Features of your vehicle
Closing the fuel filler lid
1. To install the cap, turn it clockwiseuntil it “clicks” once. This indicates
that the cap is securely tightened.
2. Close the fuel filler lid and push it in lightly making sure that it is
securely closed.
✽ ✽NOTICE
There may be an intermittent noise
near the refueling hole while the
engine is idling if the fuel cap is not
closed securely. This occurs normal-
ly with the OBD system.
✽ ✽NOTICE
When refueling on unlevel ground,
the fuel gauge may not point to the F
position.
It is not a malfunction. If you move
your vehicle to a level ground, the fuel
gauge will move to the full position.
Always check that the fuel cap is
installed securely to prevent fuel
spillage in the event of an accident.
✽ ✽NOTICE
Tighten the cap until it clicks once,
otherwise the fuel cap open warning
indicator light will illuminate.
WARNING- Fire/explo-
sion risk
Read and follow all warnings
posted at the gas station facili-
ty. Failure to follow all warnings
may result in severe personal
injury, severe burns or death
due to fire or explosion.WARNING- Refueling
Always remove the fuel cap
carefully and slowly. If the cap
is venting fuel or if you hear a
hissing sound, wait until the
condition stops before com-
pletely removing the cap. If
pressurized fuel sprays out, it
can cover your clothes or skin
and subject you to the risk of
fire and burns.
Page 151 of 624
461
Features of your vehicle
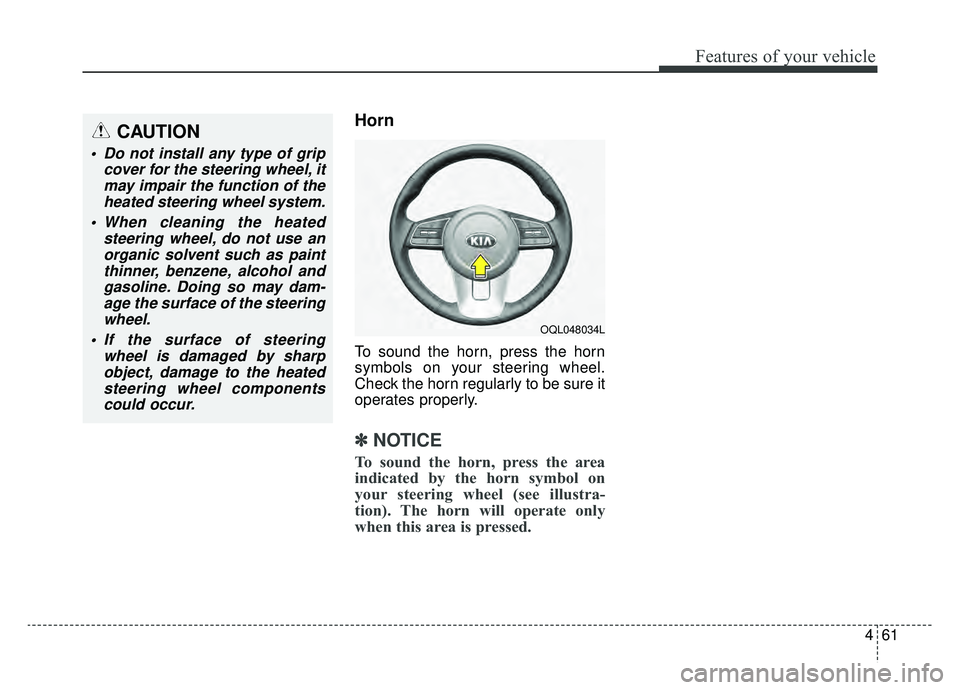
Horn
To sound the horn, press the horn
symbols on your steering wheel.
Check the horn regularly to be sure it
operates properly.
✽ ✽NOTICE
To sound the horn, press the area
indicated by the horn symbol on
your steering wheel (see illustra-
tion). The horn will operate only
when this area is pressed.
CAUTION
Do not install any type of grip
cover for the steering wheel, itmay impair the function of theheated steering wheel system.
When cleaning the heated steering wheel, do not use anorganic solvent such as paintthinner, benzene, alcohol andgasoline. Doing so may dam-age the surface of the steeringwheel.
If the surface of steering wheel is damaged by sharpobject, damage to the heatedsteering wheel componentscould occur.
OQL048034L
Page 180 of 624
Features of your vehicle
90
4
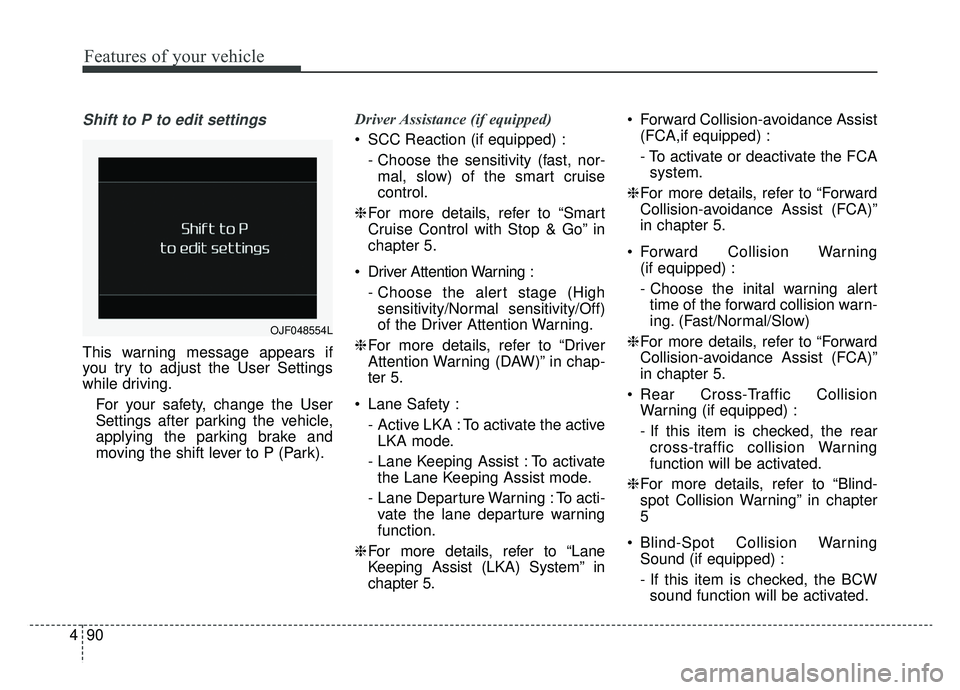
Shift to P to edit settings
This warning message appears if
you try to adjust the User Settings
while driving.
For your safety, change the User
Settings after parking the vehicle,
applying the parking brake and
moving the shift lever to P (Park). Driver Assistance (if equipped)
SCC Reaction (if equipped) :
- Choose the sensitivity (fast, nor-mal, slow) of the smart cruise
control.
❈ For more details, refer to “Smart
Cruise Control with Stop & Go” in
chapter 5.
Driver Attention Warning : - Choose the alert stage (Highsensitivity/Normal sensitivity/Off)
of the Driver Attention Warning.
❈ For more details, refer to “Driver
Attention Warning (DAW)” in chap-
ter 5.
Lane Safety : - Active LKA : To activate the activeLKA mode.
- Lane Keeping Assist : To activate the Lane Keeping Assist mode.
- Lane Departure Warning : To acti- vate the lane departure warning
function.
❈ For more details, refer to “Lane
Keeping Assist (LKA) System” in
chapter 5. Forward Collision-avoidance Assist
(FCA,if equipped) :
- To activate or deactivate the FCAsystem.
❈ For more details, refer to “Forward
Collision-avoidance Assist (FCA)”
in chapter 5.
Forward Collision Warning (if equipped) :
- Choose the inital warning alerttime of the forward collision warn-
ing. (Fast/Normal/Slow)
❈ For more details, refer to “Forward
Collision-avoidance Assist (FCA)”
in chapter 5.
Rear Cross-Traffic Collision Warning (if equipped) :
- If this item is checked, the rearcross-traffic collision Warning
function will be activated.
❈ For more details, refer to “Blind-
spot Collision Warning” in chapter
5
Blind-Spot Collision Warning Sound (if equipped) :
- If this item is checked, the BCWsound function will be activated.
OJF048554L