tyre pressure Lancia Delta 2010 Owner handbook (in English)
[x] Cancel search | Manufacturer: LANCIA, Model Year: 2010, Model line: Delta, Model: Lancia Delta 2010Pages: 276, PDF Size: 5.31 MB
Page 179 of 276
178IN AN EMERGENCY
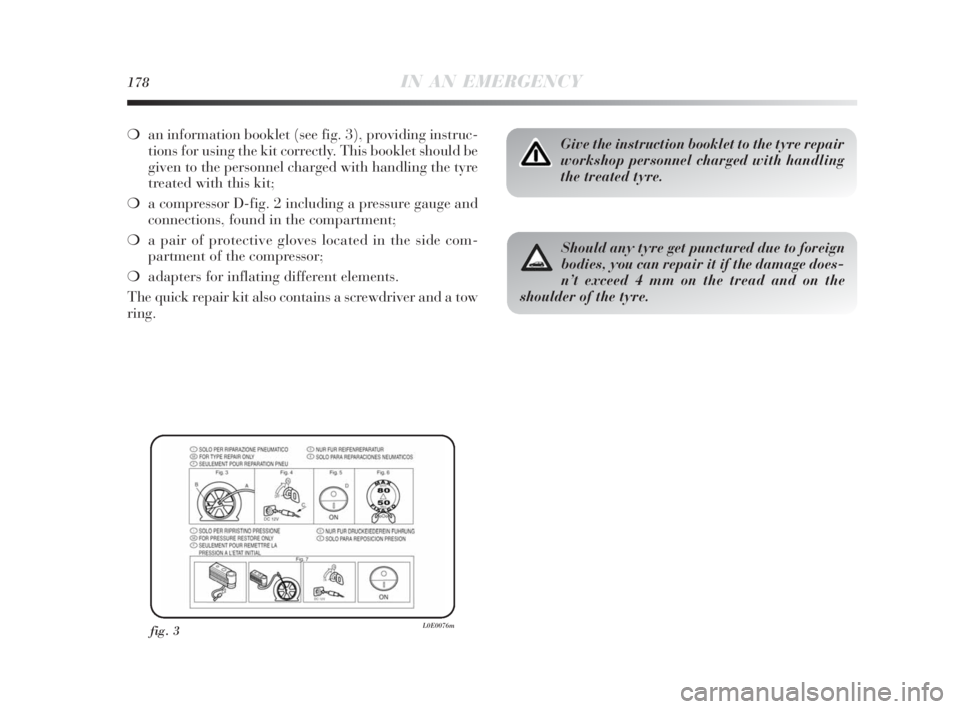
❍an information booklet (see fig. 3), providing instruc-
tions for using the kit correctly. This booklet should be
given to the personnel charged with handling the tyre
treated with this kit;
❍a compressor D-fig. 2 including a pressure gauge and
connections, found in the compartment;
❍a pair of protective gloves located in the side com-
partment of the compressor;
❍adapters for inflating different elements.
The quick repair kit also contains a screwdriver and a tow
ring.
Should any tyre get punctured due to foreign
bodies, you can repair it if the damage does-
n’t exceed 4 mm on the tread and on the
shoulder of the tyre.
Give the instruction booklet to the tyre repair
workshop personnel charged with handling
the treated tyre.
fig. 3L0E0076m
175-214 Delta 4ed gb 24-02-2010 14:36 Pagina 178
Page 182 of 276
IN AN EMERGENCY181
4
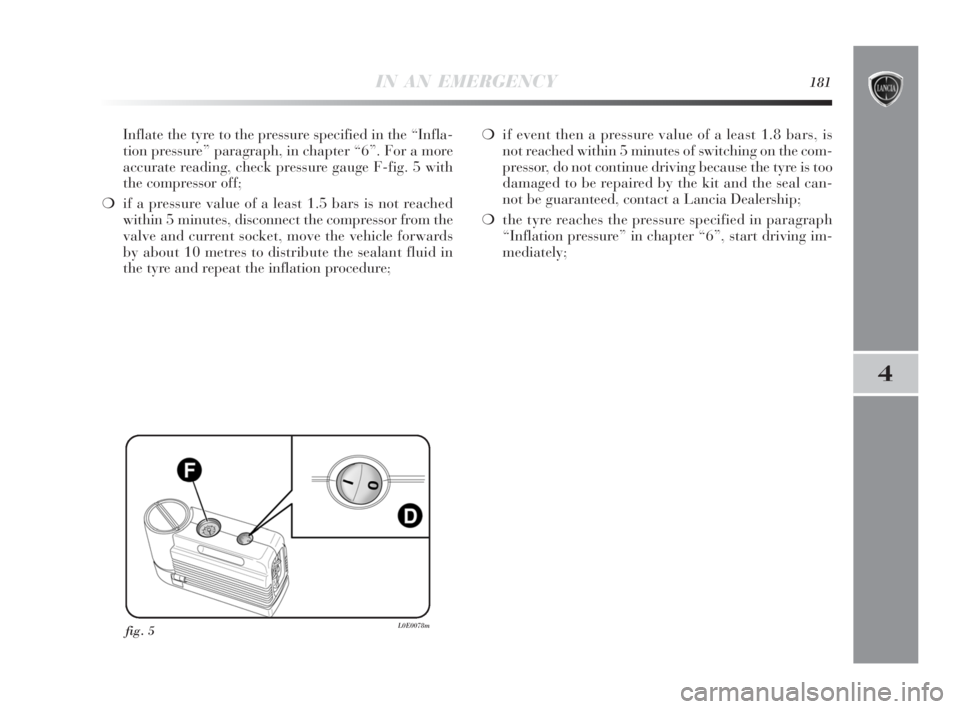
Inflate the tyre to the pressure specified in the “Infla-
tion pressure” paragraph, in chapter “6”. For a more
accurate reading, check pressure gauge F-fig. 5 with
the compressor off;
❍if a pressure value of a least 1.5 bars is not reached
within 5 minutes, disconnect the compressor from the
valve and current socket, move the vehicle forwards
by about 10 metres to distribute the sealant fluid in
the tyre and repeat the inflation procedure;❍if event then a pressure value of a least 1.8 bars, is
not reached within 5 minutes of switching on the com-
pressor, do not continue driving because the tyre is too
damaged to be repaired by the kit and the seal can-
not be guaranteed, contact a Lancia Dealership;
❍the tyre reaches the pressure specified in paragraph
“Inflation pressure” in chapter “6”, start driving im-
mediately;
fig. 5L0E0078m
175-214 Delta 4ed gb 24-02-2010 14:36 Pagina 181
Page 183 of 276
182IN AN EMERGENCY
❍after driving for about 10 minutes, stop and check the
tyre pressure again; remember to engage the hand-
brake;❍if, on the other hand, a pressure of at least 1.8 bar pres-
sure is read, restore the correct pressure (with engine
running and handbrake on) and continue driving;
❍drive with the utmost care to the nearest Lancia Deal-
ership.
Apply the adhesive label in a position clear-
ly visible by the driver as a reminder that the
tyre has been treated with the quick repair
kit. Drive carefully, particularly on bends. Do not
exceed 80 km/h. Do not accelerate and brake sud-
denly.
Stop if the pressure has dropped to less than
1.8 bars: The automatic Fix & Go fast repair
kit cannot work properly because the tyre is
excessively damaged. Contact a Lancia Dealership.
Remember to inform the workshop that the
tyre has been treated with a quick repair kit.
Give the instruction booklet to the tyre repair
workshop personnel.
175-214 Delta 4ed gb 24-02-2010 14:36 Pagina 182
Page 184 of 276
IN AN EMERGENCY183
4
FOR CHECKING AND RESTORING
PRESSURE ONLY
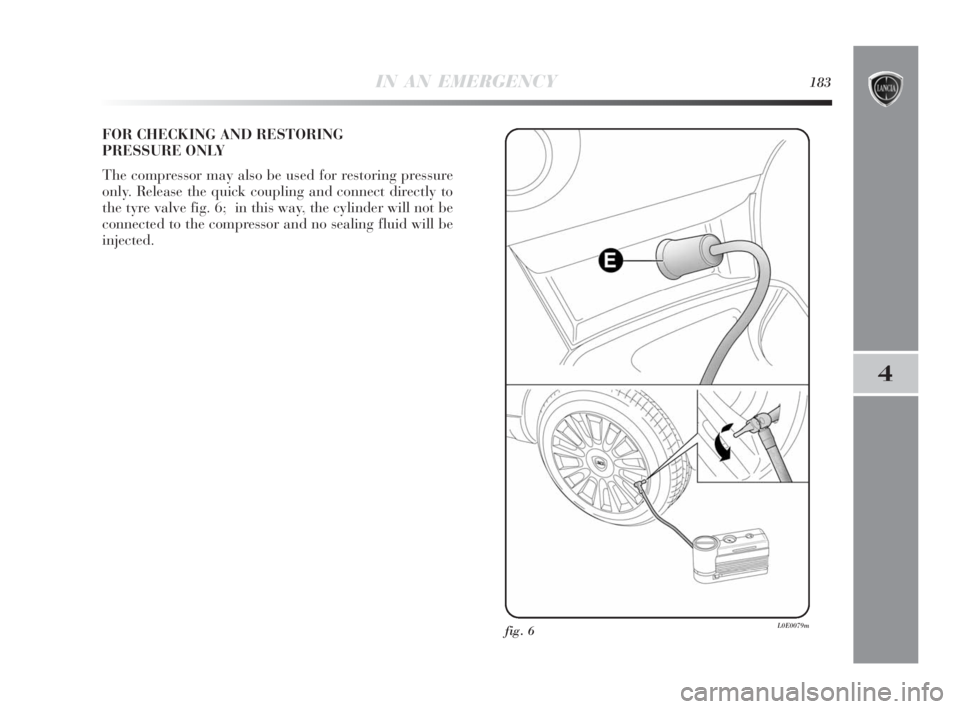
The compressor may also be used for restoring pressure
only. Release the quick coupling and connect directly to
the tyre valve fig. 6; in this way, the cylinder will not be
connected to the compressor and no sealing fluid will be
injected.
fig. 6L0E0079m
175-214 Delta 4ed gb 24-02-2010 14:36 Pagina 183
Page 187 of 276
186IN AN EMERGENCY
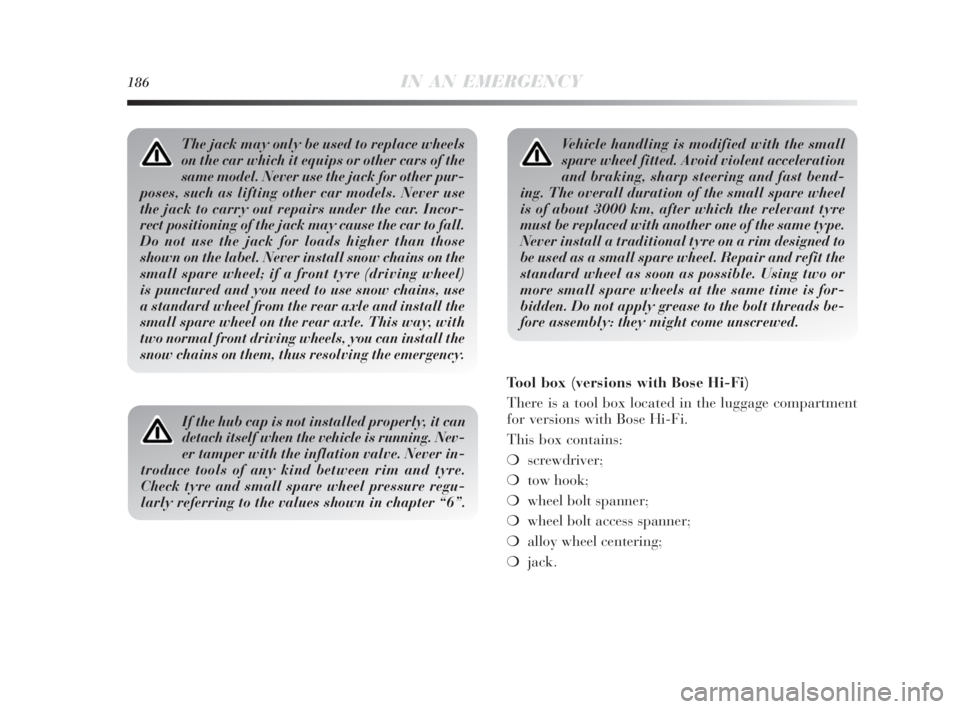
Vehicle handling is modified with the small
spare wheel fitted. Avoid violent acceleration
and braking, sharp steering and fast bend-
ing. The overall duration of the small spare wheel
is of about 3000 km, after which the relevant tyre
must be replaced with another one of the same type.
Never install a traditional tyre on a rim designed to
be used as a small spare wheel. Repair and refit the
standard wheel as soon as possible. Using two or
more small spare wheels at the same time is for-
bidden. Do not apply grease to the bolt threads be-
fore assembly: they might come unscrewed.The jack may only be used to replace wheels
on the car which it equips or other cars of the
same model. Never use the jack for other pur-
poses, such as lifting other car models. Never use
the jack to carry out repairs under the car. Incor-
rect positioning of the jack may cause the car to fall.
Do not use the jack for loads higher than those
shown on the label. Never install snow chains on the
small spare wheel; if a front tyre (driving wheel)
is punctured and you need to use snow chains, use
a standard wheel from the rear axle and install the
small spare wheel on the rear axle. This way, with
two normal front driving wheels, you can install the
snow chains on them, thus resolving the emergency.
If the hub cap is not installed properly, it can
detach itself when the vehicle is running. Nev-
er tamper with the inflation valve. Never in-
troduce tools of any kind between rim and tyre.
Check tyre and small spare wheel pressure regu-
larly referring to the values shown in chapter “6”.
Tool box (versions with Bose Hi-Fi)
There is a tool box located in the luggage compartment
for versions with Bose Hi-Fi.
This box contains:
❍screwdriver;
❍tow hook;
❍wheel bolt spanner;
❍wheel bolt access spanner;
❍alloy wheel centering;
❍jack.
175-214 Delta 4ed gb 24-02-2010 14:36 Pagina 186
Page 193 of 276
192IN AN EMERGENCY
After tyre replacement
❍stow the small spare wheel D-fig. 10 in the space pro-
vided in the luggage compartment;
❍fit the partially-opened jack in its box, forcing it light-
ly to prevent it from vibrating when travelling;
❍put the tools back into place in the container;
❍stow the container, complete with tools, into the spare
wheel and tighten the locking device B-fig. 10;
❍put back the luggage compartment mat into the prop-
er position.
IMPORTANT Do not use an inner tube with tubeless tyres.
Periodically check the inflation pressure of the tyres and
small spare wheel.CHANGING A BULB
GENERAL INSTRUCTIONS
❍Before changing a bulb check the contacts for oxida-
tion;
❍blown bulbs must be replaced with others of the same
type and power;
❍after replacing a headlight bulb, always check its align-
ment for safety reasons;
❍when a bulb is not working, check that the corre-
sponding fuse is intact before replacing it: refer to the
“Replacing fuses” paragraph in this chapter for fuse
location.
Modifications or repairs to the electrical sys-
tem that are not carried out properly or do
not take the system’s technical specifications
into account can cause malfunctions leading to the
risk of fire. If you choose to install wheels of a different
type (with alloy rims instead of the steel ones
or vice versa) you must change all the re-
taining bolts with others of a suitable size and use
a specific small spare wheel, with different speci-
fications. It is advisable to keep the replaced bolts
and small spare wheel, as they are necessary if in
future you decide to reinstall the original wheels.
175-214 Delta 4ed gb 24-02-2010 14:36 Pagina 192
Page 210 of 276
IN AN EMERGENCY209
4
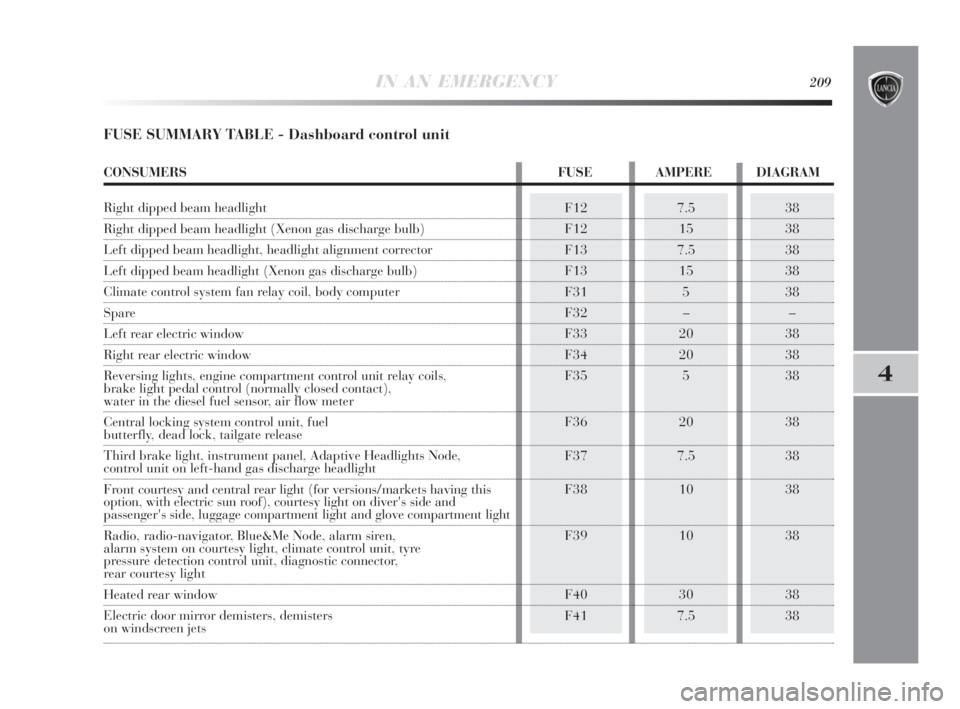
FUSE SUMMARY TABLE - Dashboard control unit
F12
F12
F13
F13
F31
F32
F33
F34
F35
F36
F37
F38
F39
F40
F417.5
15
7.5
15
5
–
20
20
5
20
7.5
10
10
30
7.538
38
38
38
38
–
38
38
38
38
38
38
38
38
38
CONSUMERS FUSE AMPERE DIAGRAM
Right dipped beam headlight
Right dipped beam headlight (Xenon gas discharge bulb)
Left dipped beam headlight, headlight alignment corrector
Left dipped beam headlight (Xenon gas discharge bulb)
Climate control system fan relay coil, body computer
Spare
Left rear electric window
Right rear electric window
Reversing lights, engine compartment control unit relay coils,
brake light pedal control (normally closed contact),
water in the diesel fuel sensor, air flow meter
Central locking system control unit, fuel
butterfly, dead lock, tailgate release
Third brake light, instrument panel, Adaptive Headlights Node,
control unit on left-hand gas discharge headlight
Front courtesy and central rear light (for versions/markets having this
option, with electric sun roof), courtesy light on diver's side and
passenger's side, luggage compartment light and glove compartment light
Radio, radio-navigator, Blue&Me Node, alarm siren,
alarm system on courtesy light, climate control unit, tyre
pressure detection control unit, diagnostic connector,
rear courtesy light
Heated rear window
Electric door mirror demisters, demisters
on windscreen jets
175-214 Delta 4ed gb 24-02-2010 14:36 Pagina 209
Page 211 of 276
210IN AN EMERGENCY
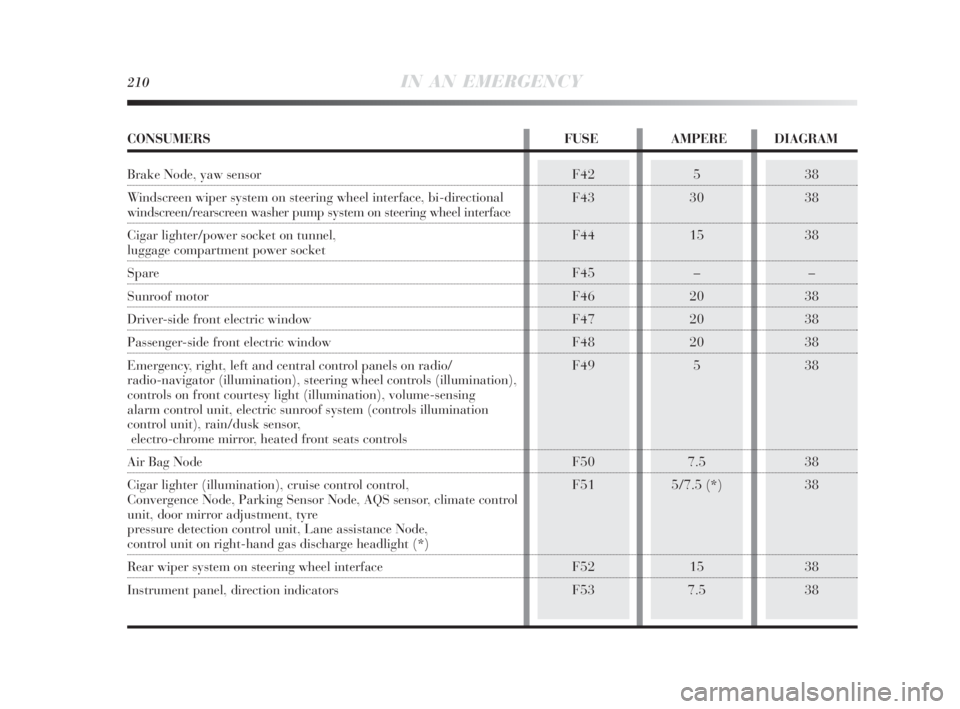
38
38
38
–
38
38
38
38
38
38
38
38F42
F43
F44
F45
F46
F47
F48
F49
F50
F51
F52
F535
30
15
–
20
20
20
5
7.5
5/7.5 (*)
15
7.5
CONSUMERS FUSE AMPERE DIAGRAM
Brake Node, yaw sensor
Windscreen wiper system on steering wheel interface, bi-directional
windscreen/rearscreen washer pump system on steering wheel interface
Cigar lighter/power socket on tunnel,
luggage compartment power socket
Spare
Sunroof motor
Driver-side front electric window
Passenger-side front electric window
Emergency, right, left and central control panels on radio/
radio-navigator (illumination), steering wheel controls (illumination),
controls on front courtesy light (illumination), volume-sensing
alarm control unit, electric sunroof system (controls illumination
control unit), rain/dusk sensor,
electro-chrome mirror, heated front seats controls
Air Bag Node
Cigar lighter (illumination), cruise control control,
Convergence Node, Parking Sensor Node, AQS sensor, climate control
unit, door mirror adjustment, tyre
pressure detection control unit, Lane assistance Node,
control unit on right-hand gas discharge headlight (*)
Rear wiper system on steering wheel interface
Instrument panel, direction indicators
175-214 Delta 4ed gb 24-02-2010 14:36 Pagina 210
Page 217 of 276
216CARE AND MAINTENANCE
SCHEDULED SERVICING
Correct maintenance is essential for ensuring long car life
under the best conditions.
Lancia has prepared a series of checks and service oper-
ations to be carried out every 30,000 kilometres (for petrol
versions) or every 35,000 kilometres (for diesel versions).
Scheduled servicing will not however fully cover all of the
needs of your car: also in the initial period before the
30,000/35,000 km service and later, between one ser-
vice and another, ordinary care is still required such as
routine checks, topping up the fluid levels,checking tyre
pressure, etc.
IMPORTANT Scheduled Services are required by the man-
ufacturer. Failure to carry them out may invalidate the
warranty.Scheduled Services are offered by all Lancia Dealerships
according to a set time schedule.
If during each operation, in addition to the scheduled ones,
the need arises for further replacements or repairs, these
may be carried out only with the explicit agreement of the
Customer.
IMPORTANT You are advised to contact a Lancia Deal-
ership in the event of any minor operating faults, with-
out waiting for the next service.
If your car is used frequently for towing, the interval be-
tween one service and the next should be reduced.
215-242 Delta 3ed gb 11-11-2009 12:14 Pagina 216
Page 218 of 276
CARE AND MAINTENANCE217
5
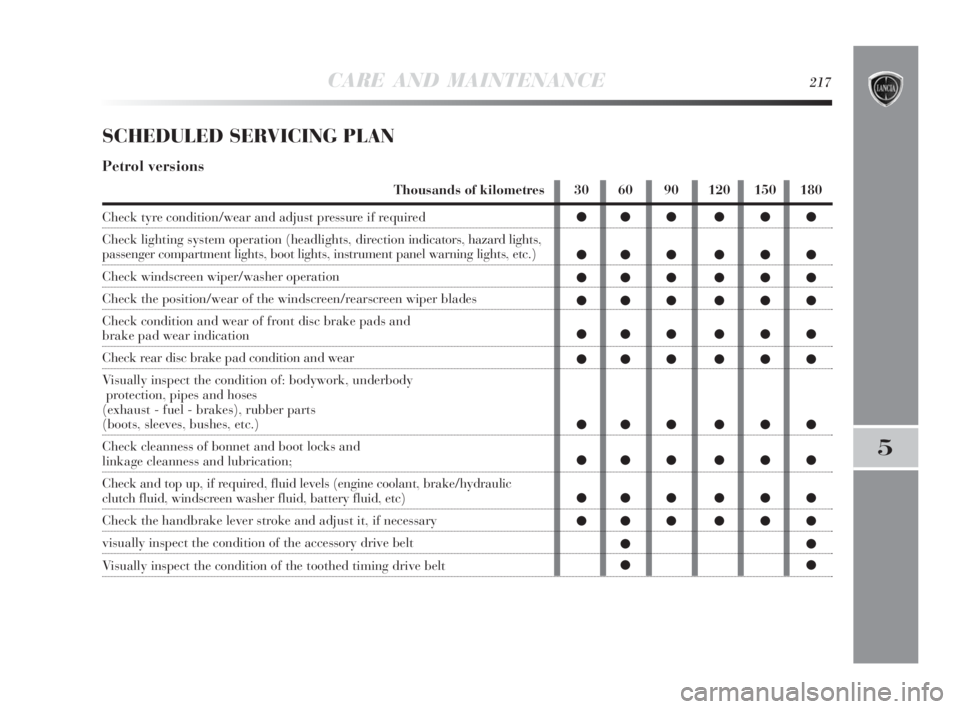
SCHEDULED SERVICING PLAN
Petrol versions
Thousands of kilometres
Check tyre condition/wear and adjust pressure if required
Check lighting system operation (headlights, direction indicators, hazard lights,
passenger compartment lights, boot lights, instrument panel warning lights, etc.)
Check windscreen wiper/washer operation
Check the position/wear of the windscreen/rearscreen wiper blades
Check condition and wear of front disc brake pads and
brake pad wear indication
Check rear disc brake pad condition and wear
Visually inspect the condition of: bodywork, underbody
protection, pipes and hoses
(exhaust - fuel - brakes), rubber parts
(boots, sleeves, bushes, etc.)
Check cleanness of bonnet and boot locks and
linkage cleanness and lubrication;
Check and top up, if required, fluid levels (engine coolant, brake/hydraulic
clutch fluid, windscreen washer fluid, battery fluid, etc)
Check the handbrake lever stroke and adjust it, if necessary
visually inspect the condition of the accessory drive belt
Visually inspect the condition of the toothed timing drive belt30 60 90 120 150 180
●●● ●●●
●●● ●●●
●●● ●●●
●●● ●●●
●●● ●●●
●●● ●●●
●●● ●●●
●●● ●●●
●●● ●●●
●●● ●●●
●●
●●
215-242 Delta 3ed gb 11-11-2009 12:14 Pagina 217