boot Lancia Delta 2010 Owner handbook (in English)
[x] Cancel search | Manufacturer: LANCIA, Model Year: 2010, Model line: Delta, Model: Lancia Delta 2010Pages: 276, PDF Size: 5.31 MB
Page 92 of 276
GETTING TO KNOW YOUR CAR91
1
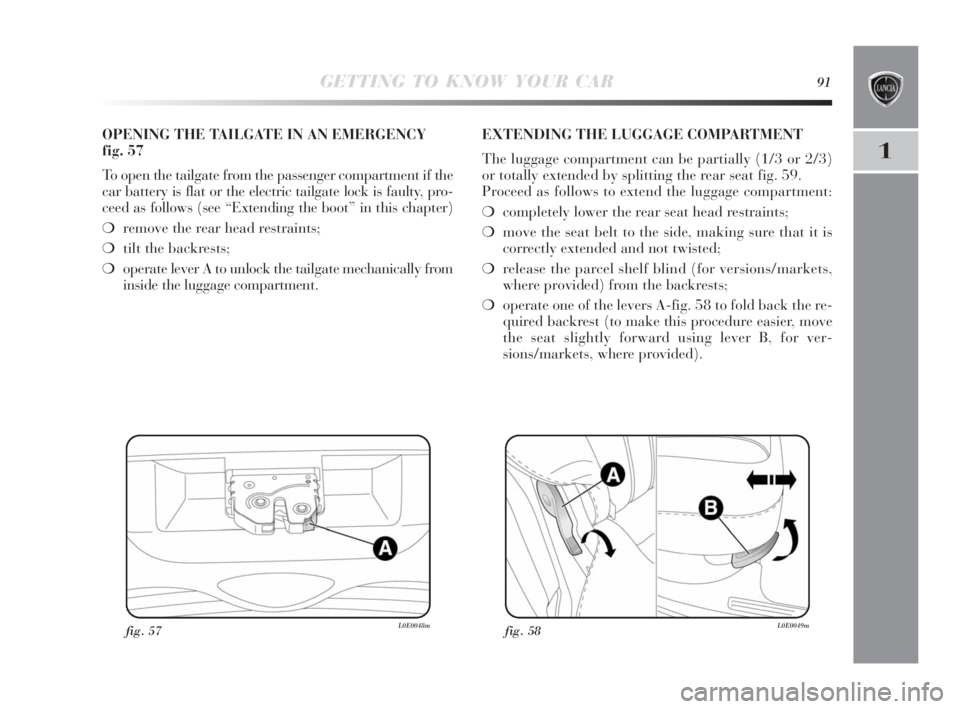
fig. 57L0E0048m
OPENING THE TAILGATE IN AN EMERGENCY
fig. 57
To open the tailgate from the passenger compartment if the
car battery is flat or the electric tailgate lock is faulty, pro-
ceed as follows (see “Extending the boot” in this chapter)
❍remove the rear head restraints;
❍tilt the backrests;
❍operate lever A to unlock the tailgate mechanically from
inside the luggage compartment.EXTENDING THE LUGGAGE COMPARTMENT
The luggage compartment can be partially (1/3 or 2/3)
or totally extended by splitting the rear seat fig. 59.
Proceed as follows to extend the luggage compartment:
❍completely lower the rear seat head restraints;
❍move the seat belt to the side, making sure that it is
correctly extended and not twisted;
❍release the parcel shelf blind (for versions/markets,
where provided) from the backrests;
❍operate one of the levers A-fig. 58 to fold back the re-
quired backrest (to make this procedure easier, move
the seat slightly forward using lever B, for ver-
sions/markets, where provided).
fig. 58L0E0049m
001-142 Delta 3ed gb 30-11-2009 11:22 Pagina 91
Page 95 of 276
94GETTING TO KNOW YOUR CAR
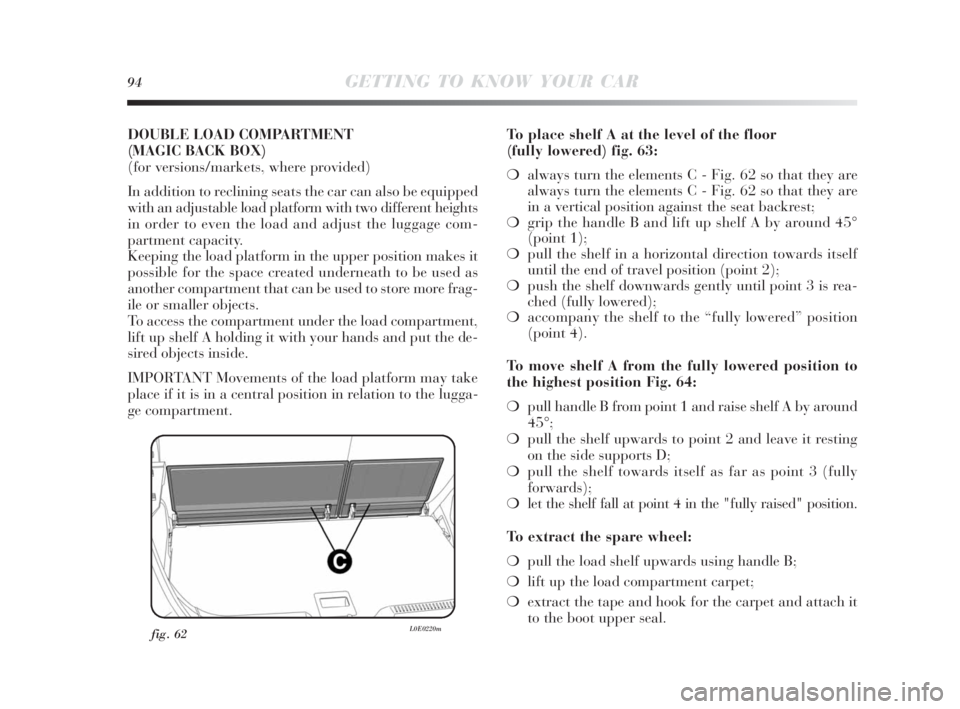
fig. 62L0E0220m
DOUBLE LOAD COMPARTMENT
(MAGIC BACK BOX)
(for versions/markets, where provided)
In addition to reclining seats the car can also be equipped
with an adjustable load platform with two different heights
in order to even the load and adjust the luggage com-
partment capacity.
Keeping the load platform in the upper position makes it
possible for the space created underneath to be used as
another compartment that can be used to store more frag-
ile or smaller objects.
To access the compartment under the load compartment,
lift up shelf A holding it with your hands and put the de-
sired objects inside.
IMPORTANT Movements of the load platform may take
place if it is in a central position in relation to the lugga-
ge compartment.To place shelf A at the level of the floor
(fully lowered) fig. 63:
❍always turn the elements C - Fig. 62 so that they are
always turn the elements C - Fig. 62 so that they are
in a vertical position against the seat backrest;
❍grip the handle B and lift up shelf A by around 45°
(point 1);
❍pull the shelf in a horizontal direction towards itself
until the end of travel position (point 2);
❍push the shelf downwards gently until point 3 is rea-
ched (fully lowered);
❍accompany the shelf to the “fully lowered” position
(point 4).
To move shelf A from the fully lowered position to
the highest position Fig. 64:
❍pull handle B from point 1 and raise shelf A by around
45°;
❍pull the shelf upwards to point 2 and leave it resting
on the side supports D;
❍pull the shelf towards itself as far as point 3 (fully
forwards);
❍let the shelf fall at point 4 in the "fully raised" position.
To extract the spare wheel:
❍pull the load shelf upwards using handle B;
❍lift up the load compartment carpet;
❍extract the tape and hook for the carpet and attach it
to the boot upper seal.
001-142 Delta 3ed gb 30-11-2009 11:22 Pagina 94
Page 101 of 276
100GETTING TO KNOW YOUR CAR
HEADLIGHTS
BEAM DIRECTION
The correct orientation of the headlights is important for
the comfort and safety of not only the driver but all road
users. It is also a specific rule of the highway code.
The headlights must be correctly aligned to ensure the best
visibility conditions for all drivers.
Contact a Lancia Dealership to have the headlights prop-
erly adjusted.
Check beam alignment every time the load or its distrib-
ution changes.
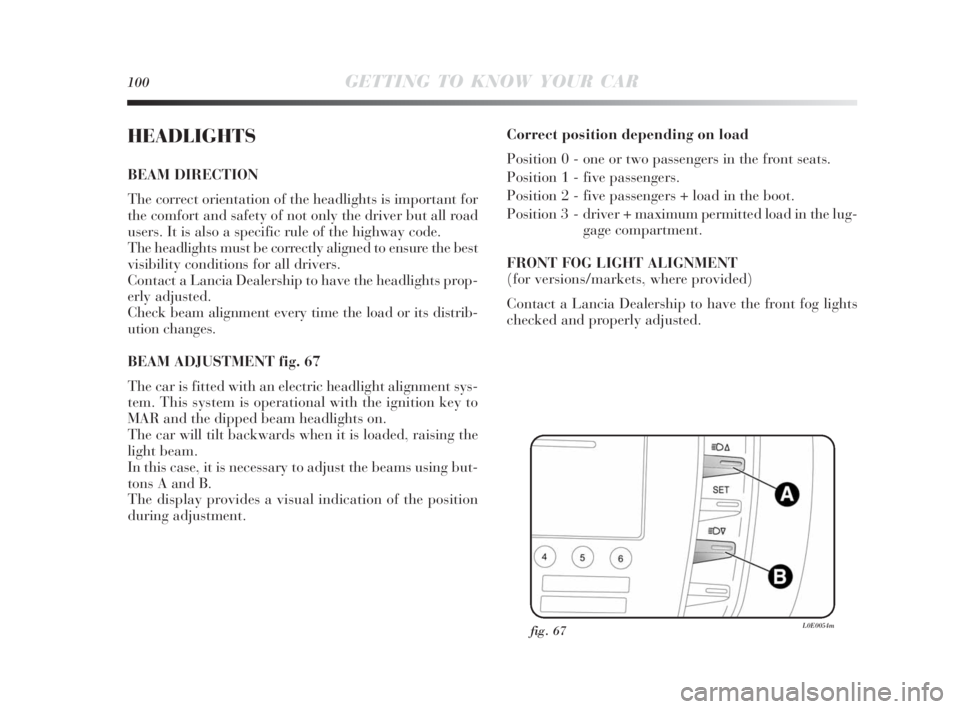
BEAM ADJUSTMENT fig. 67
The car is fitted with an electric headlight alignment sys-
tem. This system is operational with the ignition key to
MAR and the dipped beam headlights on.
The car will tilt backwards when it is loaded, raising the
light beam.
In this case, it is necessary to adjust the beams using but-
tons A and B.
The display provides a visual indication of the position
during adjustment.Correct position depending on load
Position 0 - one or two passengers in the front seats.
Position 1 - five passengers.
Position 2 - five passengers + load in the boot.
Position 3 - driver + maximum permitted load in the lug-
gage compartment.
FRONT FOG LIGHT ALIGNMENT
(for versions/markets, where provided)
Contact a Lancia Dealership to have the front fog lights
checked and properly adjusted.
fig. 67L0E0054m
001-142 Delta 3ed gb 30-11-2009 11:22 Pagina 100
Page 171 of 276
170STARTING UP AND DRIVING
To engage reverse gear R from neutral, raise ring A un-
der the knob and at the same time move the gearshift lever
to the left and then forwards.
For the 1.6 Multijet version: To engage reverse R from neu-
tral, raise ring A under the knob and at the same time
move the gearshift lever to the right and then backwards.
IMPORTANT The clutch pedal should only be used to
change gear. Do not drive with you foot resting on the
clutch pedal, even lightly. For versions/markets, where
provided, the electronic clutch control could cut in by in-
terpreting the anomalous driving style as a fault.
Press the clutch pedal fully to change gears
correctly. For this reason, there must be no
obstacles on the floor under the pedals: en-
sure that rubber mats (if any) are correctly posi-
tioned, not interfering with the pedals.
Do not drive with your hand resting on the
gear lever, because this pressure, even if light,
over time can wear out the gearbox inner
components.
REDUCING RUNNING COSTS
Here are some useful tips to save fuel and minimize pol-
luting emissions of CO
2and other pollutants (nitric oxide,
unburnt hydrocarbons, fine dusts etc…).
GENERAL CONSIDERATIONS
Car maintenance
Have checks and adjustments carried out in accordance
with the “Scheduled Service Plan”.
Tyres
Check tyre pressure regularly, at least once every four
weeks: excessively low pressure will increase fuel con-
sumption because rolling resistance will be higher.
Unnecessary loads
Do not travel with an overloaded boot. Do not travel with
too much luggage stowed in the boot. The weight of the
car (especially when driving in town) and its trim great-
ly affect fuel consumption and stability.
165-174 Delta 3ed gb 11-11-2009 12:10 Pagina 170
Page 218 of 276
CARE AND MAINTENANCE217
5
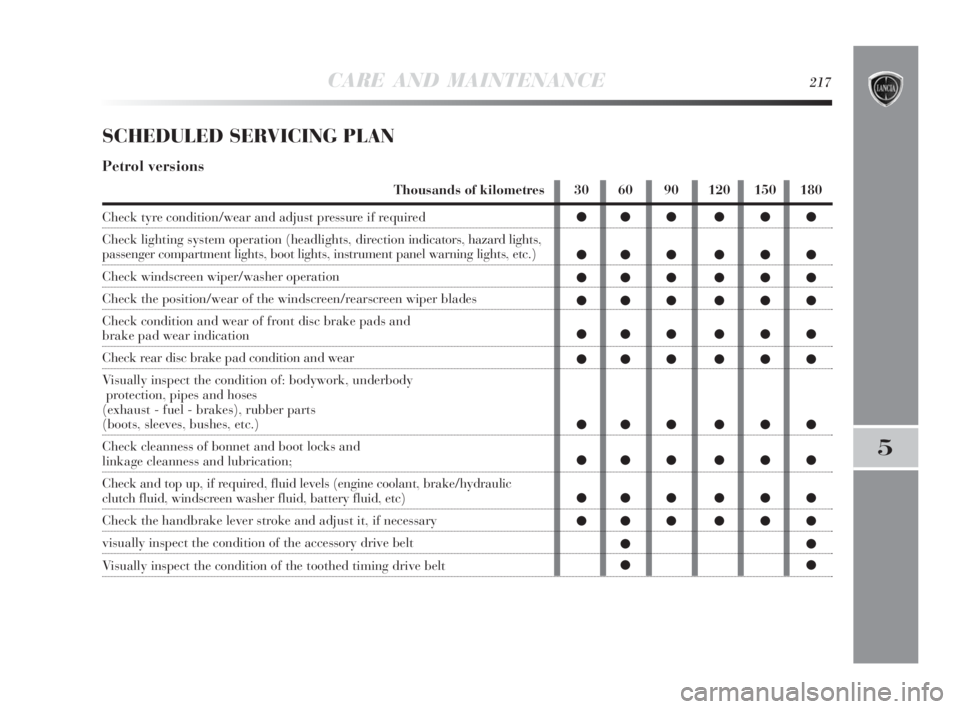
SCHEDULED SERVICING PLAN
Petrol versions
Thousands of kilometres
Check tyre condition/wear and adjust pressure if required
Check lighting system operation (headlights, direction indicators, hazard lights,
passenger compartment lights, boot lights, instrument panel warning lights, etc.)
Check windscreen wiper/washer operation
Check the position/wear of the windscreen/rearscreen wiper blades
Check condition and wear of front disc brake pads and
brake pad wear indication
Check rear disc brake pad condition and wear
Visually inspect the condition of: bodywork, underbody
protection, pipes and hoses
(exhaust - fuel - brakes), rubber parts
(boots, sleeves, bushes, etc.)
Check cleanness of bonnet and boot locks and
linkage cleanness and lubrication;
Check and top up, if required, fluid levels (engine coolant, brake/hydraulic
clutch fluid, windscreen washer fluid, battery fluid, etc)
Check the handbrake lever stroke and adjust it, if necessary
visually inspect the condition of the accessory drive belt
Visually inspect the condition of the toothed timing drive belt30 60 90 120 150 180
●●● ●●●
●●● ●●●
●●● ●●●
●●● ●●●
●●● ●●●
●●● ●●●
●●● ●●●
●●● ●●●
●●● ●●●
●●● ●●●
●●
●●
215-242 Delta 3ed gb 11-11-2009 12:14 Pagina 217
Page 220 of 276
CARE AND MAINTENANCE219
5
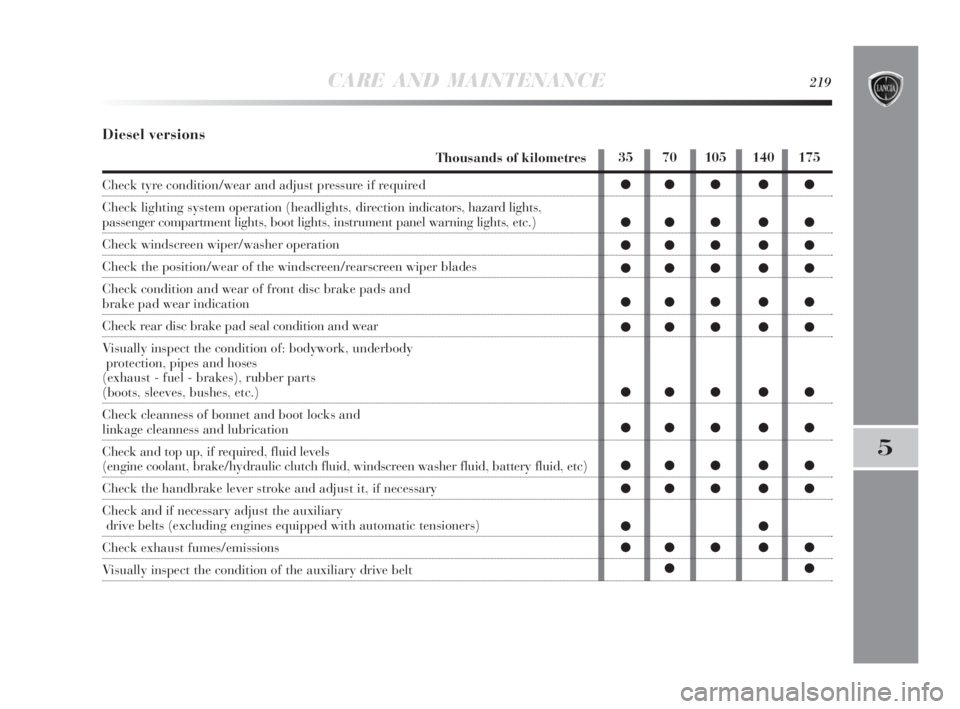
Diesel versions
Thousands of kilometres
Check tyre condition/wear and adjust pressure if required
Check lighting system operation (headlights, direction indicators, hazard lights,
passenger compartment lights, boot lights, instrument panel warning lights, etc.)
Check windscreen wiper/washer operation
Check the position/wear of the windscreen/rearscreen wiper blades
Check condition and wear of front disc brake pads and
brake pad wear indication
Check rear disc brake pad seal condition and wear
Visually inspect the condition of: bodywork, underbody
protection, pipes and hoses
(exhaust - fuel - brakes), rubber parts
(boots, sleeves, bushes, etc.)
Check cleanness of bonnet and boot locks and
linkage cleanness and lubrication
Check and top up, if required, fluid levels
(engine coolant, brake/hydraulic clutch fluid, windscreen washer fluid, battery fluid, etc)
Check the handbrake lever stroke and adjust it, if necessary
Check and if necessary adjust the auxiliary
drive belts (excluding engines equipped with automatic tensioners)
Check exhaust fumes/emissions
Visually inspect the condition of the auxiliary drive belt35 70 105 140 175
●● ● ● ●
●● ● ● ●
●● ● ● ●
●● ● ● ●
●● ● ● ●
●● ● ● ●
●● ● ● ●
●● ● ● ●
●● ● ● ●
●● ● ● ●
●●
●● ● ● ●
●●
215-242 Delta 3ed gb 11-11-2009 12:14 Pagina 219
Page 223 of 276
222CARE AND MAINTENANCE
Perform the following inspections more frequently than
shown on the Scheduled Service Plan:
❍check front disc brake pad condition and wear;
❍check cleanness of bonnet and boot locks and linkage
cleanness and lubrication;
❍visually inspect the condition of: engine, gearbox,
transmission, pipes and hoses (exhaust – fuel supply
- brakes) rubber elements (gaiters – hoses - bushes
etc.);❍check battery charge and fluid level (electrolyte); (see
“Battery - Charge and electrolyte level check” in this
chapter);
❍visually inspect the condition of auxiliary drivebelts;
❍check and if necessary replace the pollen filter; in par-
ticular it should be replaced if a decrease in the air flow
into the passenger compartment is detected;
❍check the air filter and replace, if required.
215-242 Delta 3ed gb 11-11-2009 12:14 Pagina 222
Page 259 of 276
1410
570
1077
903
1980
1300
80
601320
570
1002
888
1890
1300
80
60
258TECHNICAL DATA
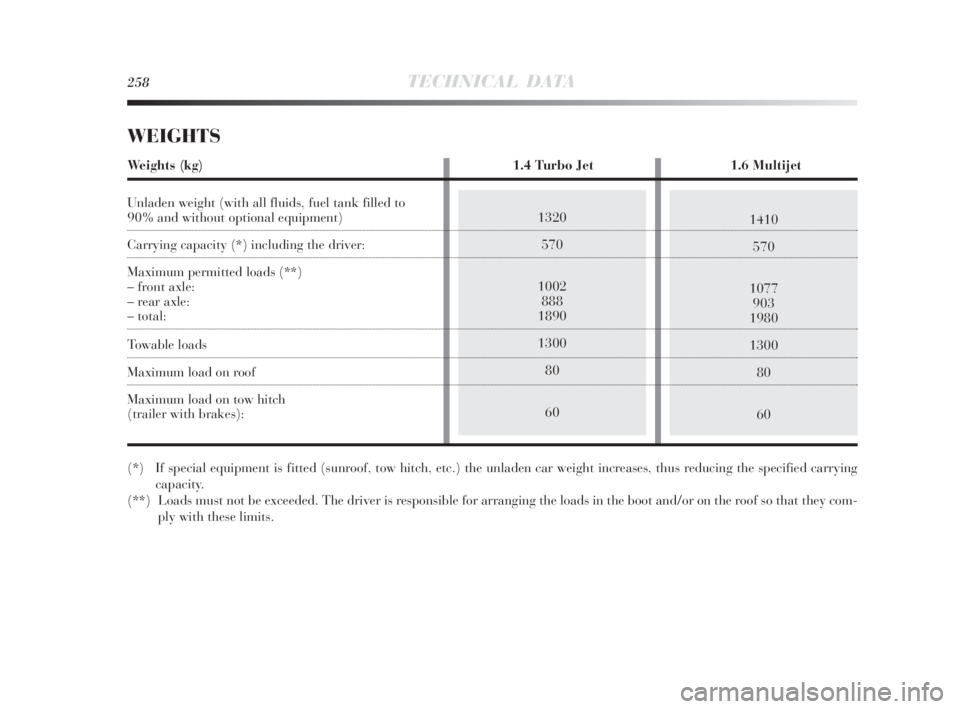
WEIGHTS
Weights (kg) 1.4 Turbo Jet 1.6 Multijet
Unladen weight (with all fluids, fuel tank filled to
90% and without optional equipment)
Carrying capacity (*) including the driver:
Maximum permitted loads (**)
– front axle:
– rear axle:
– total:
Towable loads
Maximum load on roof
Maximum load on tow hitch
(trailer with brakes):
(*) If special equipment is fitted (sunroof, tow hitch, etc.) the unladen car weight increases, thus reducing the specified carrying
capacity.
(**) Loads must not be exceeded. The driver is responsible for arranging the loads in the boot and/or on the roof so that they com-
ply with these limits.
243-266 Delta 3ed gb 11-11-2009 12:16 Pagina 258
Page 260 of 276
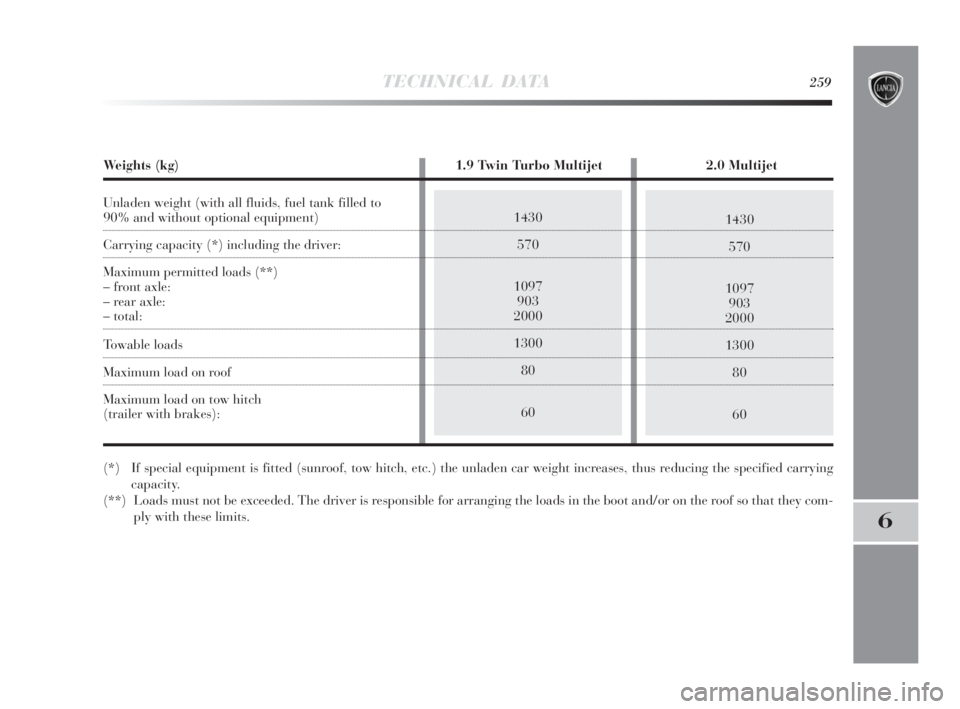
TECHNICAL DATA259
6
1430
570
1097
903
2000
1300
80
601430
570
1097
903
2000
1300
80
60
Weights (kg) 1.9 Twin Turbo Multijet 2.0 Multijet
Unladen weight (with all fluids, fuel tank filled to
90% and without optional equipment)
Carrying capacity (*) including the driver:
Maximum permitted loads (**)
– front axle:
– rear axle:
– total:
Towable loads
Maximum load on roof
Maximum load on tow hitch
(trailer with brakes):
(*) If special equipment is fitted (sunroof, tow hitch, etc.) the unladen car weight increases, thus reducing the specified carrying
capacity.
(**) Loads must not be exceeded. The driver is responsible for arranging the loads in the boot and/or on the roof so that they com-
ply with these limits.
243-266 Delta 3ed gb 11-11-2009 12:16 Pagina 259
Page 268 of 276
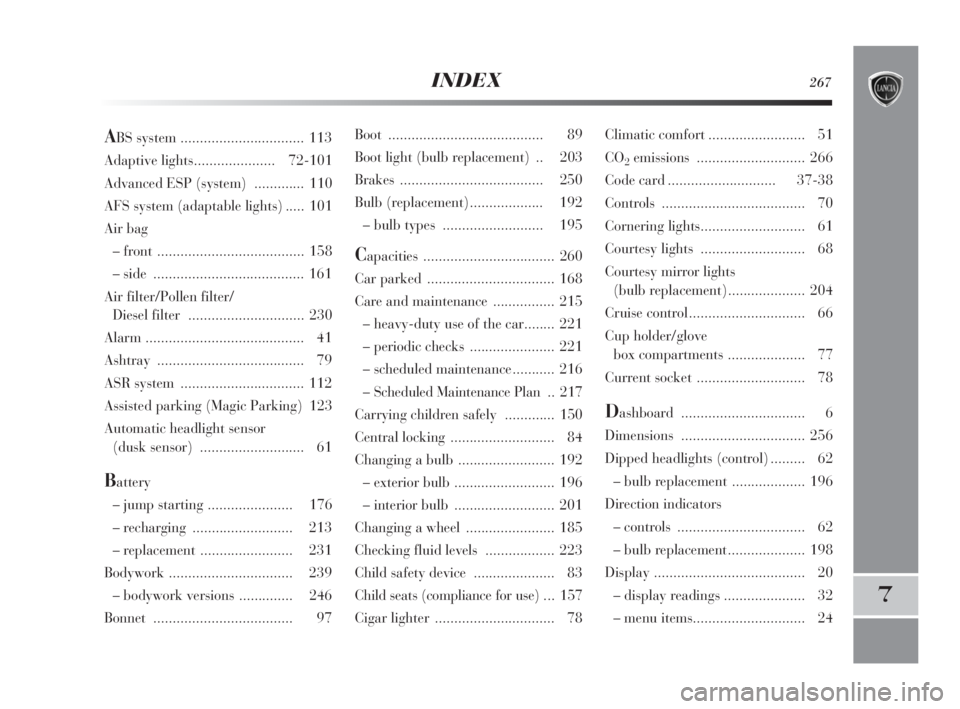
INDEX267
7
Boot ........................................ 89
Boot light (bulb replacement) .. 203
Brakes ..................................... 250
Bulb (replacement)................... 192
– bulb types .......................... 195
Capacities .................................. 260
Car parked ................................. 168
Care and maintenance................ 215
– heavy-duty use of the car........ 221
– periodic checks ...................... 221
– scheduled maintenance ........... 216
– Scheduled Maintenance Plan .. 217
Carrying children safely ............. 150
Central locking ........................... 84
Changing a bulb ......................... 192
– exterior bulb.......................... 196
– interior bulb.......................... 201
Changing a wheel....................... 185
Checking fluid levels .................. 223
Child safety device..................... 83
Child seats (compliance for use) ... 157
Cigar lighter ............................... 78Climatic comfort ......................... 51
CO
2emissions ............................ 266
Code card ............................ 37-38
Controls ..................................... 70
Cornering lights........................... 61
Courtesy lights ........................... 68
Courtesy mirror lights
(bulb replacement).................... 204
Cruise control .............................. 66
Cup holder/glove
box compartments.................... 77
Current socket ............................ 78
Dashboard ................................ 6
Dimensions ................................ 256
Dipped headlights (control) ......... 62
– bulb replacement ................... 196
Direction indicators
– controls ................................. 62
– bulb replacement.................... 198
Display ....................................... 20
– display readings..................... 32
– menu items............................. 24
ABS system ................................ 113
Adaptive lights..................... 72-101
Advanced ESP (system)............. 110
AFS system (adaptable lights) ..... 101
Air bag
– front ...................................... 158
– side ....................................... 161
Air filter/Pollen filter/
Diesel filter .............................. 230
Alarm......................................... 41
Ashtray...................................... 79
ASR system ................................ 112
Assisted parking (Magic Parking) 123
Automatic headlight sensor
(dusk sensor)........................... 61
Battery
– jump starting ...................... 176
– recharging .......................... 213
– replacement ........................ 231
Bodywork ................................ 239
– bodywork versions .............. 246
Bonnet .................................... 97
267-274 Delta 4ed gb 12-02-2010 10:22 Pagina 267