mirror Lancia Delta 2010 Owner handbook (in English)
[x] Cancel search | Manufacturer: LANCIA, Model Year: 2010, Model line: Delta, Model: Lancia Delta 2010Pages: 276, PDF Size: 5.31 MB
Page 6 of 276

GETTING TO KNOW YOUR CAR5
1
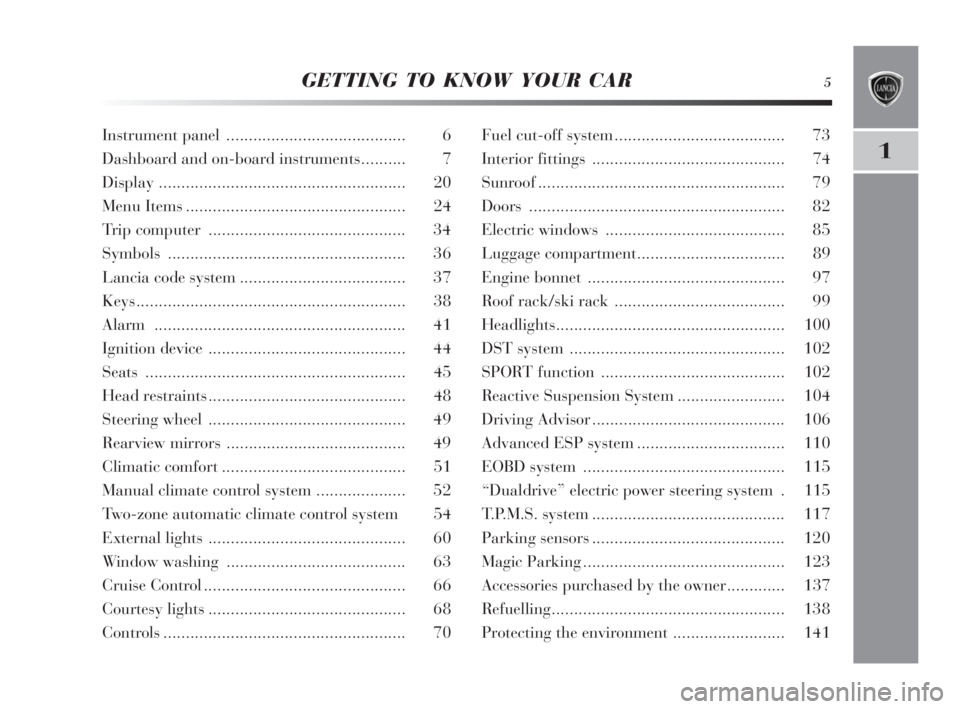
Instrument panel........................................ 6
Dashboard and on-board instruments.......... 7
Display ....................................................... 20
Menu Items ................................................. 24
Trip computer ............................................ 34
Symbols..................................................... 36
Lancia code system..................................... 37
Keys............................................................ 38
Alarm........................................................ 41
Ignition device............................................ 44
Seats .......................................................... 45
Head restraints ............................................ 48
Steering wheel............................................ 49
Rearview mirrors ........................................ 49
Climatic comfort ......................................... 51
Manual climate control system .................... 52
Two-zone automatic climate control system 54
External lights............................................ 60
Window washing ........................................ 63
Cruise Control ............................................. 66
Courtesy lights............................................ 68
Controls...................................................... 70Fuel cut-off system...................................... 73
Interior fittings........................................... 74
Sunroof....................................................... 79
Doors......................................................... 82
Electric windows........................................ 85
Luggage compartment................................. 89
Engine bonnet ............................................ 97
Roof rack/ski rack...................................... 99
Headlights................................................... 100
DST system ................................................ 102
SPORT function ......................................... 102
Reactive Suspension System ........................ 104
Driving Advisor........................................... 106
Advanced ESP system................................. 110
EOBD system ............................................. 115
“Dualdrive” electric power steering system . 115
T.P.M.S. system........................................... 117
Parking sensors........................................... 120
Magic Parking............................................. 123
Accessories purchased by the owner............. 137
Refuelling.................................................... 138
Protecting the environment ......................... 141
001-142 Delta 3ed gb 30-11-2009 11:21 Pagina 5
Page 50 of 276

GETTING TO KNOW YOUR CAR49
1
STEERING WHEEL
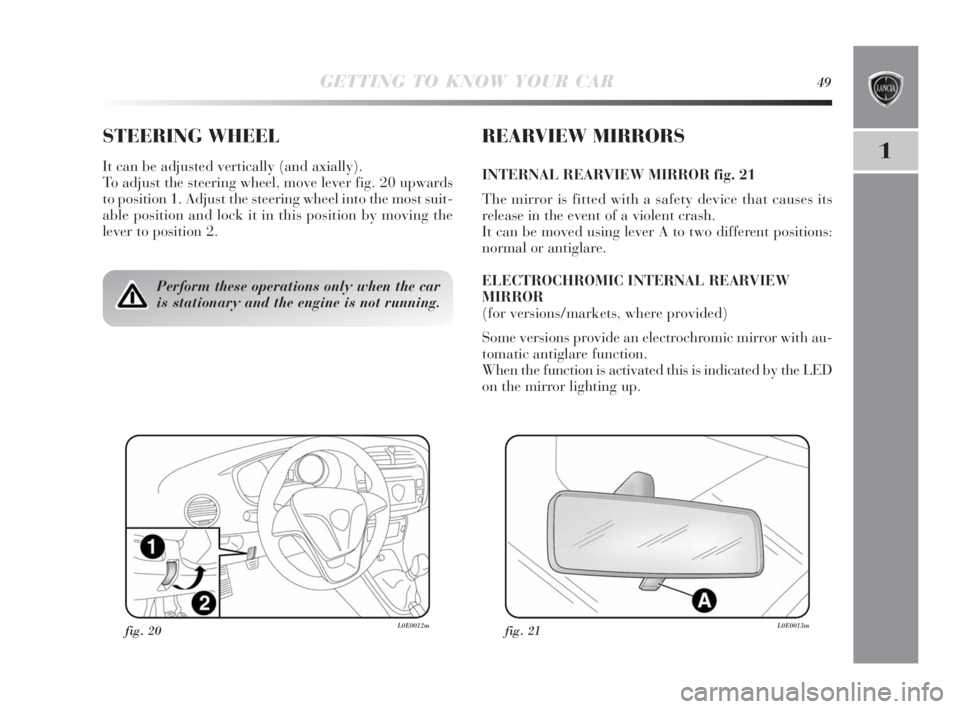
It can be adjusted vertically (and axially).
To adjust the steering wheel, move lever fig. 20 upwards
to position 1. Adjust the steering wheel into the most suit-
able position and lock it in this position by moving the
lever to position 2.
REARVIEW MIRRORS
INTERNAL REARVIEW MIRROR fig. 21
The mirror is fitted with a safety device that causes its
release in the event of a violent crash.
It can be moved using lever A to two different positions:
normal or antiglare.
ELECTROCHROMIC INTERNAL REARVIEW
MIRROR
(for versions/markets, where provided)
Some versions provide an electrochromic mirror with au-
tomatic antiglare function.
When the function is activated this is indicated by the LED
on the mirror lighting up.
Perform these operations only when the car
is stationary and the engine is not running.
fig. 21L0E0013mfig. 20L0E0012m
001-142 Delta 3ed gb 30-11-2009 11:21 Pagina 49
Page 51 of 276

50GETTING TO KNOW YOUR CAR
Engaging reverse gear automatically sets the mirror for
daylight use.
DOOR MIRRORS fig. 22
Proceed as follows to adjust the position of the door mir-
rors:
❍select the mirror using selector B;
❍adjust the mirror using controls A, in all four direc-
tions.Folding back door mirrors fig. 23
When required (for example when the mirror causes dif-
ficulty in narrow spaces) it is possible to fold the mirror
by moving it from position 1 (open), to position 2 (closed).
On some versions the door mirrors can be folded back elec-
trically by operating a dedicated control.
fig. 22L0E0014mfig. 23L0E0015m
When driving, the mirrors should always be
in position 1. As the door mirrors are curved,
they may slightly alter the perception of dis-
tance.
001-142 Delta 3ed gb 30-11-2009 11:21 Pagina 50
Page 59 of 276

58GETTING TO KNOW YOUR CAR
heated rear windscreen and door mirrors
demisting/defrosting fig. 26
Press button F (
() to activate the function: When the
function is active, an LED on the button lights up.
This function is timed and will turn off automatically af-
ter 20 minutes. Press
(again to disable the function in
advance.
IMPORTANT Do not apply stickers on the inside of the
rear window over the heating filaments to avoid damage
that might cause it to stop working properly.
IMPORTANT Press
Tto draw air in from the outside
(in this case the LED on the button should be off).Rapid window demisting/defrosting
(MAX-DEF function) fig. 26
Press button G
-to automatically activate the timed op-
eration of all the functions required to rapidly
demist/defrost the windscreen and front windows.
The functions are:
❍climate control compressor engagement (with an out-
door temperature of above 4°C);
❍disengagement (if previously engaged) of air recircu-
lation (the LED on button
Tshould be off);
❍engagement of heated rear windscreen (the LED on
button
-should be on) and door mirror heater coils;
❍air temperature set to maximum;
❍activation of air flow.
Activation of air recirculation and enablement of
AQS (Air Quality System) fig. 26
Press button
T.
Air recirculation is carried out according to three possi-
ble operation modes:
❍automatic control, indicated by the AQS appearing on
the display and the LED on button
Tshould be off;
001-142 Delta 3ed gb 30-11-2009 11:22 Pagina 58
Page 66 of 276

GETTING TO KNOW YOUR CAR65
1
fig. 30L0E0023m
The rear window wiper stops operating a few strokes af-
ter the lever is released; after a few seconds, a further
cleaning stroke completes the wiping operation.
RAIN SENSOR
(for versions/markets, where provided)
The rain sensor A-fig. 30 is located behind the interior
rear-view mirror in contact with the windscreen and au-
tomatically adjusts the frequency of the windscreen wiper
strokes according to the rain intensity during intermittent
operation.
The sensor has an adjustment range that varies progres-
sively from wiper still (no stroke) when the windscreen
is dry, to wiper at first continuous speed (slow continu-
ous operation) with intense rain.Activation
Move the right lever down by one click.
The activation of the rain sensor is signalled by a com-
mand acquisition stroke.
IMPORTANT Keep the glass in the sensor area clean.
By turning selector wheel F-fig. 29 is it possible to increase
the sensitivity of the rain sensor to obtain a more rapid
variation between wiper still (no stroke) when the wind-
screen is dry, to wiper at first continuous speed (slow con-
tinuous operation).
The increase in the sensitivity of the rain sensor is signalled
by a control and acquisition “stroke”.
When the windscreen washer is operated with the rain sen-
sor activated, the normal washing cycle is performed, at
the end of which the rain sensor resumes its normal au-
tomatic function.
001-142 Delta 3ed gb 30-11-2009 11:22 Pagina 65
Page 75 of 276

74GETTING TO KNOW YOUR CAR
INTERIOR FITTINGS
SUN VISORS fig. 39
These are arranged at the sides of the internal rearview
mirror.
They may be positioned frontally and to the side.
A mirror is provided on the back of the sun visors. This
is illuminated by courtesy light A. The driver and pas-
senger-side sun visors also feature a document holder.
fig. 39L0E0032m
FRONT ARMREST WITH ODDMENT
COMPARTMENT
This is located between the front seats. An oddment com-
partment and cooled drinks compartment is located in-
side the armrest (see following sections). The armrest can
be moved backwards and forwards by operating cover
A-fig. 40.
Oddment compartment
Lift up cover A-fig. 40: you can then access oddment com-
partment B-fig. 40.
fig. 40L0E0033m
001-142 Delta 3ed gb 30-11-2009 11:22 Pagina 74
Page 106 of 276

GETTING TO KNOW YOUR CAR105
1
On the 1.4 Turbo Jet 150 HP version, when the SPORT
button is pressed, the turbocharger (overboost) function
is also activated; the engine management control unit, de-
pending on the
position of the accelerator pedal and, for a limited time,
allows maximum pressure leves inside the turbocharger
to be reached with a consequent increase in engine torque
compared with that that can be reached normally.
This function is particularly useful if maximum perfor-
mance is required for a short period (e.g. when overtak-
ing).
IMPORTANT When the SPORT function is used, during
acceleration shuddering of the steering may be noticed
which is typical of a sports setting.
IMPORTANT The function is activated about 5 seconds
after the SPORT button is pressed.
System failure
In the case of fault, the system notifies the driver by means
of a message on the reconfigurable multifunctional display
instrument panel and by lighting up the amber symbol
i.
In this case, go to a Lancia Dealership.
DRIVING ADVISOR
(for versions/markets, where provided)
The Driving Advisor is a warning system that notifies
the driver if they drift out of their lane because they have
been distracted.
A video sensor, fitted to the windscreen near the internal
rear-view mirror, detects the lane boundaries and the ve-
hicle’s position in respect to them.
IMPORTANT If the windscreen needs replacing on cars
fitted with a Driving Advisor system, it is advisable to go
to a Lancia Dealership. If the repair is being carried out
at a specialist window replacement centre, it is still nec-
essary to go to a Lancia Dealership to have the tv cam-
era calibrated.
001-142 Delta 3ed gb 30-11-2009 11:22 Pagina 105
Page 173 of 276

172STARTING UP AND DRIVING
Acceleration
Sudden acceleration has a very negative effect on fuel con-
sumption and emissions: accelerate gradually.
CONDITIONS OF USE
Cold starting
Short distances and frequent cold start-ups will prevent
the engine from reaching optimal running temperature.
Consequently, both fuel consumption (from +15 to +30%
on urban cycle ) and emissions will increase.
Traffic and road conditions
Rather high fuel consumption is caused by heavy traffic,
for instance when travelling in a queue with frequent use
of low gears or in cities with many traffic lights. Moun-
tain and rough roads also have a negative effect on fuel
consumption.
Traffic hold-ups
During prolonged hold-ups (level crossings) the engine
should be switched off.TOWING TRAILERS
IMPORTANT NOTES
The car must be provided with a type-approved tow hitch
and adequate electrical system to tow caravans or trail-
ers. Installation must be performed by specialised per-
sonnel who will issue the required papers for travelling on
roads.
Install any specific and/or additional rear-view mirrors as
specified by the Highway Code.
Remember that when towing a trailer, steep hills are hard-
er to climb, braking distances increase and overtaking
takes longer depending on the overall weight of the trail-
er.
Engage a low gear when driving downhill, rather than con-
stantly using the brake.
The weight of the trailer on the car’s tow hitch will reduce
the loading capacity of the car by the same amount. Con-
sider the weight of the vehicle at full load, including ac-
cessories and luggage to make sure you do not exceed the
maximum towable weight (shown on the registration cer-
tificate).
Respect the speed limits specific for each country for ve-
hicles towing trailers. In all cases, the top speed must not
exceed 100 km/h.
165-174 Delta 3ed gb 11-11-2009 12:10 Pagina 172
Page 205 of 276

204IN AN EMERGENCY
fig. 34L0E0173mfig. 36L0E0175m
fig. 35L0E0174m
GLOVE COMPARTMENT LIGHT
To change the bulb, proceed as follows:
❍open the glove compartment, and remove the light A-
fig. 34;
❍replace bulb B releasing it from the side contacts and
making sure the new bulb is correctly fastened between
the contacts.
SUN VISOR COURTESY LIGHT
(for versions/markets, where provided)
To change the bulb, proceed as follows:
❍open the cover A-fig. 35 on the mirror;
❍levering in the points shown by the arrows, remove
light B;❍replace bulb C-fig. 36 releasing it from the side con-
tacts and making sure the new bulb is correctly fas-
tened between the contacts.
175-214 Delta 4ed gb 24-02-2010 14:36 Pagina 204
Page 210 of 276

IN AN EMERGENCY209
4
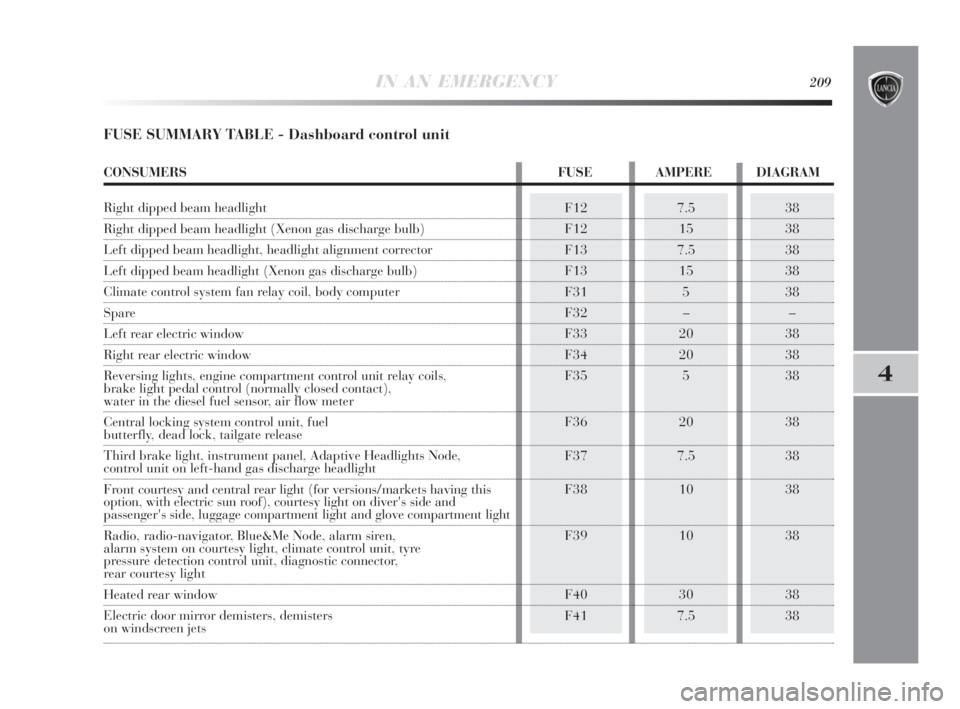
FUSE SUMMARY TABLE - Dashboard control unit
F12
F12
F13
F13
F31
F32
F33
F34
F35
F36
F37
F38
F39
F40
F417.5
15
7.5
15
5
–
20
20
5
20
7.5
10
10
30
7.538
38
38
38
38
–
38
38
38
38
38
38
38
38
38
CONSUMERS FUSE AMPERE DIAGRAM
Right dipped beam headlight
Right dipped beam headlight (Xenon gas discharge bulb)
Left dipped beam headlight, headlight alignment corrector
Left dipped beam headlight (Xenon gas discharge bulb)
Climate control system fan relay coil, body computer
Spare
Left rear electric window
Right rear electric window
Reversing lights, engine compartment control unit relay coils,
brake light pedal control (normally closed contact),
water in the diesel fuel sensor, air flow meter
Central locking system control unit, fuel
butterfly, dead lock, tailgate release
Third brake light, instrument panel, Adaptive Headlights Node,
control unit on left-hand gas discharge headlight
Front courtesy and central rear light (for versions/markets having this
option, with electric sun roof), courtesy light on diver's side and
passenger's side, luggage compartment light and glove compartment light
Radio, radio-navigator, Blue&Me Node, alarm siren,
alarm system on courtesy light, climate control unit, tyre
pressure detection control unit, diagnostic connector,
rear courtesy light
Heated rear window
Electric door mirror demisters, demisters
on windscreen jets
175-214 Delta 4ed gb 24-02-2010 14:36 Pagina 209