Lancia Delta 2011 Owner handbook (in English)
Manufacturer: LANCIA, Model Year: 2011, Model line: Delta, Model: Lancia Delta 2011Pages: 290, PDF Size: 8.36 MB
Page 91 of 290

90KNOWING YOUR CAR
Electric window system initialisation
The system must be re-initialised after disconnecting the
battery or if the relevant protection fuse is blown.
Initialisation procedure:
❍fully close the window to be initialised manually;
❍once fully closed, keep holding down the closing con-
trol for at least 1 second.
IMPORTANT Where provided, after there has been no
power supply for the control units (battery replaced or
disconnected or protective fuses for the electric window
control units replaced), the automatic operation of the
windows must be restored.The restoration procedure must be performed as follows
with the doors closed:
1. completely open the driver’s door window keeping the
operating button pressed for at least three seconds af-
ter the (lower) end of travel position;
2. completely raise the driver’s side window and keep the
button pressed for at least three seconds once the end
of travel position (upper end stop) has been reached;
3. repeat stages 1 and 2 for the passenger-side window
4. make sure that the initialisation is correct by check-
ing that the windows work automatically.
IMPORTANT With central locking on, operating the in-
ternal handle of one of the doors will unlock all the doors.
If there is no electric power supply (fuse blown, battery
disconnected, etc.) it is still possible to operate the door
locking manually; in this case the automatic lowering
function for the windows is not available and to open or
close the door with the window closed it is necessary to
exert pressure on the window towards the inside of the
vehicle to facilitate the movement of the window on the
moulding.
Page 92 of 290

1
KNOWING YOUR CAR91
BOOT
OPENING THE TAILGATE
When unlocked, the luggage compartment can be opened
from the outside using the handle fig. 55.
The tailgate can be opened at any time, if the doors are
unlocked.
The key with remote control should be used to open the
tailgate.
fig. 55L0E0046m
If the luggage compartment is not closed correctly, this
is indicated by the warning light
´coming on in the in-
strument panel or the icon
Rappearing in the display
together with a dedicated message (see “Instrument panel
warning lights” paragraph in this chapter).
Opening the tailgate will switch the boot light on: the
light will go off automatically when closing the tailgate.
The light will stay on for about 15 minutes after turning
the key to STOP: if during this time, a door or the tailgate
is opened, the light will switch on again for 15 minutes.
Opening the tailgate using the key
with remote control
To release the tailgate lock press R. Luggage com-
partment opening is indicated by the double flashing of
the direction indicators; tailgate closing is indicated by
single flashing (only with the alarm switched on, where
provided).
Page 93 of 290

92KNOWING YOUR CAR
CLOSING THE TAILGATE fig. 56
To close, lower the tailgate pressing near the lock until
you hear it click. There are handles B provided inside the
tailgate to allow it to be closed more easily.
fig. 56L0E0047m
If you travel in areas with few filling stations
and you want to transport fuel in a spare
tank, comply with the regulations in force
and use only an approved, suitably secured tank. In
the event of a collision the fire risk is increased all
the same.
Take care not to knock objects on the roof rack
when opening the tailgate.
Never exceed the maximum allowed load in
the luggage compartment; see chapter 6.
Make sure that the objects are well arranged
in the boot so that they will not be projected for-
wards following sudden braking. Never travel with
the tailgate open: exhaust gases may get into the
passenger’s compartment.
Page 94 of 290

1
KNOWING YOUR CAR93
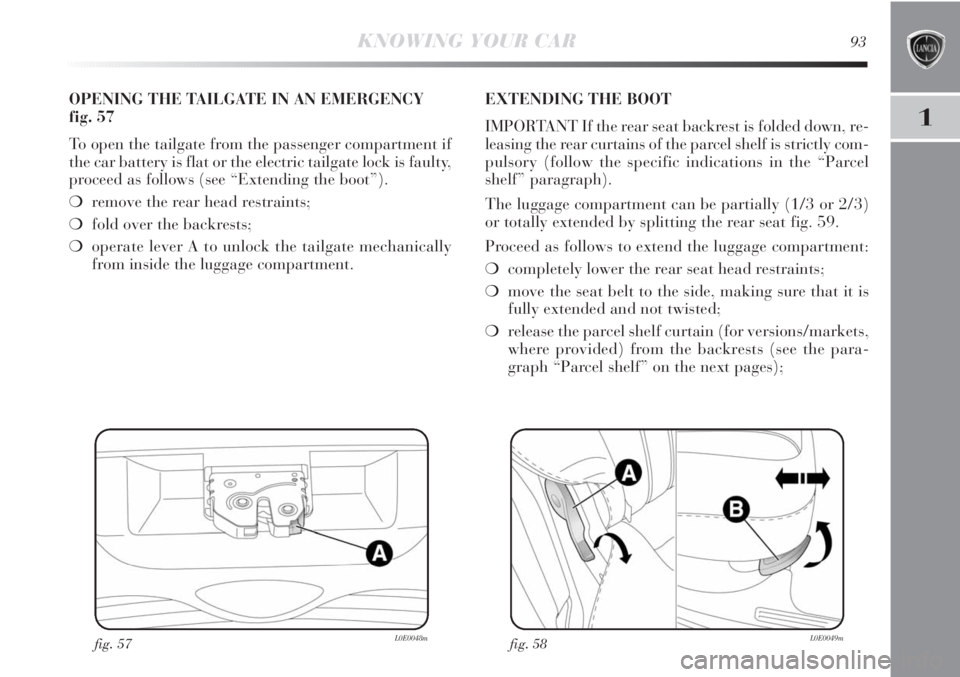
fig. 57L0E0048m
OPENING THE TAILGATE IN AN EMERGENCY
fig. 57
To open the tailgate from the passenger compartment if
the car battery is flat or the electric tailgate lock is faulty,
proceed as follows (see “Extending the boot”).
❍remove the rear head restraints;
❍fold over the backrests;
❍operate lever A to unlock the tailgate mechanically
from inside the luggage compartment.EXTENDING THE BOOT
IMPORTANT If the rear seat backrest is folded down, re-
leasing the rear curtains of the parcel shelf is strictly com-
pulsory (follow the specific indications in the “Parcel
shelf” paragraph).
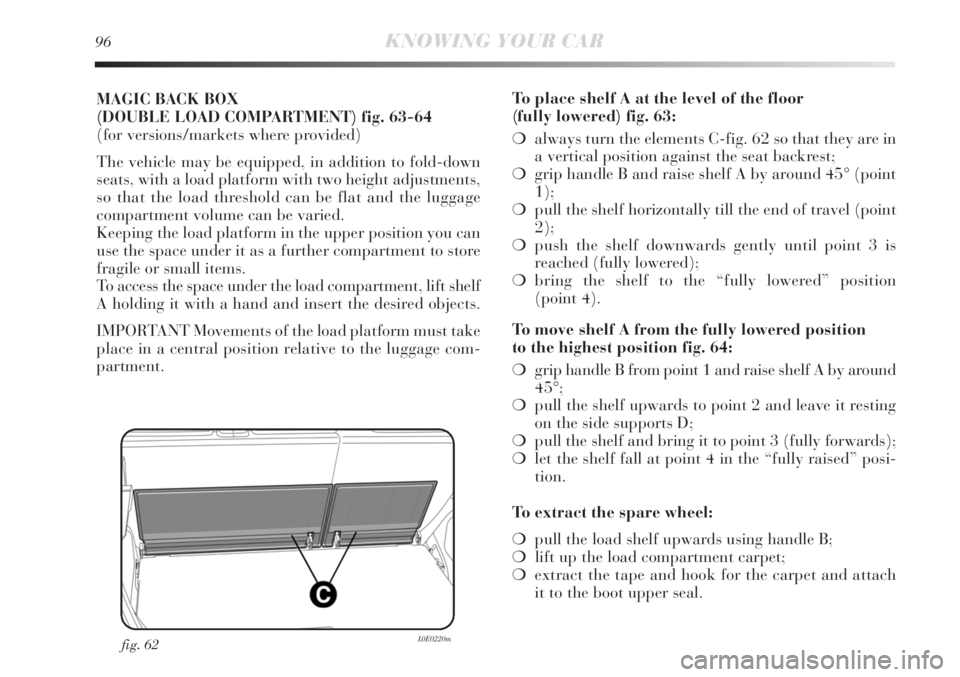
The luggage compartment can be partially (1/3 or 2/3)
or totally extended by splitting the rear seat fig. 59.
Proceed as follows to extend the luggage compartment:
❍completely lower the rear seat head restraints;
❍move the seat belt to the side, making sure that it is
fully extended and not twisted;
❍release the parcel shelf curtain (for versions/markets,
where provided) from the backrests (see the para-
graph “Parcel shelf” on the next pages);
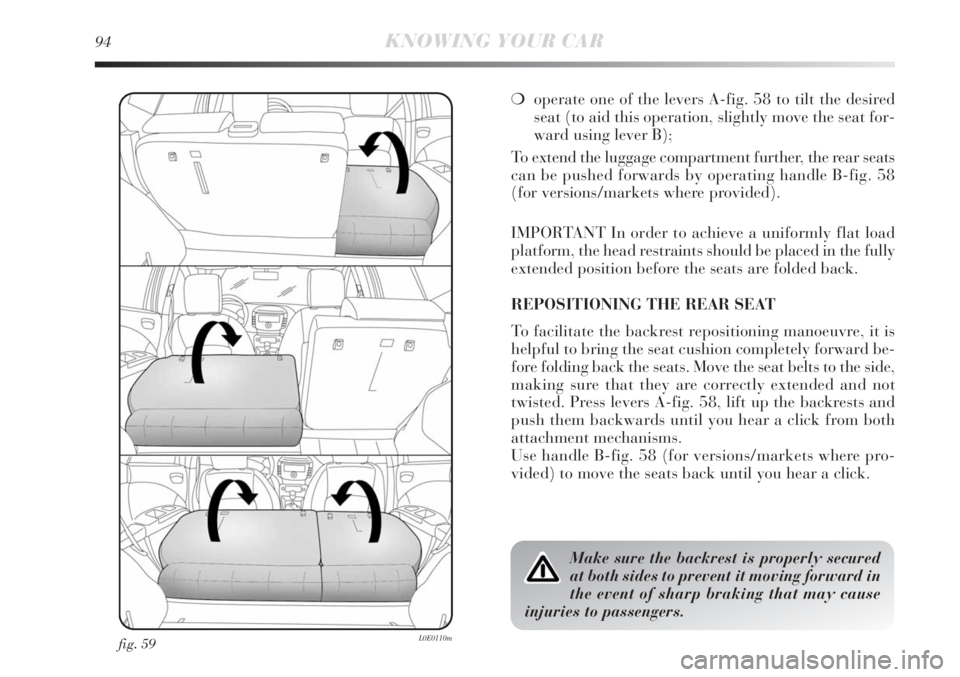
fig. 58L0E0049m
Page 95 of 290

94KNOWING YOUR CAR
fig. 59L0E0110m
❍operate one of the levers A-fig. 58 to tilt the desired
seat (to aid this operation, slightly move the seat for-
ward using lever B);
To extend the luggage compartment further, the rear seats
can be pushed forwards by operating handle B-fig. 58
(for versions/markets where provided).
IMPORTANT In order to achieve a uniformly flat load
platform, the head restraints should be placed in the fully
extended position before the seats are folded back.
REPOSITIONING THE REAR SEAT
To facilitate the backrest repositioning manoeuvre, it is
helpful to bring the seat cushion completely forward be-
fore folding back the seats. Move the seat belts to the side,
making sure that they are correctly extended and not
twisted. Press levers A-fig. 58, lift up the backrests and
push them backwards until you hear a click from both
attachment mechanisms.
Use handle B-fig. 58 (for versions/markets where pro-
vided) to move the seats back until you hear a click.
Make sure the backrest is properly secured
at both sides to prevent it moving forward in
the event of sharp braking that may cause
injuries to passengers.
Page 96 of 290

1
KNOWING YOUR CAR95
fig. 61L0E0051mfig. 60L0E0284m
❍grasp the tangs C and guide the curtains in the reel;
❍release attachments A-fig. 61 (one on each side);
❍release attachments B-fig. 61, rotate the parcel shelf
through 90° and slide it out.
To refit the parcel shelf, reverse the removal instructions. PARCEL SHELF
To take out the parcel shelf, proceed as follows:
❍release the curtains of the parcel shelf A - fig. 60 from
the attachments B on the rear seat backrests;
Page 97 of 290

96KNOWING YOUR CAR
MAGIC BACK BOX
(DOUBLE LOAD COMPARTMENT) fig. 63-64
(for versions/markets where provided)
The vehicle may be equipped, in addition to fold-down
seats, with a load platform with two height adjustments,
so that the load threshold can be flat and the luggage
compartment volume can be varied.
Keeping the load platform in the upper position you can
use the space under it as a further compartment to store
fragile or small items.
To access the space under the load compartment, lift shelf
A holding it with a hand and insert the desired objects.
IMPORTANT Movements of the load platform must take
place in a central position relative to the luggage com-
partment.To place shelf A at the level of the floor
(fully lowered) fig. 63:
❍always turn the elements C-fig. 62 so that they are in
a vertical position against the seat backrest;
❍grip handle B and raise shelf A by around 45° (point
1);
❍pull the shelf horizontally till the end of travel (point
2);
❍push the shelf downwards gently until point 3 is
reached (fully lowered);
❍bring the shelf to the “fully lowered” position
(point 4).
To move shelf A from the fully lowered position
to the highest position fig. 64:
❍grip handle B from point 1 and raise shelf A by around
45°;
❍pull the shelf upwards to point 2 and leave it resting
on the side supports D;
❍pull the shelf and bring it to point 3 (fully forwards);
❍let the shelf fall at point 4 in the “fully raised” posi-
tion.
To extract the spare wheel:
❍pull the load shelf upwards using handle B;
❍lift up the load compartment carpet;
❍extract the tape and hook for the carpet and attach
it to the boot upper seal.
fig. 62L0E0220m
Page 98 of 290

1
KNOWING YOUR CAR97
fig. 63L0E0221m
Page 99 of 290

98KNOWING YOUR CAR
fig. 64L0E0222m
Page 100 of 290

1
KNOWING YOUR CAR99
fig. 65L0E0053m
BONNET
OPENING fig. 65
Proceed as follows:
❍pull lever A in the direction indicated by the arrow;
❍agire sulla levetta B come indicato in figura;
❍lift the bonnet and, at the same time, release stay rod
C from its catch, then insert the end of the rod into
housing D in the bonnet (larger hole) and push to
safety position (smaller hole), as shown in the diagram.
Incorrect positioning of the stay rod may
cause the bonnet to drop suddenly. This should
only be done when the car is stationary.
Before opening the bonnet, check that wind-
screen wiper arm is not lifted from the wind-
screen.