dashboard warning lights Lancia Delta 2011 Owner handbook (in English)
[x] Cancel search | Manufacturer: LANCIA, Model Year: 2011, Model line: Delta, Model: Lancia Delta 2011Pages: 290, PDF Size: 8.36 MB
Page 7 of 290

6KNOWING YOUR CAR
INSTRUMENT PANEL
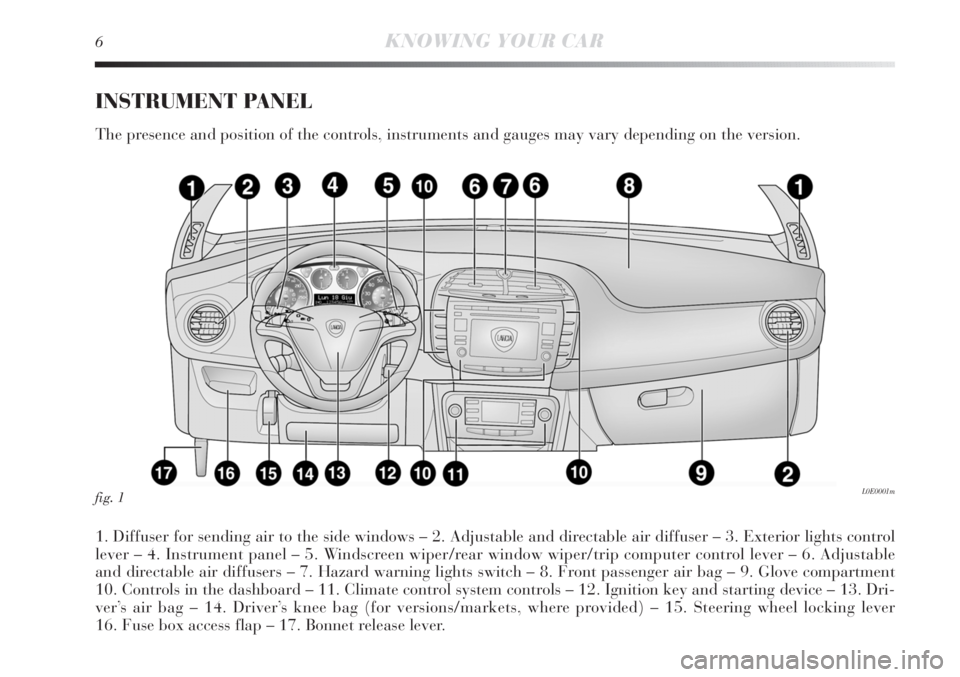
The presence and position of the controls, instruments and gauges may vary depending on the version.
1. Diffuser for sending air to the side windows – 2. Adjustable and directable air diffuser – 3. Exterior lights control
lever – 4. Instrument panel – 5. Windscreen wiper/rear window wiper/trip computer control lever – 6. Adjustable
and directable air diffusers – 7. Hazard warning lights switch – 8. Front passenger air bag – 9. Glove compartment
10. Controls in the dashboard – 11. Climate control system controls – 12. Ignition key and starting device – 13. Dri-
ver’s air bag – 14. Driver’s knee bag (for versions/markets, where provided) – 15. Steering wheel locking lever
16. Fuse box access flap – 17. Bonnet release lever.
fig. 1L0E0001m
Page 65 of 290

64KNOWING YOUR CAR
DIPPED HEADLIGHTS/SIDE LIGHTS
With the ignition key turned to MAR, turn the twist
switch to 2. If the dipped beam headlights are activated,
the day lights are switched off and the side lights, dipped
headlights and number plate lights are switched on. The
warning light
3on the instrument panel comes on.
When the ignition key is turned to STOP or removed and
the twist switch is turned from
Oto2, all the side lights
and taillights and number plate lights come on. The
warning light
3in the instrument panel comes on.
Parking function
With the side lights on and the ignition key in the STOP
position or extracted, it is possible to select the lighting
on the desired side by operating the lights lever down-
wards (left side) or upwards (right side). In this case the
warning light
3in the instrument panel will go out.
MAIN BEAM HEADLIGHTS
With ring nut in position 2, push the stalk forward toward
the dashboard (stable position). The warning light 1on
the instrument panel will come on. They are switched off
by pulling the lever towards the steering wheel.
Flashing the headlights
You can flash the beams by pulling the stalk toward the
steering wheel (unstable position). The warning light
1
on the instrument panel will come on.DIRECTION INDICATORS fig. 28
Place the lever in the (stable) position:
– up (position
a): activates the right direction indicator;
– down (position
b): activates the left direction indicator.
The warning light
¥orÎstars flashing on the instrument
panel. The indicators switch off automatically when the
steering wheel is straightened.
fig. 28L0E0020m
Page 109 of 290

108KNOWING YOUR CAR
OPERATION
The system is not active when the vehicle is started. It is
only activated when button A-fig. 71 in the dashboard
is pressed. The LED in the button lights up to confirm
that the system has been switched on plus a dedicated
warning message in the instrument panel display. Once
it is turned on the system will recognise the operating
conditions and this is signalled to the driver by the LED
located in the button flashing and the symbol
ein the
amber coloured panel in the instrument panel display
flashing too. Once the system has recognised the operat-
ing conditions, it becomes active. Therefore: the
eicon
in the display switches off and the LED on the button
remains on constantly.
IMPORTANT If the operating conditions are no longer
present then the system will deactivate. This is signalled
to the driver by the LED on the button flashing and the
amber
eicon on the display flashing.
OPERATING CONDITIONS FOR ACTIVATION
Once switched on, the system becomes active only if the
following conditions are present:
❍always keep at least one hand on the steering wheel;
❍vehicle speed between 65 km/h and 180 km/h;
❍presence of lane demarcation lines not deteriorated
and visible on both sides;
❍suitable visibility conditions;
❍straight line or wide radius bends;
❍visual field condition sufficient (safe distance from ve-
hicle in front). ACTIVATING/DEACTIVATING THE SYSTEM
With the system on, if the vehicle approaches one of the
lines defining the side of the lane, a torque is applied to
the steering wheel to let the driver know which direction
to steer in order to stay within the lane. If the driver turns
on the direction indicator in order to change lanes or for
overtaking, then the system will switch off momentarily.
If the driver wishes to change lanes without turning the
direction indicator on, then there will be a warning from
the steering wheel that they are about to cross the line.
If the driver continues with the manoeuvre to change
lanes, the system will be temporarily deactivated and
then switch back on again once it has recognised the new
driving lane. This temporary deactivation will be sig-
nalled to the driver by the LED in the button flashing and
by the
esymbol in the amber coloured panel in the in-
strument panel display also flashing.
IMPORTANT The force applied to the steering wheel by
the system is sufficient for the driver to notice it but they
can easily override it and maintain control of the vehicle.